- Table of Contents
- Related Documents
-
| Title | Size | Download |
|---|---|---|
| 07-SNMP Troubleshooting Guide | 120.97 KB |
Troubleshooting network management & monitoring
SNMP issues
SNMP connection failure
Symptom
The Network Management System (NMS) cannot connect to the device successfully via SNMP.
Common causes
The following are the common causes of this type of issue:
· Network connection failure between the device and NMS.
· Authentication failure because of configuration errors.
· The device is under an SNMP packet attack and enters SNMP silence mode.
Troubleshooting flow
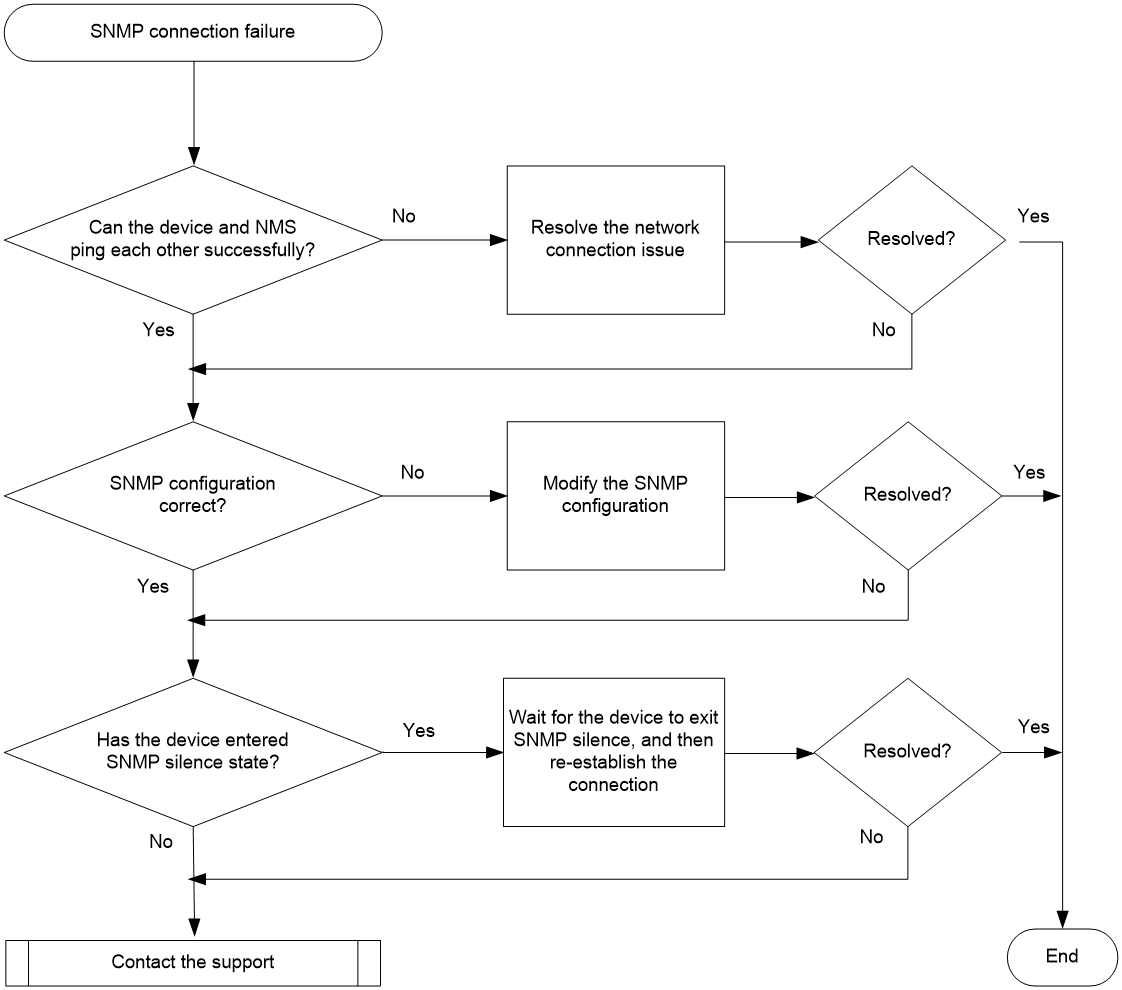
Figure 1 shows the troubleshooting flowchart.
Figure 1 Flowchart for troubleshooting SNMP connection failure
Solution
To resolve the issue:
1. Execute the ping command to identify if the device and NMS are reachable to each other.
¡ If the ping is successful, the device and NMS are reachable to each other. Proceed to step 2.
¡ If the ping fails, see the ping failure troubleshooting procedure described in "Troubleshooting network management and monitoring" to resolve the network connection issue. After the ping is successful, re-establish the SNMP connection. If the SNMP connection still cannot be established after that, proceed to step 2.
2. Identify if the SNMP configuration is correct.
a. Execute the display snmp-agent sys-info version command to identify the SNMP version used on the device. The SNMP version used on the device and the NMS must be the same. If they are different, use the snmp-agent sys-info version command to modify their SNMP versions to be the same.
b. If SNMPv1 or SNMPv2c is used, execute the display snmp-agent community command to view the community information configured on the device (including the community name and ACLs used). The community name used on the device and the NMS must be the same, and the ACLs configured on the device must permit access from the NMS. If these conditions are not met, execute the snmp-agent community and acl commands to modify the configuration.
c. If SNMPv3 is used, execute the display snmp-agent usm-user command to view SNMPv3 user information (including the username and ACLs used), and execute the display snmp-agent group command to view SNMP group information (including the authentication/encryption mode and ACLs used). The username and authentication/encryption parameters configured on the device and NMS must be consistent, and the ACLs configured on the device must permit access from the NMS. If these conditions are not met, use the snmp-agent group, snmp-agent usm-user v3, and acl commands to modify the configuration.
3. Identify if the device has entered SNMP silence state.
|
|
NOTE: Support for SNMP silence and whether SNMP silence can be enabled or disabled by using command lines depend on the device model. |
If 100 or more SNMP messages fails authentication on the device within a statistical period (1 minute), the system determines that the device is under an SNMP attack. Consequently, the SNMP module enters silence state (the device will print a log "SNMP agent is now silent"), and the device will not respond to any received SNMP messages for approximately 4 to 5 minutes. In such a situation, Re-establish the SNMP connection after the device exits SNMP silence mode.
4. If the issue persists, collect the following information and contact Technical Support:
¡ Results of each step.
¡ Configuration file, log messages, and alarm messages.
Related alarm and log messages
Alarm messages
Module Name: SNMPv2-MIB
· authenticationFailure (1.3.6.1.6.3.1.1.5.5)
Log messages
· SNMP/3/SNMP_ACL_RESTRICTION
· SNMP/4/SNMP_AUTHENTICATION_FAILURE
· SNMP/4/SNMP_SILENT
SNMP operation timeout
Symptom
The NMS performs an SNMP Get or Set operations on the device, but the operation times out.
Common causes
The following are the common causes of this type of issue:
· Interruption of the SNMP connection, causing failure of the NMS to access the device.
· Packet loss on the network, causing failure of the device to receive the SNMP request.
· Insufficient storage space on the storage medium of the device, causing the device to be unable to process the SNMP request.
· The device is busy processing other tasks, which prevents it from processing the SNMP request.
· The SNMP process (acting as an SNMP agent) is busy processing other SNMP requests, preventing it from responding to the current SNMP request.
· An exception occurs while the SNMP process is handling the current SNMP request.
Troubleshooting flow
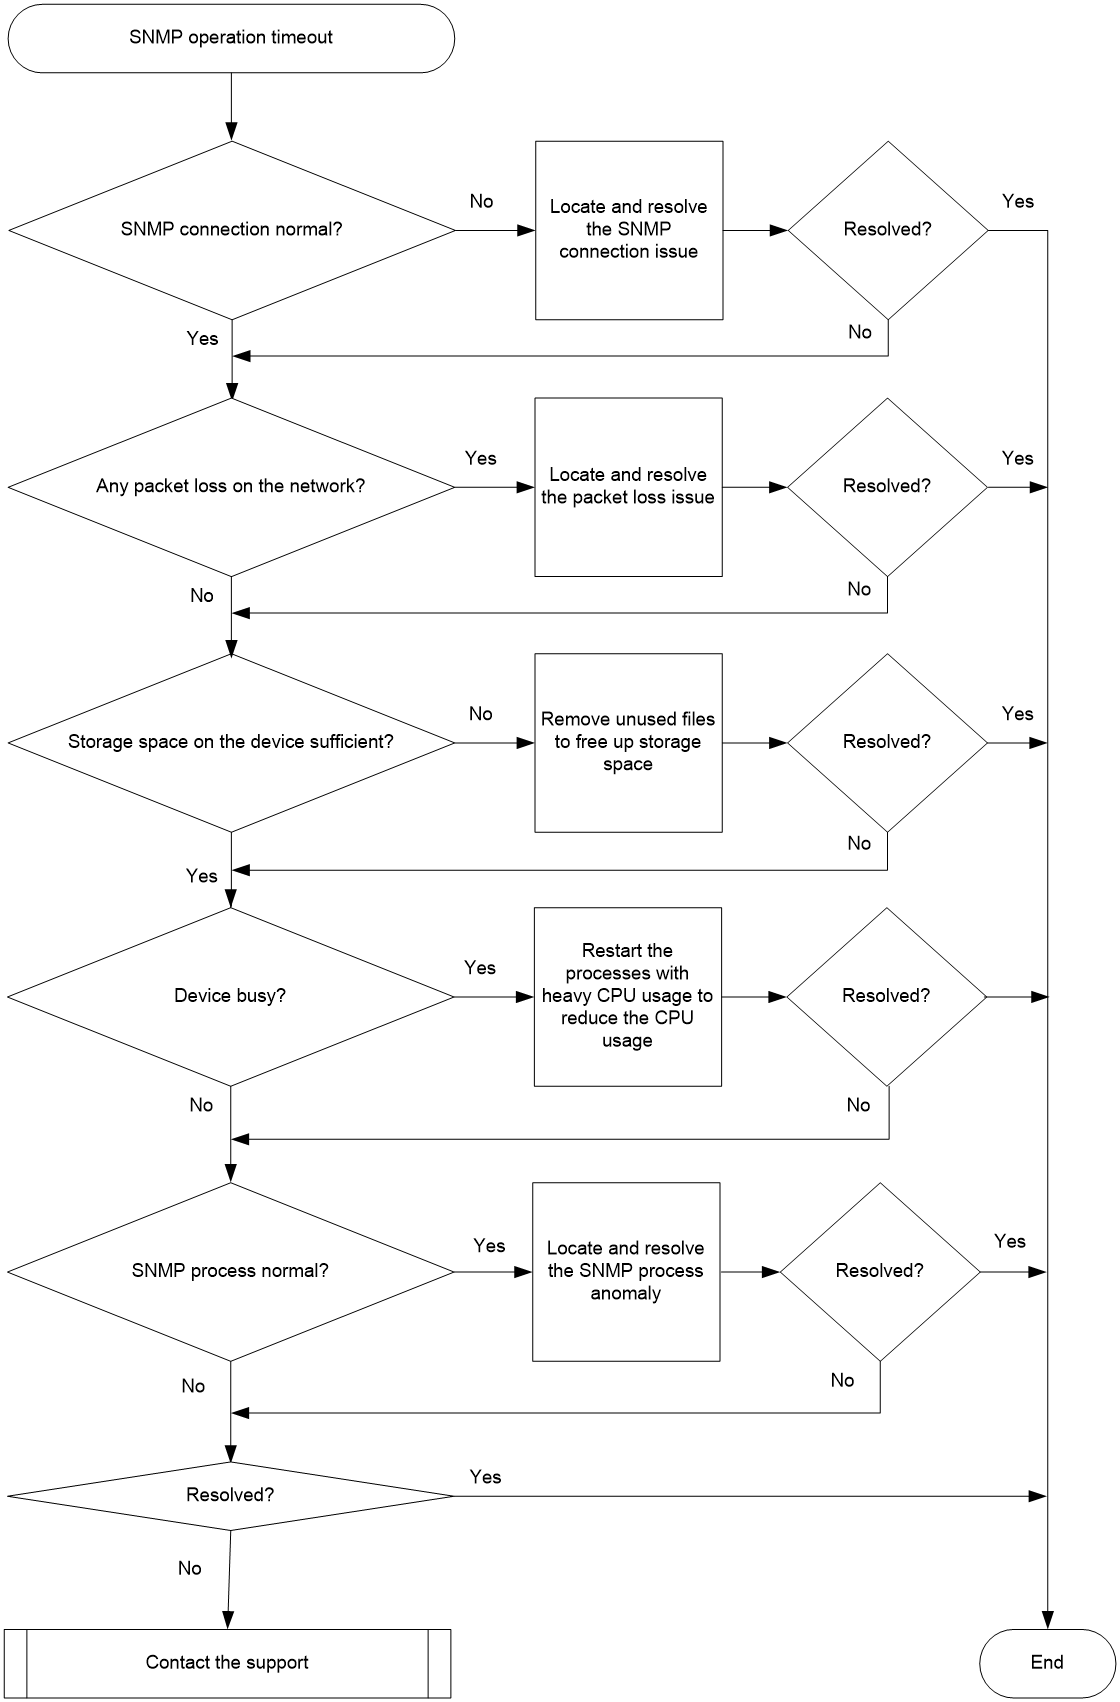
Figure 2 shows the troubleshooting flowchart.
Figure 2 Troubleshooting flowchart for SNMP operation timeout
Solution
To resolve the issue:
1. Locate and resolve the SNMP connection issue.
Check the SNMP connection on the NMS. If the connection timed out or failed, see the troubleshooting procedure for SNMP connection failure to locate and resolve the SNMP connection issue.
2. Identify if there is any packet loss on the network.
Execute the ping –c count host command on the NMS, for example, setting the count parameter to 100, and the host parameter to the IP address of the device. Identify the packet loss field in the ping command result to determine if there is any packet loss on the network.
¡ If there is no packet loss, proceed to step 3.
¡ If there is packet loss, see the ping failure troubleshooting procedure in "Troubleshooting network management & monitoring" to resolve the network connection issue.
|
|
NOTE: –c count: Specifies the number of ICMP echo requests that are sent to the destination. The value range is 1 to 4294967295, and the default is 5. |
3. Locate and resolve the issue of insufficient storage space on the storage media of the device.
Execute the display memory-threshold command in any view. If the Current free-memory state field value in the command output is normal, the storage space on the storage media of the device is sufficient. If the field value is not normal, the storage space on the storage media of the device is sufficient. Use the following methods to free up storage space.
¡ Use the reset recycle-bin command to remove files from the recycle bin. (The files in the recycle bin also occupy space on the storage media.)
¡ Use the delete /unreserved file command to delete unused files completely at once. If you do not specify the /unreserved parameter, the deleted files will be stored in the recycle bin.
|
|
NOTE: Depending on the device model, the storage medium supported by the device might be Flash or compact flash card (CF card). |
4. Locate and resolve the device busyness issue.
a. Execute the display cpu-usage command several times in any view to identify if the CPU usage of the device remains at a high level.
b. Execute the monitor process command in any view to identify if there are processes with high CPU usage. If a service process has a high CPU usage, you can reduce the CPU usage by restarting the service as needed. Whether the process can be restarted depends on the device model.
5. Identify and resolve the issue with the SNMP process.
For devices that support the display system internal snmp-agent operation in-progress command, execute the probe command in the system view to enter probe view, and then execute the display system internal snmp-agent operation in-progress command several times to view information about the SNMP operations that the device is processing.
¡ If the Request ID value in the outputs is constantly changing, the SNMP process is handling different requests, and the current SNMP process is busy. You need to reduce the frequency of SNMP operations from the NMS to the device.
¡ If the Request ID value in the outputs remains unchanged, the SNMP process is continuously handling the same request, and the SNMP process times out while processing the request. You can resolve the issue by using the following method:
- Execute the undo snmp-agent command and snmp-agent command in sequence to restart the SNMP process.
- Execute the display system internal snmp-agent operation timed-out and display system internal snmp-agent packet timed-out commands to identify time-consuming SNMP operations and the MIB objects involved in the operation. Reduce or avoid execution of similar operations.
|
|
NOTE: Support for the display system internal snmp-agent operation in-progress command depends on the device model. |
For devices that do not support the display system internal snmp-agent operation in-progress command, you can use the following methods to resolve the issue:
¡ Execute the debugging snmp agent command to enable SNMP debugging. Then, perform the SNMP Get or Set operation again to reproduce the issue. Use debugging information to locate and resolve the issue.
¡ If the SNMP process gets stuck and cannot execute SNMP operations to reproduce the issue, you can execute the follow command in probe view to identify the cause for the SNMP process getting stuck. Then execute the undo snmp-agent command and snmp-agent command in sequence to restart the SNMP process.
6. If the issue persists, collect the following information and contact Technical Support:
¡ Results of each step.
¡ Configuration file, log messages, and alarm messages.
Related alarm and log messages
Alarm messages
N/A
Log messages
N/A
NMS failure to manage the device
Symptom
The NMS performs an SNMP Set or Get operation on the device, but the device does not respond or a prompt is displayed indicating that the operation has failed.
Common causes
The following are the common causes of this type of issue:
· The NMS cannot connect to the device via SNMP.
· The SNMP version used by the NMS does not match that of the MIB object.
· The NMS does not have access permission to the device.
· The SNMP process on the device is busy, unable to respond to the current SNMP request.
Troubleshooting flow
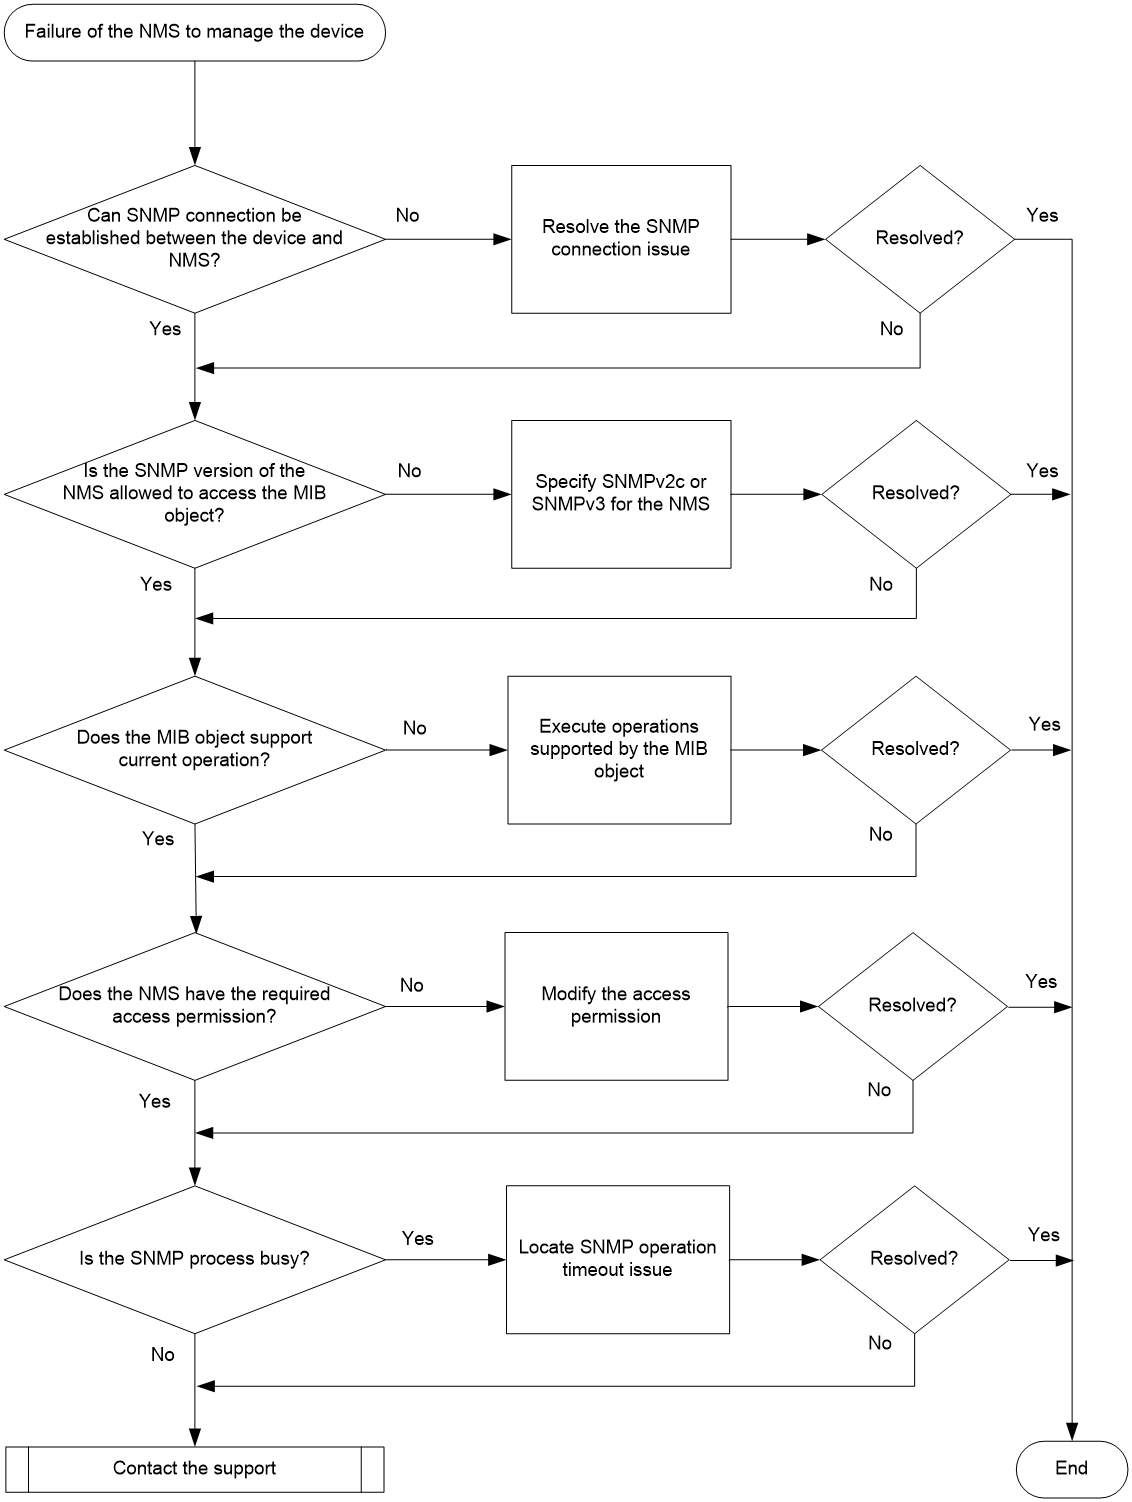
Figure 3 shows the troubleshooting flowchart.
Figure 3 Troubleshooting flowchart for NMS failure to manage the device
Solution
To resolve the issue:
1. Identify if the NMS can connect to the device via SNMP.
If the NMS fails to connect to the device via SNMP, see the troubleshooting procedure for SNMP connection failure to resolve the issue.
2. Identify whether the SNMP version used by the NMS has the access permission to the MIB object.
For example, the snmpUsmMIB object allows access only via SNMPv3. Data types such as Integer32, Unsigned32, and Counter64 are supported only in SNMPv2c and SNMPv3. If the NMS connects the device via SNMPv1, it will not be able to access MIB objects of Integer32, Unsigned32, and Counter64 data types. For the data type of a MIB object, see the SYNTAX field of the MIB object in the MIB file.
hh3cDhcpServer2BadNum OBJECT-TYPE
SYNTAX Counter64
MAX-ACCESS read-only
STATUS current
DESCRIPTION
"The total number of the bad packets received."
::= { hh3cDhcpServer2StatGroup 1 }
If the NMS cannot access the MIB object because of version incompatibility, specify SNMPv2c or SNMPv3 for the NMS. Then re-establish connection with the device, and perform SNMP Get and Set operations.
3. Identify if the MIB object supports the current access operation.
Access the MIB object based on the access type supported by it. For the access type of a MIB object, see the MAX-ACCESS field of the MIB object in the MIB file.
hh3cDhcpServer2BadNum OBJECT-TYPE
SYNTAX Counter64
MAX-ACCESS read-only
STATUS current
DESCRIPTION
"The total number of the bad packets received."
::= { hh3cDhcpServer2StatGroup 1 }
4. Identify the access permissions of the NMS. If the access permissions are insufficient, modify the corresponding configuration to assign the required permissions to the NMS.
SNMP uses the following modes to control access to MIB objects:
¡ View-based Access Control Model—VACM mode controls access to MIB objects by assigning MIB views to SNMP communities or users. You can view the MIB view related configuration by using the display current-configuration | include view command and view the detailed information of the MIB view by using the display snmp-agent mib-view command. If the configuration is incorrect, modify the relevant MIB configuration.
The device supports three types of MIB views.
- Read view: The NMS can only read the value of the objects in this view.
- Write-view: The NMS can read and write the value of the objects in this view.
- Notify-view: When the notification object included in this view reaches the trigger condition, the NMS will receive the corresponding trap/inform message.
¡ Role based access control—RBAC mode controls access to MIB objects by assigning user roles to SNMP communities or users. The users access and operate specific system functions and resource objects according to their roles. When creating an SNMPv3 user, you can assign a user role to it. The rules established for the user role will define the MIB objects that the user can access and access permissions to these MIB objects. If an error is found in the role permission configuration, execute the role name command to enter user role view and modify the user role rules.
- SNMP communities or users with the network-admin or level-15 predefined user role have read and write access to all MIB objects.
- SNMP communities or users with the network-operator predefined user role have read-only access to all MIB objects.
- SNMP communities or users with a user-defined user role have access rights to MIB objects as specified by the rule command.
|
|
NOTE: Only users with network-admin or level-15 user roles can configure SNMP communities, users, or groups after logging in to the device. For successful configuration, make sure the user has a network-admin or level-15 user role. |
5. Determine if the SNMP process is busy.
If the device does not respond to the request from the NMS because the SNMP process on the device busy, you can resolve the issue by referring to the troubleshooting procedure for the SNMP operation timeout issue.
6. Other recommendations
As a best practice, connect the NMS to a service port on the device for access, as the service port has better packet processing capabilities than the network management port. This ensures that SNMP packets can be processed as quickly as possible.
If multiple NMSs access a device simultaneously and the device responds slowly, reduce the access frequency to alleviate the device load. For example, set the access interval to be a minimum of 5 minutes.
7. If the issue persists, collect the following information and contact Technical Support:
¡ Results of each step.
¡ Configuration file, log messages, and alarm messages.
Related alarm and log messages
Alarm messages
Module Name: SNMPv2-MIB
· authenticationFailure (1.3.6.1.6.3.1.1.5.5)
Log messages
· SNMP/3/SNMP_ACL_RESTRICTION
· SNMP/4/SNMP_AUTHENTICATION_FAILURE
· SNMP/4/SNMP_SILENT
Failure of the NMS to receive SNMP notifications
Symptom
The NMS fails to receive SNMP notifications sent from the device.
Common causes
The following are the common causes of this type of issue:
· The device and NMS are unreachable to each other, or SNMP malfunctions, resulting in SNMP connection failure.
· Configuration error on the device side or NMS side.
· No notifications have been generated from the service modules on the device.
· Loss of notifications.
· The SNMP notification messages are too large, exceeding the notification message size that the SNMP module can process.
Troubleshooting flow
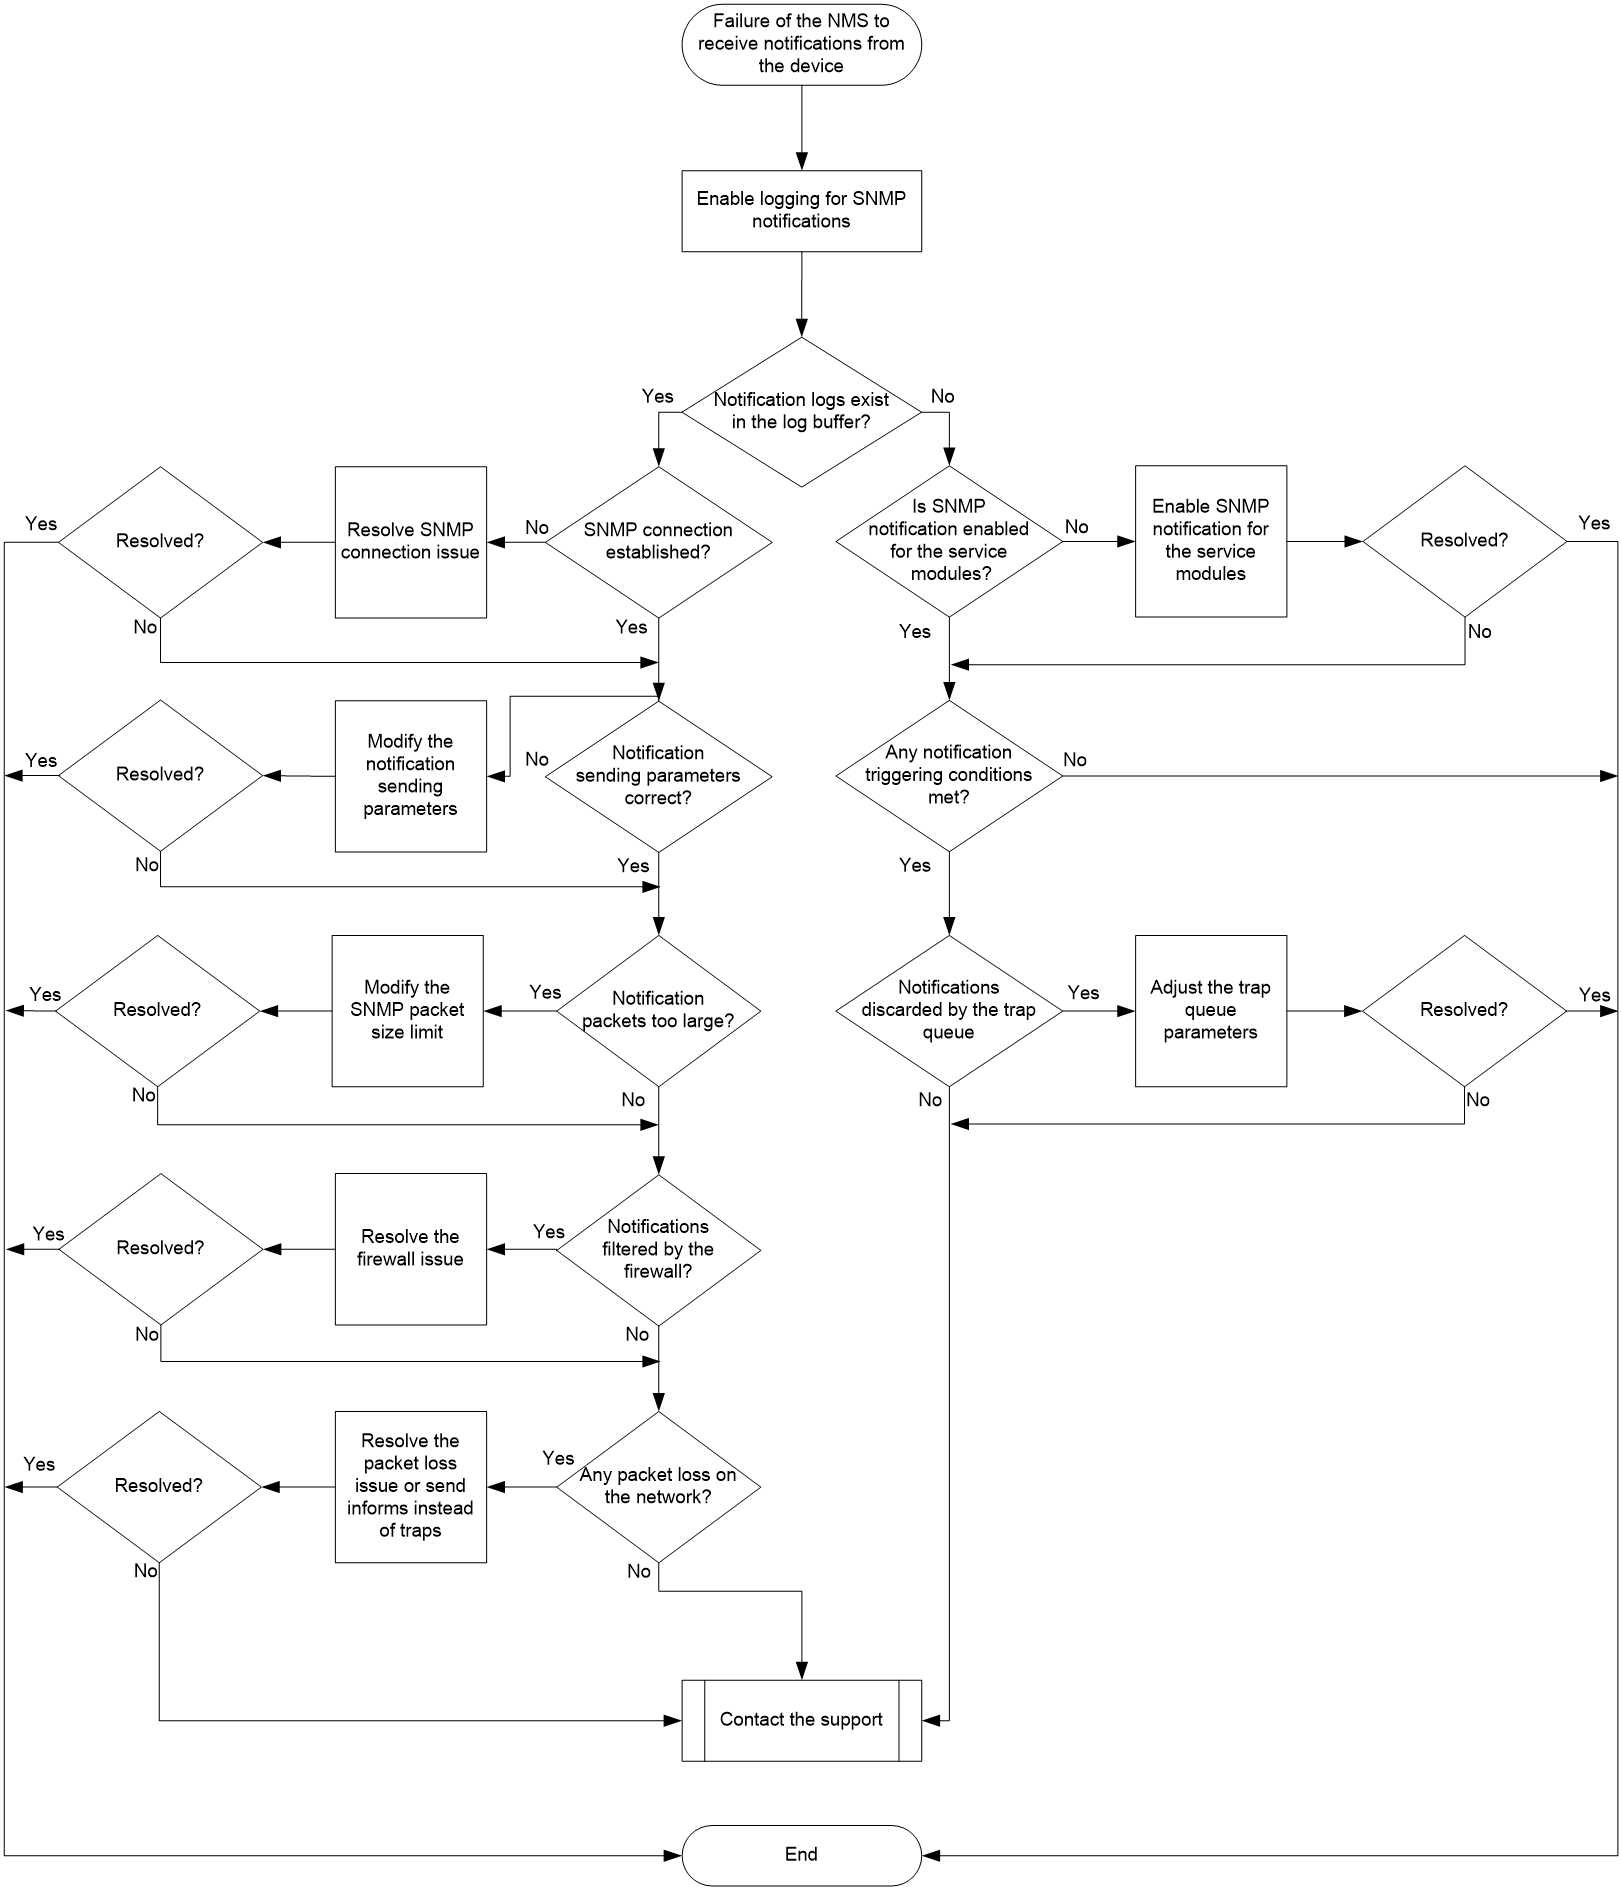
Figure 4 shows the troubleshooting flowchart.
Solution
To resolve the issue:
1. Execute the snmp-agent trap log command in system view to enable logging for SNMP notifications. When the device sends an SNMP notification to the NMS, a log will be generated on the device to record that notification.
2. Execute the display logbuffer | include SNMP_NOTIFY command to identify whether a notification has been generated on the device and the detailed information about the generated notification.
¡ If a notification has been generated, proceed to step 3.
¡ If no notification has been generated, proceed to step 4.
a. Identify whether the device can establish an SNMP connection with the NMS. If the connection establishment fails, see the SNMP connection failure troubleshooting procedure to resolve the issue.
b. Execute the display current-configuration | include snmp command to identify whether the snmp-agent target-host trap command has been configured correctly. If any configuration error exists, modify the configuration to ensure that the target IP address (VPN parameters) and port number configured in that command are consistent with those used by the NMS to receive SNMP notifications. In addition, make sure the device and NMS are consistent in SNMP version and security word.
- In SNMPv1 or SNMPv2c, the security word is the community name. To create an SNMP community name, execute the snmp-agent community command.
- In SNMPv3, the security word is the username, and the device and NMS must have the same authentication and encryption levels. To create an SNMPv3 user, execute the snmp-agent group and snmp-agent usm-user v3 commands. The authentication and encryption modes and authentication password and encryption password (if used) configured for the user must be consistent with those on the NMS side. Also, the authentication and encryption levels configured for the user must be higher than those specified in the snmp-agent target-host trap command. Security levels increases from unauthenticated and unencrypted, authenticated and unencrypted, to authenticated and encrypted.
- The MIB view accessible to the community name and user must include the corresponding notification object. If this condition is not met, the device will not send the notifications to the NMS due to permission issue.
c. Execute the debugging udp packet command to enable debugging for UDP packets and determine whether the notifications sent from the device are too large. If the data encapsulated by the service module is relatively large, the notification packets might exceed the maximum length of SNMP packets that the device can transmit and be discarded. You can adjust the maximum length of SNMP packets that the device can transmit by using the snmp-agent packet max-size command. Take into account the MTU value of the network and whether fragmentation is supported when making the adjustment.
*Dec 27 22:35:41:203 2021 Sysname SOCKET/7/UDP: -MDC=1;
UDP Output:
UDP Packet: vrf = 0, src = 192.168.56.121/30912, dst = 192.168.56.1/162
len = 79, checksum = 0xd98f
d. Identify whether a firewall on the network filters the notifications.
If a firewall on the network filters the notifications, use the following method to resolve the issue:
- If the firewall has filtered the notifications by source IP, use the snmp-agent trap source command to modify the source IP address of the notifications.
- Modify the firewall rules to permit the notifications.
e. Identify if the network is unstable and has packet loss.
If there is packet loss on the network, use the following methods to resolve the issue:
- Check the network and resolve the packet loss issue on the network.
- Configure the device to send informs instead of traps. Informs require acknowledge from the NMS, more reliable than traps. Informs are supported only in SNMPv2c and SNMPv3.
4. Identify if the SNMP module has sent notifications to the NMS.
a. Use the display snmp-agent trap-list command to identify whether SNMP notification has been enabled for the service modules. If not enabled, use the snmp-agent trap enable command to enable SNMP notification for the modules.
b. Identify if the notification triggering conditions have been met. For example, the interface status change notification is generated when the status of an interface changes, and high CPU or memory usage notification is generated when the CPU or memory usage exceeds the threshold.
- If no notification triggering conditions have been met, it is normal that no notification is generated.
- If a notification triggering condition has been met but the device has not sent a notification, proceed to step c.
c. Use the display snmp-agent trap queue command to identify if the notification buffer is full. If the Message number is greater than the Queue size, the notification buffer might be full, and newly generated notifications might be discarded. In this case, you can use the snmp-agent trap queue-size and snmp-agent trap life commands in system view to adjust the performance parameters of the notification buffer.
5. If the issue persists, collect the following information and contact Technical Support:
¡ Results of each step.
¡ Configuration file, log messages, and alarm messages.
Related alarm and log messages
Alarm messages
N/A
Log messages
· SNMP/6/SNMP_NOTIFY
· SNMP/3/SNMP_INFORM_LOST