- Table of Contents
- Related Documents
-
| Title | Size | Download |
|---|---|---|
| 03-H3C vAC Access Controllers Comware 7 Software Upgrade Guide | 554.81 KB |
|
|
|
H3C vAC Access Controllers |
|
Comware 7 Software Upgrade Guide |
|
|
Copyright © 2022 New H3C Technologies Co., Ltd. All rights reserved.
No part of this manual may be reproduced or transmitted in any form or by any means without prior written consent of New H3C Technologies Co., Ltd.
Except for the trademarks of New H3C Technologies Co., Ltd., any trademarks that may be mentioned in this document are the property of their respective owners.
The information in this document is subject to change without notice.
Upgrading software
Software upgrade enables you to upgrade a software version, add new features, and fix software bugs.
Upgrade methods
You can upgrade system software by using one of the following methods:
|
Upgrade method |
Remarks |
|
· You must reboot the vAC to complete the upgrade. · This method can interrupt ongoing network services. |
|
|
You must reboot the vAC to complete the upgrade. |
Preparing for the upgrade
|
|
CAUTION: During the upgrade, the vAC cannot provide any services. Make sure the upgrade has minimal impact on the network services. |
Before you upgrade system software from the CLI or BootWare menu, complete the following tasks:
· Set up the upgrade environment as shown in Figure 1.
· Configure routes to ensure that the AC and the file server can reach each other.
· Run a TFTP or FTP server on the file server.
· Log in to the CLI of the AC through Telnet or the console port.
· Copy the upgrade file to the file server and correctly set the working directory on the TFTP or FTP server.
Figure 1 Setting up the upgrade environment for upgrading from the CLI or BootWare menu

Upgrading from the CLI
Upgrading through TFTP
The vAC acts as a TFTP client to access the specified directory on a TFTP server to back up the image file and upgrade the software.
Saving the running configuration and image file and verifying the storage space
1. Execute the save command in any view to save the running configuration.
<Sysname> save
The current configuration will be written to the device. Are you sure? [Y/N]:y
Please input the file name(*.cfg)[flash:/startup.cfg]
(To leave the existing filename unchanged, press the enter key):
flash:/startup.cfg exists, overwrite? [Y/N]:y
Validating file. Please wait...
Configuration is saved to device successfully.
<Sysname>
2. Execute the dir command to display files on the storage medium. Identify the system software image and configuration file names and verify that the storage medium has sufficient space for the new system software image.
<Sysname> dir
Directory of flash:
0 -rw- 7693312 Jun 28 2019 06:32:04 boot.bin
1 -rw- 148480 Jun 28 2019 06:32:04 capture.bin
2 -rw- - Jun 15 2019 06:32:59 diagfile
3 -rw- - Jun 28 2019 06:30:35 ifindex.dat
4 -rw- 6008832 Jun 28 2019 06:42:08 license
5 -rw- 44162048 Jun 28 2019 06:42:08 logfile
6 -rw- 50178048 Jun 28 2019 06:42:08 reboot.log
7 -rw- 8728 Jun 28 2019 06:30:36 seclog
8 -rw- 1557 Jun 28 2019 06:43:51 startup.cfg
9 -rw- 32871 Jun 28 2019 06:43:51 startup.mdb
10 -rw- 81991680 Jun 28 2019 06:32:04 system.bin
11 -rw- 89692160 Jun 28 2019 06:32:04 vAC1000.ipe
12 -rw- 8728 Jun 28 2019 06:33:03 version.log
732775648 KB total (732599712 KB free)
<Sysname>
3. Execute the tftp put command in user view to back up image file vAC1000.ipe to the TFTP server.
<Sysname> tftp 2.2.2.2 put vAC1000.ipe
Press CTRL+C to abort.
% Total % Received % Xferd Average Speed Time Time Time Current
Dload Upload Total Spent Left Speed
100 85.5M 0 0 100 85.5M 0 2282k 0:00:38 0:00:38 --:--:-- 2595k
<Sysname>
4. Execute the tftp put command in user view to back up configuration file startup.cfg to the TFTP server.
<Sysname> tftp 2.2.2.2 put startup.cfg
Press CTRL+C to abort.
% Total % Received % Xferd Average Speed Time Time Time Current
Dload Upload Total Spent Left Speed
100 1557 0 0 100 1557 0 41140 --:--:-- --:--:-- --:--:-- 97312
<Sysname>
Upgrading the image file
1. Execute the tftp get command in user view to download image file vAC1000.ipe to the vAC.
<Sysname> tftp 2.2.2.2 get vAC1000.ipe
Press CTRL+C to abort.
% Total % Received % Xferd Average Speed Time Time Time Current
Dload Upload Total Spent Left Speed
100 85.5M 0 0 100 85.5M 250 0 0:05:50 0:05:50 --:--:-- 595k
Writing file...Done.
<Sysname>
2. Specify the vAC1000.ipe file as the main image file for the AC at the next reboot.
<Sysname> boot-loader file flash:/vAC1000.ipe main
Verifying the file flash:/vAC1000.ipe on the device...Done.
H3C vAC1000 images in IPE:
boot.bin
system.bin
This command will set the main startup software images. Please do not reboot the device during the upgrade. Continue? [Y/N]:y
Add images to the device.
File flash:/boot.bin already exists on the device.
File flash:/system.bin already exists on the device.
Overwrite the existing files? [Y/N]: y
Decompressing file boot.bin to flash:/boot.bin...Done.
Decompressing file system.bin to flash:/boot.bin...Done.
Verifying the file flash:/boot.bin on the device...Done.
Verifying the file flash:/system.bin on the device...Done.
The images that have passed all examinations will be used as the main startup software images at the next reboot on the device.
Decompression completed.
You are reconnended to delete the .ipe file after you set startup software images for all slots.
Do you want to delete flash:/vAC1000.ipe now? [Y/N]:y
<Sysname>
3. Verify that the file has been loaded.
<Sysname> display boot-loader
Software images on the device:
Current software images:
flash:/boot.bin
flash:/system.bin
Main startup software images:
flash:/ boot-X64.bin
flash:/ system.bin
Backup startup software images:
None
<Sysname>
4. Reboot the vAC.
<Sysname> reboot
Start to check configuration with next startup configuration file, please wait.........DONE!
This command will reboot the device. Continue? [Y/N]:y
Now rebooting, please wait...
5. After the reboot finishes, verify that the system software image is correct.
<Sysname> display version
H3C Comware Software, Version 7.1.064, Customer 5421
Copyright (c) 2004-2019 New H3C Technologies Co., Ltd. All rights reserved.
H3C vAC1000 uptime is 0 weeks, 0 days, 0 hours, 28 minutes
Last reboot reason : Power on
Boot image: flash:/boot.bin
Boot image version: 7.1.064, Customer 5421
Compiled Apr 12 2019 16:00:00
System image: flash:/system.bin
System image version: 7.1.064, Customer 5421
Compiled Apr 12 2019 16:00:00
CPU ID: 0x01000101, vCPUs: Total 1, Available 1
1.00G bytes RAM Memory
Basic BootWare Version: 1.11
Extended BootWare Version: 1.11
[SLOT 1]VNIC-E1000 (Driver)1.0
<Sysname>
Upgrading through FTP
Saving the running configuration and image file and verifying the storage space
1. Execute the save command in any view to save the running configuration.
<Sysname> save
The current configuration will be written to the device. Are you sure? [Y/N]:y
Please input the file name(*.cfg)[flash:/startup.cfg]
(To leave the existing filename unchanged, press the enter key):
flash:/startup.cfg exists, overwrite? [Y/N]:y
Validating file. Please wait...
Configuration is saved to device successfully.
<Sysname>
2. Execute the dir command to display files on the storage medium. Identify the system software image and configuration file names and verify that the storage medium has sufficient space for the new system software image.
<Sysname> dir
Directory of flash:
0 -rw- 7693312 Jun 28 2019 06:32:04 boot.bin
1 -rw- 148480 Jun 28 2019 06:32:04 capture.bin
2 -rw- - Jun 15 2019 06:32:59 diagfile
3 -rw- - Jun 28 2019 06:30:35 ifindex.dat
4 -rw- 6008832 Jun 28 2019 06:42:08 license
5 -rw- 44162048 Jun 28 2019 06:42:08 logfile
6 -rw- 50178048 Jun 28 2019 06:42:08 reboot.log
7 -rw- 8728 Jun 28 2019 06:30:36 seclog
8 -rw- 1557 Jun 28 2019 06:43:51 startup.cfg
9 -rw- 32871 Jun 28 2019 06:43:51 startup.mdb
10 -rw- 81991680 Jun 28 2019 06:32:04 system.bin
11 -rw- 89692160 Jun 28 2019 06:32:04 vAC1000.ipe
12 -rw- 8728 Jun 28 2019 06:33:03 version.log
732775648 KB total (732599712 KB free)
<Sysname>
3. Execute the ftp command in user view to log in to the FTP server, and enter the username and password as prompted.
<Sysname> ftp 2.2.2.2
Press CTRL+C to abort.
Connected to 2.2.2.2 (2.2.2.2).
220 WFTPD 2.0 service (by Texas Imperial Software) ready for new user
User (2.2.2.2:(none)): user001
331 Give me your password, please
Password:
230 Logged in successfully
Remote system type is MSDOS
ftp>
4. Execute the ftp put command in user view to back up image file vAC1000.ipe to the FTP server.
ftp> put vAC1000.ipe
227 Entering passive mode (2,2,2,2,7,210)
125 Using existing data connection
226 Closing data connection; File transfer successful.
FTP: 50178048 byte(s) sent in 21.363 second(s), 2293.00Kbyte(s)/sec.
ftp>
5. Execute the put command in user view to back up configuration file startup.cfg to the FTP server.
ftp> put startup.cfg
227 Entering passive mode (2,2,2,2,7,177)
125 Using existing data connection
226 Closing data connection; File transfer successful.
FTP: 1677 byte(s) sent in 0.142 second(s), 11.00Kbyte(s)/sec.
ftp>
Upgrading the image file
1. From FTP client view, download image file vAC1000.ipe to the storage medium on the vAC.
ftp> get vAC1000.ipe
227 Entering passive mode (2,2,2,2,7,225)
125 Using existing data connection
226 Closing data connection; File transfer successful.
FTP: 50178048 byte(s) received in 30.907 second(s), 1585.00K byte(s)/sec.
ftp>
2. Return to user view.
<ftp> quit
221 Service closing control connection
<Sysname>
3. Specify the vAC1000.ipe file as the main image file for the vAC at the next reboot.
<Sysname> boot-loader file flash:/vAC1000.ipe main
Verifying the file flash:/vAC1000.ipe on the device...Done.
H3C vAC1000 images in IPE:
boot.bin
system.bin
This command will set the main startup software images. Please do not reboot the device during the upgrade. Continue? [Y/N]:y
Add images to the device.
File flash:/boot.bin already exists on the device.
File flash:/system.bin already exists on the device.
Overwrite the existing files? [Y/N]: y
Decompressing file boot.bin to flash:/boot.bin...Done.
Decompressing file system.bin to flash:/boot.bin...Done.
Verifying the file flash:/boot.bin on the device...Done.
Verifying the file flash:/system.bin on the device...Done.
The images that have passed all examinations will be used as the main startup software images at the next reboot on the device.
Decompression completed.
You are reconnended to delete the .ipe file after you set startup software images for all slots.
Do you want to delete flash:/vAC1000.ipe now? [Y/N]:y
<Sysname>
4. Verify that the file has been loaded.
<Sysname> display boot-loader
Software images on the device:
Current software images:
flash:/boot.bin
flash:/system.bin
Main startup software images:
flash:/ boot.bin
flash:/ system.bin
Backup startup software images:
None
<Sysname>
5. Reboot the vAC.
<Sysname> reboot
Start to check configuration with next startup configuration file, please wait.........DONE!
This command will reboot the device. Continue? [Y/N]:y
Now rebooting, please wait...
6. After the reboot finishes, verify that the system software image is correct.
<Sysname> display version
H3C Comware Software, Version 7.1.064, Customer 5421
Copyright (c) 2004-2019 New H3C Technologies Co., Ltd. All rights reserved.
H3C vAC1000 uptime is 0 weeks, 0 days, 0 hours, 28 minutes
Last reboot reason : Power on
Boot image: flash:/boot.bin
Boot image version: 7.1.064, Customer 5421
Compiled Apr 12 2019 16:00:00
System image: flash:/system.bin
System image version: 7.1.064, Customer 5421
Compiled Apr 12 2019 16:00:00
CPU ID: 0x01000101, vCPUs: Total 1, Available 1
1.00G bytes RAM Memory
Basic BootWare Version: 1.11
Extended BootWare Version: 1.11
[SLOT 1]VNIC-E1000 (Driver)1.0
<Sysname>
Upgrading by using an ISO image from the VMware platform
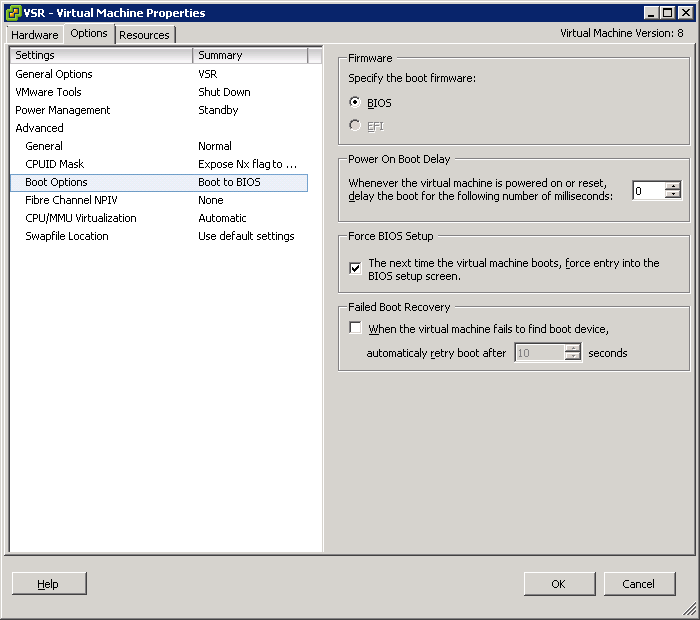
1. Select a VM from the left navigation pane, right-click that VM, and then select the Edit Settings option.
2. Click the Options tab. Select the option in the Force BIOS Setup area, and then click OK.
Figure 2 Selecting force BIOS setup
3. Select the VM from the left navigation pane,
and then click ![]() to
start the VM.
to
start the VM.
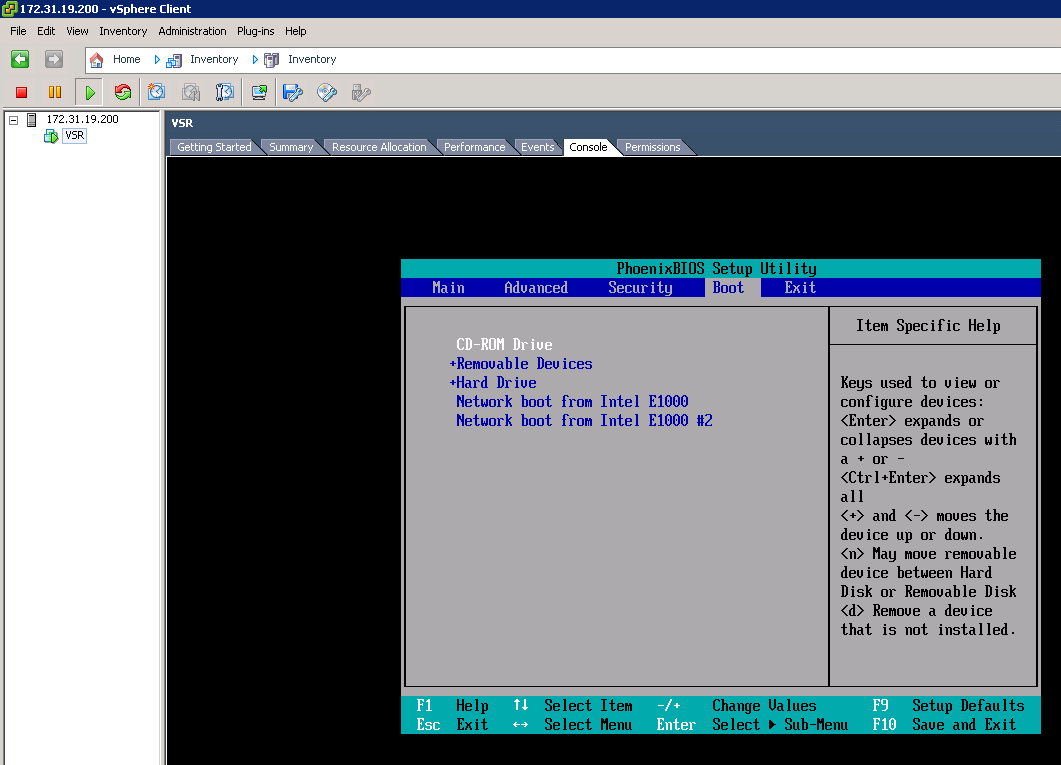
4. Click the Console tab, choose to boot from CD-ROM, and then save and exit.
Figure 3 Choosing to boot from CD-ROM
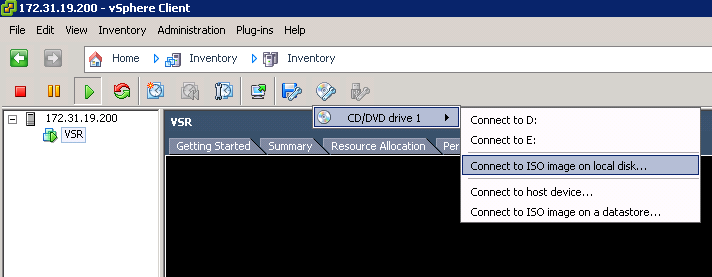
5. Click ![]() and
then select Connect to ISO image
on local disk. Star the VM.
and
then select Connect to ISO image
on local disk. Star the VM.
Figure 4 Connecting to ISO image on the local disk of the vAC
6. After the installation screen appears, select 2 from the vAC installation menu to upgrade the software version of the vAC to the version in the ISO image.

7. After the installation finishes, disconnect from the CD-ROM, and then click Yes to restart the system to complete the upgrade.
Figure 6 Disconnecting from CD-ROM (1)

Figure 7 Disconnecting from CD-ROM (2)

8. After the reboot finishes, verify that the system software image is correct.
<Sysname> display version
H3C Comware Software, Version 7.1.064, Customer 5421
Copyright (c) 2004-2019 New H3C Technologies Co., Ltd. All rights reserved.
H3C vAC1000 uptime is 0 weeks, 0 days, 0 hours, 28 minutes
Last reboot reason : Power on
Boot image: flash:/boot.bin
Boot image version: 7.1.064, Customer 5421
Compiled Apr 12 2019 16:00:00
System image: flash:/system.bin
System image version: 7.1.064, Customer 5421
Compiled Apr 12 2019 16:00:00
CPU ID: 0x01000101, vCPUs: Total 1, Available 1
1.00G bytes RAM Memory
Basic BootWare Version: 1.11
Extended BootWare Version: 1.11
[SLOT 1]VNIC-E1000 (Driver)1.0
<Sysname>
Upgrading by using an ISO image from the KVM platform
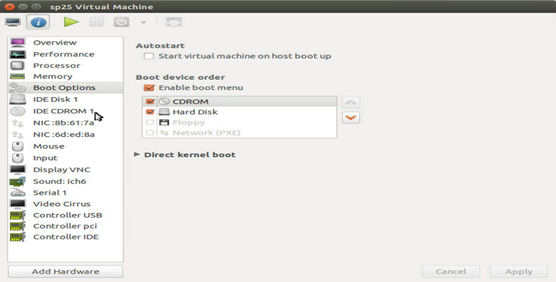
1. Select a VM on the Virtual Machine Manager page, right-click that VM to open the console. Click ![]() ,
configure the boot device order, and then click Apply.
,
configure the boot device order, and then click Apply.
Figure 8 Configuring the boot device order
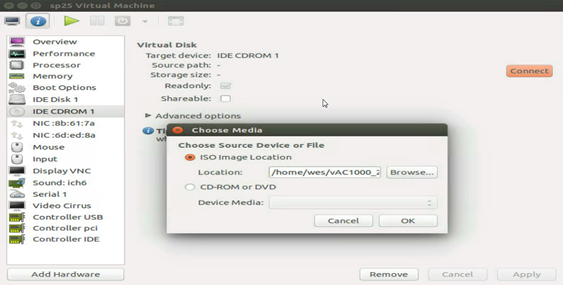
2. Select IDE CDROM 1 from the left menu, and then click Connect.
3. In the dialog box that opens, click Browse, select an ISO image, and then click OK.
Figure 9 Connecting CD-ROM to ISO image
4. Click ![]() in
the toolbar as shown in Figure 9 to
power on the VM.
in
the toolbar as shown in Figure 9 to
power on the VM.
5. Click ![]() in
the toolbar as shown in Figure 9 to
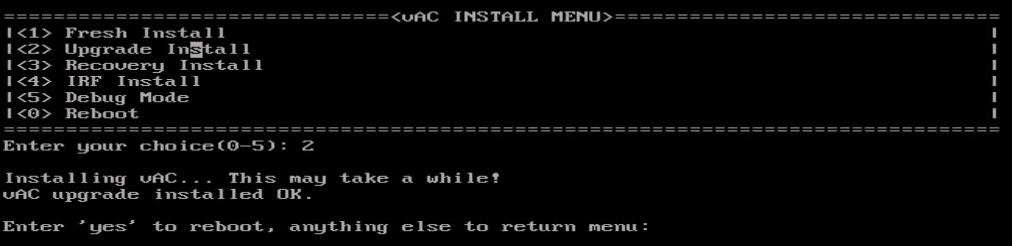
access the vAC installation menu. Select 2 and then enter yes.
in
the toolbar as shown in Figure 9 to
access the vAC installation menu. Select 2 and then enter yes.
Figure 10 Upgrading the vAC
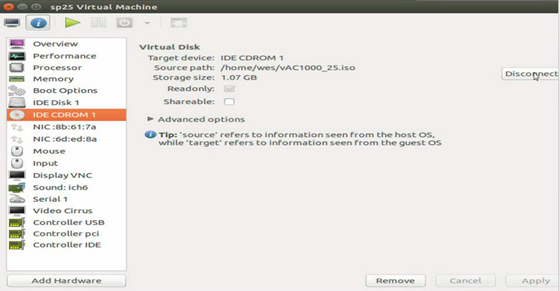
6. Click the disconnect button to disconnect the CD-ROM, and then press Enter. The vAC will restart to complete the upgrade.
Figure 11 Disconnecting from CD-ROM (1)

Figure 12 Disconnecting from CD-ROM (2)
7. After the reboot finishes, verify that the system software image is correct.
<Sysname> display version
H3C Comware Software, Version 7.1.064, Customer 5421
Copyright (c) 2004-2019 New H3C Technologies Co., Ltd. All rights reserved.
H3C vAC1000 uptime is 0 weeks, 0 days, 0 hours, 28 minutes
Last reboot reason : Power on
Boot image: flash:/boot.bin
Boot image version: 7.1.064, Customer 5421
Compiled Apr 12 2019 16:00:00
System image: flash:/system.bin
System image version: 7.1.064, Customer 5421
Compiled Apr 12 2019 16:00:00
CPU ID: 0x01000101, vCPUs: Total 1, Available 1
1.00G bytes RAM Memory
Basic BootWare Version: 1.11
Extended BootWare Version: 1.11
[SLOT 1]VNIC-E1000 (Driver)1.0
Handling software upgrade failures
If a software upgrade fails, the system runs the old software version. To handle a software failure:
1. Check the file transfer settings:
¡ If TFTP is used, you must enter the same server IP addresses, file name, and working directory as set on the TFTP server.
¡ If FTP is used, you must enter the same FTP server IP address, source file name, working directory, and FTP username and password as set on the FTP server.
2. Check the FTP or TFTP server for any incorrect setting.
3. Verify that the storage device has sufficient space for the upgrade file.
4. If the message "Something is wrong with the file" appears, check the file for file corruption.
