- Table of Contents
-
- 04-DPI Configuration Guide
- 00-Preface
- 01-DPI overview
- 02-DPI engine configuration
- 03-IPS configuration
- 04-URL filtering configuration
- 05-Data filtering configuration
- 06-File filtering configuration
- 07-Anti-virus configuration
- 08-Data analysis center configuration
- 09-Proxy policy configuration
- 10-WAF configuration
- 11-IP reputation configuration
- 12-APT defense configuration
- 13-Domain reputation configuration
- Related Documents
-
| Title | Size | Download |
|---|---|---|
| 11-IP reputation configuration | 103.41 KB |
Contents
Restrictions: Licensing requirements for IP reputation
IP reputation tasks at a glance
Enabling IP reputation globally
Specifying actions for an attack category
Specifying an exception IP address
Managing the IP reputation signature library
Restrictions and guidelines for IP reputation signature library management
Scheduling automatic IP reputation signature library update
Triggering an immediate IP reputation signature update
Performing an IP reputation signature manual update
Rolling back the IP reputation signature library
Enabling the top hit ranking feature
Display and maintenance commands for IP reputation
IP reputation configuration examples
Example: Configuring IP reputation
Configuring IP reputation
About IP reputation
The IP reputation feature uses IP addresses on the IP reputation list to filter network traffic. The list contains IP addresses with poor reputation, which are vulnerable to DDoS attacks, command injection attacks, Trojan virus download attacks, and port scan attacks. Each IP address entry on the reputation list contains the attributes of the attack category, match field, and actions for matching packets.
IP reputation workflow
Figure 1 describes the IP reputation workflow.
Figure 1 IP reputation workflow

After receiving a packet, the device performs the following operations:
1. Determines whether the source or destination IP address of the packet matches an exception IP address.
¡ If a match is found, the device forwards the packet.
¡ If no match exists, the device proceeds to the next step.
2. Determines whether the packet matches an IP address on the IP reputation list.
Whether an IP address on the list is compared to the source or destination IP address in the packet depends on the match field attribute of the IP address entry. If the match field attribute is bidirectional, the reputation IP address is compared with both the source and destination IP addresses in the packet. A match is found when this reputation IP address is the same as either the source or destination IP address in the packet.
¡ If a match is found, the device takes actions for the attack category of the IP address. The device supports the following actions:
- Permit—Allows packets to pass through.
- Drop—Drops packets.
- Logging—Generates IP reputation logs for the matching IP address.
¡ If no match is found, the device forwards the packet.
Restrictions: Licensing requirements for IP reputation
To use the IP reputation feature, you must purchase a license for the feature and install it on the device. If the license expires, you can use the IP reputation feature with the existing IP reputation list on the device but you cannot upgrade the IP reputation signature library. For more information about licenses, see license management in Fundamentals Configuration Guide.
IP reputation tasks at a glance
To configure IP reputation, perform the following tasks:
1. Enabling IP reputation globally
2. Specifying actions for an attack category
3. (Optional.) Specifying an exception IP address
4. Managing the IP reputation signature library
5. (Optional.) Enabling the top hit ranking feature
Enabling IP reputation globally
About this task
This feature identifies packets based on the source or destination IP address on the reputation list and processes the matching packets based on the attack category of the IP address.
Procedure
1. Enter system view.
system-view
2. Enter IP reputation view.
ip-reputation
3. Enable IP reputation globally.
global enable
By default, IP reputation is disabled globally.
Specifying actions for an attack category
About this task
On the IP reputation list, an IP address can belong to multiple attack categories. Each attack category has its own actions.
If an IP address belongs to only one attack category, the device takes the actions in this attack category. If an IP address belongs to multiple attack categories, the device takes an action that has higher priority among all actions in those attack categories. The drop action has higher priority than the permit action.
If logging is enabled for one of attack categories to which an IP address belongs, the device generates a log when the IP address is matched.
The device supports fast output of IP reputation logs. For more information about fast log output, see fast log output configuration in Network Management and Monitoring Configuration Guide.
Procedure
1. Enter system view.
system-view
2. Enter IP reputation view.
ip-reputation
3. Specify actions for an attack category.
attack-category attack-id { action { deny | permit } | logging { disable | enable } } *
By default, no actions are configured for an attack category and each attack category has its own pre-defined actions.
Specifying an exception IP address
About this task
The device forwards a packet if the source or destination IP address of the packet is an exception IP address.
Procedure
1. Enter system view.
system-view
2. Enter IP reputation view.
ip-reputation
3. Specify an exception IP address.
exception ipv4 ipv4-address
By default, no exception IP address is specified.
Managing the IP reputation signature library
Restrictions and guidelines for IP reputation signature library management
· Do not delete the /dpi/ folder in the root directory of the storage medium.
· Do not perform update or rollback of the IP reputation signature library when the device's free memory is below the normal state threshold. For more information about device memory thresholds, see device management in Fundamentals Configuration Guide.
· For successful automatic and immediate signature library update, make sure the device can resolve the IP name of the company's website into an IP address through DNS. For more information about DNS, see DNS configuration in Layer 3—IP Services Configuration Guide.
· Update only one signature library at a time. Do not perform signature library update until the existing signature library update is completed.
Scheduling automatic IP reputation signature library update
About this task
You can schedule automatic IP reputation signature library update if the device can access the signature database services on the official website to update its local signature library according to the update schedule.
Procedure
1. Enter system view.
system-view
2. Enable automatic update of the IP reputation signature library and enter automatic IP reputation signature library update configuration view.
ip-reputation signature auto-update
By default, automatic update of the IP reputation signature library is disabled.
3. Schedule the update time.
update schedule { daily | weekly { fri | mon | sat | sun | thu | tue | wed } } start-time time tingle minutes
By default, the device starts updating the IP reputation signature library at a random time between 01:00:00 and 03:00:00 every day.
Triggering an immediate IP reputation signature update
About this task
Anytime you find a release of new signature library version on the official website, you can trigger the device to immediately update the local signature library.
After you perform this task, the device immediately starts the automatic update process of the IP reputation signature library. Before overwriting the current signature library file, the device automatically backs it up to the ipreputation_sigpack_curr.dat file in the device storage medium.
Restrictions and guidelines
This feature can take effect no matter whether or not automatic signature library update is enabled.
Procedure
1. Enter system view.
system-view
2. Trigger an immediate IP reputation signature library update.
ip-reputation signature auto-update-now
Performing an IP reputation signature manual update
About this task
If the device cannot access the signature database services on the official website, use one of the following methods to manually update the IP reputation signature library on the device:
· Local update—Updates the IP reputation signature library by using a locally stored IP reputation signature library file. To use this method, first obtain the signature library file from the official website and import it to the device.
Store the update file on the master device for successful signature library update.
· FTP/TFTP update—Updates the IP reputation signature library by using the file stored on an FTP or TFTP server. The device automatically downloads the signature file from the server before using it to update the signature library.
Prerequisites
To use the local update method, first obtain the signature library file from the official website and import it to the device.
To use the FTP/TFTP update method, make sure the device and the FTP/TFTP server can reach each other.
Procedure
1. Enter system view.
system-view
2. Manually update the IP reputation signature library on the device.
ip-reputation signature update file-path
Rolling back the IP reputation signature library
About this task
If an IP reputation signature library update causes exceptions or a high false alarm rate, you can roll back the IP reputation signature library.
Before performing an IP reputation signature library rollback, the device backs up the current IP reputation signature library as the previous version. For example, the previous library version is V1 and the current library version is V2. If you perform a rollback to the previous version, library version V1 becomes the current version and library version V2 becomes the previous version. If you perform a rollback to the previous version again, the library rolls back to library version V2.
Procedure
1. Enter system view.
system-view
2. Roll back the IP reputation signature library to the previous version.
ip-reputation signature rollback last
Enabling the top hit ranking feature
About this task
This feature enables the device to collect hit statistics for IP addresses on the IP reputation list and rank them. After you disable this feature, the device clears hit statistics for IP reputation.
Procedure
1. Enter system view.
system-view
2. Enter IP reputation view.
ip-reputation
3. Enabling the top hit ranking feature.
top-hit-statistics enable
By default, the top hit ranking feature is disabled.
Display and maintenance commands for IP reputation
Execute display commands in any view.
|
Task |
Command |
|
Display information about attack categories for IP reputation. |
display ip-reputation attack-category |
|
Display exception IP addresses. |
display ip-reputation exception |
|
Display IP reputation signature library information. |
display ip-reputation signature library |
|
Display statistics for IP addresses with the highest hits on the IP reputation list. |
display ip-reputation top-hit-statistics [ top-number ] [ slot slot-id ] |
|
Display IP reputation information about an IP address. |
display ip-reputation ipv4 ipv4-address |
IP reputation configuration examples
Example: Configuring IP reputation
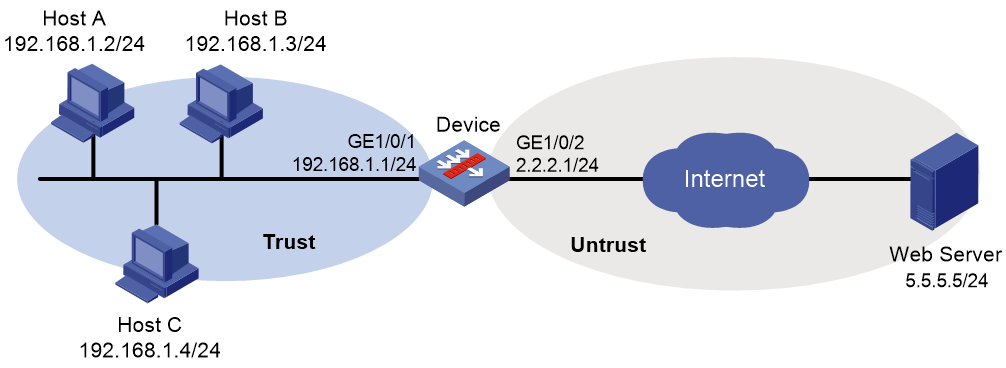
Network configuration
As shown in Figure 2, the device connects to the LAN and Internet through security zones Trust and Untrust, respectively. Configure IP reputation on the device to filter incoming and outgoing traffic on the device, and enable the top hit ranking feature to collect hit statistics.
Procedure
1. Assign IP addresses to interfaces:
# Assign an IP address to interface GigabitEthernet 1/0/1.
<Device> system-view
[Device] interface gigabitethernet 1/0/1
[Device-GigabitEthernet1/0/1] ip address 192.168.1.1 255.255.255.0
[Device-GigabitEthernet1/0/1] quit
# Assign IP addresses to other interfaces in the same way. (Details not shown.)
2. Configure settings for routing.
This example configures static routes, and the next hop in the routes is 2.2.2.2 to the external Web server.
[Device] ip route-static 5.5.5.0 24 2.2.2.2
3. Add interfaces to security zones.
[Device] security-zone name trust
[Device-security-zone-Trust] import interface gigabitethernet 1/0/1
[Device-security-zone-Trust] quit
[Device] security-zone name untrust
[Device-security-zone-Untrust] import interface gigabitethernet 1/0/2
[Device-security-zone-Untrust] quit
4. Configure a security policy:
# Create security policy ip and enter its view. Create a rule named trust-untrust to allow the internal users to access the Internet.
[Device] security-policy ip
[Device-security-policy-ip] rule name trust-untrust
[Device-security-policy-ip-10-trust-untrust] source-zone trust
[Device-security-policy-ip-10-trust-untrust] source-ip-subnet 192.168.1.0 24
[Device-security-policy-ip-10-trust-untrust] destination-zone untrust
[Device-security-policy-ip-10-trust-untrust] action pass
[Device-security-policy-ip-10-trust-untrust] quit
[Device] security-policy ip
[Device-security-policy-ip] rule na
# Activate the security policy configuration.
[Device-security-policy-ip] accelerate enhanced enable
[Device-security-policy-ip] quit
5. Configure IP reputation.
# Enable IP reputation.
[Device] ip-reputation
[Device-ip-reputation] global enable
# Enable the top hit ranking feature.
[Device-ip-reputation] top-hit-statistics enable
# Specify actions deny and logging for attack category 1.
[Device-ip-reputation] attack-category 1 action deny logging enable
Verifying the configuration
Verify that the device drops packets that match attack category 1 and generates logs for IP addresses that are matched. You can view the top hit ranks for IP addresses on the IP reputation list on the Web interface.
