- Table of Contents
-
- 04-DPI Configuration Guide
- 00-Preface
- 01-DPI overview
- 02-DPI engine configuration
- 03-IPS configuration
- 04-URL filtering configuration
- 05-Data filtering configuration
- 06-File filtering configuration
- 07-Anti-virus configuration
- 08-Data analysis center configuration
- 09-WAF configuration
- 10-Proxy policy configuration
- 11-IP reputation configuration
- 12-Domain reputation configuration
- 13-APT defense configuration
- 14-DLP configuration
- 15-Content moderation configuration
- Related Documents
-
| Title | Size | Download |
|---|---|---|
| 02-DPI engine configuration | 222.75 KB |
Contents
Restrictions: Hardware compatibility with DPI engine
Configure a DPI application profile
Activating policy and rule settings for DPI service modules
Configuring action parameter profiles
Configuring a block source parameter profile
Configuring a capture parameter profile
Configuring a logging parameter profile
Configuring a redirect parameter profile
Configuring an email parameter profile
Configuring a warning parameter profile
Enabling inspection suspension upon excessive CPU usage
Configuring DPI engine inspection parameters
Configuring an inspection mode
Configuring stream fixed length inspection
Configuring file fixed length inspection
Configuring MD5 fixed-length file inspection
Configuring MD5 hash-based virus inspection for all files
Configuring file decompression parameters
Configuring advanced features of the DPI engine
Enabling source port-based application identification
Specifying a proxy server for online DPI service signature update
Specifying the cloud query server for DPI services
Enabling support for HA dual-active mode
Enabling WAF logging to record HTTP packet details
Configuring real source IP inspection
Enabling real source IP inspection
Setting the priority of an inspected field for real source IP inspection
Configuring real source IP address inspection for the X-Forwarded-For field
Configuring real source IP inspection for the TCP Options field
Disabling the DPI engine for all protocols
Disabling the DPI engine for the specified protocols
Display and maintenance commands for DPI engine
Configuring DPI engine
About DPI engine
DPI engine is an inspection module shared by DPI service modules. DPI engine uses inspection rules to identify the application layer information, including the application layer protocol and behavior. DPI service modules process packets based on the inspection results.
DPI functions
DPI engine provides the following functions:
· Protocol parsing—Identifies the application layer protocols and analyzes the application layer information. Information analysis includes recognizing, normalizing, and uncompressing application layer fields.
· AC pattern matching—Matches packet payloads by the Aho-Corasick (AC) patterns in inspection rules. AC pattern matching is fast and it is the core function of the DPI engine.
· Option matching—Matches packet payloads by the options in the inspection rules whose AC patterns have been matched. Option matching is slower than AC pattern matching.
DPI engine inspection rules
DPI engine uses inspection rules to match packets. Inspection rules are transformed from the rules or signatures of the DPI service modules. The match criteria in an inspection rule can contain the following types:
· AC pattern—Criteria that identify packet signatures. An AC pattern is a character string that is three or more bytes long.
· Option—Criteria other than AC patterns. For example, an option can be the port number or protocol type.
An inspection rule can contain both AC patterns and options. A packet must match both the AC patterns and options to match the rule.
An inspection rule can also contain only options. A packet matches the rule if it matches the options in the rule.
DPI engine mechanism
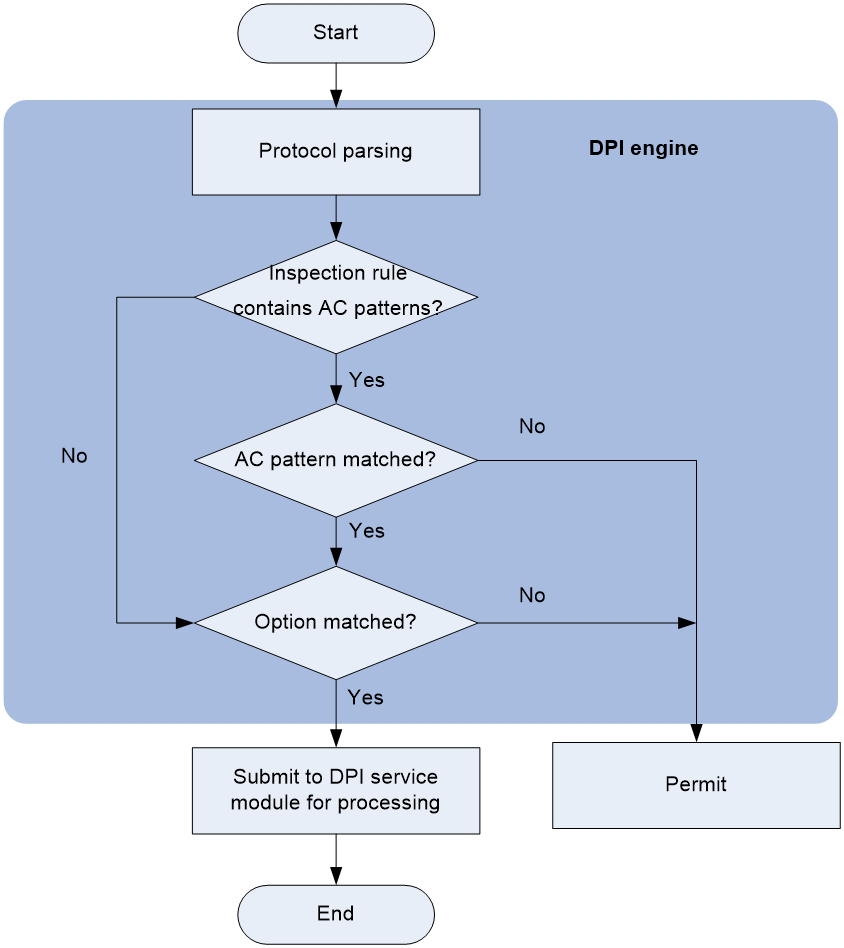
As shown in Figure 1, DPI engine works as follows:
1. The DPI engine performs protocol parsing for the packet and searches for applicable inspection rules according to the parsing results.
2. If an applicable inspection rule contains AC patterns, DPI engine performs AC pattern matching first. If an applicable inspection rule does not contain AC patterns, DPI engine directly performs option matching. The packet matches the rule if it matches the options.
3. If the packet matches an AC pattern in an applicable inspection rule, the DPI engine further compares the packet against the options associated with the AC pattern. The packet matches the rule if it matches the both the AC pattern and its associated options. If the packet matches an AC pattern but does not match its associated options, the DPI engine permits the packet to pass.
4. If the packet matches an inspection rule, the DPI engine submits the packet to the corresponding DPI service module for processing. If the packet does not match any rule, the DPI engine permits the packet to pass.
Restrictions: Hardware compatibility with DPI engine
|
Hardware platform |
Module type |
DPI engine compatibility |
|
M9006 M9010 M9014 |
Blade 4 firewall module |
Yes |
|
Blade 5 firewall module |
No |
|
|
NAT module |
No |
|
|
M9010-GM |
Encryption module |
Yes |
|
M9016-V |
Blade 5 firewall module |
No |
|
M9008-S M9012-S |
Blade 4 firewall module |
Yes |
|
Intrusion prevention service (IPS) module |
Yes |
|
|
Video network gateway module |
Yes |
|
|
M9008-S-6GW |
IPv6 module |
Yes |
|
M9008-S-V |
Blade 4 firewall module |
Yes |
|
M9000-AI-E4 M9000-AI-E8 M9000-AI-E16 |
Blade 5 firewall module |
Yes |
|
M9000-X06 M9000-X10 |
Blade 6 firewall module |
Yes |
vSystem support for features
Non-default vSystems support the following features:
· Configure a DPI application profile
· Activating policy and rule settings for DPI service modules
· Configuring action parameter profiles
For information about the support of non-default vSystems for the commands, see DPI engine command reference. For information about vSystem, see Virtual Technologies Configuration Guide.
DPI engine tasks at a glance
To configure the DPI engine, perform the following tasks:
1. Configure a DPI application profile
2. Activating policy and rule settings for DPI service modules
3. Configuring action parameter profiles
4. (Optional.) Optimizing the DPI engine
5. (Optional.) Enabling inspection suspension upon excessive CPU usage
6. (Optional.) Configuring DPI engine inspection parameters
¡ Configuring an inspection mode
¡ Configuring stream fixed length inspection
¡ Configuring file fixed length inspection
¡ Configuring MD5 fixed-length file inspection
¡ Configuring MD5 hash-based virus inspection for all files
¡ Configuring file decompression parameters
7. (Optional.) Configuring advanced features of the DPI engine
¡ Enabling source port-based application identification
¡ Specifying a proxy server for online DPI service signature update
¡ Specifying the cloud query server for DPI services
¡ Enabling support for HA dual-active mode
¡ Enabling WAF logging to record HTTP packet details
8. Configuring real source IP inspection
9. (Optional.) Disabling the DPI engine
Configure a DPI application profile
About this task
A DPI application profile includes a set of DPI service policies, such as a URL filtering policy. It can be applied to an object policy rule or a security policy rule to specify the DPI service policy for packets that match the rule.
Procedure
1. Enter system view.
system-view
2. Create a DPI application profile and enter its view.
app-profile profile-name
3. Apply DPI service policies to the DPI application profile.
¡ Specify an IPS policy.
ips apply policy policy-name mode { protect | alert }
For more information about this command, see DPI Command Reference.
¡ Specify a URL filtering policy.
url-filter apply policy policy-name
For more information about this command, see DPI Command Reference.
¡ Specify a data filtering policy.
data-filter apply policy policyname
For more information about this command, see DPI Command Reference.
¡ Specify a file filtering policy.
file-filter apply policy policyname
For more information about this command, see DPI Command Reference.
¡ Specify an anti-virus policy.
anti-virus apply policy policyname mode { alert | protect }
For more information about this command, see DPI Command Reference.
¡ Specify a WAF policy.
waf apply policy policy-name mode { protect | alert }
By default, no DPI service policies are applied to a DPI application profile.
Activating policy and rule settings for DPI service modules
About this task
By default, the system will detect whether another configuration change (such as creation, modification, or deletion) occurs within a 20-second interval after a configuration change for DPI service modules such as URL filtering:
· If no configuration change occurs within the interval, the system performs an activation operation at the end of the next interval to make the configuration take effect.
· If a configuration change occurs within the interval, the system continues to periodically check whether a configuration change occurs within the interval.
To activate the policy and rule configurations for DPI service modules immediately, you can execute the inspect activate command.
Procedure
1. Enter system view.
system-view
2. Activate policy and rule settings for DPI service modules.
inspect activate
By default, the creation, modification, and deletion of DPI service policies and rules will be activated automatically.
|
|
CAUTION: This command causes transient DPI service interruption. DPI-based services might also be interrupted. For example, security policies cannot control access to applications, or server load balancing services cannot load share traffic based on applications. |
Configuring action parameter profiles
Configuring a block source parameter profile
About this task
A block source parameter profile defines the block period for the block source action in DPI service modules.
Restrictions and guidelines
The block source action takes effect only after the blacklist feature is enabled.
With the blacklist feature is enabled, the device drops the matching packet and adds the packet's source IP address to the IP blacklist. Subsequent packets from the source IP address will be dropped directly during the block period.
For more information about the blacklist feature, see attack detection and prevention configuration in the Security Configuration Guide.
Procedure
1. Enter system view.
system-view
2. Create a block source parameter profile and enter its view.
inspect block-source parameter-profile parameter-name
3. Set the block period during which a source IP address is blocked.
block-period period
The default setting is 1800 seconds.
Configuring a capture parameter profile
About this task
A capture parameter profile defines the following parameters for the capture action in DPI service modules:
· Maximum number of bytes that can be cached.
· Daily export time for cached packets.
· URL to which cached packets are exported.
The device caches captured packets locally and exports the cached packets to the designated URL at the daily export time or when the number of cached bytes reaches the limit. After the export, the device clears the local cache and starts to capture new packets.
Procedure
1. Enter system view.
system-view
2. Create a capture parameter profile and enter its view.
inspect capture parameter-profile parameter-name
3. Set the maximum volume of captured packets that can be cached.
capture-limit kilobytes
By default, the device can cache a maximum of 512 Kilobytes of captured packets.
4. Set the daily export time for cached captured packets.
export repeating-at time
By default, the cached captured packets are exported at 1:00 a.m. every day.
5. Specify the URL to which cached captured packets are exported
export url url-string
By default, no URL is specified for exporting the cached captured packets.
Configuring a logging parameter profile
About this task
A logging parameter profile defines the log output method and log output language for the logging action in DPI service modules.
Restrictions and guidelines
After setting the IPS log language to Chinese, only the attack name field of the IPS logs supports displaying in Chinese.
Procedure
1. Enter system view.
system-view
2. Create a logging parameter profile and enter its view.
inspect logging parameter-profile parameter-name
3. Specify the log export method.
log { email | syslog }
By default, logs are exported to the information center.
4. Set the language for IPS log output to Chinese.
log language chinese
By default, IPS logs are output in English.
Configuring a redirect parameter profile
About this task
A redirect parameter profile defines the URL to which packets are redirected for the redirect action in DPI service modules.
Procedure
1. Enter system view.
system-view
2. Create a redirect parameter profile and enter its view.
inspect redirect parameter-profile parameter-name
3. Specify the URL to which packets are redirected.
redirect-url url-string
By default, no URL is specified for packet redirecting.
Configuring an email parameter profile
About this task
An email parameter profile defines the following parameters for the email action in DPI service modules:
· Email server.
· Email sender and receiver.
· Username and password for logging in to the email server.
Restrictions and guidelines
The email server address can be an IP address or a host name. If you specify the email server by host name, make sure the device can resolve the host name into its IP address through static or dynamic DNS. Make sure the device and the email server can reach each other. For more information about DNS, see DNS configuration in Layer 3—IP Services Configuration Guide.
Procedure
1. Enter system view.
system-view
2. Create an email parameter profile and enter its view.
inspect email parameter-profile parameter-name
3. Specify the email server.
email-server addr-string
By default, no email server is specified.
4. Specify the email sender address.
sender addr-string
By default, no email sender address is specified.
5. Specify the email receiver address.
receiver addr-string
By default, no email receiver address is specified.
6. (Optional.) Configure email client authentication.
a. Enable email client authentication.
authentication enable
By default, email client authentication is enabled.
b. Specify the username for logging in to the email server.
username name-string
By default, no username is specified for logging in to the email server.
c. Specify the password for logging in to the email server.
password { cipher | simple } string
By default, no password is specified for logging in to the email server.
d. Enable the secure password transmission feature.
secure-authentication enable
By default, the secure password transmission feature is disabled.
7. Configure output limit for log entries sent to the email server.
email-limit interval interval max-number value
By default, the device allows sending a maximum of 10 log entries within five minutes.
Configuring a warning parameter profile
About this task
A warning parameter profile defines the parameters for the warning action in DPI service modules. After you create a warning parameter profile, you can import a user-defined alarm message from a file.
Procedure
1. Enter system view.
system-view
2. Create a warning parameter profile and enter its view,.
inspect warning parameter-profile profile-name
3. Import a user-defined alarm message from a warning file.
import block warning-file file-path
By default, the device uses the alarm message "The site you are accessing has a security risk and thereby is blocked."
4. (Optional.) Restore the default alarm message.
reset block warning-file
This command clears the user-defined alarm message and restores the default alarm message.
Optimizing the DPI engine
About this task
The DPI engine includes a series of optimization features. For example, you can enable the DPI engine to uncompress or decode the compressed or encoded packets to identify the application information of the packets. The optimization features improve inspection and accuracy of the DPI engine, but consume more system resources.
Procedure
1. Enter system view.
system-view
2. Set the maximum number of payload-carrying packets to be inspected per data flow.
inspect packet maximum max-number
By default, the DPI engine can inspect a maximum of 32 payload-carrying packets per data flow.
3. Set the maximum number of options to be cached per TCP or UDP data flow.
inspect cache-option maximum max-number
By default, the DPI engine can cache a maximum of 32 options per TCP or UDP data flow.
4. Configure the TCP segment reassembly feature.
¡ Enable TCP segment reassembly.
inspect tcp-reassemble enable
By default, the TCP segment reassembly feature is disabled.
¡ Set the maximum number of TCP segments that can be cached for reassembly per TCP flow.
inspect tcp-reassemble max-segment max-number
By default, a maximum of 10 TCP segments can be cached for reassembly per TCP flow.
5. (Optional.) Disable a DPI engine optimization feature.
inspect optimization [ chunk | no-acsignature | raw | uncompress | url-normalization ] disable
By default, all DPI engine optimization features are enabled.
You can disable DPI engine optimization features to improve the device performance as needed.
Enabling inspection suspension upon excessive CPU usage
About this task
Packet inspection of the DPI engine is a complex and resource-consuming process.
Inspection suspension upon excessive CPU usage works as follows:
· When the device's CPU usage rises to or above the CPU usage threshold, the DPI engine suspends packet inspection to guarantee the device performance.
· When the device's CPU usage drops to or below the CPU usage recovery threshold, the DPI engine resumes packet inspection.
For information about configuring the CPU usage thresholds, see device management in Fundamentals Configuration Guide.
Restrictions and guidelines
Do not disable inspection suspension upon excessive CPU usage if the device's CPU usage is high.
When the device's CPU usage is low, you can disable this feature to improve inspection accuracy.
When a sudden CPU overload occurs, the DPI engine suspends packet inspection for certain types of traffic to guarantee device performance, even though the CPU usage threshold is not reached.
Procedure
1. Enter system view.
system-view
2. Enable inspection suspension upon excessive CPU usage.
undo inspect cpu-threshold disable
By default, inspection suspension upon excessive CPU usage is enabled.
Configuring DPI engine inspection parameters
Configuring an inspection mode
About this task
Select an inspection mode as required:
· Balanced mode—Applicable to most scenarios. This mode makes a tradeoff between the device performance and inspection coverage. The maximum length is 64 Kilobytes for FTP, HTTP, SMB, NFS, and email streams, and the maximum file length for MD5 inspection is 2048 Kilobytes.
· Large coverage mode—Applicable to the scenarios that require large inspection coverage. This mode improves the inspection coverage at the cost of device performance. The maximum length is 128 Kilobytes for FTP, HTTP, SMB, NFS, and email streams, and the maximum file length for MD5 inspection is 5120 Kilobytes.
· High performance mode—Applicable to the scenarios that require high device performance. This mode improves the device performance while ensuring a certain inspection coverage. The maximum length is 32 Kilobytes for FTP, HTTP, SMB, NFS, and email streams, and the maximum file length for MD5 inspection is 32 Kilobytes.
· User-defined mode—Applicable to the scenarios that have specific requirements for inspection coverage and device performance. In this mode, you can execute the inspect stream-fixed-length and inspect md5-fixed-length commands commands to set the maximum stream length for inspection and maximum file length for MD5 value calculation, respectively.
The maximum lengths for stream inspection and MD5 inspection will not change after the user-defined inspection mode is switched, and you can adjust those lengths as required.
Procedure
1. Enter system view.
system-view
2. Configure a DPI engine inspection mode.
inspect coverage { balanced | large-coverage | high-performance | user-defined }
By default, the DPI engine uses the balanced mode.
Configuring stream fixed length inspection
About this task
DPI engine inspects only the fixed-length data after the first packet for each stream. The remaining stream data is not inspected. Reducing the fixed length for stream inspection enhances the inspection efficiency.
Restrictions and guidelines
This feature can be configured only if the DPI engine inspection mode is user-defined mode.
Procedure
1. Enter system view.
system-view
2. Enable the stream fixed length inspection.
undo inspect stream-fixed-length disable
By default, the stream fixed length inspection is enabled.
3. Set the fixed length for stream inspection.
inspect stream-fixed-length { email | ftp | http | nfs | smb } * length
The default length is 64 Kilobytes for FTP, HTTP, NFS, SMB, and email streams.
The longer the inspection data length, the lower the device throughput, and the higher the packet inspection accuracy.
Configuring file fixed length inspection
About this task
DPI engine inspects only the fixed-length data of files in each data stream. The remaining data of the file is not inspected. This is because virus signatures are typically embedded in the first half of a file. Narrowing the inspection scope enhances the file inspection efficiency.
Restrictions and guidelines
This feature can be configured only if the DPI engine inspection mode is user-defined mode.
Because files are transmitted in a data stream, the fixed length of files must not be longer than that of the data stream.
Procedure
1. Enter system view.
system-view
2. Enable the file fixed length inspection.
inspect file-fixed-length enable
By default, the file fixed length inspection is disabled.
3. Set the fixed length for file inspection.
inspect file-fixed-length { email | ftp | http | nfs | smb } * length-value
By default, the fixed length is 64 Kilobytes for FTP, HTTP, NFS, SMB, and email files.
If a data stream contains multiple files, this feature inspects only the fixed length data of each file.
Configuring MD5 fixed-length file inspection
About this task
In the anti-virus services, the device matches the packet signatures, calculates MD5 values of the files, and compares the calculated MD5 values with the MD5 rules in the signature library. If the MD5 value for a file matches an MD5 rule in the signature library, the file is considered to contain viruses. For more information about virus inspection, see "Configuring anti-virus."
The DPI engine inspects the packet signatures and MD5 values at the same time. After the length of a file reaches the fixed stream inspection length, the DPI engine will stop the packet signature inspection. To continue the MD5 inspection for a file, enable MD5 fixed-length file inspection and configure a fixed file length for MD5 inspection longer than the fixed length for stream inspection. Then the DPI engine calculates MD5 value of the fixed-length file.
The increase of the file length for MD5 inspection will reduce the device performance but improve the success rate of the MD5 inspection. The decrease of the file length for MD5 inspection will improve the device performance but reduce the success rate of the MD5 inspection.
Restrictions and guidelines
This feature can be configured only if the DPI engine inspection mode is user-defined mode.
Procedure
1. Enter system view.
system-view
2. Enable MD5 fixed-length file inspection.
inspect md5-fixed-length enable
By default, MD5 fixed-length file inspection is enabled.
3. Set the fixed file length for MD5 inspection.
inspect md5-fixed-length { email | ftp | http | nfs | smb } * length
By default, the fixed length of FTP, HTTP, SMB, NFS, and email files for MD5 inspection is 2048 Kilobytes.
Configuring MD5 hash-based virus inspection for all files
Restrictions and guidelines
This feature might degrade the processing performance of other services. Enable it only when necessary.
Procedure
1. Enter system view.
system-view
2. Enable MD5 hash-based virus inspection for all files.
inspect md5-verify all-files
By default, the DPI engine performs MD5 hash-based virus inspection only for executable files, office files, and compressed files.
Configuring file decompression parameters
About this task
After the device receives compressed files, DPI engine will decompress the files and match the decompressed files with signatures. You can set the following parameters for file decompression:
· Decompression data size limit—Maximum data size that can be decompressed in a file. DPI engine will not decompress the remaining file data and will match the remaining compressed file data with signatures.
· Decompression layer limit—Maximum number of layers that can be decompressed in a file. DPI engine will not decompress the remaining layers and will match the remaining compressed file with signatures.
Restrictions and guidelines
DPI engine can decompress only .zip and .gzip files.
Set appropriate parameters for file decompression.
· Large limits might make DPI engine get stuck in decompressing a large file or a multi-layer compressed file, improving the identification of file content at the cost of the following aspects:
¡ Affect the decompression of subsequent files.
¡ Consume a large amount of the device memory.
¡ Affect the device forwarding performance.
· Small limits might make DPI engine unable to identify the original file content correctly, reducing the impact on the device forwarding performance but affecting the accuracy of the file inspection results for DPI services (such as anti-virus and data filtering).
Procedure
1. Enter system view.
system-view
2. Set the maximum data size that can be decompressed in a file.
inspect file-uncompr-len max-size
By default, the device can decompress a maximum of 100 MB data in a file.
3. Set the maximum number of layers that can be decompressed in a file.
inspect file-uncompr-layer max-layer
By default, the device can decompress a maximum of three layers in a file. If the max-layer field value is 0, the file will not be decompressed.
Configuring advanced features of the DPI engine
Enabling source port-based application identification
About this task
You can use this feature to identify traffic of applications that use fixed source ports when the following conditions are true:
· The types of traffic transmitted over networks are relatively unvaried and use fixed source ports.
· Destination port-based application identification or signature-based traffic content identification is not supported.
The application identification results produced by this feature might not be accurate. Configure this feature according to your live network as a best practice.
Procedure
1. Enter system view.
system-view
2. Enable source port-based application identification.
inspect source-port-identify enable
By default, source port-based application identification is disabled.
Specifying a proxy server for online DPI service signature update
About this task
The device must access the company's website for online signature update of DPI services (such as URL filtering). If direct connectivity is not available, the device can access the company's website through the specified proxy server. For more information about online signature update, see "Configuring URL filtering" and "Configuring anti-virus."
Restrictions and guidelines
If you specify a proxy server by domain name instead of IP address, make sure the device can resolve the domain name into an IP address through DNS. For more information about DNS, see Layer 3—IP Services Configuration Guide.
Procedure
1. Enter system view.
system-view
2. Specify a proxy server for online DPI service signature update
inspect signature auto-update proxy { domain domain-name | ip ip-address } [ port port-number ] [ user user-name password { cipher | simple } string ]
By default, the proxy server used by DPI services for online signature update is not specified.
Specifying the cloud query server for DPI services
About this task
You can specify the server used for cloud query by DPI services.
Currently, the cloud query server supports URL filtering cloud query and anti-virus MD5 value cloud query.
Restrictions and guidelines
For successful cloud query, make sure the device can resolve the host name of the cloud query server into an IP address through DNS. For more information about DNS, see DNS configuration in Layer 3—IP Services Configuration Guide.
Procedure
1. Enter system view.
system-view
2. Specify the cloud query server for DPI services.
inspect cloud-server host-name
By default, DPI services use the cloud query server with host name sec.h3c.com.
Enabling support for HA dual-active mode
About this task
The feature ensures the device in HA dual-active mode can correctly process DPI services in a network with asymmetric forwarding of flows.
For more information about HA dual-active mode, see high availability group configuration in High Availability Configuration Guide.
Restrictions and guidelines
This feature takes effect only when the device operates in HA dual-active mode.
This feature takes effect only after you enable transparent service traffic transmission between the remote backup group members (see RBM configuration in High Availability Configuration Guide).
Procedure
1. Enter system view.
system-view
2. Enable support for HA dual-active mode.
inspect dual-active enable
By default, support for HA dual-active mode is disabled.
Enabling WAF logging to record HTTP packet details
About this task
The feature enables the device to record more fields of HTTP packets in WAF logs.
· For HTTP requests, when this feature is disabled, the device records only the request line and request method. When this feature is enabled, the device records all fields.
· For HTTP requests, when this feature is disabled, the device does not record any fields. When this feature is enabled, the device records the status line information.
Restrictions and guidelines
This feature does not take effect on WAF logs generated before it is enabled.
To save system resources, enable this feature only when necessary.
Procedure
1. Enter system view.
system-view
2. Enabling WAF logging to record HTTP packet details.
inspect waf http-log-details enable
By default, this feature is disabled.
Configuring real source IP inspection
Enabling real source IP inspection
About this task
When a client connects to a Web server through HTTP proxies, the source IP address of the request will change. To identify the source IP attacks accurately, you can enable real source IP inspection to obtain the real source IP address from the corresponding fields in the request.
Procedure
1. Enter system view.
system-view
2. Enable real source IP inspection.
inspect real-ip enable
By default, real source IP inspection is disabled.
Setting the priority of an inspected field for real source IP inspection
About this task
With real source IP inspection enabled, the device obtains the real source IP address of the client by inspecting multiple fields in the packets by default.
When multiple IP addresses are detected, the devices uses the IP address obtained from the field with the highest priority as the final real source IP address.
Procedure
1. Enter system view.
system-view
2. Set the priority of an inspected field for real source IP inspection.
inspect real-ip detect-field { cdn-src-ip | tcp-option | x-real-ip | xff } priority priority-value
By default, no priority is specified for any inspected field in the real source IP inspection, and all inspected fields use priority value 0. The device inspects the fields in the order of the xff, cdn-src-ip, x-real-ip, and tcp-option fields.
Configuring real source IP address inspection for the X-Forwarded-For field
About this task
When a client connects to a Web server through an HTTP proxy, the HTTP header might contain the X-Forwarded-For field that carries multiple IP addresses. The standard syntax of the X-Forwarded-For field is <client>, <proxy1>, <proxy2>,…<proxyn>. If a request goes through multiple proxies, the IP addresses of each successive proxy are listed. The rightmost IP address is the IP address of the most recent proxy and the leftmost IP address is the IP address of the originating client.
Procedure
1. Enter system view.
system-view
2. Configure real source IP address inspection for the X-Forwarded-For field.
inspect real-ip detect-field xff { head | tail }
By default, the rightmost IP address in the X-Forwarded-For field is the real source IP address.
Configuring real source IP inspection for the TCP Options field
About this task
To enable the device to locate the real source IP address in the TCP Option field, you must first define a hexadecimal string. If no hexadecimal string is found, the device will stop searching the TCP Options field for the real IP address.
Restrictions and guidelines
With real source IP inspection enabled, the device does not obtain the real source IP address from the TCP Options field by default. The device searches the real source IP from the TCP Options field only after the parameters are configured.
Procedure
1. Enter system view.
system-view
2. Configure real source IP inspection for the TCP Options field.
inspect real-ip detect-field tcp-option hex hex-vector [ offset offset-value ] [ depth depth-value ] [ ip-offset ip-offset-value ]
By default, real source IP inspection is not configured for the TCP Options field, and the device does not obtain the real source IP address from the TCP Options field.
Disabling the DPI engine
Disabling the DPI engine for all protocols
About this task
Packet inspection in the DPI engine is a complex and resource-consuming process. When the CPU usage is too high, you can disable the DPI engine to guarantee the device performance.
Procedure
1. Enter system view.
system-view
2. Disable the DPI engine.
inspect bypass
By default, the DPI engine is enabled.
|
|
CAUTION: This command causes packets of any protocols not to be processed by DPI. DPI-based services might also be interrupted. For example, security policies cannot control access to applications, or server load balancing services cannot load share traffic based on applications. |
Disabling the DPI engine for the specified protocols
About this task
Perform this task in the following scenarios:
· Scenario 1: Inspection on packets of the specified protocols is not required. You can disable the DPI engine for the specified protocols to reduce the consumption of device resources and improve the device performance.
· Scenario 2: Inspection on packets of the specified protocols causes device reboot. You can specify the protocols to bypass the DPI engine to avoid device reboot caused by inspection error and ensure the inspection on packets of other protocols.
To disable the DPI engine for the specified protocols, you can use either of the following methods:
· Manual configuration—If the administrator knows the protocols to bypass, you can use this method. This method applies to scenario 1.
· Automatic configuration—This method applies to scenario 2. If you use this method, the device automatically identifies the protocols to bypass the DPI engine after device reboot.
Procedure
1. Enter system view.
system-view
2. Disable the DPI engine for the specified protocols.
¡ Manually disable the DPI engine for the specified protocols.
inspect bypass protocol { dns | ftp | ftp-data | http | https | imap | nfs | pop3 | rtmp | sip | smb | smtp | telnet | tftp } *
By default, the DPI engine inspects all supported protocols.
¡ Automatically disable the DPI engine for the specified protocols.
inspect auto-bypass enable
By default, automatic bypass of the DPI engine is disabled.
Display and maintenance commands for DPI engine
Execute display commands in any view.
|
Task |
Command |
|
Display the status of the DPI engine. |
display inspect status |
|
Display information about the MD5 hash-based virus inspection for all files feature. |
display inspect md5-verify configuration |
