- Table of Contents
-
- 11-Network Management and Monitoring Configuration Guide
- 00-Preface
- 01-System maintenance and debugging configuration
- 02-NQA configuration
- 03-iNQA configuration
- 04-NTP configuration
- 05-PTP configuration
- 06-PoE configuration
- 07-SNMP configuration
- 08-RMON configuration
- 09-Event MIB configuration
- 10-NETCONF configuration
- 11-Ansible configuration
- 12-Puppet configuration
- 13-SmartMC configuration
- 14-EPA configuration
- 15-CWMP configuration
- 16-EAA configuration
- 17-Process monitoring and maintenance configuration
- 18-Mirroring configuration
- 19-sFlow configuration
- 20-Information center configuration
- 21-Packet capture configuration
- 22-VCF fabric configuration
- 23-Cloud connection configuration
- 24-EPS agent configuration
- 25-Chef configuration
- 26-eMDI configuration
- 27-SQA configuration
- Related Documents
-
| Title | Size | Download |
|---|---|---|
| 25-Chef configuration | 170.53 KB |
Configuring Chef
About Chef
Chef is an open-source configuration management tool. It uses the Ruby language. You can use the Ruby language to create cookbooks and save them to a server, and then use the server for centralized configuration enforcement and management.
Chef network framework
Figure 1 Chef network framework
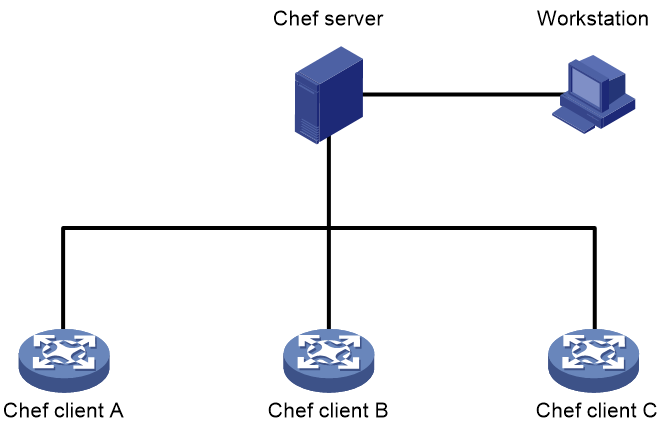
As shown in Figure 1, Chef operates in a client/server network framework. Basic Chef network components include the Chef server, Chef clients, and workstations.
Chef server
The Chef server is used to centrally manage Chef clients. It has the following functions:
· Creates and deploys cookbooks to Chef clients on demand.
· Creates .pem key files for Chef clients and workstations. Key files include the following two types:
¡ User key file—Stores user authentication information for a Chef client or a workstation. The Chef server uses this file to verify the validity of a Chef client or workstation. Before the Chef client or workstation initiates a connection to the Chef server, make sure the user key file is downloaded to the Chef client or workstation.
¡ Organization key file—Stores authentication information for an organization. For management convenience, you can classify Chef clients or workstations that have the same type of attributes into organizations. The Chef server uses organization key files to verify the validity of organizations. Before a Chef client or workstation initiates a connection to the Chef server, make sure the organization key file is downloaded to the Chef client or workstation.
For information about installing and configuring the Chef server, see the official Chef website at
Workstation
Workstations provide the interface for you to interact with the Chef server. You can create or modify cookbooks on a workstation and then upload the cookbooks to the Chef server.
A workstation can be hosted by the same host as the Chef server. For information about installing and configuring the workstation, see the official Chef website at
Chef client
Chef clients are network devices managed by the Chef server. Chef clients download cookbooks from the Chef server and use the settings in the cookbooks.
The device supports Chef 12.3.0 client.
Chef resources
Chef uses Ruby to define configuration items. A configuration item is defined as a resource. A cookbook contains a set of resources for one feature.
Chef manages types of resources. Each resource has a type, a name, one or more properties, and one action. Every property has a value. The value specifies the state desired for the resource. You can specify the state of a device by setting values for properties regardless of how the device enters the state. The following resource example shows how to configure a device to create VLAN 2 and configure the description for VLAN 2.
netdev_vlan 'vlan2' do
vlan_id 2
description 'chef-vlan2'
action :create
end
The following are the resource type, resource name, properties, and actions:
· netdev_vlan—Type of the resource.
· vlan2—Name of the resource. The name is the unique identifier of the resource.
· do/end—Indicates the beginning and end of a Ruby block that contains properties and actions. All Chef resources must be written by using the do/end syntax.
· vlan_id—Property for specifying a VLAN. In this example, VLAN 2 is specified.
· description—Property for configuring the description. In this example, the description for VLAN 2 is chef-vlan2.
· create—Action for creating or modifying a resource. If the resource does not exist, this action creates the resource. If the resource already exists, this action modifies the resource with the new settings. This action is the default action for Chef. If you do not specify an action for a resource, the create action is used.
· delete—Action for deleting a resource.
Chef supports only the create and delete actions.
For more information about resource types supported by Chef, see "Chef resources."
Chef configuration file
You can manually configure a Chef configuration file. A Chef configuration file contains the following items:
· Attributes for log messages generated by a Chef client.
· Directories for storing the key files on the Chef server and Chef client.
· Directory for storing the resource files on the Chef client.
After Chef starts up, the Chef client sends its key file specified in the Chef configuration file to the Chef server for authentication request. The Chef server compares its local key file for the client with the received key file. If the two files are consistent, the Chef client passes the authentication. The Chef client then downloads the resource file to the directory specified in the Chef configuration file, loads the settings in the resource file, and outputs log messages as specified.
Table 1 Chef configuration file description
|
Item |
Description |
|
(Optional.) log_level |
Severity level for log messages. Available values include :auto, :debug, :info, :warn, :error, and :fatal. The severity levels in ascending order are listed as follows: · :debug · :info · :warn (:auto) · :error · :fatal The default severity level is :auto, which is the same as :warn. |
|
log_location |
Log output mode: · STDOUT—Outputs standard Chef success log messages to a file. With this mode, you can specify the destination file for outputting standard Chef success log messages when you execute the third-part-process start command. The standard Chef error log messages are output to the configuration terminal. · STDERR—Outputs standard Chef error log messages to a file. With this mode, you can specify the destination file for outputting standard Chef error log messages when you execute the third-part-process start command. The standard Chef success log messages are output to the configuration terminal. · logfilepath—Outputs all log messages to a file, for example, flash:/cheflog/a.log. If you specify none of the options, all log messages are output to the configuration terminal. |
|
node_name |
Chef client name. A Chef client name is used to identify a Chef client. It is different from the device name configured by using the sysname command. |
|
chef_server_url |
URL of the Chef server and name of the organization created on the Chef server, in the format of https://localhost:port/organizations/ORG_NAME. The localhost argument represents the name or IP address of the Chef server. The port argument represents the port number of the Chef server. The ORG_NAME argument represents the name of the organization. |
|
validation_key |
Path and name of the local organization key file, in the format of flash:/chef/validator.pem. |
|
client_key |
Path and name of the local user key file, in the format of flash:/chef/client.pem. |
|
cookbook_path |
Path for the resource files, in the format of [ 'flash:/chef-repo/cookbooks' ]. |
Restrictions and guidelines: Chef configuration
The Chef server cannot run a lower version than Chef clients.
Prerequisites for Chef
Before configuring Chef on the device, complete the following tasks on the device:
· Enable NETCONF over SSH. The Chef server sends configuration information to Chef clients through NETCONF over SSH. For information about NETCONF over SSH, see "Configuring NETCONF."
· Configure SSH login. Chef clients communicate with the Chef server through SSH. For information about SSH login, see Fundamentals Configuration Guide.
Starting Chef
Configuring the Chef server
1. Create key files for the workstation and the Chef client.
2. Create a Chef configuration file for the Chef client.
For more information about configuring the Chef server, see the Chef server installation and configuration guides.
Configuring a workstation
1. Create the working path for the workstation.
2. Create the directory for storing the Chef configuration file for the workstation.
3. Create a Chef configuration file for the workstation.
4. Download the key file for the workstation from the Chef server to the directory specified in the workstation configuration file.
5. Create a Chef resource file.
6. Upload the resource file to the Chef server.
For more information about configuring a workstation, see the workstation installation and configuration guides.
Configuring a Chef client
1. Download the key file from the Chef server to a directory on the Chef client.
The directory must be the same as the directory specified in the Chef client configuration file.
2. Download the Chef configuration file from the Chef server to a directory on the Chef client.
The directory must be the same as the directory that will be specified by using the --config=filepath option in the third-part-process start command.
3. Start Chef on the device:
a. Enter system view.
system-view
b. Start Chef.
third-part-process start name chef-client arg --config=filepath --runlist recipe[Directory]
By default, Chef is shut down.
|
Parameter |
Description |
|
--config=filepath |
Specifies the path and name of the Chef configuration file. |
|
--runlist recipe[Directory] |
Specifies the name of the directory that contains files and subdirectories associated with the resource. |
For more information about the third-part-process start command, see "Monitoring and maintaining processes."
Shutting down Chef
Prerequisites
Before you shut down Chef, execute the display process all command to identify the ID of the Chef process. This command displays information about all processes on the device. Check the following fields:
· THIRD—This field displays Y for a third-party process.
· COMMAND—This field displays chef-client /opt/ruby/b for the Chef process.
· PID—Process ID.
Procedure
1. Enter system view.
system-view
2. Shut down Chef.
third-part-process stop pid pid-list
For more information about the third-part-process stop command, see "Monitoring and maintaining processes."
Chef configuration examples
Example: Configuring Chef
Network configuration
As shown in Figure 2, the device is connected to the Chef server. Use Chef to configure the device to create VLAN 3.

Procedure
1. Configure the Chef server:
# Create user key file admin.pem for the workstation. Specify the workstation username as Herbert George Wells, the Email address as [email protected], and the password as 123456.
$ chef-server-ctl user-create Herbert George Wells [email protected] 123456 –filename=/etc/chef/admin.pem
# Create organization key file admin_org.pem for the workstation. Specify the abbreviated organization name as ABC and the organization name as ABC Technologies Co., Limited. Associate the organization with the user Herbert.
$ chef-server-ctl org-create ABC_org "ABC Technologies Co., Limited" –association_user Herbert –filename =/etc/chef/admin_org.pem
# Create user key file client.pem for the Chef client. Specify the Chef client username as Herbert George Wells, the Email address as [email protected], and the password as 123456.
$ chef-server-ctl user-create Herbert George Wells [email protected] 123456 –filename=/etc/chef/client.pem
# Create organization key file validator.pem for the Chef client. Specify the abbreviated organization name as ABC and the organization name as ABC Technologies Co., Limited. Associate the organization with the user Herbert.
$ chef-server-ctl org-create ABC "ABC Technologies Co., Limited" –association_user Herbert –filename =/etc/chef/validator.pem
# Create Chef configuration file chefclient.rb for the Chef client.
log_level :info
log_location STDOUT
node_name 'Herbert'
chef_server_url 'https://1.1.1.2:443/organizations/abc'
validation_key 'flash:/chef/validator.pem'
client_key 'flash:/chef/client.pem'
cookbook_path [ 'flash:/chef-repo/cookbooks' ]
2. Configure the workstation:
# Create the chef-repo directory on the workstation. This directory will be used as the working path.
# Create the .chef directory. This directory will be used to store the Chef configuration file for the workstation.
$ mkdir –p /chef-repo/.chef
# Create Chef configuration file knife.rb in the /chef-repo/.chef0 directory.
log_level :info
log_location STDOUT
node_name 'admin'
client_key '/root/chef-repo/.chef/admin.pem'
validation_key '/root/chef-repo/.chef/admin_org.pem'
chef_server_url 'https://chef-server:443/organizations/abc'
# Use TFTP or FTP to download the key files for the workstation from the Chef server to the /chef-repo/.chef directory on the workstation. (Details not shown.)
# Create resource directory netdev.
$ knife cookbook create netdev
After the command is executed, the netdev directory is created in the current directory. The directory contains files and subdirectories for the resource. The recipes directory stores the resource file.
# Create resource file default.rb in the recipes directory.
netdev_vlan 'vlan3' do
vlan_id 3
action :create
end
# Upload the resource file to the Chef server.
$ knife cookbook upload –all
3. Configure the Chef client:
# Configure SSH login and enable NETCONF over SSH on the device. (Details not shown.)
# Use TFTP or FTP to download Chef configuration file chefclient.rb from the Chef server to the root directory of the Flash memory on the Chef client. Make sure this directory is the same as the directory specified by using the --config=filepath option in the third-part-process start command.
# Use TFTP or FTP to download key files validator.pem and client.pem from the Chef server to the flash:/chef/ directory.
# Start Chef. Specify the Chef configuration file name and path as flash:/chefclient.rb and the resource file name as netdev.
<ChefClient> system-view
[ChefClient] third-part-process start name chef-client arg --config=flash:/chefclient.rb --runlist recipe[netdev]
After the command is executed, the Chef client downloads the resource file from the Chef server and loads the settings in the resource file.
Chef resources
netdev_device
Use this resource to specify a device name for a Chef client, and specify the SSH username and password used by the client to connect to the Chef server.
Properties and action
Table 2 Properties and action for netdev_device
|
Property/Action name |
Description |
Value type and restrictions |
|
hostname |
Specifies the device name. |
String, case insensitive. Length: 1 to 64 characters. |
|
user |
Specifies the username for SSH login. |
String, case sensitive. Length: 1 to 55 characters. |
|
password |
Specifies the password for SSH login. |
String, case sensitive. Length and form requirements in non-FIPS mode: · 1 to 63 characters when in plaintext form. · 1 to 110 characters when in hashed form. · 1 to 117 characters when in encrypted form. |
|
action |
Specifies the action for the resource. |
Symbol: · create—Establishes a NETCONF connection to the Chef server. · delete—Closes the NETCONF connection to the Chef server. The default action is create. |
Resource example
# Configure the device name as ChefClient, and set the SSH username and password to user and 123456 for the Chef client.
netdev_device 'device' do
hostname "ChefClient"
user "user"
passwd "123456"
end
netdev_interface
Use this resource to configure attributes for an interface.
Properties
Table 3 Properties for netdev_interface
|
Property name |
Description |
Property type |
Value type and restrictions |
|
ifindex |
Specifies an interface by its index. |
Index |
Unsigned integer. |
|
description |
Configures the description for the interface. |
N/A |
String, case sensitive. Length: 1 to 255 characters. |
|
admin |
Specifies the management state for the interface. |
N/A |
Symbol: · up—Brings up the interface. · down—Shuts down the interface. |
|
speed |
Specifies the interface rate. |
N/A |
Symbol: · auto—Autonegotiation. · 10m—10 Mbps. · 100m—100 Mbps. · 1g—1 Gbps. · 10g—10 Gbps. · 40g—40 Gbps. · 100g—100 Gbps. |
|
duplex |
Sets the duplex mode. |
N/A |
Symbol: · full—Full-duplex mode. · half—Half-duplex mode. · auto—Autonegotiation. This attribute applies only to Ethernet interfaces. |
|
linktype |
Sets the link type for the interface. |
N/A |
Symbol: · access—Sets the link type of the interface to Access. · trunk—Sets the link type of the interface to Trunk. · hybrid—Sets the link type of the interface to Hybrid. This attribute applies only to Layer 2 Ethernet interfaces. |
|
portlayer |
Sets the operation mode for the interface. |
N/A |
Symbol: · bridge—Layer 2 mode. · route—Layer 3 mode. |
|
mtu |
Sets the MTU permitted by the interface. |
N/A |
Unsigned integer in bytes. The value range depends on the interface type. This attribute applies only to Layer 3 Ethernet interface. |
Resource example
# Configure the following attributes for Ethernet interface 2:
· Interface description—ifindex2.
· Management state—Up.
· Interface rate—Autonegotiation.
· Duplex mode—Autonegotiation.
· Link type—Hybrid.
· Operation mode—Layer 2.
· MTU—1500 bytes.
netdev_interface 'ifindex2' do
ifindex 2
description 'ifindex2'
admin 'up'
speed 'auto'
duplex 'auto'
linktype 'hybrid'
portlayer 'bridge'
mtu 1500
end
netdev_l2_interface
Use this resource to configure VLAN attributes for a Layer 2 Ethernet interface.
Properties
Table 4 Properties for netdev_l2_interface
|
Property name |
Description |
Property type |
Value type and restrictions |
|
ifindex |
Specifies a Layer 2 Ethernet interface by its index. |
Index |
Unsigned integer. |
|
pvid |
Specifies the PVID for the interface. |
N/A |
Unsigned integer. Value range: 1 to 4094. |
|
permit_vlan_list |
Specifies the VLANs permitted by the interface. |
N/A |
String, a comma separated list of VLAN IDs or VLAN ID ranges, for example, 1,2,3,5-8,10-20. Value range for each VLAN ID: 1 to 4094. The string cannot end with a comma (,), hyphen (-), or space. |
|
untagged_vlan_list |
Specifies the VLANs from which the interface sends packets after removing VLAN tags. |
N/A |
String, a comma separated list of VLAN IDs or VLAN ID ranges, for example, 1,2,3,5-8,10-20. Value range for each VLAN ID: 1 to 4094. The string cannot end with a comma (,), hyphen (-), or space. A VLAN cannot be on the untagged list and the tagged list at the same time. |
|
tagged_vlan_list |
Specifies the VLANs from which the interface sends packets without removing VLAN tags. |
N/A |
String, a comma separated list of VLAN IDs or VLAN ID ranges, for example, 1,2,3,5-8,10-20. Value range for each VLAN ID: 1 to 4094. The string cannot end with a comma (,), hyphen (-), or space. A VLAN cannot be on the untagged list and the tagged list at the same time. |
Resource example
# Specify the PVID as 2 for interface 5, and configure the interface to permit packets from VLANs 2 through 6. Configure the interface to forward packets from VLAN 3 after removing VLAN tags and forward packets from VLANs 2, 4, 5, and 6 without removing VLAN tags.
netdev_l2_interface 'ifindex5' do
ifindex 5
pvid 2
permit_vlan_list '2-6'
tagged_vlan_list '2,4-6'
untagged_vlan_list '3'
end
netdev_l2vpn
Use this resource to enable or disable L2VPN.
Properties
Table 5 Properties for netdev_l2vpn
|
Property name |
Description |
Value type and restrictions |
|
Enable |
Enables or disables L2VPN. |
Symbol: · true—Enables L2VPN. · false—Disables L2VPN. The default value is false. |
Resource example
# Enable L2VPN.
netdev_l2vpn 'l2vpn' do
enable true
end
netdev_lagg
Use this resource to create, modify, or delete an aggregation group.
Properties and action
Table 6 Properties and action for netdev_lagg
|
Property/Action name |
Description |
Property type |
Value type and restrictions |
|
group_id |
Specifies an aggregation group ID. |
Index |
Unsigned integer. The value range for a Layer 2 aggregation group is 1 to 1024. The value range for a Layer 3 aggregation group is 16385 to 17408. |
|
linkmode |
Specifies the aggregation mode. |
N/A |
Symbol: · static—Static. · dynamic—Dynamic. |
|
addports |
Specifies the indexes of the interfaces that you want to add to the aggregation group. |
N/A |
String, a comma separated list of interface indexes or interface index ranges, for example, 1,2,3,5-8,10-20. The string cannot end with a comma (,), hyphen (-), or space. An interface index cannot be on the list of adding interfaces and the list of removing interfaces at the same time. |
|
deleteports |
Specifies the indexes of the interfaces that you want to remove from the aggregation group. |
N/A |
String, a comma separated list of interface indexes or interface index ranges, for example, 1,2,3,5-8,10-20. The string cannot end with a comma (,), hyphen (-), or space. An interface index cannot be on the list of adding interfaces and the list of removing interfaces at the same time. |
|
action |
Specifies the action for the resource. |
N/A |
Symbol: · create—Creates or modifies an aggregation group. · delete—Deletes an aggregation group. The default action is create. |
Resource example
# Create aggregation group 16386 and set the aggregation mode to static. Add interfaces 1 through 3 to the group, and remove interface 8 from the group.
netdev_lag 'lagg16386' do
group_id 16386
linkmode 'static'
addports '1-3'
deleteports '8'
end
netdev_vlan
Use this resource to create, modify, or delete a VLAN, or configure the name and description for the VLAN.
Properties and action
Table 7 Properties and action for netdev_vlan
|
Property/Action name |
Description |
Property type |
Value type and restrictions |
|
vlan_id |
Specifies a VLAN ID. |
Index |
Unsigned integer. Value range: 1 to 4094. |
|
description |
Configures the description for the VLAN. |
N/A |
String, case sensitive. Length: 1 to 255 characters. |
|
vlan_name |
Configures the VLAN name. |
N/A |
String, case sensitive. Length: 1 to 32 characters. |
|
action |
Specifies the action for the resource. |
N/A |
Symbol: · create—Creates or modifies a VLAN. · delete—Deletes a VLAN. The default action is create. |
Resource example
# Create VLAN 2, configure the description as vlan2, and configure the VLAN name as vlan2.
netdev_vlan 'vlan2' do
vlan_id 2
description 'vlan2'
vlan_name ‘vlan2’
end
netdev_vsi
Use this resource to create, modify, or delete a Virtual Switch Instance (VSI).
Properties and action
Table 8 Properties and action for netdev_vsi
|
Property/Action name |
Description |
Property type |
Value type and restrictions |
|
vsiname |
Specifies a VSI name. |
Index |
String, case sensitive. Length: 1 to 31 characters. |
|
admin |
Enable or disable the VSI. |
N/A |
Symbol: · up—Enables the VSI. · down—Disables the VSI. The default value is up. |
|
action |
Specifies the action for the resource. |
N/A |
Symbol: · create—Creates or modifies a VSI. · delete—Deletes a VSI. The default action is create. |
Resource example
# Create the VSI vsia and enable the VSI.
netdev_vsi 'vsia' do
vsiname 'vsia'
admin 'up'
end
netdev_vte
Use this resource to create or delete a tunnel.
Properties and action
Table 9 Properties and action for netdev_vte
|
Property/Action name |
Description |
Property type |
Value type and restrictions |
|
vte_id |
Specifies a tunnel ID. |
Index |
Unsigned integer. |
|
mode |
Sets the tunnel mode. |
N/A |
Unsigned integer: · 1—IPv4 GRE tunnel mode. · 2—IPv6 GRE tunnel mode. · 3—IPv4 over IPv4 tunnel mode. · 4—Manual IPv6 over IPv4 tunnel mode. · 8—IPv6 over IPv6 or IPv4 tunnel mode. · 16—IPv4 IPsec tunnel mode. · 17—IPv6 IPsec tunnel mode. · 24—UDP-encapsulated IPv4 VXLAN tunnel mode. · 25—UDP-encapsulated IPv6 VXLAN tunnel mode. You must specify the tunnel mode when creating a tunnel. After the tunnel is created, you cannot change the tunnel mode. |
|
action |
Specifies the action for the resource. |
N/A |
Symbol: · create—Creates a tunnel. · delete—Deletes a tunnel. The default action is create. |
Resource example
# Create UDP-encapsulated IPv4 VXLAN tunnel 2.
netdev_vte 'vte2' do
vte_id 2
mode 24
end
netdev_vxlan
Use this resource to create, modify, or delete a VXLAN.
Properties and action
Table 10 Properties and action for netdev_vxlan
|
Property/Action name |
Description |
Property type |
Value type and restrictions |
|
vxlan_id |
Specifies a VXLAN ID. |
Index |
Unsigned integer. Value range: 1 to 16777215. |
|
vsiname |
Specifies the VSI name. |
N/A |
String, case sensitive. Length: 1 to 31 characters. You must specify the VSI name when creating a VSI. After the VSI is created, you cannot change its name. |
|
add_tunnels |
Specifies the tunnel interfaces to be associated with the VXLAN. |
N/A |
String, a comma separated list of tunnel interface IDs or tunnel interface ID ranges, for example, 1,2,3,5-8,10-20. The string cannot end with a comma (,), hyphen (-), or space. A tunnel interface ID cannot be on the list of adding interfaces and the list of removing interfaces at the same time. |
|
delete_tunnels |
Removes the association between the specified tunnel interfaces and the VXLAN. |
N/A |
String, a comma separated list of tunnel interface IDs or tunnel interface ID ranges, for example, 1,2,3,5-8,10-20. The string cannot end with a comma (,), hyphen (-), or space. A tunnel interface ID cannot be on the list of adding interfaces and the list of removing interfaces at the same time. |
|
action |
Specifies the action for the resource. |
N/A |
Symbol: · create—Creates or modifies a VXLAN. · delete—Deletes a VXLAN. The default action is create. |
Resource example
# Create VXLAN 10, configure the VSI name as vsia, add tunnel interfaces 2 and 4 to the VXLAN, and remove tunnel interfaces 1 and 3 from the VXLAN.
netdev_vxlan 'vxlan10' do
vxlan_id 10
visname 'vsia'
add_tunnels '2,4'
delete_tunnels '1,3'
end
