- Table of Contents
-
- H3C Comware 7 Security Products Safety & Configuration Cautions and Guidelines-6W100
- 00-Preface
- 01-Hardware Safety Guidelines
- 02-CLI-based configuration cautions and guidelines
- 03-Web-Based Configuration Cautions and Guidelines
- 04-Web-Based Configuration Cautions and Guidelines
- 05-Web-Based Configuration Cautions and Guidelines
- 06-Web-Based Configuration Cautions and Guidelines
- Related Documents
-
| Title | Size | Download |
|---|---|---|
| 04-Web-Based Configuration Cautions and Guidelines | 285.28 KB |
Submitting configuration changes
Shutting down an SSL VPN AC interface
Removing the device management interface from the Management security zone
Restoring the factory defaults
Moving a security engine from the default security engine group to a non-default group
Updating the signature library
Converting the device operating mode
Changing the member ID of an IRF member device
Binding a physical interface to an IRF port
Locking a user account permanently after it consecutively fails the maximum number of login attempts
Introduction
This guide contains important information that if not understood or followed can result in undesirable situations, including:
· Unexpected shutdown or reboot of devices or cards.
· Service anomalies or interruption.
· Loss of data, configuration, or important files.
· User login failure or unexpected logoff.
Only trained and qualified personnel are allowed to do the configuration tasks described in this guide.
Before you configure your device, read the information in this document carefully.
This document applies only to H3C SecPath M9000 and T9000 firewalls. The webpages might be slightly different depending on the software or hardware version of the firewalls.
Objects
APP security
Enabling the bypass feature
Impact
After the bypass feature is enabled, the system does not perform DPI on received packets. This might cause disruptions of DPI-based services. For example, security policies cannot take effect to control access.
Procedure
1. On the top navigation bar, click Objects.
2. From the navigation pane, select App Security > Advanced Settings.
3. In the Bypass area, select Enable.

Activating configuration
Impact
This operation might cause disruptions of the DPI service and other DPI-based services. For example, security policies cannot take effect to control access.
Procedure
1. On the top navigation bar, click Objects.
2. From the navigation pane, select App Security > Advanced Settings.
3. In the Activate area, click Activate.

Submitting configuration changes
Impact
This operation might cause disruptions of the DPI service and other DPI-based services. For example, security policies cannot take effect to control access.
Procedure
1. On the top navigation bar, click Objects.
2. From the navigation pane, select App Security > IPS > Profiles.
3. Click Submit to submit the configuration changes of the IPS profiles.

4. Use the same procedure to submit the configuration changes of the profiles for other DPI services, such as anti-virus.
Network
SSL VPN
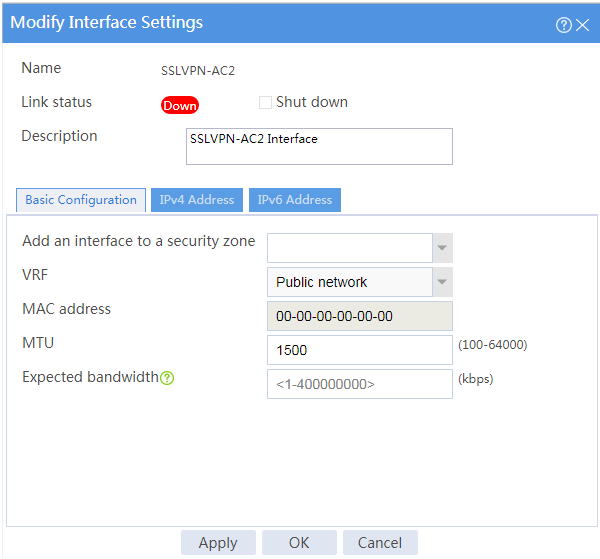
Shutting down an SSL VPN AC interface
Impact
Shutting down an SSL VPN AC interface might cause disruption of the SSL VPN IP access service.
Procedure
1. On the top navigation bar, click Network.
2. From the navigation pane, select SSL VPN > SSL VPN AC Interfaces.
3. Click the Edit icon for an SSL VPN AC interface.
4. Select Shut down in the Link status field.
Security zones
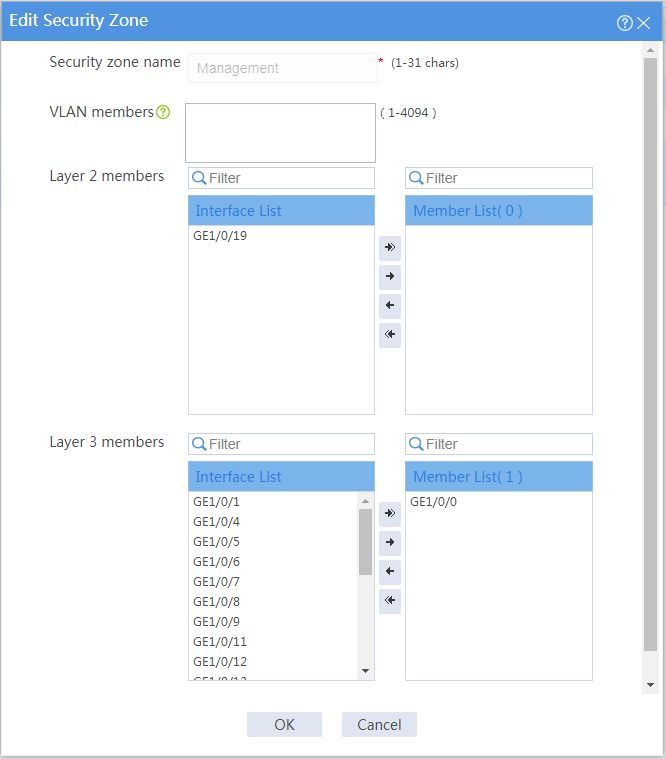
Removing the device management interface from the Management security zone
Impact
The device management interface belongs to the Management security zone by default. You can log in to the Web interface of the device from the management interface. If you remove the management interface from the Management security zone, you cannot manage the device remotely from the Web interface.
Procedure
1. On the top navigation bar, click Network.
2. From the navigation pane, select Security Zones.
3. Click the Edit icon for the Management security zone.
4. Select the device management interface from the member list, and then click the Remove icon to remove the interface to the interface list.
5. Click OK.
System
Configuration management
Restoring the factory defaults
Impact
This operation deletes next-startup configuration files from the device and restores the device configuration to the factory defaults. If you restore the factory defaults, all user-configured settings will be deleted from the device.
Procedure
1. On the top navigation bar, click System.
2. From the left navigation pane, select Maintenance > Configuration Management.
3. Click Restore factory defaults. In the dialog box that opens, click OK.
![]()
Contexts
Stopping a context
Impact
Stopping a context interrupts all services running on that context and automatically logs off all users from that context.
Procedure
1. On the top navigation bar, click System.
2. From the left navigation pane, select Virtualization > Contexts > Contexts.
3. On the page that opens, select a context and click Stop.

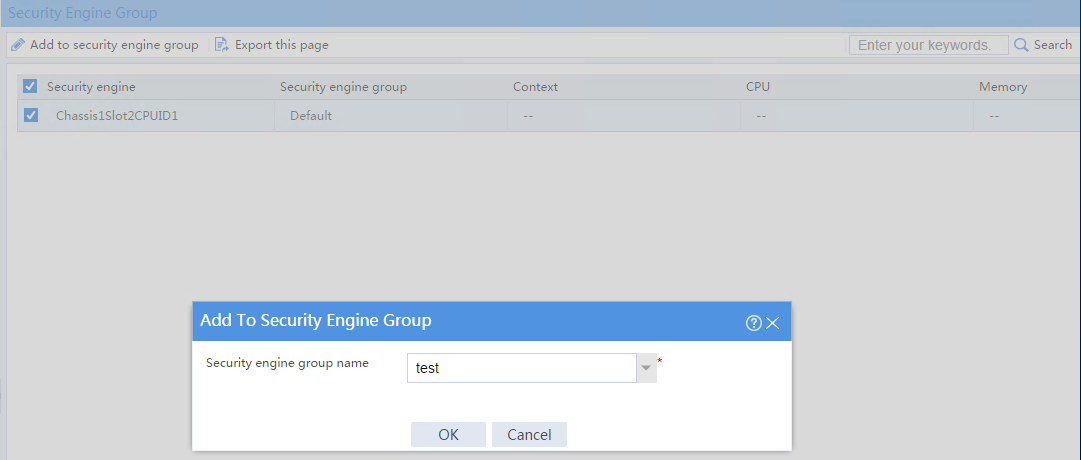
Moving a security engine from the default security engine group to a non-default group
Impact
The default security engine group must have a minimum of one security engine for the device to process services correctly.
To prevent service anomalies, make sure the default security engine group still contains a minimum of one security engine after you move an engine from it to a non-default security engine group.
Procedure
1. On the top navigation bar, click System.
2. From the left navigation pane, select Virtualization > Contexts > Security Engine Group.
3. Select the only security engine in the default security engine group and click Add to security engine group.
4. In the dialog box that opens, add the security engine to a non-default security engine group.
Upgrade center
Updating the signature library
Impact
This operation will temporarily interrupt DPI services and DPI-based services. For example, a security policy for DPI will be unable to provide application-based access control while the signature library is being updated. As a best practice, schedule the update for off-peak hours.
Procedure
1. On the top navigation bar, click System.
2. From the left navigation pane, select Upgrade Center > Signature Upgrade.
3. On the page that opens, select an update operation in the Actions column for a signature library.

Upgrading the software
Impact
This operation will interrupt services during the upgrade.
Procedure
1. On the top navigation bar, click System.
2. From the left navigation pane, select Upgrade Center > Software Upgrade.
3. On the page that opens, click Upgrade immediately.
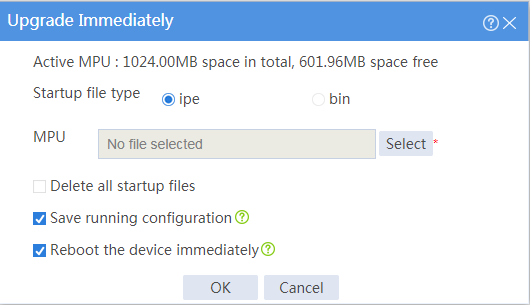
4. Select a .ipe file, select Reboot the device immediately, and click OK.
IRF
Converting the device operating mode
Impact
When you convert the operating mode of the device between IRF and standalone, the device automatically reboots, causing service interruption. When you perform this task, make sure you fully aware of its impact on services.
Procedure
1. On the top navigation bar, click System.
2. From the left navigation pane, select Virtualization > IRF.
3. Click the Settings icon for an IRF member device.
4. Select or clear Enable for the IRF mode field on the following page:

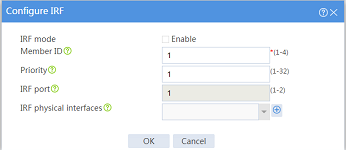
Changing the member ID of an IRF member device
Impact
On an IRF fabric, an IRF member ID change can invalidate member ID-related settings and cause data loss.
The new member ID takes effect at reboot. After the device reboots, the settings on all member ID-related physical resources (including common physical network interfaces) are removed, regardless of whether you have saved the configuration.
Procedure
1. On the top navigation bar, click System.
2. From the left navigation pane, select Virtualization > IRF.
3. Click the Settings icon for an IRF member device.
4. Change the member ID of the IRF member device on the following page:

Binding a physical interface to an IRF port
Impact
This operation causes service interruption on the physical interface.
Procedure
1. On the top navigation bar, click System.
2. From the left navigation pane, select Virtualization > IRF.
3. Click the Settings icon for an IRF port.
4. Bind a physical interface to the IRF port on the following page:
Password control
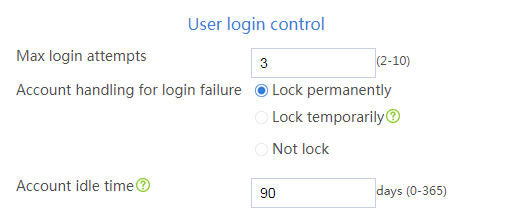
Locking a user account permanently after it consecutively fails the maximum number of login attempts
Impact
With password control enabled, this operation prevents a user from using its IP address to access the device after it consecutively fails the maximum number of login attempts.
Procedure
1. On the top navigation bar, click System.
2. From the left navigation pane, select Administrators > Administrators.
3. Click Password control.
4. Select Enable password control.
5. In the User login control area, select Lock permanently for the Account handling for login failure field on the following page:
Reboot
Rebooting the device
Impact
This operation might cause service interruption.
Procedure
1. From the navigation pane, select System > Maintenance > Reboot.
2. Reboot the device on the following page:

