- Table of Contents
-
- 02-WLAN Configuration Guide
- 00-Preface
- 01-WLAN Interface Configuration
- 02-WLAN Access Configuration
- 03-WLAN Security Configuration
- 04-IACTP Tunnel and WLAN Roaming Configuration
- 05-WLAN RRM Configuration
- 06-WLAN IDS Configuration
- 07-WLAN QoS Configuration
- 08-WLAN Mesh Link Configuration
- 09-Advanced WLAN Configuration
- 10-WLAN High Availability Configuration
- 11-WLAN IPS Configuration
- 12-WLAN Optimization Configuration
- Related Documents
-
| Title | Size | Download |
|---|---|---|
| 04-IACTP Tunnel and WLAN Roaming Configuration | 291.86 KB |
Configuring IACTP tunnel and WLAN roaming
Isolating tunnels in a mobility group
Displaying and maintaining WLAN roaming
WLAN roaming configuration examples
Intra-AC roaming configuration example
Inter-AC roaming configuration example
Configuring IACTP tunnel and WLAN roaming
Support for this feature depends on the device model. For more information, see About the H3C Access Controllers Configuration Guides.
For a client to remain in the same VLAN during WLAN roaming, enable MAC VLAN.
IACTP tunnel
The Inter AC Tunneling Protocol (IACTP) is an H3C-proprietary protocol that provides a generic packet encapsulation and transport mechanism for ACs to securely communicate with each other.
IACTP provides a control tunnel to exchange control messages, and a data tunnel to transmit data packets between ACs. IACTP supports both IPv4 and IPv6.
WLAN roaming, AC backup, and AC-BAS collaboration must support IACTP for inter-AC communication.
WLAN roaming overview
WLAN roaming enables clients to roam between ACs in a mobility group or within an AC. ACs in a mobility group communicate with each other through IACTP tunnels.
When a client supporting fast roaming associates to one of the ACs in a mobility group for the first time, the AC (called the HA) performs 802.1X authentication and 11 Key exchange for the client. The client information is synchronized across ACs in the mobility group. When this client roams to another AC in the mobility group (called the FA), the FA uses stored client information to fast authenticate the client by skipping 802.1X authentication and performing only 802.11 key exchange and associates with the client.
Terminology
· HA—The AC to which a wireless client is connected by associating with an AP for the first time is the HA of the client.
· FA—An AC that is other than the HA and to which a client is currently connected is an FA of the client.
· Fast-roam client—A wireless client that associates with an AC in the mobility-group and supports fast roaming (only key caching is supported).
· Roam-out client—A wireless client that has associated with an AC other than the HA in the mobility-group is a roam-out client at its HA.
· Roam-in client—A wireless client that has associated with an AC other than the HA in the mobility-group is a roam-in client at the FA.
· Intra-AC roaming—A procedure where a wireless client roams from one AP to another AP. The APs are connected to the same AC.
· Inter-AC roaming—A procedure where a wireless client roams from one AP to another AP. The APs are connected to different ACs.
· Inter-AC fast roaming capability—If a client uses 802.1X (RSN) authentication through negotiation and supports key caching, this client has inter-AC fast roaming capability.
WLAN roaming topologies
WLAN roaming topologies contain the following types:
· Intra-AC roaming topology
· Inter-AC roaming topology
· Intra-FA roaming topology
· Inter-FA roaming topology
· Roam-back topology
Intra-AC roaming
Figure 1 Intra-AC roaming
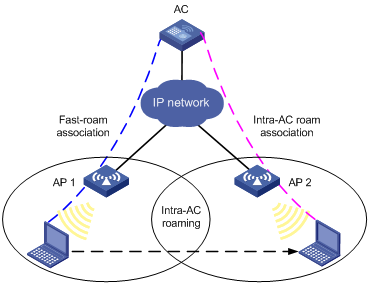
1. A client is associated with AP 1, which is connected to an AC.
2. The client disassociates with AP 1 and roams to AP 2 connected to the same AC.
3. The client is associated with AP 2 through intra-AC roam association.
Inter-AC roaming
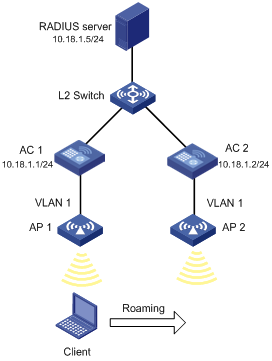
Figure 2 Inter-AC roaming

1. A client is associated with AP 1, which is connected to AC 1.
2. The client disassociates with AP 1 and roams to AP 2 connected to AC 2.
3. The client is associated with AP 2 through inter-AC roam association. Before inter-AC roaming, AC 1 must synchronize the client information with AC 2 through an IACTP tunnel.
Intra-FA roaming
Figure 3 Intra-FA roaming
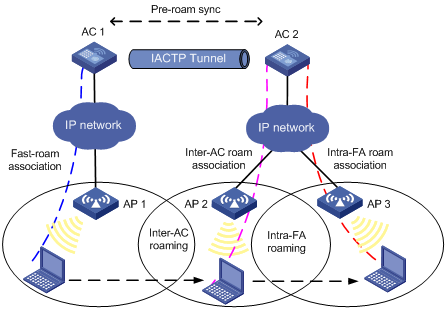
1. A client associates with AP 1.
2. The client disassociates with AP 1 and roams to AP 2 connected to AC 2. Now AC 2 is the FA for the client.
3. The client is associated with AP 2 through inter-AC roam association. Before inter-AC roaming, AC 1 must synchronize the client information with AC 2 through an IACTP tunnel.
4. The client then disassociates with AP 2 and roams to AP 3 which is also connected to AC 2. The client is associated with AP 3 through intra-FA roam association.
Inter-FA roaming
Figure 4 Inter-FA roaming
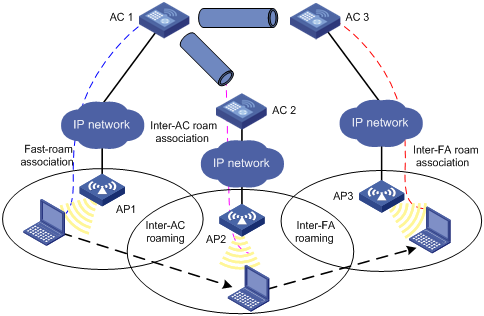
1. A client is associated with AP 1, which is connected to AC 1.
2. The client disassociates with AP 1 and roams to AP 2 connected to AC 2. Now AC 2 is the FA for the client.
3. The client is associated with AP 2 through inter-AC roam association.
4. The client then disassociates with AP 2 and roams to AP 3 which is connected to AC 3, which now is its FA. Before inter-AC roaming, AC 1 must synchronize the client information with AC 2 and AC 3 through IACTP tunnels.
Roam-back
Figure 5 Roam-back

1. A client is associated with AP 1, which is connected to AC 1.
2. The client disassociates with AP 1 and roams to AP 3 connected to AC 2. Now AC 2 is the FA for the client.
3. The client is associated with AP 3 through inter-AC roam association. Before inter-AC roaming, AC 1 must synchronize the client information with AC 2 through an IACTP tunnel.
4. The client then disassociates with AP 3 and roams back to AP 2 or AP 1 connected to AC 1, which is its HA.
Configuring a mobility group
|
Step |
Command |
Remarks |
|
1. Enter system view. |
system-view |
N/A |
|
2. Create a mobility group and enter mobility group view. |
wlan mobility-group name |
ACs in the same mobility group must have the same group name. |
|
3. Set the IACTP tunnel protocol type. |
mobility-tunnel { iactp | iactp6 } |
Optional. By default, the IACTP tunnel protocol type is IPv4. |
|
4. Set the tunnel source IP address. |
source { ip ipv4-address | ipv6 ipv6-address } |
By default, no source IP address is configured. |
|
5. Add a group member. |
member { ip ipv4-address | ipv6 ipv6-address } [ vlan vlan-id-list ] |
By default, no ACs exist in a mobility group. |
|
6. Configure the IACTP control message integrity authentication mode. |
authentication-mode authentication-method [ cipher | simple ] authentication-key |
Optional. By default, IACTP control message integrity authentication is disabled. |
|
7. Enable the IACTP service for the group. |
mobility-group enable |
By default, IACTP service is disabled. |
ACs in a mobility group must have the same user profile configurations. For more information about user profile, see Security Configuration Guide.
Isolating tunnels in a mobility group
This feature ensures that tunnels in a mobility group do not forward packets to each other.
To isolate tunnels in a mobility group:
|
Step |
Command |
Remarks |
|
1. Enter system view. |
system-view |
N/A |
|
2. Isolate tunnels in a mobility group. |
wlan mobility-group-isolation enable |
By default, tunnel isolation in a mobility group is enabled. |
Enabling WLAN roaming
To enable clients to roam between ACs, configure a mobility group and then enable WLAN roaming on the ACs.
To enable WLAN roaming:
|
Step |
Command |
Remarks |
|
1. Enter system view. |
system-view |
N/A |
|
2. Enter mobility group view. |
wlan mobility-group name |
N/A |
|
3. Enable WLAN roaming. |
roam enable |
Optional. By default, WLAN roaming is enabled. Before you enable or disable WLAN roaming, make sure mobility group is disabled. |
Displaying and maintaining WLAN roaming
|
Task |
Command |
Remarks |
|
Display mobility group information. |
display wlan mobility-group [ member { ip IPv4-address | ipv6 IPv6-address } ] [ | { begin | exclude | include } regular-expression ] |
Available in any view. |
|
Display the roam-track information of a client on the HA. |
display wlan client roam-track mac-address mac-address [ | { begin | exclude | include } regular-expression ] |
Available in any view. |
|
Display the WLAN client roaming information. |
display wlan client { roam-in | roam-out } [ member { ip IPv4-address | ipv6 IPv6-address } ] [ verbose ] [ | { begin | exclude | include } regular-expression ] |
Available in any view. |
WLAN roaming configuration examples
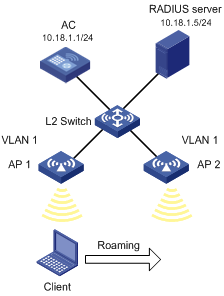
Intra-AC roaming configuration example
Network requirements
As shown in Figure 6, an AC has two APs associated and all of them are in VLAN 1. A client is associated with AP 1. Configure intra-AC roaming so that the client can associate with AP 2 when roaming to AP 2.
Configuration procedure
For wireless service configuration, see "Configuring WLAN access." A client has inter-AC fast roaming capability only if it uses 802.1X (RSN) authentication.
If you select an authentication mode involving remote authentication, configure the corresponding RADIUS server. For more information, see "Configuring WLAN security."
1. Configure the AC:
# Set the port security mode for WLAN-ESS1 to userlogin-secure-ext, and enable the key negotiation function on the port.
<AC> system-view
[AC] interface wlan-ess 1
[AC-WLAN-ESS1] port-security port-mode userlogin-secure-ext
[AC-WLAN-ESS1] port-security tx-key-type 11key
# Disable the multicast trigger function and the online user handshake function.
[AC-WLAN-ESS1] undo dot1x multicast-trigger
[AC-WLAN-ESS1] undo dot1x handshake
[AC-WLAN-ESS1] quit
# Create service template 1 of crypto type, set its SSID to intra-roam, and bind WLAN-ESS1 to the service template.
[AC] wlan service-template 1 crypto
[AC-wlan-st-1] ssid intra-roam
[AC-wlan-st-1] bind wlan-ess 1
# Enable open system authentication and enable the CCMP cipher suite.
[AC-wlan-st-1] authentication-method open-system
[AC-wlan-st-1] cipher-suite ccmp
[AC-wlan-st-1] security-ie rsn
[AC-wlan-st-1] quit
# Enable port security.
[AC] port-security enable
# Set the 802.1X authentication method to EAP.
[AC] dot1x authentication-method eap
# Create a RADIUS scheme rad, and set the extended RADIUS server type.
[AC] radius scheme rad
[AC-radius-rad] server-type extended
# Set the IP addresses of the primary authentication server and accounting server to 10.18.1.5.
[AC-radius-rad] primary authentication 10.18.1.5
[AC-radius-rad] primary accounting 10.18.1.5
# Set the shared key for RADIUS authentication/accounting packets to 12345678.
[AC-radius-rad] key authentication 12345678
[AC-radius-rad] key accounting 12345678
# Set the source IP address of RADIUS packets sent by the AC to 10.18.1.1.
[AC-radius-rad] nas-ip 10.18.1.1
[AC-radius-rad] quit
# Create ISP domain cams and configure the ISP domain cams to use RADIUS scheme rad to implement authentication, authorization, and accounting for all types of users.
[AC] domain cams
[AC-isp-cams] authentication default radius-scheme rad
[AC-isp-cams] authorization default radius-scheme rad
[AC-isp-cams] accounting default radius-scheme rad
[AC-isp-cams] quit
# Configure the mandatory authentication domain cams for 802.1X users on WLAN-ESS1.
[AC] interface WLAN-ESS 1
[AC-WLAN-ESS1] dot1x mandatory-domain cams
[AC-WLAN-ESS1] quit
# Create an AP template named ap1, and specify the AP model and serial ID.
[AC] wlan ap ap1 model WA3628i-AGN
[AC-wlan-ap-ap1] serial-id 210235A045B05B1236548
[AC-wlan-ap-ap1] radio 1 type dot11an
# Bind service template 1 to radio 1.
[AC-wlan-ap-ap1-radio-1] service-template 1
[AC-wlan-ap-ap1-radio-1] radio enable
[AC-wlan-ap-ap1-radio-1] quit
[AC-wlan-ap-ap1] quit
# Enable service template 1.
[AC] wlan service-template 1
[AC-wlan-st-1] service-template enable
[AC-wlan-st-1] quit
# Create an AP template named ap2, and specify the AP model and serial ID.
[AC] wlan ap ap2 model WA3628i-AGN
[AC-wlan-ap-ap2] serial-id 210235A22W0076000103
[AC-wlan-ap-ap2] radio 1 type dot11an
# Bind service template 1 to radio 1 of AP 2. Intra-AC roaming requires consistent SSIDs of different APs. Therefore, radio 1 of AP 2 must be bound to service template 1.
[AC-wlan-ap-ap2-radio-1] service-template 1
[AC-wlan-ap-ap2-radio-1] radio enable
[AC-wlan-ap-ap2-radio-1] return
2. Verify the configuration:
After the client roams to AP 2, use the display wlan client verbose command to display detailed client information. You should find that the AP name and BSSID fields have been changed to those of AP 2. You can also use the display wlan client roam-track mac-address command to view client roaming track information.
Inter-AC roaming configuration example
Network requirements
As shown in Figure 7, configure inter-AC roaming so that the client can associate with AP2 when roaming to it.
Configuration procedure
For wireless service configuration, see "Configuring WLAN access." A client has inter-AC fast roaming capability only if it uses 802.1X (RSN) authentication through negotiation.
If you select an authentication mode involving remote authentication, configure the corresponding RADIUS server. For more information, see "Configuring WLAN security."
1. Configure AC 1:
# Set the port security mode for WLAN-ESS1 to userlogin-secure-ext, and enable the key negotiation function on the port.
<AC1> system-view
[AC1] interface wlan-ess 1
[AC1-WLAN-ESS1] port-security port-mode userlogin-secure-ext
[AC1-WLAN-ESS1] port-security tx-key-type 11key
# Disable the multicast trigger function and the online user handshake function.
[AC1-WLAN-ESS1] undo dot1x multicast-trigger
[AC1-WLAN-ESS1] undo dot1x handshake
[AC1-WLAN-ESS1] quit
# Create service template 1 of crypto type, set its SSID to inter-roam, and bind WLAN-ESS1 to inter-roam.
[AC1] wlan service-template 1 crypto
[AC1-wlan-st-1] ssid inter-roam
[AC1-wlan-st-1] bind wlan-ess 1
# Enable open system authentication and enable the CCMP cipher suite.
[AC1-wlan-st-1] authentication-method open-system
[AC1-wlan-st-1] cipher-suite ccmp
[AC1-wlan-st-1] security-ie rsn
[AC1-wlan-st-1] quit
# Enable port security.
[AC1] port-security enable
# Set the 802.1X authentication method to EAP.
[AC1] dot1x authentication-method eap
# Create a RADIUS scheme rad, and set the extended RADIUS server type.
[AC1] radius scheme rad
[AC1-radius-rad] server-type extended
# Set the IP addresses of the primary authentication server and accounting server to 10.18.1.5.
[AC1-radius-rad] primary authentication 10.18.1.5
[AC1-radius-rad] primary accounting 10.18.1.5
# Set the shared key for RADIUS authentication/accounting packets to 12345678.
[AC1-radius-rad] key authentication 12345678
[AC1-radius-rad] key accounting 12345678
# Set the source IP address of RADIUS packets sent by the AC to 10.18.1.1.
[AC1-radius-rad] nas-ip 10.18.1.1
[AC1-radius-rad] quit
# Configure ISP domain cams to use RADIUS scheme rad to implement authentication, authorization, and accounting for all types of users.
[AC1] domain cams
[AC1-isp-cams] authentication default radius-scheme rad
[AC1-isp-cams] authorization default radius-scheme rad
[AC1-isp-cams] accounting default radius-scheme rad
[AC1-isp-cams] quit
# Configure the mandatory authentication domain cams for 802.1X users on WLAN-ESS1.
[AC1] interface WLAN-ESS 1
[AC1-WLAN-ESS1] dot1x mandatory-domain cams
[AC1-WLAN-ESS1] quit
# Create an AP template named ap1, and specify the AP model and serial ID.
[AC1] wlan ap ap1 model WA3628i-AGN
[AC1-wlan-ap-ap1] serial-id 210235A045B05B1236548
[AC1-wlan-ap-ap1] radio 1 type dot11an
# Bind service template inter-roam to radio 1.
[AC1-wlan-ap-ap1-radio-1] service-template 1
[AC1-wlan-ap-ap1-radio-1] radio enable
[AC1-wlan-ap-ap1-radio-1] quit
[AC1-wlan-ap-ap1] quit
# Enable service template 1.
[AC1] wlan service-template 1
[AC1-wlan-st-1] service-template enable
[AC1-wlan-st-1] quit
# Create mobility group roam, set the tunnel source IP to 10.18.1.1, and set the IP address for AC 2 to 10.18.1.2.
[AC1] wlan mobility-group roam
[AC1-wlan-mg-roam] source ip 10.18.1.1
[AC1-wlan-mg-roam] member ip 10.18.1.2
[AC1-wlan-mg-roam] mobility-group enable
# Enable WLAN roaming (by default, WLAN roaming is enabled, so this step is optional.).
[AC1-wlan-mg-roam] roam enable
# Enable mobility group.
[AC1-wlan-mg-roam] mobility-group enable
2. Configure AC 2:
# Set the port security mode for WLAN-ESS1 to userlogin-secure-ext, and enable the key negotiation function on the port.
<AC2> system-view
[AC2] interface wlan-ess 1
[AC2-WLAN-ESS1] port-security port-mode userlogin-secure-ext
[AC2-WLAN-ESS1] port-security tx-key-type 11key
# Disable the multicast trigger function and the online user handshake function.
[AC2-WLAN-ESS1] undo dot1x multicast-trigger
[AC2-WLAN-ESS1] undo dot1x handshake
[AC2-WLAN-ESS1] quit
# Create service template 1 of crypto type, set its SSID to inter-roam, and bind WLAN-ESS1 to intra-roam.
[AC2] wlan service-template 1 crypto
[AC2-wlan-st-1] ssid inter-roam
[AC2-wlan-st-1] bind wlan-ess 1
# Enable open system authentication and enable the CCMP cipher suite.
[AC2-wlan-st-1] authentication-method open-system
[AC2-wlan-st-1] cipher-suite ccmp
[AC2-wlan-st-1] security-ie rsn
[AC2-wlan-st-1] quit
# Enable port security.
[AC2] port-security enable
# Set the 802.1X authentication method to EAP.
[AC2] dot1x authentication-method eap
# Create a RADIUS scheme rad, and set the extended RADIUS server type.
[AC2] radius scheme rad
[AC2-radius-rad] server-type extended
# Set the IP addresses of the primary authentication server and accounting server to 10.18.1.88.
[AC2-radius-rad] primary authentication 10.18.1.5
[AC2-radius-rad] primary accounting 10.18.1.5
# Set the shared key for RADIUS authentication/accounting packets to 12345678.
[AC2-radius-rad] key authentication 12345678
[AC2-radius-rad] key accounting 12345678
# Set the source IP address for the AC to send RADIUS packets to 10.18.1.2.
[AC2-radius-rad] nas-ip 10.18.1.2
[AC2-radius-rad] quit
# Configure AAA domain cams by referencing RADIUS scheme rad.
[AC2] domain cams
[AC2-isp-cams] authentication default radius-scheme rad
[AC2-isp-cams] authorization default radius-scheme rad
[AC2-isp-cams] accounting default radius-scheme rad
[AC2-isp-cams] quit
# Configure the 802.1X authentication domain by referencing AAA domain cams.
[AC2] interface WLAN-ESS 1
[AC2-WLAN-ESS1] dot1x mandatory-domain cams
[AC2-WLAN-ESS1] quit
# Create an AP template named ap2, and specify the AP model and serial ID.
[AC2] wlan ap ap2 model WA3628i-AGN
[AC2-wlan-ap-ap2] serial-id 210235A22W0076000103
[AC2-wlan-ap-ap2] radio 1 type dot11an
# Bind service template inter-roam to radio 1 of AP 2. (Inter-AC roaming requires consistent SSIDs of APs. Therefore, radio 1 of AP 2 must be bound to service template inter-roam.)
[AC2-wlan-ap-ap2-radio-1] service-template 1
[AC2-wlan-ap-ap2-radio-1] radio enable
[AC2-wlan-ap-ap2-radio-1] quit
[AC2-wlan-ap-ap2] quit
# Enable service template 1.
[AC2] wlan service-template 1
[AC2-wlan-st-1] service-template enable
[AC2-wlan-st-1] quit
# Create mobility group roam, set the tunnel source IP to 10.18.1.2, and set the IP address for AC 2 to 10.18.1.1.
[AC2] wlan mobility-group roam
[AC2-wlan-mg-roam] source ip 10.18.1.2
[AC2-wlan-mg-roam] member ip 10.18.1.1
[AC2-wlan-mg-roam] mobility-group enable
# Enable WLAN roaming (by default, WLAN roaming is enabled, so this step is optional.).
[AC2-wlan-mg-roam] roam enable
# Enable mobility group.
[AC2-wlan-mg-roam] mobility-group enable
3. Verify the configuration:
You can use the display wlan client roam-out command on AC 1 to display roamed out client information, and use the display wlan client roam-in command on AC 2 to display roamed in client information. You can also use the display wlan client roam-track mac-address command to view client roaming track information on AC 1.