- Table of Contents
-
- H3C WX3024E Wireless Switch Installation Guide-6W106
- 00-Preface
- 01-Text
- 02-Appendix A Technical Specifications
- 03-Appendix B Transceiver Module Specifications
- 04-Appendix C Installing a Lightning Arrester for a Network Interface
- 05-Appendix D Installing a Lightning Arrester for AC Power
- 06-Appendix E Maintaining Software
- Related Documents
-
| Title | Size | Download |
|---|---|---|
| 06-Appendix E Maintaining Software | 542.25 KB |
Appendix E Maintaining software
Approaches for software maintenance
Upgrading a system software image file through the web interface
Setting up a web configuration environment
Upgrading the software through a serial connection by using XMODEM
Modifying serial communication parameters
Upgrading a system software image file through a serial connection
Upgrading a system software image file through an Ethernet port by using TFTP
Upgrading a system software image file by using TFTP through the BootWare menu
Upgrading and backing up a system software image file by using TFTP at the CLI
Upgrading a system software image file through an Ethernet port by using FTP
Upgrading a system software image file by using FTP through the BootWare menu
Upgrading and backing up a system software image file by using FTP at the CLI
Maintaining the system software image files and configuration files
Setting the system software image file type
Backing up and restoring BootWare
Backing up and restoring BootWare through the BootWare menu
Backing up and restoring BootWare at the CLI
Files managed by the switch
The WX3024E consists of two virtual systems: access control engine and switching engine, for which two independent file systems are employed to manage the following types of files:
· BootWare image file
· System software image files
· Configuration files
The access control engine manages the system software image files and both the access control engine and switching engine store and manage their respective BootWare image file and configuration files.
BootWare image file
The BootWare image file is used to boot applications during the startup of the switch. A complete BootWare image file includes a basic section and an extended section.
· The basic BootWare section is used to complete the primary initialization of the system.
· With rich human-computer interaction (HCI) functions, the extended BootWare section is used for initializing the interfaces and upgrading the system software image files and the boot system.
· A complete BootWare image is the combination of the basic and extended BootWare sections. After the basic BootWare section is started, you can download and upgrade the extended BootWare through the menu of the basic BootWare section.
|
|
CAUTION: Do not power off or restart the switch when upgrading the BootWare image file; otherwise, the BootWare image may be damaged and the switch may fail to operate properly. |
System software image files
The WX3024E supports the Dual Image function. By default, the system defines the following system software image files for system boot:
· Main file
· Backup file
· Secure file
These system software image files are stored in the Flash memory, with the file name extension of .bin.
Typically, the default system software image files are written into the built-in Flash memory before switch delivery.
If you have loaded all the three types of system software image files in the Flash memory, the system uses these files to boot the switch in the sequence of main.bin, backup.bin, and secure.bin. For how to set the type of a system software image file, see “Maintaining the system software image files and configuration files .”
The following gives the default names and types of the system software image files and their priorities for booting:
· Main file. The default name is main.bin and the file type is M. It is the default system software image file for system boot.
· Backup file. The default name is backup.bin and the file type is B. If the system fails to boot using the main system software image file, it tries the backup system software image file.
· Secure file. The default name is secure.bin and the file type is S. If the system fails to boot using the backup system software image file, it tries the secure system software image file. If the system fails to boot using the secure file, it gives a startup failure message.
Note the following guidelines:
· Only the system software image files of the M, B, and S types can be used to boot the system, while a system software image file of the N type (a system software image file other than the M, B, or S type) cannot.
· You can rename a system software image file in the Flash memory at the command line interface (CLI) after the system software image file is loaded. You can modify the file type of the M, B, and N files through the BootWare menu or at the CLI after application startup, while you cannot modify the file type of the S-type system software image file.
· The secure file is the last resort for system boot. You cannot change the file type of the secure file or turn another type of file into a secure file by modifying the file type. The secure file can only be downloaded from the BootWare menu.
· Only one file of the same type (M, B, or S) can exist in the Flash memory at a time. For example, if a system software image file of type M+B exists in the CF card, another file of type M or B cannot exist. If the type of another file is changed to B, the existing type M+B file changes to a file of type M.
Configuration files
With the file name extension of .cfg, configuration files are used to store the configuration information of the switch. Typically, no configuration file with the name extension .cfg is provided when the switch is delivered. The switch loads the default configuration at startup. If the configuration file is deleted or missing, the switch also loads the default configuration at reboot.
· The access control engine has only one configuration file with no backup.
· The switching engine has main and backup configuration files, which are managed like the system software image files on the access control engine.
|
|
CAUTION: · The length of a configuration file name must not exceed 64 characters (including the drive identifier and the string terminator). For example, if the drive identifier is flash: /, the maximum length of a file name is [ 64 – 1 – 5 ] = 58 characters. · If the length of a file name exceeds 58 characters, operations on that file will fail, so keep a file name within 16 characters. · The length of file name that can be displayed in BootWare is limited. If a file name is shorter than 30 characters, all the characters of the file name can be displayed; if a file name has or exceeds 30 characters, only the first 26 characters of the file name can be displayed, followed by a tilde (~) and a serial number. This serial number identifies the position in sequence of the file. For example, if file A, file B, and file C have a file name longer than 30 characters, the name of file A will appear as the first 26 characters plus ~001, that of file B will appear as the first 26 characters plus ~002, and that of file C will appear as the first 26 characters plus ~003. |
Approaches for software maintenance
You can maintain the switch in one of the following ways:
· Upgrade a system software image file through the web interface.
· Upgrade the BootWare and a system software image file by using the XMODEM protocol through a serial port.
· Upgrade the BootWare and a system software image file by using the TFTP/FTP protocol via an Ethernet port through the BootWare menu or at the CLI.
|
|
NOTE: · The BootWare image file is upgraded together with the Comware system software image file. When you upgrade the Comware system software image file to the latest version, the BootWare file is automatically upgraded to the latest version. · Before upgrading the software, check the current version of BootWare and that of the system software image file to make sure that the correct file is used for the upgrade. For the association between the system software image file version and the BootWare version, see the Release Notes. |
Upgrading a system software image file through the web interface
Setting up a web configuration environment
To set up a web configuration environment:
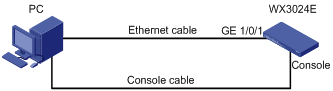
1. Connect Ethernet port GE1/0/1 on the WX3024E to the PC with an Ethernet cable.
Figure 1 Set up a web configuration environment
|
|
NOTE: · By default, ports GE 1/0/1 and GE 1/0/2 on the access controller engine of the WX3024E are aggregated, and ports GE 1/0/29 and GE 1/0/30 on the switching engine are aggregated. All the aggregate ports belong to VLAN 1 and can communicate with each other. · The switch has default web login information when shipped. You can use the default information to log in to the web interface: username admin, password admin, IP address of VLAN-interface 1 of the main control board 192.168.0.100/24. |
2. Specify an IP address for the PC, for example, 192.168.0.200/24, and make sure that the PC and the WX3024E can reach each other.
3. Open the browser, type the IP address 192.168.0.100 in the address bar and press Enter.
The login page of the web interface (see Figure 2) appears.
4. Enter the username and password admin, and the verification code, select the language (English or Chinese), and click Login.

|
|
NOTE: The web configuration interface supports the browsers of Microsoft Internet Explorer 6.0 SP2 and higher, Mozilla Firefox 3.0 and higher, Google Chrome 2.0.174.0 and higher. |
Upgrading the software
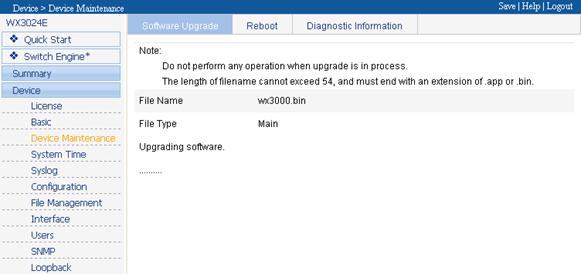
1. Select Device > Device Maintenance from the navigation tree to enter the page as shown in Figure 3.
Figure 3 Software upgrade page

2. Click Browse to select a file. Select If a file with the same name already exists, overwrite it without a prompt and Reboot after the upgrade is finished as needed.
Figure 4 Software upgrade
|
Item |
Description |
|
File |
Browse the target file, whose name must contain the extension .bin. |
|
File Name |
Name of the file, which must contain the same extension as the name of the system software image file to be upgraded. |
|
File Type |
Specify the type of the system software image file to be used at the next boot: 1. Main—Main system software image file. 2. Backup—Backup system software image file. |
|
If a file with the same name already exists, overwrite it without any prompt |
Specify whether to overwrite the file with the same name. If you do not select this option, when a file with the same name exists, the system prompts that the file already exists, and the system software image file cannot be upgraded. |
|
Reboot after the upgrade is finished |
Set whether to reboot the access controller to make the configuration take effect after the file is upgraded. |
|
|
CAUTION: Software upgrade takes a period of time. Do not perform any operation on the web interface during the upgrade process to avoid interruption. |
BootWare menus
BootWare main menu
When the switch is powered on or restated, the terminal first displays the following information:
System is starting...
Then the following information appears:
Booting Normal Extend BootWare....
***************************************************************************
* *
* H3C WX3024E BootWare, Version 1.02 *
* *
***************************************************************************
Copyright (c) 2004-2010 Hangzhou H3C Technologies Co., Ltd.
Compiled Date : Nov 23 2010
CPU Type : XLS208
CPU L1 Cache : 32KB
CPU Clock Speed : 750MHz
Memory Type : DDR2 SDRAM
Memory Size : 512MB
Memory Speed : 533MHz
BootWare Size : 768KB
Flash Size : 1024MB
CPLD Version : 004
PCB Version : Ver.A
BootWare Validating...
Press Ctrl+B to enter extended boot menu...
To enter the extended BootWare menu, press Ctrl + B; otherwise, the system will start loading and decompressing the system software image file.
|
|
NOTE: · To enter the BootWare menu, you must press Ctrl + B within 4 seconds when the system prompts “Press Ctrl+B to enter extended boot menu”. · To enter the BootWare menu after the system software image file is decompressed, restart the switch. |
Press Ctrl + B when the system prompts “Press Ctrl+B to enter extended boot menu”. Then, the system prompts you to enter the BootWare password:
Please input BootWare password:
Enter the BootWare password. The system displays the BootWare main menu.
|
|
CAUTION: · The initial BootWare password is null. · If you fail to enter the correct password three times in a row, the system will be halted and all you can do is to restart the system. |
Note: The current operating device is flash
Enter < Storage Device Operation > to select device.
==========================<EXTEND-BOOTWARE MENU>===========================
|<1> Boot System |
|<2> Enter Serial SubMenu |
|<3> Enter Ethernet SubMenu |
|<4> File Control |
|<5> Modify BootWare Password |
|<6> Skip Current System Configuration |
|<7> BootWare Operation Menu |
|<8> Clear Super Password |
|<9> Storage Device Operation |
|<0> Reboot |
============================================================================
Enter your choice(0-9):
BootWare submenus
Serial submenu
Select 2 from the BootWare main menu to enter the serial submenu. The following information is displayed:
===========================<Enter Serial SubMenu>===========================
|Note:the operating device is flash |
|<1> Download Application Program To SDRAM And Run |
|<2> Update Main Application File |
|<3> Update Backup Application File |
|<4> Update Secure Application File |
|<5> Modify Serial Interface Parameter |
|<0> Exit To Main Menu |
============================================================================
Enter your choice(0-5):
Ethernet submenu
Select 3 from the BootWare main menu to enter the Ethernet submenu. The following information is displayed:
==========================<Enter Ethernet SubMenu>==========================
|Note:the operating device is flash |
|<1> Download Application Program To SDRAM And Run |
|<2> Update Main Application File |
|<3> Update Backup Application File |
|<4> Update Secure Application File |
|<5> Modify Ethernet Parameter |
|<0> Exit To Main Menu |
|<Ensure The Parameter Be Modified Before Downloading!> |
============================================================================
Enter your choice(0-5):
File control submenu
Select 4 from the BootWare main menu to enter the file control submenu. The following information is displayed:
===============================<File CONTROL>===============================
|Note:the operating device is flash |
|<1> Display All File(s) |
|<2> Set Application File type |
|<3> Delete File |
|<0> Exit To Main Menu |
============================================================================
Enter your choice(0-3):
BootWare operation submenu
Select 7 from the BootWare main menu to enter the BootWare operation submenu. The following information is displayed:
=========================<BootWare Operation Menu>==========================
|Note:the operating device is flash |
|<1> Backup Full BootWare |
|<2> Restore Full BootWare |
|<3> Update BootWare By Serial |
|<4> Update BootWare By Ethernet |
|<0> Exit To Main Menu |
============================================================================
Enter your choice(0-4):
Storage device operation submenu
Select 9 from the BootWare main menu to enter the storage device operation submenu. The following information is displayed:
==============================<DEVICE CONTROL>==============================
|<1> Display All Available Nonvolatile Storage Device(s) |
|<2> Set The Operating Device |
|<3> Set The Default Boot Device |
|<0> Exit To Main Menu |
============================================================================
Enter your choice(0-3):
Upgrading the software through a serial connection by using XMODEM
To upgrade the BootWare and system software image file through a serial connection, use the XMODEM protocol.
XMODEM is a file transfer protocol that is widely applied because of its simplicity and good performance. XMODEM transfers files through serial ports. It supports two types of data packets (128 bytes and 1 KB), two check methods (general checksum and CRC), and error packet retransmission mechanism (generally the maximum number of transmission attempts is 10).
The XMODEM transmission procedure is completed by the cooperation of a receiving program and a sending program. The receiving program sends a negotiation packet to negotiate the packet check method. After the negotiation, the sending program starts to send data packets. When receiving a complete packet, the receiving program checks the packet using the agreed method.
· If the check succeeds, the receiving program sends an acknowledgement (ACK) character and the sending program proceeds to send another packet.
· If the check fails, the receiving program sends a negative acknowledgement (NAK) character and the sending program retransmits the packet.
Modifying serial communication parameters
Sometimes, a high serial port baud rate is needed to save the upgrade time, or a lower baud rate to ensure the transmission reliability. This section describes how to adjust the serial communication baud rate.
1. Enter the BootWare main menu, select 2 to enter the serial submenu, and then select 5 to modify the baud rate.
The system displays the following information:
=================================<BAUDRATE SET>============================
|Note:'*'indicates the current baudrate |
| Change The HyperTerminal's Baudrate Accordingly |
|---------------------------<Baudrate Available>---------------------------|
|<1> 9600(Default)* |
|<2> 19200 |
|<3> 38400 |
|<4> 57600 |
|<5> 115200 |
|<0> Exit |
===========================================================================
Enter your choice(0-5):
2. Select an appropriate downloading rate. If you want an 115200 bps download rate, for example, enter 5.
The system displays the following information:
Baudrate has been changed to 115200 bps.
Please change the terminal's baudrate to 115200 bps, press ENTER when ready.
The serial communication baud rate of the switch has been changed to 115,200 bps while that of the terminal is still 9,600 bps, the two sides cannot communicate with each other. Change the baud rate to 115,200 bps in HyperTerminal.
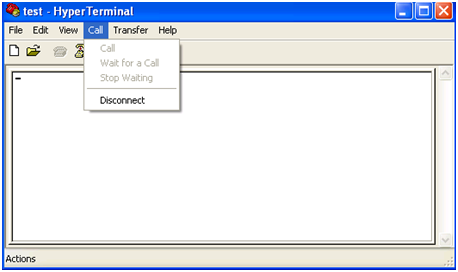
a. Disconnect the terminal connection in HyperTerminal.
Figure 5 Disconnect the terminal connection
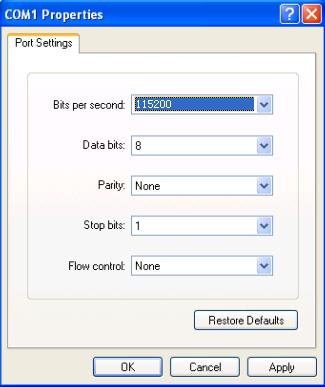
b. Select File > Properties. In the Properties dialog box, click Configure… and then select 115,200 from the Bits per second list.
Figure 6 Modify the baud rate
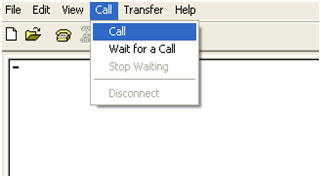
c. Select Call > Call to reestablish the connection.
Figure 7 Reestablish the connection
3. Press Enter in the terminal window.
The terminal displays the current baud rate setting:
The current baudrate is 115200 bps
The current baudrate is 115200 bps
===============================<BAUDRATE SET>===============================
|Note:'*'indicates the current baudrate |
| Change The HyperTerminal's Baudrate Accordingly |
|---------------------------<Baudrate Available>---------------------------|
|<1> 9600(Default) |
|<2> 19200 |
|<3> 38400 |
|<4> 57600 |
|<5> 115200* |
|<0> Exit |
============================================================================
Enter your choice(0-5):
|
|
NOTE: After downloading files with a changed baud rate, timely change the baud rate back to 9,600 bps in HyperTerminal to ensure the normal display on the terminal screen when the system boots or reboots. |
Upgrading a system software image file through a serial connection
Enter the BootWare main menu (see “BootWare main menu”). Select 2 from the BootWare main menu to enter the BootWare serial submenu. For more information, see “Serial submenu.”
Take upgrading the main system software image file as an example.
To accelerate the file upgrade, you can modify the serial port baud rate. For how to modify the baud rate, see “Modifying serial communication parameters.”
1. Select 2 on the BootWare operation submenu.
The system prompts the following information:
Please Start To Transfer File, Press <Ctrl+C> To Exit.
2. Select Transfer > Send file in the HyperTerminal window.
The following dialog box appears.
Figure 8 File transmission dialog box

3. Click Browse to select the system software image file to be downloaded, select Xmodem from the Protocol list, and click Send.
The following dialog box appears:
Figure 9 Sending the system software image file using XMODEM
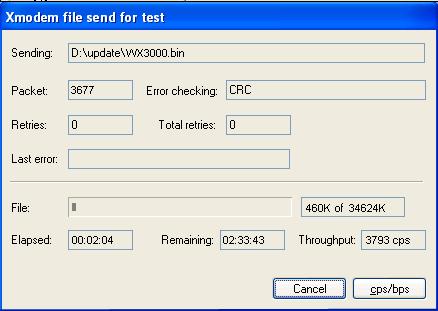
After download completion, the terminal displays the following information:
Download successfully!
35454336 bytes downloaded!
4. Change the baud rate from 115200 bps back to 9600 bps in HyperTerminal and reboot the switch.
|
|
NOTE: · The file name, size and path shown in the figures are for reference only and may differ from the actualities on your switch. Before upgrading the software of your switch, check the current application version to make sure that the correct file is used for the upgrade. · After downloading files with a changed baud rate, timely change the baud rate back to 9,600 bps in HyperTerminal to ensure the normal display on the terminal screen when the system boots or reboots. · The size of a system software image file is typically over 10 MB. Even at a serial baud rate of 115,200 bps, the upgrade takes about 60 minutes. H3C recommends you to upgrade a system software image file through an Ethernet port. |
Upgrading a system software image file through an Ethernet port by using TFTP
To upgrade a large system software image file, use the Trivial File Transfer Protocol (TFTP), which can remarkably shorten the software maintenance time.
TFTP is a TCP/IP protocol used for file transfer between client and server. It provides a simple and low-overhead file transfer service. TFTP provides unreliable data transfer over UDP and does not provide any access authorization and authentication mechanism. It employs the timeout retransmission method to implement best-effort delivery of data.
The WX3024E provides TFTP Client service. With the switch serving as the TFTP client and the file server serving as the TFTP server, you can upload a system software image file from the switch to the file server, or download a system software image file from the file server to the switch.
You can upgrade a system software image file by using TFTP through the BootWare menu or at the CLI.
Upgrading a system software image file by using TFTP through the BootWare menu
Setting up an upgrade environment
Figure 10 Set up a TFTP environment
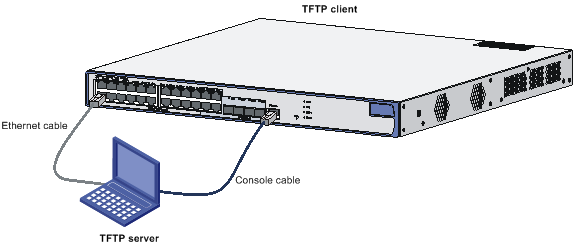
1. Connect the Ethernet port GigabitEthernet 1/0/1 of the switch to the PC by using a crossover Ethernet cable, and configure IP addresses for the Ethernet port of the switch and the PC, which must be on the same network segment so that the switch and the PC can communicate with each other. For example, set the IP address of the VLAN interface to 192.168.0.1 and that of the PC to 192.168.0.2.
2. Run TFTP Server on the PC, and set the path of the system software image file to be downloaded.
|
|
CAUTION: · The TFTP server software is not provided with the WX3024E. You must make sure that it is available by yourself. · Only the management Ethernet port, GigabitEthernet 1/0/1, can be used for system software image file upgrade. |
Configuring the Ethernet port parameters
Before upgrading a system software image file through the management Ethernet port, configure the port as follows:
Select 3 from the BootWare main menu to enter the Ethernet submenu and select 5 to enter the Ethernet port configuration submenu.
============================<ETHERNET PARAMETER SET>===========================
|Note: '.' = Clear field. |
| '-' = Go to previous field. |
| Ctrl+D = Quit. |
===============================================================================
Protocol (FTP or TFTP) :tftp
Load File Name :wx3000.bin
:
Target File Name :wx3000.bin
:
Server IP Address :192.168.0.2
Local IP Address :192.168.0.1
Gateway IP Address :0.0.0.0
FTP User Name :
FTP User Password :
|
|
NOTE: When configuring a parameter, enter a new value, or press Enter to accept the default value that follows a colon. You can type . to clear the current input, - to return to the previous parameter field, and Ctrl+D to quit from the parameter configuration interface. |
Upgrading a system software image file
After configuring the Ethernet port parameters, select 3 from the BootWare main menu to enter the Ethernet submenu and then select 2. In this example you upgrade the main system software image file. The following information appears:
Loading...................................................................................................................................................................................................................................................................................................................................................................................................................................................................................................................................................................................................................................................................................................................Done!
35454328 bytes downloaded!
Updating File flash:/wx3000.bin
The file is exist,will you overwrite it? [Y/N]Y..................................................................................................................................................................................................................................................................................................................................................................................................................................................................................................................................................................................................................................................................................................................................Done!
Finalizing system software image file upgrade
Select 0 to return to the BootWare main menu, and then press 1 to reboot the system.
|
|
CAUTION: · If you specify a filename that already exists in the Flash memory, the system prompts The file is exist,will you overwrite it? [Y/N] If you select Y, the existing file will be overwritten. · Make sure that sufficient space is available in the Flash memory. In case of insufficient space, the upgrade cannot proceed and the system will give an error prompt. · The new system software image file replaces the existing file of the same type, if any, and becomes the only system software image file of that type. In this example, wx3000.bin replaces the system software image file with the attribute of M and becomes the only main system software image file. · For more information about the file types, see “Files managed by the switch.” |
Upgrading and backing up a system software image file by using TFTP at the CLI
The access control engine and the switching engine have separate file systems. You need to log in to the CLI of a specific system before you can do file operations in it.
After the switch starts, you are directly logged in to the access control engine system. To enter the switching engine system, use the oap connect slot 0 command; to log out, press Ctrl + K.
|
|
NOTE: · A system software image file is managed only on the access control engine. · At the CLI of the access control engine, you can change to the CLI for the switching engine through the oap command and perform operations on the configuration files and other files on the switching engine. |
Setting up an upgrade environment
Set up a software upgrade environment and specify the working path of the server. For more information, see “Setting up an upgrade environment.”
· For operations on the access control engine, the data needs to be transferred from the switching engine to the access control engine, so you need to configure the IP addresses of the switching engine, access control engine and the PC to be in the same network segment. For example, configure the IP address of the TFTP server as 192.168.0.1, that of the access control engine of the switch as 192.168.0.2, and that of the switching engine as 192.168.0.3 (to configure the IP address of the switching engine, change to the CLI of the switching engine by using the oap command). Verify the connection by using the ping command.
· For operations on the switching engine, log in to the switching engine by using the oap command, configure the IP addresses as mentioned above, and verify the connection by using the ping command.
|
|
NOTE: The IP addresses of the access control engine and switching engine are both configured in VLAN interface view. |
Backing up and restoring system software image files and configuration files
After setting up the environment, do the following on the terminal:
Use the dir command to check what files are in the file system:
<H3C>dir
Directory of flash:/
0 -rw- 1039 Jan 04 2011 17:21:52 startup.cfg
1 -rw- 35454328 Jan 18 2011 09:02:23 wx3000.bin
2 -rw- 4204 Jan 17 2011 15:43:25 system.xml
3 -rw- 2334 Jan 17 2011 15:43:26 test.cfg
1015424 KB total (979500 KB free)
For example, to copy the startup.cfg file on the switch and save it as config.bak on the TFTP server, use the following command:
<H3C>tftp 192.168.0.1 put startup.cfg config.bak
File will be transferred in binary mode
Sending file to remote TFTP server. Please wait... \
TFTP: 1039 bytes sent in 0 second(s).
File uploaded successfully.
To download config.cfg from the server to the switch, use the following command:
<H3C>tftp 192.168.0.1 get config.cfg statup.cfg
The file statup.cfg exists. Overwrite it?[Y/N]:y
Verifying server file...
Deleting the old file, please wait...
File will be transferred in binary mode
Downloading file from remote tftp server, please wait...\
TFTP: 1039 bytes received in 0 second(s)
File downloaded successfully.
If a file with the same name exists on the switch, the switch will prompt you whether to overwrite the existing file. You can choose Y to overwrite it or N to abort.
|
|
CAUTION: · When you back up a file to the server, the existing file with the same name on the server, if any, will be replaced without a prompt. · The operations mentioned above are to be performed in user view. · You can modify the backup configuration file with a text editor and then download the modified file to upgrade the configuration. The upgrade takes effect upon system reboot. Likewise, you can download the system software image file to the switch and overwrite the existing main system software image file to upgrade the system software image file. |
Upgrading a system software image file through an Ethernet port by using FTP
If the system software image file to be downloaded has a large size, you can use the File Transfer Protocol (FTP) to save the software maintenance time.
FTP is an application-layer TCP/IP protocol used for file transfer between server and client. It provides reliable, connection-oriented data transfer service over TCP.
You can upgrade a system software image file by using FTP in the following ways:
· Through the BootWare menu. In this approach, the switch must serve as an FTP client.
· At the CLI. In this approach, the switch can serve as either an FTP server or an FTP client.
Upgrading a system software image file by using FTP through the BootWare menu
Setting up an upgrade environment
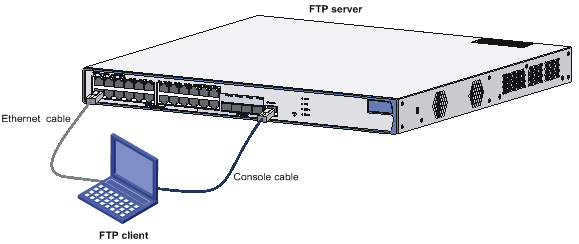
Figure 11 Set up an environment
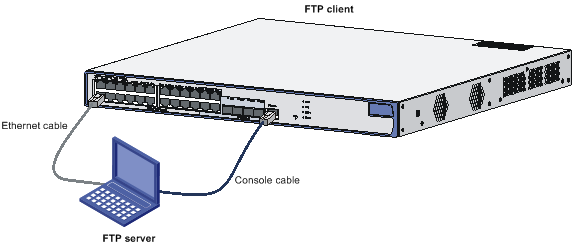
· The switch servers as an FTP client, and the PC as the FTP server.
· Connect the Ethernet port GigabitEthernet 1/0/1 of the switch to the PC by using a crossover Ethernet cable, and configure IP addresses for the Ethernet port of the switch and the PC, which must be on the same network segment so that the switch and the PC can communicate with each other. For example, set the IP address of the VLAN interface to 192.168.0.1 and that of the PC to 192.168.0.2.
· Run the FTP Server on the PC and set the path of the system software image file to be downloaded, FTP username and password.
|
|
CAUTION: · The FTP server software is not provided with the WX3024E. You must make sure that it is available by yourself. · Only the management Ethernet port, GigabitEthernet 1/0/1, can be used for system software image file upgrade. |
Upgrading and backing up a system software image file by using FTP at the CLI
With the switch as an FTP client and the PC as an FTP server
1. Set up an upgrade environment by referring to “Upgrading a system software image file by using FTP through the BootWare menu.”
¡ For operations on the access control engine, the data needs to be transferred from the switching engine to the access control engine; therefore, you need to configure the IP addresses of the switching engine, access control engine and the PC to be in the same network segment. For example, configure the IP address of the FTP server as 192.168.0.1, that of the access control engine of the switch as 192.168.0.2, and that of the switching engine as 192.168.0.3 (to configure the IP address of the switching engine, you need to change to CLI of the switching engine by using the oap command). Verify the connection by using the ping command.
¡ For operations on the switching engine, you need to log in to the switching engine using the oap command, configure the IP addresses as mentioned above, and verify the connection by using the ping command.
2. Maintain the switch through the terminal connected to the console port of the switch.
<H3C>ftp 192.168.0.1
Trying 192.168.0.1 ...
Press CTRL+K to abort
Connected to 192.168.0.1.
220 FTP service ready.
User(192.168.0.1:(none)):guest // Enter the username set on the server
331 Password required for quest.
Password: // Enter the password
230 User logged in
[ftp]
After a successful connection, you can execute the following commands to maintain the switch.
Use the get and put commands to implement file download and backup.
[ftp]get wx3000.bin wx3000.bin
flash:/wx3000.bin has been existing. Overwrite it?[Y/N]:y
227 Entering passive mode (192,168,0,1,6,231).
125 Using exiting data connection………………
226 Closing data connection; File transfer successful.
FTP: 35454328 byte(s) received in 172.108 second(s) 206.00K byte(s)/sec.
[ftp]put wx3000.bin wx3000.bin
227 Entering passive mode (192,168,0,1,6,233).
125 Using exiting data connection
226 Closing data connection; File transfer successful.
FTP: 35454328 byte(s) sent in 39.569 second(s) 896.00Kbyte(s)/sec.
[ftp]quit
221 Service closing control connection
With the switch as an FTP server and the PC as an FTP client
1. Set up an upgrade environment
Figure 12 Set up an environment, with the switch as an FTP server
¡ For operations on the access control engine, the data needs to be transferred from the switching engine to the access control engine; therefore, you need to configure the IP addresses of the switching engine, access control engine and the PC to be in the same network segment. For example, configure the IP address of the FTP client as 192.168.0.1, that of the access control engine of the switch as 192.168.0.2, and that of the switching engine as 192.168.0.3 (to configure the IP address of the switching engine, you need to change to CLI of the switching engine by using the oap command). Verify the connection by using the ping command.
¡ For operations on the switching engine, you need to log in to the switching engine using the oap command, configure the IP addresses as mentioned above, and verify the connection by using the ping command.
2. Enable the FTP server
The FTP server feature supports concurrent access of multiple clients. Upon receiving a request from an FTP client, the FTP server performs the requested operation and returns the result.
a. Use the following command to enable FTP server:
[H3C]ftp server enable
% Start FTP server
b. Add an authorized FTP username and password:
[H3C]local-user guest // Create user account guest
[H3C-luser- guest]service-type ftp // Set the user type to FTP
[H3C-luser- guest]password simple 123456 // Set the password to 123456
3. Maintain the switch
a. Start the FTP client application on the PC after enabling FTP server and setting the username and password on the switch.
This example assumes that you use Microsoft FTP Client provided in Windows XP.
b. Open a DOS prompt window, and enter ftp at the DOS prompt.
C:\Documents and Settings\Administrator>ftp
ftp> // The system prompt changed to ftp>
ftp> open 192.168.0.2 // Connect to the device
Connected to 192.168.0.2.
220 FTP service ready.
User (192.168.0.2:(none)): guest // Enter the username set on the device
331 Password required for guest
Password: // Enter the password 123456
230 User logged in.
c. To back up wx3000.bin from the switch to the PC, use the following command:
ftp> binary // Set the transfer mode to binary mode
200 Type set to I.
ftp> lcd c:\temp // Change the local file directory
Local directory now C:\temp.
ftp> get wx3000.bin wx3000.bin // Back up the file from the switch to the PC
200 Port command okay.
150 Opening BINARY mode data connection for /wx3000.bin.
226 Transfer complete.
ftp: 35454328 bytes received in 41.62Seconds 851.87Kbytes/sec.
d. To restore the backup to the switch, use the following command:
ftp> put wx3000.bin wx3000.bin
200 Port command okay.
150 Opening BINARY mode data connection for wx3000.bin.
226 Transfer complete.
ftp: 35454328 bytes sent in 20.52Seconds 1727.37Kbytes/sec.
ftp> quit
221 Server closing.
Maintaining the system software image files and configuration files
You can modify the types of the files on the access control engine and view the file information through the file control submenu or at the CLI.
|
|
NOTE: You can maintain the files on the switching engine only at the CLI, rather than the BootWare menu. |
Select 4 from the BootWare main menu to enter the file control submenu. The following information is displayed:
===============================<File CONTROL>===============================
|Note:the operating device |
|<1> Display All File(s) |
|<2> Set Application File type |
|<3> Delete File |
|<0> Exit To Main Menu |
============================================================================
Enter your choice(0-3):
Displaying all files
Displaying all files through the BootWare menu
Select 1 from the file control submenu. The following information appears:
Display all file(s) in flash:
'M' = MAIN 'B' = BACKUP 'S' = SECURE 'N/A' = NOT ASSIGNED
============================================================================
|NO. Size(B) Time Type Name |
|1 35454328 Jan/18/2011 09:02:23 M wx3000.bin |
|2 4204 Jan/17/2011 15:43:25 N/A system.xml |
|3 2334 Jan/17/2011 15:43:26 N/A test.cfg |
|4 1039 Jan/04/2011 17:21:52 N/A startup.cfg |
============================================================================
Displaying all files at the CLI
<H3C>dir
Directory of flash:/
0 -rw- 1039 Jan 04 2011 17:21:52 startup.cfg
1 -rw- 35454328 Jan 18 2011 09:02:23 wx3000.bin
2 -rw- 4204 Jan 17 2011 15:43:25 system.xml
3 -rw- 2334 Jan 17 2011 15:43:26 test.cfg
1015424 KB total (979500 KB free)
Setting the system software image file type
Setting the system software image file type in the BootWare menu
1. Select 2 from the file control submenu.
The following information appears:
'M' = MAIN 'B' = BACKUP 'S' = SECURE 'N/A' = NOT ASSIGNED
============================================================================
|NO. Size(B) Time Type Name |
|1 35454328 Jan/18/2011 09:02:23 M wx3000.bin |
|0 Exit |
============================================================================
Enter file No:
2. Enter the file number at the prompt above. In this example, type 1 for wx3000.bin, and press Enter.
The system prompts you to specify a new file type:
Modify the file attribute:
============================================================================
|<1> +Main |
|<2> -Main |
|<3> +Backup |
|<4> -Backup |
|<0> Exit |
============================================================================
Enter your choice(0-4):
3. Select 1 to set the file type to M, 2 to remove the current M type, 3 to set the file type to B, and 4 to remove the current B type.
For more information about the file types, see “System software image files.”
Setting the system software image file type at the CLI
# Change the type of wx3000.bin from B to M+B.
<H3C> boot-loader file wx3000.bin main
This command will set the system software image file. Continue? [Y/N]:y
The specified file will be used as the main system software image file at the next reboot on slot 1!
Deleting a file
Deleting a file through the BootWare menu
1. Select 3 from the file control submenu.
The following information appears:
Deleting the file in flash:
'M' = MAIN 'B' = BACKUP 'S' = SECURE 'N/A' = NOT ASSIGNED
============================================================================
|NO. Size(B) Time Type Name |
|1 35454328 Jan/18/2011 09:02:23 M wx3000.bin |
|2 4204 Jan//2011 15:43:25 N/A system.xml |
|3 2334 Jan/17/2011 15:43:26 N/A test.cfg |
|4 1039 Jan/04/2011 17:21:52 N/A startup.cfg |
|0 Exit |
============================================================================
Enter file No:
2. Enter the file number and press Enter.
The following information appears:
The file you selected is flash:/startup.cfg,Delete it? [Y/N]
3. Press Y to proceed.
When the following information appears, the file has been successfully deleted:
Deleting..........Done!
Deleting a file at the CLI
You can use the delete [ /unreserved ] file-url command in user view to delete a file.
· /unreserved: Deletes the file immediately without placing it into the Recycle Bin.
· file-url: Name of the file to be deleted.
# Delete startup.cfg from the root directory.
<H3C> delete startup.cfg
Delete flash:/startup.cfg?[Y/N]:y
%Delete file flash:/startup.cfg...Done.
The file startup.cfg is now temporarily in the Recycle Bin. You can use the undelete command to restore the file from the Recycle Bin.
# Restore the file startup.cfg from the Recycle Bin.
<H3C> undelete startup.cfg
Undelete flash:/startup.cfg? [Y/N]:y
% Undeleted file flash:/startup.cfg.
Dealing with password loss
BootWare password loss
If you forget the BootWare password, contact your local dealer. The technical support staff will help you log in to the system and set a new password.
To change the BootWare password, enter the BootWare main menu, select 5, and follow the instructions. The following information is displayed on the terminal:
please input old password:
Please input new password:
Please input new password again:
Password Set Successfully.
|
|
NOTE: · Once you enter a wrong old password or different new passwords, the password modification operation fails and the system exits this operation. · A BootWare password can contain up to 32 characters, including printable characters such as letters, numerals, and punctuations. |
User password loss
Your login will be refused if you forget the user password. Set a new user password by following the steps below:
1. Select 6 from the BootWare main menu to start the system without loading the system configuration.
The following information appears:
Flag Set Success.
2. When the BootWare main menu appears again, select 0 to restart the system.
System starts booting …
3. Set a new password in system view.
<H3C>system-view
[H3C]user-interface aux 0
[H3C-ui-aux0]authentication-mode password
[H3C-ui-aux0]set authentication password simple 123456
The output shows that password authentication is required for console port login, and the password has been set to 123456 in plain text.
|
|
NOTE: · Upon reboot, the system runs with the default configuration, with the configuration file stored in the Flash memory. To restore the original configuration, use the display saved-configuration command to view the contents of the configuration file, copy them and run them. · If the password is stored in plain text, use the display current-configuration command to view the password in the current configuration. If you use the set authentication password cipher 123456 command to set your password, the password will be stored in cipher text. |
4. Save the new configuration.
[H3C] save
|
|
NOTE: After modifying the user password, use the save command to save it. |
Super password loss
The super password allows you to switch between four super levels. Without a super password, you cannot perform higher privilege operations.
Select 8 from the BootWare main menu to clear the super password.
|
|
NOTE: · After selecting 8 and restarting the switch, you will directly enter system view. · This setting works only once. When the switch is restarted for a second time, the super password is restored. |
Backing up and restoring BootWare
Backing up and restoring BootWare through the BootWare menu
Select 7 from the BootWare main menu to enter the BootWare operation submenu. For more information about this submenu, see “BootWare operation submenu.”
Backing up BootWare
To back up the entire BootWare to the Flash memory, select 1 from the BootWare main menu and follow the instructions.
Will you backup the Basic BootWare? [Y/N]Y
Begin to backup the Basic BootWare……………….Done!
Will you backup the Extend BootWare? [Y/N]Y
Begin to backup the Extend BootWare……………….Done!
Restoring BootWare
To restore the backup BootWare from the Flash memory, select 2 from the BootWare main menu and follow the instructions:
Will you restore the Basic BootWare? [Y/N]Y
Begin to restore Normal Basic BootWare...Done!
Will you restore the Extend BootWare? [Y/N]Y
Begin to restore Normal Extend BootWare....Done!
Backing up and restoring BootWare at the CLI
To back up and restore BootWare of the access control engine, use the bootrom command. The switching engine does not support this operation.
Backing up BootWare
<H3C>bootrom backup all
Now backuping bootrom, please wait...
Backup bootrom completed!
The entire BootWare has been backed up in the Flash memory.
<H3C>bootrom backup part
Now backuping bootrom, please wait...
Backup bootrom completed!
The extended BootWare has been backed up in the Flash memory.
Restoring BootWare
<H3C>bootrom restore all
This command will restore bootrom file, Continue? [Y/N]:y
Now restoring bootrom, please wait...
Restore bootrom completed!
The entire BootWare section has been restored.
<H3C>bootrom restore part
This command will restore bootrom file, Continue? [Y/N]:y
Now restoring bootrom, please wait...
Restore bootrom completed!
The extended BootWare section has been restored.