- Table of Contents
-
- Fundamentals Configuration Guide
- 00-Preface
- 01-Feature Matrix
- 02-CLI Configuration
- 03-Controlling Login Users
- 04-File Management Configuration
- 05-FTP and TFTP Configuration
- 06-Device Management Configuration
- 07-Basic System Configuration
- 08-HTTP Configuration
- 09-Logging In to the AP Configuration
- 10-Index
- Related Documents
-
| Title | Size | Download |
|---|---|---|
| 09-Logging In to the AP Configuration | 324.17 KB |
Table of Contents
Introduction to User Interface
Common User Interface Configuration
Logging In Through the Console Port
Introduction to Local Console Port Login
Logging In Through the Console Port
Configuring Common Settings for Console Login
Configuring None Authentication for Console Port Login
Configuring Password Authentication for Console Port Login
Configuring Scheme Authentication for Console Port Login
Establishing a Telnet Connection
Configuring Common Settings for Telnet Login
Telnet Login Configuration Task List
Configuring None Authentication for Telnet Login
Configuring Password Authentication for Telnet Login
Configuring Scheme Authentication for Telnet Login
Configuring Command Authorization
Logging In Through a Web-Based Network Management System
Connection Establishment Through an NMS
l The models listed in this document are not applicable to all regions. Please consult your local sales office for the models applicable to your region.
l Support of the H3C WA series WLAN access points (APs) for features may vary by AP model. For more information, see Feature Matrix.
l The interface types and the number of interfaces vary by AP model.
l The term AP in this document refers to common APs, wireless bridges, and mesh APs.
Logging In to an AP
You can control the WA series WLAN APs through an access controller (AC) or a unified switch associated with the AP when the AP works in fit AP mode.
To log in to a WA series fit AP (AP for short), use any of the following methods:
l Logging In Through the Console Port
l Logging In Through a Web-Based Network Management System
Introduction to User Interface
Supported User Interfaces
The AP supports two types of user interfaces: console and VTY.
l Console port: Manages and monitors users that log in via the console port. The AP provides one console port of EIA/TIA-232 DCE type. The port is usually used for the first access to the AP.
l VTY (virtual type terminal): Manages and monitors users that log in via VTY. A VTY port is usually used when you access the AP through Telnet or SSH.
Table 1-1 Description on user interfaces
|
User interface |
Applicable user |
Port used |
Description |
|
Console |
Users that log in through the console port |
Console port |
Each AP can accommodate one console user. |
|
VTY |
Telnet and SSH users |
Ethernet port |
Each AP can accommodate up to 5 VTY users. |
One user interface corresponds to one user interface view, where you can configure a set of parameters, such as authentication mode at login and the user levels after login. When a user logs in through a user interface, the user’s access is restricted by these parameter settings. Thus, the centralized management of user sessions can be achieved.
Users and User Interfaces
User interfaces (also called lines) allow you to manage and monitor users that log in through different methods. An AP provides one console user interface and five VTY user interfaces.
User interfaces do not associate with specific users. When a user initiates a connection request, based on the login type the system automatically assigns an idle user interface with the smallest number to the user. During the login, the configuration in the user interface view takes effect. The user interface varies depending on the login type and the login time. For example, User A can use VTY 0 to log in to an AP, and User B can also use VTY 0 to log in to the AP when User A logs out.
User Interface Number
User interfaces can be numbered in two ways: absolute numbering and relative numbering.
1) Absolute numbering:
l The console user interface is numbered first, with the absolute number 0.
l VTY user interfaces are numbered after the console user interface. The VTY user interfaces are numbered from 1, with a step of 1.
2) Relative numbering numbers a user interface in the form of “user interface type + number”. The rules of relative numbering are as follows:
l The console user interface is numbered Console 0.
l VTY user interfaces are numbered from 0, with a step of 1, such as VTY0, VTY1.
Common User Interface Configuration
Follow these steps to perform common user interface configuration:
|
To do… |
Use the command… |
Remarks |
|
Lock the current user interface |
lock |
Optional Available in user view. A user interface is not locked by default. |
|
Send messages to all user interfaces or a specified user interface |
send { all | num1 | { console | vty } num2 } |
Optional Available in user view. |
|
Disconnect a specified user interface |
free user-interface { num1 | { console | vty } num2 } |
Optional Available in user view. |
|
Display the information about the current user interface/all user interfaces |
display users [ all ] |
Optional Available in any view. |
|
Display the physical attributes and configuration of the current/a specified user interface |
display user-interface [ type number | number ] [ summary ] |
|
|
Enter system view |
system-view |
— |
|
Enable the display of copyright information |
copyright-info enable |
Optional Enabled by default. When the display of copyright information is enabled, the copyright information is displayed when you log in to your AP through telnet or SSH, or exit user view through the console port. No copyright information is displayed in other cases. |
Logging In Through the Console Port
Introduction to Local Console Port Login
Logging in through the console port is the most common way to log in to an AP. It is also the prerequisite to configuring other login methods. By default, you can log in to a AP through its console port only.
To log in to an AP through its console port, the related configuration of the user terminal must be in accordance with that of the console port.
Table 1-2 lists the default settings of a console port.
Table 1-2 The default settings of a console port
|
Setting |
Default |
|
Baud rate |
9,600 bps |
|
Flow control |
Off |
|
Check mode |
No check bit |
|
Stop bits |
1 |
|
Data bits |
8 |
After logging in to your AP, you can perform configuration for console users. For more information, see Configuring Common Settings for Console Login .
Logging In Through the Console Port
Step1 Connect the serial port of your PC/terminal to the console port of the AP, as shown in Figure 1-1.
Figure 1-1 Set a local configuration environment

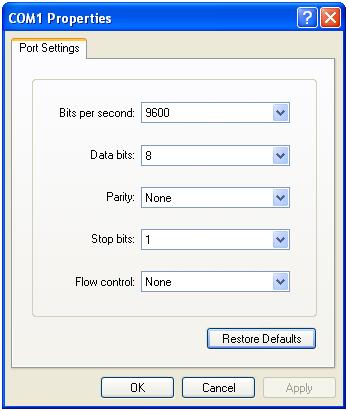
Step2 Launch a terminal emulation utility (such as HyperTerminal in Windows XP/Windows 2000) and set the terminal parameters as follows: set Bits per second to 9600, Data bits to 8, Parity to None, Stop bits to 1, and Flow control to None, as shown in Figure 1-2 through Figure 1-4.
![]()
If you use the Windows 2003 Server operating system on your PC, add a HyperTerminal, and then log in to and manage the AP as described in this document. If you use Windows 2008 Server, Windows 7, Windows Vista, or any other operating system on your PC, use the third party terminal software. For how to use the third party terminal software, see the user guide or online help of that software.
Figure 1-2 Create a connection

Figure 1-3 Specify the port used to establish the connection
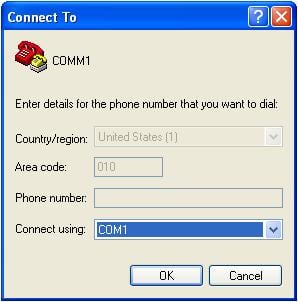
Figure 1-4 Set port parameters terminal window
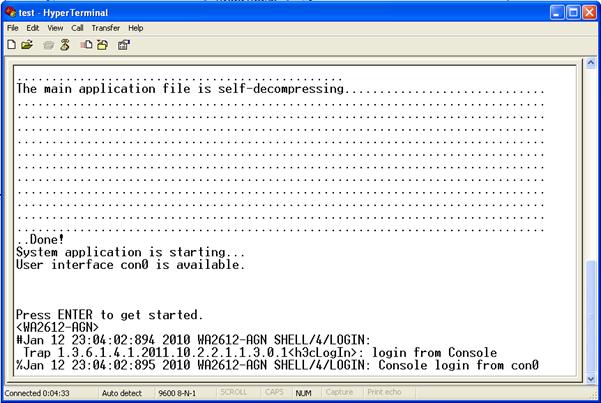
Step3 Turn on the AP. You are prompted to press Enter if the AP successfully completes the power-on self test (POST). The prompt (such as <WA2610E-GNP>) appears after you press Enter, as shown in Figure 1-5.
Step4 You can then configure the AP or check the information about the AP by executing commands. You can also get help by typing ?. For information about the commands, see the following sections.
Configuring Common Settings for Console Login
Table 1-3 lists the common settings for console port login.
Table 1-3 Common settings for console port login
|
To do… |
Use the command… |
Description |
|
|
Enter system view |
system-view |
— |
|
|
Enter console user interface view |
user-interface console 0 |
— |
|
|
Console port configuration |
Baud rate |
speed speed-value |
Optional The default baud rate is 9,600 bps. |
|
Check mode |
parity { even | mark | none | odd | space } |
Optional By default, the check mode of the console port is set to none, which means no check bit. |
|
|
Stop bits |
stopbits { 1 | 1.5 | 2 } |
Optional The default stop bits of a console port is 1. |
|
|
Data bits |
databits { 5 | 6 | 7 | 8 } |
Optional The default data bits of a console port is 8. |
|
|
Define a shortcut key for terminating tasks. |
escape-key { default | character } |
Optional By default, you can use Ctrl+C to terminate a task. |
|
|
Configure the type of terminal display under the current user interface. |
terminal type { ansi | vt100 } |
Optional By default, the terminal display type is ANSI. |
|
|
Configure the command level available to the users logging in to the console user interface |
user privilege level level |
Optional By default, commands of level 3 are available to the users logging in to the console user interface. |
|
|
Set the maximum number of lines on the next screen |
screen-length screen-length |
Optional By default, the next screen displays 24 lines. |
|
|
Set history command buffer size |
history-command max-size value |
Optional By default, the history command buffer can contain up to 10 commands. |
|
|
Set the timeout timer |
idle-timeout minutes [ seconds ] |
Optional The default timeout time is 10 minutes. The system automatically terminates the user’s connection if there is no information interaction between the device and the user in timeout time. Setting idle-timeout to 0 disables the timer. |
|
![]()
Common console login configuration takes effect immediately. The connection may be interrupted when you perform such configuration after logging in through the console port. Therefore, use another login method to configure the console port settings. To log in to your AP again through the console port, modify the settings of the terminal program running on your PC to make them consistent with the console port settings on your AP shown in Figure 1-4.
Console port login configurations for different authentication modes
Table 1-4 lists console port login configurations for different authentication modes.
Table 1-4 Console port login configurations for different authentication modes
|
Authentication mode |
Configuration |
Description |
|
None |
Configure not to authenticate users |
For more information, see Configuring None Authentication for Console Port Login. |
|
Password |
Configure to authenticate users using the local password |
For more information, see Configuring Password Authentication for Console Port Login. |
|
Set the local password |
||
|
Scheme |
Configure the authentication scheme |
For more information, see Configuring Scheme Authentication for Console Port Login. |
|
Configure to authenticate users locally or remotely |
||
|
Configure password authentication |
![]()
A change to the authentication mode of console port login does not take effect unless you exit and enter the CLI again.
Configuring None Authentication for Console Port Login
Configuration procedure
Follow these steps to configure none authentication for console port login:
|
To do… |
Use the command… |
Remarks |
|
Enter system view |
system-view |
— |
|
Enter console user interface view |
user-interface console 0 |
— |
|
Specify the none authentication mode |
authentication-mode none |
Required By default, users that log in through the console port are not authenticated. |
Configuration example
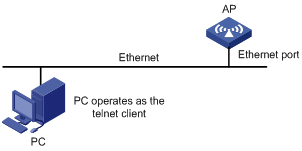
1) Network requirements
Assume the AP supports Telnet, and the user level of telnet users is set to the manage level (level 3). Telnet to the AP, and configure parameters for console login as follows.
l Configure none authentication mode for console login.
l Configure command level 2 for console users.
l Configure the baud rate of the console port as 19200 bps.
l Configure the screen to contain up to 30 lines.
l Configure the history command buffer to contain up to 20 commands.
l Configure the timeout time of the console user interface as 6 minutes.
2) Network diagram
Figure 1-6 Network diagram for console login configuration (with the authentication mode none)
3) Configuration procedure
# Enter system view.
<Sysname> system-view
# Enter console user interface view.
[Sysname] user-interface console 0
# Specify the none authentication mode for users that log in through the console port.
[Sysname-ui-console0] authentication-mode none
# Specify command level 2 for console users.
[Sysname-ui-console0] user privilege level 2
# Set the baud rate of the console port to 19200 bps.
[Sysname-ui-console0] speed 19200
# Set the maximum number of lines the screen can contain to 30.
[Sysname-ui-console0] screen-length 30
# Set the maximum number of commands the history command buffer can store to 20.
[Sysname-ui-console0] history-command max-size 20
# Set the timeout time of the console user interface to 6 minutes.
[Sysname-ui-console0] idle-timeout 6
To ensure successful login, change the settings of the terminal emulation program running on the PC, as shown in Figure 1-4, to make them consistent with those on the AP.
Configuring Password Authentication for Console Port Login
Configuration procedure
Follow these steps to configure password authentication for console port login:
|
To do… |
Use the command… |
Remarks |
|
Enter system view |
system-view |
— |
|
Enter console user interface view |
user-interface console 0 |
— |
|
Enable password authentication |
authentication-mode password |
Required By default, users that log in through the console port are not authenticated. |
|
Set the local password |
set authentication password { cipher | simple } password |
Required By default, no local password is set. |
Configuration example
1) Network requirements
Assume the AP supports Telnet, and the user level of telnet users is set to the manage level (level 3). Telnet to the AP, and configure parameters for console login as follows.
l Configure the password authentication mode for console login.
l Configure the local password as 123456 (in plain text).
l Configure command level 2 for console users.
l Configure the baud rate of the console port as 19200 bps.
l Configure the screen to contain up to 30 lines.
l Configure the history command buffer to contain up to 20 commands.
l Configure the timeout time of the console user interface as 6 minutes.
2) Network diagram
Figure 1-7 Network diagram for console port login configuration (with the authentication mode password)

3) Configuration procedure
# Enter system view.
<Sysname> system-view
# Enter console user interface view.
[Sysname] user-interface console 0
# Specify the password authentication mode.
[Sysname-ui-console0] authentication-mode password
# Set the local password to 123456 (in plain text).
[Sysname-ui-console0] set authentication password simple 123456
# Specify commands of level 2 are available to the user that logs in to the console user interface.
[Sysname-ui-console0] user privilege level 2
# Set the baud rate of the console port to 19200 bps.
[Sysname-ui-console0] speed 19200
# Set the maximum number of lines the screen can contain to 30.
[Sysname-ui-console0] screen-length 30
# Set the maximum number of commands the history command buffer can store to 20.
[Sysname-ui-console0] history-command max-size 20
# Set the timeout time of the console user interface to 6 minutes.
[Sysname-ui-console0] idle-timeout 6
To ensure successful login, change the settings of the terminal emulation program running on the PC, as shown in Figure 1-4, to make them consistent with those on the AP.
Configuring Scheme Authentication for Console Port Login
Configuration procedure
Follow these steps to configure scheme authentication for console port login:
|
To do… |
Use the command… |
Remarks |
|
|
Enter system view |
system-view |
— |
|
|
Enter console user interface view |
user-interface console 0 |
— |
|
|
Enable scheme authentication |
authentication-mode scheme |
Required By default, users that log in through the console port are not authenticated. |
|
|
Quit to system view |
quit |
— |
|
|
Configure the authentication mode |
Enter the default ISP domain view |
domain domain name |
Optional By default, the local AAA scheme is applied. If you specify to apply the local AAA scheme, perform the configuration concerning local user as well. If you apply an existing scheme by providing the radius-scheme-name argument, perform the following configuration as well: l Perform AAA-RADIUS configuration on the AP. (For more information, see AAA in the Security Configuration Guide.) l Configure the user name and password on the AAA server. (For more information, see AAA in the Security Configuration Guide.) |
|
Apply an AAA scheme to the domain |
authentication default { local | none | radius-scheme radius-scheme-name [ local ] } |
||
|
Quit to system view |
quit |
||
|
Create a local user (Enter local user view.) |
local-user user-name |
Required By default, no local user exists. |
|
|
Set the authentication password for the local user |
password { simple | cipher } password |
Required |
|
|
Specifies the level of the local user |
authorization-attribute level level |
Optional By default, commands of level 0 are available to Telnet users authenticated by password |
|
|
Specify the service type for the local user |
service-type terminal |
Required By default, a user is authorized with no service. |
|
l When you log in to an AP by using the scheme authentication mode, your access rights depend on your user level defined in the AAA scheme.
l When the local scheme authentication mode is used, the user levels are specified by using the authorization-attribute level level command.
l When the RADIUS scheme authentication mode is used, the user levels are set on the corresponding RADIUS servers.
![]()
For more information about AAA and RADIUS, see AAA in the Security Configuration Guide.
Configuration example
1) Network requirements
Assume the AP supports Telnet, and the user level of telnet users is set to the manage level (level 3). Telnet to the AP, and configure parameters for console login as follows.
l Configure the name of the local user as guest.
l Configure the local password as 123456 (in plain text).
l Set the service type of the local user to Terminal and the command level to 2.
l Configure the scheme authentication mode.
l Configure the baud rate of the console port as 19200 bps.
l Configure the screen to contain up to 30 lines.
l Configure the history command buffer to contain up to 20 commands.
l Configure the timeout time of the console user interface as 6 minutes.
Figure 1-8 Network diagram for console login configuration (with the authentication mode scheme)

2) Configuration procedure
l Configure the AP
# Enter system view.
<Sysname> system-view
# Create a local user named guest and enter local user view.
[Sysname] local-user guest
# Set the authentication password to 123456 (in plain text).
[Sysname-luser-guest] password simple 123456
# Set the service type to terminal.
[Sysname-luser-guest] service-type terminal
# Set the command level to 2.
[Sysname-luser-guest] authorization-attribute level 2
[Sysname-luser-guest] quit
# Enter console user interface view.
[Sysname] user-interface console 0
# Enable scheme authentication for console users.
[Sysname-ui-console0] authentication-mode scheme
# Set the baud rate of the console port to 19200 bps.
[Sysname-ui-console0] speed 19200
# Set the maximum number of lines the screen can contain to 30.
[Sysname-ui-console0] screen-length 30
# Set the maximum number of commands the history command buffer can store to 20.
[Sysname-ui-console0] history-command max-size 20
# Set the timeout time of the console user interface to 6 minutes.
[Sysname-ui-console0] idle-timeout 6
l Configure the authentication scheme
Configure the authentication server by referring to related parts in AAA in the Security Configuration Guide.
To ensure successful login, change the settings of the terminal emulation program running on the PC, as shown in Figure 1-4, to make them consistent with those on the AP.
Logging In Through Telnet
You can telnet to a remote AP to manage and maintain the AP. To achieve this, configure both the AP and the Telnet terminal.
Table 1-5 Telnet login configuration requirements
|
Item |
Requirement |
|
AP |
Start the Telnet Server (Telnet server is enabled by default). |
|
The IP address of the VLAN interface of the AP is configured and the AP and the Telnet terminal can reach each other. |
|
|
The authentication mode and other settings are configured. See Table 1-6 and Table 1-7. |
|
|
Telnet terminal |
Telnet is running. |
|
The IP address of the management VLAN interface of the AP is available. |
Establishing a Telnet Connection
Use a PC as the telnet client to telnet to an AP and configure it.
Step1 Configure the IP address of VLAN-interface 1 through the console port (VLAN 1 is the default VLAN of the AP).
l Set up a configuration environment as shown in Figure 1-9. Connect the serial port of the PC (or terminal) to the console port of the AP through a console cable.
Figure 1-9 Set up a local configuration environment

l Launch a terminal emulation utility (such as HyperTerminal in Windows XP/Windows 2000) and set Bits per second to 9600, Data bits to 8, Parity to None, Stop bits to 1, and Flow control to None.
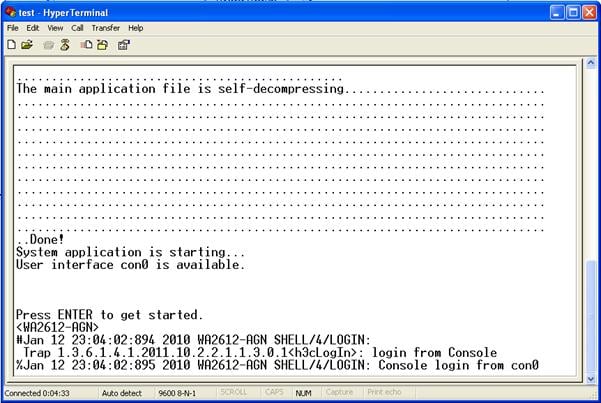
l Turn on the AP. You are prompted to press Enter if the AP successfully completes the POST. A prompt appears after you press Enter, as shown in Figure 1-10.
Figure 1-10 Configuration page
l Execute the following commands on the terminal to configure the IP address of VLAN-interface 1 as 202.38.160.92/24.
<Sysname> system-view
[Sysname] interface Vlan-interface 1
[Sysname-Vlan-interface1] ip address 202.38.160.92 255.255.255.0
Step2 Configure an authentication mode for telnet users on the AP. For more information, see Configuring None Authentication for Telnet Login, Configuring Password Authentication for Telnet Login, and Configuring Scheme Authentication for Telnet Login.
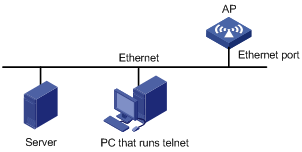
Step3 Set up a configuration environment as shown in Figure 1-11. Connect the PC to an Ethernet port in VLAN 1 of the AP, and make sure that the PC and VLAN-interface 1 can reach each other.
Figure 1-11 Set up a local configuration environment
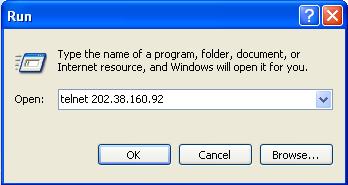
Step4 Execute the following telnet command on the PC.
Step5 Enter the password when the Telnet window displays “Login authentication” and prompts for login password. The CLI prompt (such as <Sysname>) appears if the password is correct. If all VTY user interfaces of the AP are in use, you fail to establish the connection and receive the message that says “All user interfaces are used, please try later!”. A WA series WLAN AP can accommodate up to 5 Telnet connections at same time.
Step6 After successfully Telnetting to an AP, you can configure the AP or display information about the AP by executing corresponding commands. You can also type ? at any time for help. Refer to the following chapters for information about the commands.
![]()
l A Telnet connection is terminated if you delete or modify the IP address of the corresponding VLAN interface.
l By default, commands of level 0 are available to Telnet users authenticated by password. See CLI in the Fundamentals Configuration Guide for information about command hierarchy.
Configuring Common Settings for Telnet Login
Table 1-6 lists the common Telnet settings.
Table 1-6 Common Telnet settings
|
To do… |
Use the command… |
Remarks |
|
|
Enter system view |
system-view |
— |
|
|
Enable the Telnet Server |
telnet server enable |
Optional By default, telnet server is enabled. |
|
|
Enter one or more VTY user interface views |
user-interface vty first-number [ last-number ] |
— |
|
|
VTY user interface configuration |
Enable terminal services |
shell |
Optional By default, terminal services are available in all user interfaces. |
|
Set the command that is automatically executed when a user logs into the user interface |
auto-execute command text |
Optional By default, no command is automatically executed when a user logs into a VTY user interface. |
|
|
Configure the protocols the VTY user interface supports |
protocol inbound { all | ssh | telnet } |
Optional By default, APs support telnet, and only APs that support 802.11n support SSH. |
|
|
Define a shortcut key for terminating tasks. |
escape-key { default | character } |
Optional By default, you can use Ctrl+C to terminate a task. |
|
|
Configure the type of terminal display under the current user interface. |
terminal type { ansi | vt100 } |
Optional By default, the terminal display type is ANSI. |
|
|
Configure the command level for users logging in to the VTY user interface |
user privilege level level |
Optional By default, commands of level 0 are available to users logging in to the VTY user interface. |
|
|
Set the maximum number of lines on the next screen |
screen-length screen-length |
Optional By default, the next screen displays 24 lines. A value of 0 disables the function. |
|
|
Set history command buffer size |
history-command max-size value |
Optional By default, the history command buffer can contain up to 10 commands. |
|
|
Set the timeout time of a VTY user interface |
idle-timeout minutes [ seconds ] |
Optional The default timeout time is 10 minutes. The system automatically terminates the user’s connection if there is no information interaction between the device and the user in timeout time. Setting idle-timeout to 0 disables the timer. |
|
Telnet Login Configuration Task List
Telnet login configurations vary with different authentication modes.
Table 1-7 Telnet login configuration tasks when different authentication modes are adopted
|
Authentication mode |
Configuration |
Description |
|
None |
Configure none authentication |
For more information, see Configuring None Authentication for Telnet Login . |
|
Password |
Enable password authentication |
For more information, see Configuring Password Authentication for Telnet Login. |
|
Set the local password |
||
|
Scheme |
Configure to authenticate users locally or remotely |
For more information, see Configuring Scheme Authentication for Telnet Login. |
|
Configure the authentication scheme |
||
|
Configure password authentication |
Configuring None Authentication for Telnet Login
Configuration procedure
Follow these steps to perform Telnet login configuration (with authentication mode none):
|
To do… |
Use the command… |
Remarks |
|
Enter system view |
System-view |
— |
|
Enter one or more VTY user interface views |
user-interface vty first-number [ last-number ] |
— |
|
Configure none authentication for telnet users that log in to VTY user interfaces |
authentication-mode none |
Required By default, the authentication mode for VTY user interfaces is password. |
If you configure not to authenticate the users, the command level for telnet users that log in to the AP depends on the user privilege level level command.
Configuration example
1) Network requirements
By default, you can log in to the device through the console port without authentication and have user privilege level 3 after login.
l Do not authenticate users that log in to VTY 0.
l Commands of level 2 are available to users that log in to VTY 0.
l Telnet is supported.
l The screen can contain up to 30 lines.
l The history command buffer can contain up to 20 commands.
l The timeout time of VTY 0 is 6 minutes.
2) Network diagram
Figure 1-13 Network diagram for Telnet configuration (with the authentication mode none)

3) Configuration procedure
# Enter system view.
<Sysname> system-view
# Enter VTY 0 user interface view.
[Sysname] user-interface vty 0
# Enable none authentication for Telnet users that log in to VTY 0.
[Sysname-ui-vty0] authentication-mode none
# Specify commands of level 2 are available to users that log in to VTY 0.
[Sysname-ui-vty0] user privilege level 2
# Configure Telnet protocol is supported.
[Sysname-ui-vty0] protocol inbound telnet
# Set the maximum number of lines the screen can contain to 30.
[Sysname-ui-vty0] screen-length 30
# Set the maximum number of commands the history command buffer can store to 20.
[Sysname-ui-vty0] history-command max-size 20
# Set the timeout time to 6 minutes.
[Sysname-ui-vty0] idle-timeout 6
Configuring Password Authentication for Telnet Login
Configuration procedure
Follow these steps to perform Telnet configuration (with authentication mode password):
|
To do… |
Use the command… |
Remarks |
|
Enter system view |
system-view |
— |
|
Enter one or more VTY user interface views |
user-interface vty first-number [ last-number ] |
— |
|
Enable password authentication |
authentication-mode password |
Required By default, the authentication mode for VTY user interfaces is password. |
|
Set the local password |
set authentication password { cipher | simple } password |
Required By default, no local password is set. |
If password authentication is configured, the command level for users that log in to the AP depends on the user privilege level level command.
Configuration example
1) Network requirements
You have logged in to the AP.
By default, you can log in to the device through the console port without authentication and have user privilege level 3 after login. The network requirements are as follows:
l Authenticate users logging in to VTY 0 using a local password.
l Set the local password to 123456 (in plain text).
l Commands of level 2 are available to users logging in to VTY 0.
l Telnet is supported.
l The screen can contain up to 30 lines.
l The history command buffer can contain up to 20 commands.
l The timeout time of VTY 0 is 6 minutes.
2) Network diagram
Figure 1-14 Network diagram for Telnet configuration (with the authentication mode password)

3) Configuration procedure
# Enter system view.
<Sysname> system-view
# Enter VTY 0 user interface view.
[Sysname] user-interface vty 0
# Enable password authentication for users that log in to VTY 0.
[Sysname-ui-vty0] authentication-mode password
# Set the local password to 123456 (in plain text).
[Sysname-ui-vty0] set authentication password simple 123456
# Specify commands of level 2 are available to users that log in to VTY 0.
[Sysname-ui-vty0] user privilege level 2
# Configure VTY 0 to support Telnet.
[Sysname-ui-vty0] protocol inbound telnet
# Set the maximum number of lines the screen can contain to 30.
[Sysname-ui-vty0] screen-length 30
# Set the maximum number of commands the history command buffer can store to 20.
[Sysname-ui-vty0] history-command max-size 20
# Set the timeout time to 6 minutes.
[Sysname-ui-vty0] idle-timeout 6
Configuring Scheme Authentication for Telnet Login
Configuration procedure
Follow these steps to perform Telnet configuration (with authentication mode scheme):
|
To do… |
Use the command… |
Remarks |
|
|
Enter system view |
system-view |
— |
|
|
Enter one or more VTY user interface views |
user-interface vty first-number [ last-number ] |
— |
|
|
Enable scheme authentication |
authentication-mode scheme |
Required The specified AAA scheme determines whether to authenticate users locally or remotely. Users are authenticated locally by default. |
|
|
Quit to system view |
quit |
— |
|
|
Configure the authentication scheme |
Enter the default ISP domain view |
domain domain name |
Optional By default, the local AAA scheme is applied. If you specify to apply the local AAA scheme, perform the configuration concerning local user as well. If you specify to apply an existing scheme by providing the radius-scheme-name argument, perform the following configuration as well: l Perform AAA-RADIUS configuration on the AP. (See AAA in the Security Configuration Guide.) l Configure the user name and password accordingly on the AAA server. (See AAA in the Security Configuration Guide.) |
|
Configure the AAA scheme to be applied to the domain |
authentication default { local | none | radius-scheme radius-scheme-name [ local ] } |
||
|
Quit to system view |
quit |
||
|
Create a local user and enter local user view |
local-user user-name |
No local user exists by default. |
|
|
Set the authentication password for the local user |
password { simple | cipher } password |
Required |
|
|
Specifies the level of the VTY user |
authorization-attribute level level |
By default, the command level is 0. |
|
|
Specify the service type for VTY users |
service-type telnet |
Required By default, a user is authorized with no service |
|
l When you log in to an AP by using the scheme authentication mode, your access rights depend on your user level defined in the AAA scheme.
l When the local scheme authentication mode is used, the user levels are specified by using the authorization-attribute level level command.
l When the RADIUS scheme authentication mode is used, the user levels are set on the corresponding RADIUS servers.
![]()
For more information about AAA and RADIUS, see AAA in the Security Configuration Guide.
Configuration example
1) Network requirements
You have logged in to the AP.
By default, you can log in to the device through the console port without authentication and have user privilege level 3 after login. The network requirements are as follows:
l Configure the name of the local user as “guest”.
l Set the authentication password of the local user to 123456 (in plain text).
l Set the service type of VTY users to Telnet.
l Configure scheme authentication for users that log in to VTY 0.
l The commands of level 2 are available to users that log in to VTY 0.
l Telnet is supported in VTY 0.
l The screen can contain up to 30 lines.
l The history command buffer can store up to 20 commands.
l The timeout time of VTY 0 is 6 minutes.
Network diagram
Figure 1-15 Network diagram for Telnet configuration (with the authentication mode scheme)

1) Configuration procedure
l Configure the AP
# Enter system view.
<Sysname> system-view
# Create a local user named guest and enter local user view.
[Sysname] local-user guest
# Set the authentication password of the local user to 123456 (in plain text).
[Sysname-luser-guest] password simple 123456
# Set the service type to Telnet
[Sysname-luser-guest] service-type telnet
# Set the command level to 2.
[Sysname-luser-guest] authorization-attribute level 2
# Enter VTY 0 user interface view.
[Sysname] user-interface vty 0
# Configure scheme authentication for users that log in to VTY 0.
[Sysname-ui-vty0] authentication-mode scheme
# Configure Telnet protocol is supported.
[Sysname-ui-vty0] protocol inbound telnet
# Set the maximum number of lines the screen can contain to 30.
[Sysname-ui-vty0] screen-length 30
# Set the maximum number of commands the history command buffer can store to 20.
[Sysname-ui-vty0] history-command max-size 20
# Set the timeout time to 6 minutes.
[Sysname-ui-vty0] idle-timeout 6
l Configure the authentication scheme
Configure the authentication server by referring to related parts in AAA in the Security Configuration Guide.
![]()
The IPv6 Telnet command is telnet ipv6 { ipv6-address | hostname } [ -i interface-type interface-number ] [ port-number ].
Logging In Through SSH
Secure Shell (SSH) offers an approach to logging into a remote device securely. With encryption and strong authentication, it protects devices against attacks such as IP spoofing and plain text password interception. For the security features provided by SSH, see SSH2.0 in the Security Configuration Guide.
![]()
At present, only APs that support 802.11n support SSH login.
Configuring Command Authorization
By default, command level for a login user depends on the user level. The user is authorized the command with the default level not higher than the user level. With the command authorization configured, the command level for a login user is decided by both the user level and AAA authorization. If a user executes a command of the corresponding user level, the authorization server checks whether the command is authorized. If yes, the command can be executed.
The authorization server checks the commands authorized for users through the username, and thus the command authorization configuration involves four steps:
Step1 Configure the authentication mode as scheme (In other words, use username and password are required for authentication) when users log in.
Step2 Enable command authorization. For more information, see the following table.
Step3 Configure a RADIUS scheme. Specify the IP addresses of the RADIUS authorization servers and other related parameters. For more information, see AAA in the Security Configuration Guide.
Step4 Configure the ISP domain to use the RADIUS scheme for command line users. For more information, See AAA in the Security Configuration Guide.
Follow these steps to enable command authorization:
|
To do… |
Use the command… |
Remarks |
|
Enter system view |
system-view |
— |
|
Enter one or more VTY user interface views |
user-interface [ vty | console ] first-number [ last-number ] |
— |
|
Enable command authorization |
command authorization |
Required Disabled by default, that is, users can execute commands without authorization. |
Logging In Through a Web-Based Network Management System
Introduction
A WA series WLAN access point has a built-in Web server. You can log in to an AP through a Web browser and intuitively manage and maintain the AP by interacting with the built-in Web server.
To log in to an AP through the built-in Web-based network management system, you need to perform the related configuration on both the AP and the PC operating as the network management terminal.
Table 1-8 Requirements for logging in to a AP through the Web-based network management system
|
Item |
Requirement |
|
AP |
Start the Web server |
|
The IP address of the management VLAN of the AP is configured. The route between the AP and the network management terminal is available. |
|
|
The user name and password for logging in to the Web-based network management system are configured. |
|
|
PC that operates as the network management terminal |
IE is available. |
|
The IP address of the management VLAN interface of the AP is available. |
Web Server Configuration
Follow these steps to log in through web-based network management configuration
|
To do… |
Use the command… |
Remarks |
|
Enter system view |
system-view |
— |
|
Start the web server |
ip http enable |
Required |
|
Add a local user and enter local user view |
local-user user-name |
Required No local user exists by default. |
|
Configure a password for the local user |
password { cipher | simple } password |
Required |
|
Configure the authorization attributes for the VTY user |
authorization-attribute level level |
Optional By default, the command level is 0. |
|
Specify the service types for the VTY user |
service-type telnet |
Optional By default, no service is authorized to a user. |
l When you log in to an AP by using the scheme authentication mode, your access rights depend on your user level defined in the AAA scheme.
l When the local authentication mode is used, the user levels are specified using the authorization-attribute level level command.
l When the RADIUS authentication mode is used, the user levels are set on the corresponding RADIUS servers.
![]()
For more information about AAA and RADIUS, see AAA in the Security Configuration Guide.
Displaying Web Users
Follow the step below to display information about Web users:
|
To do… |
Use the command… |
Remarks |
|
Display information about Web users |
display web users |
Available in any view |
Configuration Example
Step1 Log in to the AP through the console port and assign an IP address to VLAN-interface 1 of the AP. By default, VLAN 1 is the management VLAN.
l Connect to the console port. See Logging In Through the Console Port.
l Execute the following commands in the terminal window to assign an IP address to VLAN-interface 1 of the AP.
# Configure the IP address of the management VLAN interface as 10.153.17.82 with the mask 255.255.255.0.
<Sysname> system-view
[Sysname] interface vlan-interface 1
[Sysname-Vlan-interface1] ip address 10.153.17.82 255.255.255.0
Step2 Configure the user name and the password for the web-based network management system.
# Configure the user name as admin, the password as admin, and command level as 3.
[Sysname] local-user admin
[Sysname-luser-admin] password simple admin
[Sysname-luser-admin] authorization-attribute level 3
[Sysname-luser-admin] service-type telnet
Step3 Establish an HTTP connection between your PC and the AP, as shown in the following figure.
Figure 1-16 Establish an HTTP connection between your PC and the AP

Step4 Log in to the AP through IE. Launch IE on the Web-based network management terminal (your PC) and enter the IP address of the management VLAN interface of the AP (here it is http://10.153.17.82). (Make sure the web-based network management terminal and the AP can reach each other.)
Step5 When the login interface (shown in Figure 1-17) appears, enter the user name and the password configured in step 2, select a language, and then click Login to log in to the main page of the Web-based network management system.
Figure 1-17 The login page of the Web-based network management system

Logging In Through an NMS
Introduction
You can also log in to an AP through a network management station (NMS), and then configure and manage the AP through the agent on the AP. The Simple Network Management Protocol (SNMP) is applied between the NMS and the agent. For more information about SNMP, see SNMP in the Network Management and Monitoring Configuration Guide.
To log in to an AP through an NMS, you need to perform related configuration on both the NMS and the AP.
Table 1-9 Requirements for logging in to an AP through an NMS
|
Item |
Requirement |
|
AP |
The IP address of the management VLAN of the AP is configured. The route between the NMS and the AP is available. |
|
The basic SNMP functions are configured. (See SNMP in the Network Management and Monitoring Configuration Guide.) |
|
|
NMS |
The NMS is properly configured. For more information about NMS, see the corresponding manual shipped with the NMS. |
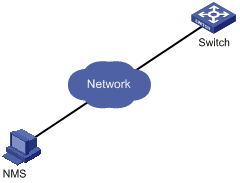
Connection Establishment Through an NMS
Figure 1-18 Network diagram for logging in through an NMS
