- Table of Contents
-
- Fundamentals Configuration Guide
- 00-Preface
- 01-Feature Matrix
- 02-CLI Configuration
- 03-Controlling Login Users
- 04-File Management Configuration
- 05-FTP and TFTP Configuration
- 06-Device Management Configuration
- 07-Basic System Configuration
- 08-HTTP Configuration
- 09-Logging In to the AP Configuration
- 10-Index
- Related Documents
-
| Title | Size | Download |
|---|---|---|
| 06-Device Management Configuration | 109.64 KB |
Device Management Configuration Task List
Configuring the Exception Handling Method
Configuring the Scheduled Automatic Execution Function
Upgrading the Boot ROM Program Through Command Lines
Upgrading the Boot File Through Command Lines
Clearing the 16-Bit Interface Indexes Not Used in the Current System
Displaying and Maintaining Device Management Configuration
Device Management Configuration Example
Remote Upgrade Configuration Example
l The models listed in this document are not applicable to all regions. Please consult your local sales office for the models applicable to your region.
l Support of the H3C WA series WLAN access points (APs) for features may vary by AP model. For more information, see Feature Matrix.
l The interface types and the number of interfaces vary by AP model.
l The term AP in this document refers to common APs, wireless bridges, and mesh APs.
This chapter includes these sections:
l Device Management Configuration Task List
l Displaying and Maintaining Device Management Configuration
l Device Management Configuration Example
![]()
In this document, an application file is named as test.bin, which is for reference only.
Device Management Overview
Through the device management function, you can view the current working state of a device, configure running parameters, and perform daily device maintenance and management.
Currently, the following device management functions are available:
l Configuring the Exception Handling Method
l Configuring the Scheduled Automatic Execution Function
l Clearing the 16-Bit Interface Indexes Not Used in the Current System
l Displaying and Maintaining Device Management Configuration
Device Management Configuration Task List
Complete these tasks to configure device management:
|
Task |
Remarks |
|
Optional |
|
|
Optional |
|
|
Optional |
|
|
Optional |
|
|
Clearing the 16-Bit Interface Indexes Not Used in the Current System |
Optional |
Configuring the Exception Handling Method
When the system detects any software abnormality, it handles the situation with one of the following two methods:
l reboot: The system recovers itself through automatic reboot.
l maintain: The system maintains the current situation, and does not take any measure to recover itself. Therefore, you need to recover the system manually, such as reboot the system. Sometimes, it is difficult for the system to recover, or some prompts that are printed during the failure are lost after the reboot. In this case, you can use this method to maintain the abnormal state to locate problems and recover the system.
Follow these steps to configure the exception handling method (centralized device):
|
To do… |
Use the command… |
Remarks |
|
Enter system view |
system-view |
— |
|
Configure the exception handling method |
system-failure { maintain | reboot } |
Optional By default, the system adopts the reboot method to handle exceptions. |
Rebooting a Device
When a fault occurs to a running device, you can remove the fault by rebooting the AP, depending on the actual situation.
You can reboot a device following any of the three methods:
l Power on the AP after powering it off, which is also called hard reboot or cold start. This method impacts the AP a lot. Powering off a running device will cause data loss and hardware damages. It is not recommended.
l Trigger the immediate reboot through command lines.
l Enable the scheduled reboot function through command lines. You can set a time at which the AP can automatically reboot, or set a delay so that the AP can automatically reboot within the delay.
The last two methods are command line operations. Reboot through command lines is also called hot start, which is mainly used to reboot a device in remote maintenance without performing hardware reboot of the AP.
Follow the step below to reboot a device through command lines immediately:
|
To do… |
Use the command… |
Remarks |
|
Reboot the AP immediately |
reboot |
Optional Available in user view |
Follow these steps to reboot a device:
|
To do… |
Use the command… |
Remarks |
|
Enable the scheduled reboot function and specify a specific reboot time and date |
schedule reboot at hh:mm [ date ] |
Optional The scheduled reboot function is disabled by default. Execute the command in user view. |
|
Enable the scheduled reboot function and specify a reboot waiting time |
schedule reboot delay { hh:mm | mm } |
![]()
l Before device reboot, use the save command to save the current configurations. For more information about the save command, see File System in the Fundamentals Command Reference.
l Before device reboot, use the commands of display startup and display boot-loader to check if the configuration file and boot file for the next boot are configured. For more information about the display startup command, see File System in the Fundamentals Command Reference. For more information about the display boot-loader command, see Device Management in the Fundamentals Command Reference.
l The precision of the rebooting timer is 1 minute. One minute before the rebooting time, the AP will prompt “REBOOT IN ONE MINUTE” and will reboot in one minute.
l Device reboot may result in the interruption of the ongoing services. Be careful to use these commands.
l If the current boot file in use fails or does not exist, the AP cannot be rebooted with the reboot command. In this case, you can re-specify a boot file before rebooting the AP.
l If you are performing file operations when the AP is to be rebooted, the system does not perform the reboot operation for the sake of security.
Configuring the Scheduled Automatic Execution Function
The scheduled automatic execution function enables the system to automatically execute a specified command at a specified time in a specified view. This function is used for scheduled system upgrade or configuration.
Follow these steps to configure the scheduled automatic execution function:
|
To do… |
Use the command… |
Remarks |
|
Enter system view |
system-view |
— |
|
Create a scheduled task and enter job view, or enter this view directly if a task is ready |
job job-name |
Required No scheduled task is created by default. |
|
Specify the view in which the task is executed |
view view-name |
Required By default, no view is specified for executing the scheduled task. |
|
Bind the execution time with the commands in the task, that is, configure the time to execute the commands in the task |
time timeID at time1 date command command |
Required Use any of the commands. |
|
time timeID { one-off | repeating } at time1 [ month-date month-day | week-day week-daylist ] command command |
||
|
time timeID { one-off | repeating } delay time2 command command |
![]()
l Only one view can be specified for a task, that is, all commands in the task are executed in the specified view. If different views are specified by executing the view view-name command repeatedly, only the last configuration takes effect.
l The view must be currently supported by the system, with its name specified using its complete format but not an abbreviation. Most commonly used view names include: monitor for user view, system for system view, Etherentx/x/x for Ethernet interface view, Wlan-radiox/x/x for radio interface view, and Vlan-interfacex for VLAN interface view.
l timeID is used to uniquely identify the binding between a command and its execution time. A scheduled task can contain up to ten commands.
l The command specified by the command command argument must be a command that can be executed in the view specified by the view view-name command; otherwise this command cannot be automatically executed. Therefore, ensure the correctness of the configuration.
Upgrading Device Software
Device Software Overview
Device software consists of the Boot ROM program and the system boot file. After the AP is powered on, the AP runs the Boot ROM program, initializes the hardware, and displays the hardware information. Then the AP runs the boot file. The boot file provides drivers and adaptation for hardware, and implements service features. The Boot ROM program and system boot file are required for the startup and running of a device. Figure 1-1 illustrates their relationship.
Figure 1-1 Relationship between the Boot ROM program and the system boot file
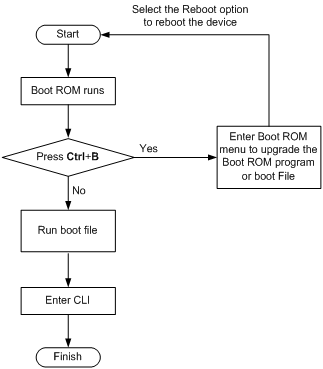
The Boot ROM program and system boot file can both be upgraded through the Boot ROM menu or command lines. The following sections describe the upgrading through command lines. For instructions about how to upgrade them through the Boot ROM menu, see the installation menu of your AP.
Upgrading the Boot ROM Program Through Command Lines
Follow these steps to upgrade the Boot ROM program:
1) Copy the Boot ROM program to the root directory of the AP's storage medium using FTP or TFTP.
2) Use a command to specify the Boot ROM program for the next boot.
3) Reboot the AP to make the specified Boot ROM program take effect.
Follow these steps to upgrade the Boot ROM program:
|
To do… |
Use the command… |
Remarks |
|
Read, restore, back up, or upgrade the Boot ROM program on the AP |
bootrom { read | restore | backup | update file file-url } [ all | part ] |
Required All contents of the Boot ROM file are operated if the all and part keywords are not specified. Available in user view. |
![]()
l You must save the file for the next device boot under the root directory of the AP. You can copy or move a file to change the path of it to the root directory.
l A backup boot file is not applicable to access points (AP.
Upgrading the Boot File Through Command Lines
Follow the steps to upgrade the boot file:
1) Save the boot file to the root directory of the AP's storage medium using FTP, TFTP, or other approaches.
2) Use a command to specify the boot file for the next boot of the AP.
3) Reboot the AP to make the boot file take effect.
When multiple Boot ROM files are available on the storage media, you can specify a file for the next device boot by executing the following command. A main boot file is used to boot a device and a backup boot file is used to boot a device only when a main boot file is unavailable.
Follow the step below to upgrade the boot file:
|
To do… |
Use the command… |
Remarks |
|
Specify a boot file for the next boot |
boot-loader file file-url |
Required Available in user view. |
![]()
You must save the file for the next device boot under the root directory of the AP. You can copy or move a file to change the path of it to the root directory.
Clearing the 16-Bit Interface Indexes Not Used in the Current System
In practical networks, the network management software requires the AP to provide a uniform, stable 16-bit interface index. That is, a one-to-one relationship should be kept between the interface name and the interface index in the same device.
For the purpose of the stability of an interface index, the system will save the 16-bit interface index when a card or logical interface is removed.
If you repeatedly insert and remove different subcards or interface cards to create or delete a large number of logical interfaces, the interface indexes will be used up, which will result in interface creation failures. To avoid such a case, you can clear all 16-bit interface indexes saved but not used in the current system in user view.
After the above operation,
l For a re-created interface, the new interface index may not be consistent with the original one.
l For existing interfaces, their interface indexes remain unchanged.
Follow the step below to clear the 16-bit interface indexes not used in the current system:
|
To do… |
Use the command… |
Remarks |
|
Clear the 16-bit interface indexes saved but not used in the current system |
reset unused porttag |
Required Available in user view |
![]()
Displaying and Maintaining Device Management Configuration
Follow these steps to display and maintain device management configuration:
|
To do… |
Use the command… |
Remarks |
|
Display information of the boot file |
display boot-loader |
Available in any view |
|
Display the statistics of the CPU usage |
display cpu-usage [ entry-number [ offset ] [ verbose ] [ from-device ] ] |
|
|
Display history statistics of the CPU usage in a chart |
display cpu-usage history [ task task-id ] |
|
|
Display electrical label information of the AP |
display device manuinfo |
|
|
Display device information |
display device [ verbose ] |
|
|
Display the usage of the memory of a device |
display memory |
|
|
Display the reboot type of a device |
display reboot-type |
|
|
Display the reboot time of a device |
display schedule reboot |
|
|
Display detailed configurations of the scheduled automatic execution function |
display job [ job-name ] |
|
|
Display the exception handling method |
display system-failure |
Device Management Configuration Example
Remote Upgrade Configuration Example
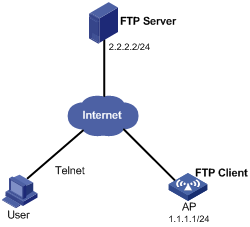
Network requirements
l As shown in Figure 1-2, access point (AP) serves as the FTP Client. The test.bin program and the BootWare program boot.btm are both saved under the aaa directory of the FTP Server.
l The IP address of a VLAN interface on AP is 1.1.1.1/24, the IP address of the FTP Server is 2.2.2.2/24, and FTP Server is reachable.
l User can log in to AP through Telnet to perform operations on AP (download the application program from FTP Server and remotely upgrade AP through command lines). Ensure that a route exists between User and AP.
Figure 1-2 Network diagram for remote upgrade
Configuration procedure
l Configuration on FTP Server (Note that configurations may vary with different types of servers)
# Enable FTP Server.
<FTP-Server> system-view
[FTP-Server] ftp server enable
# Set the FTP username to aaa and password to hello.
[FTP-Server] local-user aaa
[FTP-Server-luser-aaa] password cipher hello
# Configure the user to have access to the aaa directory.
[FTP-Server-luser-aaa] level 3
[FTP-Server-luser-aaa] service-type ftp
[FTP-Server-luser-aaa] work-directory flash:/aaa
l Configuration on AP
![]()
If the size of the Flash on the AP is not large enough, delete the original application programs from the Flash before downloading.
# Enter the following command in user view to log in to FTP Server.
<AP> ftp 2.2.2.2
Trying ...
Press CTRL+K to abort
Connected.
220 WFTPD 2.0 service (by Texas Imperial Software) ready for new user
User(none): aaa
331 Give me your password, please
Password:
230 Logged in successfully
[ftp]
# Download the test.bin and boot.btm programs on FTP Server to the Flash of AP.
[ftp] get test.bin
[ftp] get boot.btm
# Clear the FTP connection and return to user view.
[ftp] bye
<AP>
# Upgrade the BootWare file of the main board.
<AP> bootrom update file boot.btm
# Specify the application program for the next boot of the main board.
<AP> boot-loader file test.bin
# Reboot the AP to validate the application program upgrade.
<AP> reboot
After the AP reboots, use the display version command to check if the upgrade is successful.