- Table of Contents
-
- Fundamentals Configuration Guide
- 00-Preface
- 01-Feature Matrix
- 02-CLI Configuration
- 03-Controlling Login Users
- 04-File Management Configuration
- 05-FTP and TFTP Configuration
- 06-Device Management Configuration
- 07-Basic System Configuration
- 08-HTTP Configuration
- 09-Logging In to the AP Configuration
- 10-Index
- Related Documents
-
| Title | Size | Download |
|---|---|---|
| 05-FTP and TFTP Configuration | 122.38 KB |
Table of Contents
Establishing an FTP Connection
FTP Client Configuration Example
Displaying and Maintaining FTP
Displaying and Maintaining the TFTP Client
TFTP Client Configuration Example
l The models listed in this document are not applicable to all regions. Please consult your local sales office for the models applicable to your region.
l Support of the H3C WA series WLAN access points (APs) for features may vary by AP model. For more information, see Feature Matrix.
l The interface types and the number of interfaces vary by AP model.
l The term AP in this document refers to common APs, wireless bridges, and mesh APs.
This chapter includes these sections:
l Displaying and Maintaining FTP
FTP Overview
Introduction to FTP
The File Transfer Protocol (FTP) is an application layer protocol for sharing files between server and client over a TCP/IP network.
FTP uses TCP ports 20 and 21 for file transfer. Port 20 is used to transmit data, and port 21 to transmit control commands. See RFC 959 for details of FTP basic operation.
FTP transmits files in two modes:
l Binary mode: Transfers files as raw data, like .app, .bin, and .btm files.
l ASCII mode: Transfers files as text, like .txt, .bat, and .cfg files.
Operation of FTP
FTP adopts the client/server model. Your device can function either as the client or the server (as shown in Figure 1-1). They work in the following way:
l When the device serves as the FTP client, use Telnet or an emulation program to log in to the device from the PC, execute the ftp command to establish a connection from the device (FTP client) to the PC (FTP server), and then upload/download files to/from the server.
l When the device serves as the FTP server, run the FTP client program on the PC to establish a connection to the FTP server and upload/download files to/from the server
Figure 1-1 Network diagram for FTP

At present, the device can only serve as an FTP client.
When the device serves as the FTP client, you need to perform the following configuration:
Table 1-1 Configuration when the device serves as the FTP client
|
Device |
Configuration |
Remarks |
|
Device (FTP client) |
Use the ftp command to establish the connection to the remote FTP server |
If the remote FTP server supports anonymous FTP, the device can log in to it directly; if not, the device must obtain the FTP username and password first to log in to the remote FTP server. |
|
PC (FTP server) |
Enable FTP server on the PC, and configure the username, password, user privilege level, and so on. |
— |
![]()
Make sure that the FTP server and the FTP client can reach each other before establishing the FTP connection.
Configuring the FTP Client
Establishing an FTP Connection
Before you can access the FTP server, you must first establish a connection from the FTP client to the FTP server. You can either use the ftp command to establish the connection directly or use the open command in FTP client view to establish the connection.
Source address binding means to configure an IP address on a stable interface such as an loopback interface or Dialer interface, and then use this IP address as the source IP address of an FTP connection. The source address binding function simplifies the configuration of ACL rules and security policies. You just need to specify the source or destination address argument in an ACL rule as this address to filter inbound and outbound packets on the AP ignoring the difference between interface IP addresses as well as the affect of interface statuses. You can configure the source address by configuring the source interface or source IP address. The primary IP address configured on the source interface is the source address of the transmitted packets. The source address of the transmitted packets is selected following these rules:
l If no source address is specified, the FTP client uses the IP address of the interface determined by the matched route as the source IP address to communicate with an FTP server.
l If the source address is specified with the ftp client source or ftp command, this source address is used to communicate with an FTP server.
l If the source address is specified with the ftp client source command and then with the ftp command, the address specified with the latter one is used to communicate with an FTP server.
The source address specified with the ftp client source command is valid for all FTP connections and the source address specified with the ftp command is valid only for the current FTP connection.
Follow these steps to establish an IPv4 FTP connection:
|
To do… |
Use the command… |
Remarks |
|
Enter system view |
system-view |
— |
|
Configure the source address of the FTP client |
ftp client source { interface interface-type interface-number | ip source-ip-address } |
Optional An AP uses the IP address of the interface determined by the matched route as the source IP address to communicate with the FTP server by default. |
|
Exit to system view |
quit |
— |
|
Log in to the remote FTP server directly in user view |
ftp [ server-address [ service-port ] [ source { interface interface-type interface-number | ip source-ip-address } ] ] |
Use either command. The ftp command is available in user view; and the open command is available in FTP client view. |
|
Log in to the remote FTP server indirectly in FTP client view |
ftp |
|
|
open server-address [ service-port ] |
![]()
l If no primary IP address is configured on the specified source interface, no FTP connection can be established.
l If you use the ftp client source command to first configure the source interface and then the source IP address of the transmitted packets, the new source IP address will overwrite the current one, and vice versa.
Follow these steps to establish an IPv6 FTP connection:
|
To do… |
Use the command… |
Remarks |
|
Log in to the remote FTP server directly in user view |
ftp ipv6 [ server-address [ service-port ] [ source ipv6 source-ipv6-address ] [ -i interface-type interface-number ] ] |
Use either command. The ftp ipv6 command is available in user view; and the open ipv6 command is available in FTP client view. |
|
Log in to the remote FTP server indirectly in FTP client view |
ftp ipv6 |
|
|
open ipv6 server-address [ service-port ] [ -i interface-type interface-number ] |
Configuring the FTP Client
After the AP serving as the FTP client has established a connection with the FTP server (For how to establish an FTP connection, see Establishing an FTP Connection.), the device can perform the following operations in the authorized directories:
|
To do… |
Use the command… |
Remarks |
|
Display help information of FTP-related commands supported by the remote FTP server |
remotehelp [ protocol-command ] |
Optional |
|
Enable information display in a detailed manner |
verbose |
Optional Enabled by default |
|
Enable FTP related debugging when the device acts as the FTP client |
debugging |
Optional Disabled by default |
|
Use another username to relog after logging in to the FTP server successfully |
user username [ password ] |
Optional |
|
Set the file transfer mode to ASCII |
ascii |
Optional ASCII by default |
|
Set the file transfer mode to binary |
binary |
Optional ASCII by default |
|
Change the working path on the remote FTP server |
cd { directory | .. | / } |
Optional |
|
Exit the current directory and enter the upper level directory |
cdup |
Optional |
|
Display files/directories information on the FTP server |
dir [ remotefile [ localfile ] ] |
Optional |
|
Check files/directories on the FTP server |
ls [ remotefile [ localfile ] ] |
Optional |
|
Download a file from the FTP server |
get remotefile [ localfile ] |
Optional |
|
Upload a file to the FTP server |
put localfile [ remotefile ] |
Optional |
|
Display the working directory that is being accessed |
pwd |
Optional |
|
Find the working path of the FTP client |
lcd |
Optional |
|
Create a directory on the FTP server |
mkdir directory |
Optional |
|
Set the data transfer mode to passive |
passive |
Optional Passive by default |
|
Delete the specified file on the FTP server permanently |
delete remotefile |
Optional |
|
Delete specified directory on the FTP server |
rmdir directory |
Optional |
|
Disconnect from the FTP server without exiting the FTP client view |
disconnect |
Optional Equal to the close command |
|
Disconnect from the FTP server without exiting the FTP client view |
close |
Optional Equal to the disconnect command |
|
Disconnect from the FTP server and exit to user view |
bye |
Optional |
|
Terminate the connection with the remote FTP server, and exit to user view |
quit |
Optional Available in FTP client view, equal to the bye command |
![]()
l FTP uses two modes for file transfer: ASCII mode (which can be set with the ascii command) and binary mode (which can be set with the binary command).
l The Is command can only display the file/directory name, while the dir command can display more information, such as the sizes of and date of creation of files or directories.
l The commands listed in the above table are only available for level 3 (manage level) users logging in to the device which serves as the FTP client. However, whether the users can successfully execute the commands depends on the FTP server’s authorization.
FTP Client Configuration Example
Network requirements
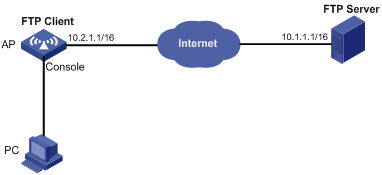
l As shown in Figure 1-2, use an access point (AP) as an FTP client, PC as an FTP server. Their IP addresses are 10.2.1.1/16 and 10.1.1.1/16 respectively. AP and PC are reachable to each other.
l AP downloads a boot file from PC, and uploads the configuration file to PC for backup.
l On the PC, an FTP user account has been created for the FTP client (AP), with the username being abc and the password being pwd.
Figure 1-2 Network diagram for FTPing a boot file from an FTP server
Configuration procedure
![]()
If the available memory space of the master and slave is insufficient, use the fixdisk command to clear the memory or use the delete /unreserved file-url command to delete the files not in use and then perform the following operations.
# Log in to the server through FTP.
<Sysname> ftp 10.1.1.1
Trying 10.1.1.1
Connected to 10.1.1.1
220 WFTPD 2.0 service (by Texas Imperial Software) ready for new user
User(10.1.1.1:(none)):abc
331 Give me your password, please
Password:
230 Logged in successfully
# Set the transmission mode to binary.
[ftp] binary
200 Type set to I.
# Download boot file newest.app from PC to the device.
[ftp] get test.bin
227 Entering Passive Mode (10,1,1,1,4,1).
125 BINARY mode data connection already open, transfer starting for / test.bin.
.....226 Transfer complete.
FTP: 5805100 byte(s) received in 19.898 second(s) 291.74K byte(s)/sec.
# Upload configuration file config.cfg of the AP to the server for backup.
[ftp] ascii
[ftp] put config.cfg back-config.cfg
227 Entering Passive Mode (10,1,1,1,4,2).
125 ASCII mode data connection already open, transfer starting for /config.cfg.
226 Transfer complete.
FTP: 3494 byte(s) sent in 5.646 second(s), 618.00 byte(s)/sec.
[ftp] bye
# Specify test.bin as the main boot file to be used at the next startup.
<Sysname> boot-loader file test.bin main
# Reboot the AP.
<Sysname> reboot
![]()
The boot file for the next startup must be saved in the root directory of the storage medium. For more information about the boot-loader command, see Device Management in the Fundamentals Command Reference.
Displaying and Maintaining FTP
|
To do… |
Use the command… |
Remarks |
|
Display the configuration of the FTP client |
display ftp client configuration |
Available in any view |
This chapter includes these sections:
l Displaying and Maintaining the TFTP Client
l TFTP Client Configuration Example
TFTP Overview
Introduction to TFTP
The Trivial File Transfer Protocol (TFTP) provides functions similar to those provided by FTP, but it is not as complex as FTP in interactive access interface and authentication. Therefore, it is more suitable in environments where complex interaction is not needed between client and server.
TFTP uses the UDP port 69 for data transmission. For TFTP basic operation, see RFC 1986.
In TFTP, file transfer is initiated by the client.
l In a normal file downloading process, the client sends a read request to the TFTP server, receives data from the server, and then sends the acknowledgement to the server.
l In a normal file uploading process, the client sends a write request to the TFTP server, sends data to the server, and receives the acknowledgement from the server.
TFTP transfers files in two modes:
l Binary mode for program file transmission, like files with the suffixes .app, .bin, or .btm.
l ASCII mode for text file transmission, like files with the suffixes .txt, .bat, or .cfg.
Operation of TFTP
Only the TFTP client service is available with the device at present.
Figure 2-1 TFTP configuration diagram
Before using TFTP, the administrator needs to configure IP addresses for the TFTP client and server, and make sure that there is a reachable route between the TFTP client and server.
When the device serves as the TFTP client, you need to perform the following configuration:
Table 2-1 Configuration when the device serves as the TFTP client
|
Device |
Configuration |
Remarks |
|
Device (TFTP client) |
l Configure the IP address and routing function, and ensure that the route between the device and the TFTP server is available. l You can use the tftp command to establish a connection to the remote TFTP server to upload/download files to/from the TFTP server |
— |
|
PC (TFTP server) |
Enable TFTP server on the PC, and configure the TFTP working directory. |
— |
Configuring the TFTP Client
When a device acts as a TFTP client, you can upload a file on the device to a TFTP server and download a file from the TFTP server to the local device. You can use either of the following ways to download a file:
l Normal download: The device writes the obtained a file to the storage medium directly. In this way, if you use a filename that has already existed in the directory, the original system file will be overwritten and if file download fails (for example, due to network disconnection), the device cannot start up normally because the original system file has been deleted.
l Secure download: The device saves the obtained file to its memory and does not write it to the storage medium until the whole file is obtained. In this way, if file download fails (for example, due to network disconnection), the device can still start up because the original system file is not overwritten. This mode is more secure but consumes more memory.
You are recommended to use the secure mode or, if you use the normal mode, specify a filename not existing in the current directory as the target filename when downloading the startup file or the startup configuration file.
Source address binding means to configure an IP address on a stable interface such as an loopback interface or Dialer interface, and then use this IP address as the source IP address of a TFTP connection. The source address binding function simplifies the configuration of ACL rules and security policies. You just need to specify the source or destination address argument in an ACL rule as this address to filter inbound and outbound packets on the device ignoring the difference between interface IP addresses as well as the affect of interface statuses. You can configure the source address by configuring the source interface or source IP address. The primary IP address configured on the source interface is the source address of the transmitted packets. The source address of the transmitted packets is selected following these rules:
l If no source address of the TFTP client is specified, a device uses the IP address of the interface determined by the matched route as the source IP address to communicate with a TFTP server.
l If the source address is specified with the tftp client source or tftp command, this source address is adopted.
l If the source address is specified with the tftp client source command and then with the tftp command, the source address configured with the latter one is used to communicate with a TFTP server.
The source address specified with the tftp client source command is valid for all TFTP connections and the source address specified with the tftp command is valid only for the current tftp connection.
Follow these steps to configure the TFTP client:
|
To do… |
Use the command… |
Remarks |
|
Enter system view |
system-view |
— |
|
Use an ACL to control the device’s access to TFTP servers |
tftp-server [ ipv6 ] acl acl-number |
Optional By default, no ACL is used to control the device’s access to TFTP servers. |
|
Configure the source address of the TFTP client |
tftp client source { interface interface-type interface-number | ip source-ip-address } |
Optional A device uses the source address determined by the matched route to communicate with the TFTP server by default. |
|
Return to user view |
quit |
— |
|
Download or upload a file in an IPv4 network |
tftp server-address { get | put | sget } source-filename [ destination-filename ] [ source { interface interface-type interface-number | ip source-ip-address } ] |
Optional Available in user view |
|
Download or upload a file in an IPv6 network |
tftp ipv6 tftp-ipv6-server [ -i interface-type interface-number ] { get | put } source-file [ destination-file ] |
Optional Available in user view |
![]()
l If no primary IP address is configured on the source interface, no TFTP connection can be established.
l If you use the ftp client source command to first configure the source interface and then the source IP address of the packets of the TFTP client, the new source IP address will overwrite the current one, and vice versa.
Displaying and Maintaining the TFTP Client
|
To do… |
Use the command… |
Remarks |
|
Display the configuration of the TFTP client |
display tftp client configuration |
Available in any view |
TFTP Client Configuration Example
Network requirements
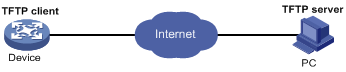
l As shown in Figure 2-2, use a PC as the TFTP server and AP as the TFTP client. Their IP addresses are 1.2.1.1/16 and 1.1.1.1/16 respectively. AP and PC can reach each other.
l AP downloads a boot file from PC for upgrading and uploads a configuration file named config.cfg to PC for backup.
Figure 2-2 Smooth upgrading using the TFTP client function

Configuration procedure
1) Configure PC (TFTP Server), the configuration procedure omitted.
l On the PC, enable the TFTP server
l Configure a TFTP working directory
2) Configure AP (TFTP Client)
![]()
If the available memory space of the device is not enough, use the fixdisk command to clear the memory or use the delete /unreserved file-url command to delete the files not in use and then perform the following operations.
# Enter system view.
<Sysname> system-view
# Download boot file test.bin from PC to the AP.
<Sysname> tftp 1.2.1.1 get test.bin
# Upload a configuration file config.cfg of the AP to the TFTP server.
<Sysname> tftp 1.2.1.1 put config.cfg configback.cfg
# Specify test.bin as the main boot file to be used at the next startup.
<Sysname> boot-loader file test.bin main
# Reboot the AP.
<Sysname> reboot
![]()
The boot file used for the next startup must be saved in the root directory of the storage medium. For more information about the boot-loader command, see Device Management in the Fundamentals Command Reference.