- Table of Contents
- Related Documents
-
| Title | Size | Download |
|---|---|---|
| 02-AAA Troubleshooting Guide | 370.11 KB |
Troubleshooting user access and authentication
Troubleshooting AAA
Execution fails for some commands after you log in to the device
Symptom
After you log in to the device and execute specific commands, the system prompts "Permission denied."
Common causes
The common cause of this type of issues is that the permissions of the granted user role are too limited.
Troubleshooting flow
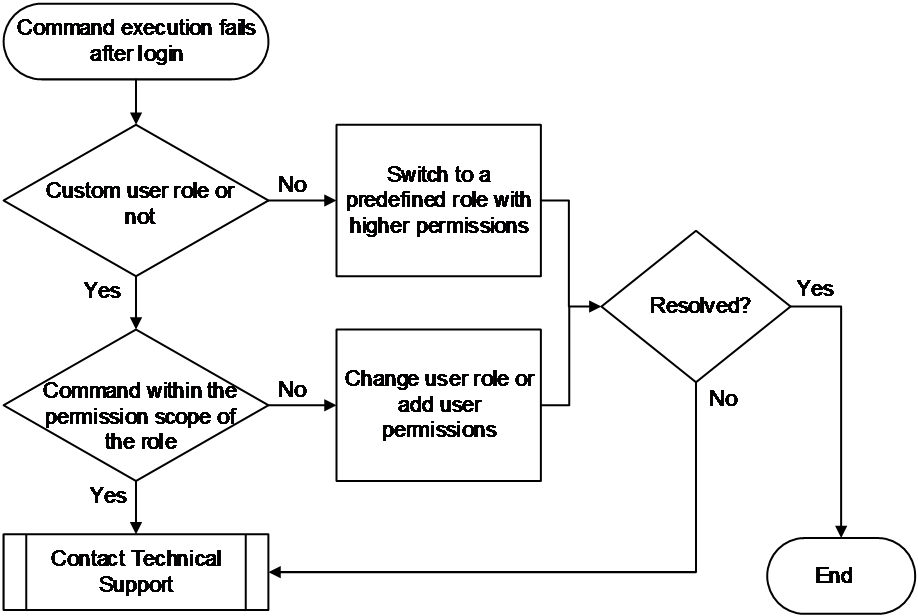
Figure 1 shows the troubleshooting flowchart.
Figure 1 Flowchart for troubleshooting command execution failure
Solution
1. Verify if the user role is a custom user role.
Log in to the device as the super administrator (a role with the network-admin or level-15 permissions), execute the display line command to check the authentication method of the login user line, and take different processing steps based on the authentication method.
<Sysname> display line
Idx Type Tx/Rx Modem Auth Int Location
0 CON 0 9600 - N - 0/0
+ 81 VTY 0 - N - 0/0
+ 82 VTY 1 - P - 0/0
+ 83 VTY 2 - A - 0/0
...
¡ For the none and password authentication methods (the Auth field is N and P respectively), verify if the user role under the corresponding user line view is a custom user role. If it is not a custom user role, use the user-role role-name command to specify a predefined role with higher permissions.
¡ For the scheme authentication method (the Auth field is A), first check the authentication method configured under the login user authentication domain.
- If the local authentication method is used, use the display local-user command to verify if the user role is a custom user role. If it is not a custom user role, use the authorization-attribute user-role role-name command to specify a predefined user role with higher permissions. The following uses the network-admin role as an example:
<Sysname> system-view
[Sysname] local-user test class manage
[Sysname-luser-manage-test] authorization-attribute user-role network-admin
- If the remote authentication method is used, contact the administrator of the remote authentication server to authorize users with higher predefined roles.
2. Verify if the command that is not allowed to execute is within the permission scope allowed by the custom user role.
a. Execute the display role name role-name command to view the command permission rules for the custom role.
b. If the command executed by the user is not within the permission scope allowed by the user role, change the user role to one with higher permissions, or use the rule command to add the corresponding command permission rule. Note that even if custom user roles are configured with higher permissions, some commands are still not supported. For more information, see configuring RBAC in Fundamentals Configuration Guide.
3. If the issue persists, collect the following information and contact Technical Support:
¡ Execution results of the above steps.
¡ Device configuration file, log information, and alarm messages.
Related alarm and log messages
Alarm messages
None.
Log messages
None.
Local user creation or modification fails after you log into the device
Symptom
If you log in to the device and create or modify a local user, the system prompts "Insufficient right to perform the operation."
Common causes
The common cause of this type of issues is that the user role assigned to the user does not have the permission to modify the target local user.
Troubleshooting flow
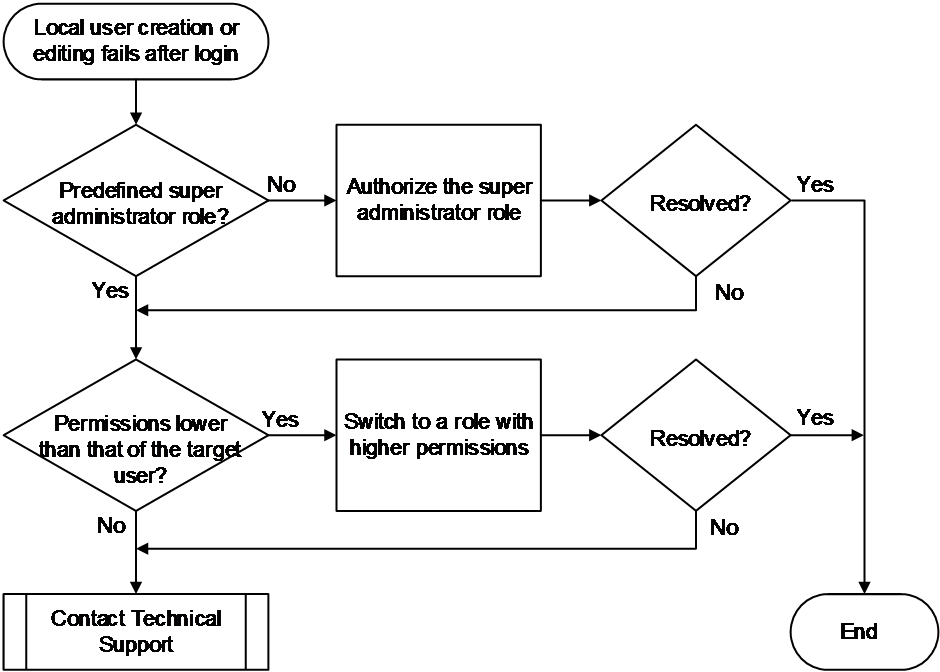
Figure 2 shows the troubleshooting flowchart.
Figure 2 Flowchart for troubleshooting local user creation or modification failure
Solution
1. If local user creation fails, verify if the login user's role is one of the predefined super administrator roles: network-admin or level-15.
Only the predefined user roles mentioned above have the permission to create local users. Other user roles only have permission to enter their own local user views. If the login user does not have a predefined user role, assign one of the predefined user role to the user. If the issue persists, proceed to the next step.
2. If local user modification fails, compare the login user's permission scope with the target user's permission scope.
Execute the display role name role-name command to compare the role permissions of the login user and the target user. If the operator has limited permissions, assign a user role with higher permissions
3. If the issue persists, collect the following information and contact Technical Support:
¡ Execution results of the above steps.
¡ Device configuration file, log information, and alarm messages.
Related alarm and log messages
Alarm messages
None.
Log messages
None.
Administrator not authorized with a user role
Symptom
The administrator cannot successfully log in to the device, and the device does not provide three login attempts. For example, when the user logs in using Telnet, after the user enters the username and password, the device login interface does not print the message "AAA authentication failed" and does not prompt the user to re-enter the username and password.
Common causes
The common cause of this type of issues is that no user role is assigned to the user.
Troubleshooting flow
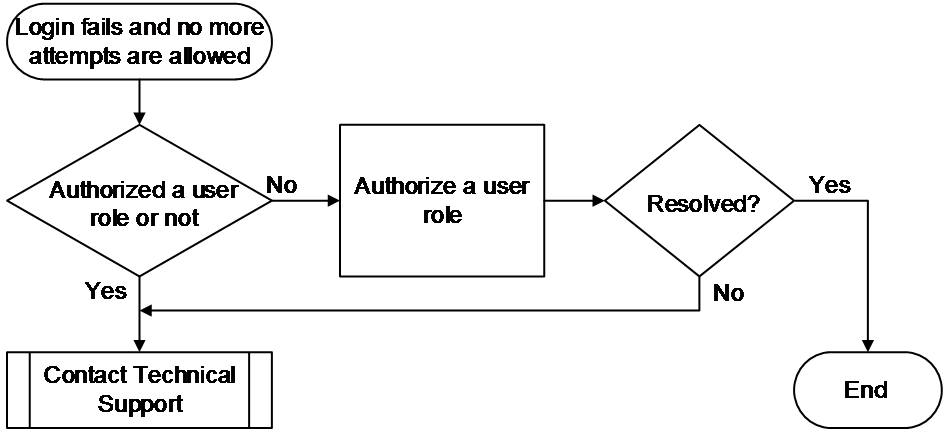
Figure 3 shows the troubleshooting flowchart.
Figure 3 Flowchart for troubleshooting user role authorization failure
Solution
1. Verify if a user role has been authorized for the user.
Log in to the device as the super administrator (a role with the network-admin or level-15 permissions), execute the display line command to check the authentication method of the login user line, and take different processing steps based on the authentication method.
<Sysname> display line
Idx Type Tx/Rx Modem Auth Int Location
0 CON 0 9600 - N - 0/0
+ 81 VTY 0 - N - 0/0
+ 82 VTY 1 - P - 0/0
+ 83 VTY 2 - A - 0/0
...
¡ For the none and password authentication methods (the Auth field is N and P respectively), verify if the user role configuration exists in the corresponding user line view. If not, use the user-role role-name command to specify a user role. In this example, the user role is abc.
<Sysname> system-view
[Sysname] line vty 0 63
[Sysname-line-vty0-63] user-role abc
¡ For the scheme authentication method (the Auth field is A), first check the authentication method configured under the login user authentication domain.
- If the Local authentication method is used, use the display local-user to view the authorized user role of the user. If the User role list: field is empty in the command output, it indicates that the user is not authorized with any user role.
<Sysname> display local-user user-name test class manage
Total 1 local users matched.
Device management user test:
State: Active
Service type: Telnet
User group: system
Bind attributes:
Authorization attributes:
Work directory: flash:
User role list:
...
Enter local user view and execute the authorization-attribute user-role command assign a user role to the user. In this example, user role abc is assigned.
<Sysname> system-view
[Sysname] local-user test class manage
[Sysname-luser-manage-test] authorization-attribute user-role abc
- If the remote authentication method is used, contact the administrator of the remote authentication server to confirm whether the user role has been assigned to the user. If not, add the user role attribute for the user. Taking the Free RADIUS server as an example, to add user role network-admin in the users file, edit the script as follows:
user Cleartext-Password := "123456"
H3C-User-Roles ="shell:roles=\"network-admin\""
Refer to the actual situation for adding user roles on other RADIUS servers.
2. If the issue persists, collect the following information and contact Technical Support:
¡ Execution results of the above steps.
¡ Device configuration file, log information, and alarm messages.
Related alarm and log messages
Alarm messages
None.
Log messages
None.
Illegal characters in login username
Symptom
The administrator fails to log in to the device, and the system prints the following log message:
Sysname LOGIN/5/LOGIN_INVALID_USERNAME_PWD: -MDC=1; Invalid username or password from xx.xx.xx.xx.
Common causes
The common cause of this type of issues is that the username contains illegal characters.
Troubleshooting flow
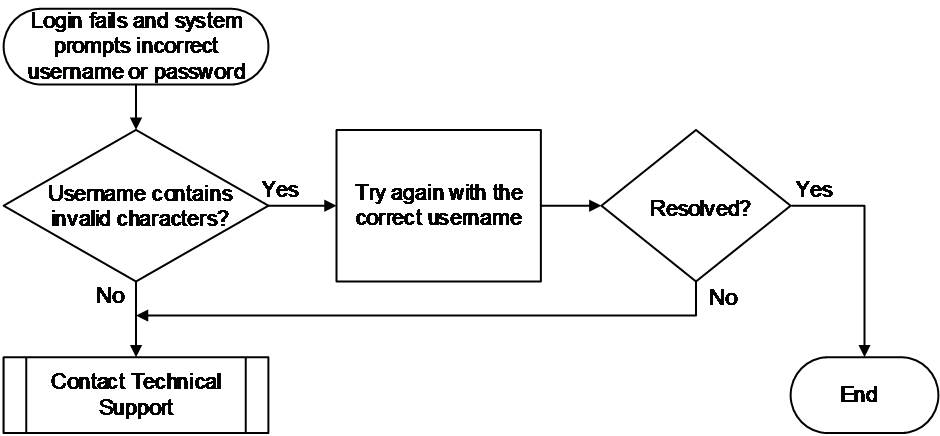
Figure 4 shows the troubleshooting flowchart.
Figure 4 Flowchart for troubleshooting illegal characters in login username
Solution
|
|
NOTE: This process is only applicable to SSH and Telnet login users. |
1. Verify if the input username contains illegal characters.
When a user logs into the device, the system checks the validity of the pure username and domain name. If the pure username contains any of the illegal characters \|/:*?<>@, or if the domain name contains @, login is not allowed. In this case, try to log in again as a best practice and make sure to enter the correct username.
2. If the issue persists, collect the following information and contact Technical Support:
¡ Execution results of the above steps.
¡ Device configuration file, log information, and alarm messages.
Related alarm and log messages
Alarm messages
None.
Log messages
LOGIN_INVALID_USERNAME_PWD
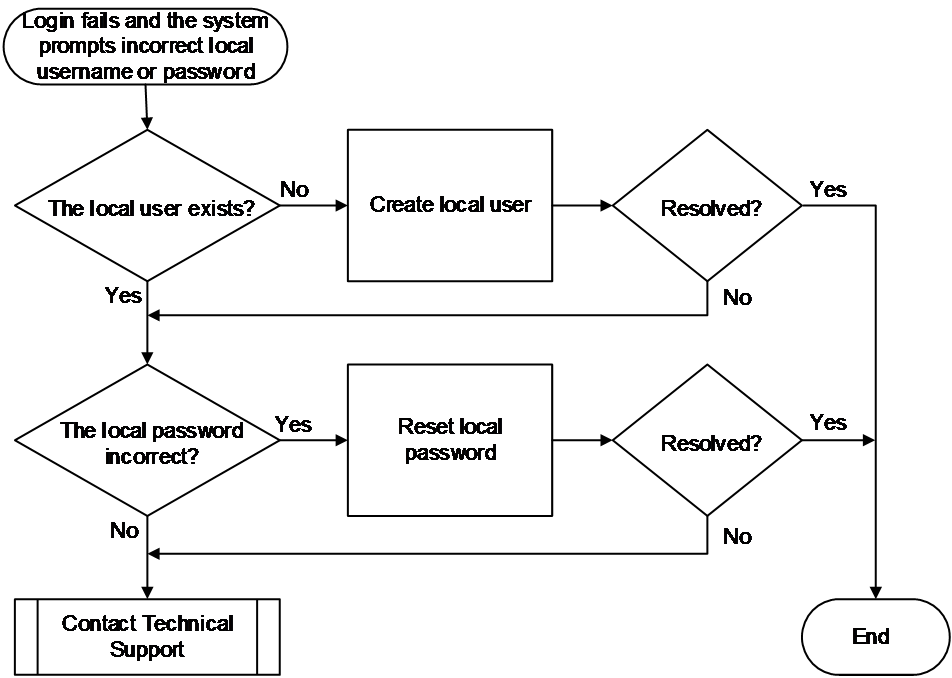
Incorrect local username or password
Symptom
The administrator failed to log into the device using local authentication. If event debugging is enabled for Local-Server on the device (by using the debugging local-server event command), the system will print debugging information in the following format:
*Aug 18 10:36:58:514 2021 Sysname LOCALSER/7/EVENT: -MDC=1;
Authentication failed, user password is wrong.
Or
*Aug 18 10:37:24:962 2021 Sysname LOCALSER/7/EVENT: -MDC=1;
Authentication failed, user "t4" doesn't exist.
Common causes
The following are the common causes of this type of issue:
· The user entered an incorrect password.
· The local username does not exist.
Troubleshooting flow
Figure 5 shows the troubleshooting flowchart.
Figure 5 Flowchart for troubleshooting incorrect username or password
Solution
1. Verify if the local username exists.
Execute the display local-user command to verify if a device management local user with the same username exists.
¡ If the local user does not exist, use the local-user command to create a device management local user and notify the user to log in to the device again. In this example, the username is test.
<Sysname> system-view
[Sysname] local-user test class manage
[Sysname-luser-manage-test]
¡ If the local user exists, proceed to step 2.
2. Verify if the local user password is correct.
If the system prompts that the password is incorrect, enter local user view, execute the password command to reset the password, and notify the user to relog in to the device. In this example, the password is 123456TESTplat&!.
<Sysname> system-view
[Sysname] local-user test class manage
[Sysname-luser-manage-test] password simple 123456TESTplat&!
3. If the issue persists, collect the following information and contact Technical Support:
¡ Execution results of the above steps.
¡ Device configuration file, log information, alarm messages, and debugging information.
Related alarm and log messages
Alarm messages
None.
Log messages
None.
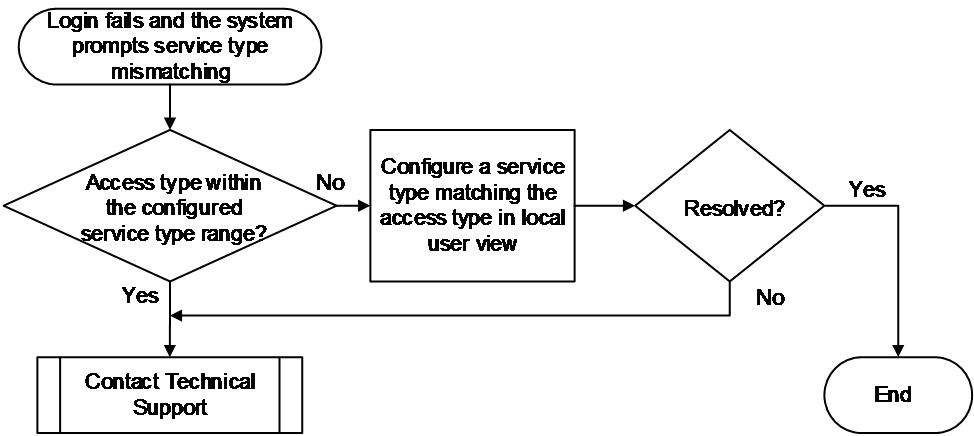
Mismatched service type of local users
Symptom
The administrator failed to log into the device using local authentication. If event debugging is enabled for Local-Server on the device (by using the debugging local-server event command), the system will print debugging information in the following format:
*Aug 7 17:18:07:098 2021 Sysname LOCALSER/7/EVENT: -MDC=1; Authentication failed, unexpected user service type 64 (expected = 3072).
Common causes
The common cause of this type of issues is that the user access type does not match the local user service type configured on the device, meaning the user access type is not within the configured service type range.
Troubleshooting flow
Figure 6 shows the troubleshooting flowchart.
Figure 6 Flowchart for troubleshooting service type mismatching for local users
Solution
1. Verify if the user access type is within the configured service type range.
a. Execute the display local-user command to view the local user configuration. The Service type field indicates the user service type.
<Sysname> display local-user user-name test class manage
Total 1 local users matched.
Device management user test:
State: Active
Service type: Telnet
User group: system
Bind attributes:
Authorization attributes:
Work directory: flash:
User role list:
...
b. In local user view, execute the service-type type command to change the local user service type to the actual type. In this example, the service type is SSH.
<Sysname> system-view
[Sysname] local-user test class manage
[Sysname-luser-manage-test] service-type ssh
2. If the issue persists, collect the following information and contact Technical Support:
¡ Execution results of the above steps.
¡ Device configuration file, log information, alarm messages, and debugging information.
Related alarm and log messages
Alarm messages
None.
Log messages
None.
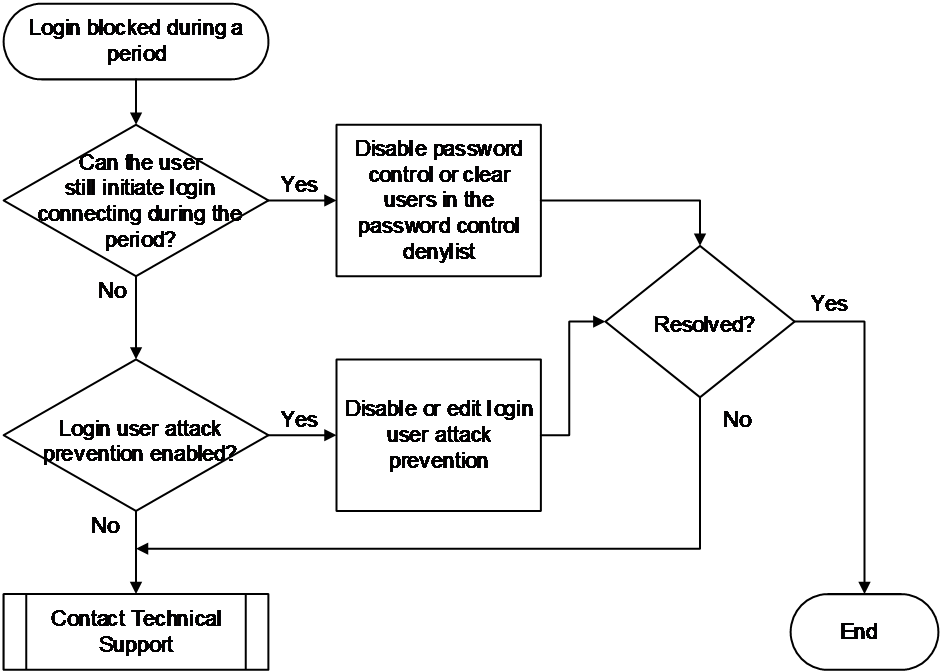
Login prohibited after the login failure limit is reached
Symptom
When the number of login failures of an administrator reaches the upper limit, the system prohibits the administrator from logging in for a certain period.
Common causes
The following are the common causes of this type of issue:
· Login user attack prevention is enabled on the device. With this feature enabled, if the number of login failures of a user reaches the limit and the user IP address is added to the denylist, the device drops packets from that IP address. This prevents the user from logging in during the specified blocking period.
· The user logs into the device using local authentication and password control is enabled on the device. After the number of login failures of a user reaches the limit, the system adds the user to the password control denylist, and restricts subsequent login behaviors of the user according to the configured processing measures. When the number of login failures of a user reaches the limit, the system prohibits the user from logging in. After a period of time, the user is allowed to log in again.
Troubleshooting flow
Figure 7 shows the troubleshooting flowchart.
Figure 7 Flowchart for troubleshooting prohibited login after the login failure limit is reached
Solution
1. Wait for a certain period of time, and try logging in again.
If login is temporarily blocked due to occasional password input errors, wait for some time before attempting to log in again. If you encounter the same issue when logging into the device again with the correct username and password, switch to another administrator account to continue the subsequent troubleshooting steps.
2. Verify if users can initiate login connections after being blocked.
¡ If the user is still able to initiate login connections to the device after being blocked but cannot authenticate successfully, execute the display password-control blacklist command in any view to verify if the user has been added to the denylist. If the user is on the denylist and the Lock flag in the command output is set to lock, it means the user is locked out.
<Sysname> display password-control blacklist
Per-user blacklist limit: 100.
Blacklist items matched: 1.
Username IP address Login failures Lock flag
test 3.3.3.3 4 lock
For users on the denylist, the following processing options are available:
- Use the undo password-control enable command in system view to disable global password control.
<Sysname> system-view
[Sysname] undo password-control enable
- Execute the reset password-control blacklist command in user view to clear the user in the denylist. In this example, the username is test.
<Sysname> reset password-control blacklist user-name test
¡ If the user is blocked and unable to initiate a login connection to the device, proceed to step 3.
3. Verify if login user attack prevention is enabled.
If a command starting with attack-defense login exists in the configuration, it indicates that login user attack prevention is enabled. You can disable this feature or change the login failure threshold or user block time as needed.
¡ Use the undo attack-defense login enable command to disable login user attack prevention, and use the undo blacklist global enable command to disable the global blacklist.
<Sysname> system-view
[Sysname] undo attack-defense login enable
[Sysname] undo blacklist global enable
¡ Use the attack-defense login max-attempt command to increase the consecutive login failure threshold. In this example, the threshold is set to 5.
<Sysname> system-view
[Sysname] attack-defense login max-attempt 5
¡ Use the attack-defense login block-timeout command to decrease the user block time. In this example, the block time is set to 1 minute.
<Sysname> system-view
[Sysname] attack-defense login block-timeout 1
Executing the above operations might weaken the device ability to guard against DoS attacks by login users. Please proceed with caution.
4. If the issue persists, collect the following information and contact Technical Support:
¡ Execution results of the above steps.
¡ Device configuration file, log information, and alarm messages.
Related alarm and log messages
Alarm messages
None.
Log messages
None.
Users must wait for a certain period to perform reauthentication after a login failure
Symptom
After the administrator fails to log in to the device, the console does not respond for a certain period of time, during which the user cannot perform any operations.
Common causes
The common cause of this type of issues is that login delay is configured on the device. With login delay enabled, after a user login fails, the system allows the user to try again after a period of time.
Troubleshooting flow
Figure 8 shows the troubleshooting flowchart.
Figure 8 Flowchart for troubleshooting delayed reauthentication

Solution
1. Verify if login delay is enabled.
If the attack-defense login reauthentication-delay command exists in the configuration, it indicates that login delay is enabled. You can disable the feature or change the delay period as needed.
¡ You can use the undo attack-defense login reauthentication-delay command to disable login delay.
<Sysname> system-view
[Sysname] undo attack-defense login reauthentication-delay
¡ Use the attack-defense login reauthentication-delay seconds command to set a shorter delay period. In this example, the period is set to 10 seconds.
<Sysname> system-view
[Sysname] attack-defense login reauthentication-delay 10
Executing the above operations might weaken the device ability to guard against dictionary attacks by login users. Please proceed with caution.
2. If the issue persists, collect the following information and contact Technical Support:
¡ Execution results of the above steps.
¡ Device configuration file, log information, and alarm messages.
Related alarm and log messages
Alarm messages
None.
Log messages
None.
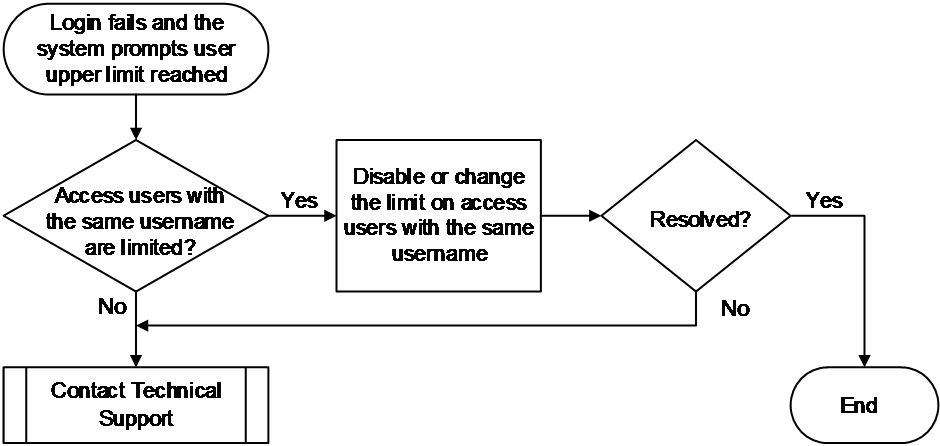
Concurrent users with the same username reached the upper limit
Symptom
When the number of local users accessing the device with the same username reaches the upper limit, subsequent login attempts using that username will fail.
If event debugging is enabled for Local-Server on the device (by using the debugging local-server event command), the system will print debugging information in the following format:
*Aug 18 10:52:56:664 2021 Sysname LOCALSER/7/EVENT: -MDC=1;
Authentication failed, the maximum number of concurrent logins already reached for the local user.
Common causes
The common cause of this type of issues is that the device is configured with a maximum number of users using the current local username for accessing the device.
Troubleshooting flow
Figure 9 shows the troubleshooting flowchart.
Figure 9 Flowchart for troubleshooting upper limit exceeding of users with the same username
Solution
1. Verify if the maximum number of users with the current local username is set on the device.
Use the display local-user command to view the local user configuration for the username. If the Access limit field is Enabled, it indicates that the upper limit is set. In this example, the upper limit is 2, indicating that a maximum of two concurrent users with the username are allowed.
<Sysname> display local-user user-name test class manage
Total 1 local users matched.
Device management user test:
Service type: SSH/Telnet
Access limit: Enabled Max access number: 2
Service type: Telnet
User group: system
Bind attributes:
Authorization attributes:
Work directory: flash:
User role list: test
...
You can remove the configuration or change the upper limit as needed in local user view.
¡ Use the undo access-limit command to remove the upper limit configuration.
<Sysname> system-view
[Sysname] local-user test class manage
[Sysname-luser-manage-test] undo access-limit
¡ Use the access-limit max-user-number command to increase the upper limit. In this example, the upper limit is set to 10.
<Sysname> system-view
[Sysname] local-user test class manage
[Sysname-luser-manage-test] access-limit 10
2. If the issue persists, collect the following information and contact Technical Support:
¡ Execution results of the above steps.
¡ Device configuration file, log information, and alarm messages.
Related alarm and log messages
Alarm messages
None.
Log messages
None.
Online users of the same access type reached the upper limit
Symptom
When the number of online users of the same access type reaches the upper limit, subsequent login attempts from the same user type will fail.
If event debugging is enabled for the relevant access module on the device, the system will print the debugging information in the following format:
%Aug 18 10:57:52:596 2021 Sysname TELNETD/6/TELNETD_REACH_SESSION_LIMIT: -MDC=1; Telnet client 1.1.1.1 failed to log in. The current number of Telnet sessions is 5. The maximum number allowed is (5).
Common causes
The common cause of this type of issues is that the device is configured with a maximum number of users that come online through a specific login method.
Troubleshooting flow
Figure 10 shows the troubleshooting flowchart.
Figure 10 Flowchart for troubleshooting upper limit exceeding of users of the same access type
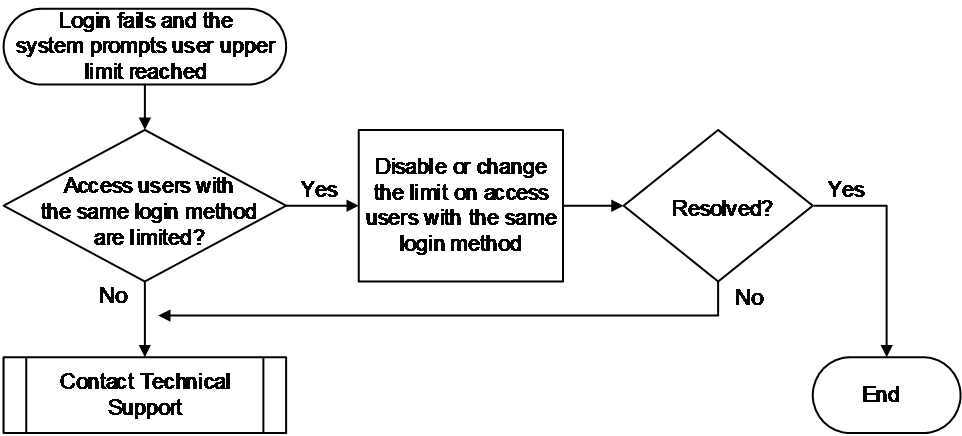
Solution
1. Verify if the device is configured with a maximum number of users that come online through a specific login method.
If the aaa session-limit command exists in the configuration, it indicates that the upper limit of users of the same type is configured. You can use the aaa session-limit { ftp | http | https | ssh | telnet } max-sessions command to change the upper limit. In this example, the upper limit is set to 32.
<Sysname> system-view
[Sysname] aaa session-limit telnet 32
2. If the issue persists, collect the following information and contact Technical Support:
¡ Execution results of the above steps.
¡ Device configuration file, log information, and alarm messages.
Related alarm and log messages
Alarm messages
None.
Log messages
None.
RADIUS server not responding
Symptom
The authentication, authorization, or accounting process fails because the RADIUS server is unresponsive. If event debugging is enabled for RADIUS on the device (by using the debugging radius event command), the system will print debugging information in the following format:
*Aug 8 17:49:06:143 2021 Sysname RADIUS/7/EVENT: -MDC=1; Reached the maximum retries
Common causes
The following are the common causes of this type of issue:
· The shared key configured on the RADIUS server does not match the shared key configured on the access device.
· The IP address of the access device is not added on the RADIUS server or the added IP address is incorrect.
· A network issue exists between the RADIUS server and the access device. For example, a firewall exists between the server and the access device and blocks the AAA service port used by the server. The default authentication port is 1812 and the default accounting port is 1813.
Troubleshooting flow
Figure 11 shows the troubleshooting flowchart.
Figure 11 Flowchart for troubleshooting RADIUS server not responding
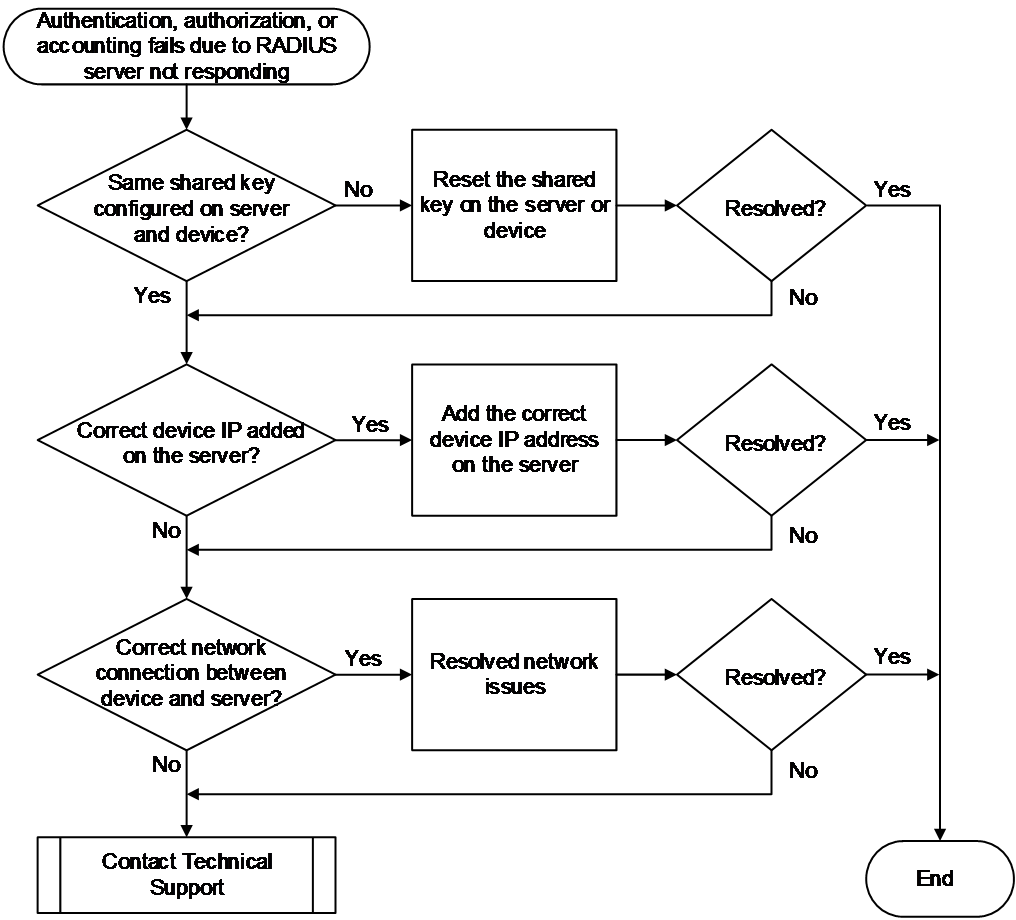
Solution
1. Verify if the shared key configured on the RADIUS server matches the shared key configured on the access device.
¡ If the shared key configuration is inconsistent:
Execute the key authentication and key accounting commands in RADIUS scheme view on the device to reconfigure the authentication and accounting shared keys. In this example, the authentication shared key is 123 and the accounting shared key is 456.
<Sysname> system-view
[Sysname] radius scheme radius1
[Sysname-radius-radius1] key authentication simple 123
[Sysname-radius-radius1] key accounting simple 456
On the RADIUS server, reconfigure the shared key for exchanging RADIUS packets with the access device to ensure consistency with the configuration on the access device.
¡ If the shared key configuration is the same, proceed to step 2.
2. Verify if the IP address of the access device is added on the RADIUS server or if the added IP address is correct.
Make sure the IP address of the device added on the RADIUS server is the source IP address used by the access device to send RADIUS packets. You can use a command to set the source IP address for sending RADIUS packets.
The access device selects the source IP address for sending RADIUS packets in the following order:
a. NAS-IP address configured in RADIUS scheme view (using the nas-ip command).
b. Source NAS-IP address configured in system view (using the radius nas-ip command).
c. IP address of the egress interface out of which the RADIUS packets are sent.
3. Examine the network between the server and the access device for issues.
First, use ping or other methods to check the network reachability between the device and the server, and then verify if a firewall or other device exists in the network. Usually, if a firewall exists in the network and does not allow packets destined for the RADIUS server's UDP port to pass, the RADIUS packets will be discarded. The default RADIUS authentication port is 1812, and the default RADIUS accounting port is 1813.
4. If the issue persists, collect the following information and contact Technical Support:
¡ Execution results of the above steps.
¡ Device configuration file, log information, alarm messages, and debugging information.
Related alarm and log messages
Alarm messages
None.
Log messages
None.
HWTACACS server not responding
Symptom
HWTACACS authentication, authorization, or accounting fails. If HWTACACS event debugging is enabled (by using the debugging hwtacacs event command), the output debugging information shows Connection timed out.
Common causes
The following are the common causes of this type of issue:
· The shared key configured on the HWTACACS server does not match the shared key configured on the access device.
· The IP address of the access device is not added on the HWTACACS server or the added IP address is incorrect.
· A network issue exists between the HWTACACS server and the access device. For example, a firewall exists between the server and the access device and blocks the AAA service port used by the server. The default authentication, authorization, and accounting port is 49.
Troubleshooting flow
Figure 12 shows the troubleshooting flowchart.
Figure 12 Flowchart for troubleshooting HWTACACS server not responding

Solution
1. Verify if the shared key configured on the HWTACACS server matches the shared key configured on the access device.
¡ If the shared key configuration is inconsistent:
Execute the key authentication, key authorization, and key accounting commands in HWTACACS scheme view on the device to reconfigure the authentication, authorization, and accounting shared keys. In this example, the authentication and authorization shared key is 123 and the accounting shared key is 456.
<Sysname> system-view
[Sysname] hwtacacs scheme hwt1
[Sysname-hwtacacs-hwt1] key authentication simple 123
[Sysname-hwtacacs-hwt1] key authorization simple 123
[Sysname-hwtacacs-hwt1] key accounting simple 456
On the HWTACACS server, reconfigure the shared key for exchanging HWTACACS packets with the access device to ensure consistency with the configuration on the access device.
¡ If the shared key configuration is the same, proceed to step 2.
2. Verify if the IP address of the access device is added on the HWTACACS server or if the added IP address is correct.
Make sure the IP address of the device added on the HWTACACS server is the source IP address used by the access device to send HWTACACS packets. You can use a command to set the source IP address for sending HWTACACS packets.
The access device selects the source IP address for sending HWTACACS packets in the following order:
a. IP IP address configured in HWTACACS scheme view (using the nas-ip command).
b. Source IP address configured in system view (using the hwtacacs nas-ip command).
c. IP address of the egress interface out of which the HWTACACS packets are sent.
3. Examine the network between the server and the access device for issues.
First, use ping or other methods to check the network reachability between the device and the server, and then verify if a firewall or other device exists in the network. Usually, if a firewall exists in the network and does not allow packets destined for the HWTACACS server's TCP port to pass, the HWTACACS packets will be discarded. The default HWTACACS authentication, authorization, and accounting port is 49.
4. If the issue persists, collect the following information and contact Technical Support:
¡ Execution results of the above steps.
¡ Device configuration file, log information, alarm messages, and debugging information.
Related alarm and log messages
Alarm messages
None.
Log messages
None.
Mismatched user access type and the Login-Service attribute value issued by the RADIUS server
Symptom
User authentication fails because the device does not support the Login-Service attribute value issued by the RADIUS server.
Use the debugging radius packet command to enable RADIUS packet debugging on the device. In the debugging information of the following form, you can see that the server issued a Login-Service attribute type not supported by the device.
*Aug 3 02:33:18:707 2021 Sysname RADIUS/7/PACKET:
Service-Type=Framed-User
Idle-Timeout=66666
Session-Timeout=6000
Login-Service=TCP-Clear
Common causes
The main reason for this class of faults is that the service type for user login does not match the service type specified by the Login-Service attribute issued by the server.
The Login-Service attribute is issued to the user by the RADIUS server to identify the type of service for authenticated users. The device currently supports the following Login-Service attribute values:
· 0: Telnet (standard attribute)
· 50: SSH (expansion attribute)
· 51: FTP (expansion attribute)
· 52: Terminal (expansion attribute)
· 53: HTTP (expansion attribute)
· 54: HTTPS (expansion attribute)
You can use the CLI to set the method in which the device inspects the value of the Login-Service attribute, controlling the consistency check method for user service types.
Troubleshooting flow
Figure 13 shows the troubleshooting flowchart.
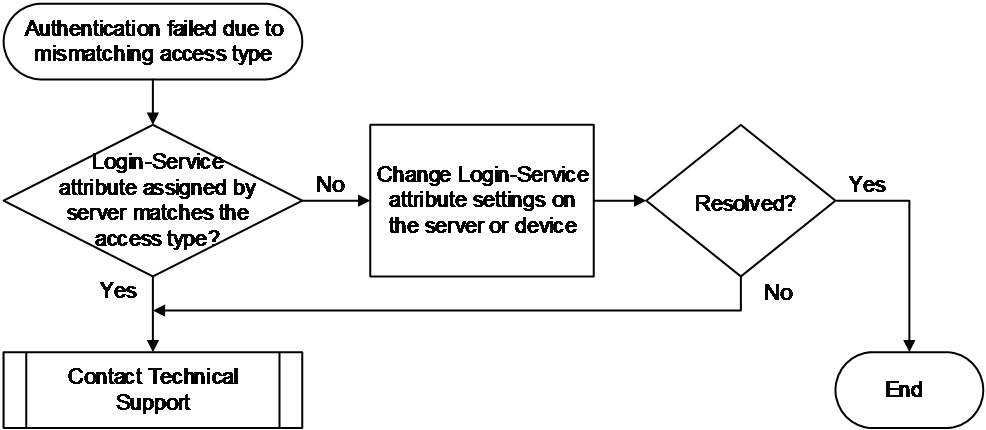
Solution
1. Verify if the Login-Service attribute value issued by the RADIUS server matches the access type.
Execute the display radius scheme command on the access device to view the value of the Attribute 15 check-mode field for the RADIUS scheme.
¡ If the value is Loose, it indicates that the loose check mode is used and the device uses the standard value of the Login-Service attribute to check the user service type. SSH, FTP, and terminal users can pass authentication only when the Login-Service attribute value issued by the RADIUS server is 0, indicating the Telnet user type.
¡ If the value is Strict, it indicates that the strict check mode is used and the device uses both the standard value and expansion values of the Login-Service attribute to check the user service type. SSH, FTP, and terminal users can pass authentication only when the RADIUS server assigns the corresponding Login-Service expansion attribute value.
If the Login-Service attribute issued to a user by the RADIUS server is out of the range supported by the device, you can resolve this issue by using one of the following methods:
¡ On the RADIUS server, set the server to either not issue the Login-Service attribute or change the issued attribute value to a value supported by the access device.
¡ On the access device, enter the corresponding RADIUS scheme and use the attribute 15 check-mode command to change the check mode for the Login-Service attribute. In this example, the check mode is set to loose.
<Sysname> system-view
[Sysname] radius scheme radius1
[Sysname-radius-radius1] attribute 15 check-mode loose
2. If the issue persists, collect the following information and contact Technical Support:
¡ Execution results of the above steps.
¡ Device configuration file, log information, debugging information, and alarm messages.
Related alarm and log messages
Alarm messages
None.
Log messages
None.
Local authentication login failure
Symptom
The administrator failed to log into the device using local authentication.
Common causes
The following are the common causes of this type of issue:
· The configuration of the authentication method for the user line is incorrect.
· The protocol type supported by the VTY user line is incorrect.
· The configured authentication, authorization, and accounting schemes for the ISP domain are incorrect.
· The local user does not exist, the password is incorrect, or the service type is incorrect.
· The number of local user accesses has reached the upper limit.
· The number of users logged into the device has reached the upper limit.
· The global password management function is enabled, and the local lauth.dat file on the device is abnormal.
Troubleshooting flow
Figure 14 shows the troubleshooting flowchart.
Figure 14 Flowchart for troubleshooting local authentication login failures

Solution
|
|
NOTE: For login issues with Web, NETCONF over SOAP, and FTP, inspection of the user line (class) configuration is not required. The other troubleshooting steps are the same. |
1. Check the user line configuration .
Execute the line vty first-number [ last-number ] command to enter the view of the specified VTY user line, and execute the display this command to view if the following configurations are correct:
¡ The authentication-mode is set to scheme.
¡ For Telnet login, the protocol inbound is set to telnet or the default value is used.
¡ For SSH login, the protocol inbound is set to ssh or the default value is used.
2. Check the configuration in user line class view.
3. The configuration in user line view takes precedence over the configuration in user line class view. If the user line view does not contain any configuration, continue to check the settings in user line class view.
4. Execute the line class vty command to enter VTY user line class view, and use the display this command to verify if the following configurations are correct:
¡ The authentication-mode is set to scheme.
¡ For Telnet login, the protocol inbound is set to telnet or the default value is used.
¡ For SSH login, the protocol inbound is set to ssh or the default value is used.
If the configurations in user line view and user line class view are incorrect, set the authentication scheme to scheme as needed for the user line or user line class, and specify the supported protocol types for user login.
5. Check if the authentication, authorization, and accounting scheme configurations for the ISP domain are correct.
Execute the display domain command to view the configuration information.
¡ If a user login username includes the domain name (for example, test), verify if the value of the Login authentication scheme field for the domain is Local. If the Login authentication scheme field is missing for the domain, verify if the value of the Default authentication scheme field is Local.
<Sysname> display domain test
Domain: test
State: Active
Login authentication scheme: Local
Default authentication scheme: Local
Default authorization scheme: Local
Default accounting scheme: Local
Accounting start failure action: Online
Accounting update failure action: Online
Accounting quota out action: Offline
Service type: HSI
Session time: Exclude idle time
NAS-ID: N/A
DHCPv6-follow-IPv6CP timeout: 60 seconds
Authorization attributes:
Idle cut: Disabled
Session timeout: Disabled
IGMP access limit: 4
MLD access limit: 4
¡ If the user login username does not include the domain name, execute the display this command in system view to view the configuration of domain default enable isp-name. In this example, the default domain name is system.
#
domain default enable system
#
- If this configuration exists, execute the display domain command to verify if the value of the Login authentication scheme field for the ISP domain is Local. If the Login authentication scheme field is missing for the domain, verify if the value of the Default authentication scheme field is Local.
- If the configuration does not exist, execute the display domain command to verify if the value of the Login authentication scheme field for the system domain is Local. If the Login authentication scheme field is missing for the system domain, verify if the value of the Default authentication scheme field is Local.
The method for confirming the authorization and accounting configuration is similar. If the above configurations are incorrect, configure the local scheme for authentication, authorization, or accounting for login users in the relevant ISP domain.
6. Verify that the username and password are correct.
Execute the display local-user command to verify if the corresponding local user configuration exists.
¡ If a local user exists, execute the local-user username class manage command to enter local user view. Then, use the display this command to verify if a password is configured in the view and if the service-type configuration matches the required service type.
- If the user password is required, try resetting the password once. In this example, the password is set to 123456TESTplat&!.
<Sysname> system-view
[Sysname] local-user test class manage
[Sysname-luser-manage-test] password simple 123456TESTplat&!
- If the service type is incorrect, configure the service type to match the login method. In this example, SSH is used.
<Sysname> system-view
[Sysname] local-user test class manage
[Sysname-luser-manage-test] service-type ssh
¡ If a local user does not exist, execute the local-user username class manage command to create a device management local user and configure the password and service type. In this example, the username is test.
<Sysname> system-view
[Sysname] local-user test class manage
[Sysname-luser-manage-test]
7. Verify if the number of users accessing with this local username has reached the upper limit.
Execute the display this command in local user view to verify if the access-limit configuration exists.
¡ If the access-limit configuration exists, execute the display local-user username class manage command to verify if the value of the Current access number field has reached the configured upper limit. If the upper limit is reached, take one of the following measures as needed:
- In local user view, execute the access-limit command to increase the user limit. In this example, the upper limit is changed to 20.
<Sysname> system-view
[Sysname] local-user test class manage
[Sysname-luser-manage-test] access-limit 20
- Execute the free command in user view to force other online users offline. This example releases all connections established on VTY1.
<Sysname> free line vty 1
Are you sure to free line vty1? [Y/N]:y
[OK]
¡ If the access-limit configuration does not exist, or the number of users has not reached the upper limit, proceed to the next step.
8. Verify if the number of online users for the specified login type has reached the upper limit.
a. Execute the display this command in system view to verify if the aaa session-limit configuration exists. If the configuration is not found, it indicates that the default value 32 is used.
#
aaa session-limit ftp 33
domain default enable system
s#
b. Execute the display users command to view the current user login status in use line and verify if the user quantity has reached the upper limit.
c. If the number of online users reaches the upper limit, take one of the following measures as needed:
- In system view, execute the aaa session-limit command to increase the user quantity upper limit.
- Execute the free command in user view to force other online users offline.
9. Verify if the local lauth.dat file is correct.
After you enable the global password management feature, the device automatically generates a lauth.dat file to record local users' authentication and login information. Manually deleting or modifying this file will cause an anomaly in local authentication. Therefore, first execute the display password-control command to verify if the global password management feature is enabled on the device.
¡ If the file does not exist, is of size 0, or is very small (less than 20B), contact Technical Support. If urgent, try re-enabling the global password management feature to resolve the issue.
<Sysname> dir
Directory of flash: (EXT4)
0 drw- - Aug 16 2021 11:45:37 core
1 drw- - Aug 16 2021 11:45:42 diagfile
2 drw- - Aug 16 2021 11:45:57 dlp
3 -rw- 713 Aug 16 2021 11:49:41 ifindex.dat
4 -rw- 12 Sep 01 2021 02:40:01 lauth.dat
...
<Sysname> system-view
[Sysname] undo password-control enable
[Sysname] password-control enable
¡ If this feature is not enabled, skip this step.
10. If the issue persists, collect the following information and contact Technical Support:
¡ Execution results of the above steps.
¡ Device configuration file, log information, alarm messages, and debugging information.
¡ Use the debugging local-server all command to enable debugging of the local server to collect the device debugging information.
Related alarm and log messages
Alarm messages
· hh3cLogInAuthenFailure (1.3.6.1.4.1.25506.2.2.1.1.3.0.3)
· Module: HH3C-SSH-MIB
· hh3cSSHUserAuthFailure (1.3.6.1.4.1.25506.2.22.1.3.0.1)
Log messages
· LOGIN/5/LOGIN_FAILED
· SSHS/6/SSHS_AUTH_FAIL
RADIUS authentication login failure
Symptom
The administrator failed to log in to the device using RADIUS authentication.
Common causes
The following are the common causes of this type of issue:
· The configuration of the authentication method for the user line is incorrect.
· The protocol type supported by the VTY user line is incorrect.
· The configured authentication, authorization, and accounting schemes for the ISP domain are incorrect.
· Interaction with the RADIUS server failed.
· The value of the Login-Service attribute issued by the RADIUS server is incorrect.
· The RADIUS server failed to assign a user role.
Troubleshooting flow
Figure 15 shows the troubleshooting flowchart.
Figure 15 Flowchart for troubleshooting RADIUS authentication login failures
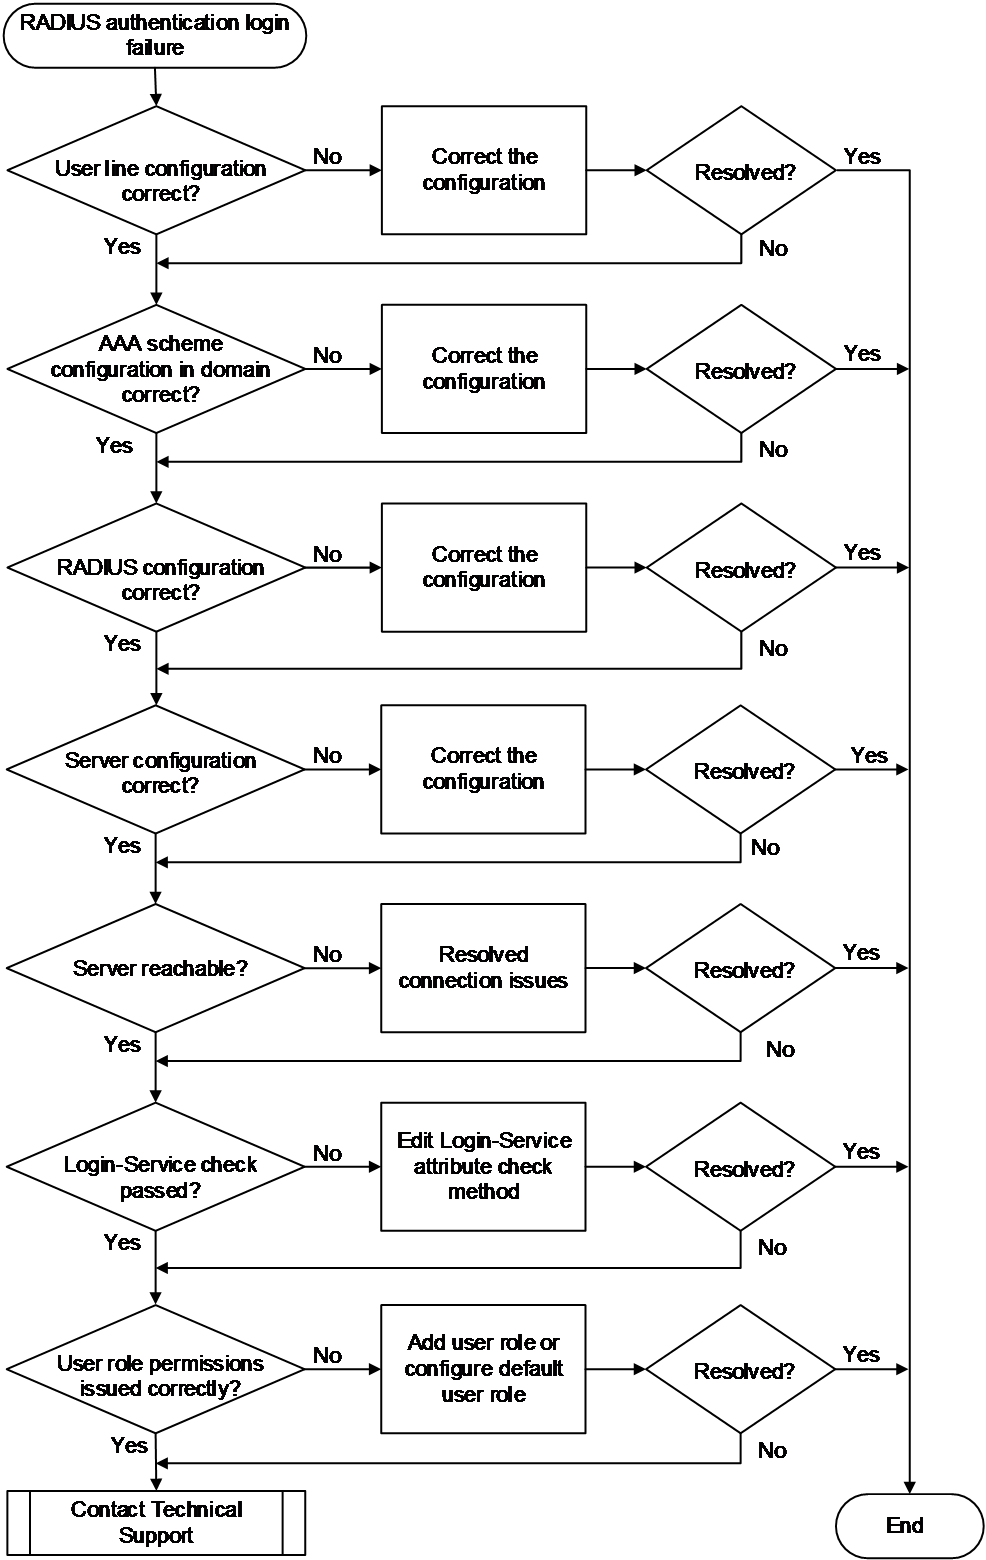
Solution
|
|
NOTE: For login issues with Web, NETCONF over SOAP, and FTP, inspection of the user line (class) configuration is not required. The other troubleshooting steps are the same. |
1. Check the user line configuration .
Execute the line vty first-number [ last-number ] command to enter the view of the specified VTY user line, and execute the display this command to view if the following configurations are correct:
¡ The authentication-mode is set to scheme.
¡ For Telnet login, the protocol inbound is set to telnet or the default value is used.
¡ For SSH login, the protocol inbound is set to ssh or the default value is used.
2. Check the configuration in user line class view.
3. The configuration in user line view takes precedence over the configuration in user line class view. If the user line view does not contain any configuration, continue to check the settings in user line class view.
4. Execute the line class vty command to enter VTY user line class view, and use the display this command to verify if the following configurations are correct:
¡ The authentication-mode is set to scheme.
¡ For Telnet login, the protocol inbound is set to telnet or the default value is used.
¡ For SSH login, the protocol inbound is set to ssh or the default value is used.
If the configurations in user line view and user line class view are incorrect, set the authentication scheme to scheme as needed for the user line or user line class, and specify the supported protocol types for user login.
5. Check if the authentication, authorization, and accounting scheme configurations for the ISP domain are correct.
Execute the display domain command to view the configuration information.
¡ If a user login username includes the domain name (for example, test), verify if the value of the Login authentication scheme field for the domain is in the RADIUS=xx format. If the Login authentication scheme field is missing for the domain, verify if the value of the Default authentication scheme field is in the RADIUS=xx format.
<Sysname> display domain test
Domain: test
State: Active
Login authentication scheme: RADIUS=rds
Default authentication scheme: Local
Default authorization scheme: Local
Default accounting scheme: Local
Accounting start failure action: Online
Accounting update failure action: Online
Accounting quota out action: Offline
Service type: HSI
Session time: Exclude idle time
NAS-ID: N/A
DHCPv6-follow-IPv6CP timeout: 60 seconds
Authorization attributes:
Idle cut: Disabled
Session timeout: Disabled
IGMP access limit: 4
MLD access limit: 4
¡ If the user login username does not include the domain name, execute the display this command in system view to view the configuration of domain default enable isp-name. In this example, the default domain name is system.
#
domain default enable system
#
- If this configuration exists, execute the display domain command to verify if the value of the Login authentication scheme field for the ISP domain is in the RADIUS=xx format. If the Login authentication scheme field is missing for the domain, verify if the value of the Default authentication scheme field is in the RADIUS=xx format.
- If the configuration does not exist, execute the display domain command to verify if the value of the Login authentication scheme field for the system domain is in the RADIUS=xx format. If the Login authentication scheme field is missing for the domain, verify if the value of the Default authentication scheme field is in the RADIUS=xx format.
The method for confirming the authorization and accounting configuration is similar. If the above configurations are incorrect, configure the RADIUS scheme for authentication, authorization, or accounting for login users in the relevant ISP domain. In this example, the specified RADIUS scheme is rd1.
<Sysname> system-view
[Sysname] domain test
[Sysname-isp-test] authentication login radius-scheme rd1
[Sysname-isp-test] authorization login radius-scheme rd1
[Sysname-isp-test] accounting login radius-scheme rd1
6. Use the RADIUS debugging information to troubleshoot the following faults:
¡ Execute the debugging radius packet command to enable RADIUS packet debugging. If the output debugging information shows Authentication reject, it indicates that the server has rejected the user's access request. In this case, continue to review the authentication logs recorded on the RADIUS server and contact the server administrator for appropriate processing based on the failure reasons described in the logs.
¡ Execute the debugging radius error command to enable RADIUS error debugging. If the output debugging information shows Invalid packet authenticator, it indicates that the shared key between the device and the server does not match. Try setting a matching shared key for the RADIUS scheme.
¡ Execute the debugging radius event command to enable RADIUS event debugging. If the output debugging information shows Response timed out, it indicates that the device is unreachable from the server. Try troubleshooting the link connectivity issues between the device and the server.
7. Verify if the value of the Login-Service attribute issued by the RADIUS server matches the service type supported by the device.
Execute the debugging radius packet command to enable RADIUS packet debugging. Then, view the Login-Service attribute issued by the RADIUS server, and use the method described in "Mismatched user access type and the Login-Service attribute value issued by the RADIUS server" to resolve the issue.
8. Verify if the RADIUS server has assigned the correct user role.
Execute the debugging radius all command to enable all RADIUS debugging functions. If the connection disconnects immediately after the user enters the username and password, and no anomaly exists in the RADIUS event debugging or RADIUS error debugging output, it is possible that the RADIUS server failed to assign a user role or assigned an incorrect user role to the user. In this case, verify if the RADIUS packet debugging information includes the shell:roles=xx or Exec-Privilege=xx field.
¡ If not included, it means the RADIUS server did not assign a user role to the user. To solve this issue, use one of the following methods:
- On the device, use the role default-role enable rolename command to enable default user role authorization. This gives users a default user role when the server has not authorized any roles for them.
<Sysname> system-view
[Sysname] role default-role enable
- Contact the RADIUS server administrator to assign the appropriate user role to users.
¡ If included, but the specified user role does not exist on the device, contact the RADIUS server administrator to modify the user role settings or use the user-role role-name command to create the corresponding user role on the device.
9. If the issue persists, collect the following information and contact Technical Support:
¡ Execution results of the above steps.
¡ Device configuration file, log information, alarm messages, and debugging information.
¡ Use the debugging radius all command to enable all the RADIUS debugging functions to collect the device debugging information.
Related alarm and log messages
Alarm messages
Module: HH3C-UI-MAN-MIB
· hh3cLogInAuthenFailure (1.3.6.1.4.1.25506.2.2.1.1.3.0.3)
· Module: HH3C-SSH-MIB
· hh3cSSHUserAuthFailure (1.3.6.1.4.1.25506.2.22.1.3.0.1)
Log messages
· LOGIN/5/LOGIN_AUTHENTICATION_FAILED
· LOGIN/5/LOGIN_FAILED
· SSHS/6/SSHS_AUTH_FAIL
HWTACACS authentication login failure
Symptom
The administrator failed to log in to the device using HWTACACS authentication.
Common causes
The following are the common causes of this type of issue:
· The configuration of the authentication method for the user line is incorrect.
· The protocol type supported by the VTY user line is incorrect.
· The configured authentication, authorization, and accounting schemes for the ISP domain are incorrect.
· Interaction with the HWTACACS server failed.
· The HWTACACS server failed to assign a user role.
Troubleshooting flow
Figure 16 shows the troubleshooting flowchart.
Figure 16 Flowchart for troubleshooting HWTACACS authentication login failures
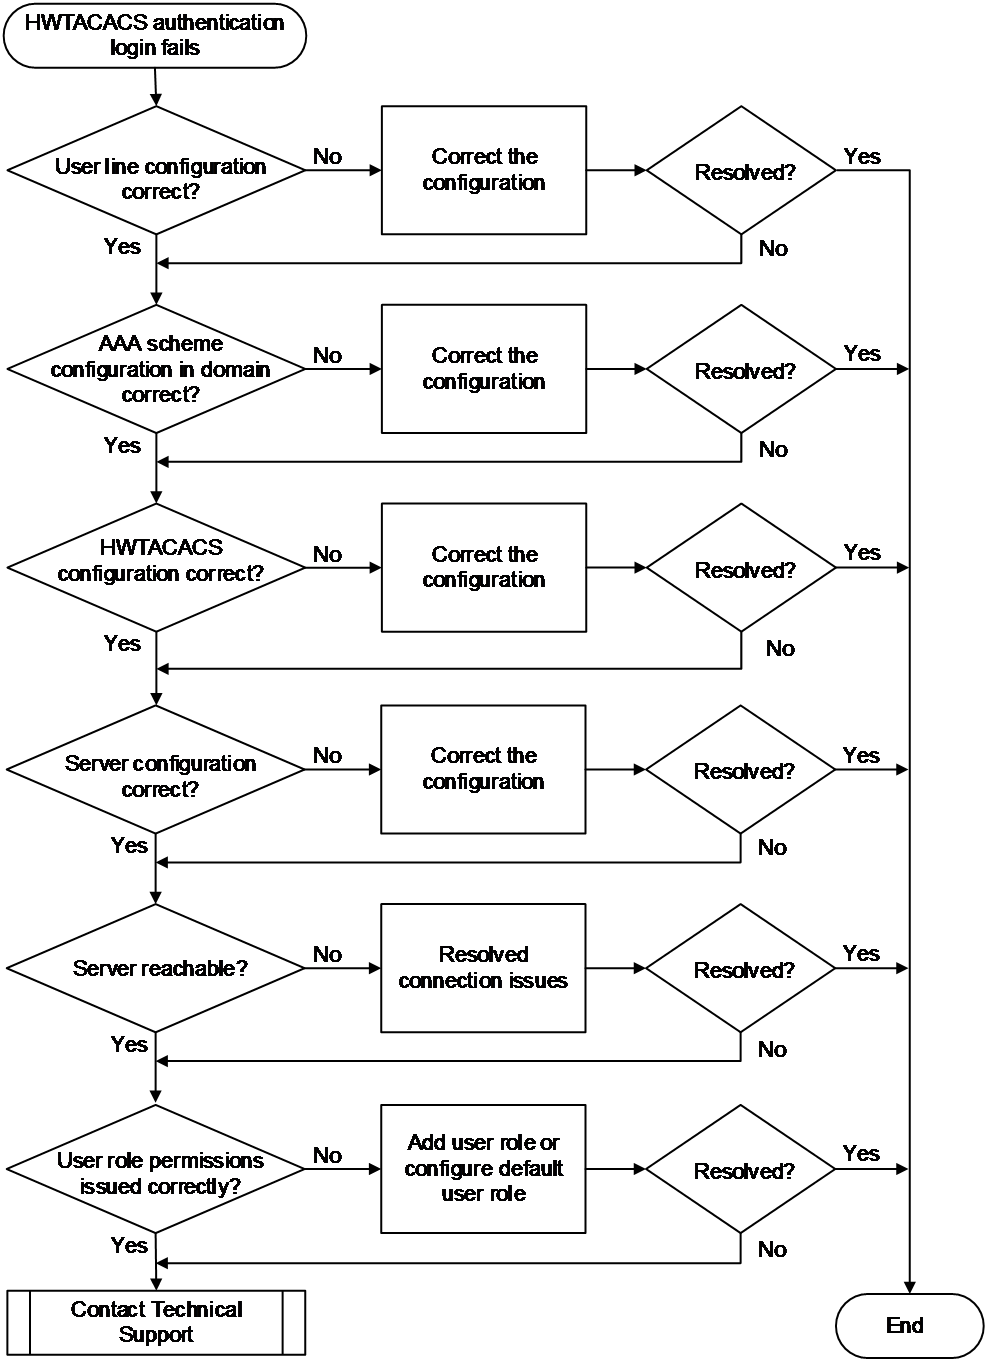
Solution
|
|
NOTE: For login issues with Web, NETCONF over SOAP, and FTP, inspection of the user line (class) configuration is not required. The other troubleshooting steps are the same. |
1. Check the user line configuration .
Execute the line vty first-number [ last-number ] command to enter the view of the specified VTY user line, and execute the display this command to view if the following configurations are correct:
¡ The authentication-mode is set to scheme.
¡ For Telnet login, the protocol inbound is set to telnet or the default value is used.
¡ For SSH login, the protocol inbound is set to ssh or the default value is used.
2. Check the configuration in user line class view.
3. The configuration in user line view takes precedence over the configuration in user line class view. If the user line view does not contain any configuration, continue to check the settings in user line class view.
4. Execute the line class vty command to enter VTY user line class view, and use the display this command to verify if the following configurations are correct:
¡ The authentication-mode is set to scheme.
¡ For Telnet login, the protocol inbound is set to telnet or the default value is used.
¡ For SSH login, the protocol inbound is set to ssh or the default value is used.
¡ If the configurations in user line view and user line class view are incorrect, set the authentication scheme to scheme as needed for the user line or user line class, and specify the supported protocol types for user login.
5. Check if the authentication, authorization, and accounting scheme configurations for the ISP domain are correct.
Execute the display domain command to view the configuration information.
¡ If a user login username includes the domain name (for example, test), verify if the value of the Login authentication scheme field for the domain is in the HWTACACS=xx format. If the Login authentication scheme field is missing for the domain, verify if the value of the Default authentication scheme field is in the HWTACACS=xx format.
<Sysname> display domain test
Domain: test
State: Active
Login authentication scheme: HWTACACS=hwt1
Default authentication scheme: Local
Default authorization scheme: Local
Default accounting scheme: Local
Accounting start failure action: Online
Accounting update failure action: Online
Accounting quota out action: Offline
Service type: HSI
Session time: Exclude idle time
NAS-ID: N/A
DHCPv6-follow-IPv6CP timeout: 60 seconds
Authorization attributes:
Idle cut: Disabled
Session timeout: Disabled
IGMP access limit: 4
MLD access limit: 4
¡ If the user login username does not include the domain name, execute the display this command in system view to view the configuration of domain default enable isp-name. In this example, the default domain name is system.
#
domain default enable system
#
- If this configuration exists, execute the display domain command to verify if the value of the Login authentication scheme field for the ISP domain is in the HWTACACS=xx format. If the Login authentication scheme field is missing for the domain, verify if the value of the Default authentication scheme field is in the HWTACACS=xx format.
- If the configuration does not exist, execute the display domain command to verify if the value of the Login authentication scheme field for the system domain is in the HWTACACS=xx format. If the Login authentication scheme field is missing for the domain, verify if the value of the Default authentication scheme field is in the HWTACACS=xx format.
The method for confirming the authorization and accounting configuration is similar. If the above configurations are incorrect, configure the RADIUS scheme for authentication, authorization, or accounting for login users in the relevant ISP domain. In this example, the specified HWTACACS scheme is hwt1.
<Sysname> system-view
[Sysname] domain test
[Sysname-isp-test] authentication login hwtacacs-scheme hwt1
[Sysname-isp-test] authorization login hwtacacs-scheme hwt1
[Sysname-isp-test] accounting login hwtacacs-scheme hwt1
6. Use the HWTACACS debugging information to troubleshoot the following faults:
¡ Execute the debugging hwtacacs send-packet and debugging hwtacacs receive-packet commands to enable HWTACACS packet sending and receiving debugging. If the output debugging information shows status: STATUS_FAIL, it means the server rejected the user's access request. In this case, review the failure reasons described in the HWTACACS authentication log and pinpoint based on the specific reasons for failure.
¡ Execute the debugging hwtacacs error command to enable HWTACACS error debugging. If the output debugging information shows Failed to get available server, it indicates that the shared key between the device and the server does not match. Try setting a matching shared key for the HWTACACS scheme.
¡ Execute the debugging radius event command to enable HWTACACS event debugging. If the output debugging information shows Connection timed out, it indicates that the device is unreachable from the server. Try troubleshooting the link connectivity issues between the device and the server.
7. Verify if the HWTACACS server has assigned the correct user role.
Execute the debugging hwtacacs all command to enable all HWTACACS debugging functions. If the connection disconnects immediately after the user logs in, and no anomaly exists in the HWTACACS event debugging output or HWTACACS error debugging output, it is possible that the HWTACACS server failed to assign a user role to the user. In this case, verify if the HWTACACS packet debugging information includes the priv-lvl=xx or roles=xx field.
¡ If not included, it means the HWTACACS server did not assign user role to the user. To solve this issue, use one of the following methods:
- On the device, use the role default-role enable rolename command to enable default user role authorization. This gives users a default user role when the server has not authorized any roles for them.
<Sysname> system-view
[Sysname] role default-role enable
- Contact the HWTACACS server administrator to assign the appropriate user role to users. The authorization role configuration on the HWTACACS server must meet the format of roles="name1 name2 namen", where name1, name2, and namen are the user roles to be authorized and issued to users. Multiple roles are allowed and separated by spaces.
¡ If included, but the specified user role does not exist on the device, contact the RADIUS server administrator to modify the user role settings or use the user-role role-name command to create the corresponding user role on the device.
8. If the issue persists, collect the following information and contact Technical Support:
¡ Execution results of the above steps.
¡ Device configuration file, log information, alarm messages, and debugging information.
¡ Use the debugging hwtacacs all command to enable all the HWTACACS debugging functions to collect the device debugging information.
Related alarm and log messages
Alarm messages
Module: HH3C-UI-MAN-MIB
· hh3cLogInAuthenFailure (1.3.6.1.4.1.25506.2.2.1.1.3.0.3)
· Module: HH3C-SSH-MIB
· hh3cSSHUserAuthFailure (1.3.6.1.4.1.25506.2.22.1.3.0.1)
Log messages
· LOGIN/5/LOGIN_AUTHENTICATION_FAILED
· LOGIN/5/LOGIN_FAILED
· SSHS/6/SSHS_AUTH_FAIL
LDAP authentication login failure
Symptom
The administrator failed to log in to the device using LDAP authentication.
Common causes
The following are the common causes of this type of issue:
· The configuration of the authentication method for the user line is incorrect.
· The protocol type supported by the VTY user line is incorrect.
· The configured authentication, authorization, and accounting schemes for the ISP domain are incorrect.
· Interaction with the LDAP server failed.
Troubleshooting flow
Figure 17 shows the troubleshooting flowchart.
Figure 17 Flowchart for troubleshooting LDAP authentication login failures
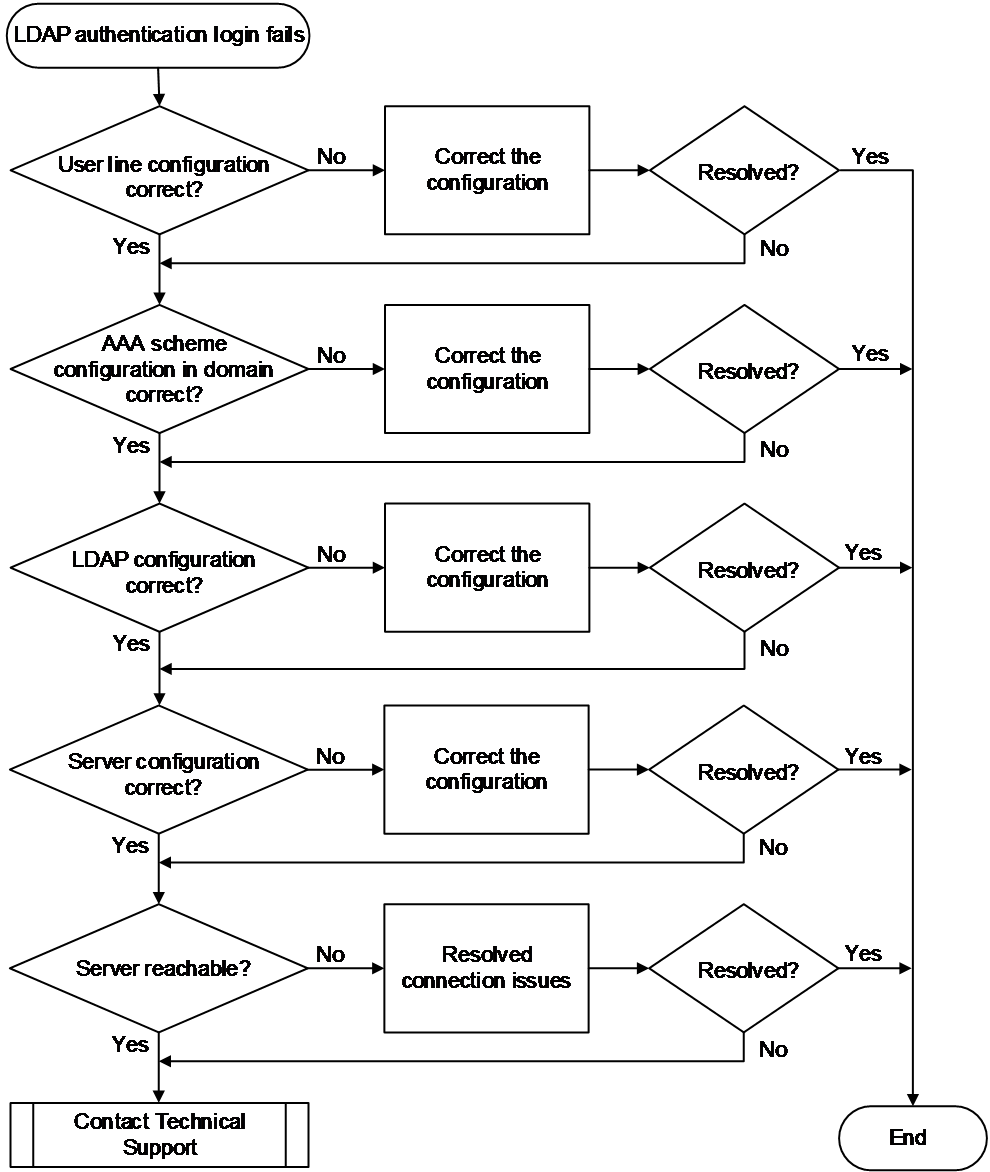
Solution
|
|
NOTE: For login issues with Web, NETCONF over SOAP, and FTP, inspection of the user line (class) configuration is not required. The other troubleshooting steps are the same. |
1. Check the user line configuration.
Execute the line vty first-number [ last-number ] command to enter the view of the specified VTY user line, and execute the display this command to view if the following configurations are correct:
¡ The authentication-mode is set to scheme.
¡ For Telnet login, the protocol inbound is set to telnet or the default value is used.
¡ For SSH login, the protocol inbound is set to ssh or the default value is used.
2. Check the configuration in user line class view.
3. The configuration in user line view takes precedence over the configuration in user line class view. If the user line view does not contain any configuration, continue to check the settings in user line class view.
4. Execute the line class vty command to enter VTY user line class view, and use the display this command to verify if the following configurations are correct:
¡ The authentication-mode is set to scheme.
¡ For Telnet login, the protocol inbound is set to telnet or the default value is used.
¡ For SSH login, the protocol inbound is set to ssh or the default value is used.
If the configurations in user line view and user line class view are incorrect, set the authentication scheme to scheme as needed for the user line or user line class, and specify the supported protocol types for user login.
5. Check if the authentication, authorization, and accounting scheme configurations for the ISP domain are correct.
Execute the display domain command to view the configuration information.
¡ If a user login username includes the domain name (for example, test), verify if the value of the Login authentication scheme field for the domain is in the LDAP=xx format. If the Login authentication scheme field is missing for the domain, verify if the value of the Default authentication scheme field is in the LDAP=xx format.
<Sysname> display domain test
Domain: test
State: Active
Login authentication scheme: LDAP=ldp
Default authentication scheme: Local
Default authorization scheme: Local
Default accounting scheme: Local
Accounting start failure action: Online
Accounting update failure action: Online
Accounting quota out action: Offline
Service type: HSI
Session time: Exclude idle time
NAS-ID: N/A
DHCPv6-follow-IPv6CP timeout: 60 seconds
Authorization attributes:
Idle cut: Disabled
Session timeout: Disabled
IGMP access limit: 4
MLD access limit: 4
¡ If the user login username does not include the domain name, execute the display this command in system view to view the configuration of domain default enable isp-name. In this example, the default domain name is system.
#
domain default enable system
#
- If this configuration exists, execute the display domain command to verify if the value of the Login authentication scheme field for the ISP domain is in the LDAP=xx format. If the Login authentication scheme field is missing for the domain, verify if the value of the Default authentication scheme field is in the LDAP=xx format.
- If the configuration does not exist, execute the display domain command to verify if the value of the Login authentication scheme field for the system domain is in the LDAP=xx format. If the Login authentication scheme field is missing for the domain, verify if the value of the Default authentication scheme field is in the LDAP=xx format.
If the above configurations are incorrect, configure the LDAP authentication scheme for login users in the relevant ISP domain. LDAP servers generally act as authentication servers, and authorization and accounting are usually configured differently, such as local, RADIUS, or HWTACACS. In this example, authentication uses the LDAP scheme ccc, and local authorization and accounting are used.
<Sysname> system-view
[Sysname] domain test
[Sysname-isp-test] authentication login ldap-scheme ccc
[Sysname-isp-test] authorization login local
[Sysname-isp-test] accounting login local
6. Use the LDAP debugging information to troubleshoot the following faults:
Execute the debugging ldap error command to enable LDAP error debugging. Use the following debugging information printed by the system to identify the issue:
¡ If the output information shows Failed to perform binding operation as administrator, it indicates that the administrator DN configured in LDAP server view does not exist or the administrator password is incorrect. To address this issue, enter LDAP server view and execute the login-dn and login-password commands to modify the administrator DN and password configuration, respectively. In this example, the DN for a user with the administrator role is cn=administrator,cn=users,dc=ld, and the administrator password is admin!123456.
<Sysname> system-view
[Sysname] ldap server ldap1
[Sysname-ldap-server-ldap1] login-dn cn=administrator,cn=users,dc=ld
[Sysname-ldap-server-ldap1] login-password simple admin!123456
¡ If the output information shows Failed to get bind result.errno = 115, it indicates that the LDAP service is not enabled on the peer or the LDAP server is experiencing an anomaly. To address this issue, contact the administrator of the LDAP server.
¡ If the output information shows Bind operation failed, it indicates the device cannot reach the LDAP server. Try troubleshooting connectivity issues between the device and the server.
¡ If the output information shows Failed to perform binding operation as user, it indicates the password of the LDAP user is incorrect.
¡ If the output information shows Failed to bind user username for the result of searching DN is NULL, it indicates the LDAP user does not exist. To address this issue, contact the administrator of the LDAP server.
7. If the issue persists, collect the following information and contact Technical Support:
¡ Execution results of the above steps.
¡ Device configuration file, log information, alarm messages, and debugging information.
¡ Use the debugging ldap all command to enable all the LDAP debugging functions to collect the device debugging information.
Related alarm and log messages
Alarm messages
Module: HH3C-UI-MAN-MIB
· hh3cLogInAuthenFailure (1.3.6.1.4.1.25506.2.2.1.1.3.0.3)
· Module: HH3C-SSH-MIB
· hh3cSSHUserAuthFailure (1.3.6.1.4.1.25506.2.22.1.3.0.1)
Log messages
· LOGIN/5/LOGIN_AUTHENTICATION_FAILED
· LOGIN/5/LOGIN_FAILED
· SSHS/6/SSHS_AUTH_FAIL