- Table of Contents
-
- H3C iMC Database Installation Guide-5W103
- 01-MySQL 8.0.xx Installation and Configuration Guide (for Linux)
- 02-MySQL 8.0.xx Installation and Configuration Guide (for Windows)
- 03-Oracle 11g Installation and Configuration Guide
- 04-Oracle 11g R2 Installation and Configuration Guide
- 05-Oracle 12c Installation and Configuration Guide
- 06-Oracle 12c R2 Installation and Configuration Guide
- 07-Oracle 18c Installation and Configuration Guide
- 08-SQL Server 2016 Installation and Configuration Guide
- 09-SQL Server 2017 Installation and Configuration Guide
- 10-SQL Server 2019 Installation and Configuration Guide
- 11-SQL Server 2022 Installation and Configuration Guide
- 12-MariaDB 10.x.x Installation Guide (Linux)
- 13-MariaDB 10.x.x Installation Guide (Windows)
- Related Documents
-
| Title | Size | Download |
|---|---|---|
| 03-Oracle 11g Installation and Configuration Guide | 4.36 MB |
|
|
|
H3C Intelligent Management Center v7.3 |
|
Oracle 11g Installation and Configuration Guide |
|
|
Software version: IMC PLAT 7.3 (E0708)
Document version: 5W102-20241206
Copyright © 2025 New H3C Technologies Co., Ltd. All rights reserved.
No part of this manual may be reproduced or transmitted in any form or by any means without prior written consent of New H3C Technologies Co., Ltd.
Except for the trademarks of New H3C Technologies Co., Ltd., any trademarks that may be mentioned in this document are the property of their respective owners.
The information in this document is subject to change without notice.
Preface
This preface includes the following topics about the documentation:
· Audience.
· Conventions.
Audience
This documentation is intended for:
· Network planners.
· Field technical support and servicing engineers.
· Network administrators working with the H3C Intelligent Management Center (IMC).
Conventions
The following information describes the conventions used in the documentation.
GUI conventions
|
Convention |
Description |
|
Boldface |
Window names, button names, field names, and menu items are in Boldface. For example, the New User window opens; click OK. |
|
> |
Multi-level menus are separated by angle brackets. For example, File > Create > Folder. |
Symbols
|
Convention |
Description |
|
|
An alert that calls attention to important information that if not understood or followed can result in personal injury. |
|
|
An alert that calls attention to important information that if not understood or followed can result in data loss, data corruption, or damage to hardware or software. |
|
|
An alert that calls attention to essential information. |
|
NOTE: |
An alert that contains additional or supplementary information. |
|
|
An alert that provides helpful information. |
Documentation feedback
You can e-mail your comments about product documentation to [email protected].
We appreciate your comments.
Contents
Setting the number of file descriptors
Setting the number of user processes
Checking the required software packages
Creating operating system users and groups
Modifying the access rights on the Oracle home directory
Configuring the Oracle base directory
Setting environment variables for the Oracle database
Setting environment variables for the oracle user
Setting the NLS_LANG environment variable
Adding the IP-to-hostname mapping in /etc/hosts
Preparing the installation package
Installing the Oracle database server
Installing and configuring the Oracle client
Testing the connectivity to the server
Configuring network service names
Starting the Oracle service manually
Stopping the Oracle service manually
Configuring the Oracle database listener
Setting the maximum number of Oracle processes and Oracle connection limit
Automating Oracle database startup on Linux
Adding storage space to the database
Adding database storage space through Oracle Enterprise Manager
Setting database storage space through SQL statements
Modifying database memory settings
Setting the Oracle database user password lifetime
Changing user passwords of the Oracle database
Using database administrator account to change the user password
Updating the user password in the IMC configuration file
Overview
This guide describes the installation of Oracle Database 11g for IMC on Red Hat Enterprise Linux Server 7.3. If your installation of Oracle Database 11g uses a different version of Red Hat Enterprise Linux, see the Oracle database installation documents for your Linux version.
To achieve an optimized performance of the system running the Oracle database, see the Oracle installation guides on the Oracle website.
After you install Oracle Database 11g, configure the following Oracle management features to ensure correct operation of IMC:
· Setting the maximum number of Oracle processes and Oracle connection limit
· Adding storage space to the database
· Modifying database memory settings
To install IMC, you must restart the operating system after configuring these features.
If you plan to install IMC and the Oracle database on separate servers, follow these guidelines:
· Before installing IMC, install the Oracle client on the same server as IMC. The client version must match the version of the Oracle database.
· On the database server, create a file folder for storing IMC data. You will need to specify the path to the folder during IMC installation.
Preparing for installation
The following information describes the tasks you must complete in Linux as the root user before installing Oracle Database 11g.
To avoid installation errors, use the keyboard to enter your entries rather than using a cut-and-paste function for user input. Also, a 32-bit Linux must use the 32-bit Oracle database, and a 64-bit Linux must use the 64-bit Oracle database.
Disabling the firewall
Log in to the system as a root user and execute the following commands to disable the firewall:
systemctl stop firewalld.service
systemctl disable firewalld.service
To view the firewall status, use the following command:
systemctl status firewalld.service
Disabling SELinux
1. Open the SELinux configuration file.
vim /etc/selinux/config
2. Set the value for the SELINUX parameter to disabled.
SELINUX=disabled
3. Save the configuration and restart the system.
Setting the number of file descriptors
1. Log in to the system as a root user to view the number of file descriptors.
ulimit –n
2. If the number of file descriptors is less than 65535, open the limits.conf file.
vim /etc/security/limits.conf
3. Add the following parameter settings at the end of the file. If the parameters already exist, make sure the parameter values are greater than 65535.
* soft nofile 65535
* hard nofile 65535
4. Save the configuration and restart the system.
Setting the number of user processes
1. Log in to the system as a root user to open the 20-nproc.conf file.
vim /etc/security/limits.d/20-nproc.conf
2. Change the default value to 40960.
* soft nproc 40960
root soft nproc unlimited
3. Save the configuration and restart the system.
Checking the required software packages
Before installing the Oracle database and IMC, make sure you have installed all required software packages on the Linux operating system.
The software packages are stored in the Packages directory of the Linux installation drive. Use the rpm -ivh --nodeps xxx.rpm command to install the packages without a package dependency check.
|
|
IMPORTANT: · To identify all packages that are already installed on the system, use the rpm –qa command. To determine whether a required software package has been installed, use the rpm -q command. · RHEL 7.X does not provide the compat-libstdc++-33 installation package. To ensure correct operation of IMC, locate the package in RHEL 6.X or download it from the associated website. |
The following 64-bit software packages, or later packages, are required:
· binutils-2.25.1-22.base.el7.x86_64.rpm
· compat-libcap1-1.10-7.el7.x86_64.rpm
· cpp-4.8.5-11.el7.x86_64.rpm
· elfutils-libelf-0.166-2.el7.x86_64.rpm
· elfutils-libelf-devel-0.166-2.el7.x86_64.rpm
· gcc-4.8.5-11.el7.x86_64.rpm
· gcc-c++-4.8.5-11.el7.x86_64.rpm
· glibc-2.17-157.el7.x86_64.rpm
· glibc-common-2.17-157.el7.x86_64.rpm
· glibc-devel-2.17-157.el7.x86_64.rpm
· ksh-20120801-26.el7.x86_64.rpm
· libaio-0.3.109-13.el7.x86_64.rpm
· libaio-devel-0.3.109-13.el7.x86_64.rpm
· libgcc-4.8.5-11.el7.x86_64.rpm
· libstdc++-4.8.5-11.el7.x86_64.rpm
· libstdc++-devel-4.8.5-11.el7.x86_64.rpm
· libXext-1.3.3-3.el7.x86_64.rpm
· make-3.82-23.el7.x86_64.rpm
· mpfr-3.1.1-4.el7.x86_64.rpm
· sysstat-10.1.5-11.el7.x86_64.rpm
· unixODBC-2.3.1-11.el7.x86_64.rpm
· unixODBC-devel-2.3.1-11.el7.x86_64.rpm
The following 32-bit software packages, or later packages, are required:
· glibc-2.17-157.el7.i686.rpm
· glibc-devel-2.17-157.el7.i686.rpm
· libaio-0.3.109-13.el7.i686.rpm
· libao-1.1.0-8.el7.i686.rpm
· libgcc-4.8.5-11.el7.i686.rpm
· libstdc++-4.8.5-11.el7.i686.rpm
· nss-softokn-freebl-3.16.2.3-14.4.el7.i686.rpm
· compat-libstdc++-33-3.2.3-69.el6.i686.rpm
Checking the disk space
Check the amount of free disk space on the system.
df -k
The following disk space requirements must be met for the Oracle installation:
· A minimum of 10 GB of free space in the /home directory.
· A minimum of 400 MB of free space in the /tmp directory.
The actual disk space requirements depend on the numbers of managed devices and performance monitoring instances. For more information, see the H3C IMC deployment guides.
Adjusting kernel parameters
To ensure the normal operation of the Oracle database, adjust the kernel parameters:
1. Open the sysctl.conf file.
vi /etc/sysctl.conf
2. Set the following variable values:
kernel.shmall=2097152
kernel.shmmax=4294967295
kernel.shmmni=4096
kernel.sem=250 32000 100 128
fs.file-max=6815744
fs.suid_dumpable=1
fs.aio-max-nr=1048576
net.ipv4.ip_local_port_range=9000 65500
net.core.rmem_default=4194304
net.core.rmem_max=4194304
net.core.wmem_default=262144
net.core.wmem_max=1048576
3. Save and close the file.
/sbin/sysctl -p /etc/sysctl.conf
|
|
NOTE: This example uses the minimum values for the kernel parameters. As a best practice, adjust these values for optimal system performance. |
Creating operating system users and groups
Create the oracle user, the oinstall group, and the dba group before installing Oracle.
· Only the oracle user can install, start, or stop the Oracle database.
· The oinstall group user can install Oracle software
· The dba group user can manage the database.
To create the required user and groups:
1. Create the oinstall and the dba groups.
groupadd oinstall
groupadd dba
2. Create the oracle user and set the password of the user.
useradd -g oinstall -G dba –d /home/oracle –m –s /bin/bash oracle
passwd oracle
Modifying the access rights on the Oracle home directory
Grant the oracle user permissions to run the database installation program from the Oracle installation directory (/home/oracle).
chown -R oracle:oinstall /home/oracle/
chmod -R 775 /home/oracle/
Configuring the Oracle base directory
1. Create the Oracle base directory.
mkdir -p /u01/app/
2. Set the directory owner and the owner permissions.
chown -R oracle:oinstall /u01/app/
chmod -R 775 /u01/app/
Setting environment variables for the Oracle database
|
|
CAUTION: · Before you install the Oracle database, verify that the environment variable settings have taken effect. If the environment variable settings have not taken effect, database installation might fail. For more information, see "How can I identify whether the environment variable settings have taken effect?" · If the Oracle database adopts independent deployment (remote database), and the global database variables configuration causes startup failure of other third-party software, perform the configuration as shown in "After you configure global database variables, other third-party software cannot start. How can I resolve this issue?" |
Set environment variables for the Oracle database in the profile file to automatically take effect at Linux startup.
To set the environment variables:
1. Open the profile file.
vi /etc/profile
2. Add the following content to the profile file:
ORACLE_BASE=/u01/app/oracle
ORACLE_HOME=$ORACLE_BASE/product/11.1.0/db_1
ORACLE_SID=orcl
PATH=$PATH:$ORACLE_HOME/bin:$HOME/bin
LD_LIBRARY_PATH=$ORACLE_HOME/lib
export ORACLE_BASE ORACLE_HOME ORACLE_SID PATH LD_LIBRARY_PATH
The variable description is as follows:
¡ ORACLE_BASE—Oracle base directory.
¡ ORACLE_HOME—Oracle home directory.
¡ ORACLE_SID—Oracle database instance ID. Use the same instance ID for Oracle database installation.
3. Save and close the file.
Setting environment variables for the oracle user
1. Open the .bash_profile file.
vi /home/oracle/.bash_profile
2. Set the language variable according to the language your system supports.
LANG=en_US.UTF-8
export LANG
3. Add the following content to the end of the file:
umask 022
4. Save the file.
5. Switch to oracle and validate the new settings.
su - oracle
export DISPLAY=localhost:0.0
6. Switch to root.
exit
Setting the NLS_LANG environment variable
1. Open the profile file.
vi /etc/profile
2. Add the following content to the file:
NLS_LANG=AMERICAN_AMERICA.WE8ISO8859P1
export NLS_LANG
3. Save and close the file.
The environment variable automatically takes effect at Linux startup.
|
|
IMPORTANT: · Set the correct value. Otherwise, Oracle database and IMC data cannot be displayed correctly. For more information about determining the NLS_LANG value, see Oracle Database Globalization Support Guide. · If the Oracle database is deployed on the same server as the IMC server, set the NLS_LANG environment variable. |
Adding the IP-to-hostname mapping in /etc/hosts
1. Open the /etc/hosts file.
vi /etc/hosts
2. Add a line of text in the format ip-address localhost localhost.localdomain.
As shown in Figure 1, enter 192.168.1.158 imctest imctest.IMC to map 192.168.1.158 to the host name imctest in the IMC domain.
Figure 1 Modifying the /etc/hosts file

3. Save and close the file.
Preparing the installation package
Copy the Oracle installation package to the /home/oracle directory and decompress the package. If you use the installation CD, follow the instructions on the CD.
Installing the Oracle database server
1. Restart Linux after you complete all preparation tasks in "Preparing for installation."
2. Log in to Linux as oracle, and then start the database installation wizard.
./runInstaller
The Select Installation Method page opens, as shown in Figure 2.
Figure 2 Select Installation Method page
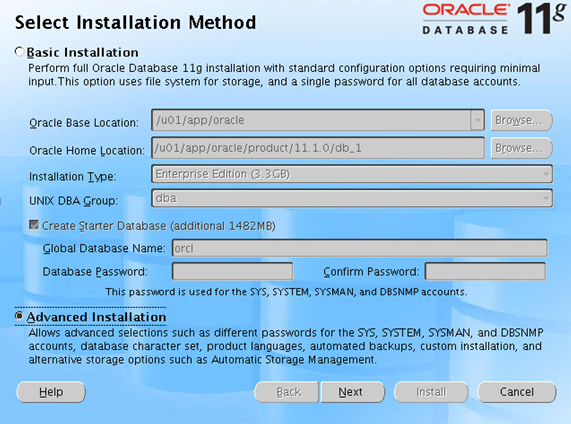
3. Select Advanced Installation, and then click Next.
The Select Installation Type page opens, as shown in Figure 3.
Figure 3 Select Installation Type page
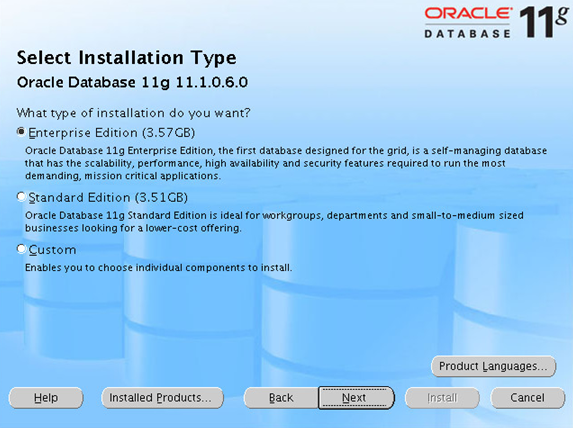
4. Select Enterprise Edition, and then click Next.
The Install Location page opens, as shown in Figure 4.
Figure 4 Install Location page
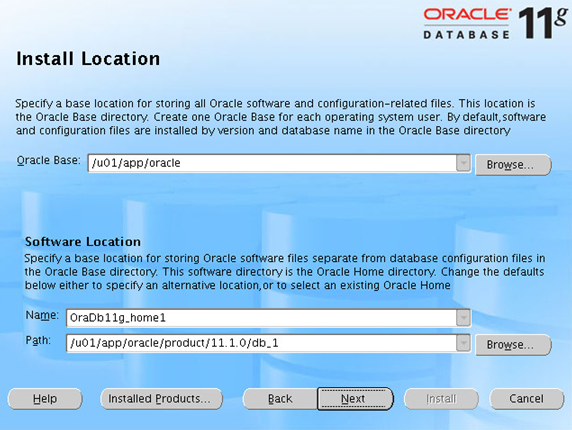
5. Click Next, with the default settings unchanged.
The Product-Specific Prerequisite Checks page opens, as shown in Figure 5.
Figure 5 Product-Specific Prerequisite Checks page
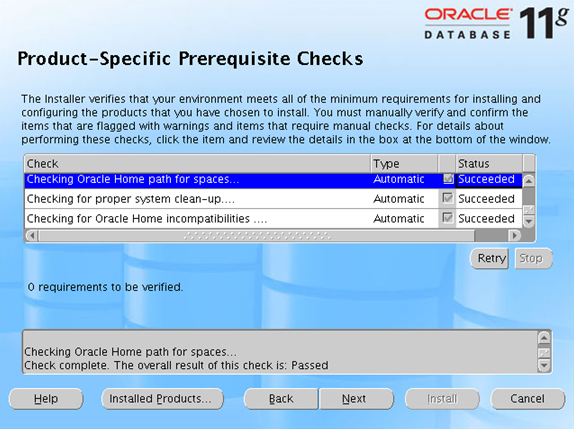
6. Manually verify the items that are flagged with warnings or require a manual check.
a. Modify the environment settings.
b. If the software package check fails because later versions of packages are installed, click Ignore all.
7. Click Next.
The Select Configuration Option page opens, as shown in Figure 6.
Figure 6 Select Configuration Option page
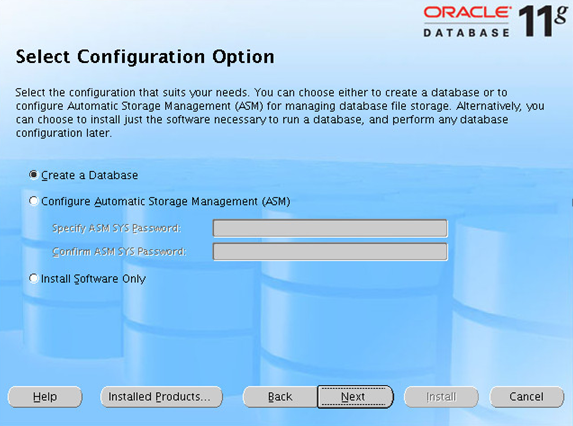
8. Click Next, with the default settings unchanged.
The Select Database Configuration page opens, as shown in Figure 7.
Figure 7 Select Database Configuration page
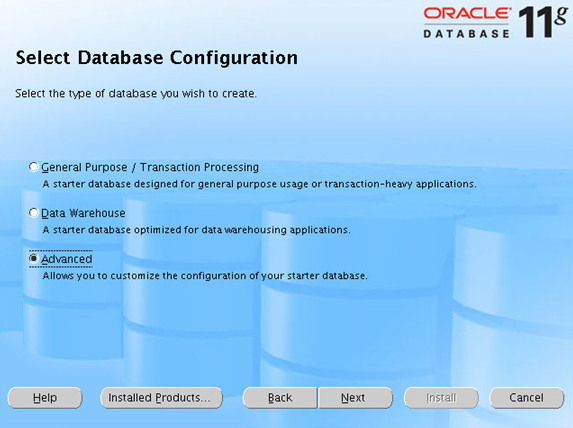
9. Select Advanced, and then click Next.
The Privileged Operating System Groups page opens, as shown in Figure 8.
Figure 8 Privileged Operating System Groups page
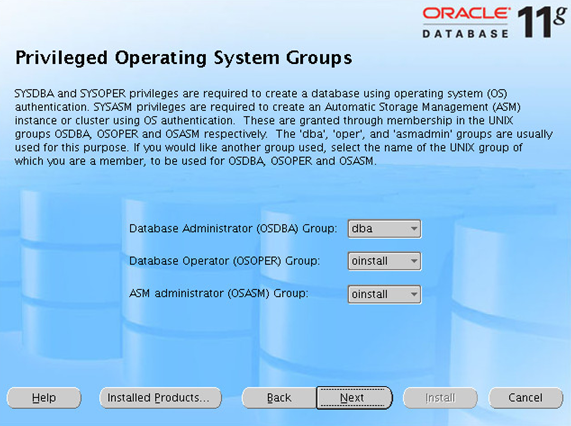
10. Click Next, with the default settings unchanged.
The Oracle Configuration Manager Registration page opens, as shown in Figure 9.
Figure 9 Oracle Configuration Manager Registration page
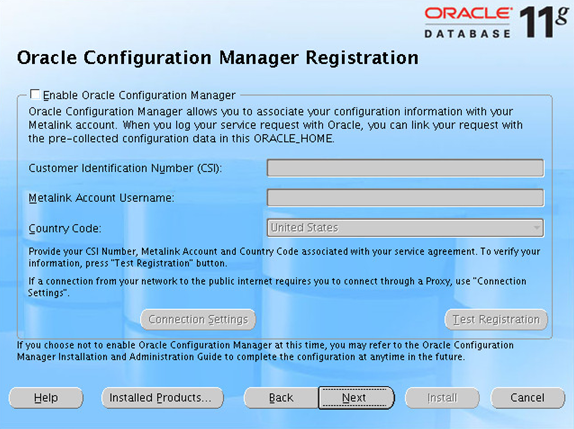
11. If you have purchased the Oracle license, select Enable Oracle Configuration Manager, and then enter the authorization information.
12. Click Next.
The Summary page displays the settings you have specified, as shown in Figure 10.
Figure 10 Summary page
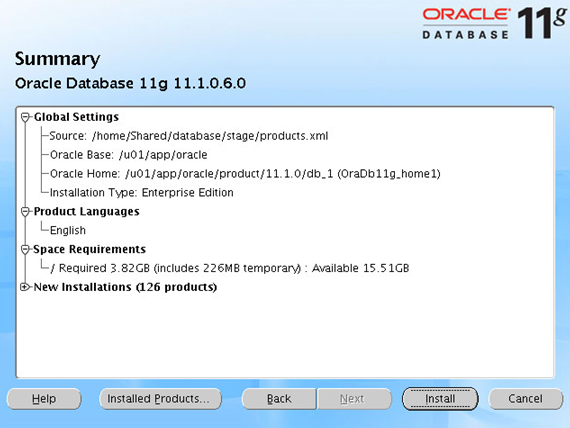
13. Click Install.
The Install page displays the installation progress, as shown in Figure 11.
Figure 11 Viewing the installation progress
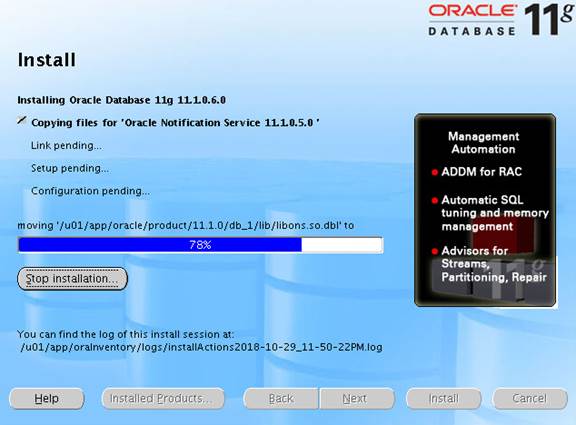
When the installation is complete, the Database Templates page opens, as shown in Figure 12.
Figure 12 Database Templates page
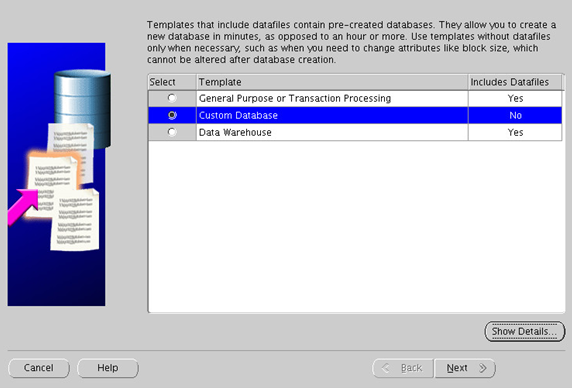
14. Select Custom Database, and then click Next.
The Database Identification page opens, as shown in Figure 13.
Figure 13 Database Identification page
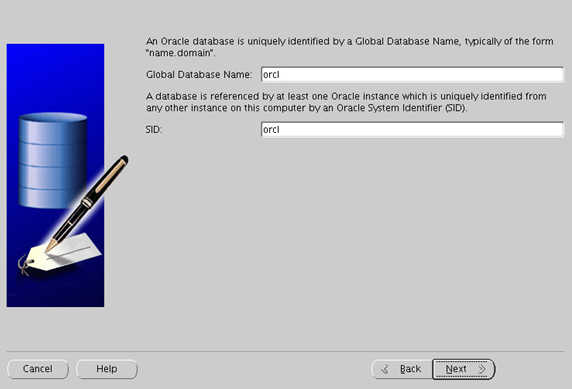
15. Enter the global database name and the Oracle system identifier (SID).
The SID must be consistent with the ORACLE_SID variable set in the profile file. For more information, see "Setting environment variables for the Oracle database."
16. Click Next.
The Management Options page opens, as shown in Figure 14.
Figure 14 Management Options page

17. Click Next, with the default settings unchanged.
The Database Credentials page opens, as shown in Figure 15.
Figure 15 Database Credentials page
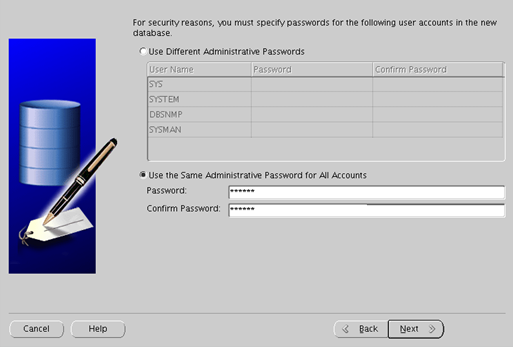
18. Set passwords.
¡ You can set different passwords for the database accounts SYS, SYSTEM, DBSNMP, and SYSMAN, or use the same password for all accounts.
¡ For IMC to correctly identify the password of the SYS account during installation, make sure the password does not contain spaces, tabs, or any of the following characters:
` ' " ! ( ) & | \ $ ; @ < > / ^
¡ If you do not want to change the password of the SYS account, create a user account with the same privileges as the SYS account. Make sure the password of the account does not contain any of the previous characters. For more information, see "Creating a database user."
19. Click Next.
The Storage Options page opens, as shown in Figure 16.
Figure 16 Storage Options page
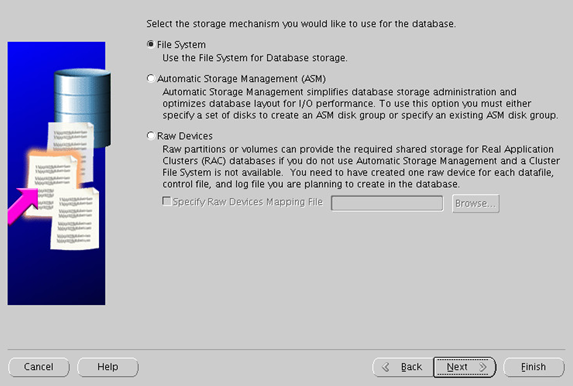
20. Select File System, and then click Next.
The Database File Locations page opens, as shown in Figure 17.
Figure 17 Database File Locations page
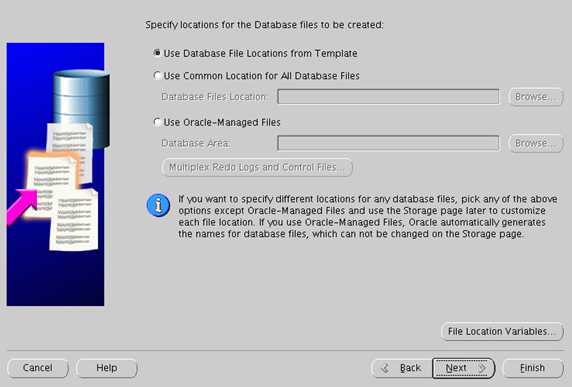
21. Select Use Database File Locations from Template, and then click Next.
The Recovery Configuration page opens, as shown in Figure 18.
Figure 18 Recovery Configuration page
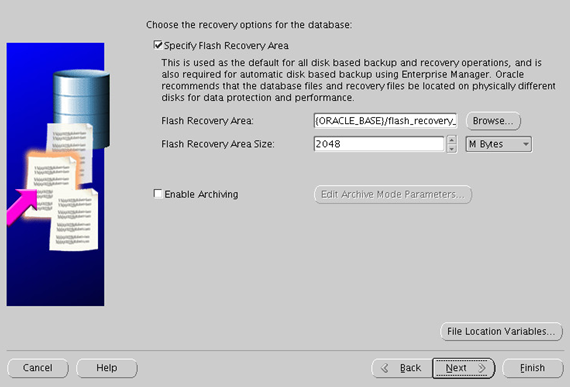
22. Click Next, with the default settings unchanged.
The Database Content page opens, as shown in Figure 19.
Figure 19 Database Content page
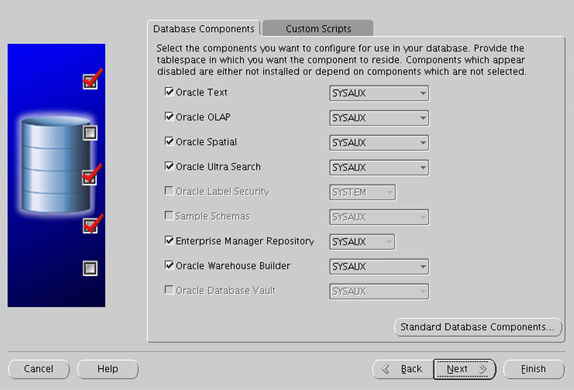
23. Click Next, with the default settings unchanged.
The Initialization Parameters page opens, as shown in Figure 20.
24. Configure the memory settings on the Memory tab as needed.
Figure 20 Setting memory parameters
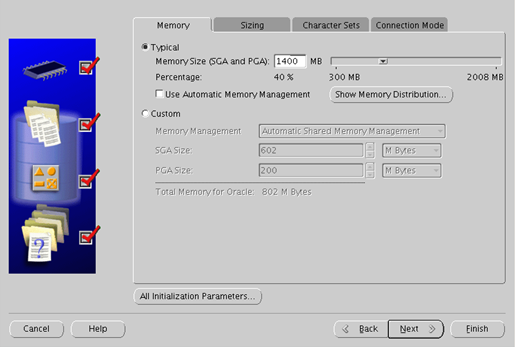
Table 1 lists the recommended memory sizes.
Table 1 Recommended memory settings
|
System memory |
Local database |
Remote database |
|
4 GB |
1400 MB |
2400 MB |
|
6 GB |
2400 MB |
3600 MB |
|
8 GB |
3600 MB |
4800 MB |
|
10 GB or larger |
4500 MB |
5000 MB |
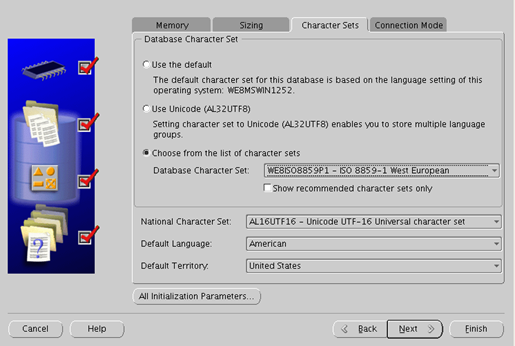
25. Click the Character Sets tab, and then specify the character set for the database, as shown in Figure 21.
¡ To prevent unreadable characters, set the correct character set for the database. This example uses West European WE8ISO8859P1.
¡ If you are not sure of the language, select Use Unicode (AL32UTF8).
For more information about setting the database character set, see Oracle Database Globalization Support Guide.
Figure 21 Setting the character set
26. Click Next.
The Security Settings page opens, as shown in Figure 22.
Figure 22 Security Settings page
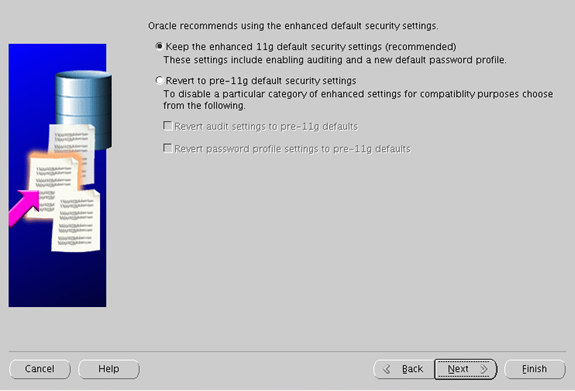
27. Click Next, with the default settings unchanged.
The Automatic Maintenance Tasks page opens, as shown in Figure 23.
Figure 23 Automatic Maintenance Tasks page
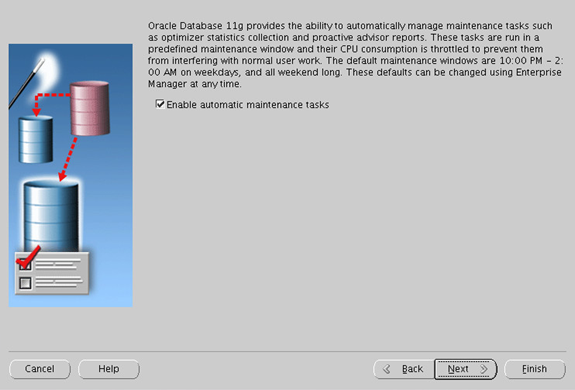
28. Select Enable automatic maintenance tasks, and then click Next.
The Database Storage page opens, as shown in Figure 24.
Figure 24 Database Storage page

29. From the navigation tree, select Tablespaces > USERS.
30. On the General tab, select Use bigfile tablespace, and then click Next.
The Creation Options page opens, as shown in Figure 25.
Figure 25 Creation Options page
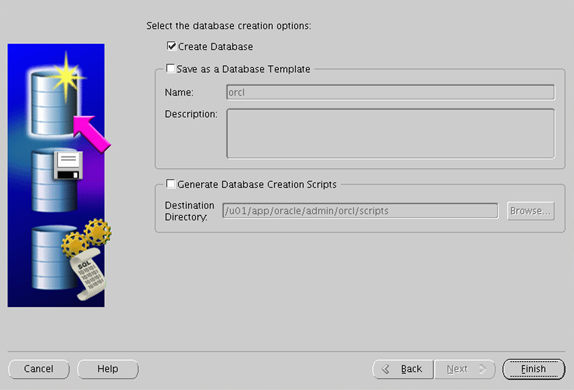
31. Click Next, with the default settings unchanged.
The Confirmation dialog box opens, as shown in Figure 26.
Figure 26 Confirmation dialog box
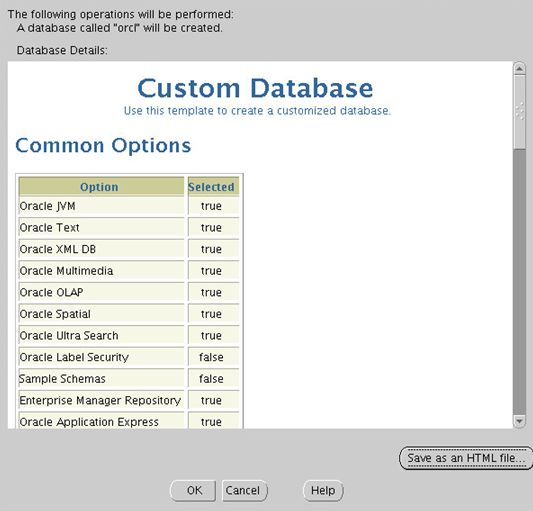
32. Click OK.
The installation program starts to install the database.
After the installation is complete, the Database Configuration Assistant page opens, as shown in Figure 27.
Figure 27 Database Configuration Assistant
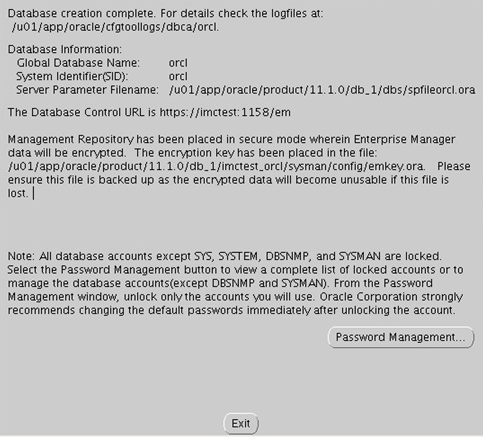
33. Click Exit.
The Execute Configuration scripts dialog box opens, as shown in Figure 28.
Figure 28 Execute Configuration scripts
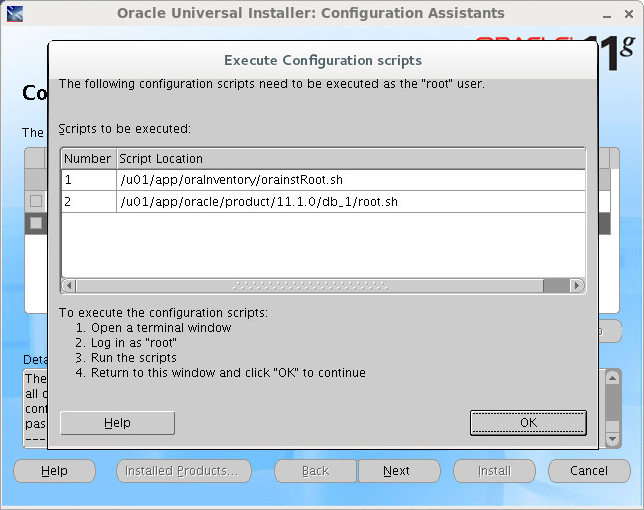
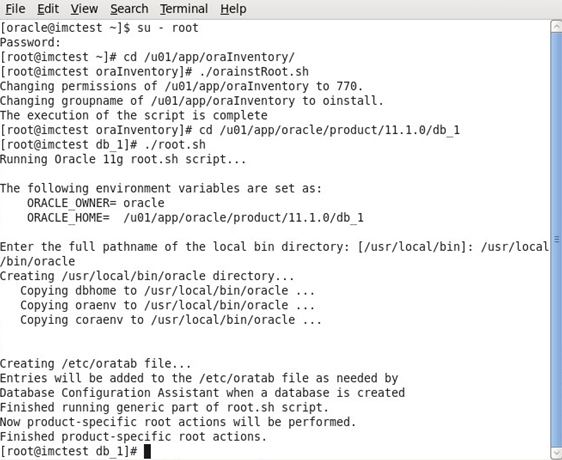
34. Open a terminal window, switch to root, and execute the scripts, as shown in Figure 29.
Figure 29 Executing configuration scripts
35. Close the terminal window.
36. In the Execute Configuration scripts dialog box, click OK.
The End of Installation page opens, as shown in Figure 30.
Figure 30 End of Installation page
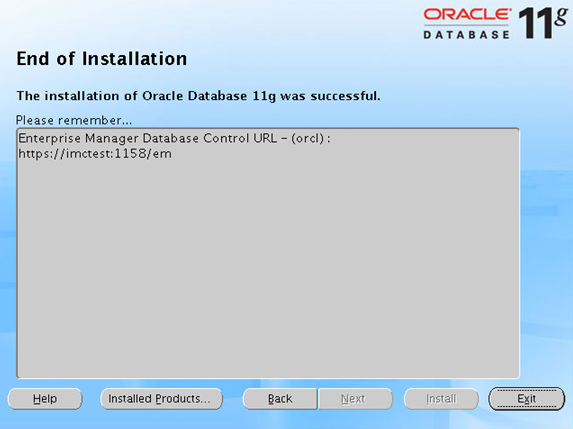
37. Click Exit.
Installing and configuring the Oracle client
To enable IMC to connect to a remote Oracle database server, you must install a compatible Oracle client on the server that will host IMC.
Installing the Oracle client
1. Complete the tasks described in "Preparing for installation."
2. Restart the operating system, and then log in as Oracle.
3. Run the installation program from the Oracle client installation directory.
./runInstaller
The Welcome page opens, as shown in Figure 31.
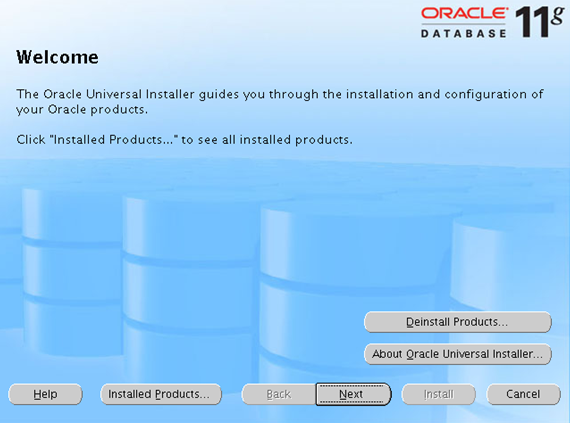
4. Click Next.
The Specify Inventory directory and credentials page opens, as shown in Figure 32.
Figure 32 Specify Inventory directory and credentials page
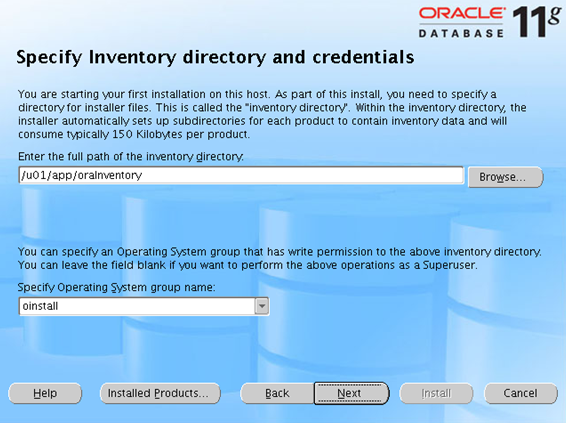
5. Click Next, with the default settings unchanged.
The Select Installation Type page opens, as shown in Figure 33.
Figure 33 Select Installation Type page
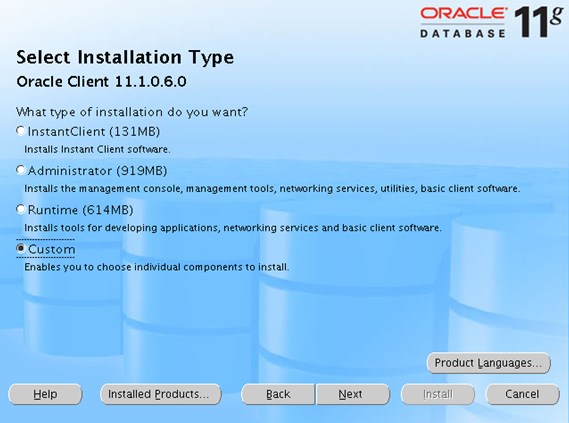
6. Select Custom, and then click Next.
The Install Location page opens, as shown in Figure 34.
Figure 34 Install Location page
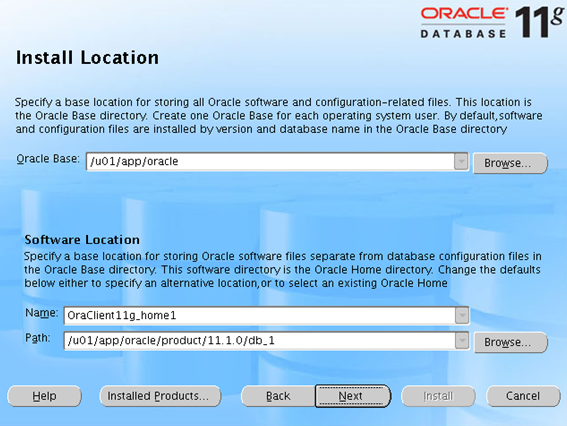
7. Enter the ORACLE_SID of the database server in the Name field.
8. Click Next, with the default settings for other parameters unchanged.
The Product-Specific Prerequisite Checks page opens, as shown in Figure 35.
Figure 35 Product-Specific Prerequisite Checks page
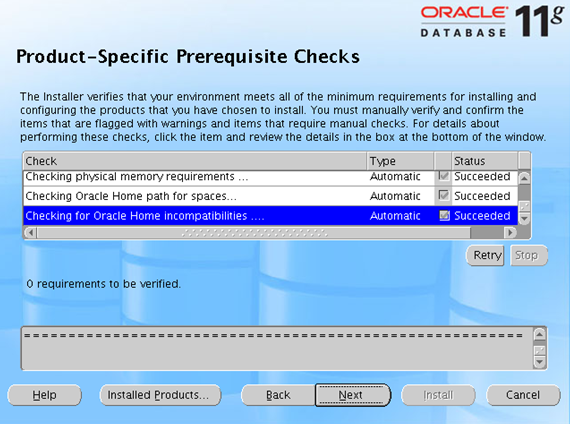
9. The installation program checks the system environment and displays the check result.
¡ If your system environment settings meet the requirements, click Next.
¡ If not, modify your system environment variables before going to the next step.
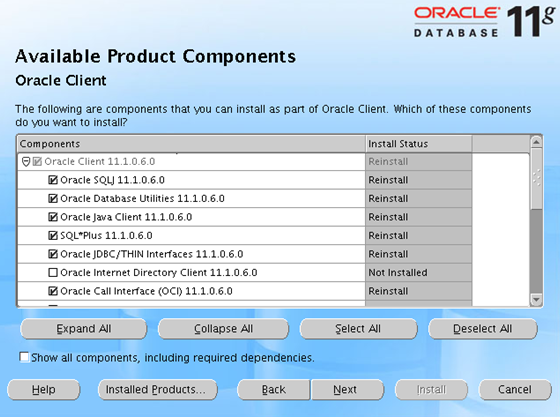
10. On the Available Product Components page shown in Figure 36, select the following components:
¡ Oracle SQLJ
¡ Oracle Database Utilities
¡ Oracle Java Client
¡ SQL*Plus
¡ Oracle JDBC/THIN Interfaces
¡ Oracle Call Interface (OCI)
¡ Oracle ODBC Driver
¡ Oracle SQL Developer
Figure 36 Available Product Components page
11. Click Next.
The Summary page opens, as shown in Figure 37.

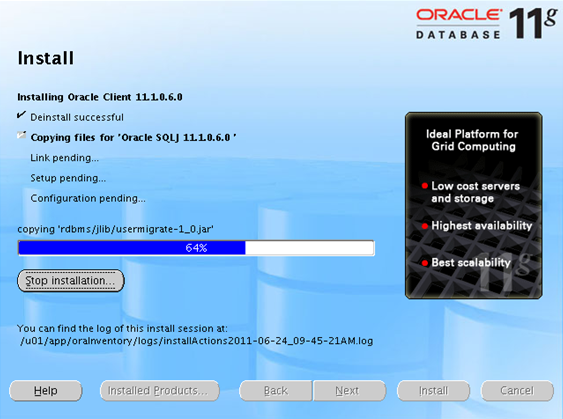
12. Click Install.
The Install page displays the installation progress, as shown in Figure 38.
Figure 38 Install page
The Execute Configuration scripts dialog box opens during installation, as shown in Figure 39.
Figure 39 Execute Configuration scripts dialog box

13. Open a terminal window, log in as root, and execute the scripts instructed in Figure 39, as shown in Figure 40.
Figure 40 Executing the scripts
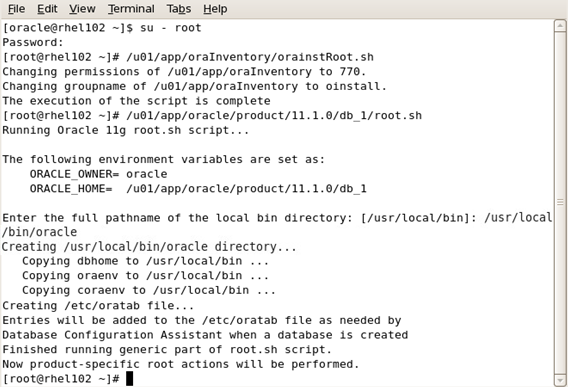
14. Close the terminal window.
15. In the Execute Configuration scripts dialog box, click OK.
The End of Installation page opens, as shown in Figure 41.
Figure 41 End of Installation page
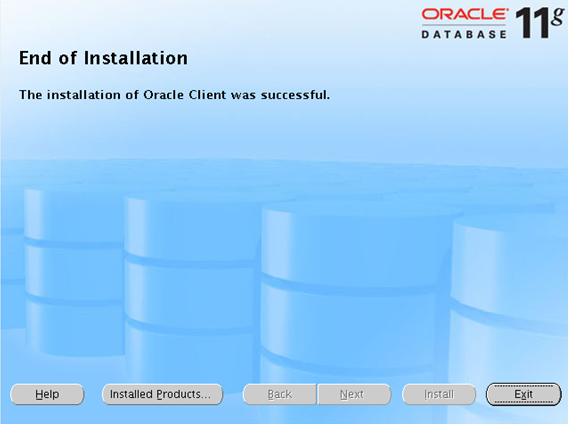
16. Click Exit.
Testing the connectivity to the server
Test the connectivity between the database client and server to ensure that IMC can connect to the database server by using the client during installation:
1. Log in to Linux as oracle.
2. In the terminal window, log in to the database to test the connectivity. In this example, the username is sys, the password is iMC123, and the network service name is orcl.
sqlplus sys/iMC123@service-test as sysdba
Configuring network service names
|
|
IMPORTANT: If IMC servers use different Oracle databases in a distributed deployment, you must configure a unique network service name for each database. |
To enable IMC to connect to remote databases, you must configure correct network service names on the Oracle database server and client.
Configuration procedure
1. Log in to Linux as oracle.
2. Start the database service.
See "Starting the Oracle service manually" for the operation procedure.
3. Start Oracle Net Configuration Assistant.
cd $ORACLE_HOME/bin
./netca
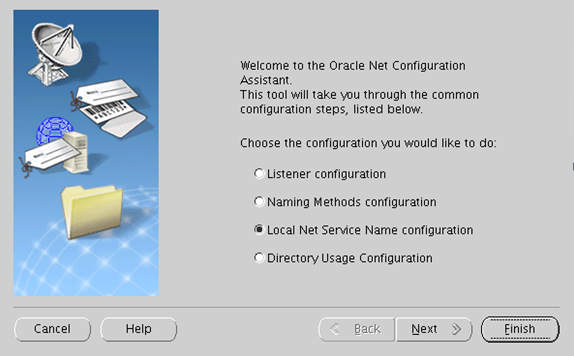
The Welcome page opens, as shown in Figure 42.
Figure 42 Welcome page
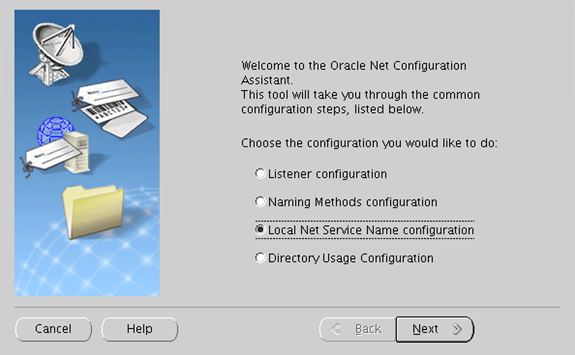
4. Select Local Net Service Name configuration, and then click Next.
The Net Service Name Configuration page opens, as shown in Figure 43.
Figure 43 Net Service Name Configuration page
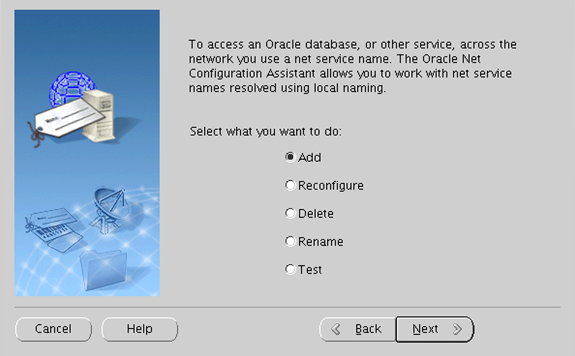
5. Select Add, and then click Next.
The page for configuring the database service name opens, as shown in Figure 44.
Figure 44 Specifying the service name
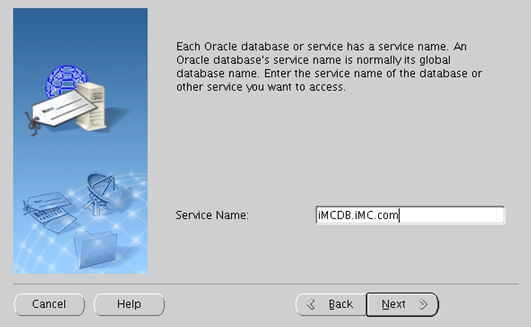
6. In the Service Name field, enter the database service name, which is typically the database's global database name, and then click Next.
The page for selecting a network protocol opens, as shown in Figure 45.
Figure 45 Selecting a network protocol
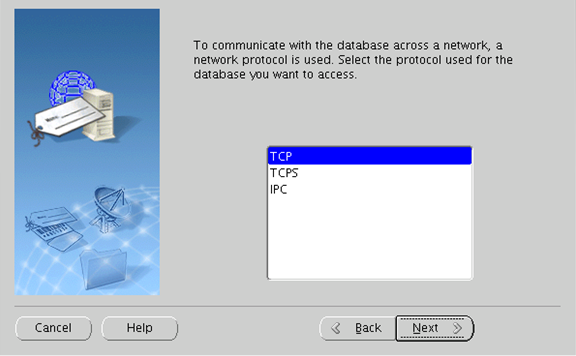
7. Select a protocol used to connect to the database server, and then click Next. This example uses TCP.
The page for configuring the host name and port number opens, as shown in Figure 46.
Figure 46 Configuring the host name and port number
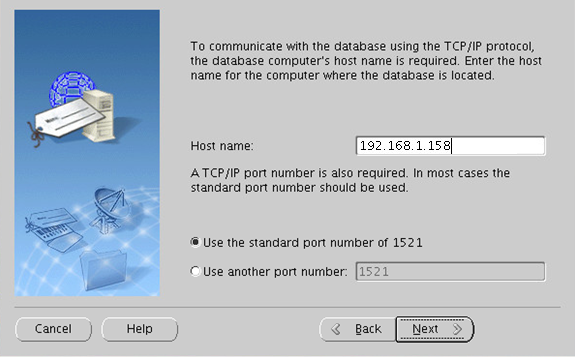
8. Configure the following parameters:
¡ Enter the IP address of the database server in the Host name field.
¡ Select Use the standard port number of 1521. This option is selected by default.
The page for testing connectivity to the database opens, as shown in Figure 47.
Figure 47 Performing a connectivity test
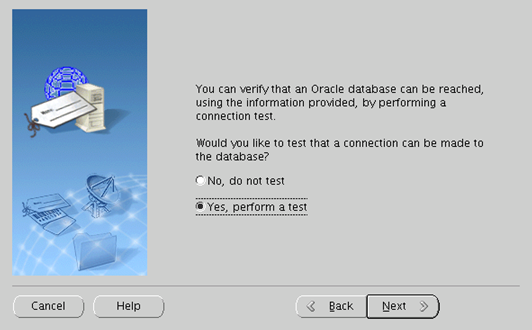
9. Select Yes, perform a test, and then click Next.
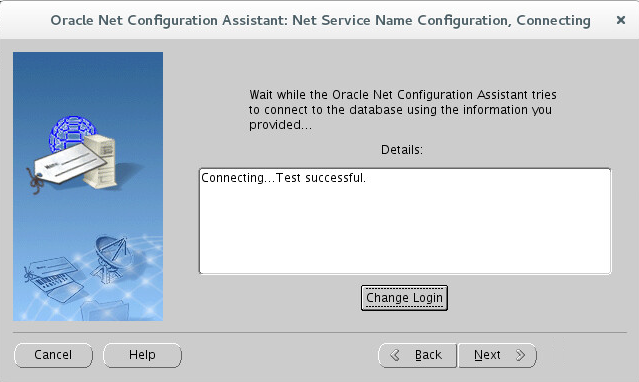
Oracle Net Configuration Assistant displays the connectivity test result under Details, as shown in Figure 48.
Figure 48 Test result
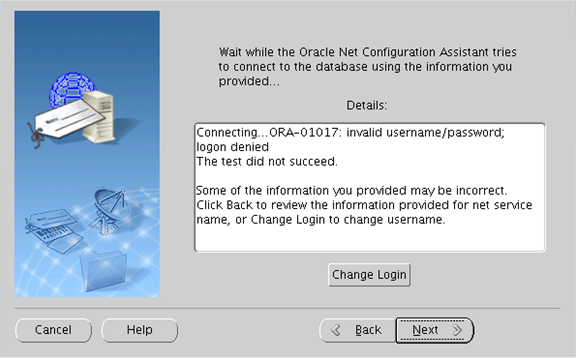
10. If the connection attempt fails, click Change Login.
The Change Login dialog box opens, as shown in Figure 49.
Figure 49 Changing username and password
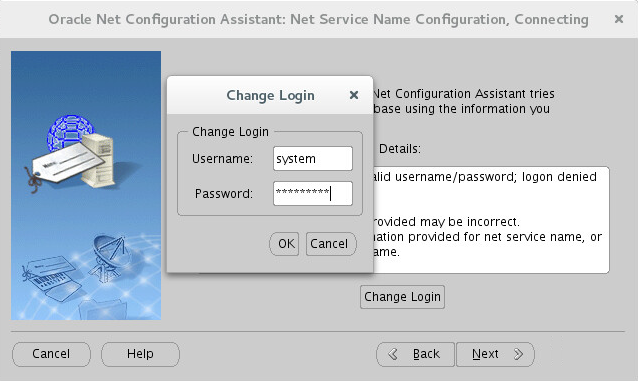
11. Enter the correct password of the user system, and then click OK.
Oracle Net Configuration Assistant performs a new connection test.
12. When you see a successful test result, click Next, as shown in Figure 50.
Figure 50 Test result
The page for configuring the network service name opens, as shown in Figure 51.
Figure 51 Entering the network service name
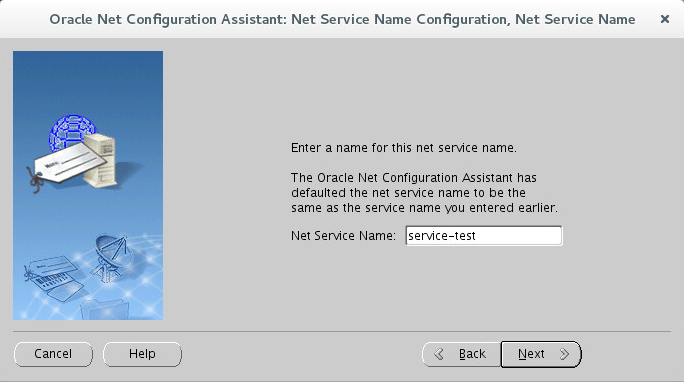
13. Enter a network service name in the Net Service Name field.
This name will be added to the list for selecting a network service name when you install IMC.
14. Click Next.
The page for adding network service names opens, as shown in Figure 52.
Figure 52 Adding network service names as needed
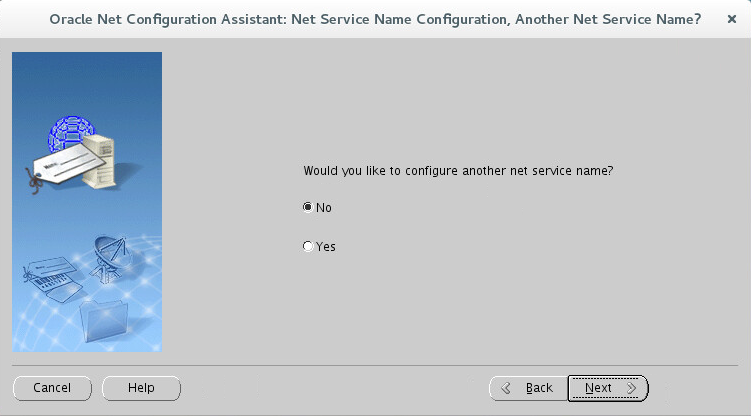
15. To add additional network service names, select Yes. If additional network service names are not needed, click No. In this example, select No, and then click Next.
The configuration complete page opens, as shown in Figure 53.
Figure 53 Network service name configuration completion page
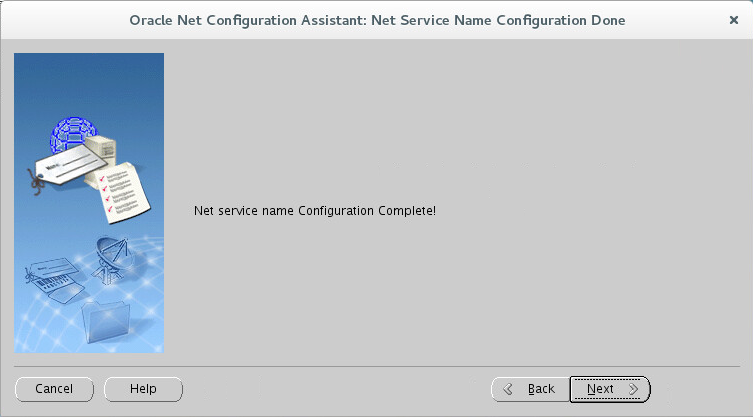
16. Click Next.
17. On the page shown in Figure 54, click Finish.
Figure 54 Finishing the configuration
Configuration examples
The network service name configuration varies depending on whether IMC uses local or remote databases.
Scenario 1
As shown in Figure 55, IMC server A (master server), and servers B and C (subordinate servers) use their respective local databases.
For each database, you must assign a unique network service name. In this example, TNSNAME_A, TNSNAME_B, and TNSNAME_C are the network service names for accessing the databases on servers A, B, and C, respectively.
For the servers to communicate with each other, you must configure all these network service names on each IMC server. Make sure the settings for each network service name are the same across all servers.

Scenario 2
IMC server A (master server), and servers B and C (subordinate servers) share a remote database server, DBServer_D.
In this scenario, you must configure the servers as follows:
· Install the Oracle client on each IMC server to connect to the remote database server.
· Configure the same network service name (for example, TNSNAME_D) for accessing the database across all servers, including the IMC servers (Oracle clients) and the database server.
Managing Oracle Database 11g
To manage the database server, you must log in to Linux as oracle. Execute the commands in subsequent sections as oracle unless specified otherwise.
For correct operation of IMC, make sure you follow the procedures in this chapter to set the maximum number of Oracle processes and Oracle connection limit, add storage space to the database, modify database memory settings, add redo log groups, and disable database auditing and tracing. After complete the settings, you must restart the operating system before installing IMC.
In the following examples, sys is the username of the Oracle database administrator and iMC123 is the user password.
Starting the Oracle service manually
1. Start the listener control utility.
cd $ORACLE_HOME/bin
./lsnrctl start
2. Verify that the listener control utility is started.
./lsnrctl service
3. Start the Oracle database.
cd $ORACLE_HOME/bin
./sqlplus sys/iMC123 as sysdba
SQL>startup
SQL>exit
Stopping the Oracle service manually
1. Stop the Oracle database.
./sqlplus sys/iMC123 as sysdba
SQL>shutdown immediate
SQL>exit
2. Stop the listener control utility.
cd $ORACLE_HOME/bin
./lsnrctl stop
Configuring the Oracle database listener
If the database you install is used as a remote database, you must configure a listener for the database to receive remote connection requests.
To configure the Oracle database listener:
1. Start Oracle Net Manager in the $ORACLE_HOME/bin/ directory.
cd $ORACLE_HOME/bin/
./netmgr
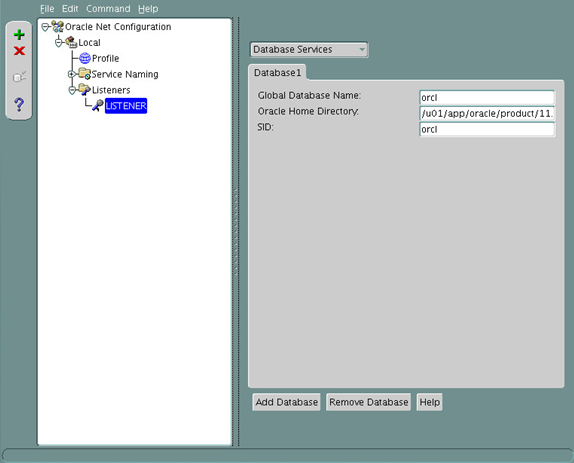
2. From the navigation tree, select Oracle Net Configuration > Local > Listeners > LISTENER.
3. Select Database Services from the list, and then click Add Database.
4. Specify the global database name, Oracle home directory, and the SID.
Make sure the global database name and the SID are the same as those specified during database installation (see Figure 13).
Figure 56 shows the detailed configurations.
Figure 56 Configuring the listener
Setting the maximum number of Oracle processes and Oracle connection limit
By default, the Oracle database allows a maximum of 150 connections.
In a centralized IMC deployment or when a database error occurs, you might need to modify the Oracle process and connection limits according to the number of deployed IMC components. The number of Oracle connections must be not less than 800.
Table 2 lists the Oracle connection limit required by IMC modules.
Table 2 Oracle connection limit on IMC modules
|
IMC module |
Oracle connection limit |
|
IMC platform |
14 |
|
Alarm management |
24 |
|
Syslog management |
9 |
|
Performance management |
11 |
|
Report management |
10 |
|
Guest Access Manager |
5 |
|
User self-service management |
5 |
|
Network asset manager |
5 |
|
Virtual Resource Management |
9 |
|
Configuration center |
9 |
|
ACL management |
7 |
|
VLAN management |
11 |
|
Security control center |
5 |
|
Server & Storage Automation |
6 |
|
VXLAN management |
4 |
|
VAN Fabric Manager |
27 |
|
Resource Automation Manager |
16 |
|
QoS manager |
5 |
|
Service Health Manager |
60 |
|
User access management/CAMS accounting manager |
100 |
|
EAD security policy configuration |
25 |
|
Desktop asset manager |
40 |
|
MPLS VPN manager |
9 |
|
L2VPN manager |
17 |
|
Application Manager |
10 |
|
Branch Intelligent Management System |
10 |
|
IPsec VPN manager |
8 |
|
VAN Connection Manager |
5 |
|
Security Service Manager |
10 |
|
Load Balancing Manager |
5 |
|
Wireless Service Manager |
50 |
To view and modify the maximum number of Oracle processes and the Oracle connection limit:
1. Switch to the oracle user.
su – oracle
2. Log in to the Oracle database as sysdba.
sqlplus sys/iMC123 as sysdba
In the command, the database username is sys and password is iMC123.
3. View the number of Oracle processes and the Oracle connection limit.
¡ View the number of Oracle processes.
SQL>show parameter processes;
¡ View the Oracle connection limit.
SQL>show parameter sessions;
4. Change the maximum number of Oracle processes and the Oracle connection limit according to the installed IMC modules.
¡ Change the maximum number of Oracle processes. Replace 800 with another value as needed.
SQL>alter system set processes=800 scope=spfile;
¡ Change the Oracle connection limit. Replace 800 with another value as needed.
SQL>alter system set sessions=800 scope=spfile;
5. Restart the Oracle database to make the changes take effect.
Automating Oracle database startup on Linux
1. Log in to Linux as root.
2. Copy the Oracle startup script oracled.tar.gz from the /manual directory of the IMC installation package to the Linux operating system.
3. Decompress the script file.
tar -xzf oracled.tar.gz
4. Copy the decompressed file to the /etc/rc.d/init.d/ directory.
cp oracled /etc/rc.d/init.d/
5. Change the file permissions.
chmod –R 755 oracled
6. Add the script to the startup configuration file of the Linux operating system.
chkconfig --add oracled
7. Open the Oracle configuration file /etc/oratab for editing.
vi /etc/oratab
8. Set the following line to Y.
orcl:/u01/app/oracle/product/11.1.0/db_1:Y
9. Save and close the configuration file.
The Oracle database automatically starts at the Linux startup.
10. To manually start or stop the Oracle database, use the following commands:
service oracled start
service oracled stop
Creating a database user
1. Log in to the Oracle database as sys.
./sqlplus sys/iMC123 as sysdba
In the command, sys is the database username and iMC123 is the password.
2. Create a database user named imc and the password imcpassword.
create user imc identified by imcpassword;
|
|
IMPORTANT: For IMC to correctly identify the
password during installation, make sure the password does not contain
spaces, tabs, or any of the following characters: |
3. Grant the sysdba privilege to the user.
grant sysdba to imc;
|
|
IMPORTANT: To avoid deployment errors, give database users sysdba privileges for connecting to the database. |
Adding storage space to the database
The amount of storage space available on the database for IMC depends on the number of data files in the USERS tablespace. By default, the USERS tablespace has a single data file with a size limit of 32 GB. You can add data files to the USERS tablespace to provide additional storage.
The number of data files to add depends on the disk space required by the IMC components. For example, if IMC requires 300 GB for device management, create a minimum of 10 files (300 GB/32 GB = 9.375). If a database is used by multiple IMC components, create data files according to the total disk space required by the installed components.
You can add data files to the USERS tablespace through Oracle Enterprise Manager or by using SQL statements.
Adding database storage space through Oracle Enterprise Manager
1. Log in to Linux as oracle, and then start the Oracle Enterprise Manager.
emctl start dbconsole
2. Access the Oracle Enterprise Manager at:
https://ip-address:5500/em
In the URL, ip-address is the IP address of the Oracle database server.
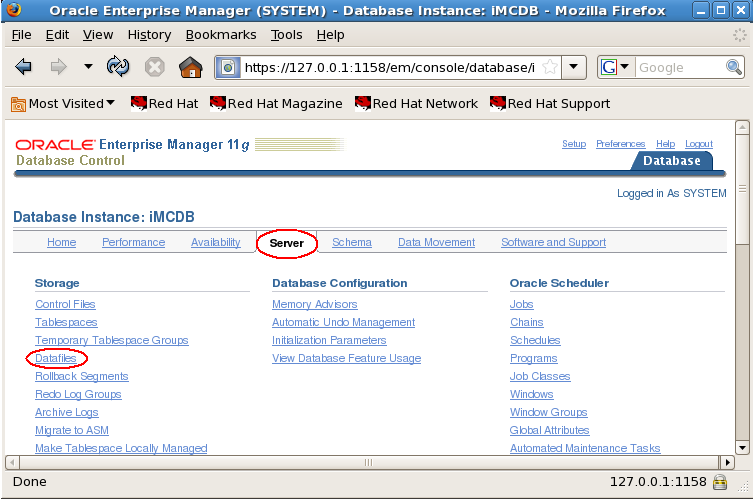
3. Log in to the Oracle Enterprise Manager as SYSTEM, and then select Server > Datafiles, as shown in Figure 57.
Figure 57 Database instance management interface
4. Select the data file that belongs to the USERS tablespace, as shown in Figure 58.
Figure 58 Data file management page
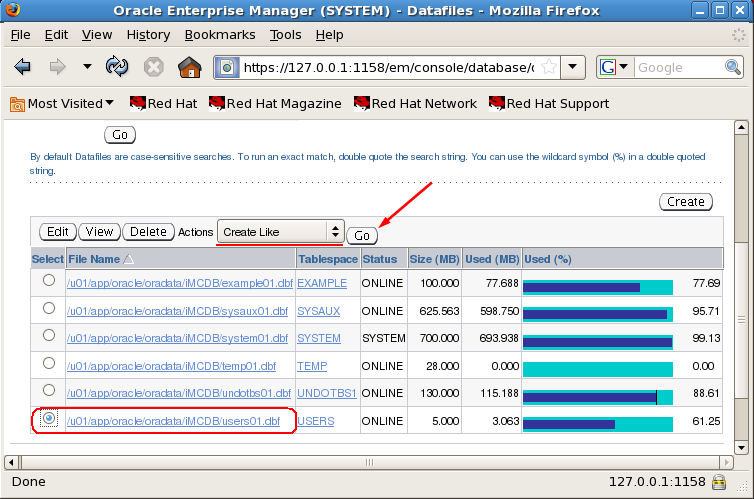
5. Click Go.
The Create Datafile page opens, as shown in Figure 59.
Figure 59 Creating a data file
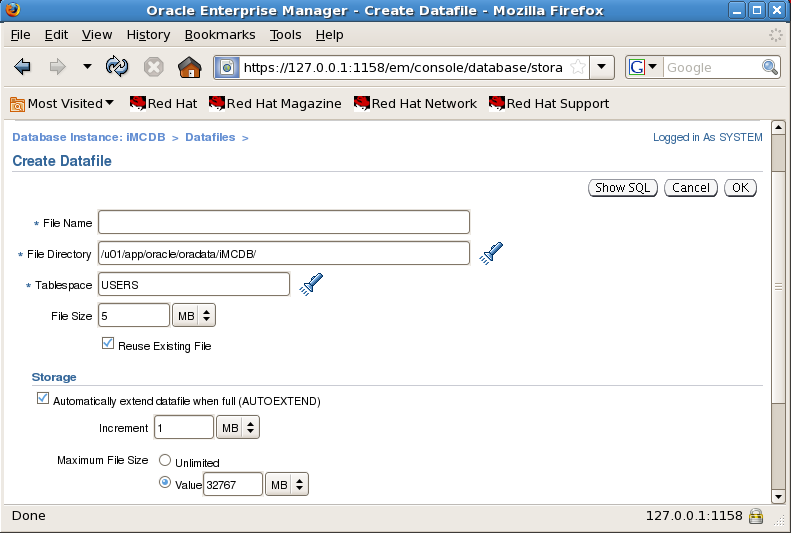
6. Enter the file name and file directory, or use the default file entries, and then click OK.
7. To add additional data files, repeat the steps in this procedure.
If the system has multiple hard disk drives, distribute the files on different disk drives for I/O load balancing.
Setting database storage space through SQL statements
1. Log in to Linux as oracle.
2. Log in to the Oracle database as sys.
sqlplus sys/iMC123@orcl as sysdba
In the command, iMC123 is the sys user password, and orcl is the network service name.
3. Display existing data files in the USERS tablespace.
SQL> select file_name from dba_data_files where tablespace_name='USERS';
FILE_NAME
-----------------------------------------------------------
/u01/app/oracle/oradata/orcl/users01.dbf
The output shows that the USERS tablespace contain only one data file in the /u01/app/oracle/oradata/orcl/ directory.
4. Add a new data file named users02.dbf to the directory.
SQL> alter tablespace USERS add datafile '/u01/app/oracle/oradata/orcl/userdata02.dbf' size 100M autoextend on next 100M maxsize UNLIMITED;
5. Add users03.dbf, users04.dbf, and more data files to the directory. (Details not shown.)
Modifying database memory settings
1. Log in to Linux as oracle.
2. Log in to the Oracle database as sys.
sqlplus sys/iMC123@orcl as sysdba
In the command, sys is the database username, iMC123 is the password, and orcl is the network service name.
3. Set the value of MEMORY_TARGET.
SQL> alter system set MEMORY_TARGET=1700M scope=spfile;
Table 3 lists the recommended memory sizes.
Table 3 Recommended memory sizes
|
System memory |
Local database |
Remote database |
|
4 GB |
1400 MB |
2400 MB |
|
6 GB |
2400 MB |
3600 MB |
|
8 GB |
3600 MB |
4800 MB |
|
10 GB or larger |
4500 MB |
5000 MB |
Setting the Oracle database user password lifetime
By default, the lifetime of the Oracle database user password is 180 days.
To set the password lifetime to Unlimited:
1. Log in to Linux as oracle, and then log in to the Oracle database as sys.
sqlplus sys/iMC123@orcl as sysdba
In the command, sys is the database user name, iMC123 is the password, and orcl is the network service name.
2. Set and display the sys user password.
SQL> select * from dba_profiles s where s.profile='DEFAULT'
and resource_name='PASSWORD_LIFE_TIME';
PROFILE RESOURCE_NAME RESOURCE LIMIT
-----------------------------------------------------------
DEFAULT PASSWORD_LIFE_TIME PASSWORD 180dys
The output shows that the lifetime of the user is 180 days.
3. Set the password lifetime to Unlimited.
SQL> ALTER PROFILE DEFAULT LIMIT PASSWORD_LIFE_TIME UNLIMITED;
The modification takes effect immediately without rebooting the database and the password never expires.
Changing user passwords of the Oracle database
If the password lifetime is not set to unlimited, change the password of an Oracle user before the lifetime expires. You can view all the existing IMC users in the $IMCROOT/common/conf/server-addr.xml file. The username in each db-config represents a user account.
If the IMC components are not installed at the same time, query the expiration date of user passwords.
Figure 60 shows the query result.
select username,expiry_date from dba_users;

To change a user password, follow these steps:
1. Using database administrator account to change the user password.
2. Updating the user password in the IMC configuration file.
If the new password is the same as the one to be expired, you do not need to update the user password in the IMC configuration file.
If you change the password in Oracle or IMC without updating the IMC configuration files, the user account is locked because of inconsistent passwords. For more information, see "Unlocking a database user."
The following examples illustrate how to change the password of user imc_config, and how to unlock the user.
|
|
IMPORTANT: Stop IMC before you change passwords. After you complete changing user passwords, start IMC. |
Using database administrator account to change the user password
1. Query the password of the Oracle database user by executing the pwdmgr.sh -query script provided by IMC. As shown in Figure 61, the password of the imc_config user is iMC5_sNB2MhoQuf.
Figure 61 Query the password of the imc_config user

2. Log in to Linux as oracle.
3. Log in to the Oracle database as sys.
sqlplus sys/iMC123@orcl as sysdba
In the command, iMC123 is the password of the sys user, and orcl is the network service name.
4. Change the password of a specified user.
SQL>alter user imc_config identified by dbpasswd
In the command, dbpasswd is the new password of user imc_config.
Updating the user password in the IMC configuration file
|
|
IMPORTANT: For the correct operation of the report module, the database user password of the report database must be set to sqlsql. |
After the database password of an IMC component is changed using the database management tool, execute pwdmgr.bat to update the password in the server-addr.xml file on the IMC server. The file is located in the /common/conf/server-addr.xml file in the IMC installation path. It stores database passwords of all IMC components in ciphertext.
The following is an example for updating the password of the imc_config database user stored in IMC:
To update the database user password in IMC:
1. Log in to Linux as root.
2. Change the password of the imc_config user.
cd deploy/
./pwdmgr.sh –modify 127.0.0.1 orcl imc_config dbpasswd
Change password successfully
In the example:
¡ The dbpasswd string represents the new password of the imc_config user.
¡ The orcl string is the Oracle instance name.
¡ 127.0.0.1 is the IP address of the database. The database IP address can be found in the /common/conf/server-addr.xml file in the IMC installation directory.
If IMC is deployed in distributed mode, you must update the database password on every IMC server. If you have installed UAM/EAD V3.60 and its patches, change passwords for user ead, as shown in Table 4.
Table 4 Change passwords for user ead
|
File |
Variable name |
Remarks |
|
DBUserPassword |
If you are using E6301, E6301P01, or E6301H02, set the value of PlatDBUserPassword variable in the iMC/uam/etc/uam.conf file to the password of user imc_config. The uamjob directory is available in E6301L03 and later versions. |
|
|
database.password |
||
|
database.password |
||
|
password |
If you have installed the DAM component, set the password in the iMC/dam/conf/server.xml file to the password for DAM database user account dam.
If you have installed the UAM, EAD, or CAMS E6301 version and changed the database user password, change the passwords of all database users listed in the iMC/deploy/conf/ component-env.xml file before you can upgrade the components.
Unlocking a database user
If the passwords stored in IMC and the database are inconsistent, the database user account might be locked and the related IMC service cannot start. Check whether the account is locked by logging in using the account with the new password. If the account is locked, the system displays an account locked message, as shown in Figure 62.
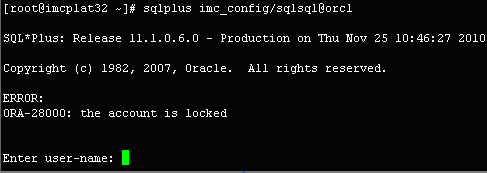
In this example, user imc_config is locked. Log in to the Oracle database as sys, and unlock the user.
sqlplus sys/iMC123@orcl as sysdba
In the command, iMC123 is the password of the sys user, and orcl is the network service name.
SQL> ALTER USER imc_config ACCOUNT UNLOCK;
After the user is unlocked, change the password for the user in Oracle and IMC, and make sure the two passwords are consistent.
You can also disable the auto-locking feature for a user by using the following command:
SQL> ALTER PROFILE DEFAULT LIMIT FAILED_LOGIN_ATTEMPTS UNLIMITED;
|
|
IMPORTANT: Use the command with caution because the database will never lock this account or user. |
Adding redo log groups
Redo logs record changes made to the database (such as data rollback) and can be used for data recovery. By default, three groups of redo logs are available. Each group contains 50 MB log files. To improve the write efficiency if an excessive amount of data needs to be written, add redo log groups after installing Oracle.
To add redo log groups:
1. Switch to the oracle user.
su – oracle
2. Log in to the Oracle database as sys.
sqlplus sys/iMC123@orcl as sysdba
In the command, sys is the database username, iMC123 is the password, and orcl is the network service name.
3. Locate the storage directory of redo log files.
SQL>select MEMBER from v$logfile;
MEMBER
---------------------------------------
/u01/app/oracle/oradata/orcl/redo03.log
/u01/app/oracle/oradata/orcl/redo02.log
/u01/app/oracle/oradata/orcl/redo01.log
Redo log files are stored in the directory /u01/app/oracle/oradata/orcl.
4. Use the following commands to add three redo log groups, each with a size of 2048 MB.
SQL>alter database add logfile group 4('/u01/app/oracle/oradata/orcl/redo04.log') SIZE 2048M;
SQL>alter database add logfile group 5('/u01/app/oracle/oradata/orcl/redo05.log') SIZE 2048M;
SQL>alter database add logfile group 6('/u01/app/oracle/oradata/orcl/redo06.log') SIZE 2048M;
Disabling database auditing
Database auditing records database activities and monitors user operations, such as database connection, SQL statement executions, and data access. Database auditing is enabled by default and it can produce a large number of audit files. To save system resources, disable the auditing feature as follows:
1. Log in to the Oracle database.
sqlplus sys/iMC123@orcl as sysdba
In the command, sys is the database username, iMC123 is the password, and orcl is the network service name.
2. View the database auditing status.
SQL>show parameter audit_trail;
NAME TYPE VALUE
---- ---- -----
audit_trail string DB
The VALUE field value for audit_trail is DB, which indicates that database auditing is enabled.
3. Disable the database auditing.
SQL>alter system set audit_trail=FALSE scope=spfile;
System altered.
4. Restart the database.
SQL>shutdown immediate;
SQL>startup;
5. Verify that the database auditing feature is disabled.
SQL>show parameter audit_trail;
NAME TYPE VALUE
---- ---- -----
audit_trail string FALSE
The VALUE field value for audit_trail is FALSE, which indicates that database auditing is disabled.
Disabling database tracing
The database tracing feature trails the execution history and code paths of Oracle and provides information for debugging. This feature is enabled by default and it affects the database performance. To upgrade the performance, disable this feature as follows:
1. Log in to the Oracle database.
sqlplus sys/iMC123@orcl as sysdba
In the command, sys is the database username, iMC123 is the password, and orcl is the network service name.
2. View the database tracing status.
SQL>show parameter trace;
NAME TYPE VALUE
------------------------------- ------- -----
log_archive_trace integer 0
sec_protocol_error_trace_action string TRACE
sqltrace bollean FALSE
trace_enabled boolean TRUE
tracefile_identifier string
The VALUE field value for trace_enabled is TRUE, which indicates that the tracing is enabled.
3. Disable database tracing.
SQL>alter system set trace_enabled=FALSE scope=spfile;
System altered.
4. Restart the database.
SQL>shutdown immediate;
SQL>startup;
5. Verify that the database tracing feature is disabled.
SQL>show parameter trace_enabled;
NAME TYPE VALUE
------------- ------- -----
trace_enabled boolean FALSE
The VALUE field value for trace_enabled is FALSE, which indicates that database tracing is disabled.
Removing Oracle Database 11g
You can remove the Oracle database by using the uninstall script provided with the database, or remove Oracle program files, users, and user groups by executing commands as root.
To manually remove Oracle Database 11g:
1. Log in to Linux as root.
2. Stop the Oracle service.
cd $ORACLE_HOME/bin
sqlplus sys/imc123 as sysdba
SQL>shutdown
In the command, imc123 is the password of the sys user.
3. Stop the listener.
cd $ORACLE_HOME/bin
./lsnrctl stop
4. Delete the Oracle installation directory /u01 in the root directory.
cd /
rm –rf /u01
5. Delete the directory /usr/local/bin/oracle (the default is /usr/local/bin). This is the directory configured using the configuration scripts during Oracle database installation (see Figure 29). The asterisks (*) in the command represents the name of the file you want to delete.
rm –rf **
6. Delete files oratab and oraInst.loc in the /etc directory.
cd /etc
rm –rf oratab
rm –rf oraInst.loc
7. Delete the oracle user.
userdel oracle
8. Delete the oinstall user group.
groupdel oinstall
9. Delete the dba user group.
groupdel dba
10. Delete the /home/oracle directory.
cd /home
rm –rf oracle/
11. Delete the startup service.
chkconfig -–del oracled
12. Reboot Linux.
FAQ
Why does the system display an insufficient disk space error when creating the database instance?
Verify that the etc/sysctl.conf file is correctly configured. For more information, see "Adjusting kernel parameters."
Why are there unreadable characters displayed on IMC that uses the Oracle database?
The following issues can cause unreadable characters:
· Incorrect character set for the database.
The Oracle database character set is incompatible with the language setting of IMC. For example, the Oracle database uses the English character set, but IMC uses a non-English language coding. To resolve the problem, reinstall the Oracle database and select the correct character set.
· Incorrect NLS_LANG variable setting.
The NLS_LANG environment variable is not set correctly. To resolve the problem, correct the NLS_LANG setting, and then restart the server and IMC. For information about setting the NLS_LANG variable, see "Setting the NLS_LANG environment variable."
· Incorrect LANG variable setting for the Oracle database server that uses the default character set.
The LANG variable is not set correctly for a database server that is configured to use the default character set during installation. The default character set is determined by the LANG variable. For more information about setting the LANG variable, see "Setting environment variables for the oracle user."
For example, the LANG variable is set to LANG= en_US.UTF-8 for a database that requires a non-English character set. If the database is configured to use the default character set, which is WE8ISO8859P1 in this example, unreadable characters will be displayed.
To resolve the problem, reinstall the Oracle database with the correct character set. For more information, see "Installing the Oracle database server."
For more information about setting the database and client character sets, see Oracle Database Globalization Support Guide on the Oracle website.
How can I identify whether the environment variable settings have taken effect?
Execute the echo $environment variable name command under the root user to verify that the Oracle main directory, Oracle LIB directory, and Oracle instance settings have taken effect as follows:
echo $ORACLE_HOME
/u01/app/oracle/product/11.1.0/db_1
echo $LD_LIBRARY_PATH
/u01/app/oracle/product/11.1.0/db_1/lib
echo $ORACLE_SID
orcl
The connection to the database server is very slow. How can I resolve the issue?
Use the vi editor to view the /etc/resolv.conf file and identify whether the DNS settings are correct.
cd /etc
vi resolv.conf
nameserver 10.72.66.36
nameserver 10.72.66.37
After you configure global database variables, other third-party software cannot start. How can I resolve this issue?
Because certain third-party software does not support configuring global environment variables, the software might fail to start correctly. To resolve this issue, you can change the global database variable settings to the Oracle user's environment variables as follows:
|
|
CAUTION: If only the Oracle user's database environment variables are configured and global database environment variables are not configured, the DBMan feature might be unavailable. |
1. Open the profile file in the /home/oracle/.bash_profile directory:
vi /home/oracle/.bash_profile
2. Add the following content to the profile file:
ORACLE_BASE=/u01/app/oracle
ORACLE_HOME=$ORACLE_BASE/product/11.1.0/db_1
ORACLE_SID=orcl
PATH=$PATH:$ORACLE_HOME/bin:$HOME/bin
LD_LIBRARY_PATH=$ORACLE_HOME/lib
export ORACLE_BASE ORACLE_HOME ORACLE_SID PATH LD_LIBRARY_PATH
The variable description is as follows:
¡ ORACLE_BASE—Oracle base directory.
¡ ORACLE_HOME—Oracle home directory.
¡ ORACLE_SID—Oracle database instance ID. Use the same instance ID for Oracle database installation.
3. Save and close the file.