- Table of Contents
-
- H3C G3&G5 Servers Storage Controller User Guide-6W109
- 00-Preface
- 01-Storage controller overview
- 02-Storage controller features
- 03-Configuring an embedded RSTe RAID controller
- 04-Configuring an NVMe VROC module
- 05-Configuring a P430 storage controller
- 06-Configuring a 1000 storage controller
- 07-Configuring a 9361, 9440, 9460, L460, P5408, or H5408 storage controller
- 08-Configuring an H460, P460, P2404 or P4408 storage controller
- 09-Configuring a 9300 storage controller
- 10-Configuring a 9311 storage controller
- 11-Configuring an LSI 9400 or 9500 series storage controller
- 12-Configuring a RAID-MARVELL-SANTACRUZ-LP-2i storage controller
- 13-Appendix A Troubleshooting storage controllers
- 14-Appendix B RAID arrays and fault tolerance
- Related Documents
-
| Title | Size | Download |
|---|---|---|
| 06-Configuring a 1000 storage controller | 6.63 MB |
Configuring an HBA-1000-M2-1 storage controller
|
|
NOTE: The BIOS screens might vary by the BIOS version. The screenshots in this chapter are for illustration only. |
About the HBA-1000-M2-1 storage controller
The HBA-1000-M2-1 storage controller supports 6-Gbps and 12-Gbps SAS/SATA data channels. For detailed storage controller information, access http://www.h3c.com/en/home/qr/default.htm?id=66.
Features
Operating modes
The storage controller supports the following operating modes:
· HBA mode—In this mode, physical drives attached to the storage controller are exposed as raw drives and RAID functions are disabled.
· RAID mode—In this mode, RAID functions are enabled and RAID arrays can be created on physical drives. Only logical drives are exposed to the operating system.
· Mixed mode—This is the default mode. In this mode, RAID functions are enabled and RAID arrays can be created on physical drives. Both logical drives and raw physical drives are exposed to the operating system.
|
|
IMPORTANT: · The operating system might fail to start up after the operating mode of the storage controller is changed. To resolve the issue, re-install the operating system. If the issue persists, contact Technical Support. · If the storage controller has RAID configuration, you must clear RAID configuration before changing the operation mode of the storage controller to HBA mode. The new operating mode takes effect after the server reboots. · For the new mode to take effect, restart the server after an operating mode change. |
RAID levels
Table 1 shows the minimum number of drives required by each RAID level and the maximum number of failed drives supported by each RAID level. For more information about RAID levels, see "Appendix B RAID arrays and fault tolerance."
Table 1 RAID levels and the numbers of drives for each RAID level
|
RAID level |
Min. drives required |
Max. failed drives |
|
RAID 0 |
1 |
0 |
|
RAID 1 |
2 |
1 |
|
RAID 10 |
4 |
n, where n is the number of RAID 1 arrays in the RAID 10 array. |
Hot spare drives
You can configure hot spare drives to improve data security. A hot spare drive is a standby drive that does not store any data. When a drive in a redundant RAID fails, a spare drive automatically replaces the failed drive and rebuilds the data of the failed drive.
The storage controller supports the following types of hot spare drives. For more information about hot spare drive types, see "Storage controller features."
· Dedicated spare drive.
· Auto replace spare drive.
Restrictions and guidelines for configuring RAID
· As a best practice, configure RAID with drives that do not contain RAID information.
· To build a RAID successfully and ensure RAID performance, make sure all drives in the RAID are the same type (HDDs or SSDs) and have the same connector type (SAS or SATA).
· For efficient use of storage, use drives that have the same capacity to build a RAID. If the drives have different capacities, the lowest capacity is used across all drives in the RAID.
· If you use one physical drive to create multiple RAIDs, RAID performance might decrease in addition to increased maintenance complexities.
Configuring RAID arrays in UEFI mode
This section describes how to configure RAID arrays through a storage controller in UEFI mode. For more information about how to enter the BIOS and set the boot mode to UEFI, see the BIOS user guide for the server.
RAID array configuration tasks at a glance
To configure RAID arrays in UEFI mode, perform the following tasks:
· Accessing the storage controller configuration screen
· Switching the operating mode
· (Optional.) Configuring hot spare drives
· (Optional.) Deleting a RAID array
· (Optional.) Scanning drives and viewing drive information
· (Optional.) Locating drives
· (Optional.) Viewing basic storage controller information
· (Optional.) Viewing and modifying storage controller settings
· (Optional.) Clearing storage controller configuration information
· (Optional.) Upgrading the storage controller firmware online
· (Optional.) Erasing drives
· (Optional.) Forcing logical drives to come online
Accessing the storage controller configuration screen
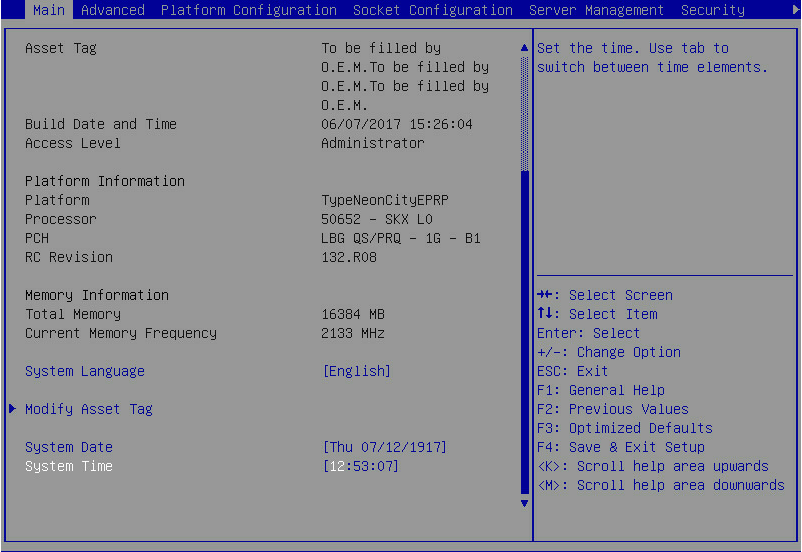
1. During server POST, press Delete, Esc, or F2 as prompted to open the BIOS setup screen as shown in Figure 1.
For how to navigate screens and modify settings, see the operation instructions at the lower right corner.
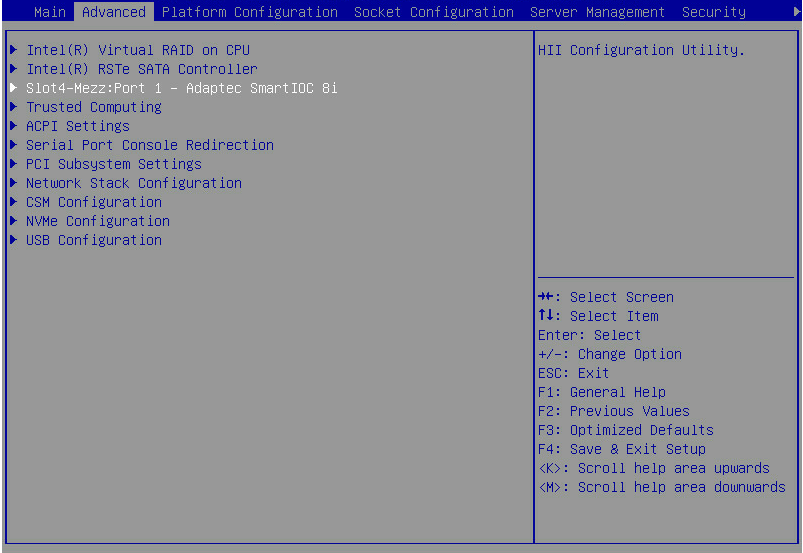
2. On the screen as shown in Figure 2, select Advanced > Dynamic Device Configuration > Adaptec Smart IOC 8i or select Advanced > Adaptec Smart IOC 8i, and press Enter. Whether the Dynamic Device Configuration menu is displayed depends on the BIOS version.
Figure 2 Selecting Adaptec Smart IOC 8i
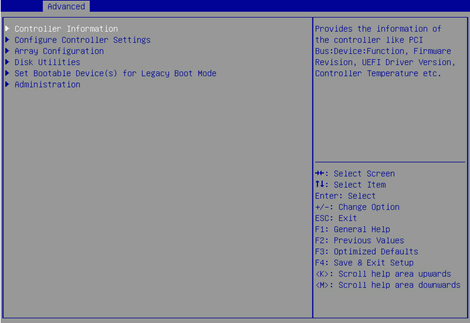
The storage controller configuration screen as shown in Figure 3 opens.
Figure 3 Storage controller configuration screen

Switching the operating mode
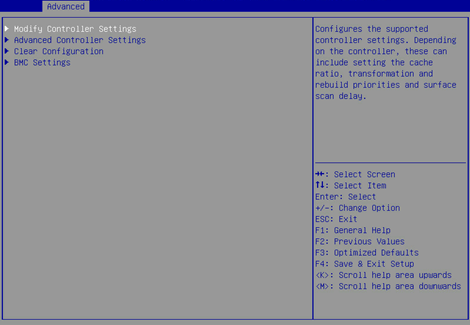
1. On the storage controller configuration screen as shown in Figure 4, select Configure Controller Settings and press Enter.
Figure 4 Storage controller configuration screen
2. On the screen as shown in Figure 5, select Modify Controller Settings and press Enter.
Figure 5 Controller Configuration screen

3. On the screen as shown in Figure 6, change the operating mode for connector (CN0) and connector (CN1), select SUBMIT, and press Enter.
If the storage controller connects to a drive backplane, you can set different modes for connector (CN0) and connector (CN1). If the storage controller connects to an expander module, specify the same operating mode for connector (CN0) and connector (CN1) as a best practice.
Figure 6 Modify Controller Settings screen
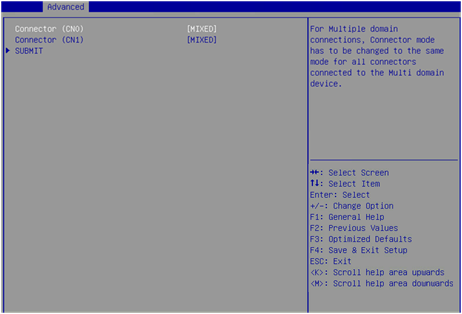
Figure 6 shows a screen with no RAID array configured. If a RAID array is configured, the Modify Controller Settings screen is as shown in Figure 7.
Figure 7 Modify Controller Settings screen
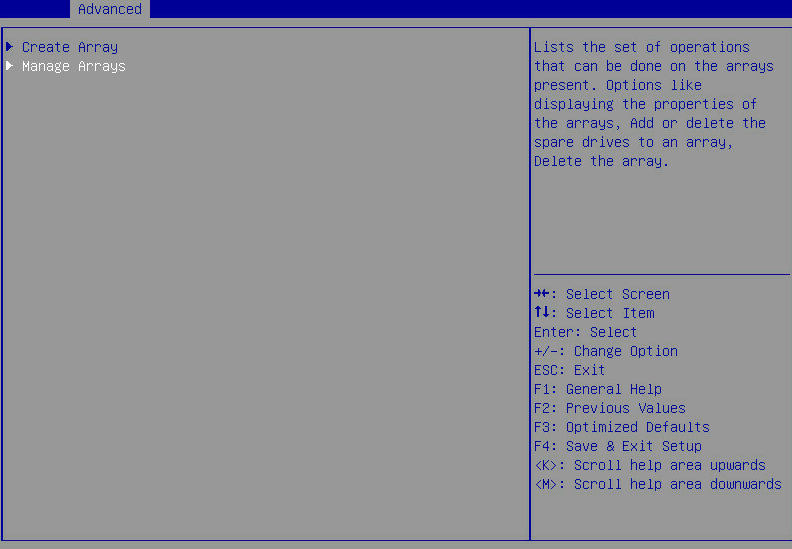
Configuring a RAID array
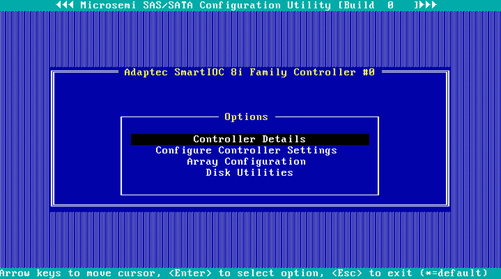
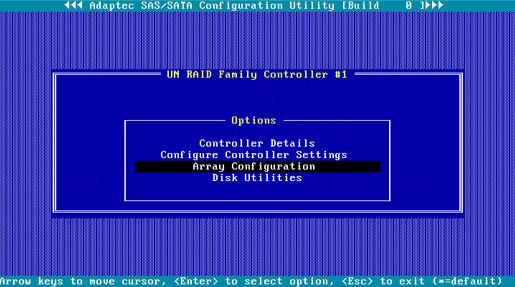
1. On the storage controller configuration screen as shown in Figure 8, select Array Configuration and press Enter.
Figure 8 Storage controller configuration screen

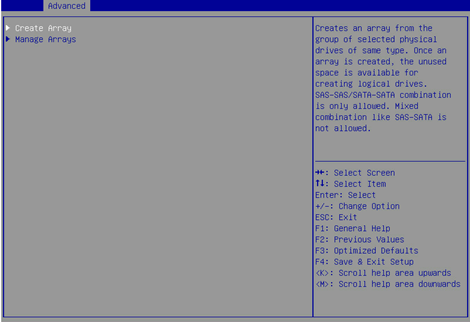
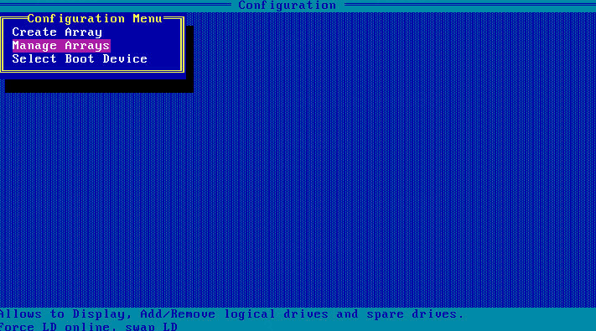
2. On the screen as shown in Figure 9, select Create Array and press Enter.
Figure 9 Array Configuration screen
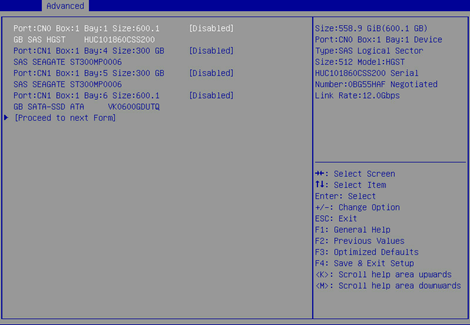
3. On the screen as shown in Figure 10, select the target drives. ([Enabled] following a drive means that the drive has been selected.) Then, select Proceed to next Form and press Enter.
Figure 10 Selecting the target drives
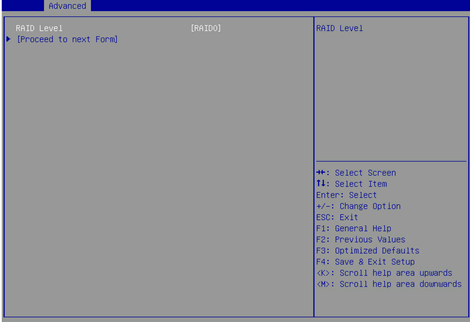
4. On the screen as shown in Figure 11, set the RAID level, select Proceed to next Form, and then press Enter.
Figure 11 Setting the RAID level
5. On the screen as shown in Figure 12, set the values for Logical Drive Label, Stripe Size/Full Stripe Size, Sectors Per Track, Size, Unit Size, SSD Over Provisioning Optimization, and Acceleration Method. Then, select Submit Changes and press Enter. For more information about the parameter description, see Table 2.
Figure 12 Configuring RAID parameters
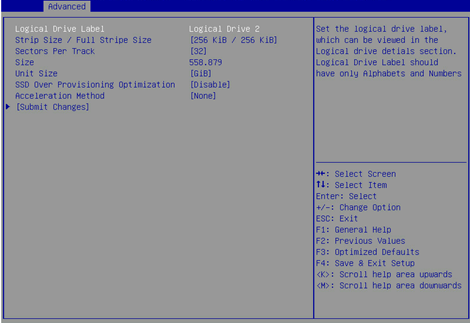
|
Parameter |
Description |
|
Logical Drive Label |
RAID array name. |
|
Stripe Size |
Data block size for each drive. |
|
Sectors Per Track |
Number of sectors per track. |
|
Size |
Capacity of the logical drive. |
|
Unit Size |
Size for the unit. |
|
Acceleration Method |
Logical drive acceleration method. |
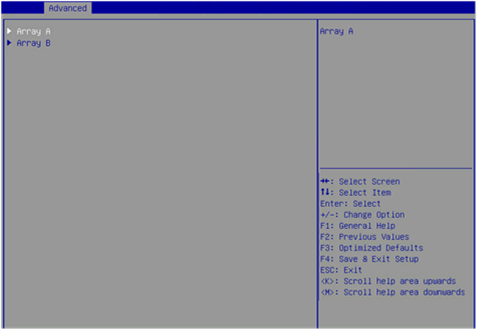
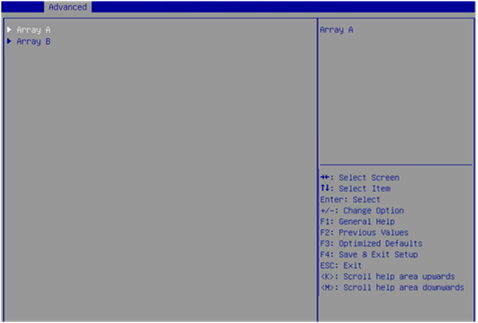
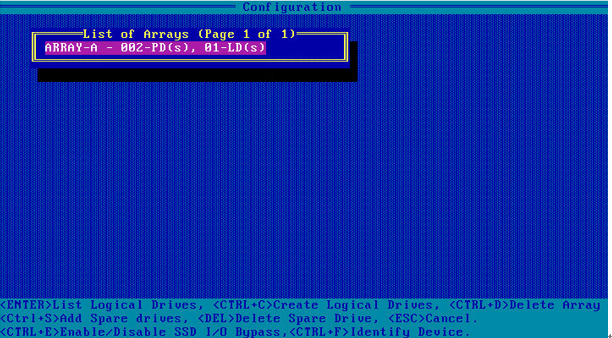
6. After creating the RAID array, select Array Configuration > Manage Arrays and press Enter. On the screen as shown in Figure 13, select the RAID array you want to view and press Enter.
Figure 13 Selecting a RAID array
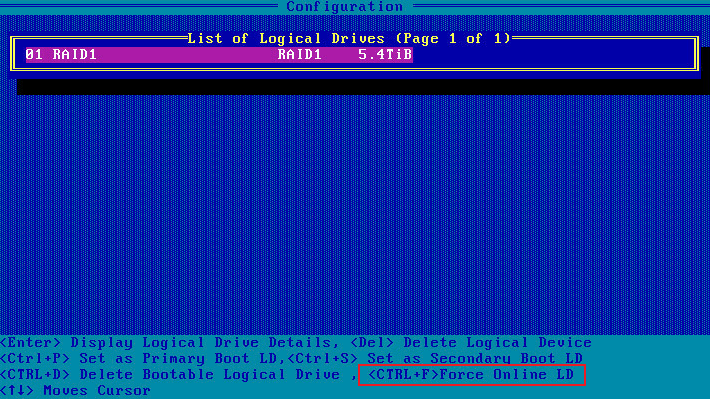
7. On the screen as shown in Figure 14, select List Logical Drives, select the RAID array you want to view, and press Enter.
Figure 14 Selecting List Logical Drives

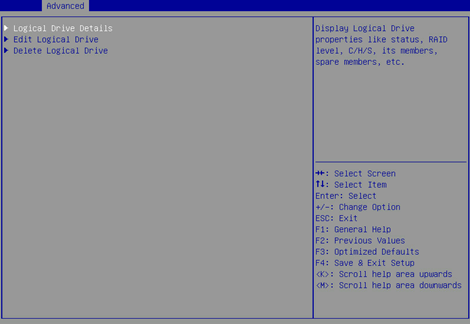
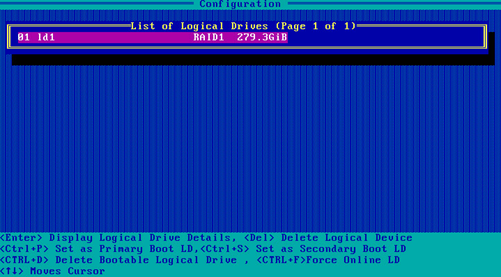
8. On the screen as shown in Figure 15, select Logical Drive Details and press Enter to view detailed information about the RAID array (including RAID array name, level, and drive information).
Figure 15 Selecting Logical Drive Details
Configuring hot spare drives
1. On the storage controller configuration screen as shown in Figure 16, select Array Configuration and press Enter.
Figure 16 Storage controller configuration screen

2. On the screen as shown in Figure 17, select Manage Arrays and press Enter.
Figure 17 Array Configuration screen

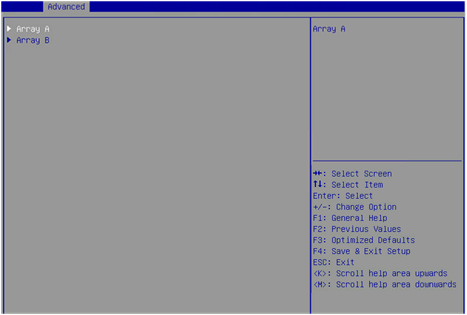
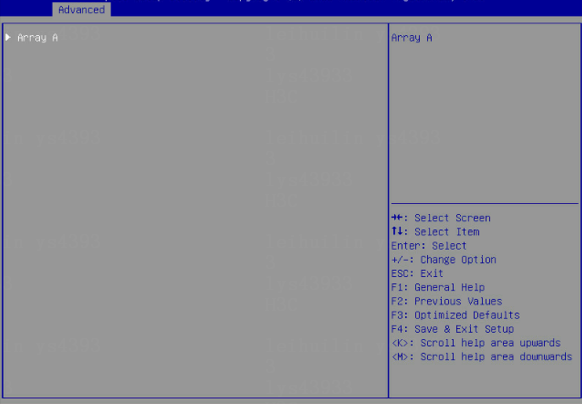
3. On the screen as shown in Figure 18, select the target RAID array and press Enter.
Figure 18 Selecting the target RAID array
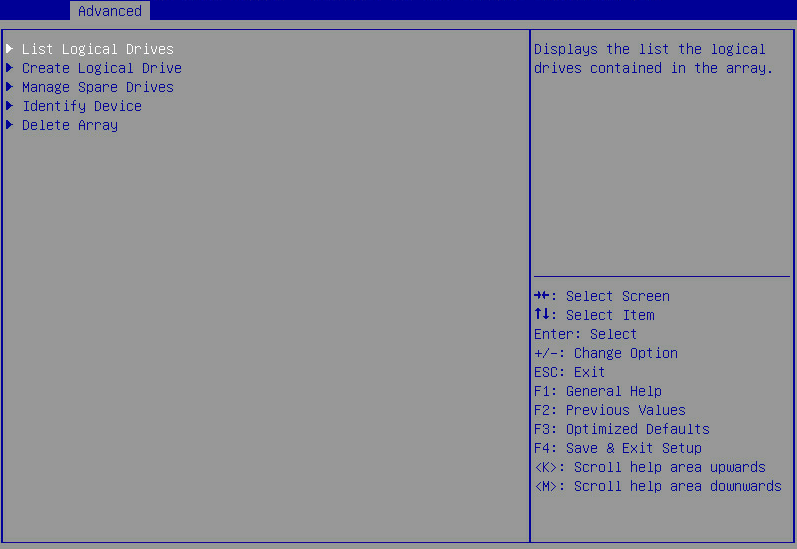
4. On the screen as shown in Figure 19, select Manage Spare Drives and press Enter.
Figure 19 Selecting Manage Spare Drives

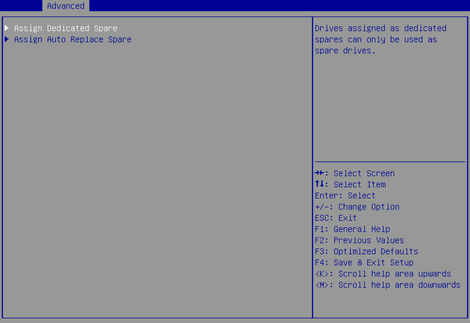
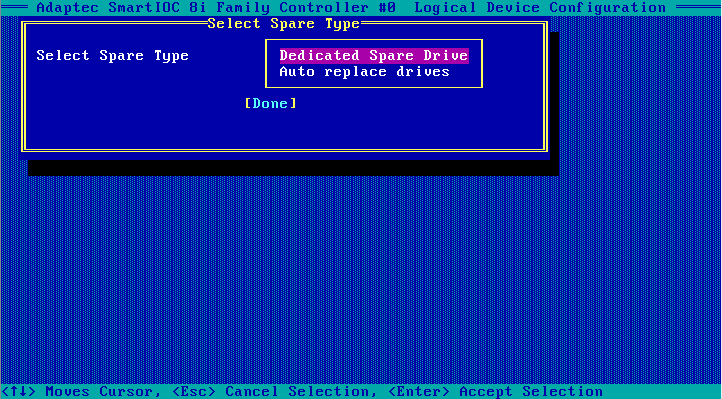
5. On the screen as shown in Figure 20, select Assign Dedicated Spare (for specifying hot spare drives for the specified array) or Assign Auto Replace Spare (for automatically replacing failed drives) and press Enter.
Figure 20 Selecting the spare type
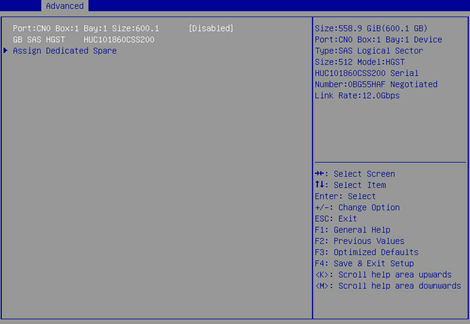
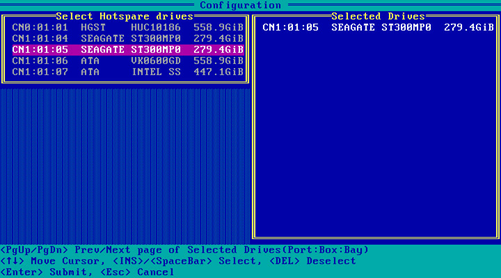
6. On the screen as shown in Figure 21, select the target drive and press Enter.
Figure 21 Selecting the target drive
Deleting a RAID array
This task allows you to delete a RAID array and the logical drives contained in it.
|
|
NOTE: Deleting logical drives in the middle of a RAID array might cause discontinuous sectors on the physical drives of this array. As a consequence, the operation might affect the drive read and write rate and limit the operations on logical drives performed by using RAID array configuration tools. As a best practice to avoid these problems, delete logical drives from back to front in sequence. If you delete logical drives in the middle, wait for all the logical drives to enter normal state before executing any other operations. |
To delete a RAID array:
1. On the storage controller configuration screen as shown in Figure 22, select Array Configuration and press Enter.
Figure 22 Storage controller configuration screen
2. On the screen as shown in Figure 23, select Manage Arrays and press Enter.
Figure 23 Array Configuration screen

3. On the screen as shown in Figure 24, select the target array and press Enter.
Figure 24 Selecting the target array
4. On the screen as shown in Figure 25, select Delete Array and press Enter.
Figure 25 Selecting Delete Array
Scanning drives and viewing drive information
1. On the storage controller configuration screen as shown in Figure 26, select Disk Utilities and press Enter.
The storage controller starts scanning all available drives.
Figure 26 Storage controller configuration screen
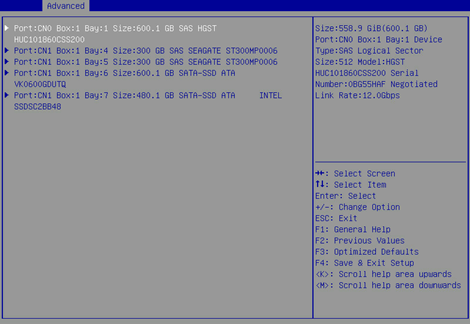
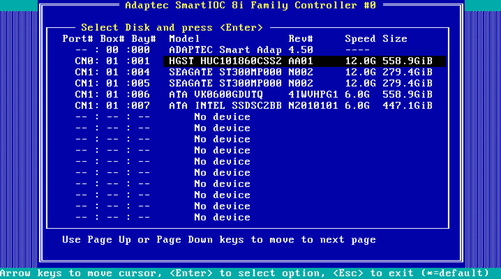
2. On the screen as shown in Figure 27, you can see information for all available drives.
Locating drives
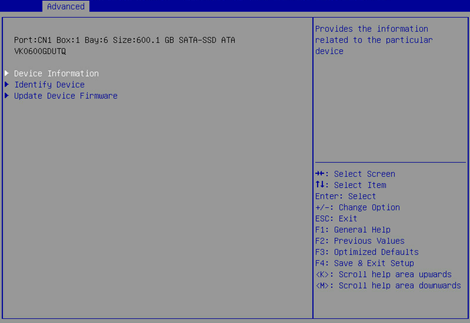
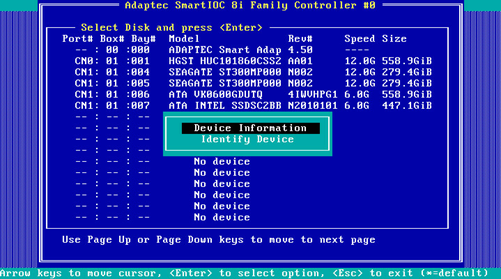
1. Select the target drive on the screen as shown in Figure 27 and press Enter.
2. On the screen as shown in Figure 28, select Identify Device to turn on the LED indicator for the slot where the drive is located.
Viewing basic storage controller information
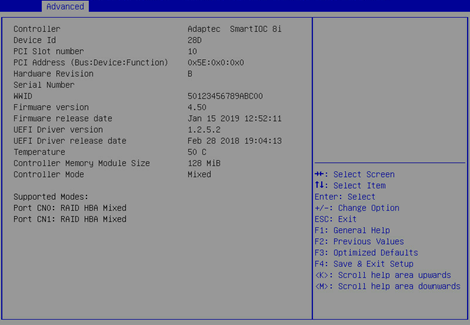
1. On the storage controller configuration screen as shown in Figure 29, select Controller Information and press Enter.
Figure 29 Storage controller configuration screen
2. On the screen as shown in Figure 30, you can see basic information for the storage controller. For more information about the parameter description, see Table 3.
Figure 30 Basic storage controller information screen
|
Parameter |
Description |
|
Controller |
Storage controller model. |
|
Hardware Revision |
Hardware version. |
Viewing and modifying storage controller settings
1. On the storage controller configuration screen as shown in Figure 31, select Configure Controller Settings and press Enter.
Figure 31 Storage controller configuration screen

2. On the screen as shown in Figure 32, select Modify Controller Settings and press Enter.
Figure 32 Controller Configuration screen

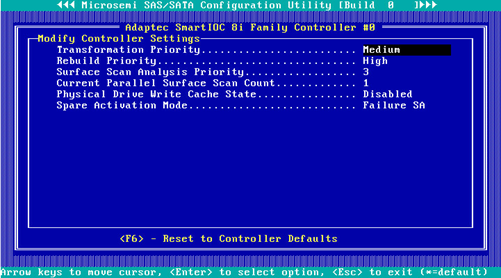
3. On the screen as shown in Figure 33, you can view and modify the basic storage controller settings. If no logical drives are available, you can only modify the operating mode for the storage controller.
Figure 33 Modify Controller Settings screen

Clearing storage controller configuration information
1. On the storage controller configuration screen as shown in Figure 34, select Configure Controller Settings and press Enter.
Figure 34 Storage controller configuration screen
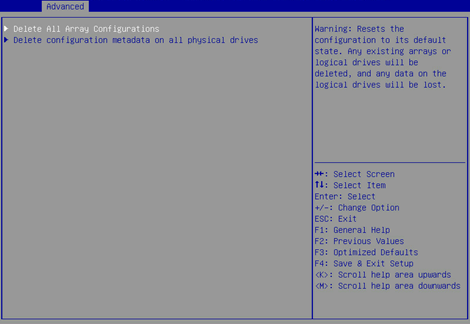
2. On the screen as shown in Figure 35, select Clear Configuration and press Enter.
Figure 35 Controller Configuration screen
3. On the screen as shown in Figure 36, select Delete All Arrays Configurations and press Enter.
Figure 36 Selecting Delete All Arrays Configurations
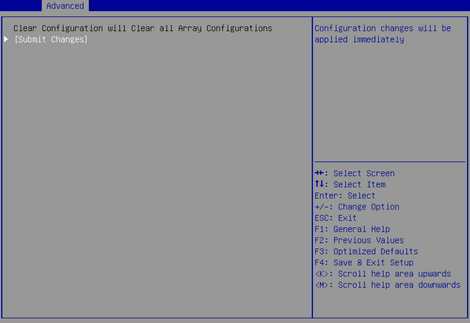
4. On the screen as shown in Figure 37, select Submit Changes and press Enter.
Figure 37 Selecting Submit Changes
Upgrading the storage controller firmware online
The BIOS supports only online firmware upgrade. To upgrade the SEEPROM, contact Technical Support.
To upgrade the storage controller firmware online:
1. On the storage controller configuration screen as shown in Figure 38, select Administration and press Enter.
Figure 38 Storage controller configuration screen
2. On the screen as shown in Figure 39, select Flash Controller Firmware and press Enter.
Figure 39 Administration screen

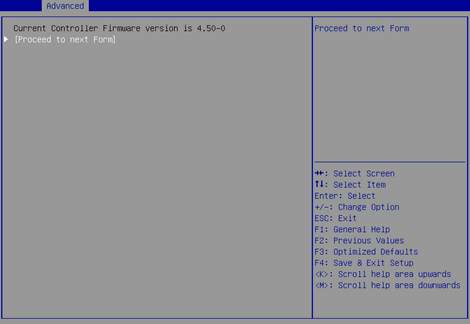
3. On the screen as shown in Figure 40, select Proceed to next Form and press Enter.
Figure 40 Selecting Proceed to next Form
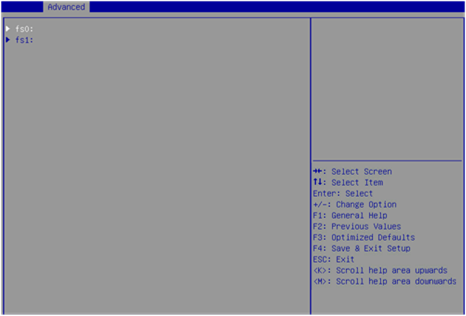
4. On the screen as shown in Figure 41, select the target device where the update file is located and press Enter.
Figure 41 Selecting the target device
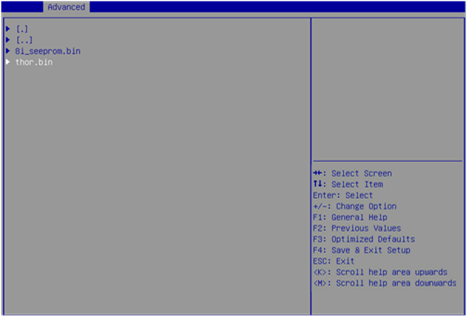
5. On the screen as shown in Figure 42, select the update file suffixed with .bin (thor.bin in this example) and press Enter.
Figure 42 Selecting the update file
6. On the screen as shown in Figure 43, select PROCEED and press Enter.
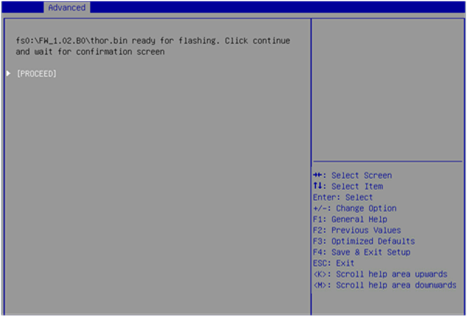
7. After the update is complete, restart the server for the new firmware to take effect.
Erasing drives
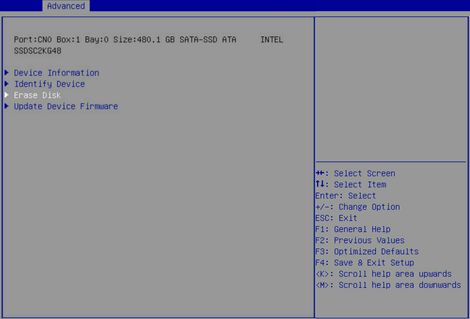
1. On the storage controller configuration screen as shown in Figure 44, select Disk Utilities, and press Enter. The system starts to scan all available drives.
Figure 44 Storage controller configuration screen

2. On the screen as shown in Figure 45, select the drive to be erased, and press Enter.
Figure 45 Selecting the drive to be erased
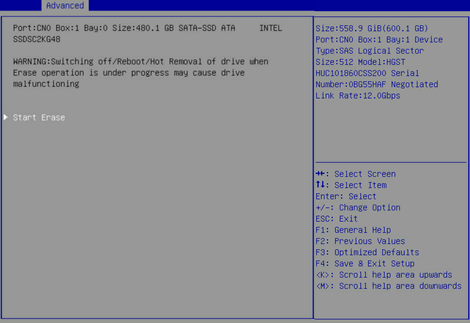
3. On the screen as shown in Figure 46, select Erase Disk, and press Enter.
4. On the screen as shown in Figure 47, press Enter to start erasing. After erasing, the Main menu opens.
Forcing logical drives to come online
If the number of offline drives exceeds the tolerance range of the logical drive fault-tolerant method, the management tool interface will display the logical drive state as Failed. In this case, you can use the Force Online function to force the logical drives to come online. The Force Online function for storage controllers is named Re-Enable in UEFI boot mode.
|
|
CAUTION: · Forcing a logical drive in Failed state to come online might cause the existing data on the logical drive to become invalid or unrecoverable. You can reformat and use the logical drive in the OS. · The Force Online operation might change data a logical drive. Before performing this operation, make sure you fully understand the impact. |
To force logical drives to come online:
1. On the storage controller configuration screen as shown inFigure 48, select Array Configuration and press Enter.
Figure 48 Storage controller configuration screen

2. On the screen as shown in Figure 49, select Manage Arrays and press Enter.
Figure 49 Array Configuration screen
3. On the screen as shown inFigure 50, select an array that has failed due to offline drives and press Enter.
Figure 50 Manage Arrays screen
4. On the screen as shown in Figure 51, select List Logical Drives and press Enter.
Figure 51 Screen for a failed array due to offline drives
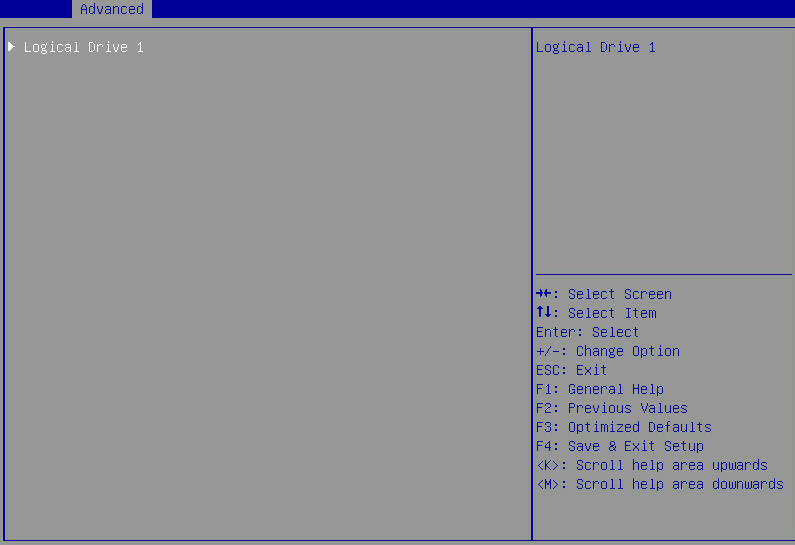
5. On the screen as shown in Figure 52, select a logical drive in Failed state and press Enter.
Figure 52 List Logical Drives screen
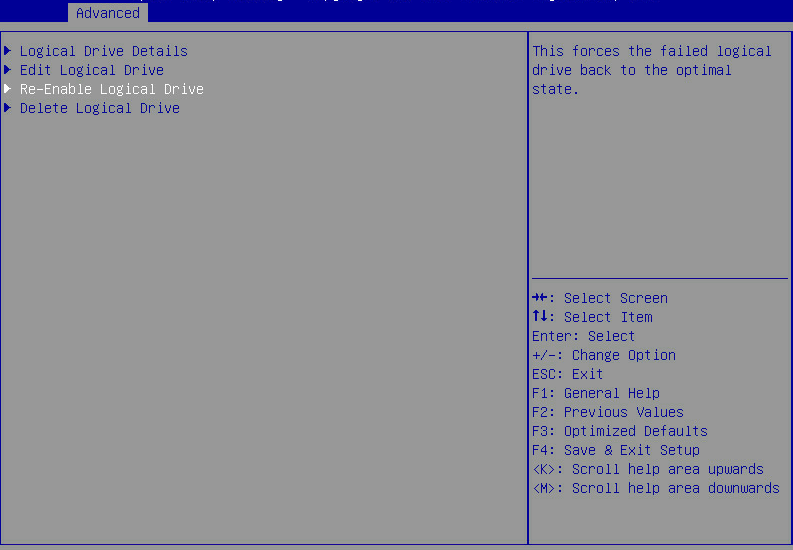
6. On the screen as shown in Figure 53, select Re-Enable Logical Drives and press Enter.
Figure 53 Screen for logical drives in Failed state
Configuring RAID arrays in legacy mode
This section describes how to configure RAID arrays through a storage controller in legacy mode. For more information about how to enter the BIOS and set the boot mode to legacy, see the BIOS user guide for the server.
RAID array configuration tasks at a glance
To configure a RAID array in legacy mode, perform the following tasks:
· Accessing the storage controller configuration screen
· Switching the operating mode
· (Optional.) Configuring hot spare drives
· (Optional.) Configuring the primary boot drives
· (Optional.) Deleting a RAID array
· (Optional.) Scanning drives and viewing drive information
· (Optional.) Locating drives
· (Optional.) Clearing storage controller settings
· (Optional.) Forcing logical drives to come online
Accessing the storage controller configuration screen
During server POST as shown in Figure 54, press Ctrl+A.
The storage controller configuration screen opens as shown in Figure 55. You can view basic RAID status and version information on the storage controller configuration screen.
Figure 55 Storage controller configuration screen

Switching the operating mode
1. On the storage controller configuration screen as shown in Figure 56, select Configure Controller Settings and press Enter.
Figure 56 Storage controller configuration screen

2. On the screen as shown in Figure 57, select Configure Controller Port Mode and press Enter.
Figure 57 Configure Controller Settings screen
3. On the screen as shown in Figure 58, change the operating mode for Connector CN0 and Connector CN1 as needed.
Figure 58 Configure Controller Port Mode screen
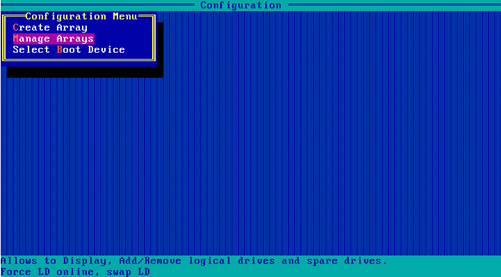
Configuring a RAID array
1. On the storage controller configuration screen as shown in Figure 59, select Array Configuration and press Enter.
Figure 59 Storage controller configuration screen
2. On the screen as shown in Figure 60, select Create Array and press Enter.
Figure 60 Array Configuration screen
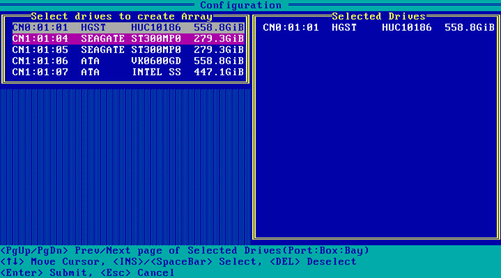
3. On the screen as shown in Figure 61, navigate to a drive and press Insert or the space bar to select it. Repeat this step to select more drives, and then press Enter.
Figure 61 Selecting the target drives
4. On the screen as shown in Figure 62, set the values for RAID Level, Logical Drive Name, Stripe Size, Build Method, Size, and Acceleration Method. Then, select Done and press Enter. For more information about the parameter description, see Table 4.
Figure 62 Configuring RAID parameters
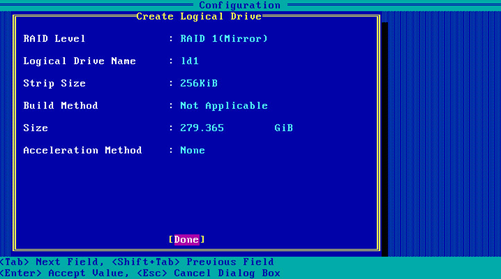
|
Parameter |
Description |
|
RAID Level |
RAID level that determines the drive performance, fault tolerance capability, and logical drive capacity. |
|
Logical Drive Name |
RAID array name. |
|
Stripe Size |
Data block size for each drive. |
|
Size |
Capacity of the logical drive. |
|
Acceleration Method |
Logical drive acceleration method. |
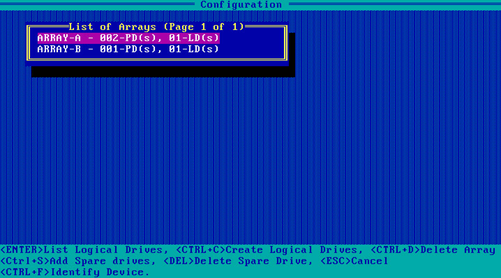
5. On the screen as shown in Figure 63, select Manage Arrays and press Enter.
Figure 63 Selecting Manage Arrays

6. On the screen as shown in Figure 64, select the RAID array you want to view and press Enter to view detailed information about the RAID array (including RAID array name, level, and drive information).
Figure 64 Selecting the target RAID array
Configuring hot spare drives
In legacy mode, if a hot spare drive is configured for a RAID array, the hot spare drive will not take effect on other RAID arrays. To avoid this problem, configure all RAID arrays and then add hot spare drives.
To configure a hot spare drive:
1. On the storage controller configuration screen as shown in Figure 65, select Array Configuration and press Enter.
Figure 65 Storage controller configuration screen

2. On the screen as shown in Figure 66, select Manage Arrays and press Enter.
Figure 66 Array Configuration screen
3. On the screen as shown in Figure 67, select the target array and press Ctrl+S.
Figure 67 Selecting the target array

4. On the screen as shown in Figure 68, navigate to a drive and press Insert or the space bar to select it. Repeat this step to select more drives, and then press Enter.
Figure 68 Selecting the target drives
5. On the screen as shown in Figure 69, select the spare type, select Done, and then press Enter.
Figure 69 Selecting the spare type
Configuring the primary boot drives
Configuring physical drives as the primary boot drives
1. On the storage controller configuration screen as shown in Figure 70, select Array Configuration and press Enter.
Figure 70 Storage controller configuration screen
2. On the screen as shown in Figure 71, select Select Boot Device and press Enter.
Figure 71 Array Configuration screen
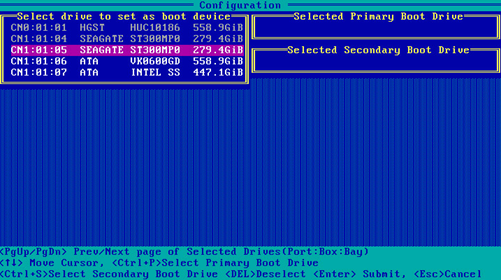
3. On the screen as shown in Figure 72, navigate to a drive and press Ctrl+P or Ctrl+S to select it. Repeat this step to select more drives, and then press Enter.
Figure 72 Selecting the target drives
Configuring a logical drive as the primary boot drive
1. On the storage controller configuration screen, select Array Configuration and press Enter.
2. On the screen as shown in Figure 73, select Manage Arrays and press Enter.
Figure 73 Array Configuration screen

3. On the screen as shown in Figure 74, select the target RAID array and press Enter.
Figure 74 Selecting the target RAID array

4. On the screen as shown in Figure 75, press Ctrl+P to configure the RAID array as the primary boot drive.
Figure 75 Configuring the primary boot drive
Deleting a RAID array
1. On the storage controller configuration screen as shown in Figure 76, select Array Configuration and press Enter.
Figure 76 Storage controller configuration screen
2. On the screen as shown in Figure 77, select Manage Arrays and press Enter.
Figure 77 Array Configuration screen
3. On the screen as shown in Figure 78, select the target array, press Enter, and then press Delete to delete the array.
Figure 78 Deleting the target array
Scanning drives and viewing drive information
1. On the storage controller configuration screen as shown in Figure 79, select Disk Utilities and press Enter.
The storage controller starts scanning all available drives.
Figure 79 Storage controller configuration screen
2. On the screen as shown in Figure 80, you can see information for all available drives.
Locating drives
1. Select the target drive on the screen as shown in Figure 80 and press Enter.
2. On the screen as shown in Figure 81, perform one of the following operations:
¡ Select Device Information and press Enter to view drive information.
¡ Select Identify Drive and press Enter to locate the drive. The Fault/UID LED on the drive turns steady green.
Clearing storage controller settings
1. On the storage controller configuration screen as shown in Figure 82, select Configure Controller Settings and press Enter.
Figure 82 Storage controller configuration screen
2. On the screen as shown in Figure 83, select Modify Controller Settings and press Enter.
Figure 83 Configure Controller Settings screen

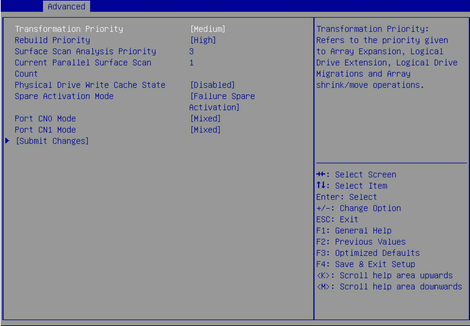
3. On the screen as shown in Figure 84, you can view the storage controller settings.
Figure 84 Modify Controller Settings screen
4. Press F6 to restore the storage controller settings to the default.
|
|
NOTE: The settings (such as Transformation Priority and Rebuild Priority) on the screen as shown in Figure 84 are configurable, but the default values are typically used. |
Forcing logical drives to come online
If the number of offline drives exceeds the tolerance range of the logical drive fault-tolerant method, the management tool interface will display the logical drive state as Failed. In this case, you can use the Force Online function to force the logical drives to come online.
|
|
CAUTION: The Force Online operation might change data a logical drive. Before performing this operation, make sure you fully understand the impact. |
To force logical drives to come online:
1. On the storage controller configuration screen as shown in Figure 85, select Array Configuration and press Enter.
Figure 85 Storage controller configuration screen
2. On the screen as shown in Figure 86, select Manage Arrays and press Enter.
Figure 86 Array Configuration screen
3. On the screen as shown in Figure 87, select an array that has failed due to offline drives and press Enter.
Figure 87 Manage Arrays screen
4. On the screen as shown in Figure 88, select a logical drive in Failed state, press Enter, and then press Ctrl+F.
Figure 88 Screen for a failed array due to offline drives
Downloading and installing ARCCONF
This section introduces the download and installation steps of the OS command line tool. You can use the OS command line tool to manage storage controllers during normal server operation without restarting the server.
Downloading ARCCONF
2. Download the installation package and release notes for the corresponding storage controller firmware as instructed.
3. Decompress the installation package to obtain the ARCCONF tool package for different operating systems.
Installing ARCCONF
See the release notes to install ARCCONF for the corresponding operating system.
Commonly-used commands in ARCCONF
This section describes the usage and examples of commonly used commands in ARCCONF. You can use ARCCONF commands to manage storage controllers during normal server operation without restarting the server.
Upgrading the storage controller firmware
Perform this task to upgrade the storage controller firmware.
Syntax
arcconf romupdate controller_id fwfile
Parameters
controller_id: Specifies the ID of the storage controller.
fwfile: Specifies the name of the .bin firmware file.
Examples
# Upgrade the storage controller firmware.
[root@localhost Arcconf]# arcconf romupdate 1 thorc.bin
Controllers found: 1
Are you sure you want to continue?
Press y, then ENTER to continue or press ENTER to abort: y
Updating controller 1 firmware...Succeeded
A new software image has been applied to controller 1.
You must restart the system for firmware updates to take effect.
Command completed successfully.
Viewing basic information about a storage controller
Perform this task to view basic information about a storage controller.
Syntax
arcconf list controller_id
Parameters
controller_id: Specifies the ID of the storage controller.
Examples
# View attributes of storage controller 1.
[root@localhost Arcconf]# arcconf list 1
Controllers found: 1
----------------------------------------------------------------------
Controller information
----------------------------------------------------------------------
Controller ID : Status, Slot, Mode, Name, SerialNumber, WWN
----------------------------------------------------------------------
Controller 1: : Optimal, Slot 10, Mixed, Adaptec SmartIOC 8i, UNKNOWN, 50123456789ABC00
----------------------------------------------------------------------
Array Information
----------------------------------------------------------------------
Array ID : Status (Interface, TotalSize MB, FreeSpace MB)
----------------------------------------------------------------------
No arrays configured
----------------------------------------------------------------------
Logical device information
----------------------------------------------------------------------
Logical ID : Status (RAID, Interface, Size MB) Name
----------------------------------------------------------------------
No logical devices configured
----------------------------------------------------------------------
Physical Device information
----------------------------------------------------------------------
Physical ID : State (Interface, BlockSize, SizeMB, Vendor, Model, Type) WWN, [Location]
----------------------------------------------------------------------
Physical 0,17 : Ready (SATA, 512 Bytes, 953869MB, ATA , ST1000NM0033-9ZM, Hard Drive) 574EAC82CDB88009, [Enclosure 1, Slot 9(Connector 0:CN0)]
Physical 0,31 : Ready (SATA, 512 Bytes, 1907729MB, ATA , ST2000NM0125-1YZ, Hard Drive) 574EAC82CDB88017, [Enclosure 1, Slot 23(Connector 0:CN0)]
Physical 2,0 : Ready (SES2, Not Applicable, Not Applicable, MSCC, SXP 68x12G, Enclosure Services Device) 574EAC82CDB8807F, [Connector 0:CN0, Enclosure 1]
Physical 2,3 : Ready (SES2, Not Applicable, Not Applicable, ADAPTEC , Virtual SGPIO, Enclosure Services Device) 50123456789ABC00, [Not Applicable]
Command completed successfully.
Viewing physical drive, array, LD, and adapter information
Perform this task to view basic information about a storage controller.
Syntax
Table 5 View storage controller information
|
Command |
Function |
|
arcconf getconfig controller_id AD |
View adapter information. |
|
arcconf getconfig controller_id LD |
View information about all the LDs. |
|
arcconf getconfig controller_id LD LD_id |
View information about the specified LD. |
|
arcconf getconfig controller_id PD |
View information about all physical drives. |
|
arcconf getconfig controller_id PD channel_id device_id |
View information about the specified physical drive. |
|
arcconf getconfig controller_id AR |
View information about all arrays. |
|
arcconf getconfig controller_id AR AR_id |
View information about the specified array. |
Parameters
controller_id: Specifies the ID of the storage controller.
LD_id: Specifies the ID of a logical drive.
channel_id: Specifies the channel ID of a drive.
device_id: Specifies the device ID of a drive.
AR_id: Specifies the ID of an array.
Examples
# View information about all arrays.
[root@localhost Arcconf]# arcconf getconfig 1 ar
Controllers found: 1
----------------------------------------------------------------------
Array Information
----------------------------------------------------------------------
Array Number 0
Name : A
Status : Ok
Interface : SATA
Total Size : 1907739 MB
Unused Size : 0 MB
Block Size : 512 Bytes
Array Utilization : 100.00% Used, 0.00% Unused
Type : Data
Transformation Status : Not Applicable
Spare Rebuild Mode : Dedicated
--------------------------------------------------------
Array Logical Device Information
--------------------------------------------------------
Logical 0 : Optimal (1, Data, 953837 MB) LogicalDrv 0
--------------------------------------------------------
Array Physical Device Information
--------------------------------------------------------
Device 17 : Present (953869MB, SATA, HDD, Connector:CN0, Enclosure:1, Slot:9) Z1W350Q0
Device 31 : Present (1907729MB, SATA, HDD, Connector:CN0, Enclosure:1, Slot:23) ZC23AJES
Array Number 1
Name : B
Status : Ok
Interface : SATA
Total Size : 3815447 MB
Unused Size : 0 MB
Block Size : 512 Bytes
Array Utilization : 100.00% Used, 0.00% Unused
Type : Data
Transformation Status : Not Applicable
Spare Rebuild Mode : Dedicated
--------------------------------------------------------
Array Logical Device Information
--------------------------------------------------------
Logical 1 : Optimal (0, Data, 3815415 MB) LogicalDrv 1
--------------------------------------------------------
Array Physical Device Information
--------------------------------------------------------
Device 22 : Present (3815447MB, SATA, HDD, Connector:CN0, Enclosure:1, Slot:14) K7G3MLEL
Command completed successfully.
[root@localhost ~]#
# View basic information about all LDs.
[root@localhost Arcconf]# arcconf getconfig 1 ld
Controllers found: 1
----------------------------------------------------------------------
Logical device information
----------------------------------------------------------------------
Logical Device number 0
Logical Device name : LogicalDrv 0
Disk Name : /dev/sdf
Block Size of member drives : 512 Bytes
Array : 0
RAID level : 1
Status of Logical Device : Optimal
Size : 953837 MB
Stripe-unit size : 256 KB
Full Stripe Size : 256 KB
Interface Type : Serial ATA
Device Type : Data
Boot Type : None
Heads : 255
Sectors Per Track : 32
Cylinders : 65535
Mount Points : Not Applicable
LD Acceleration Method : None
Volume Unique Identifier : 600508B1001C28680001932567E1D2BA
--------------------------------------------------------
Array Physical Device Information
--------------------------------------------------------
Device 17 : Present (953869MB, SATA, HDD, Connector:CN0, Enclosure:1, Slot:9) Z1W350Q0
Device 31 : Present (1907729MB, SATA, HDD, Connector:CN0, Enclosure:1, Slot:23) ZC23AJES
Logical Device number 1
Logical Device name : LogicalDrv 1
Disk Name : /dev/sdb
Block Size of member drives : 512 Bytes
Array : 1
RAID level : 0
Status of Logical Device : Optimal
Size : 3815415 MB
Stripe-unit size : 256 KB
Full Stripe Size : 256 KB
Interface Type : Serial ATA
Device Type : Data
Boot Type : None
Heads : 255
Sectors Per Track : 32
Cylinders : 65535
Mount Points : Not Applicable
LD Acceleration Method : None
Volume Unique Identifier : 600508B1001C4BFF747B7DB627D45F45
--------------------------------------------------------
Array Physical Device Information
--------------------------------------------------------
Device 22 : Present (3815447MB, SATA, HDD, Connector:CN0, Enclosure:1, Slot:14) K7G3MLEL
Command completed successfully.
[root@localhost Arcconf]#
# View basic information about all PDs.
[root@localhost Arcconf]# arcconf getconfig 1 pd
Controllers found: 1
----------------------------------------------------------------------
Physical Device information
----------------------------------------------------------------------
Channel #0:
Device #16
Device is a Hard drive
State : Ready
Drive has stale RIS data : False
Disk Name : /dev/sde
Block Size : 512 Bytes
Physical Block Size : 4K Bytes
Transfer Speed : SATA 12.0 Gb/s
Reported Channel,Device(T:L) : 0,16(16:0)
Reported Location : Enclosure 1, Slot 8(Connector 0:CN0)
Vendor : ATA
Model : ST6000NM0115-1YZ
Firmware : SN02
Serial number : ZAD00RGV
World-wide name : 574EAC82CDB88008
Reserved Size : 32768 KB
Used Size : 0 MB
Unused Size : 5723134 MB
Total Size : 5723166 MB
S.M.A.R.T. : No
S.M.A.R.T. warnings : 0
SSD : No
NCQ supported : Supported
NCQ status : Enabled
Boot Type : None
Rotational Speed : 7200 RPM
Current Temperature : 34 deg C
Maximum Temperature : 54 deg C
Threshold Temperature : 65 deg C
PHY Count : 1
Drive Configuration Type : Unassigned
Mount Point(s) : Not Mounted
Drive Exposed to OS : True
Sanitize Erase Support : False
Drive Unique ID : 3F9CA71BFFFFBF7EFFFF1D3EBF7E6041
Last Failure Reason : No Failure
----------------------------------------------------------------
Device Phy Information
----------------------------------------------------------------
Phy #0
Negotiated Physical Link Rate : 12 Gbps
Negotiated Logical Link Rate : 12 Gbps
Maximum Link Rate : 6 Gbps
----------------------------------------------------------------
Device Error Counters
----------------------------------------------------------------
Aborted Commands : 0
Bad Target Errors : 0
Ecc Recovered Read Errors : 0
Failed Read Recovers : 0
Failed Write Recovers : 0
Format Errors : 0
Hardware Errors : 0
Hard Read Errors : 0
Hard Write Errors : 0
Hot Plug Count : 0
Media Failures : 0
Not Ready Errors : 0
Other Time Out Errors : 0
Predictive Failures : 0
Retry Recovered Read Errors : 0
Retry Recovered Write Errors : 0
Scsi Bus Faults : 0
Sectors Reads : 8913624
Sectors Written : 0
Service Hours : 0
Device #17
Device is a Hard drive
State : Online
Drive has stale RIS data : False
Block Size : 512 Bytes
Physical Block Size : 512 Bytes
Transfer Speed : SATA 12.0 Gb/s
Reported Channel,Device(T:L) : 0,17(17:0)
Reported Location : Enclosure 1, Slot 9(Connector 0:CN0)
Array : 0
Vendor : ATA
Model : ST1000NM0033-9ZM
Firmware : SN04
Serial number : Z1W350Q0
World-wide name : 574EAC82CDB88009
Reserved Size : 32768 KB
Used Size : 953837 MB
Unused Size : 0 MB
Total Size : 953869 MB
S.M.A.R.T. : No
S.M.A.R.T. warnings : 0
SSD : No
NCQ supported : Supported
NCQ status : Enabled
Boot Type : None
Rotational Speed : 7200 RPM
Current Temperature : 37 deg C
Maximum Temperature : 60 deg C
Threshold Temperature : 65 deg C
PHY Count : 1
Drive Configuration Type : Data
Drive Exposed to OS : False
Sanitize Erase Support : False
Drive Unique ID : 3F9C41CCFFFF5E97FF4FFC9EFFC89E61
Last Failure Reason : No Failure
----------------------------------------------------------------
Device Phy Information
----------------------------------------------------------------
Phy #0
Negotiated Physical Link Rate : 12 Gbps
Negotiated Logical Link Rate : 12 Gbps
Maximum Link Rate : 6 Gbps
----------------------------------------------------------------
Device Error Counters
----------------------------------------------------------------
Aborted Commands : 0
Bad Target Errors : 0
Ecc Recovered Read Errors : 0
Failed Read Recovers : 0
Failed Write Recovers : 0
Format Errors : 0
Hardware Errors : 0
Hard Read Errors : 0
Hard Write Errors : 0
Hot Plug Count : 0
Media Failures : 0
Not Ready Errors : 0
Other Time Out Errors : 0
Predictive Failures : 0
Retry Recovered Read Errors : 0
Retry Recovered Write Errors : 0
Scsi Bus Faults : 0
Sectors Reads : 1762289615
Sectors Written : 691117403
Service Hours : 59
Device #22
Device is a Hard drive
State : Online
Drive has stale RIS data : False
Block Size : 512 Bytes
Physical Block Size : 4K Bytes
Transfer Speed : SATA 12.0 Gb/s
Reported Channel,Device(T:L) : 0,22(22:0)
Reported Location : Enclosure 1, Slot 14(Connector 0:CN0)
Array : 1
Vendor : ATA
Model : HGST HUS726040AL
Firmware : APBDTDM0
Serial number : K7G3MLEL
World-wide name : 574EAC82CDB8800E
Reserved Size : 32768 KB
Used Size : 3815415 MB
Unused Size : 0 MB
Total Size : 3815447 MB
S.M.A.R.T. : No
S.M.A.R.T. warnings : 0
SSD : No
NCQ supported : Supported
NCQ status : Enabled
Boot Type : None
Rotational Speed : 7200 RPM
Current Temperature : 35 deg C
Maximum Temperature : 51 deg C
Threshold Temperature : 65 deg C
PHY Count : 1
Drive Configuration Type : Data
Drive Exposed to OS : False
Sanitize Erase Support : False
Drive Unique ID : 7F2A2D01FFFFFEE7FFBFF027FF179386
Last Failure Reason : No Failure
----------------------------------------------------------------
Device Phy Information
----------------------------------------------------------------
Phy #0
Negotiated Physical Link Rate : 12 Gbps
Negotiated Logical Link Rate : 12 Gbps
Maximum Link Rate : 6 Gbps
----------------------------------------------------------------
Device Error Counters
----------------------------------------------------------------
Aborted Commands : 0
Bad Target Errors : 0
Ecc Recovered Read Errors : 0
Failed Read Recovers : 0
Failed Write Recovers : 0
Format Errors : 0
Hardware Errors : 0
Hard Read Errors : 0
Hard Write Errors : 0
Hot Plug Count : 0
Media Failures : 0
Not Ready Errors : 0
Other Time Out Errors : 0
Predictive Failures : 0
Retry Recovered Read Errors : 0
Retry Recovered Write Errors : 0
Scsi Bus Faults : 0
Sectors Reads : 7586875
Sectors Written : 21648
Service Hours : 50
Device #31
Device is a Hard drive
State : Online
Drive has stale RIS data : False
Block Size : 512 Bytes
Physical Block Size : 4K Bytes
Transfer Speed : SATA 12.0 Gb/s
Reported Channel,Device(T:L) : 0,31(31:0)
Reported Location : Enclosure 1, Slot 23(Connector 0:CN0)
Array : 0
Vendor : ATA
Model : ST2000NM0125-1YZ
Firmware : SN05
Serial number : ZC23AJES
World-wide name : 574EAC82CDB88017
Reserved Size : 32768 KB
Used Size : 1907697 MB
Unused Size : 0 MB
Total Size : 1907729 MB
S.M.A.R.T. : No
S.M.A.R.T. warnings : 0
SSD : No
NCQ supported : Supported
NCQ status : Enabled
Boot Type : None
Rotational Speed : 7200 RPM
Current Temperature : 35 deg C
Maximum Temperature : 39 deg C
Threshold Temperature : 65 deg C
PHY Count : 1
Drive Configuration Type : Data
Drive Exposed to OS : False
Sanitize Erase Support : False
Drive Unique ID : FF6B29F1FF9F3D5DFF9B8CCCFF032F17
Last Failure Reason : No Failure
----------------------------------------------------------------
Device Phy Information
----------------------------------------------------------------
Phy #0
Negotiated Physical Link Rate : 12 Gbps
Negotiated Logical Link Rate : 12 Gbps
Maximum Link Rate : 6 Gbps
----------------------------------------------------------------
Device Error Counters
----------------------------------------------------------------
Aborted Commands : 0
Bad Target Errors : 0
Ecc Recovered Read Errors : 0
Failed Read Recovers : 0
Failed Write Recovers : 0
Format Errors : 0
Hardware Errors : 0
Hard Read Errors : 0
Hard Write Errors : 0
Hot Plug Count : 0
Media Failures : 0
Not Ready Errors : 0
Other Time Out Errors : 0
Predictive Failures : 0
Retry Recovered Read Errors : 0
Retry Recovered Write Errors : 0
Scsi Bus Faults : 0
Sectors Reads : 23996
Sectors Written : 19999
Service Hours : 0
Channel #2:
Device #0
Device is an Enclosure Services Device
Reported Channel,Device(T:L) : 2,0(0:0)
Reported Location : Connector 0:CN0, Enclosure 1
Enclosure ID : 1
Enclosure Logical Identifier : 574EAC82CDB8807E
Expander ID : 0
Expander SAS Address : 574EAC82CDB8807F
SEP device ID : 377
Type : SES2
Vendor : MSCC
Model : SXP 68x12G
Firmware : RevB
Status of Enclosure Services Device
Fan 1 status : 0 rpm (Not Installed)
Fan 2 status : 0 rpm (Optimal)
Fan 3 status : 0 rpm (Optimal)
Fan 4 status : 0 rpm (Optimal)
Power supply 1 status : Optimal
Power supply 2 status : Optimal
Temperature Sensor Status 1 : 0 C/ 32 F (Not Installed)
Temperature Sensor Status 2 : Normal
Temperature Sensor Status 3 : Normal
Temperature Sensor Status 4 : Normal
Speaker status : Off
Channel #2:
Device #3
Device is an Enclosure Services Device
Reported Channel,Device(T:L) : 2,3(3:0)
Enclosure ID : 0
Enclosure Logical Identifier : 50123456789ABC00
Type : SES2
Vendor : ADAPTEC
Model : Virtual SGPIO
Firmware : 4.50
Status of Enclosure Services Device
Speaker status : Not Available
Command completed successfully.
[root@localhost Arcconf]#
# View basic information about all ADs.
[root@localhost Arcconf]# arcconf getconfig 1 ad
Controllers found: 1
----------------------------------------------------------------------
Controller information
----------------------------------------------------------------------
Controller Status : Optimal
Controller Mode : Mixed
Channel description : SCSI
Controller Model : Adaptec SmartIOC 8i
Controller Serial Number : Unknown
Controller World Wide Name : 50123456789ABC00
Physical Slot : 10
Temperature : 57 C/ 134 F (Normal)
Host bus type : PCIe 3.0
Host bus speed : 7880 MBps
Host bus link width : 8 bit(s)/link(s)
PCI Address (Bus:Device:Function) : 0:5e:0:0
Number of Ports : 2
Internal Port Count : 2
External Port Count : 0
Defunct disk drive count : 0
NCQ status : Enabled
Queue Depth : Automatic
Monitor and Performance Delay : 60 minutes
Elevator Sort : Enabled
Degraded Mode Performance Optimization : Disabled
Latency : Disabled
Statistics data collection mode : Disabled
Post Prompt Timeout : 15 seconds
Boot Controller : False
Primary Boot Volume : 3FDB0D04FF3F2A52FF3F88D9FFBB2AF6
Secondary Boot Volume : None
Driver Name : aacraid
Driver Supports SSD I/O Bypass : No
Manufacturing Part Number : Not Applicable
Manufacturing Spare Part Number : Not Applicable
Manufacturing Wellness Log : Not Applicable
NVRAM Checksum Status : Passed
--------------------------------------------------------
I2C Settings
--------------------------------------------------------
I2C Address : 0xDE
I2C Clock Speed : 400 KHZ
I2C Clock Stretching : Enabled
Global Physical Device Write Cache Policy: Disabled
--------------------------------------------------------
RAID Properties
--------------------------------------------------------
Logical devices/Failed/Degraded : 2/0/0
Automatic Failover : Disabled
Background consistency check : Idle
Consistency Check Delay : 3 seconds
Parallel Consistency Check Supported : Enabled
Parallel Consistency Check Count : 1
Inconsistency Repair Policy : Disabled
Consistency Check Inconsistency Notify : Disabled
Rebuild Priority : High
Expand Priority : Medium
--------------------------------------------------------
Controller Version Information
--------------------------------------------------------
Firmware : 4.50[0]
Driver : 1.2.1.50877
Hardware Revision : B
--------------------------------------------------------
Temperature Sensors Information
--------------------------------------------------------
Sensor ID : 0
Current Value : 36 deg C
Max Value Since Powered On : 36 deg C
Location : Inlet Ambient
Sensor ID : 1
Current Value : 57 deg C
Max Value Since Powered On : 57 deg C
Location : ASIC
--------------------------------------------------------
Connector information
--------------------------------------------------------
Connector #0
Connector Name : CN0
Functional Mode : Mixed
Connector Location : Internal
SAS Address : 50123456789ABC00
Connector #1
Connector Name : CN1
Functional Mode : Mixed
Connector Location : Internal
SAS Address : 50123456789ABC04
Command completed successfully.
[root@localhost Arcconf]#.
Setting the drive UID LED
Perform this task to turn on or turn off the UID LEDs for physical drives, logical drives, or all the drives.
Syntax
Table 6 UID management-related commands
|
Command |
Function |
|
arcconf identify controller_id device channel_id device_id time time |
Turn on the UID LED for the specified drive for a specific length of time. |
|
arcconf identify controller_id device channel_id device_id |
Turn on the UID LED for the specified drive. You can press any key to turn off the LED. |
|
arcconf identify controller_id all time time |
Turn on the UID LEDs for all physical drives for a specific length of time. |
|
arcconf identify controller_id all stop |
Turn off the UID LEDs for all physical drives. |
|
arcconf identify controller_id logicaldrive LD_id time time |
Turn on the UID LED for the specified LD for a specific length of time. |
|
arcconf identify controller_id logicaldrive LD_id |
Turn on the UID LED for the specified LD. You can press any key to turn off the LED. |
|
arcconf identify controller_id array array_id time time |
Turn on the UID LED for the specified array for a specific length of time. |
|
arcconf identify controller_id array array_id |
Turn on the UID LED for the specified array. You can press any key to turn off the LED. |
Parameters
controller_id: Specifies the ID of the storage controller.
LD_id: Specifies the ID of a logical drive.
channel_id: Specifies the channel ID of a drive.
device_id: Specifies the device ID of a drive.
time: Specifies the time during which the LED is on, in seconds.
array_id: Specifies the ID of an array.
Examples
# Turn on the UID LED for the drive with device ID 8.
[root@localhost home]# arcconf identify 1 device 0 8
Controllers found: 1
Only devices managed by an enclosure processor may be identified
The specified device(s) is/are blinking.
Press any key to stop the blinking.
# Turn on the UID LEDs for all drives for 60 seconds.
[root@localhost home]# arcconf identify 1 all time 60
Controllers found: 1
Only devices managed by an enclosure processor may be identified
Command completed successfully.
# Turn off the UID LEDs for all drives.
[root@localhost home]# arcconf identify 1 all stop
Controllers found: 1
Command completed successfully.
# Turn on the UID LED for logical drive 0.
[root@localhost home]# arcconf identify 1 logicaldrive 0
Controllers found: 1
Only devices managed by an enclosure processor may be identified
The specified device(s) is/are blinking.
Press any key to stop the blinking.
Setting the operating mode of a storage controller
Perform this task to set the operating mode of a storage controller.
Syntax
arcconf setcontrollermode controller_id mode
Parameters
controller_id: Specifies the ID of the storage controller.
mode: Specifies the operating mode of a storage controller. Options include:
· 2: Specifies the HBA mode.
· 3: Specifies the RAID mode.
· 5: Specifies the Mixed mode.
Examples
# Set the storage controller mode to RAID.
[root@localhost Arcconf]# arcconf setcontrollermode 1 3
Controllers found: 1
You must restart the system for new controller mode to take effect.
Command completed successfully.
[root@localhost Arcconf]#
# View the storage controller mode.
[root@localhost Arcconf]# arcconf getconfig 1 ad
Controllers found: 1
----------------------------------------------------------------------
Controller information
----------------------------------------------------------------------
Controller Status : Optimal
Controller Mode : Mixed
Channel description : SCSI
Controller Model : Adaptec SmartIOC 8i
Controller Serial Number : Unknown
Controller World Wide Name : 50123456789ABC00
Physical Slot : 10
Temperature : 57 C/ 134 F (Normal)
Host bus type : PCIe 3.0
Host bus speed : 7880 MBps
Host bus link width : 8 bit(s)/link(s)
PCI Address (Bus:Device:Function) : 0:5e:0:0
Number of Ports : 2
Internal Port Count : 2
External Port Count : 0
Defunct disk drive count : 0
NCQ status : Enabled
Queue Depth : Automatic
Monitor and Performance Delay : 60 minutes
Elevator Sort : Enabled
Degraded Mode Performance Optimization : Disabled
Latency : Disabled
Post Prompt Timeout : 15 seconds
Boot Controller : False
Primary Boot Volume : 3FDB0D04FF3F2A52FF3F88D9FFBB2AF6
Secondary Boot Volume : None
Driver Name : aacraid
Driver Supports SSD I/O Bypass : No
Manufacturing Part Number : Not Applicable
Manufacturing Spare Part Number : Not Applicable
Manufacturing Wellness Log : Not Applicable
NVRAM Checksum Status : Passed
--------------------------------------------------------
I2C Settings
--------------------------------------------------------
I2C Address : 0xDE
I2C Clock Speed : 400 KHZ
I2C Clock Stretching : Enabled
Global Physical Device Write Cache Policy: Disabled
--------------------------------------------------------
RAID Properties
--------------------------------------------------------
Logical devices/Failed/Degraded : 0/0/0
Automatic Failover : Disabled
Background consistency check : Idle
Consistency Check Delay : 3 seconds
Parallel Consistency Check Supported : Enabled
Parallel Consistency Check Count : 1
Inconsistency Repair Policy : Disabled
Consistency Check Inconsistency Notify : Disabled
Rebuild Priority : High
Expand Priority : Medium
--------------------------------------------------------
Controller Version Information
--------------------------------------------------------
Firmware : 4.50[0]
Driver : 1.2.1.50877
Hardware Revision : B
--------------------------------------------------------
Temperature Sensors Information
--------------------------------------------------------
Sensor ID : 0
Current Value : 36 deg C
Max Value Since Powered On : 36 deg C
Location : Inlet Ambient
Sensor ID : 1
Current Value : 57 deg C
Max Value Since Powered On : 57 deg C
Location : ASIC
--------------------------------------------------------
Connector information
--------------------------------------------------------
Connector #0
Connector Name : CN0
Functional Mode : RAID (Hide RAW)
Connector Location : Internal
SAS Address : 50123456789ABC00
Connector #1
Connector Name : CN1
Functional Mode : RAID (Hide RAW)
Connector Location : Internal
SAS Address : 50123456789ABC04
Command completed successfully
Creating and deleting RAID arrays
Perform this task to create and delete RAID arrays.
Syntax
arcconf create controller_id logicaldrive option size level channel_id device_id channel_id device_id……
arcconf delete controller_id logicaldrive ld_id noprompt
Parameters
controller_id: Specifies the ID of the storage controller.
option: Specifies the LD attributes. Attributes include:
· Stripesize: Strip size of the LD.
· Legs: NPG of the LD. This attribute is available only for RAID 50 and RAID 60.
· Name: Name of the LD.
· Method: Initialization method of the LD. Options include build and default.
· Wcache: IO Bypass. This attribute is available only when maxCache is created.
· LDcache: Controller cache.
· SSDOverProvisioningOptimization: SSD attribute, which is available only when a RAID array is set by SSDs. Options include enable and disable. Enabling this option will optimize SSDs by reallocating all used blocks before writing data to the SSDs, resulting in faster initialization.
· DataLD: ID of the accelerated LD.
size: Capacity of the LD. The unit is MB. Enter only the number here. For example, if you set the value to 1024, it indicates that the driver capacity is 1024 MB. If you set the value to MAX, it indicates that all the capacity of the physical drive is used to create the logical drive.
level: Level of the LD.
channel_id: Specifies the channel ID of a drive.
device_id: Specifies the device ID of a drive.
Examples
# Create RAID 0.
[root@localhost ~]# arcconf create 1 logicaldrive stripesize 512 name R0 max 0 0 22 0 31
Controllers found: 1
Space will be wasted as devices specified are of different sizes.
Do you want to add a logical device to the configuration?
Press y, then ENTER to continue or press ENTER to abort: y
Creating logical device: R0
Command completed successfully.
# Delete the logical drive with ID 0.
[root@localhost ~]# arcconf delete 1 logicaldrive 0 noprompt
Controllers found: 1
WARNING: Deleting this logical device will automatically delete array 0 because it is the only logical device present on that array.
All data in logical device 0 will be lost.
Deleting: logical device 0 ("R0")
Command completed successfully.
Scaling up a logical drive
Perform this task to scale up a logical drive when physical drives have capacity not used by logical drives.
Syntax
arcconf modify controller_id from LD_id to LD_size LD_level channel_id device_id channel_id device_id
Parameters
controller_id: Specifies the ID of the storage controller.
LD_id: Specifies the ID of a logical drive.
LD_size: Specifies the new LD capacity, in MB.
LD_level: Specifies the RAID level.
channel_id: Specifies the channel ID of a drive.
device_id: Specifies the device ID of a drive.
Usage guidelines
· To ensure a successful scale-up, make sure you have obtained the correct RAID level and physical ID of member drives.
· Make sure the added capacity does not exceed the remaining capacity of the array in which the logical drive resides.
Examples
# Scale up the LD capacity to 204800 MB.
[root@localhost ~]# arcconf modify 1 from 0 to 204800 1 0 0 0 1
Controllers found: 1
Reconfiguration of a logical device is a long process. Are you sure you want
to continue?
Press y, then ENTER to continue or press ENTER to abort: y
Reconfiguring logical device: LogicalDrv 0
Command completed successfully.
Migrating a logical drive
Perform this task to migrate a logical drive.
Syntax
arcconf modify controller_id logicaldrive LD_id movearray array_id
arcconf modify controller_id logicaldrive LD_id newarray channel_id device_id
Parameters
controller_id: Specifies the ID of the storage controller.
LD_id: Specifies the ID of a LD.
array_id: Specifies the ID of an array.
channel_id: Specifies the channel ID of a drive.
device_id: Specifies the device ID of a drive.
Usage guidelines
During migration, the number of the existing array member disks or new drives must be consistent with the original.
Examples
# View LD ID information and array ID information.
[root@localhost ~]# arcconf getconfig 1 ld
Controllers found: 1
----------------------------------------------------------------------
Logical device information
----------------------------------------------------------------------
Logical Device number 0
Logical Device name : LogicalDrv 0
Disk Name : /dev/sdb
Block Size of member drives : 512 Bytes
Array : 0
RAID level : 1
Status of Logical Device : Optimal
Size : 99999 MB
Stripe-unit size : 256 KB
Full Stripe Size : 256 KB
Interface Type : Serial ATA
Device Type : Data
Boot Type : None
Heads : 255
Sectors Per Track : 32
Cylinders : 25098
Mount Points : Not Applicable
LD Acceleration Method : None
Volume Unique Identifier : 600508B1001CF58A921025DAF5EE6C06
--------------------------------------------------------
Array Physical Device Information
--------------------------------------------------------
Device 22 : Present (3815447MB, SATA, HDD, Connector:CN0, Enclosure:1, Slot:14) K7G3MLEL
Device 31 : Present (1907729MB, SATA, HDD, Connector:CN0, Enclosure:1, Slot:23) ZC23AJES
Logical Device number 1
Logical Device name : LogicalDrv 1
Disk Name : /dev/sdc
Block Size of member drives : 512 Bytes
Array : 1
RAID level : 0
Status of Logical Device : Optimal
Size : 199999 MB
Stripe-unit size : 256 KB
Full Stripe Size : 512 KB
Interface Type : Serial ATA
Device Type : Data
Boot Type : None
Heads : 255
Sectors Per Track : 32
Cylinders : 50196
Mount Points : Not Applicable
LD Acceleration Method : None
Volume Unique Identifier : 600508B1001C5A923B019EC51A15769A
--------------------------------------------------------
Array Physical Device Information
--------------------------------------------------------
Device 16 : Present (13351936MB, SATA, HDD, Connector:CN0, Enclosure:1, Slot:8) 9RGA17JC
Device 18 : Present (13351936MB, SATA, HDD, Connector:CN0, Enclosure:1, Slot:10) ZHZ0VZZ2
Command completed successfully.
# Migrate logical drive 0 to array 1.
[root@localhost ~]# arcconf modify 1 logicaldrive 0 movearray 1
Controllers found: 1
WARNING: Moving this logical device will automatically delete array 0 because it is the only logical device present on that array.
The physical devices of the array 0 will be in a transient state and unavailable for use till the move operation completes.
This operation will move the logical device. Are you sure you want to continue?
Press y, then ENTER to continue or press ENTER to abort: y
Moving logical device: 0
Command completed successfully.
# Migrate logical drive 0 to a new logical drive.
[root@localhost ~]# arcconf getconfig 1 ar
Controllers found: 1
----------------------------------------------------------------------
Array Information
----------------------------------------------------------------------
Array Number 0
Name : A
Status : Ok
Interface : SATA
Total Size : 3815458 MB
Unused Size : 3615394 MB
Block Size : 512 Bytes
Array Utilization : 5.24% Used, 94.76% Unused
Type : Data
Transformation Status : Not Applicable
Spare Rebuild Mode : Dedicated
--------------------------------------------------------
Array Logical Device Information
--------------------------------------------------------
Logical 0 : Optimal (1, Data, 99999 MB) LogicalDrv 0
--------------------------------------------------------
Array Physical Device Information
--------------------------------------------------------
Device 22 : Present (3815447MB, SATA, HDD, Connector:CN0, Enclosure:1, Slot:14) K7G3MLEL
Device 31 : Present (1907729MB, SATA, HDD, Connector:CN0, Enclosure:1, Slot:23) ZC23AJES
Command completed successfully.
[root@localhost ~]# arcconf modify 1 logicaldrive 0 newarray 0 16 0 18
Controllers found: 1
WARNING: Moving this logical device will automatically delete array 0 because it is the only logical device present on that array.
The physical devices of the array 0 will be in a transient state and unavailable for use till the move operation completes.
This operation will move the logical device. Are you sure you want to continue?
Press y, then ENTER to continue or press ENTER to abort: y
Moving logical device: 0
Command completed successfully.
# View the migration process of LD 0.
[root@localhost ~]# arcconf getconfig 1 ld 0
Controllers found: 1
----------------------------------------------------------------------
Logical device information
----------------------------------------------------------------------
Logical Device number 0
Logical Device name : LogicalDrv 0
Disk Name : /dev/sdb
Block Size of member drives : 512 Bytes
Array : 0
RAID level : 1
Status of Logical Device : Logical device Reconfiguring(Expanding : 0 %)
Size : 99999 MB
Stripe-unit size : 256 KB
Full Stripe Size : 256 KB
Interface Type : Serial ATA
Device Type : Data
Boot Type : None
Heads : 255
Sectors Per Track : 32
Cylinders : 25098
Mount Points : Not Applicable
LD Acceleration Method : None
Volume Unique Identifier : 600508B1001CF58A921025DAF5EE6C06
--------------------------------------------------------
Array Physical Device Information
--------------------------------------------------------
Device 16 : Present (13351936MB, SATA, HDD, Connector:CN0, Enclosure:1, Slot:8) 9RGA17JC
Device 18 : Present (13351936MB, SATA, HDD, Connector:CN0, Enclosure:1, Slot:10) ZHZ0VZZ2
Command completed successfully.
Migrating an array
Perform this task to migrate an array.
Syntax
arcconf modify controller_id array array_id move channel_id device_id
Parameters
controller_id: Specifies the ID of the storage controller.
array_id: Specifies the ID of an array.
channel_id: Specifies the channel ID of a drive.
device_id: Specifies the device ID of a drive.
Usage guidelines
During migration, the specified number of drives must be consistent with the original.
Examples
# View LD ID information and array ID information.
[root@localhost ~]# arcconf getconfig 1 ar
Controllers found: 1
----------------------------------------------------------------------
Array Information
----------------------------------------------------------------------
Array Number 0
Name : A
Status : Ok
Interface : SATA
Total Size : 3815458 MB
Unused Size : 3615394 MB
Block Size : 512 Bytes
Array Utilization : 5.24% Used, 94.76% Unused
Type : Data
Transformation Status : Not Applicable
Spare Rebuild Mode : Dedicated
--------------------------------------------------------
Array Logical Device Information
--------------------------------------------------------
Logical 0 : Optimal (1, Data, 99999 MB) LogicalDrv 0
--------------------------------------------------------
Array Physical Device Information
--------------------------------------------------------
Device 22 : Present (3815447MB, SATA, HDD, Connector:CN0, Enclosure:1, Slot:14) K7G3MLEL
Device 31 : Present (1907729MB, SATA, HDD, Connector:CN0, Enclosure:1, Slot:23) ZC23AJES
Command completed successfully.
# Migrate array 0 to a new logical drive.
[root@localhost ~]# arcconf modify 1 array 0 move 0 16 0 18
Controllers found: 1
This will modify the array 0.
Are you sure you want to continue?
Press y, then ENTER to continue or press ENTER to abort: y
Modifying array: 0
Command completed successfully.
# View the migration process of LD 0.
[root@localhost ~]# arcconf getconfig 1 ld 0
Controllers found: 1
----------------------------------------------------------------------
Logical device information
----------------------------------------------------------------------
Logical Device number 0
Logical Device name : LogicalDrv 0
Disk Name : /dev/sdb
Block Size of member drives : 512 Bytes
Array : 0
RAID level : 1
Status of Logical Device : Logical device Reconfiguring(Expanding : 0 %)
Size : 99999 MB
Stripe-unit size : 256 KB
Full Stripe Size : 256 KB
Interface Type : Serial ATA
Device Type : Data
Boot Type : None
Heads : 255
Sectors Per Track : 32
Cylinders : 25098
Mount Points : Not Applicable
LD Acceleration Method : None
Volume Unique Identifier : 600508B1001C111E4266F6F931AC10B0
--------------------------------------------------------
Array Physical Device Information
--------------------------------------------------------
Device 16 : Present (13351936MB, SATA, HDD, Connector:CN0, Enclosure:1, Slot:8) 9RGA17JC
Device 18 : Present (13351936MB, SATA, HDD, Connector:CN0, Enclosure:1, Slot:10) ZHZ0VZZ2
Command completed successfully.
Configuring and deleting hot spare drives for logical drives
Perform this task to configure hot spare drives for logical drives.
Syntax
arcconf setstate controller_id device channel_id device_id hsp array array_id sparetype type
arcconf setstate controller_id device channel_id device_id rdy
Parameters
controller_id: Specifies the ID of the storage controller.
channel_id: Specifies the channel ID of the drive.
device_id: Specifies the drive ID.
array_id: Specifies the array ID.
type: Specifies the mode of hot spare drives. Options include:
· 1: Dedicated
· 2: Autoreplace
Examples
# Configure an Autoreplace hot spare drive for a logical drive.
[root@localhost ~]# arcconf setstate 1 device 0 18 hsp array 0 sparetype 2
Controllers found: 1
Any existing hot-spare drives of a different sparetype will be removed.
The physical drive used for this operation is connected to Mixed Mode(Smart HBA) connector. Using it will not allow operating system to use the drive contents.
Are you sure you want to continue?
Press y, then ENTER to continue or press ENTER to abort: y
Command completed successfully.
[root@localhost ~]#
# Delete the hot spare drive with device ID 18.
[root@localhost ~]# arcconf setstate 1 device 0 18 rdy
Controllers found: 1
Command completed successfully.
Setting the mode of hot spare drives
Perform this task to set the mode of hot spare drives.
Syntax
arcconf setarrayparam controller_id array_id sparetype mode
Parameters
controller_id: Specifies the ID of the storage controller.
array_id: Specifies the array ID.
type: Specifies the mode of hot spare drives. Options include:
· 1: Dedicated
· 2: Autoreplace
Examples
# Set the mode of hot spare drives for an array to Dedicated.
[root@localhost ~]# arcconf setarrayparam 1 0
sparetype 1
Controllers found: 1
Command completed successfully.
Collecting logs
Perform this task to collect storage controller logs.
Syntax
arcconf savesupportarchive path
Parameters
path: Specifies the path for storing the log file.
Examples
# Collect storage controller logs and save the log in the home directory.
[root@localhost ~]# arcconf savesupportarchive /home
Controllers found: 1
Collecting uart logs may take few seconds...
The logs are saved in relevant folders in /home/Support
Command completed successfully.
Forcing a physical drive to go offline
Perform this task to force a physical to go offline.
Syntax
arcconf setstate controller_id device channel_id device_id DDD
Parameters
controller_id: Specifies the ID of the storage controller.
channel_id: Specifies the channel ID of a drive.
device_id: Specifies the device ID of a drive.
Examples
# Force the physical drive with device ID 16 to go offline.
[root@localhost ~]# arcconf setstate 1 device 0 16 DDD
Controllers found: 1
Change state from Online to Failed may be destroy configuration of array or logicaldrive
Are you sure you want to continue?
Press y, then ENTER to continue or press ENTER to abort: Y
Command completed successfully.
Configuring consistency check
Perform this task to enable and configure consistency check.
Syntax
arcconf consistencycheck controller_id mode
arcconf consistencycheck controller_id parallelcount parallelcount_number
Parameters
controller_id: Specifies the ID of the storage controller.
mode: Specifies the action. Options include:
· on: Enable consistency check.
· off: Disable consistency check.
parallelcount_number: Specifies the number of consistency check concurrencies at the back end. Setting this value to 1 disables concurrent consistent check.
Examples
# Enable consistency check and set the number of concurrencies to 4.
[root@localhost ~]# arcconf consistencycheck 1 on
Controllers found: 1
Command completed successfully.
[root@localhost ~]# arcconf consistencycheck 1 parallelcount 4
Controllers found: 1
Command completed successfully.
Troubleshooting
For detailed information about collecting storage controller fault information, diagnosing and locating faults, and troubleshooting servers, see H3C Servers Troubleshooting Guide.
Compatibility
For information about storage controller and server compatibility, access http://www.h3c.com/en/home/qr/default.htm?id=66.
Downloading and installing drivers
Access the H3C official website to download the storage controller drivers. For more information about installing drivers, see the release notes for the driver program.
