- Table of Contents
- Related Documents
-
| Title | Size | Download |
|---|---|---|
| 01-H3C Access Controllers Software Upgrade Guide | 185.14 KB |
|
|
|
H3C Access Controllers |
|
Software Upgrade Guide |
|
|
Document version: 6W100-20191125
Copyright © 2023 New H3C Technologies Co., Ltd. All rights reserved.
No part of this manual may be reproduced or transmitted in any form or by any means without prior written consent of New H3C Technologies Co., Ltd.
Except for the trademarks of New H3C Technologies Co., Ltd., any trademarks that may be mentioned in this document are the property of their respective owners.
The information in this document is subject to change without notice.
Upgrading software
Software upgrade enables you to upgrade a software version, add new features, and fix software bugs.
Upgrade methods
This document uses an H3C WX3840X access controller (AC) as an example to describe how to upgrade software.
You can upgrade system software by using one of the following methods:
|
Upgrade method |
Remarks |
|
· You must reboot the AC to complete the upgrade. · This method can interrupt ongoing network services. |
|
|
Use this method when the AC cannot correctly start up. |
|
|
This method does not require a console cable. |
Preparing for the upgrade
|
|
CAUTION: During the upgrade, the AC cannot provide any services. Make sure the upgrade has minimal impact on the network services. |
Before you upgrade system software from the CLI or BootWare menu, complete the following tasks:
· Set up the upgrade environment as shown in Figure 1.
· Configure routes to ensure that the AC and the file server can reach each other.
· Run a TFTP or FTP server on the file server.
· Log in to the CLI of the AC through Telnet or the console port.
· Copy the upgrade file to the file server and correctly set the working directory on the TFTP or FTP server.
Before you upgrade system software from the Web interface, complete the following tasks:
· Set up the upgrade environment as shown in Figure 2.
· Copy the upgrade file to the PC.
Figure 1 Setting up the upgrade environment for upgrading from the CLI or BootWare menu

Figure 2 Setting up the upgrade environment for upgrading from the Web interface

Upgrading from the CLI
Saving the running configuration and verifying the storage space
1. Execute the save command in any view to save the running configuration.
2. Execute the dir command to display files on the storage medium. Identify the system software image and configuration file names and verify that the storage medium has sufficient space for the new system software image.
Downloading the image file to the AC
You can use the TFTP or FTP commands on the AC to access the TFTP or FTP server to back up or download files.
Using TFTP
Transfer the configuration file (for example, wx3540x.ipe) to the file server.
<Sysname> tftp 192.168.0.1 get wx3540x.ipe
Press CTRL+C to abort.
% Total % Received % Xferd Average Speed Time Time Time Current
Dload Upload Total Spent Left Speed
100 160M 100 160M 0 0 816k 0 0:03:21 0:03:21 --:--:-- 807k
<Sysname>
Using FTP
1. From FTP client view, download the image file (for example, wx3540x.ipe) to the storage medium on the AC:
<ftp> get wx3540x.ipe
wx3540x.ipe already exists. Overwrite it? [Y/N]:y
227 Entering passive mode (192,168,0,1,5,20)
125 Using existing data connection
226 Closing data connection; File transfer successful.
37691392 bytes received in 17.7 seconds (2.03 Mbyte/s)
<ftp>
2. Return to user view.
<ftp> quit
221 Service closing control connection
<Sysname>
Specifying the startup image file
1. Specify the wx3540x.ipe file as the main image file for the AC at the next reboot.
<Sysname> boot-loader file cfa0:/wx3540x.ipe all main
Verifying the file cfa0:/wx3540x.ipe on slot 1............Done.
H3C WX3540x images in IPE:
boot.bin
system.bin
This command will set the main startup software images. Continue? [Y/N]:y
Add images to slot 1.
Decompressing file boot.bin to cfa0:/boot.bin........................................Done.
Decompressing file system.bin to cfa0:/system.bin.........................Done.
Decompression completed.
You are recommended to delete the .ipe file after you set startup software image
s for all slots.
Do you want to delete cfa0:/wx3540x.ipe now? [Y/N]:
The images that have passed all examinations will be used as the main startup so
ftware images at the next reboot on slot 1.
<Sysname>
2. Verify that the file has been loaded.
<Sysname> display boot-loader
Software images on slot 1:
Current software images:
cfa0:/boot.bin
cfa0:/system.bin
Main startup software images:
cfa0:/boot.bin
cfa0:/system.bin
Backup startup software images:
cfa0:/boot_backup.bin
cfa0:/system_backup.bin
<Sysname>
Rebooting the AC to complete the upgrade
1. Reboot the AC.
<Sysname> reboot
Start to check configuration with next startup configuration file, please wait.........DONE!
This command will reboot the device. Continue? [Y/N]:y
Now rebooting, please wait...
<Sysname>
System is starting...
2. After the reboot is complete, verify that the system software image is correct.
<Sysname> display version
H3C Comware Software, Version 7.1.064, Release 5223
Copyright (c) 2004-2023 New H3C Technologies Co., Ltd. All rights reserved.
H3C WX3540x uptime is 0 weeks, 0 days, 0 hours, 37 minutes
Last reboot reason : Power on
Boot image: cfa0:/boot.bin
Boot image version: 7.1.064, Release 5223
Compiled May 28 2018 16:00:00
System image: cfa0:system.bin
System image version: 7.1.064, Release 5223
Compiled May 28 2018 16:00:00
Slot 1
Uptime is 0 week, 1 day, 16 hours, 48 minutes
with 1 RMI XLP 416 1000MHz Processor
4064M bytes DDR3
16M bytes NorFlash Memory
4002M bytes CFCard Memory
Hardware Version is Ver.A
CPLD 1 CPLD Version is 004
Basic Bootrom Version is 5.03
Extend Bootrom Version is 5.03
[Subslot 0]H3C WX3540x Hardware Version is Ver.A
<Sysname>
Upgrading from the BootWare menu
|
|
CAUTION: · The configuration will be cleared automatically during the software upgrade process. Back up the configuration file for the current software version before upgrade and reconfigure the device by using the backup configuration file after software upgrade. · When you use TFTP/FTP to upgrade software through an Ethernet port, the AC downloads the startup configuration file by using the interfaces in the order of management interface, WAN port, and LAN 1 port. |
Saving the running configuration
1. Save the running configuration to the storage medium.
<Sysname> save
The current configuration will be written to the device. Are you sure? [Y/N]:y
Please input the file name(*.cfg)[cfa0:/startup.cfg]
(To leave the existing filename unchanged, press the enter key):
cfa0:/startup.cfg exists, overwrite? [Y/N]:y
Validating file. Please wait...
Saved the current configuration to mainboard device successfully.
2. Transfer the configuration file (for example, startup.cfg) to the file server. You can use TFTP or UDP to transfer the file. This example uses TFTP.
<Sysname> tftp 192.168.0.1 put startup.cfg
File will be transferred in binary mode
Sending file to remote TFTP server. Please wait... \
TFTP: 1914 bytes sent in 0 second(s).
File uploaded successfully.
3. Reboot the AC.
System is starting...
Press Ctrl+D to access BASIC-BOOTWARE MENU
Press Ctrl+T to start heavy memory test
Booting Normal Extended BootWare
The Extended BootWare is self-decompressing....Done.
****************************************************************************
* *
* H3C WX3540X BootWare, Version 1.10 *
* *
****************************************************************************
Copyright (c) 2004-2023 New H3C Technologies Co., Ltd.
Compiled Date : Apr 23 2018
CPU Type : XLP416
CPU Clock Speed : 1000MHz
Memory Type : DDR3 SDRAM
Memory Size : 4096MB
Memory Speed : 1333MHz
BootWare Size : 768KB
Flash Size : 16MB
cfa0 Size : 4002MB
CPLD1 Version : 004
CPLD2 Version : 000
PCB Version : Ver.A
BootWare Validating...
Press Ctrl+B to access EXTENDED-BOOTWARE MENU...
4. Press Ctrl+B at the prompt to access the EXTEND-BOOTWARE menu.
Password recovery capability is enabled.
Note: The current operating device is cfa0
Enter < Storage Device Operation > to select device.
===========================<EXTENDED-BOOTWARE MENU>===========================
|<1> Boot System |
|<2> Enter Serial SubMenu |
|<3> Enter Ethernet SubMenu |
|<4> File Control |
|<5> Restore to Factory Default Configuration |
|<6> Skip Current System Configuration |
|<7> BootWare Operation Menu |
|<8> Skip Authentication for Console Login |
|<9> Storage Device Operation |
|<0> Reboot |
============================================================================
Ctrl+Z: Access EXTENDED ASSISTANT MENU
Ctrl+F: Format File System
Ctrl+C: Display Copyright
Enter your choice(0-9):
Table 1 EXTEND-BOOTWARE menu options
|
Item |
Description |
|
<1> Boot System |
Boot the system software image. |
|
<2> Enter Serial SubMenu |
Access the serial submenu. |
|
<3> Enter Ethernet SubMenu |
Access the Ethernet submenu. |
|
<4> File Control |
Access the File Control submenu. |
|
<5> Restore to Factory Default Configuration |
Delete the next-startup configuration files and load the factory-default configuration. |
|
<6> Skip Current System Configuration |
Start the AC with the factory default configuration. This is a one-time operation and does not take effect at the next reboot. You use this option when you forget the console login password. |
|
<7> BootWare Operation Menu |
Access the BootWare Operation menu for backing up, restoring, or upgrading BootWare. When you upgrade the system software image, BootWare is automatically upgraded. H3C does not recommend upgrading BootWare separately. This document does not cover using the BootWare Operation menu. |
|
<8> Skip Authentication for Console Login |
Clear all the authentication schemes on the console port. |
|
<9> Storage Device Operation |
Select a storage device. |
|
<0> Reboot |
Restart the AC. |
Using TFTP/FTP to upgrade software through an Ethernet port
1. In the EXTEND-BOOTWARE menu, enter 3 to access the Ethernet submenu.
==========================<Enter Ethernet SubMenu>==========================
|Note:the operating device is cfa0 |
|<1> Download Image Program To SDRAM And Run |
|<2> Update Main Image File |
|<3> Update Backup Image File |
|<4> Download Files(*.*) |
|<5> Modify Ethernet Parameter |
|<0> Exit To Main Menu |
|<Ensure The Parameter Be Modified Before Downloading!> |
============================================================================
Enter your choice(0-5):
Table 2 Ethernet submenu options
|
Item |
|
|
<1> Download Image Program To SDRAM And Run |
Download a system software image to the SDRAM and run the image. |
|
<2> Update Main Image File |
Upgrade the main system software image. |
|
<3> Update Backup Image File |
Upgrade the backup system software image. |
|
<4> Download Files(*.*) |
Download a system software image to the storage medium. |
|
<5> Modify Ethernet Parameter |
Modify network settings. |
|
<0> Exit To Main Menu |
Return to the EXTEND-BOOTWARE menu. |
2. Enter 5 to configure the network settings.
=========================<ETHERNET PARAMETER SET>=========================
|Note: '.' = Clear field. |
| '-' = Go to previous field. |
| Ctrl+D = Quit. |
==========================================================================
Protocol (FTP or TFTP) :ftp
Load File Name :wx3540x.ipe
:
Target File Name :wx3540x.ipe
:
Server IP Address :192.168.0.1
Local IP Address :192.168.0.100
Subnet Mask :255.255.255.0
Gateway IP Address :0.0.0.0
FTP User Name :user001
FTP User Password :********
Table 3 Network parameter fields and shortcut keys
|
Field |
Description |
|
'.' = Clear field |
Press a dot (.) and then Enter to clear the setting for a field. |
|
'-' = Go to previous field |
Press a hyphen (-) and then Enter to return to the previous field. |
|
Ctrl+D = Quit |
Press Ctrl + D to exit the Ethernet Parameter Set menu. |
|
Protocol (FTP or TFTP) |
Set the file transfer protocol to FTP or TFTP. |
|
Load File Name |
Set the name of the file to be downloaded. |
|
Target File Name |
Set a file name for saving the file on the AC. By default, the target file name is the same as the source file name. |
|
Server IP Address |
Set the IP address of the FTP or TFTP server. If a mask must be set, use a colon (:) to separate the mask length from the IP address, for example, 192.168.80.10:24. |
|
Local IP Address |
Set the IP address of the AC. |
|
Subnet Mask |
Subnet Mask of the local IP address. |
|
Gateway IP Address |
Set a gateway IP address if the AC is on a different network than the server. |
|
FTP User Name |
Set the username for accessing the FTP server. This username must be the same as configured on the FTP server. This field is not available for TFTP. |
|
FTP User Password |
Set the password for accessing the FTP server. This password must be the same as configured on the FTP server. This field is not available for TFTP. |
3. Enter 2 or 3 in the Ethernet submenu to upgrade a system software image. For example, enter 2 to upgrade the main system software image.
Loading.....................................................................
.........................................Done.
168620032 bytes downloaded!
The file is exist,will you overwrite it? [Y/N]Y
Image file boot.bin is self-decompressing...
Saving file cfa0:/boot.bin ...........................Done.
Image file system.bin is self-decompressing...
Saving file cfa0:/system.bin .........................Done.
4. Enter 0 to return to the EXTEND-BOOTWARE menu.
Enter your choice(0-5): 0
===========================<EXTENDED-BOOTWARE MENU>==========================
|<1> Boot System |
|<2> Enter Serial SubMenu |
|<3> Enter Ethernet SubMenu |
|<4> File Control |
|<5> Modify BootWare Password |
|<6> Skip Current System Configuration |
|<7> BootWare Operation Menu |
|<8> Skip Authentication for Console Login |
|<9> Storage Device Operation |
|<0> Reboot |
============================================================================
Ctrl+Z: Access EXTENDED ASSISTANT MENU
Ctrl+F: Format File System
Ctrl+C: Display Copyright
Enter your choice(0-9):
5. Enter 1 to boot the system.
Enter your choice(0-9): 1
Loading the main image files...
Loading file cfa0:/system.bin...........................Done.
Loading file cfa0:/boot.bin..............Done.
Image file cfa0:/boot.bin is self-decompressing..............Done.
System image is starting...
Press Ctrl+I to enter inter-initiate mode... 0 s
Cryptographic Algorithms Known-Answer Tests are running ...
CPU 0 of slot 1:
Starting Known-Answer tests in the user space.
Known-answer test for SHA1 passed.
Known-answer test for SHA224 passed.
Known-answer test for SHA256 passed.
Known-answer test for SHA384 passed.
Known-answer test for SHA512 passed.
Known-answer test for HMAC-SHA1 passed.
Known-answer test for HMAC-SHA224 passed.
Known-answer test for HMAC-SHA256 passed.
Known-answer test for HMAC-SHA384 passed.
Known-answer test for HMAC-SHA512 passed.
Known-answer test for AES passed.
Known-answer test for RSA(signature/verification) passed.
Known-answer test for RSA(encrypt/decrypt) passed.
Known-answer test for DSA(signature/verification) passed.
Known-answer test for random number generator passed.
Known-Answer tests in the user space passed.
Starting Known-Answer tests in the kernel.
Known-answer test for AES passed.
Known-answer test for HMAC-SHA1 passed.
Known-answer test for SHA1 passed.
Known-answer test for GCM passed.
Known-answer test for GMAC passed.
Known-answer test for random number generator passed.
Known-Answer tests in the kernel passed.
Cryptographic Algorithms Known-Answer Tests passed.
Line con0 is available.
Press ENTER to get started.
Upgrading from the Web interface
SPMs do not support upgrade from the Web interface.
Restrictions and guidelines
When you upgrade the system software from the Web interface, follow these restrictions and guidelines:
· As a best practice, use one of the following browsers to access the Web interface:
¡ Internet Explorer 10 or higher
¡ Chrome 35.0.1916.114 or higher.
¡ Firefox 30.0.0.5269 or higher.
¡ Safari 6.0 or higher.
· Make sure the browser allows first-party cookies and is enabled with Active Scripting (or JavaScript).
· If an Internet Explorer is used, make sure the following functions are enabled:
¡ Script ActiveX controls marked safe for scripting.
¡ Run ActiveX controls and plugins.
· After software upgrade, first clear cache in the browser and then log in to the Web interface as a best practice.
Procedure
1. Set the IP address of the PC to an address in the 192.168.0.0/24 segment (except for 192.168.0.100). This section uses 192.168.0.1 as an example.
2. Open a browser, enter the IP address of the AC in the address bar, and then press Enter.
3. On the login page, enter the username and password, and then click Login. By default, both the username and password are admin.
Figure 3 Logging in to the Web interface

4. From the left navigation pane, select System > File System > File System Management to verify that the storage medium has sufficient space for the new system software image.
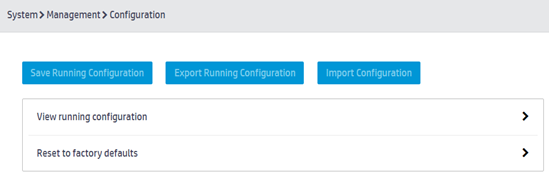
5. From the left navigation pane, select System > Management > Configuration. On the page that opens, click Export Running Configuration.
Figure 4 Exporting running configuration
6. From the left navigation pane, select System > Management > Upgrade. On the page that opens, click Manual upgrade. In the dialog box that opens, upload the new software image. You can select Reboot now to enable the system to restart the AC immediately after the upgrade completes. Click Apply.
Figure 5 Uploading the new software image

7. After the AC restarts, re-log in to the Web interface. From the left navigation pane, select System > Management > About. On the page that opens, view version information to verify that the software upgrade is successful.
