- Table of Contents
- Related Documents
-
| Title | Size | Download |
|---|---|---|
| 01-Text | 5.51 MB |
About H3C IMC configuration cautions and guidelines
Web-based configuration cautions and guidelines
Configuration tasks on the IMC GUI
Automatically adding newly discovered endpoints to the blacklist in EPS
Bulk adding users to the denylist in EIA
Bulk kicking out online users in EIA
Configuring a processing policy for unauthorized access in EIA
Bypassing authentication upon LDAP server failure in EIA
Restarting the MSCHAPv2 server process in EIA
Deleting nonexistent LDAP users during synchronization in EIA
Moving access services (manual assignment) in EIA
Moving access services (based on active directory group) in EIA
Applying the Apply for Service by User Group configuration immediately in EIA
Configuring LDAP user sync threshold in EIA
Powering off or restarting a server
Setting the security level of a security policy to Blacklist and Kick Out Mode in EAD
Adding a peripheral policy unauthorizing USB non-storage devices
Configuring an auto deployment plan
Deploying device configuration
Modifying PVIDs of access ports
Adding or deleting trunk ports
Adding or deleting hybrid ports
Not adding IMC to the whitelist
About H3C IMC configuration cautions and guidelines
Only trained and qualified personnel are allowed to do the configuration tasks described in this guide. If these tasks are not correctly performed, issues such as system shutdown, system reboot, service interruption, service malfunctioning, and deletion of configuration or important files might occur. These issues might cause inaccessibility of the system or services, or cause unexpected logoff of users.
Before you perform a critical task, read the information in this document carefully and apply for a cutover time window.
Web-based configuration cautions and guidelines
This chapter introduces critical Web-based configuration tasks.
|
|
NOTE: The webpages might be slightly different depending on the installed components. |
Configuration tasks on the IMC GUI
Automatically adding newly discovered endpoints to the blacklist in EPS
Procedure
1. On the top navigation bar, click User.
2. From the navigation pane, select Endpoint Profiling System > System Mgmt > System Parameters.
3. In the Blacklist Parameters area, configure the blacklist parameters in one of the following ways:
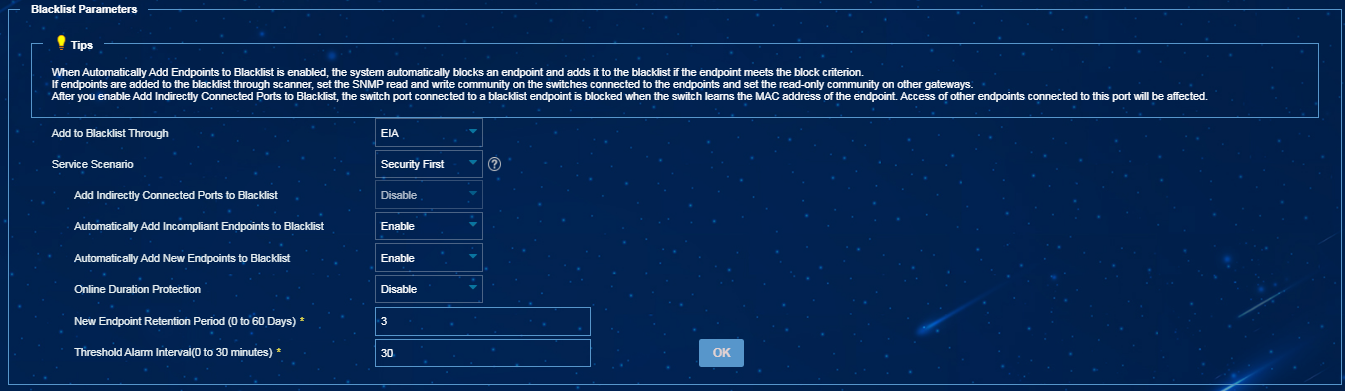
¡ Select EIA from the Add to Blacklist Through list, select Security First from the Service Scenario list, and then enable Automatically Add New Endpoints to Blacklist, as shown in Figure 1.
Figure 1 Automatically adding newly discovered endpoints to the blacklist in EPS 1
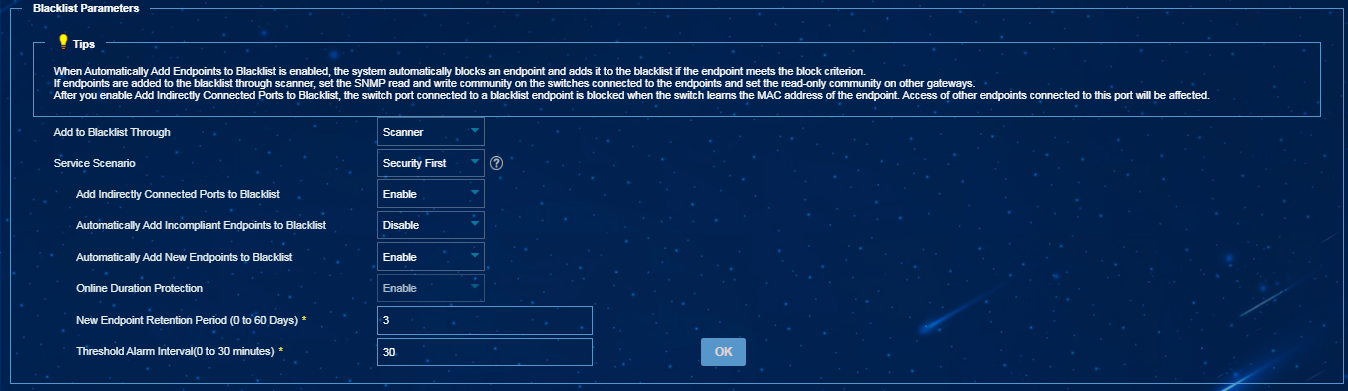
¡ Select Scanner from the Add to Blacklist Through list, select Security First from the Service Scenario list, and then enable Add Indirectly Connected Ports to Blacklist and Automatically Add New Endpoints to Blacklist, as shown in Figure 2.
Figure 2 Automatically adding newly discovered endpoints to the blacklist in EPS 2
|
|
NOTE: To select Scanner for adding newly discovered endpoints to the blacklist, you must configure an SNMP read-write community string for the access switches attached to the endpoints, and an SNMP read community string for other gateway devices. |
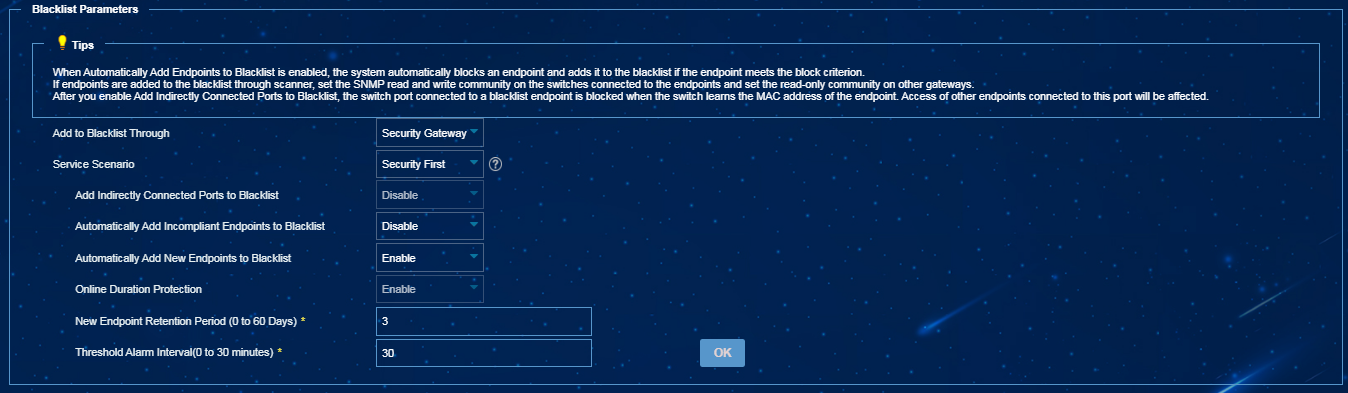
¡ Select Security Gateway from the Add to Blacklist Through list, select Security First from the Service Scenario list, and then enable Automatically Add New Endpoints to Blacklist, as shown in Figure 3.
Figure 3 Automatically adding newly discovered endpoints to the blacklist in EPS 3
|
|
NOTE: The New Endpoint Retention Period parameter takes effect only if the Automatically Add New Endpoints to Blacklist feature is enabled. · If this feature is enabled, the server detects for new endpoints at 3 a.m. after the specified retention period and adds newly discovered endpoints to the blacklist. · If this feature is disabled, the specified retention period does not take effect. To have the server immediately add newly discovered endpoints to the blacklist, set the New Endpoint Retention Period parameter to 0. |
Impact
If you enable this feature on a production network, a large number of newly discovered endpoints might be blocked and added to the blacklist.
Guidelines
Perform this operation with caution.
Bulk adding users to the denylist in EIA
Procedure
1. On the top navigation bar, click User.
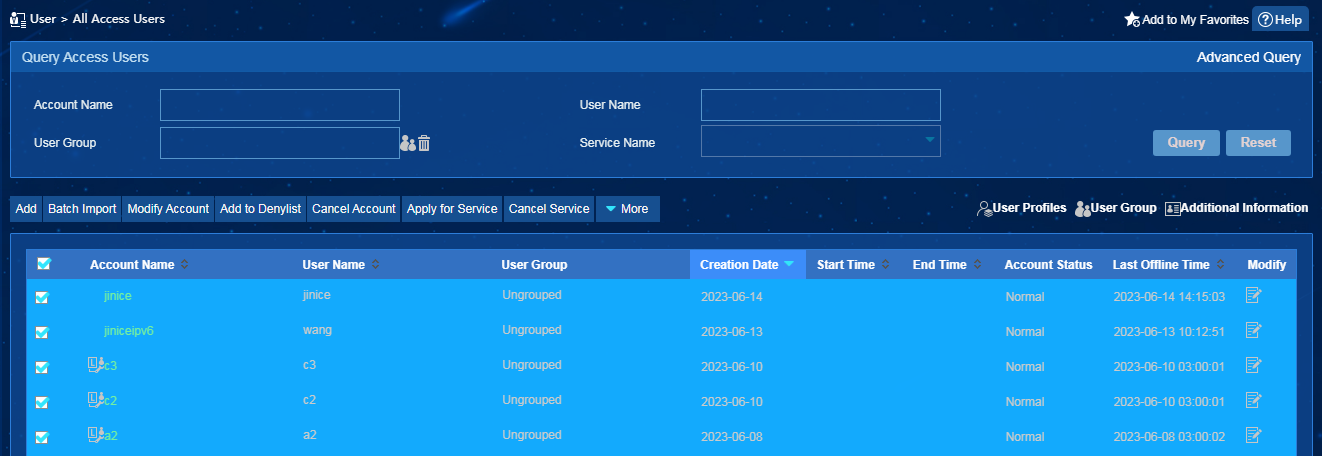
2. From the navigation pane, select Access User > All Access Users.
3. On the access user list, select multiple access users.
4. Click Add to Denylist.
5. Click OK in the confirmation dialog box that opens, as shown in Figure 4.
Figure 4 Bulk adding users to the denylist in EIA
Impact
Users bulk added to the denylist cannot pass authentication to access the network.
Guidelines
Perform this operation with caution.
Bulk kicking out online users in EIA
Procedure
1. On the top navigation bar, click User.
2. From the navigation pane, select Access User > Online Users.
3. On the online user list, select multiple online users.
4. Click Kick Out.
5. Click OK in the confirmation dialog box that opens, as shown in the following figure.
Figure 5 Bulk kicking out online users
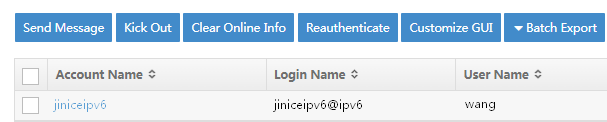
Impact
Online users forcibly kicked out will go offline.
Guidelines
Perform this operation with caution.
Deploying ACLs in EIA
Procedure
1. On the top navigation bar, click User.
2. From the navigation pane, select User Access Policy > Access Policy. All access policies are displayed on the access policy list.
3. Click Add. The page for adding an access policy opens.
4. In the Authorization Information area, select Deploy ACL, as shown in Figure 6.
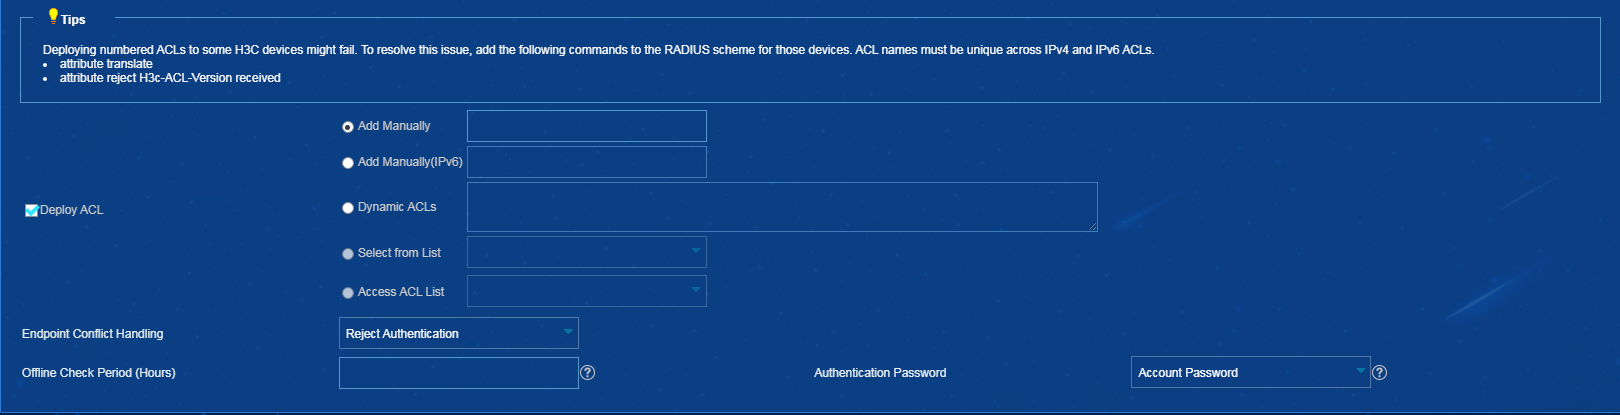
Impact
Improper ACL deployment will cause communication anomaly between endpoints and the authentication server, which might cause a large number of users to go offline.
Guidelines
Perform this operation with caution.
Configuring a processing policy for unauthorized access in EIA
Procedure
1. On the top navigation bar, click Resource.
2. From the navigation pane, select Terminal Access > Access Configuration as shown in Figure 7.
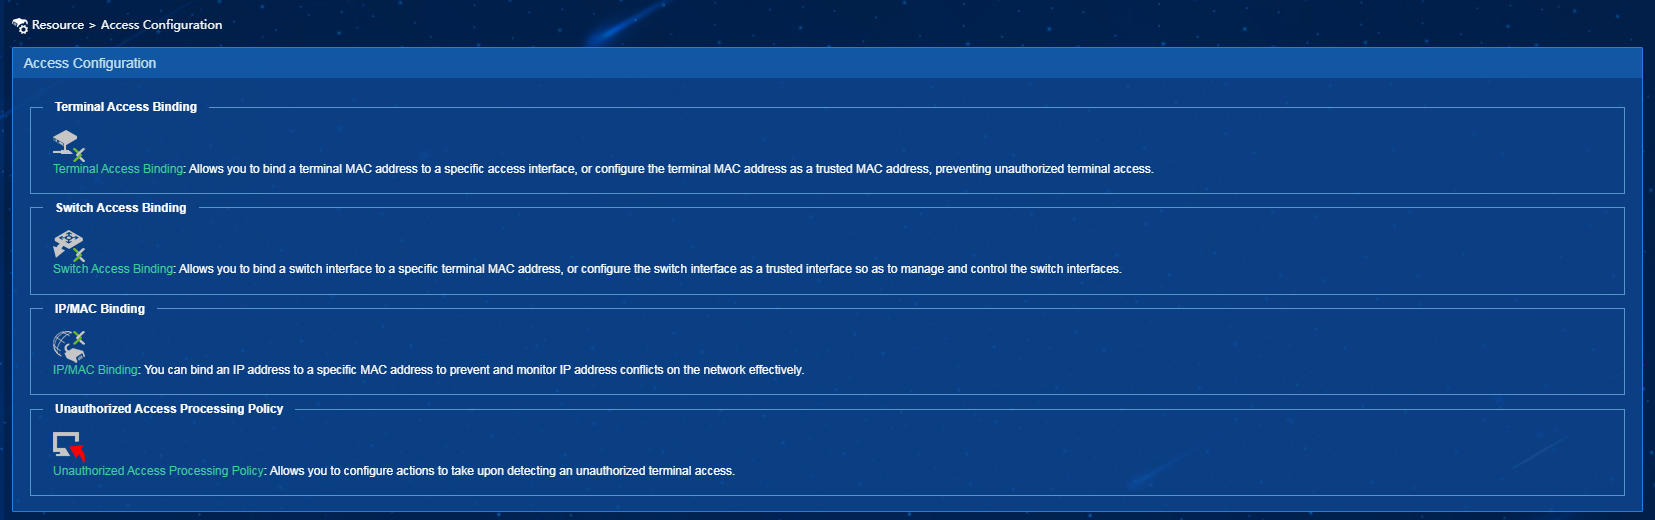
3. Click Unauthorized Access Processing Policy.
4. In the Conflict Processing Policy area, select Shut down immediately or Shut down later from the Interface Shutdown list, as shown in Figure 8.
Figure 8 Configuring an unauthorized access processing policy
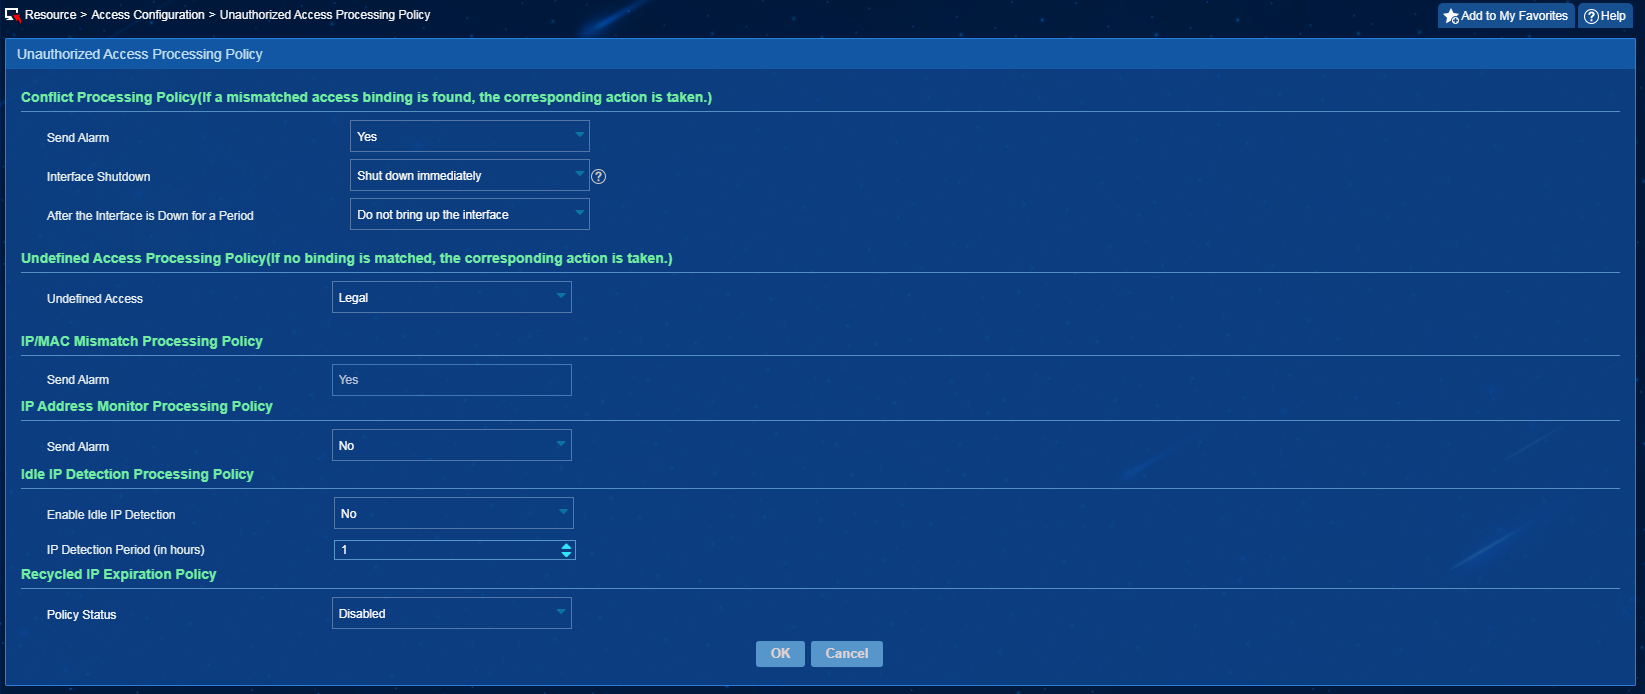
Impact
When some devices in the network are not added to the system, the learned access interface for an endpoint might not be the interface directly connected to the endpoint. Shutting down the interface (if requested by an unauthorized access processing policy) might lead to large-scale network interruption.
Guidelines
Perform this operation with caution.
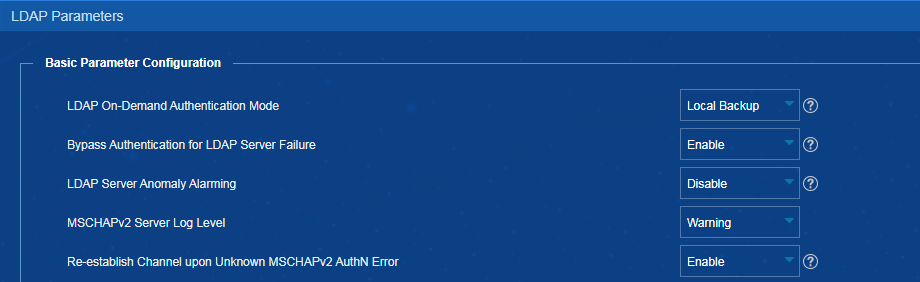
Bypassing authentication upon LDAP server failure in EIA
Procedure
1. On the top navigation bar, click User.
2. From the navigation pane, select User Access Policy > LDAP Service > LDAP Parameters.
3. Select Enable from the Bypass Authentication for LDAP Server Failure list.
Figure 9 Bypassing authentication for LDAP server failure
Impact
LDAP users can still pass the authentication even if the communication between the EIA server and the LDAP server fails, or the LDAP server fails.
Guidelines
Perform this operation with caution.
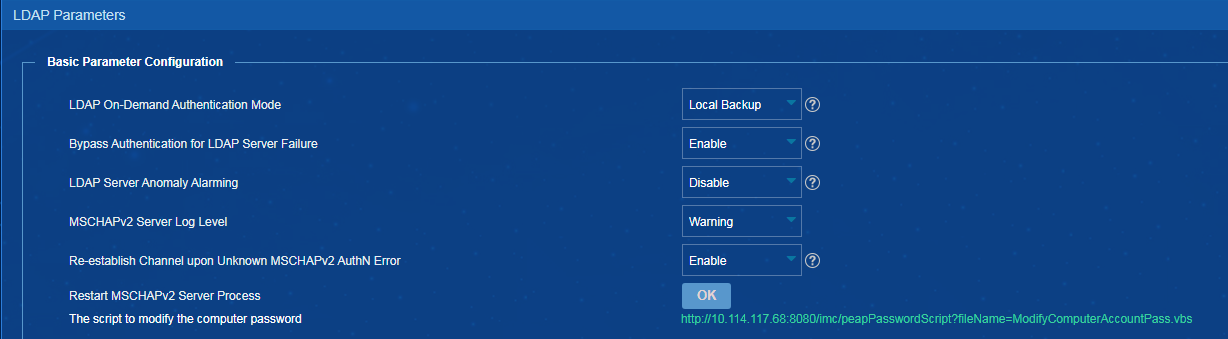
Restarting the MSCHAPv2 server process in EIA
Procedure
1. On the top navigation bar, click User.
2. From the navigation pane, select User Access Policy > LDAP Service > LDAP Parameters.
3. Click OK for Restart MSCHAPv2 Server Process, as shown in Figure 10.
Figure 10 Restarting the MSCHAPv2 server process
4. In the dialog box that opens, click OK, as shown in Figure 11.
Figure 11 Confirming restarting the MSCHAPv2 server process
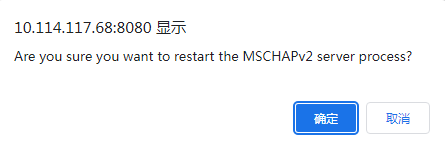
Impact
The MSCHAPv2 server process will receive a stop message after you restart it, and then the monitoring agent will automatically start the MSCHAPv2 server process. Restarting the MSCHAPv2 server process will affect MSCHAPv2 authentication.
Guidelines
Perform this operation with caution.
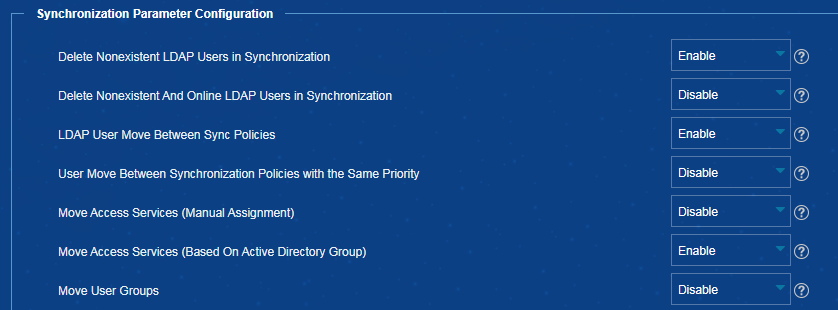
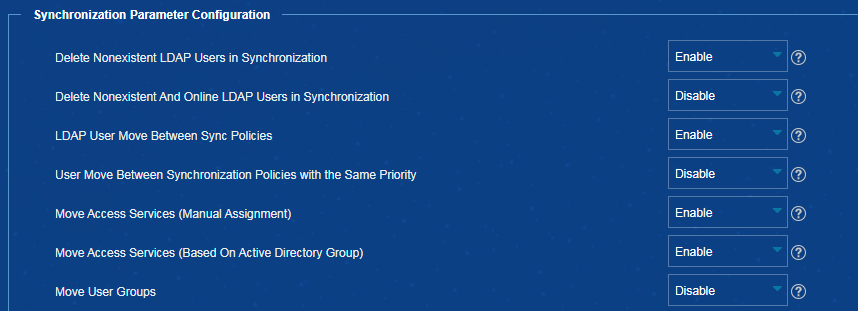
Deleting nonexistent LDAP users during synchronization in EIA
Procedure
1. On the top navigation bar, click User.
2. From the navigation pane, select User Access Policy > LDAP Service > LDAP Parameters.
3. In the Synchronization Parameter Configuration area, select Enable from the Delete Nonexistent LDAP Users in Synchronization list, as shown in Figure 12.
Figure 12 Deleting nonexistent LDAP users during synchronization
Impact
IMC will automatically delete users that no longer exist on the LDAP server during synchronization.
Guidelines
Perform this operation with caution.
Moving access services (manual assignment) in EIA
Procedure
1. On the top navigation bar, click User.
2. From the navigation pane, select User Access Policy > LDAP Service > LDAP Parameters.
3. In the Synchronization Parameter Configuration area, select Enable from the Move Access Services (Manual Assignment) list, as shown in Figure 13.
Figure 13 Moving access services (manual assignment)
Impact
Access services specified in the LDAP sync policy will be applied to LDAP users during user sync. Access service changes might affect user authentication results.
Guidelines
Perform this operation with caution. This operation takes effect only on LDAP users with the service sync type set to Manual Assignment.
Moving access services (based on active directory group) in EIA
Procedure
1. On the top navigation bar, click User.
2. From the navigation pane, select User Access Policy > LDAP Service > LDAP Parameters.
3. In the Synchronization Parameter Configuration area, select Enable from the Move Access Services (Based On Active Directory Group) list.
Figure 14 Moving access services (based on active directory group)
Impact
Access services specified for the active directory group of the LDAP sync policy will be applied to LDAP users during user sync. Access service changes might affect user authentication results.
Guidelines
Perform this operation with caution. This operation takes effect only for LDAP users with the service sync type set to Based On Active Directory Group.
Applying the Apply for Service by User Group configuration immediately in EIA
Procedure
1. On the top navigation bar, click User.
2. From the navigation pane, select User Access Policy > Service Parameters > System Settings. Click the icon in the Configure column for System Parameters.

3. In the User Data Management Parameters area, select Enable from both the Apply for Service by User Group and Apply Service Configuration Immediately lists, as shown inFigure 16.
Figure 16 Apply Service Configuration Immediately
Impact
Services specified for the user group to which a user belongs will immediately be applied to the user when the following conditions exist:
· The service sync type for the user is not Based On Active Directory Group.
· The user is moved to another user group or the service specified for the user group changes.
Access service changes might affect user authentication results.
Guidelines
Perform this operation with caution.
Configuring LDAP user sync threshold in EIA
Procedure
1. On the top navigation bar, click User.
2. From the navigation pane, select User Access Policy > LDAP Service > LDAP Parameters.
3. Configure the LDAP user sync threshold, as shown in Figure 17.
Figure 17 Configuring LDAP user sync threshold
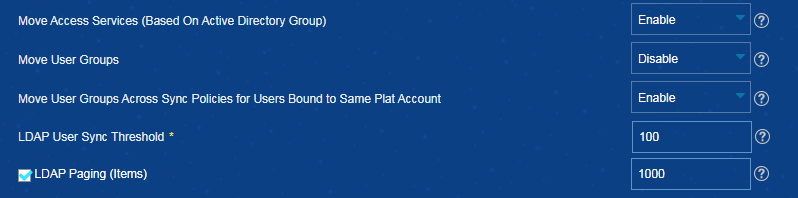
Impact
When the number of non-existent LDAP users is greater than the specified value, the system will not take any actions because this issue might be caused by anomalies. When the number of non-existent LDAP users is smaller than or equal to the specified value, the system logs them out or sets them to non-existent state.
Guidelines
Perform this operation with caution. The LDAP User Sync Threshold parameter determines how to handle non-existent LDAP users during LDAP user sync. The default value for this parameter is 0.
Powering off or restarting a server
Procedure
1. On the top navigation bar, click Resource.
2. From the navigation pane, select View Management > Device View. Click the label of a device to enter the device details page.
3. In the Action column on the right side of the page, click the Securely Power Off, Forcibly Power Off, Restart, or Securely Restart link as needed.
Impact
The server will be powered off and restarted.
Guidelines
Perform this operation only for the desired server.
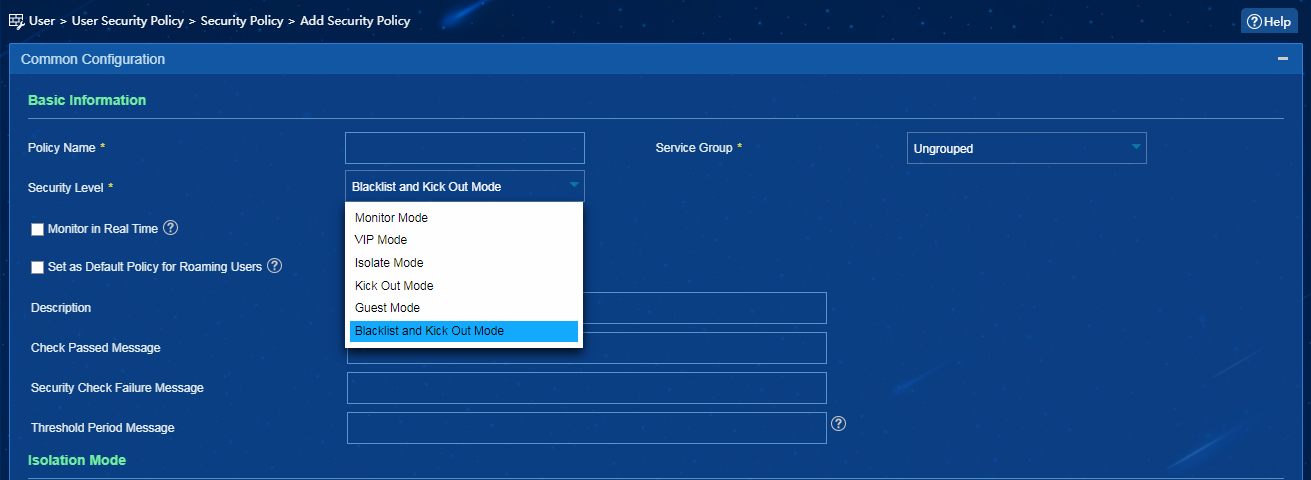
Setting the security level of a security policy to Blacklist and Kick Out Mode in EAD
Procedure
1. On the top navigation bar, click User.
2. From the navigation pane, select User Security Policy > Security Policy. Add a security policy and select Blacklist and Kick Out Mode from the Security Level list. If a user cannot pass the security check, the system adds the user to the blacklist, kicks it out and generates a security log message.
Figure 18 Setting security level
Impact
Users might not be able to pass authentication and come online.
Guidelines
Perform this operation with caution.
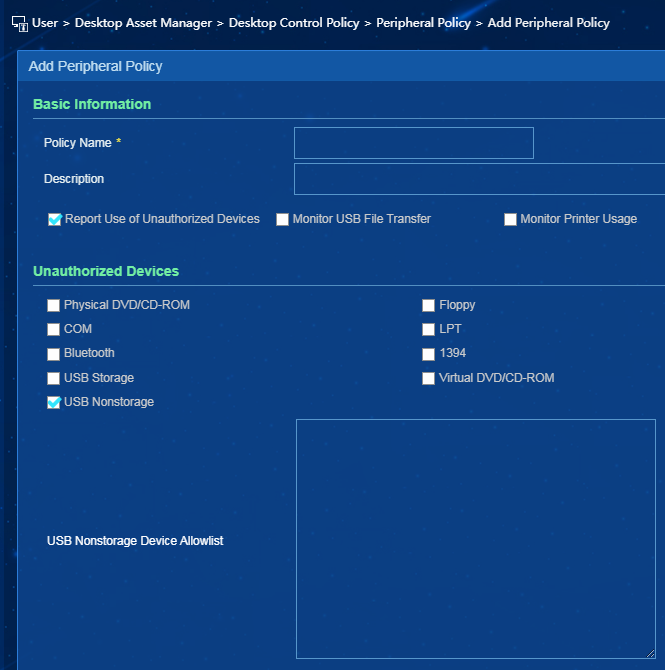
Adding a peripheral policy unauthorizing USB non-storage devices
Procedure
1. On the top navigation bar, click User.
2. From the navigation pane, select Desktop Asset Manager > Desktop Control Policy > Peripheral Policy. Click Add.
3. In the Unauthorized Devices area, select USB Nonstorage as shown in Figure 19. Perform this operation with caution, because it will prevent use of USB non-storage devices (such as mice and keyboards). To allow use of certain USB non-storage devices, you can add them to the USB non-storage device allowlist.
Figure 19 Unauthorizing USB non-storage devices
Impact
This operation might prevent use of USB non-storage devices (such as mice and keyboards).
Guidelines
Perform this operation with caution.
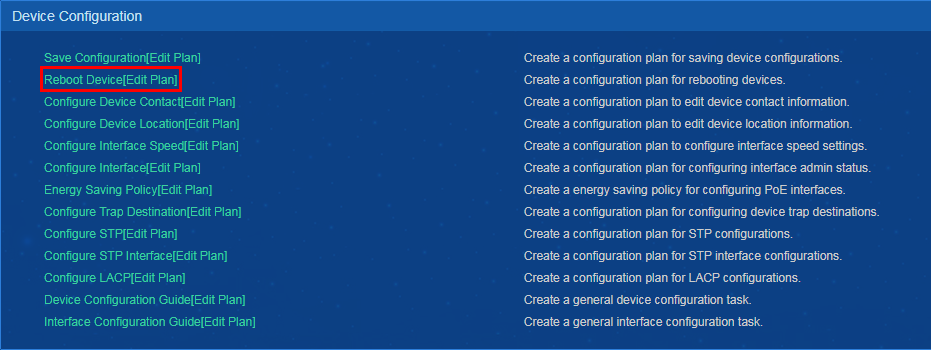
Rebooting devices
Procedure
1. On the top navigation bar, click Resource.
2. From the navigation pane, select Resource Management > Batch Operation.
3. In the Device Configuration area, click Reboot Device or Edit Plan, as shown in Figure 20.
Figure 20 Device Configuration
4. Taking the Reboot Device page as an example, select the devices to be rebooted, configure the basic information and schedule information, as shown in Figure 21. After completing the configuration, click OK.
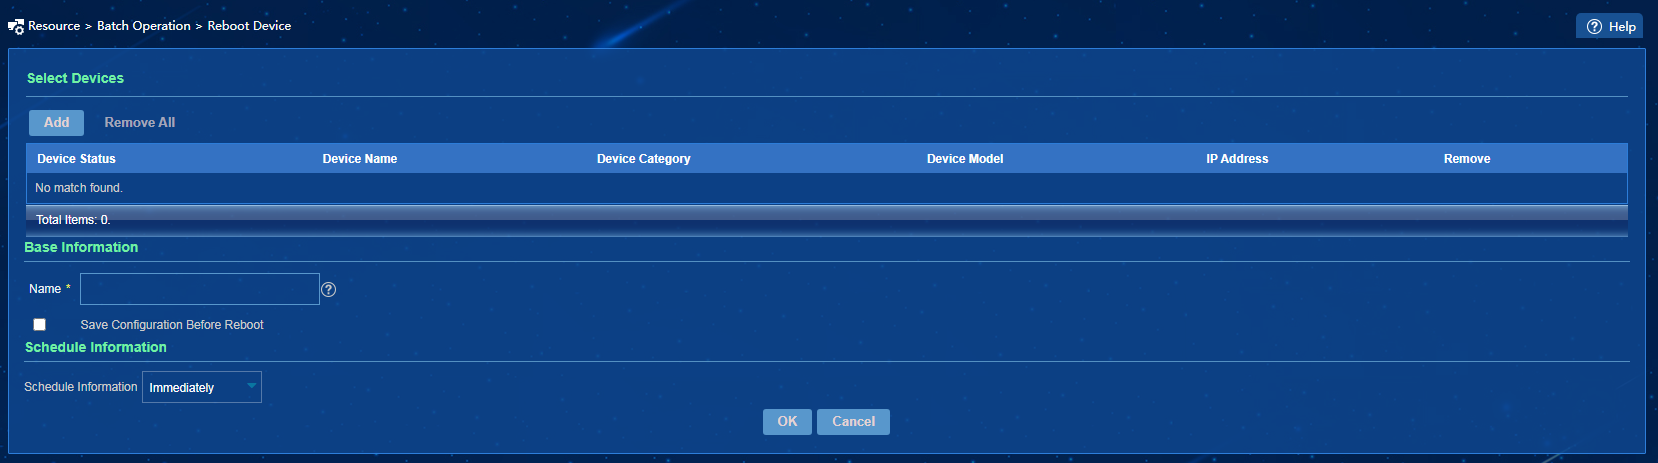
Impact
Service interruption will occur upon device reboot.
Guidelines
Perform this operation with caution. This operation creates a configuration plan to reboot devices. After you configure bulk reboot of devices, the system will issue the device reboot command to those devices.
Configuring an auto deployment plan
Procedure
1. On the top navigation bar, click Service.
2. From the navigation pane, select Configuration Center > Auto Deployment Plan, as shown in Figure 22.
Figure 22 Auto deployment plan

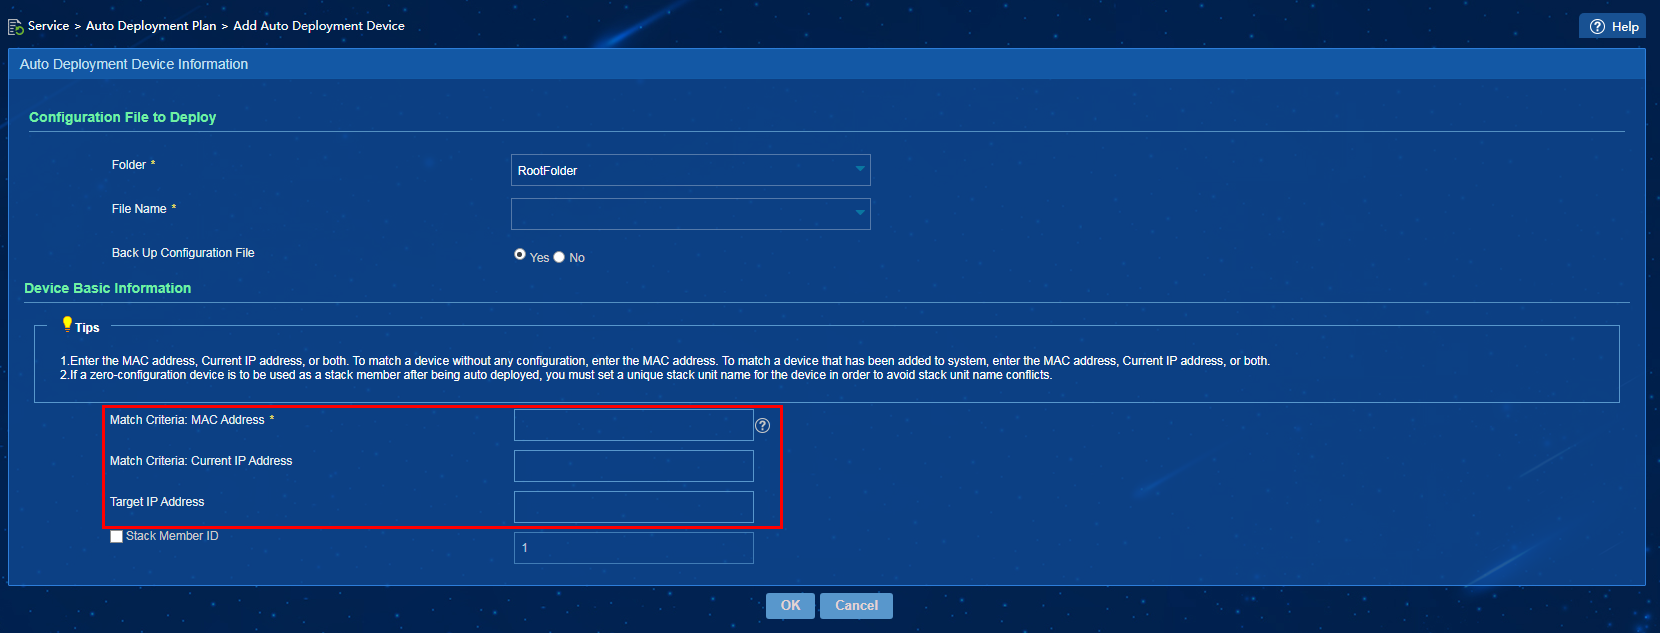
3. In the Operation area for an auto deployment plan, click the Add Auto Deployment Device icon as shown in Figure 23, or the Quickly Add Auto Deployment Device icon as shown in Figure 24.
Figure 23 Adding an auto deployment device

Figure 24 Quickly an adding auto deployment device
Impact
Misoperations might cause IP address conflicts and device reboots.
Guidelines
Perform this operation with caution.
To add or quickly add a device to an auto deployment plan, you must specify a target IP address for the device. If the device matching the specified MAC address already has an IP address, after the automatic deployment task is successfully executed, the device IP address will change to the specified target IP address.
Deploying device software
Procedure
1. On the top navigation bar, click Service.
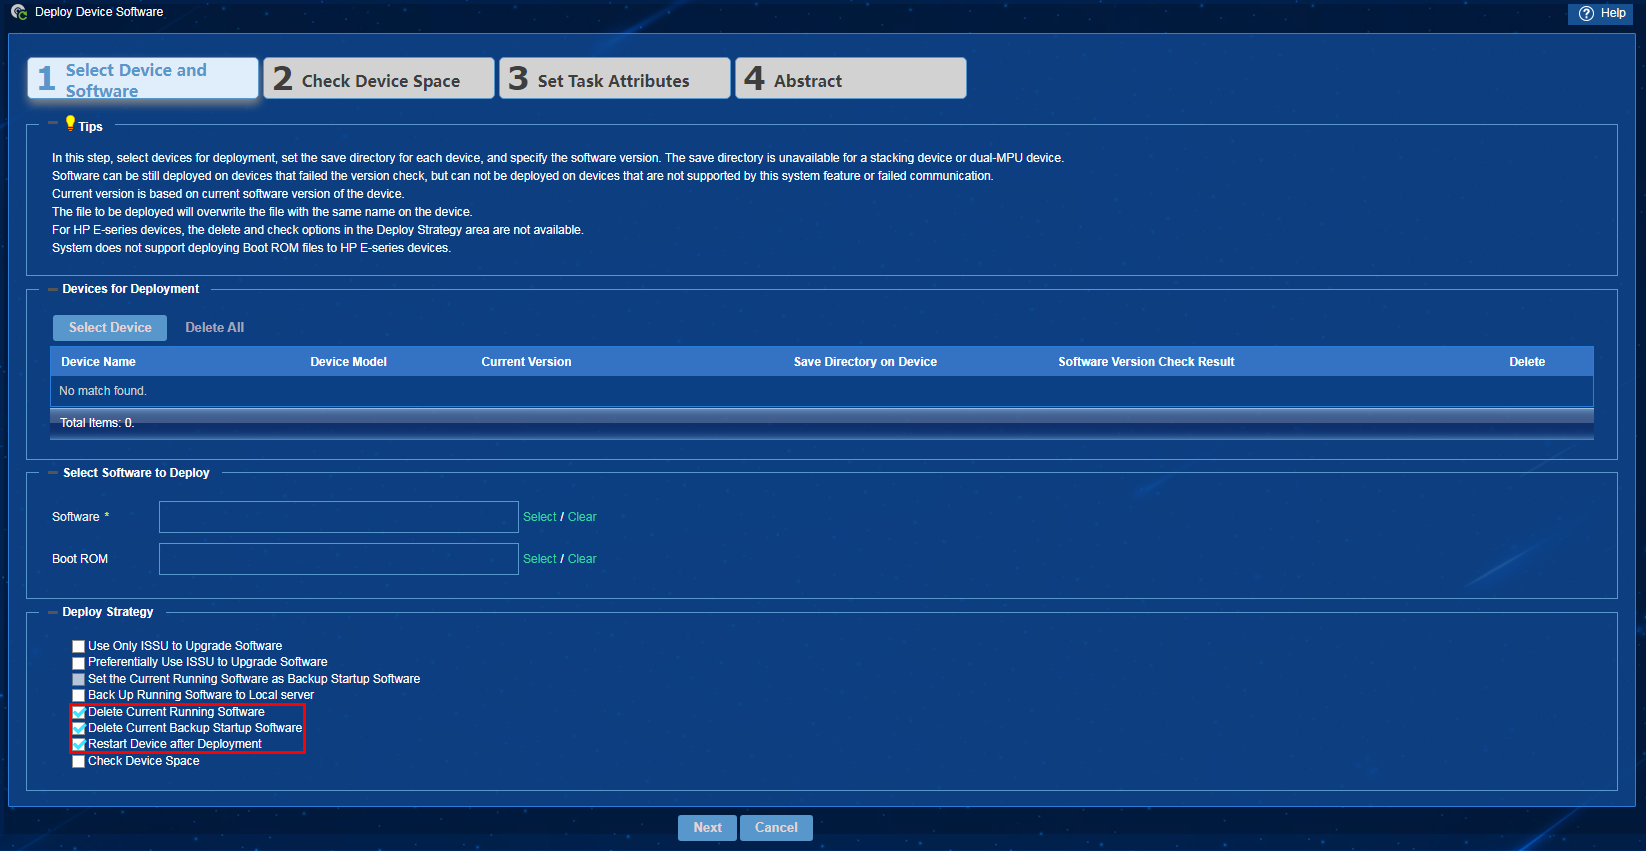
2. From the navigation pane, select Configuration Center > Deployment Guide. Click Deploy Device Software.
3. In the Deploy Strategy area, select Delete Current Running Software, Delete Current Backup Startup Software, and Restart Device after Deployment, as shown in Figure 25. Click Next, and then click OK.
Figure 25 Device software deployment strategies
Impact
If you select the Delete Current Running Software and Delete Current Backup Startup Software deploy strategies on the Deploy Device Software page, the selected devices might fail the upgrade and might not be able to startup normally.
After you select the Restart Device after Deployment deploy strategy, the system will issue the device restart command to the selected devices. Service interruption will occur upon device reboot.
Guidelines
Perform this operation with caution.
Deploying device configuration
Procedure
1. On the top navigation bar, click Service.
2. From the navigation pane, select Configuration Center > Deployment Guide. Click Deploy Device Configuration.
3. In the Deploy Strategy area, select Startup Configuration from the File Type to be Deployed list, select Restart device after deployment, as shown in Figure 26. Click Next, and then click OK.
Figure 26 Device configuration deployment strategies

Impact
The system will issue the device restart command to the selected devices. Service interruption will occur upon device reboot.
Guidelines
Perform this operation with caution.
Shutting down ports
Procedure
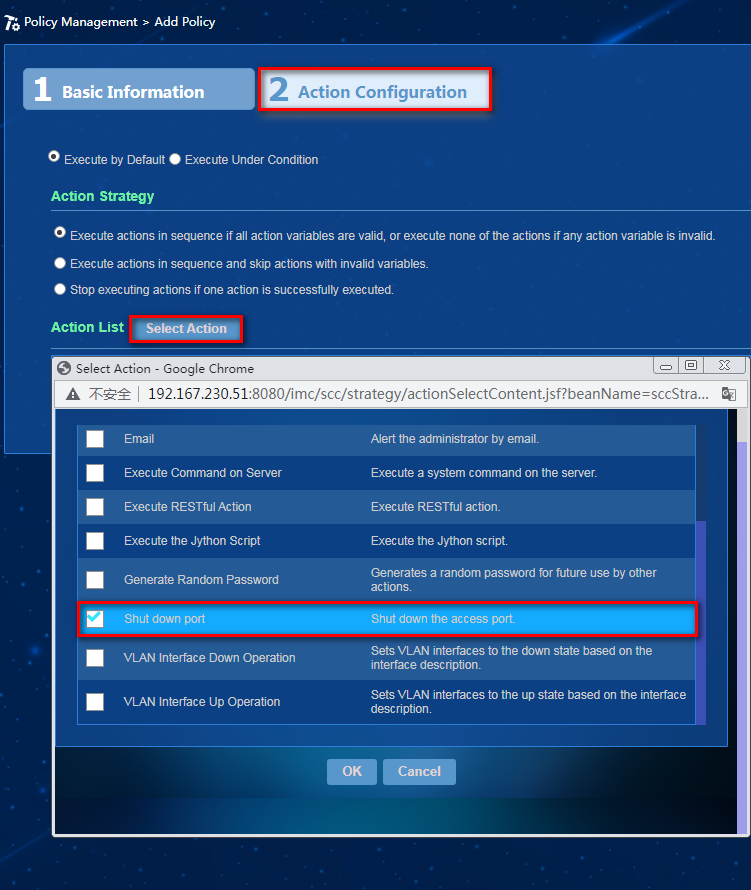
· To add a policy with the port shutdown action specified:
a. On the top navigation bar, click Service.
b. From the left navigation pane, select Intelligent Policy Center > Policy Management.
c. Click Add. Click Select Action in the action configuration. In the window that opens, select Shut down port, and then click OK, as shown in Figure 27.
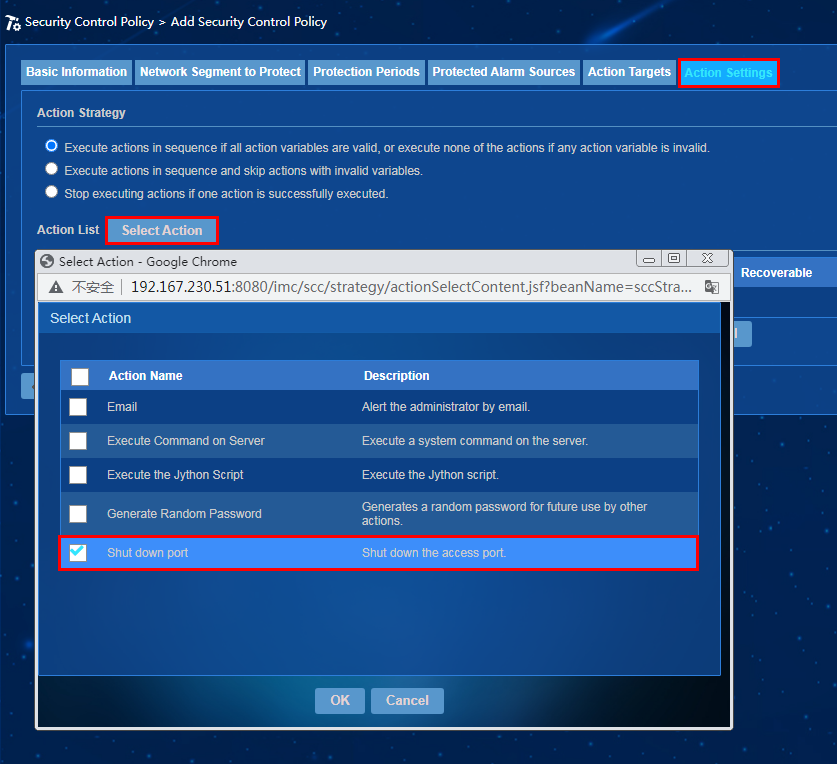
· To add a security control policy with the port shutdown action specified:
a. On the top navigation bar, click Alarm.
b. From the navigation pane, select Security Control Center > Security Control Policy.
c. Click Add. Click Select Action in the action configuration. In the window that opens, select Shut down port, and then click OK, as shown in Figure 28.
Figure 28 Adding a security control policy
Impact
Inappropriate port shutdown configuration might cause device disconnection and service interruption.
Guidelines
Perform this operation with caution.
Clearing device space
Procedure
1. On the top navigation bar, click Service.
2. From the navigation pane, select Configuration Center > Configuration Center.
3. Expand the operation options and click Clear Device Space, as shown in Figure 29.
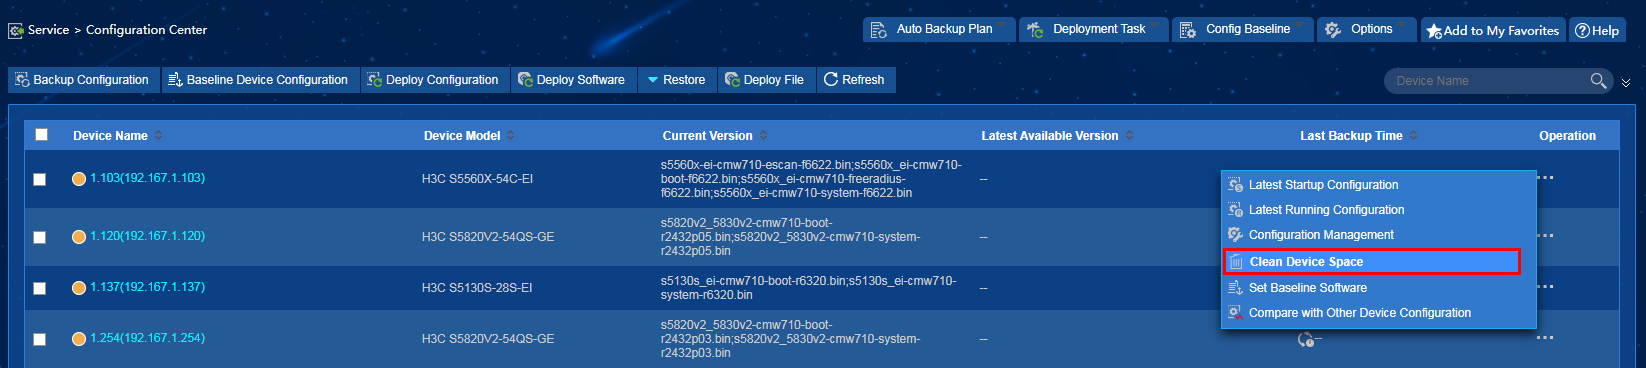
4. In the device file list, select device files and click Delete File, as shown in Figure 30.

Impact
Deleting necessary configuration files might cause device system incompleteness and reboot failures.
Guidelines
Perform this operation only for the desired device files.
Shutting down interfaces
Procedure
1. On the top navigation bar, click Resource.
2. From the navigation pane, select View Management > Port Group.
3. Click the name of a port group to enter the interface details page. Select interfaces, and then click More > Interface Configuration Guide, as shown in Figure 31.
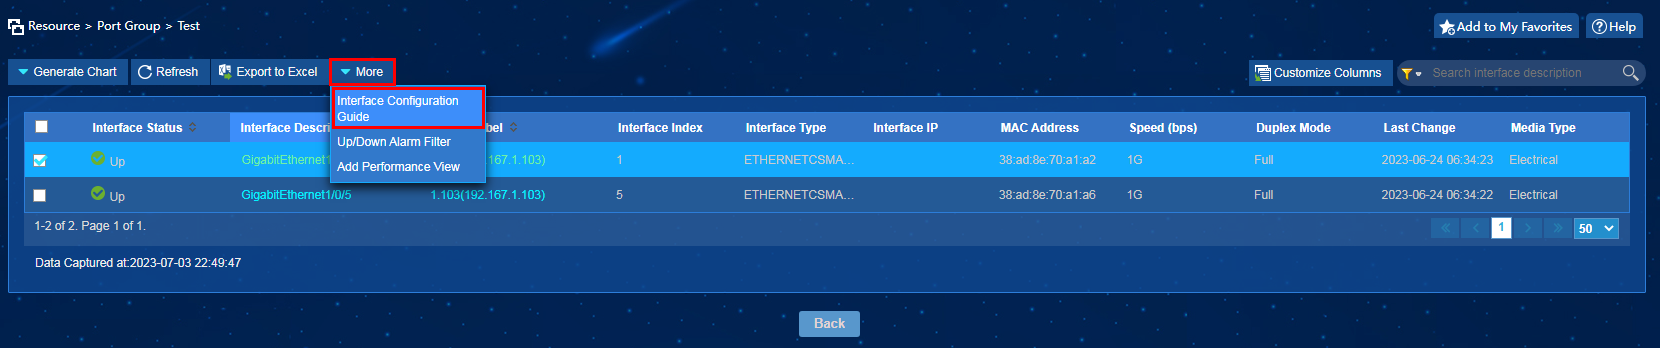
4. In the window that opens, click Add in the Operation List area. In the Select Operations window that opens, select Bring Up/Shut Down Interface from the Custom list, as shown in Figure 32, and then click OK.
Figure 32 Selecting Bring Up/Shut Down Interface
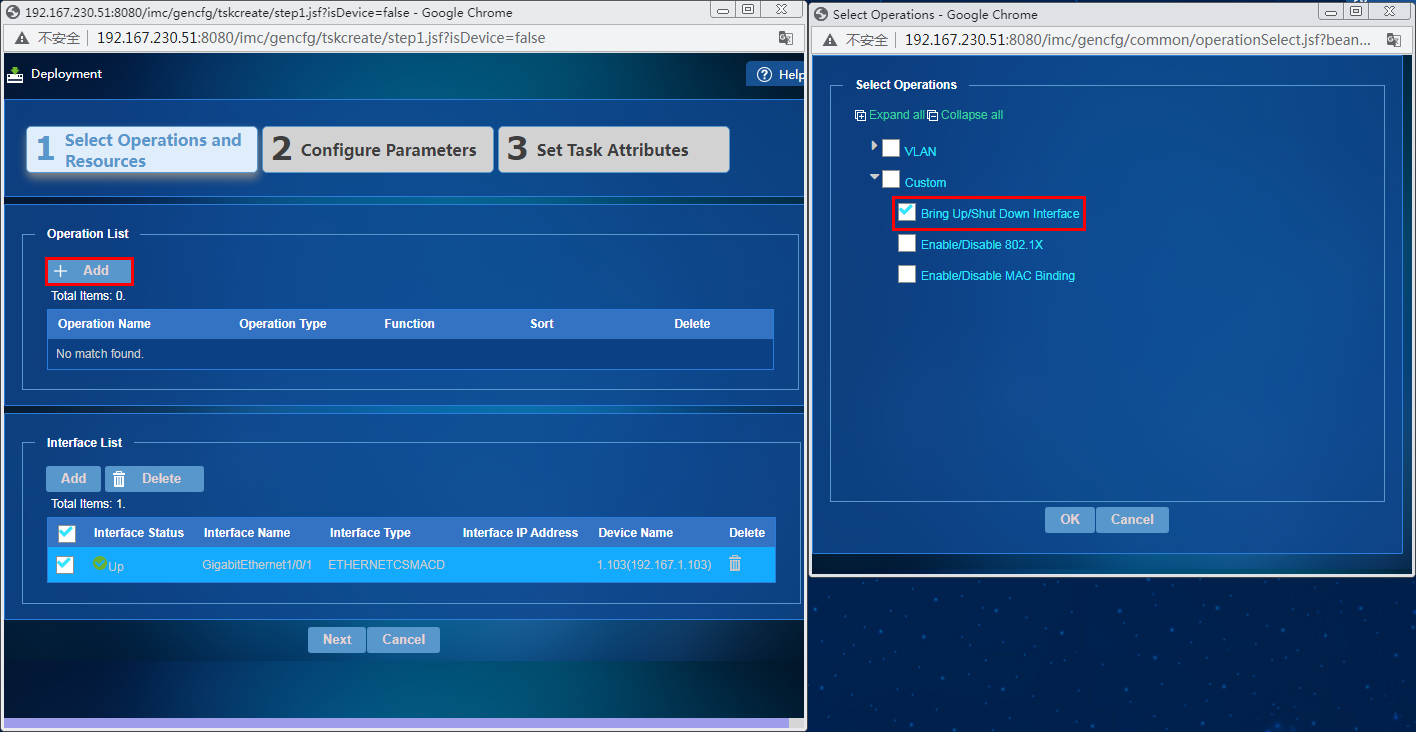
5. Click Next. Select Shut Down from the Operation list, as shown in Figure 33, and then click Next.
Figure 33 Specifying an operation for Bring Up/Shut Down Interface
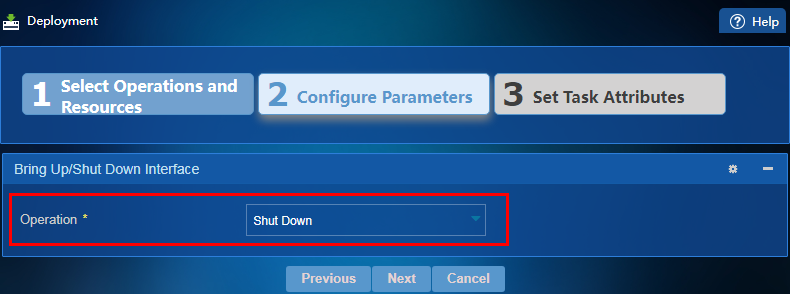
Impact
Shutting down interfaces inappropriately might cause service interruption.
Guidelines
Perform this operation with caution.
Deleting VLAN interfaces
Procedure
1. On the top navigation bar, click Service.
2. From the navigation pane, select VLAN Management > VLAN Devices.
3. Click the icon in the VLAN Configuration for a VLAN device. Click the VLAN Interface tab, select interfaces, and then click Delete, as shown in Figure 34.

4. In the dialog box that opens, click OK.
Impact
This operation might cause network communication failures on devices.
Guidelines
Perform this operation with caution.
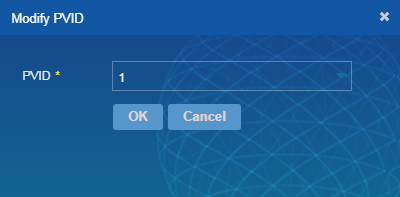
Modifying PVIDs of access ports
Procedure
1. On the top navigation bar, click Service.
2. From the navigation pane, select VLAN Management > VLAN Devices.
3. Click the icon in the VLAN Configuration for a VLAN device. Click the Access Port tab as shown in Figure 35.

4. Select access ports and click Modify PVID. In the dialog box that opens, specify the PVID and click OK, as shown in Figure 36.
Impact
This operation might cause network communication failures on devices.
Guidelines
Perform this operation with caution.
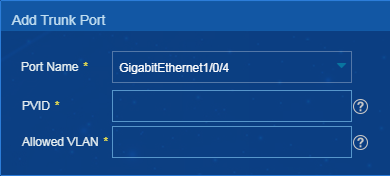
Adding or deleting trunk ports
Procedure
1. On the top navigation bar, click Service.
2. From the navigation pane, select VLAN Management > VLAN Devices.
3. Click the icon in the VLAN Configuration for a VLAN device. Click the Trunk Port tab.
4. Click Add to enter the page for adding a trunk port, as shown in Figure 37. Configure the parameters, and then click OK.
5. Select trunk ports and click Delete, as shown in Figure 38.
Figure 38 Deleting trunk ports

6. In the dialog box that opens, click OK.
Impact
This operation might cause network communication failures on devices.
Guidelines
Perform this operation with caution.
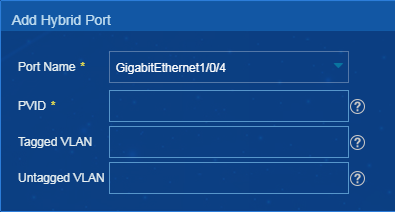
Adding or deleting hybrid ports
Procedure
1. On the top navigation bar, click Service.
2. From the navigation pane, select VLAN Management > VLAN Devices.
3. Click the icon in the VLAN Configuration for a VLAN device. Click the Hybrid Port tab.
4. Click Add to enter the page for adding a hybrid port, as shown in Figure 39. Configure the parameters, and then click OK.
Figure 39 Adding a hybrid port
5. Select hybrid ports and click Delete, as shown in Figure 40.
Figure 40 Deleting hybrid ports

6. In the dialog box that opens, click OK.
Impact
This operation might cause network communication failures on devices.
Guidelines
Perform this operation with caution.
System configuration tasks
Not adding IMC to the whitelist
Procedure
Install anti-virus software on the server where IMC is installed without adding IMC to the whitelist.
Impact
The anti-virus software might destroy the backend files of IMC. As a result, the IMC processes and functions might run abnormally.
Guidelines
Perform this operation with caution.
Powering off a server without shutting down it first
Procedure
Power off a server without shutting down it first. Anomalies occur as shown in Figure 41.
Impact
This operation might place the database in Suspect mode after the server is restarted. As a result, the processes fail to start, and related functions cannot run correctly.
Guidelines
Perform this operation with caution.
Restarting a process
Procedure
Restart a process.
Impact
This operation might affect IMC and the corresponding component of the process.
Figure 42 Restarting a process
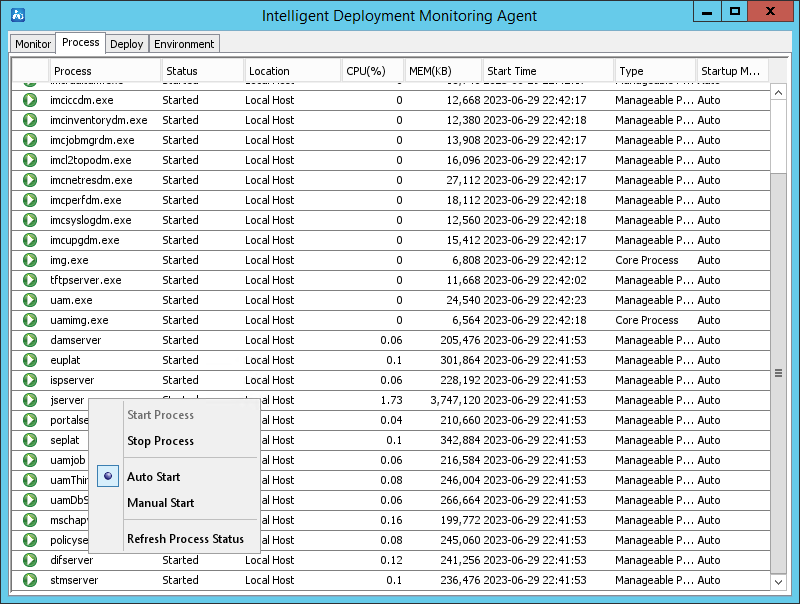
· EPS
¡ Restarting the jserver process affects front-end accesses and endpoint information reporting.
¡ Restarting the epsserver process affects packet scanning.
· EIA
¡ Restarting the jserver process affects front-end accesses and LDAP synchronization.
¡ Restarting the difserver process affects message delivery and forwarding.
¡ Restarting the Eipserver process affects BYOD authentication.
¡ Restarting the mschapv2server process affects MSCHAPv2 authentication.
¡ Restarting the portalserver process affects portal authentication.
· EAD
¡ Restarting the jserver process affects front-end accesses.
¡ Restarting the ispserver process affects packet processing of the policyserver and damserver processes.
¡ Restarting the policyserver process affects security authentication.
¡ Restarting the damserver process affects asset information reporting.
· WSM
¡ Restarting the jserver process affects the WSM front-end pages.
¡ Restarting the WSM backend processes might interrupt data collection.
· PLAT
¡ Restarting the jserver process affects system logins. If the restart time is the time for a scheduled report, report scheduling might fail.
¡ Restarting the imcupgdm process causes the ongoing deployment tasks to remain in processing state until a timeout error occurs, but the tasks are not actually executed.
¡ Restarting the database makes backend data loading fail although the connection between the IMC monitoring service and the database is still normal. You need to restart IMC.
¡ Restarting resource-related processes immediately stops ongoing device auto-discovery and device importing tasks.
Guidelines
Perform this operation with caution.
