- Table of Contents
- Related Documents
-
| Title | Size | Download |
|---|---|---|
| 05-IPS | 250.69 KB |
This help contains the following topics:
¡ Import or delete user-defined IPS signatures
Introduction
The Intrusion prevention system (IPS) feature enables devices to monitor network traffic for malicious activity and to proactively take prevention actions.
IPS functions
IPS provides the following functions:
· In-depth protection—IPS inspects the application layer data of packets, performs protocol analysis and reassembly on network traffic flows, and takes actions according to the analysis results.
· Real-time protection—IPS monitors network traffic in real-time and can take actions on detected attacks.
· All-around protection—IPS can detect and prevent the following types of attacks:
¡ Malicious software such as worms, viruses, Trojan, bots, spyware, adware, scanners, and backdoors.
¡ Malicious attacks such as common gateway interface (CGI) attacks, cross-site scripting attacks, injection attacks, directory traversal attacks, information leakage attacks, remote file inclusion attacks, buffer overflow attacks, code execution attacks, and DoS attacks.
· Bidirectional protection—IPS monitors both incoming and outgoing traffic to prevent attacks arising from the internal and external networks.
IPS profiles
IPS is implemented based on IPS profiles. An IPS profiles contains a set of IPS signatures to match packets and the actions for the matching packets.
IPS signatures
The device compares packets with IPS signatures to detect, classify, and prevent network attacks.
Each IPS signature contains various attributes, including attack category, action, protected target, severity level, and direction. By default, an IPS profile uses all enabled IPS signatures on the device. You can set criteria to filter IPS signatures that an IPS profile uses based on the signature attributes.
The device supports the following types of IPS signatures:
· Predefined IPS signatures—Automatically generated by the device based on the local signature library. You cannot add, modify, or delete a predefined IPS signature.
· User-defined IPS signatures—For new attacks that cannot be detected by predefined signatures, you can customize IPS signatures in a Snort file and then import the signatures to the device. You cannot modify user-defined signatures but you can delete all user-defined IPS signatures from the device.
Signature exceptions
Both predefined and user-defined IPS signatures have predefined signature actions and enabling status.
To change the enabling status or action for an IPS signature in an IPS profile, set the IPS signature as a signature exception in the IPS profile. The action specified for the signature exception takes precedence over the predefined signature action. For more information about IPS actions, see "IPS actions."
IPS actions
When the device detects a packet matching an IPS signature, it takes the actions specified for the signature on the packet.
The device supports the following IPS actions:
· Blacklist—Drops matching packets and adds the sources of the packets to the IP blacklist. If the IP blacklist feature is enabled, packets from the blacklisted sources will be blocked for the blacklist period. If the IP blacklist feature is not enabled, packets from the blacklisted sources are not blocked.
For more information about the IP blacklist feature, see attack defense online help.
To configure the blacklist period for the blacklist action, go to Objects > APPSecurity > Security Actions > Block.
· Drop—Drops matching packets.
· Permit—Permits matching packets to pass.
· Reset—Closes the TCP or UDP connections for matching packets by sending TCP reset messages or ICMP port unreachable messages.
· Redirect—Redirects matching packets to a webpage.
· Predefined action—Uses the predefined signature action in the signature library.
· Capture—Captures matching packets.
· Logging—Logs matching packets.
IPS mechanism
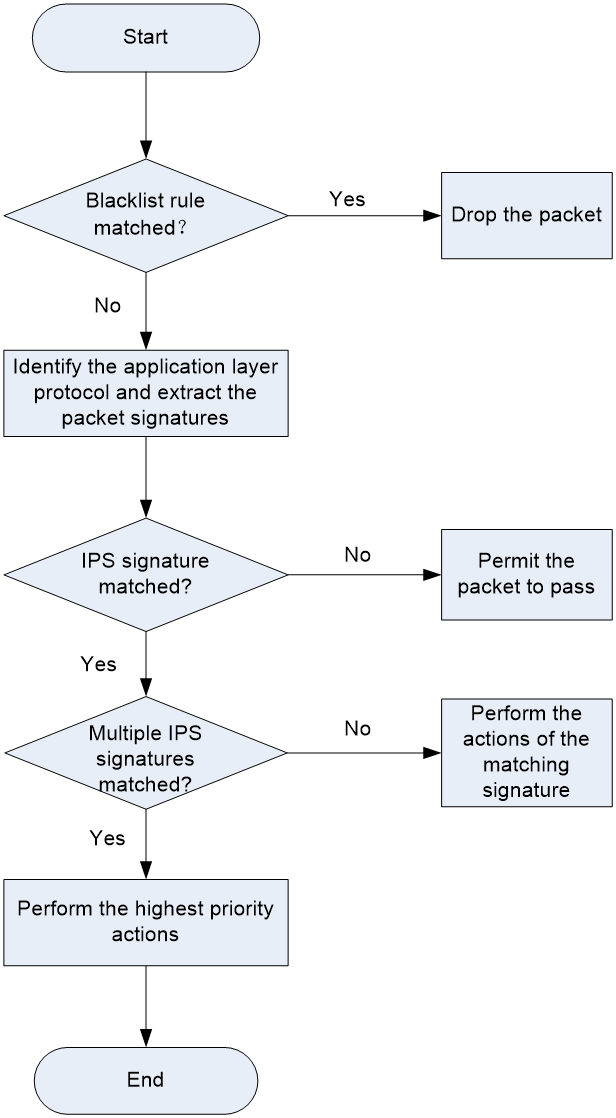
As shown in Figure 1, upon receiving a packet, the device performs the following operations:
1. The device compares the packet with the IP blacklist rules.
¡ If a matching rule is found, the device drops the packet.
¡ If no matching rule is found, the device goes to step 2.
2. The device compares the packet with the security policies.
If the packet matches a security policy that is associated with an IPS profile, the device identifies the packet application layer protocol and extracts the packet signatures.
3. The device determines the actions for the packet by comparing the extracted packet signatures with the IPS signatures in the IPS profile:
¡ If the packet does not match any IPS signatures, the device permits the packet to pass.
¡ If the packet matches only one IPS signature, the device takes the signature actions.
¡ If the packet matches multiple IPS signatures, the device uses the following rules to select the actions:
- If the matching IPS signatures have two or more actions, including redirect, drop, permit, and reset, the device takes the action of the highest priority. The actions in descending order of priority are reset, redirect, drop, and permit.
- The device will execute the blacklist, capture, and logging actions if they are in the matching IPS signatures.
Restrictions and guidelines
The IPS module requires a license to run on the device. If the license expires, you can still use the IPS functions but you can no longer upgrade the IPS signature library on the device. For more information about licenses, see license online help.
For configuration changes (create, edit, and delete settings) in an IPS profile to take effect immediately, click Submit. If you do not click Submit, the configuration changes will automatically take effect after 40 seconds.
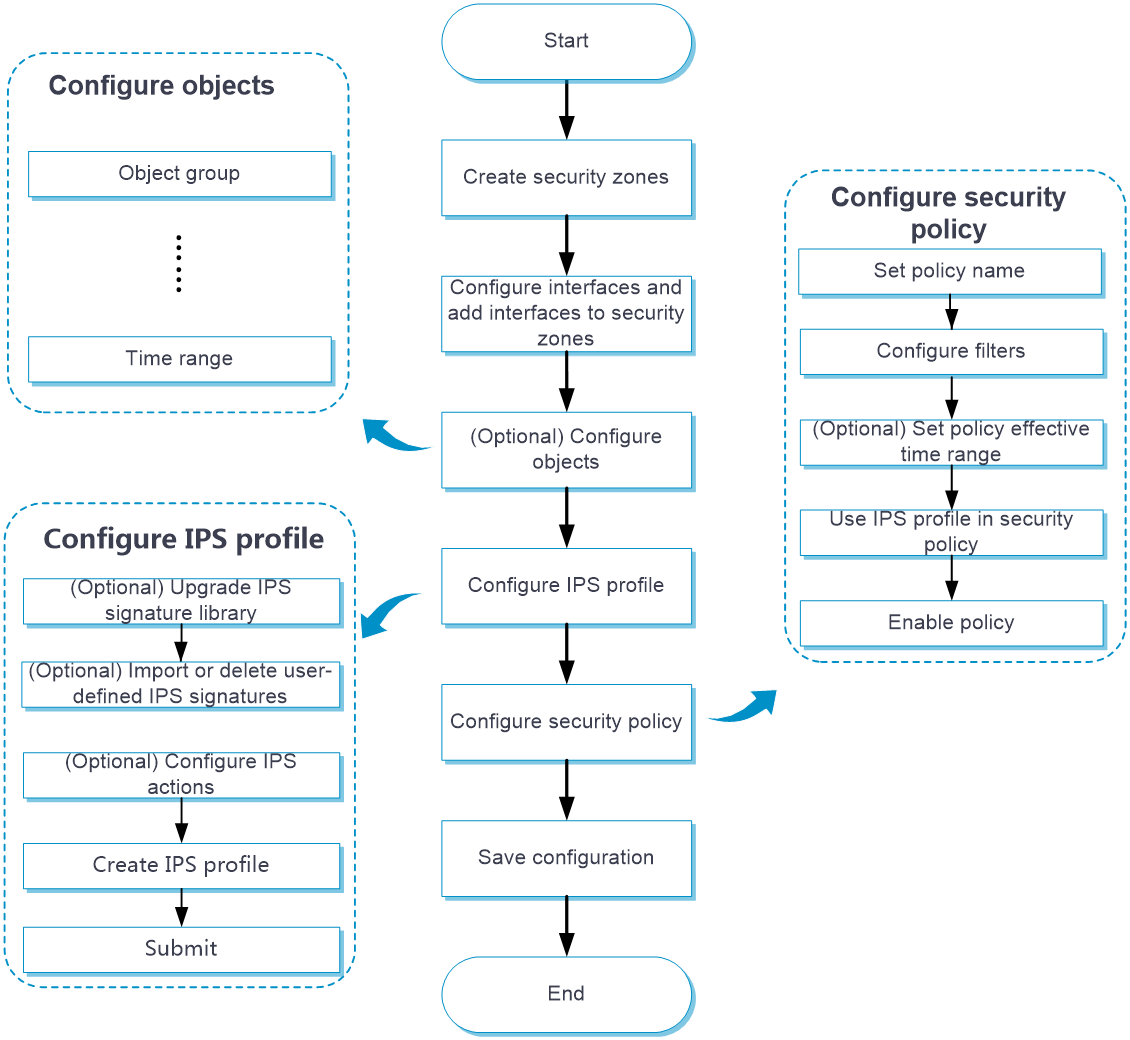
Configure IPS
Configure IPS as shown in Figure 2.
Figure 2 IPS configuration procedure
Configure an IPS profile
The device provides a predefined IPS profile named default. The default IPS profile uses all enabled IPS signatures on the device and cannot be modified or deleted.
You can also create IPS profiles on the device. By default, a newly created IPS profile uses all enabled IPS signatures and applies to the packet matching a signature the predefined signature action. You can filter the IPS signatures used by the IPS profile and change the signature actions.
You can configure global action for an IPS profile or change the action for individual IPS signatures in the profile.
The system selects the actions for packets matching an IPS signature in the following order:
1. Actions configured for the IPS signature as a signature exception in the IPS profile.
2. Global action configured for the IPS profile.
3. Predefined action of the IPS signature.
Procedure
1. Click the Objects tab.
2. In the navigation pane, select APPSecurity > IPS > Profiles.
The IPS Profiles page opens.
3. Click Create.
The Create IPS Profile page opens.
4. Create an IPS profile.
Table 1 IPS profile configuration items
|
Item |
Description |
|
Signature filtering criteria |
In the Signature filtering criteria area, set the criteria to filter the IPS signatures used in the IPS profile based signature attributes including the protected target, attack category, and direction. By default, no signature filtering criteria are set and an IPS profile uses all enabled IPS signatures on the device. An IPS profile uses an IPS signature only if the signature matches all the configured criteria. An attribute is not used for IPS signature filtering if it is not set as a filtering criterion. For each attribute-based criterion, you can specify multiple attribute values. An IPS signature matches the criterion if it matches any of the specified attribute values. To view the signatures filtered out by using the criteria, click View matching signatures. |
|
Protected target |
Select the protected targets for the protected target criterion. |
|
Attack category |
Select the attack categories for the attack category criterion. |
|
Direction |
Select the traffic directions for the direction criterion. Options are: · To-server—Client to server direction. · To-client—Server to client direction. |
|
Severity level |
Select the severity levels for the severity levels criterion. Options are Criterial, High, Medium, and Low. |
|
Other filtering criteria |
Select the actions for the predefined signature action criterion. Options are Drop, Permit, Reset, and Blacklist. |
|
Global profile action |
Apply the selected action to all traffic matching the signatures used by the profile. |
|
Action |
Select the global action for the IPS profile. Options are Predefined action, Blacklist, Drop, Permit, Reset, and Redirect. The global action applies to all packets matching the signatures in the IPS profile. By default, the Predefined action option is used. For packets matching a signature in the profile, the predefined signature action will be applied. |
|
Logging |
Select whether to enable logging for matching packets. Options are Enable and Disable. |
|
Capture |
Select whether to enable capture matching packets. Options are Enable and Disable. The capture action enables the device to capture packets and export the captured packets to the specified URL at the scheduled export time. For more information about configuring the capture action, see security actions online help. |
|
Signature exceptions |
To enable or disable a signature or set specific actions for the signature in the profile, configure the signature as a signature exception. The global profile action does not apply to signature exceptions. |
|
Add signature exceptions |
To set IPS signatures as signature exceptions in an IPS profile, use either of the following methods: · In the Signature exceptions area of the Create IPS Profile page, enter the ID of the IPS signature and click Add. · On the Create IPS Profile page, click View matching signatures. On the View Signatures page that opens, select the signatures you want to set as signature exceptions, and then click Add to signature exception list. The Edit Exception Rule window opens. Configure the following settings as needed, and then click OK. ¡ Select the action for the signatures. ¡ Enable or disable the signatures. ¡ Select whether to enable packet capture and logging for packets matching the signatures. |
|
Edit Exception Rule |
On the signature exception list, click
the Edit icon · Select the action for the signature. · Enable or disable the signature. · Select whether to enable packet capture and logging for packets matching the signature. |
5. Click OK.
The IPS profile is displayed on the IPS Profiles page.
6. Use the IPS profile in a security policy. For more information about security policies, see security policy online help.
7. To have the configuration take effect immediately, click Submit.
If you do not perform this operation, the configuration will automatically take effect after 40 seconds.
Import or delete user-defined IPS signatures
Import user-defined IPS signatures
To add your own IPS signatures, create an IPS signature file in the Snort format and import the signatures from the file to the device.
Make sure the IPS signature file contains all user-defined signatures that you want to use. All existing user-defined signatures on the device will be overwritten by the imported signatures.
For a signature defined by a Snort rule to be imported correctly from the IPS signature file, make sure Snort rule is valid.
To import user-defined IPS signatures:
1. Click the Objects tab.
2. In the navigation pane, select APPSecurity > IPS > Signatures.
The IPS Signatures page displays all IPS signatures on the device.
3. Click Import user-defined signatures in the upper-left corner of the page.
The Import user-defined signatures window opens.
4. Select the IPS signature file to import.
5. Click Import.
Delete all user-defined IPS signatures
1. Click the Objects tab.
2. In the navigation pane, select APPSecurity > IPS > Signatures.
The IPS Signatures page opens.
3. Click Delete user-defined signatures in the upper-left corner of the page.
4. Click OK in the confirmation dialog box that opens.