- Table of Contents
-
- 06-Layer 3—IP Services Configuration Guide
- 00-Preface
- 01-ARP configuration
- 02-IP addressing configuration
- 03-DHCP configuration
- 04-DNS configuration
- 05-NAT configuration
- 06-IP forwarding basics configuration
- 07-Fast forwarding configuration
- 08-Multi-CPU packet distribution configuration
- 09-Adjacency table configuration
- 10-IRDP configuration
- 11-IP performance optimization configuration
- 12-UDP helper configuration
- 13-IPv6 basics configuration
- 14-DHCPv6 configuration
- 15-IPv6 fast forwarding configuration
- 16-AFT configuration
- 17-Tunneling configuration
- 18-GRE configuration
- 19-ADVPN configuration
- 20-WAAS configuration
- Related Documents
-
| Title | Size | Download |
|---|---|---|
| 19-ADVPN configuration | 812.55 KB |
Contents
Configuring a preshared key for the VAM server
Setting the port number of the VAM server
Specifying authentication and encryption algorithms for the VAM server
Configuring an authentication method
Configuring keepalive parameters
Specifying an ADVPN domain for a VAM client
Configuring a preshared key for a VAM client
Setting the retry interval and retry number for a VAM client
Setting the dumb timer for a VAM client
Configuring a username and password for a VAM client
Configuring an ADVPN tunnel interface
Configuring IPsec for ADVPN tunnels
Display and maintenance commands for ADVPN
Example: Configuring IPv4 full-mesh ADVPN
Example: Configuring IPv6 full-mesh ADVPN
Example: Configuring IPv4 hub-spoke ADVPN
Example: Configuring IPv6 hub-spoke ADVPN
Example: Configuring IPv4 multi-hub-group ADVPN
Configuring ADVPN
About ADVPN
Auto Discovery Virtual Private Network (ADVPN) enables enterprise branches that use dynamic public addresses to establish a VPN network. ADVPN uses the VPN Address Management (VAM) protocol to collect, maintain, and distribute dynamic public addresses.
VAM protocol
VAM uses the client/server model. All VAM clients register their public addresses on the VAM server. A VAM client obtains the public addresses of other clients from the server to establish ADVPN tunnels.
ADVPN structures
ADVPN uses domains to identify VPNs. VAM clients in a VPN must be assigned to the same ADVPN domain. A VAM client can belong to only one ADVPN domain. A VAM server can serve multiple ADVPN domains and manage their clients.
VAM clients include hubs and spokes.
· Hub—A hub is the exchange center of routing information. A hub in a hub-spoke network is also a data forwarding center.
· Spoke—A spoke is the gateway of a branch. It does not forward data received from other ADVPN nodes.
ADVPN supports full-mesh, hub-spoke, and hub-group structures.
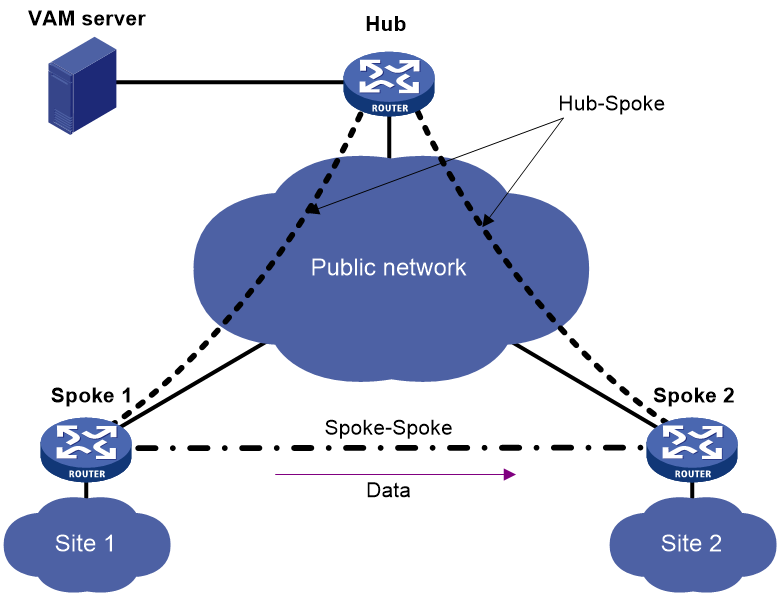
Full-mesh ADVPN
In a full-mesh ADVPN, spokes can directly communicate with each other. The hub acts as the route exchange center.
As shown in Figure 1, the spokes register with the VAM server and get hub information in the ADVPN domain. Then, they establish permanent tunnels to the hub.
Any two spokes can establish a dynamic tunnel to directly exchange data. The tunnel is deleted if no data exists during the idle timeout time.
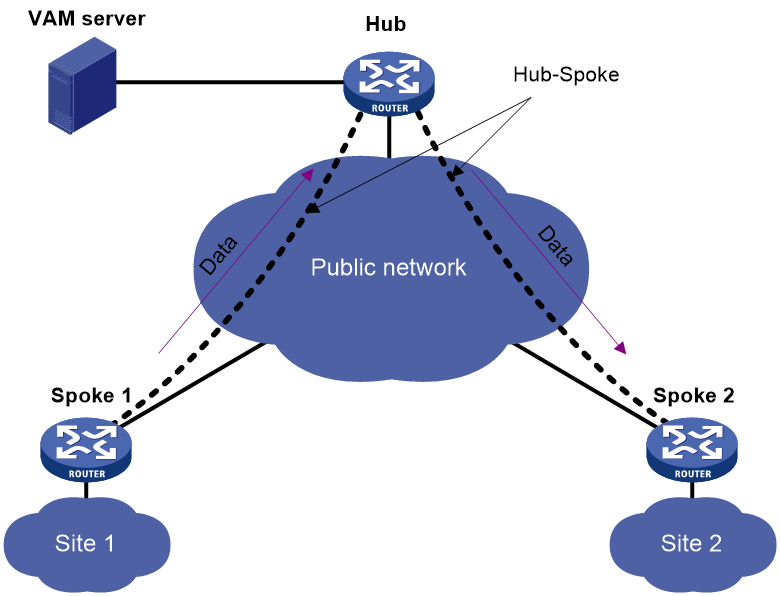
Hub-spoke ADVPN
In a hub-spoke ADVPN, spokes communicate with each other through the hub. The hub acts as both the route exchange center and data forwarding center.
As shown in Figure 2, each spoke establishes a permanent tunnel to the hub. Spokes communicate with each other through the hub.
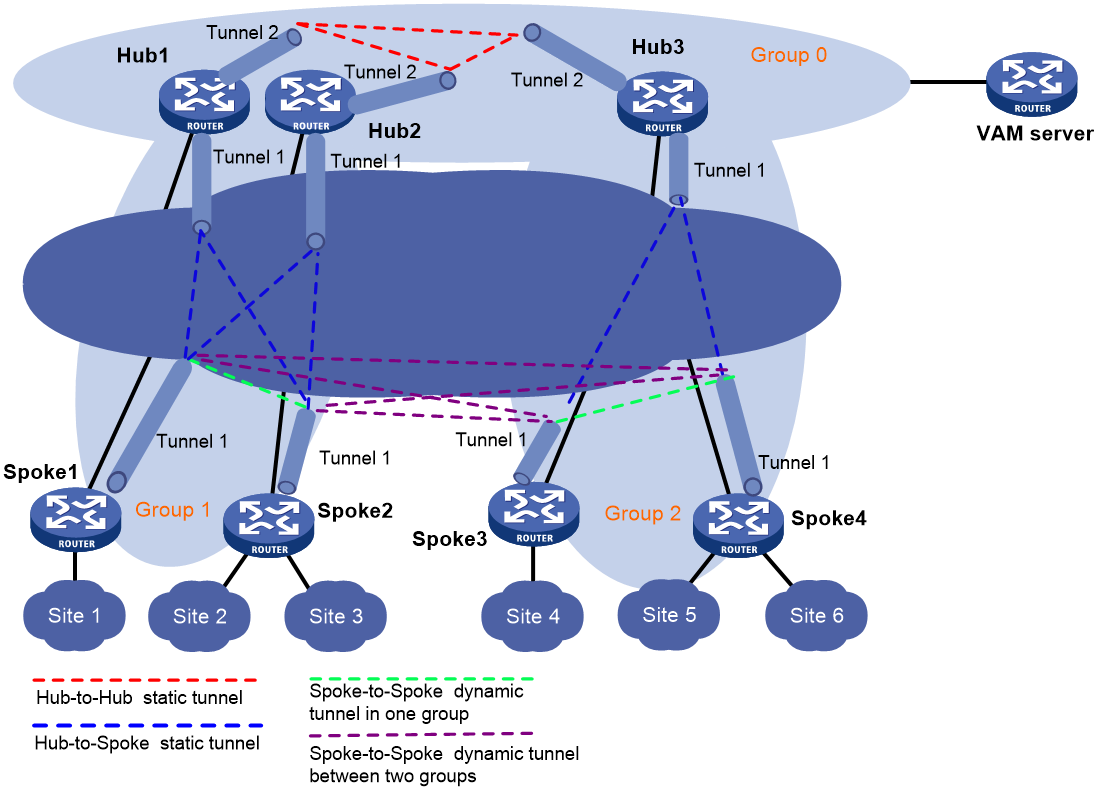
Hub-group ADVPN
A hub-group ADVPN can accommodate more ADVPN clients. This allows one hub to manage all clients. As shown in Figure 3, a hub-group ADVPN contains multiple hub groups. Each hub group has one or multiple hubs and spokes.
Follow these guidelines to classify hub groups:
· All hubs must belong to the backbone hub group. This hub group forms the full-mesh backbone area. All hubs obtain information about other hubs from the VAM server and establish permanent ADVPN tunnels to each other.
· Spokes must belong to non-backbone hub groups. Each non-backbone hub group includes at least one hub and uses either the full-mesh or hub-spoke structure. Spokes obtain hub information in the ADVPN domain from the VAM server, and establish permanent tunnels to the hub. Spokes can establish tunnels only to the hubs in the hub group.
Tunnel establishment and data forwarding in a hub group depend on the network structure. Inter-group communications between spokes need to pass the hubs of the groups. To reduce the pressure on hubs during inter-group communications, you can allow spokes in different hub groups to establish a dynamic tunnel. The dynamic tunnel is deleted if no data exists during the idle timeout time.
How ADVPN operates
The VAM server must have a static public address. VAM clients have both a public address and a private address. The public address is the address of the interface connected to the public network. It can be manually configured or dynamically assigned. The private address is the address of the ADVPN tunnel interface. It must be manually configured. All the private addresses of clients in an ADVPN domain must belong to the same network segment.
ADVPN includes the following phases:
· Connection initialization.
· Registration.
· Tunnel establishment.
· Route learning and packet forwarding.
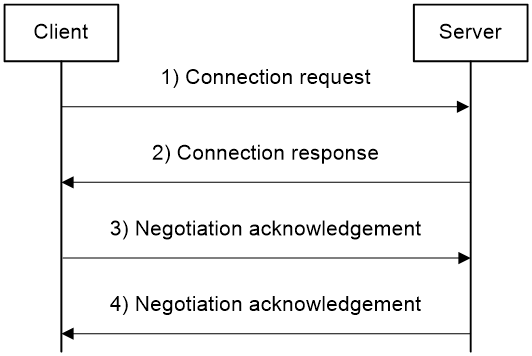
Connection initialization
As shown in Figure 4, a client and a server perform the following operations to initialize a connection:
1. The client sends encryption and authentication algorithms to the server in a connection request.
2. The server compares its algorithms in descending order of priority with the algorithms sent by the client.
3. The server sends the matching algorithms to the client.
If no match is found, the negotiation fails.
4. The server and the client generate encryption and authentication keys based on the preshared key.
If authentication and encryption are not needed, they do not generate keys.
5. The server and the client exchange negotiation acknowledgment packets protected by using the keys.
6. The server and the client use the keys to protect subsequent packets if they can restore the protected negotiation acknowledgment packets.
If they cannot restore the packets, the negotiation fails.
Figure 4 Connection initialization process
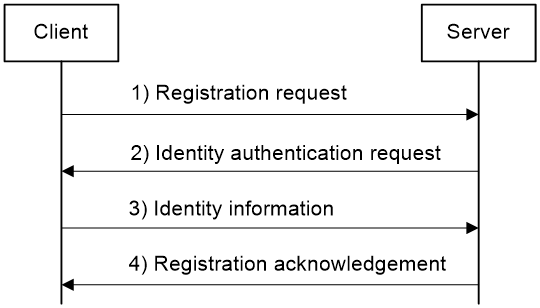
Registration
Figure 5 shows the following registration process:
1. The client sends the server a registration request that includes its public address, private address, and the connected private network.
2. The server sends the client an identity authentication request that specifies the authentication algorithm.
If authentication is not required, the server directly registers the client and sends the client a registration acknowledgement. VAM supports both PAP and CHAP authentication.
3. The client submits its identity information to the server.
4. The server performs authentication and accounting for the client through the AAA server.
5. The server sends the client a registration acknowledgement that includes hub information.
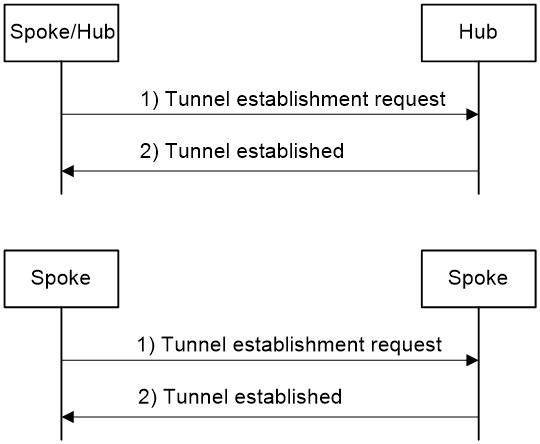
Tunnel establishment
A spoke can establish permanent tunnels to any number of hubs. Hubs in an ADVPN domain must establish permanent tunnels.
Figure 6 shows the tunnel establishment process.
1. The initiator originates a tunnel establishment request.
¡ To establish a hub-spoke tunnel:
The spoke checks whether a tunnel to each hub exists. If not, the spoke sends a tunnel establishment request to the hub.
¡ To establish a hub-hub tunnel:
The hub checks whether a tunnel to each peer hub exists. If not, the hub sends a tunnel establishment request to the peer hub.
¡ To establish a spoke-spoke tunnel:
In a full-mesh network, when a spoke receives a data packet but finds no tunnel for forwarding the packet, it sends an address resolution request to the server. After receiving the resolved address, the spoke sends a tunnel establishment request to the peer spoke.
2. The receiver saves tunnel information in the request and sends a response to the sender.
Figure 6 Tunnel establishment process
Route learning and packet forwarding
ADVPN nodes use the following methods to learn private routes:
· Static or dynamic routing—It must be configured for private networks and ADVPN tunnel interfaces to ensure connectivity among private networks. A dynamic routing protocol discovers neighbors, updates routes, and establishes a routing table over ADVPN tunnels. From the perspective of private networks, ADVPN tunnels are links that connect different private networks. The routing protocol exchanges routes between hub and hub, and between hub and spoke. It does not directly exchange routes between spoke and spoke.
When a spoke receives a packet destined to a remote private network, it performs the following operations to forward the packet:
a. Locates the private next hop from the routing table.
b. Uses the private next hop to obtain the corresponding public address from the VAM server.
c. Sends the packet to the public address over the ADVPN tunnel.
Full-mesh and hub-spoke structures are determined by routing. If the next hop is a spoke, the structure is full-mesh. If the next hop is a hub, the structure is hub-spoke.
· Registration and query from the VAM server—VAM clients register information about the connected private networks on the VAM server.
When a spoke receives a packet destined to a remote private network, it performs the following operations to forward the packet:
a. Sends the destination address of the packet to the VAM server.
b. Queries the VAM server for information about the ADVPN node (public and private addresses of the node) connected to the remote private network.
c. Generates a route to the remote private network through the ADVPN node.
d. Sends the packet to the public address of the ADVPN node over the ADVPN tunnel.
If both methods are used, the spoke sends both the private next hop and the destination address of the packet to the VAM server. The VAM server preferentially obtains the private network according to the destination address. If the route to the remote private network is learned by using both methods, the route with a lower preference is used.
NAT traversal
An ADVPN tunnel can traverse a NAT gateway.
· If only the tunnel initiator resides behind a NAT gateway, a spoke-spoke tunnel can be established through the NAT gateway.
· If the tunnel receiver resides behind a NAT gateway, packets must be forwarded by a hub before the receiver originates a tunnel establishment request. If the NAT gateway uses Endpoint-Independent Mapping, a spoke-spoke tunnel can be established through the NAT gateway.
· If both ends reside behind a NAT gateway, no tunnel can be established and packets between them must be forwarded by a hub.
ADVPN tasks at a glance
Configure ADVPN in the order of VAM servers, hubs, and spokes. Whether an ADVPN node is a hub or a spoke is specified on the VAM servers.
To configure ADVPN, perform the following tasks:
2. Configuring ADVPN nodes
c. Configuring an ADVPN tunnel interface
d. (Optional.) Configuring IPsec for ADVPN tunnels
e. (Optional.) Enabling ADVPN logging
Configuring the VAM server
VAM server tasks at a glance
To configure the VAM server, perform the following tasks:
3. Configuring a preshared key for the VAM server
5. (Optional.) Setting the port number of the VAM server
6. (Optional.) Specifying authentication and encryption algorithms for the VAM server
7. (Optional.) Configuring an authentication method
8. (Optional.) Configuring keepalive parameters
9. (Optional.) Setting the retry timer
Creating an ADVPN domain
1. Enter system view.
system-view
2. Create an ADVPN domain and enter ADVPN domain view.
vam server advpn-domain domain-name id domain-id
Enabling the VAM server
1. Enter system view.
system-view
2. Enable the VAM server. Choose one of the following tasks:
¡ In system view, enable the VAM server for one or all ADVPN domains.
vam server enable [ advpn-domain domain-name ]
¡ Execute the following commands in sequence to enable the VAM server for an ADVPN domain:
vam server advpn-domain domain-name [ id domain-id ]
server enable
By default, the VAM server is disabled.
Configuring a preshared key for the VAM server
About this task
The preshared key is used to generate initial encryption and authentication keys during connection initialization. It is also used to generate encryption and authentication keys for subsequent packets if encryption and authentication are needed.
If the preshared key on the VAM server is different than the VAM clients, packet decryption and integrity verification will fail. The VAM server and clients cannot establish connections.
Restrictions and guidelines
The VAM server and the VAM clients in the same ADVPN domain must have the same preshared key.
Procedure
1. Enter system view.
system-view
2. Enter ADVPN domain view.
vam server advpn-domain domain-name [ id domain-id ]
3. Configure a preshared key for the VAM server.
pre-shared-key { cipher | simple } string
By default, no preshared key is configured.
Configuring hub groups
About this task
Hub groups apply to large ADVPN networks. You can classify spokes to different hub groups, and specify one or more hubs for each group. The VAM server assigns a client only the hub information of the client's own hub group. A client establishes permanent ADVPN tunnels only to the hubs in its own hub group.
By default, spokes are not allowed to establish direct tunnels. If an ACL is specified to control establishing spoke-spoke tunnels, the VAM server assigns the specified ACL to an online hub. The hub uses the ACL to match received packets. If a match is found, the hub sends a redirect packet to the spoke that sent the packet. Then, the spoke sends the VAM server the destination address of the packet, obtains the remote spoke information, and establishes a direct tunnel to the remote spoke.
After a spoke-spoke tunnel is established, the spokes directly exchange packets.
When a VAM client registers with the VAM server, the VAM server selects a hub group for the client as follows:
1. The server matches the private address of the client against the private addresses of hubs in different hub groups in lexicographic order.
2. If a match is found, the server assigns the client to the hub group as a hub.
3. If no match is found, the server matches the client's private address against the private addresses of spokes in different hub groups in lexicographic order.
4. If a match is found, the server assigns the client to the hub group as a spoke.
5. If no match is found, the registration fails.
Procedure
1. Enter system view.
system-view
2. Enter ADVPN domain view.
vam server advpn-domain domain-name [ id domain-id ]
3. Create a hub group and enter hub group view.
hub-group group-name
4. Configure a hub private address.
IPv4:
hub private-address private-ip-address [ public-address { public-ipv4-address | public-ipv6-address } [ advpn-port port-number ] ]
IPv6:
hub ipv6 private-address private-ipv6-address [ public-address { public-ipv4-address | public-ipv6-address } [ advpn-port port-number ] ]
By default, no hub private addresses are configured.
A hub group must have a minimum of one hub private address.
5. Configure a spoke private address range.
IPv4:
spoke private-address { network ip-address { mask-length | mask } | range start-ipv4-address end-ipv4-address }
IPv6:
spoke ipv6 private-address { network prefix prefix-length | range start-ipv6-address end-ipv6-address }
By default, no spoke private address ranges are configured.
You can configure multiple spoke private IPv4 and IPv6 address ranges in a hub group.
6. Specify an ACL to control establishing spoke-to-spoke tunnels.
IPv4:
shortcut interest { acl { acl-number | name acl-name } all }
IPv6:
shortcut ipv6 interest { acl { ipv6-acl-number | name ipv6-acl-name } | all }
By default, spokes are not allowed to establish direct tunnels.
Setting the port number of the VAM server
Restrictions and guidelines
The port number of the VAM server must be the same as that configured on the VAM clients.
Procedure
1. Enter system view.
system-view
2. Set the port number of the VAM server.
vam server listen-port port-number
The default port number is 18000.
Specifying authentication and encryption algorithms for the VAM server
About this task
The VAM server uses the specified algorithms to negotiate with the VAM client.
The VAM server and client use SHA-1 and AES-CBC-128 during connection initialization, and use the negotiated algorithms after connection initialization.
Restrictions and guidelines
The algorithm specified earlier in a command line has a higher priority.
The configuration of the commands that specify authentication and encryption algorithms does not affect registered VAM clients. It applies to subsequently registered VAM clients.
Procedure
1. Enter system view.
system-view
2. Enter ADVPN domain view.
vam server advpn-domain domain-name [ id domain-id ]
3. Specify authentication algorithms.
authentication-algorithm { aes-xcbc-mac | md5 | none | sha-1 | sha-256 } *
The default authentication algorithm is SHA-1.
4. Specify encryption algorithms.
encryption-algorithm { 3des-cbc | aes-cbc-128 | aes-cbc-192 | aes-cbc-256 | aes-ctr-128 | aes-ctr-192 | aes-ctr-256 | des-cbc | none } *
The default encryption algorithms are AES-CBC-256, AES-CBC-192, AES-CBC-128, AES-CTR-256, AES-CTR-192, AES-CTR-128, 3DES-CBC, and DES-CBC in descending order of priority.
Configuring an authentication method
About this task
The VAM server uses the specified method to authenticate clients in the ADVPN domain. The authentication method includes none authentication and AAA authentication. If AAA is used, the VAM server supports PAP and CHAP authentication. Only VAM clients that pass identity authentication can access the ADVPN domain. For information about AAA configuration on the VAM server, see Security Configuration Guide.
Restrictions and guidelines
If the specified ISP domain does not exist, the authentication will fail.
A newly configured authentication method does not affect registered VAM clients. It applies to subsequently registered VAM clients.
Procedure
1. Enter system view.
system-view
2. Enter ADVPN domain view.
vam server advpn-domain domain-name [ id domain-id ]
3. Specify an authentication method.
authentication-method { none | { chap | pap } [ domain isp-name ] }
By default, the authentication method is CHAP, and the default ISP domain is used.
Configuring keepalive parameters
About this task
Keepalive parameters include a keepalive interval and a maximum number of keepalive retries. The VAM server assigns the configured keepalive parameters to clients in the ADVPN domain.
A client sends keepalives to the server at the specified interval. If a client does not receive any responses from the server after the maximum keepalive attempts (keepalive retries + 1), the client stops sending keepalives. If the VAM server does not receive any keepalives from a client before the timeout timer expires, the server removes information about the client and logs off the client. The timeout time is the product of the keepalive interval and keepalive attempts.
Restrictions and guidelines
Newly configured keepalive parameters do not affect registered VAM clients. They apply to subsequently registered clients.
If a device configured with dynamic NAT exists between the VAM server and VAM clients, configure the keepalive interval to be shorter than the aging time of NAT entries.
Configure proper values for the keepalive parameters depending on the network condition.
Procedure
1. Enter system view.
system-view
2. Enter ADVPN domain view.
vam server advpn-domain domain-name [ id domain-id ]
3. Configure keepalive parameters.
keepalive interval interval retry retries
By default, the keepalive interval is 180 seconds, and the maximum number of keepalive retries is 3.
Setting the retry timer
About this task
The VAM server starts the retry timer after it sends a request to a client. If the server does not receive a response from the client before the retry timer expires, the server resends the request. The server stops sending the request after receiving a response from the client or after the timeout timer (product of the keepalive interval and keepalive attempts) expires.
Procedure
1. Enter system view.
system-view
2. Enter ADVPN domain view.
vam server advpn-domain domain-name [ id domain-id ]
3. Set the retry timer.
retry interval interval
By default, the retry timer is 5 seconds.
Configuring the VAM client
VAM client tasks at a glance
To configure the VAM client, perform the following tasks:
4. Specifying an ADVPN domain for a VAM client
5. Configuring a preshared key for a VAM client
6. (Optional.) Setting the retry interval and retry number for a VAM client
7. (Optional.) Setting the dumb timer for a VAM client
8. (Optional.) Configuring a username and password for a VAM client
Creating a VAM client
1. Enter system view.
system-view
2. Create a VAM client and enter its view.
vam client name client-name
Enabling VAM clients
1. Enter system view.
system-view
2. Enable VAM clients. Choose one of the following tasks:
¡ Enable one or all VAM clients.
vam client enable [ name client-name ]
¡ Execute the following commands in sequence to enable a VAM client:
vam client name client-name
client enable
By default, no VAM clients are enabled.
Specifying VAM servers
About this task
You can specify a primary VAM server and a secondary VAM server for a VAM client. The client registers with both servers, and accepts settings from the server that first registers the client. When the server fails, the client uses the settings from the other server.
Restrictions and guidelines
If the specified primary and secondary VAM servers have the same address or name, only the primary VAM server takes effect.
The port number of a VAM server must be the same as that configured on the VAM server.
Procedure
1. Enter system view.
system-view
2. Enter VAM client view.
vam client name client-name
3. Specify the primary VAM server.
server primary { ip-address ip-address | ipv6-address ipv6-address | name host-name } [ port port-number ]
By default, no VAM server is specified.
4. (Optional.) Specify the secondary VAM server.
server secondary { ip-address ip-address | ipv6-address ipv6-address | name host-name } [ port port-number ]
By default, no VAM server is specified.
Specifying an ADVPN domain for a VAM client
1. Enter system view.
system-view
2. Enter VAM client view.
vam client name client-name
3. Specify an ADVPN domain for the VAM client.
advpn-domain domain-name
By default, no ADVPN domain is specified for a VAM client.
Configuring a preshared key for a VAM client
About this task
The preshared key is used to generate initial encryption and authentication keys during connection initialization. It is also used to generate encryption and authentication keys for subsequent packets if encryption and authentication are needed.
If a VAM client and the VAM server have different preshared keys, packet decryption and integrity verification will fail. The VAM client and server cannot establish a connection.
Restrictions and guidelines
The VAM server and the VAM clients in the same ADVPN domain must have the same preshared key.
Procedure
1. Enter system view.
system-view
2. Enter VAM client view.
vam client name client-name
3. Configure a preshared key for the VAM client.
pre-shared-key { cipher | simple } string
By default, no preshared key is configured for a VAM client.
Setting the retry interval and retry number for a VAM client
About this task
After a VAM client sends a request to the server, it resends the request if it does not receive any responses within the retry interval. If the client fails to receive a response after maximum attempts (retry times + 1), the client determines that the server is unreachable.
The retry-times setting does not apply to register and update requests. The client sends those requests at the retry interval until it goes offline.
Procedure
1. Enter system view.
system-view
2. Enter VAM client view.
vam client name client-name
3. Set the retry interval and retry number.
retry interval interval count retries
By default, the retry interval is 5 seconds, and the retry number is 3.
Setting the dumb timer for a VAM client
About this task
A VAM client starts the dumb timer after the timeout timer expires. The client does not process any packets during the dumb time. When the dumb timer expires, the client sends a new connection request to the VAM server.
Procedure
1. Enter system view.
system-view
2. Enter VAM client view.
vam client name client-name
3. Set the dumb timer.
dumb-time time-interval
By default, the dumb timer is 120 seconds.
Configuring a username and password for a VAM client
About this task
A VAM client uses its username and password for authentication on the VAM server.
Procedure
1. Enter system view.
system-view
2. Enter VAM client view.
vam client name client-name
3. Configure a username and password for the client.
user username password { cipher | simple } string
By default, no username and password are configured for a VAM client.
Configuring routing
ADVPN supports OSPF, RIP, and BGP for IPv4.
· When OSPF is used, set the network type of an OSPF interface to broadcast in a full-mesh network or to P2MP in a hub-spoke network. For more information about OSPF configuration, see Layer 3—IP Routing Configuration Guide.
· Full-mesh ADVPN does not support RIP. Only hub-spoke ADVPN supports RIP. When RIP is used in a hub-spoke network, you must disable split horizon. For more information about RIP configuration, see Layer 3—IP Routing Configuration Guide.
· When BGP is used, configure a routing policy to make sure the next hop of a route destined for a remote private network meets the following requirements:
¡ In a full-mesh network, the next hop is the IP address of the peer spoke. EBGP does not support full-mesh.
¡ In a hub-spoke network, the next hop is the IP address of the hub.
For more information about BGP and routing policy configuration, see Layer 3—IP Routing Configuration Guide.
ADVPN supports OSPFv3, RIPng, and IPv6 BGP for IPv6.
· When OSPFv3 is used, set the network type of an OSPFv3 interface to broadcast in a full-mesh network or to P2MP in a hub-spoke network. For more information about OSPFv3 configuration, see Layer 3—IP Routing Configuration Guide.
· When RIPng is used, only the full-mesh network is supported. For more information about RIPng configuration, see Layer 3—IP Routing Configuration Guide.
· When IPv6 BGP is used, configure a routing policy to make sure the next hop of a route destined for a remote private network meets the following requirements:
¡ In a full-mesh network, the next hop is the IP address of the peer spoke. EBGP does not support full-mesh.
¡ In a hub-spoke network, the next hop is the IP address of the hub.
For more information about IPv6 BGP and routing policy configuration, see Layer 3—IP Routing Configuration Guide.
Configuring an ADVPN tunnel interface
Restrictions and guidelines
For more information about tunnel interface, see "Configuring tunneling." For more information about tunnel interface configuration commands, see tunneling commands in Layer 3—IP Services Command Reference.
Procedure
1. Enter system view.
system-view
2. Create an ADVPN tunnel interface and enter its view.
interface tunnel number [ mode advpn { gre | udp } [ ipv6 ] ]
The two ends of an ADVPN tunnel must use the same tunnel mode.
3. Configure a private address for the tunnel interface.
IPv4:
ip address ip-address { mask | mask-length } [ sub ]
IPv6:
ipv6 address ipv6-address prefix-length
By default, no private address is configured for the tunnel interface.
All tunnel interfaces in a hub group must reside in the same private network.
4. Specify a source address or source interface for the tunnel interface.
source { ip-address | interface-type interface-number }
By default, no source address or source interface is configured for a tunnel interface.
The specified source address or the IP address of the specified source interface is used as the source address of sent ADVPN packets.
5. (Optional.) Set the DF bit for ADVPN packets.
tunnel dfbit enable
By default, the DF bit is not set for ADVPN packets.
6. (Optional.) Set the source UDP port number of ADVPN packets.
advpn source-port port-number
By default, the source UDP port number of ADVPN packets is 18001.
This command is available when the tunnel mode is UDP.
If the vam client command configured on the tunnel interface has the compatible keyword, the tunnel interface must have a different source UDP port number than other tunnel interfaces.
7. Bind a VAM client to the tunnel interface.
IPv4:
vam client client-name [ compatible advpn0 ]
IPv6:
vam ipv6 client client-name
By default, no VAM client is bound to an ADVPN tunnel interface.
A VAM client can be bound to only one IPv4 or IPv6 ADVPN tunnel interface.
8. (Optional.) Configure a private network for the tunnel interface.
IPv4:
advpn network ip-address { mask-length | mask } [ preference preference-value ]
IPv6:
advpn ipv6 network prefix prefix-length [ preference preference-value ]
By default, no private network is configured for the tunnel interface.
Set the preference of the private network route to be higher than other dynamic routing protocols, and lower than static routing.
9. (Optional.) Set the keepalive interval and the maximum number of keepalive attempts for the tunnel interface.
keepalive interval interval retry retries
By default, the keepalive interval is 180 seconds, and the maximum number of keepalive attempts is 3.
The keepalive interval and the maximum number of keepalive attempts must be the same on the tunnel interfaces in an ADVPN domain.
10. (Optional.) Set the idle timeout time for the spoke-spoke tunnel.
advpn session idle-time time-interval
By default, the idle timeout time is 600 seconds.
The new idle timeout setting applies to both existing and subsequently established spoke-spoke tunnels.
11. (Optional.) Set the dumb timer for the tunnel interface.
advpn session dumb-time time-interval
By default, the dumb timer is 120 seconds.
The new dumb timer setting only applies to subsequently established tunnels.
12. (Optional.) Configure an ADVPN group name.
advpn group group-name
By default, no ADVPN group name is configured.
Perform this step on the spoke.
13. (Optional.) Configure a mapping between an ADVPN group and a QoS policy.
advpn map group group-name qos-policy policy-name outbound
By default, no ADVPN group-to-QoS policy mappings are configured.
Perform this step on the hub.
Configuring IPsec for ADVPN tunnels
You can configure an IPsec profile to secure ADVPN tunnels:
1. Configure IPsec transform sets to specify the security protocols, authentication and encryption algorithms, and the encapsulation mode.
2. Configure an IKE-mode IPsec profile that uses the IPsec transform sets.
3. Apply the IPsec profile to an ADVPN tunnel interface.
For more information about IPsec configuration, see Security Configuration Guide.
Enabling ADVPN logging
About this task
This feature enables the device to generate logs for the ADVPN module and send the logs to the information center of the device. For the logs to be output correctly, you must also configure the information center on the device. For more information about information center configuration, see Network Management and Monitoring Configuration Guide.
Procedure
1. Enter system view.
system-view
2. Enable ADVPN logging.
advpn logging enable
By default, ADVPN logging is disabled.
Display and maintenance commands for ADVPN
Execute display commands in any view and reset commands in user view.
|
Task |
Command |
|
Display IPv4 private-to-public address mapping information for VAM clients registered with the VAM server. |
display vam server address-map [ advpn-domain domain-name [ private-address private-ip-address ] ] [ verbose ] |
|
Display IPv6 private-to-public address mapping information for VAM clients registered with the VAM server. |
display vam server ipv6 address-map [ advpn-domain domain-name [ private-address private-ipv6-address ] ] [ verbose ] |
|
Display IPv4 private networks for VAM clients registered with the VAM server. |
display vam server private-network [ advpn-domain domain-name [ private-address private-ip-address ] ] |
|
Display IPv6 private networks for VAM clients registered with the VAM server. |
display vam server ipv6 private-network [ advpn-domain domain-name [ private-address private-ipv6-address ] ] |
|
Display ADVPN domain statistics on the VAM server. |
display vam server statistics [ advpn-domain domain-name ] |
|
Display FSM information for VAM clients. |
display vam client fsm [ name client-name ] |
|
Display statistics for VAM clients. |
display vam client statistics [ name client-name ] |
|
Display IPv4 spoke-to-spoke tunnel establishment rules for VAM clients. |
display vam client shortcut interest [ name client-name ] |
|
Display IPv6 spoke-to-spoke tunnel establishment rules for VAM clients. |
display vam client shortcut ipv6 interest [ name client-name ] |
|
Display ADVPN group-to-QoS policy mappings. |
display advpn group-qos-map [ interface tunnel number [ group group-name ] ] |
|
Display IPv4 ADVPN tunnel information. |
display advpn session [ interface tunnel number [ private-address private-ip-address ] ] [ verbose ] |
|
Display IPv6 ADVPN tunnel information. |
display advpn ipv6 session [ interface tunnel number [ private-address private-ipv6-address ] ] [ verbose ] |
|
Display the number of ADVPN sessions in different states. |
display advpn session count |
|
Clear IPv4 private-to-public address mapping information for VAM clients registered with the VAM server. |
reset vam server address-map [ advpn-domain domain-name [ private-address private-ip-address ] ] |
|
Clear IPv6 private-to-public address mapping information for VAM clients registered with the VAM server. |
reset vam server ipv6 address-map [ advpn-domain domain-name [ private-address private-ipv6-address ] ] |
|
Clear ADVPN domain statistics on the VAM server. |
reset vam server statistics [ advpn-domain domain-name ] |
|
Reset the FSM for VAM clients. |
reset vam client [ ipv6 ] fsm [ name client-name ] |
|
Clear statistics for VAM client. |
reset vam client statistics [ name client-name ] |
|
Delete IPv4 ADVPN tunnels. |
reset advpn session statistics [ interface tunnel number [ private-address private-ip-address ] ] |
|
Delete IPv6 ADVPN tunnels. |
reset advpn ipv6 session statistics [ interface tunnel number [ private-address private-ipv6-address ] ] |
|
Clear statistics for IPv4 ADVPN tunnels. |
reset advpn session statistics [ interface tunnel number [ private-address private-ip-address ] ] |
|
Clear statistics for IPv6 ADVPN tunnels. |
reset advpn ipv6 session statistics [ interface tunnel number [ private-address private-ipv6-address ] ] |
ADVPN configuration examples
Example: Configuring IPv4 full-mesh ADVPN
Network configuration
As shown in Figure 7, the primary and secondary VAM servers manage and maintain VAM client information for all hubs and spokes. The AAA server performs authentication and accounting for VAM clients. The two hubs back up each other, and perform data forwarding and route exchange.
· Establish a permanent ADVPN tunnel between each spoke and each hub.
· Establish a temporary ADVPN tunnel dynamically between the two spokes in the same ADVPN domain.

Table 1 Interface and IP address assignment
|
Device |
Interface |
IP address |
Device |
Interface |
IP address |
|
Hub 1 |
GE1/0 |
1.0.0.1/24 |
Spoke 1 |
GE1/0 |
1.0.0.3/24 |
|
|
Tunnel1 |
192.168.0.1/24 |
|
GE2/0 |
192.168.1.1/24 |
|
Hub 2 |
GE1/0 |
1.0.0.2/24 |
|
Tunnel1 |
192.168.0.3/24 |
|
|
Tunnel1 |
192.168.0.2/24 |
Spoke 2 |
GE1/0 |
1.0.0.4/24 |
|
AAA server |
|
1.0.0.10/24 |
|
GE2/0 |
192.168.2.1/24 |
|
Primary server |
GE1/0 |
1.0.0.11/24 |
|
Tunnel1 |
192.168.0.4/24 |
|
Secondary server |
GE1/0 |
1.0.0.12/24 |
|
|
|
Configuring the primary VAM server
1. Configure IP addresses for the interfaces. (Details not shown.)
2. Configure AAA:
# Configure RADIUS scheme abc.
<PrimaryServer> system-view
[PrimaryServer] radius scheme abc
[PrimaryServer-radius-abc] primary authentication 1.0.0.10 1812
[PrimaryServer-radius-abc] primary accounting 1.0.0.10 1813
[PrimaryServer-radius-abc] key authentication simple 123
[PrimaryServer-radius-abc] key accounting simple 123
[PrimaryServer-radius-abc] user-name-format without-domain
[PrimaryServer-radius-abc] quit
[PrimaryServer] radius session-control enable
# Configure AAA methods for ISP domain abc.
[PrimaryServer] domain abc
[PrimaryServer-isp-abc] authentication advpn radius-scheme abc
[PrimaryServer-isp-abc] accounting advpn radius-scheme abc
[PrimaryServer-isp-abc] quit
[PrimaryServer] domain default enable abc
3. Configure the VAM server:
# Create ADVPN domain abc.
[PrimaryServer] vam server advpn-domain abc id 1
# Create hub group 0.
[PrimaryServer-vam-server-domain-abc] hub-group 0
# Specify hub private IPv4 addresses.
[PrimaryServer-vam-server-domain-abc-hub-group-0] hub private-address 192.168.0.1
[PrimaryServer-vam-server-domain-abc-hub-group-0] hub private-address 192.168.0.2
# Specify a spoke private IPv4 network.
[PrimaryServer-vam-server-domain-abc-hub-group-0] spoke private-address network 192.168.0.0 255.255.255.0
[PrimaryServer-vam-server-domain-abc-hub-group-0] quit
# Set the preshared key to 123456.
[PrimaryServer-vam-server-domain-abc] pre-shared-key simple 123456
# Set the authentication mode to CHAP.
[PrimaryServer-vam-server-domain-abc] authentication-method chap
# Enable the VAM server for the ADVPN domain.
[PrimaryServer-vam-server-domain-abc] server enable
[PrimaryServer-vam-server-domain-abc] quit
Configuring the secondary VAM server
# Configure the secondary VAM server in the same way that the primary server is configured. (Details not shown.)
Configuring Hub 1
1. Configure IP addresses for the interfaces. (Details not shown.)
2. Configure the VAM client:
# Create VAM client Hub1.
<Hub1> system-view
[Hub1] vam client name Hub1
# Specify ADVPN domain abc for the VAM client.
[Hub1-vam-client-Hub1] advpn-domain abc
# Set the preshared key to 123456.
[Hub1-vam-client-Hub1] pre-shared-key simple 123456
# Set both the username and password to hub1.
[Hub1-vam-client-Hub1] user hub1 password simple hub1
# Specify the primary and secondary VAM servers.
[Hub1-vam-client-Hub1] server primary ip-address 1.0.0.11
[Hub1-vam-client-Hub1] server secondary ip-address 1.0.0.12
# Enable the VAM client.
[Hub1-vam-client-Hub1] client enable
[Hub1-vam-client-Hub1] quit
3. Configure an IPsec profile:
# Configure IKE.
[Hub1] ike keychain abc
[Hub1-ike-keychain-abc] pre-shared-key address 0.0.0.0 0.0.0.0 key simple 123456
[Hub1-ike-keychain-abc] quit
[Hub1] ike profile abc
[Hub1-ike-profile-abc] keychain abc
[Hub1-ike-profile-abc] quit
# Configure the IPsec profile.
[Hub1] ipsec transform-set abc
[Hub1-ipsec-transform-set-abc] encapsulation-mode transport
[Hub1-ipsec-transform-set-abc] esp encryption-algorithm des-cbc
[Hub1-ipsec-transform-set-abc] esp authentication-algorithm sha1
[Hub1-ipsec-transform-set-abc] quit
[Hub1] ipsec profile abc isakmp
[Hub1-ipsec-profile-isakmp-abc] transform-set abc
[Hub1-ipsec-profile-isakmp-abc] ike-profile abc
[Hub1-ipsec-profile-isakmp-abc] quit
4. Configure OSPF to advertise the private network.
[Hub1] ospf 1
[Hub1-ospf-1] area 0
[Hub1-ospf-1-area-0.0.0.0] network 192.168.0.0 0.0.0.255
[Hub1-ospf-1-area-0.0.0.0] quit
[Hub1-ospf-1] quit
5. Configure GRE-mode IPv4 ADVPN tunnel interface tunnel1.
[Hub1] interface tunnel1 mode advpn gre
[Hub1-Tunnel1] ip address 192.168.0.1 255.255.255.0
[Hub1-Tunnel1] vam client Hub1
[Hub1-Tunnel1] ospf network-type broadcast
[Hub1-Tunnel1] source gigabitethernet 1/0
[Hub1-Tunnel1] tunnel protection ipsec profile abc
[Hub1-Tunnel1] quit
Configuring Hub 2
1. Configure IP addresses for the interfaces. (Details not shown.)
2. Configure the VAM client:
# Create VAM client Hub2.
<Hub2> system-view
[Hub2] vam client name Hub2
# Specify ADVPN domain abc for the VAM client.
[Hub2-vam-client-Hub2] advpn-domain abc
# Set the preshared key to 123456.
[Hub2-vam-client-Hub2] pre-shared-key simple 123456
# Set both the username and password to hub2.
[Hub2-vam-client-Hub2] user hub2 password simple hub2
# Specify the primary and secondary VAM servers.
[Hub2-vam-client-Hub2] server primary ip-address 1.0.0.11
[Hub2-vam-client-Hub2] server secondary ip-address 1.0.0.12
# Enable the VAM client.
[Hub2-vam-client-Hub2] client enable
[Hub2-vam-client-Hub2] quit
3. Configure an IPsec profile:
# Configure IKE.
[Hub2] ike keychain abc
[Hub2-ike-keychain-abc] pre-shared-key address 0.0.0.0 0.0.0.0 key simple 123456
[Hub2-ike-keychain-abc] quit
[Hub2] ike profile abc
[Hub2-ike-profile-abc] keychain abc
[Hub2-ike-profile-abc] quit
# Configure the IPsec profile.
[Hub2] ipsec transform-set abc
[Hub2-ipsec-transform-set-abc] encapsulation-mode transport
[Hub2-ipsec-transform-set-abc] esp encryption-algorithm des-cbc
[Hub2-ipsec-transform-set-abc] esp authentication-algorithm sha1
[Hub2-ipsec-transform-set-abc] quit
[Hub2] ipsec profile abc isakmp
[Hub2-ipsec-profile-isakmp-abc] transform-set abc
[Hub2-ipsec-profile-isakmp-abc] ike-profile abc
[Hub2-ipsec-profile-isakmp-abc] quit
4. Configure OSPF to advertise the private network.
[Hub2] ospf 1
[Hub2-ospf-1] area 0
[Hub2-ospf-1-area-0.0.0.0] network 192.168.0.0 0.0.0.255
[Hub2-ospf-1-area-0.0.0.0] quit
[Hub2-ospf-1] quit
5. Configure GRE-mode IPv4 ADVPN tunnel interface tunnel1.
[Hub2] interface tunnel 1 mode advpn gre
[Hub2-Tunnel1] ip address 192.168.0.2 255.255.255.0
[Hub2-Tunnel1] vam client Hub2
[Hub2-Tunnel1] ospf network-type broadcast
[Hub2-Tunnel1] source gigabitethernet 1/0
[Hub2-Tunnel1] tunnel protection ipsec profile abc
[Hub2-Tunnel1] quit
Configuring Spoke 1
1. Configure IP addresses for the interfaces. (Details not shown.)
2. Configure the VAM client:
# Create VAM client Spoke1.
<Spoke1> system-view
[Spoke1] vam client name Spoke1
# Specify ADVPN domain abc for the VAM client.
[Spoke1-vam-client-Spoke1] advpn-domain abc
# Set the preshared key to 123456.
[Spoke1-vam-client-Spoke1] pre-shared-key simple 123456
# Set both the username and password to spoke1.
[Spoke1-vam-client-Spoke1] user spoke1 password simple spoke1
# Specify the primary and secondary VAM servers.
[Spoke1-vam-client-Spoke1] server primary ip-address 1.0.0.11
[Spoke1-vam-client-Spoke1] server secondary ip-address 1.0.0.12
# Enable the VAM client.
[Spoke1-vam-client-Spoke1] client enable
[Spoke1-vam-client-Spoke1] quit
3. Configure an IPsec profile:
# Configure IKE.
[Spoke1] ike keychain abc
[Spoke1-ike-keychain-abc] pre-shared-key address 0.0.0.0 0.0.0.0 key simple 123456
[Spoke1-ike-keychain-abc] quit
[Spoke1] ike profile abc
[Spoke1-ike-profile-abc] keychain abc
[Spoke1-ike-profile-abc] quit
# Configure the IPsec profile.
[Spoke1] ipsec transform-set abc
[Spoke1-ipsec-transform-set-abc] encapsulation-mode transport
[Spoke1-ipsec-transform-set-abc] esp encryption-algorithm des-cbc
[Spoke1-ipsec-transform-set-abc] esp authentication-algorithm sha1
[Spoke1-ipsec-transform-set-abc] quit
[Spoke1] ipsec profile abc isakmp
[Spoke1-ipsec-profile-isakmp-abc] transform-set abc
[Spoke1-ipsec-profile-isakmp-abc] ike-profile abc
[Spoke1-ipsec-profile-isakmp-abc] quit
4. Configure OSPF to advertise private networks.
[Spoke1] ospf 1
[Spoke1-ospf-1] area 0
[Spoke1-ospf-1-area-0.0.0.0] network 192.168.0.0 0.0.0.255
[Spoke1-ospf-1-area-0.0.0.0] network 192.168.1.0 0.0.0.255
[Spoke1-ospf-1-area-0.0.0.0] quit
[Spoke1-ospf-1] quit
5. Configure GRE-mode IPv4 ADVPN tunnel interface tunnel1. Configure its DR priority as 0 so Spoke 1 will not participate in DR/BDR election.
[Spoke1] interface tunnel1 mode advpn gre
[Spoke1-Tunnel1] ip address 192.168.0.3 255.255.255.0
[Spoke1-Tunnel1] vam client Spoke1
[Spoke1-Tunnel1] ospf network-type broadcast
[Spoke1-Tunnel1] ospf dr-priority 0
[Spoke1-Tunnel1] source gigabitethernet 1/0
[Spoke1-Tunnel1] tunnel protection ipsec profile abc
[Spoke1-Tunnel1] quit
Configuring Spoke 2
1. Configure IP addresses for the interfaces. (Details not shown.)
2. Configure the VAM client:
# Create VAM client Spoke2.
<Spoke2> system-view
[Spoke2] vam client name Spoke2
# Specify ADVPN domain abc for the VAM client.
[Spoke2-vam-client-Spoke2] advpn-domain abc
# Set the preshared key to 123456.
[Spoke2-vam-client-Spoke2] pre-shared-key simple 123456
# Set both the username and password to spoke2.
[Spoke2-vam-client-Spoke2] user spoke2 password simple spoke2
# Specify the primary and secondary VAM servers.
[Spoke2-vam-client-Spoke2] server primary ip-address 1.0.0.11
[Spoke2-vam-client-Spoke2] server secondary ip-address 1.0.0.12
# Enable the VAM client.
[Spoke2-vam-client-Spoke2] client enable
[Spoke2-vam-client-Spoke2] quit
3. Configure an IPsec profile:
# Configure IKE.
[Spoke2] ike keychain abc
[Spoke2-ike-keychain-abc] pre-shared-key address 0.0.0.0 0.0.0.0 key simple 123456
[Spoke2-ike-keychain-abc] quit
[Spoke2] ike profile abc
[Spoke2-ike-profile-abc] keychain abc
[Spoke2-ike-profile-abc] quit
# Configure the IPsec profile.
[Spoke2] ipsec transform-set abc
[Spoke2-ipsec-transform-set-abc] encapsulation-mode transport
[Spoke2-ipsec-transform-set-abc] esp encryption-algorithm des-cbc
[Spoke2-ipsec-transform-set-abc] esp authentication-algorithm sha1
[Spoke2-ipsec-transform-set-abc] quit
[Spoke2] ipsec profile abc isakmp
[Spoke2-ipsec-profile-isakmp-abc] transform-set abc
[Spoke2-ipsec-profile-isakmp-abc] ike-profile abc
[Spoke2-ipsec-profile-isakmp-abc] quit
4. Configure OSPF to advertise private networks.
[Spoke2] ospf 1
[Spoke2-ospf-1] area 0
[Spoke2-ospf-1-area-0.0.0.0] network 192.168.0.0 0.0.0.255
[Spoke2-ospf-1-area-0.0.0.0] network 192.168.2.0 0.0.0.255
[Spoke2-ospf-1-area-0.0.0.0] quit
[Spoke2-ospf-1] quit
5. Configure GRE-mode IPv4 ADVPN tunnel interface tunnel1. Configure its DR priority as 0 so Spoke 2 will not participate in DR/BDR election.
[Spoke2] interface tunnel1 mode advpn gre
[Spoke2-Tunnel1] ip address 192.168.0.4 255.255.255.0
[Spoke2-Tunnel1] vam client Spoke2
[Spoke2-Tunnel1] ospf network-type broadcast
[Spoke2-Tunnel1] ospf dr-priority 0
[Spoke2-Tunnel1] source gigabitethernet 1/0
[Spoke2-Tunnel1] tunnel protection ipsec profile abc
[Spoke2-Tunnel1] quit
Verifying the configuration
# Display IPv4 address mapping information for all VAM clients registered with the primary VAM server.
[PrimaryServer] display vam server address-map
ADVPN domain name: abc
Total private address mappings: 4
Group Private address Public address Type NAT Holding time
0 192.168.0.1 1.0.0.1 Hub No 0H 52M 7S
0 192.168.0.2 1.0.0.2 Hub No 0H 47M 31S
0 192.168.0.3 1.0.0.3 Spoke No 0H 28M 25S
0 192.168.0.4 1.0.0.4 Spoke No 0H 19M 15S
# Display IPv4 address mapping information for all VAM clients registered with the secondary VAM server.
[SecondaryServer] display vam server address-map
ADVPN domain name: abc
Total private address mappings: 4
Group Private address Public address Type NAT Holding time
0 192.168.0.1 1.0.0.1 Hub No 0H 52M 7S
0 192.168.0.2 1.0.0.2 Hub No 0H 47M 31S
0 192.168.0.3 1.0.0.3 Spoke No 0H 28M 25S
0 192.168.0.4 1.0.0.4 Spoke No 0H 19M 15S
The output shows that Hub 1, Hub 2, Spoke 1, and Spoke 2 all have registered their address mapping information with the VAM servers.
# Display IPv4 ADVPN tunnel information on Hubs. This example uses Hub 1.
[Hub1] display advpn session
Interface : Tunnel1
Number of sessions: 3
Private address Public address Port Type State Holding time
192.168.0.2 1.0.0.2 -- H-H Success 0H 46M 8S
192.168.0.3 1.0.0.3 -- H-S Success 0H 27M 27S
192.168.0.4 1.0.0.4 -- H-S Success 0H 18M 18S
The output shows that Hub 1 has established a permanent tunnel to Hub 2, Spoke 1, and Spoke 2.
# Display IPv4 ADVPN tunnel information on Spokes. This example uses Spoke 1.
[Spoke1] display advpn session
Interface : Tunnel1
Number of sessions: 2
Private address Public address Port Type State Holding time
192.168.0.1 1.0.0.1 -- S-H Success 0H 46M 8S
192.168.0.2 1.0.0.2 -- S-H Success 0H 46M 8S
The output shows that Spoke 1 has established a permanent hub-spoke tunnel to Hub 1 and Hub 2.
# Verify that Spoke 1 can ping the private address 192.168.0.4 of Spoke 2.
[Spoke1] ping 192.168.0.4
Ping 192.168.0.4 (192.168.0.4): 56 data bytes, press CTRL_C to break
56 bytes from 192.168.0.4: icmp_seq=0 ttl=255 time=4.000 ms
56 bytes from 192.168.0.4: icmp_seq=1 ttl=255 time=0.000 ms
56 bytes from 192.168.0.4: icmp_seq=2 ttl=255 time=0.000 ms
56 bytes from 192.168.0.4: icmp_seq=3 ttl=255 time=0.000 ms
56 bytes from 192.168.0.4: icmp_seq=4 ttl=255 time=1.000 ms
--- Ping statistics for 192.168.0.4 ---
5 packets transmitted, 5 packets received, 0.0% packet loss
round-trip min/avg/max/std-dev = 0.000/1.000/4.000/1.549 ms
# Display IPv4 ADVPN tunnel information on Spokes. This example uses Spoke 1.
[Spoke1] display advpn session
Interface : Tunnel1
Number of sessions: 3
Private address Public address Port Type State Holding time
192.168.0.1 1.0.0.1 -- S-H Success 0H 46M 8S
192.168.0.2 1.0.0.2 -- S-H Success 0H 46M 8S
192.168.0.4 1.0.0.4 -- S-S Success 0H 0M 1S
The output shows the following information:
· Spoke 1 has established a permanent hub-spoke tunnel to Hub 1 and Hub 2.
· Spoke 1 has established a temporary spoke-spoke tunnel to Spoke 2.
Example: Configuring IPv6 full-mesh ADVPN
Network configuration
As shown in Figure 8, the primary and secondary VAM servers manage and maintain VAM client information for all hubs and spokes. The AAA server performs authentication and accounting for VAM clients. The two hubs back up each other, and perform data forwarding and route exchange.
· Establish a permanent ADVPN tunnel between each spoke and each hub.
· Establish a temporary ADVPN tunnel dynamically between the two spokes in the same ADVPN domain.
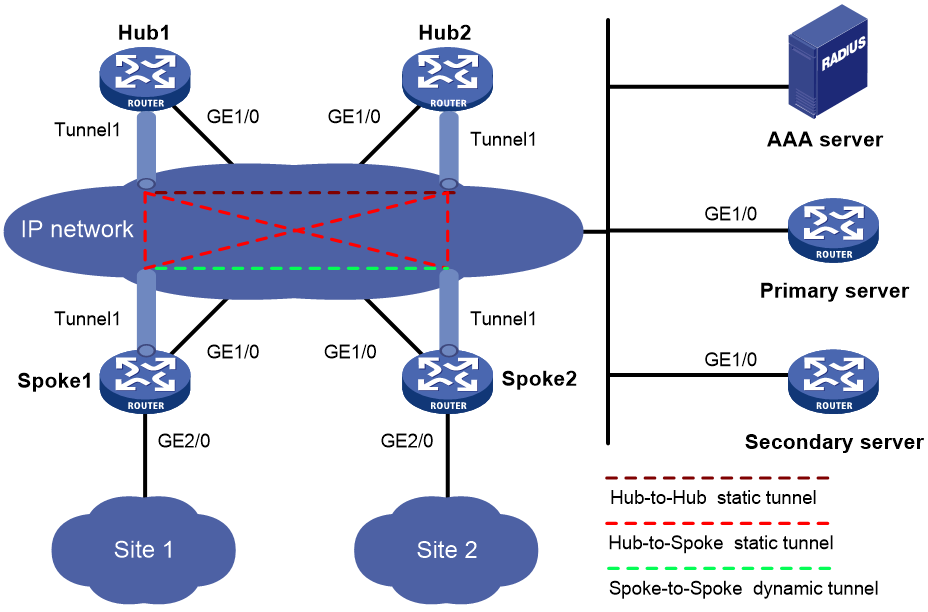
Table 2 Interface and IP address assignment
|
Device |
Interface |
IP address |
Device |
Interface |
IP address |
|
Hub 1 |
GE1/0 |
1::1/64 |
Spoke 1 |
GE1/0 |
1::3/64 |
|
|
Tunnel1 |
192:168::1/64 |
|
GE2/0 |
192:168:1::1/64 |
|
Hub 2 |
GE1/0 |
1::2/64 |
|
Tunnel1 |
192:168::3/64 |
|
|
Tunnel1 |
192:168::2/64 |
Spoke 2 |
GE1/0 |
1::4/64 |
|
AAA server |
|
1::10/64 |
|
GE2/0 |
192:168:2::1/64 |
|
Primary server |
GE1/0 |
1::11/64 |
|
Tunnel1 |
192:168::4/64 |
|
Secondary server |
GE1/0 |
1::12/64 |
|
|
|
Configuring the primary VAM server
1. Configure IP addresses for the interfaces. (Details not shown.)
2. Configure AAA:
# Configure RADIUS scheme abc.
<PrimaryServer> system-view
[PrimaryServer] radius scheme abc
[PrimaryServer-radius-abc] primary authentication ipv6 1::10 1812
[PrimaryServer-radius-abc] primary accounting ipv6 1::10 1813
[PrimaryServer-radius-abc] key authentication simple 123
[PrimaryServer-radius-abc] key accounting simple 123
[PrimaryServer-radius-abc] user-name-format without-domain
[PrimaryServer-radius-abc] quit
[PrimaryServer] radius session-control enable
# Configure AAA methods for ISP domain abc.
[PrimaryServer] domain abc
[PrimaryServer-isp-abc] authentication advpn radius-scheme abc
[PrimaryServer-isp-abc] accounting advpn radius-scheme abc
[PrimaryServer-isp-abc] quit
[PrimaryServer] domain default enable abc
3. Configure the VAM server:
# Create ADVPN domain abc.
[PrimaryServer] vam server advpn-domain abc id 1
# Create hub group 0.
[PrimaryServer-vam-server-domain-abc] hub-group 0
# Specify hub private IPv6 addresses.
[PrimaryServer-vam-server-domain-abc-hub-group-0] hub ipv6 private-address 192:168::1
[PrimaryServer-vam-server-domain-abc-hub-group-0] hub ipv6 private-address 192:168::2
# Specify a spoke private IPv6 network.
[PrimaryServer-vam-server-domain-abc-hub-group-0] spoke ipv6 private-address network 192:168::0 64
# Set the preshared key to 123456.
[PrimaryServer-vam-server-domain-abc] pre-shared-key simple 123456
# Set the authentication mode to CHAP.
[PrimaryServer-vam-server-domain-abc] authentication-method chap
# Enable the VAM server for the ADVPN domain.
[PrimaryServer-vam-server-domain-abc] server enable
[PrimaryServer-vam-server-domain-abc] quit
Configuring the secondary VAM server
# Configure the secondary VAM server in the same way that the primary server is configured. (Details not shown.)
Configuring Hub 1
1. Configure IP addresses for the interfaces. (Details not shown.)
2. Configure the VAM client:
# Create VAM client Hub1.
<Hub1> system-view
[Hub1] vam client name Hub1
# Specify ADVPN domain abc for the VAM client.
[Hub1-vam-client-Hub1] advpn-domain abc
# Set the preshared key to 123456.
[Hub1-vam-client-Hub1] pre-shared-key simple 123456
# Set both the username and password to hub1.
[Hub1-vam-client-Hub1] user hub1 password simple hub1
# Specify the primary and secondary VAM servers.
[Hub1-vam-client-Hub1] server primary ipv6-address 1::11
[Hub1-vam-client-Hub1] server secondary ipv6-address 1::12
# Enable the VAM client.
[Hub1-vam-client-Hub1] client enable
[Hub1-vam-client-Hub1] quit
3. Configure an IPsec profile:
# Configure IKE.
[Hub1] ike keychain abc
[Hub1-ike-keychain-abc] pre-shared-key address ipv6 :: 0 key simple 123456
[Hub1-ike-keychain-abc] quit
[Hub1] ike profile abc
[Hub1-ike-profile-abc] keychain abc
[Hub1-ike-profile-abc] quit
# Configure the IPsec profile.
[Hub1] ipsec transform-set abc
[Hub1-ipsec-transform-set-abc] encapsulation-mode transport
[Hub1-ipsec-transform-set-abc] esp encryption-algorithm des-cbc
[Hub1-ipsec-transform-set-abc] esp authentication-algorithm sha1
[Hub1-ipsec-transform-set-abc] quit
[Hub1] ipsec profile abc isakmp
[Hub1-ipsec-profile-isakmp-abc] transform-set abc
[Hub1-ipsec-profile-isakmp-abc] ike-profile abc
[Hub1-ipsec-profile-isakmp-abc] quit
4. Configure OSPFv3.
[Hub1] ospfv3 1
[Hub1-ospfv3-1] router-id 0.0.0.1
[Hub1-ospfv3-1] area 0
[Hub1-ospfv3-1-area-0.0.0.0] quit
[Hub1-ospfv3-1] quit
5. Configure GRE-mode IPv6 ADVPN tunnel interface tunnel1.
[Hub1] interface tunnel1 mode advpn gre ipv6
[Hub1-Tunnel1] ipv6 address 192:168::1 64
[Hub1-Tunnel1] ipv6 address fe80::1 link-local
[Hub1-Tunnel1] vam ipv6 client Hub1
[Hub1-Tunnel1] ospfv3 1 area 0
[Hub1-Tunnel1] ospfv3 network-type broadcast
[Hub1-Tunnel1] source gigabitethernet 1/0
[Hub1-Tunnel1] tunnel protection ipsec profile abc
[Hub1-Tunnel1] quit
Configuring Hub 2
1. Configure IP addresses for the interfaces. (Details not shown.)
2. Configure the VAM client:
# Create VAM client Hub2.
<Hub2> system-view
[Hub2] vam client name Hub2
# Specify ADVPN domain abc for the VAM client.
[Hub2-vam-client-Hub2] advpn-domain abc
# Set the preshared key to 123456.
[Hub2-vam-client-Hub2] pre-shared-key simple 123456
# Set both the username and password to hub2.
[Hub2-vam-client-Hub2] user hub2 password simple hub2
# Specify the primary and secondary VAM servers.
[Hub2-vam-client-Hub2] server primary ipv6-address 1::11
[Hub2-vam-client-Hub2] server secondary ipv6-address 1::12
# Enable the VAM client.
[Hub2-vam-client-Hub2] client enable
[Hub2-vam-client-Hub2] quit
3. Configure an IPsec profile:
# Configure IKE.
[Hub2] ike keychain abc
[Hub2-ike-keychain-abc] pre-shared-key address ipv6 :: 0 key simple 123456
[Hub2-ike-keychain-abc] quit
[Hub2] ike profile abc
[Hub2-ike-profile-abc] keychain abc
[Hub2-ike-profile-abc] quit
# Configure the IPsec profile.
[Hub2] ipsec transform-set abc
[Hub2-ipsec-transform-set-abc] encapsulation-mode transport
[Hub2-ipsec-transform-set-abc] esp encryption-algorithm des-cbc
[Hub2-ipsec-transform-set-abc] esp authentication-algorithm sha1
[Hub2-ipsec-transform-set-abc] quit
[Hub2] ipsec profile abc isakmp
[Hub2-ipsec-profile-isakmp-abc] transform-set abc
[Hub2-ipsec-profile-isakmp-abc] ike-profile abc
[Hub2-ipsec-profile-isakmp-abc] quit
4. Configure OSPFv3.
[Hub2] ospfv3 1
[Hub2-ospfv3-1] router-id 0.0.0.2
[Hub2-ospfv3-1] area 0
[Hub2-ospfv3-1-area-0.0.0.0] quit
[Hub2-ospfv3-1] quit
5. Configure GRE-mode IPv6 ADVPN tunnel interface tunnel1.
[Hub2] interface tunnel1 mode advpn gre ipv6
[Hub2-Tunnel1] ipv6 address 192:168::2 64
[Hub1-Tunnel1] ipv6 address fe80::2 link-local
[Hub2-Tunnel1] vam ipv6 client Hub2
[Hub2-Tunnel1] ospfv3 1 area 0
[Hub2-Tunnel1] ospfv3 network-type broadcast
[Hub2-Tunnel1] source gigabitethernet 1/0
[Hub2-Tunnel1] tunnel protection ipsec profile abc
[Hub2-Tunnel1] quit
Configuring Spoke 1
1. Configure IP addresses for the interfaces. (Details not shown.)
2. Configure the VAM client:
# Create VAM client Spoke1.
<Spoke1> system-view
[Spoke1] vam client name Spoke1
# Specify ADVPN domain abc for the VAM client.
[Spoke1-vam-client-Spoke1] advpn-domain abc
# Set the preshared key to 123456.
[Spoke1-vam-client-Spoke1] pre-shared-key simple 123456
# Set both the username and password to spoke1.
[Spoke1-vam-client-Spoke1] user spoke1 password simple spoke1
# Specify the primary and secondary VAM servers.
[Spoke1-vam-client-Spoke1] server primary ip-address 1.0.0.11
[Spoke1-vam-client-Spoke1] server secondary ip-address 1.0.0.12
# Enable the VAM client.
[Spoke1-vam-client-Spoke1] client enable
[Spoke1-vam-client-Spoke1] quit
3. Configure an IPsec profile:
# Configure IKE.
[Spoke1] ike keychain abc
[Spoke1-ike-keychain-abc] pre-shared-key address ipv6 :: 0 key simple 123456
[Spoke1-ike-keychain-abc] quit
[Spoke1] ike profile abc
[Spoke1-ike-profile-abc] keychain abc
[Spoke1-ike-profile-abc] quit
# Configure the IPsec profile.
[Spoke1] ipsec transform-set abc
[Spoke1-ipsec-transform-set-abc] encapsulation-mode transport
[Spoke1-ipsec-transform-set-abc] esp encryption-algorithm des-cbc
[Spoke1-ipsec-transform-set-abc] esp authentication-algorithm sha1
[Spoke1-ipsec-transform-set-abc] quit
[Spoke1] ipsec profile abc isakmp
[Spoke1-ipsec-profile-isakmp-abc] transform-set abc
[Spoke1-ipsec-profile-isakmp-abc] ike-profile abc
[Spoke1-ipsec-profile-isakmp-abc] quit
4. Configure OSPFv3.
[Spoke1] ospfv3 1
[Spoke1-ospfv3-1] router-id 0.0.0.3
[Spoke1-ospfv3-1] area 0
[Spoke1-ospfv3-1-area-0.0.0.0] quit
[Spoke1-ospfv3-1] quit
5. Configure GRE-mode IPv6 ADVPN tunnel interface tunnel1. Configure its DR priority as 0 so Spoke 1 will not participate in DR/BDR election.
[Spoke1] interface tunnel1 mode advpn gre ipv6
[Spoke1-Tunnel1] ipv6 address 192:168::3 64
[Spoke1-Tunnel1] ipv6 address fe80::3 link-local
[Spoke1-Tunnel1] vam ipv6 client Spoke1
[Spoke1-Tunnel1] ospfv3 1 area 0
[Spoke1-Tunnel1] ospfv3 network-type broadcast
[Spoke1-Tunnel1] ospfv3 dr-priority 0
[Spoke1-Tunnel1] source gigabitethernet 1/0
[Spoke1-Tunnel1] tunnel protection ipsec profile abc
[Spoke1-Tunnel1] quit
Configuring Spoke 2
1. Configure IP addresses for the interfaces. (Details not shown.)
2. Configure the VAM client:
# Create VAM client Spoke2.
<Spoke2> system-view
[Spoke2] vam client name Spoke2
# Specify ADVPN domain abc for the VAM client.
[Spoke2-vam-client-Spoke2] advpn-domain abc
# Set the preshared key to 123456.
[Spoke2-vam-client-Spoke2] pre-shared-key simple 123456
# Set both the username and password to spoke2.
[Spoke2-vam-client-Spoke2] user spoke2 password simple spoke2
# Specify the primary and secondary VAM servers.
[Spoke2-vam-client-Spoke2] server primary ipv6-address 1::11
[Spoke2-vam-client-Spoke2] server secondary ipv6-address 1::12
# Enable the VAM client.
[Spoke2-vam-client-Spoke2] client enable
[Spoke2-vam-client-Spoke2] quit
3. Configure an IPsec profile:
# Configure IKE.
[Spoke2] ike keychain abc
[Spoke2-ike-keychain-abc] pre-shared-key address ipv6 :: 0 key simple 123456
[Spoke2-ike-keychain-abc] quit
[Spoke2] ike profile abc
[Spoke2-ike-profile-abc] keychain abc
[Spoke2-ike-profile-abc] quit
# Configure the IPsec profile.
[Spoke2] ipsec transform-set abc
[Spoke2-ipsec-transform-set-abc] encapsulation-mode transport
[Spoke2-ipsec-transform-set-abc] esp encryption-algorithm des-cbc
[Spoke2-ipsec-transform-set-abc] esp authentication-algorithm sha1
[Spoke2-ipsec-transform-set-abc] quit
[Spoke2] ipsec profile abc isakmp
[Spoke2-ipsec-profile-isakmp-abc] transform-set abc
[Spoke2-ipsec-profile-isakmp-abc] ike-profile abc
[Spoke2-ipsec-profile-isakmp-abc] quit
4. Configure OSPFv3.
[Spoke2] ospfv3 1
[Spoke2-ospfv3-1] router-id 0.0.0.4
[Spoke2-ospfv3-1] area 0
[Spoke2-ospfv3-1-area-0.0.0.0] quit
[Spoke2-ospfv3-1] quit
5. Configure GRE-mode IPv6 ADVPN tunnel interface tunnel1. Configure its DR priority as 0 so Spoke 2 will not participate in DR/BDR election.
[Spoke2] interface tunnel1 mode advpn gre ipv6
[Spoke2-Tunnel1] ipv6 address 192:168::4 64
[Spoke2-Tunnel1] ipv6 address fe80::4 link-local
[Spoke2-Tunnel1] vam ipv6 client Spoke2
[Spoke2-Tunnel1] ospfv3 1 area 0
[Spoke2-Tunnel1] ospfv3 network-type broadcast
[Spoke2-Tunnel1] ospfv3 dr-priority 0
[Spoke2-Tunnel1] source gigabitethernet 1/0
[Spoke2-Tunnel1] tunnel protection ipsec profile abc
[Spoke2-Tunnel1] quit
Verifying the configuration
# Display IPv6 address mapping information for all VAM clients registered with the primary VAM server.
[PrimaryServer] display vam server ipv6 address-map
ADVPN domain name: abc
Total private address mappings: 4
Group Private address Public address Type NAT Holding time
0 192:168::1 1::1 Hub No 0H 52M 7S
0 192:168::2 1::2 Hub No 0H 47M 31S
0 192:168::3 1::3 Spoke No 0H 28M 25S
0 192:168::4 1::4 Spoke No 0H 19M 15S
# Display IPv6 address mapping information for all VAM clients registered with the secondary VAM server.
[SecondaryServer] display vam server ipv6 address-map
ADVPN domain name: abc
Total private address mappings: 4
Group Private address Public address Type NAT Holding time
0 192:168::1 1::1 Hub No 0H 52M 7S
0 192:168::2 1::2 Hub No 0H 47M 31S
0 192:168::3 1::3 Spoke No 0H 28M 25S
0 192:168::4 1::4 Spoke No 0H 19M 15S
The output shows that Hub 1, Hub 2, Spoke 1, Spoke 2, and Spoke 3 all have registered their address mapping information with the VAM servers.
# Display IPv6 ADVPN tunnel information on Hubs. This example uses Hub 1.
[Hub1] display advpn ipv6 session
Interface : Tunnel1
Number of sessions: 3
Private address Public address Port Type State Holding time
192:168::2 1::2 -- H-H Success 0H 46M 8S
192:168::3 1::3 -- H-S Success 0H 27M 27S
192:168::4 1::4 -- H-S Success 0H 18M 18S
The output shows that Hub 1 has established a permanent tunnel to Hub 2, Spoke 1, and Spoke 2.
# Display IPv6 ADVPN tunnel information on Spoke 1.
[Spoke1] display advpn ipv6 session
Interface : Tunnel1
Number of sessions: 2
Private address Public address Port Type State Holding time
192:168::1 1::1 -- S-H Success 0H 46M 8S
192:168::2 1::2 -- S-H Success 0H 46M 8S
The output shows that Spoke 1 has established a permanent hub-spoke tunnel to Hub 1 and Hub 2.
# Verify that Spoke 1 can ping the private address 192:168::4 of Spoke 2.
[Spoke1] ping ipv6 192:168::4
Ping6(56 data bytes) 192:168::4 --> 192:168::4, press CTRL_C to break
56 bytes from 192:168::4, icmp_seq=0 hlim=64 time=3.000 ms
56 bytes from 192:168::4, icmp_seq=1 hlim=64 time=0.000 ms
56 bytes from 192:168::4, icmp_seq=2 hlim=64 time=1.000 ms
56 bytes from 192:168::4, icmp_seq=3 hlim=64 time=1.000 ms
56 bytes from 192:168::4, icmp_seq=4 hlim=64 time=1.000 ms
--- Ping6 statistics for 192:168::4 ---
5 packets transmitted, 5 packets received, 0.0% packet loss
round-trip min/avg/max/std-dev = 0.000/1.200/3.000/0.980 ms
# Display IPv6 ADVPN tunnel information on Spokes. This example uses Spoke 1.
[Spoke1] display advpn ipv6 session
Interface : Tunnel1
Number of sessions: 3
Private address Public address Port Type State Holding time
192:168::1 1::1 -- S-H Success 0H 46M 8S
192:168::2 1::2 -- S-H Success 0H 46M 8S
192.168::4 1::4 -- S-S Success 0H 0M 1S
The output shows the following information:
· Spoke 1 has established a permanent hub-spoke tunnel to Hub 1 and Hub 2.
· Spoke 1 has established a temporary spoke-spoke tunnel to Spoke 2.
Example: Configuring IPv4 hub-spoke ADVPN
Network configuration
As shown in Figure 9, the primary and secondary VAM servers manage and maintain VAM client information for all hubs and spokes. The AAA server performs authentication and accounting for VAM clients. The two hubs back up each other, and perform data forwarding and route exchange.
Establish a permanent ADVPN tunnel between each spoke and each hub.

Table 3 Interface and IP address assignment
|
Device |
Interface |
IP address |
Device |
Interface |
IP address |
|
Hub 1 |
GE1/0 |
1.0.0.1/24 |
Spoke 1 |
GE1/0 |
1.0.0.3/24 |
|
|
Tunnel1 |
192.168.0.1/24 |
|
GE2/0 |
192.168.1.1/24 |
|
Hub 2 |
GE1/0 |
1.0.0.2/24 |
|
Tunnel1 |
192.168.0.3/24 |
|
|
Tunnel1 |
192.168.0.2/24 |
Spoke 2 |
GE1/0 |
1.0.0.4/24 |
|
AAA server |
|
1.0.0.10/24 |
|
GE2/0 |
192.168.2.1/24 |
|
Primary server |
GE1/0 |
1.0.0.11/24 |
|
Tunnel1 |
192.168.0.4/24 |
|
Secondary server |
GE1/0 |
1.0.0.12/24 |
|
|
|
Configuring the primary VAM server
1. Configure IP addresses for the interfaces. (Details not shown.)
2. Configure AAA:
# Configure RADIUS scheme abc.
<PrimaryServer> system-view
[PrimaryServer] radius scheme abc
[PrimaryServer-radius-abc] primary authentication 1.0.0.10 1812
[PrimaryServer-radius-abc] primary accounting 1.0.0.10 1813
[PrimaryServer-radius-abc] key authentication simple 123
[PrimaryServer-radius-abc] key accounting simple 123
[PrimaryServer-radius-abc] user-name-format without-domain
[PrimaryServer-radius-abc] quit
[PrimaryServer] radius session-control enable
# Configure AAA methods for ISP domain abc.
[PrimaryServer] domain abc
[PrimaryServer-isp-abc] authentication advpn radius-scheme abc
[PrimaryServer-isp-abc] accounting advpn radius-scheme abc
[PrimaryServer-isp-abc] quit
[PrimaryServer] domain default enable abc
3. Configure the VAM server:
# Create ADVPN domain abc.
[PrimaryServer] vam server advpn-domain abc id 1
# Create hub group 0.
[PrimaryServer-vam-server-domain-abc] hub-group 0
# Specify hub private IPv4 addresses.
[PrimaryServer-vam-server-domain-abc-hub-group-0] hub private-address 192.168.0.1
[PrimaryServer-vam-server-domain-abc-hub-group-0] hub private-address 192.168.0.2
# Specify a spoke private IPv4 network.
[PrimaryServer-vam-server-domain-abc-hub-group-0] spoke private-address network 192.168.0.0 255.255.255.0
[PrimaryServer-vam-server-domain-abc-hub-group-0] quit
# Set the preshared key to 123456.
[PrimaryServer-vam-server-domain-abc] pre-shared-key simple 123456
# Set the authentication mode to CHAP.
[PrimaryServer-vam-server-domain-abc] authentication-method chap
# Enable the VAM server for the ADVPN domain.
[PrimaryServer-vam-server-domain-abc] server enable
[PrimaryServer-vam-server-domain-abc] quit
Configuring the secondary VAM server
# Configure the secondary VAM server in the same way that the primary server is configured. (Details not shown.)
Configuring Hub 1
1. Configure IP addresses for the interfaces. (Details not shown.)
2. Configure the VAM client:
# Create VAM client Hub1.
<Hub1> system-view
[Hub1] vam client name Hub1
# Specify ADVPN domain abc for the VAM client.
[Hub1-vam-client-Hub1] advpn-domain abc
# Set the preshared key to 123456.
[Hub1-vam-client-Hub1] pre-shared-key simple 123456
# Set both the username and password to hub1.
[Hub1-vam-client-Hub1] user hub1 password simple hub1
# Specify the primary and secondary VAM servers.
[Hub1-vam-client-Hub1] server primary ip-address 1.0.0.11
[Hub1-vam-client-Hub1] server secondary ip-address 1.0.0.12
# Enable the VAM client.
[Hub1-vam-client-Hub1] client enable
[Hub1-vam-client-Hub1] quit
3. Configure an IPsec profile:
# Configure IKE.
[Hub1] ike keychain abc
[Hub1-ike-keychain-abc] pre-shared-key address 0.0.0.0 0.0.0.0 key simple 123456
[Hub1-ike-keychain-abc] quit
[Hub1] ike profile abc
[Hub1-ike-profile-abc] keychain abc
[Hub1-ike-profile-abc] quit
# Configure the IPsec profile.
[Hub1] ipsec transform-set abc
[Hub1-ipsec-transform-set-abc] encapsulation-mode transport
[Hub1-ipsec-transform-set-abc] esp encryption-algorithm des-cbc
[Hub1-ipsec-transform-set-abc] esp authentication-algorithm sha1
[Hub1-ipsec-transform-set-abc] quit
[Hub1] ipsec profile abc isakmp
[Hub1-ipsec-profile-isakmp-abc] transform-set abc
[Hub1-ipsec-profile-isakmp-abc] ike-profile abc
[Hub1-ipsec-profile-isakmp-abc] quit
4. Configure OSPF to advertise the private network.
[Hub1] ospf 1
[Hub1-ospf-1] area 0
[Hub1-ospf-1-area-0.0.0.0] network 192.168.0.0 0.0.0.255
[Hub1-ospf-1-area-0.0.0.0] quit
[Hub1-ospf-1] quit
5. Configure GRE-mode IPv4 ADVPN tunnel interface tunnel1.
[Hub1] interface tunnel1 mode advpn gre
[Hub1-Tunnel1] ip address 192.168.0.1 255.255.255.0
[Hub1-Tunnel1] vam client Hub1
[Hub1-Tunnel1] ospf network-type p2mp
[Hub1-Tunnel1] source gigabitethernet 1/0
[Hub1-Tunnel1] tunnel protection ipsec profile abc
[Hub1-Tunnel1] quit
Configuring Hub 2
1. Configure IP addresses for the interfaces. (Details not shown.)
2. Configure the VAM client:
# Create VAM client Hub2.
<Hub2> system-view
[Hub2] vam client name Hub2
# Specify ADVPN domain abc for the VAM client.
[Hub2-vam-client-Hub2] advpn-domain abc
# Set the preshared key to 123456.
[Hub2-vam-client-Hub2] pre-shared-key simple 123456
# Set both the username and password to hub2.
[Hub2-vam-client-Hub2] user hub2 password simple hub2
# Specify the primary and secondary VAM servers.
[Hub2-vam-client-Hub2] server primary ip-address 1.0.0.11
[Hub2-vam-client-Hub2] server secondary ip-address 1.0.0.12
# Enable the VAM client.
[Hub2-vam-client-Hub2] client enable
[Hub2-vam-client-Hub2] quit
3. Configure an IPsec profile:
# Configure IKE.
[Hub2] ike keychain abc
[Hub2-ike-keychain-abc] pre-shared-key address 0.0.0.0 0.0.0.0 key simple 123456
[Hub2-ike-keychain-abc] quit
[Hub2] ike profile abc
[Hub2-ike-profile-abc] keychain abc
[Hub2-ike-profile-abc] quit
# Configure the IPsec profile.
[Hub2] ipsec transform-set abc
[Hub2-ipsec-transform-set-abc] encapsulation-mode transport
[Hub2-ipsec-transform-set-abc] esp encryption-algorithm des-cbc
[Hub2-ipsec-transform-set-abc] esp authentication-algorithm sha1
[Hub2-ipsec-transform-set-abc] quit
[Hub2] ipsec profile abc isakmp
[Hub2-ipsec-profile-isakmp-abc] transform-set abc
[Hub2-ipsec-profile-isakmp-abc] ike-profile abc
[Hub2-ipsec-profile-isakmp-abc] quit
4. Configure OSPF to advertise the private network.
[Hub2] ospf 1
[Hub2-ospf-1] area 0
[Hub2-ospf-1-area-0.0.0.0] network 192.168.0.0 0.0.0.255
[Hub2-ospf-1-area-0.0.0.0] quit
[Hub2-ospf-1] quit
5. Configure GRE-mode IPv4 ADVPN tunnel interface tunnel1.
[Hub2] interface tunnel1 mode advpn gre
[Hub2-Tunnel1] ip address 192.168.0.2 255.255.255.0
[Hub2-Tunnel1] vam client Hub2
[Hub2-Tunnel1] ospf network-type p2mp
[Hub2-Tunnel1] source gigabitethernet 1/0
[Hub2-Tunnel1] tunnel protection ipsec profile abc
[Hub2-Tunnel1] quit
Configuring Spoke 1
1. Configure IP addresses for the interfaces. (Details not shown.)
2. Configure the VAM client:
# Create VAM client Spoke1.
<Spoke1> system-view
[Spoke1] vam client name Spoke1
# Specify ADVPN domain abc for the VAM client.
[Spoke1-vam-client-Spoke1] advpn-domain abc
# Set the preshared key to 123456.
[Spoke1-vam-client-Spoke1] pre-shared-key simple 123456
# Set both the username and password to spoke1.
[Spoke1-vam-client-Spoke1] user spoke1 password simple spoke1
# Specify the primary and secondary VAM servers.
[Spoke1-vam-client-Spoke1] server primary ip-address 1.0.0.11
[Spoke1-vam-client-Spoke1] server secondary ip-address 1.0.0.12
# Enable the VAM client.
[Spoke1-vam-client-Spoke1] client enable
[Spoke1-vam-client-Spoke1] quit
3. Configure an IPsec profile:
# Configure IKE.
[Spoke1] ike keychain abc
[Spoke1-ike-keychain-abc] pre-shared-key address 0.0.0.0 0.0.0.0 key simple 123456
[Spoke1-ike-keychain-abc] quit
[Spoke1] ike profile abc
[Spoke1-ike-profile-abc] keychain abc
[Spoke1-ike-profile-abc] quit
# Configure the IPsec profile.
[Spoke1] ipsec transform-set abc
[Spoke1-ipsec-transform-set-abc] encapsulation-mode transport
[Spoke1-ipsec-transform-set-abc] esp encryption-algorithm des-cbc
[Spoke1-ipsec-transform-set-abc] esp authentication-algorithm sha1
[Spoke1-ipsec-transform-set-abc] quit
[Spoke1] ipsec profile abc isakmp
[Spoke1-ipsec-profile-isakmp-abc] transform-set abc
[Spoke1-ipsec-profile-isakmp-abc] ike-profile abc
[Spoke1-ipsec-profile-isakmp-abc] quit
4. Configure OSPF to advertise private networks.
[Spoke1] ospf 1
[Spoke1-ospf-1] area 0
[Spoke1-ospf-1-area-0.0.0.0] network 192.168.0.0 0.0.0.255
[Spoke1-ospf-1-area-0.0.0.0] network 192.168.1.0 0.0.0.255
[Spoke1-ospf-1-area-0.0.0.0] quit
[Spoke1-ospf-1] quit
5. Configure GRE-mode IPv4 ADVPN tunnel interface tunnel1.
[Spoke1] interface tunnel1 mode advpn gre
[Spoke1-Tunnel1] ip address 192.168.0.3 255.255.255.0
[Spoke1-Tunnel1] vam client Spoke1
[Spoke1-Tunnel1] ospf network-type p2mp
[Spoke1-Tunnel1] source gigabitethernet 1/0
[Spoke1-Tunnel1] tunnel protection ipsec profile abc
[Spoke1-Tunnel1] quit
Configuring Spoke 2
1. Configure IP addresses for the interfaces. (Details not shown.)
2. Configure the VAM client:
# Create VAM client Spoke2.
<Spoke2> system-view
[Spoke2] vam client name Spoke2
# Specify ADVPN domain abc for the VAM client.
[Spoke2-vam-client-Spoke2] advpn-domain abc
# Set the preshared key to 123456.
[Spoke2-vam-client-Spoke2] pre-shared-key simple 123456
# Set both the username and password to spoke2.
[Spoke2-vam-client-Spoke2] user spoke2 password simple spoke2
# Specify the primary and secondary VAM servers.
[Spoke2-vam-client-Spoke2] server primary ip-address 1.0.0.11
[Spoke2-vam-client-Spoke2] server secondary ip-address 1.0.0.12
# Enable the VAM client.
[Spoke2-vam-client-Spoke2] client enable
[Spoke2-vam-client-Spoke2] quit
3. Configure an IPsec profile:
# Configure IKE.
[Spoke2] ike keychain abc
[Spoke2-ike-keychain-abc] pre-shared-key address 0.0.0.0 0.0.0.0 key simple 123456
[Spoke2-ike-keychain-abc] quit
[Spoke2] ike profile abc
[Spoke2-ike-profile-abc] keychain abc
[Spoke2-ike-profile-abc] quit
# Configure the IPsec profile.
[Spoke2] ipsec transform-set abc
[Spoke2-ipsec-transform-set-abc] encapsulation-mode transport
[Spoke2-ipsec-transform-set-abc] esp encryption-algorithm des-cbc
[Spoke2-ipsec-transform-set-abc] esp authentication-algorithm sha1
[Spoke2-ipsec-transform-set-abc] quit
[Spoke2] ipsec profile abc isakmp
[Spoke2-ipsec-profile-isakmp-abc] transform-set abc
[Spoke2-ipsec-profile-isakmp-abc] ike-profile abc
[Spoke2-ipsec-profile-isakmp-abc] quit
4. Configure OSPF to advertise private networks.
[Spoke2] ospf 1
[Spoke2-ospf-1] area 0
[Spoke2-ospf-1-area-0.0.0.0] network 192.168.0.0 0.0.0.255
[Spoke2-ospf-1-area-0.0.0.0] network 192.168.2.0 0.0.0.255
[Spoke2-ospf-1-area-0.0.0.0] quit
[Spoke2-ospf-1] quit
5. Configure GRE-mode IPv4 ADVPN tunnel interface tunnel1.
[Spoke2] interface tunnel1 mode advpn gre
[Spoke2-Tunnel1] ip address 192.168.0.4 255.255.255.0
[Spoke2-Tunnel1] vam client Spoke2
[Spoke2-Tunnel1] ospf network-type p2mp
[Spoke2-Tunnel1] source gigabitethernet 1/0
[Spoke2-Tunnel1] tunnel protection ipsec profile abc
[Spoke2-Tunnel1] quit
Verifying the configuration
# Display IPv4 address mapping information for all VAM clients registered with the primary VAM server.
[PrimaryServer] display vam server address-map
ADVPN domain name: abc
Total private address mappings: 4
Group Private address Public address Type NAT Holding time
0 192.168.0.1 1.0.0.1 Hub No 0H 52M 7S
0 192.168.0.2 1.0.0.2 Hub No 0H 47M 31S
0 192.168.0.3 1.0.0.3 Spoke No 0H 28M 25S
0 192.168.0.4 1.0.0.4 Spoke No 0H 19M 15S
# Display IPv4 address mapping information for all VAM clients registered with the secondary VAM server.
[SecondaryServer] display vam server address-map
ADVPN domain name: abc
Total private address mappings: 4
Group Private address Public address Type NAT Holding time
0 192.168.0.1 1.0.0.1 Hub No 0H 52M 7S
0 192.168.0.2 1.0.0.2 Hub No 0H 47M 31S
0 192.168.0.3 1.0.0.3 Spoke No 0H 28M 25S
0 192.168.0.4 1.0.0.4 Spoke No 0H 19M 15S
The output shows that Hub 1, Hub 2, Spoke 1, Spoke 2, and Spoke 3 all have registered their address mapping information with the VAM servers.
# Display IPv4 ADVPN tunnel information on Hubs. This example uses Hub 1.
[Hub1] display advpn session
Interface : Tunnel1
Number of sessions: 3
Private address Public address Port Type State Holding time
192.168.0.2 1.0.0.2 -- H-H Success 0H 46M 8S
192.168.0.3 1.0.0.3 -- H-S Success 0H 27M 27S
192.168.0.4 1.0.0.4 -- H-S Success 0H 18M 18S
The output shows that Hub 1 has established a permanent tunnel to Hub 2, Spoke 1, and Spoke 2.
# Display IPv4 ADVPN tunnel information on Spokes. This example uses Spoke 1.
[Spoke1] display advpn session
Interface : Tunnel1
Number of sessions: 2
Private address Public address Port Type State Holding time
192.168.0.1 1.0.0.1 -- S-H Success 0H 46M 8S
192.168.0.2 1.0.0.2 -- S-H Success 0H 46M 8S
The output shows that Spoke 1 has established a permanent hub-spoke tunnel to Hub 1 and Hub 2.
# Verify that Spoke 1 can ping the private address 192.168.0.4 of Spoke 2.
[Spoke1] ping 192.168.0.4
Ping 192.168.0.4 (192.168.0.4): 56 data bytes, press CTRL_C to break
56 bytes from 192.168.0.4: icmp_seq=0 ttl=255 time=4.000 ms
56 bytes from 192.168.0.4: icmp_seq=1 ttl=255 time=0.000 ms
56 bytes from 192.168.0.4: icmp_seq=2 ttl=255 time=0.000 ms
56 bytes from 192.168.0.4: icmp_seq=3 ttl=255 time=0.000 ms
56 bytes from 192.168.0.4: icmp_seq=4 ttl=255 time=1.000 ms
--- Ping statistics for 192.168.0.4 ---
5 packets transmitted, 5 packets received, 0.0% packet loss
round-trip min/avg/max/std-dev = 0.000/1.000/4.000/1.549 ms
Example: Configuring IPv6 hub-spoke ADVPN
Network configuration
As shown in Figure 10, the primary and secondary VAM servers manage and maintain VAM client information for all hubs and spokes. The AAA server performs authentication and accounting for VAM clients. The two hubs back up each other, and perform data forwarding and route exchange.
Establish a permanent ADVPN tunnel between each spoke and each hub.
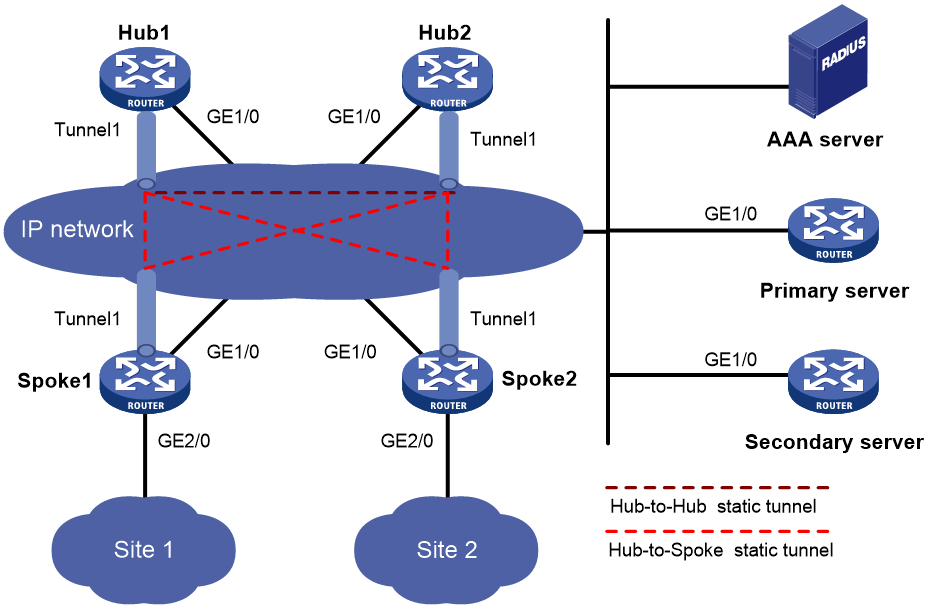
Table 4 Interface and IP address assignment
|
Device |
Interface |
IP address |
Device |
Interface |
IP address |
|
Hub 1 |
GE1/0 |
1::1/64 |
Spoke 1 |
GE1/0 |
1::3/64 |
|
|
Tunnel1 |
192:168::1/64 |
|
GE2/0 |
192:168:1::1/64 |
|
Hub 2 |
GE1/0 |
1::2/64 |
|
Tunnel1 |
192:168::3/64 |
|
|
Tunnel1 |
192:168::2/64 |
Spoke 2 |
GE1/0 |
1::4/64 |
|
AAA server |
|
1::10/64 |
|
GE2/0 |
192:168:2::1/64 |
|
Primary server |
GE1/0 |
1::11/64 |
|
Tunnel1 |
192:168::4/64 |
|
Secondary server |
GE1/0 |
1::12/64 |
|
|
|
Configuring the primary VAM server
1. Configure IP addresses for the interfaces. (Details not shown.)
2. Configure AAA:
# Configure RADIUS scheme abc.
<PrimaryServer> system-view
[PrimaryServer] radius scheme abc
[PrimaryServer-radius-abc] primary authentication ipv6 1::10 1812
[PrimaryServer-radius-abc] primary accounting ipv6 1::10 1813
[PrimaryServer-radius-abc] key authentication simple 123
[PrimaryServer-radius-abc] key accounting simple 123
[PrimaryServer-radius-abc] user-name-format without-domain
[PrimaryServer-radius-abc] quit
[PrimaryServer] radius session-control enable
# Configure AAA methods for ISP domain abc.
[PrimaryServer] domain abc
[PrimaryServer-isp-abc] authentication advpn radius-scheme abc
[PrimaryServer-isp-abc] accounting advpn radius-scheme abc
[PrimaryServer-isp-abc] quit
[PrimaryServer] domain default enable abc
3. Configure the VAM server:
# Create ADVPN domain abc.
[PrimaryServer] vam server advpn-domain abc id 1
# Create hub group 0.
[PrimaryServer-vam-server-domain-abc] hub-group 0
# Specify hub private IPv6 addresses.
[PrimaryServer-vam-server-domain-abc-hub-group-0] hub ipv6 private-address 192:168::1
[PrimaryServer-vam-server-domain-abc-hub-group-0] hub ipv6 private-address 192:168::2
# Specify a spoke private IPv6 network.
[PrimaryServer-vam-server-domain-abc-hub-group-0] spoke ipv6 private-address network 192:168::0 64
[PrimaryServer-vam-server-domain-abc-hub-group-0] quit
# Set the preshared key to 123456.
[PrimaryServer-vam-server-domain-abc] pre-shared-key simple 123456
# Set the authentication mode to CHAP.
[PrimaryServer-vam-server-domain-abc] authentication-method chap
# Enable the VAM server for the ADVPN domain.
[PrimaryServer-vam-server-domain-abc] server enable
[PrimaryServer-vam-server-domain-abc] quit
Configuring the secondary VAM server
# Configure the secondary VAM server in the same way that the primary server is configured. (Details not shown.)
Configuring Hub 1
1. Configure IP addresses for the interfaces. (Details not shown.)
2. Configure the VAM client:
# Create VAM client Hub1.
<Hub1> system-view
[Hub1] vam client name Hub1
# Specify ADVPN domain abc for the VAM client.
[Hub1-vam-client-Hub1] advpn-domain abc
# Set the preshared key to 123456.
[Hub1-vam-client-Hub1] pre-shared-key simple 123456
# Set the username and password to hub1.
[Hub1-vam-client-Hub1] user hub1 password simple hub1
# Specify the primary and secondary VAM servers.
[Hub1-vam-client-Hub1] server primary ipv6-address 1::11
[Hub1-vam-client-Hub1] server secondary ipv6-address 1::12
# Enable the VAM client.
[Hub1-vam-client-Hub1] client enable
[Hub1-vam-client-Hub1] quit
3. Configure an IPsec profile:
# Configure IKE.
[Hub1] ike keychain abc
[Hub1-ike-keychain-abc] pre-shared-key address ipv6 :: 0 key simple 123456
[Hub1-ike-keychain-abc] quit
[Hub1] ike profile abc
[Hub1-ike-profile-abc] keychain abc
[Hub1-ike-profile-abc] quit
# Configure the IPsec profile.
[Hub1] ipsec transform-set abc
[Hub1-ipsec-transform-set-abc] encapsulation-mode transport
[Hub1-ipsec-transform-set-abc] esp encryption-algorithm des-cbc
[Hub1-ipsec-transform-set-abc] esp authentication-algorithm sha1
[Hub1-ipsec-transform-set-abc] quit
[Hub1] ipsec profile abc isakmp
[Hub1-ipsec-profile-isakmp-abc] transform-set abc
[Hub1-ipsec-profile-isakmp-abc] ike-profile abc
[Hub1-ipsec-profile-isakmp-abc] quit
4. Configure OSPFv3.
[Hub1] ospfv3 1
[Hub1-ospfv3-1] router-id 0.0.0.1
[Hub1-ospfv3-1] area 0
[Hub1-ospfv3-1-area-0.0.0.0] quit
[Hub1-ospfv3-1] quit
5. Configure GRE-mode IPv6 ADVPN tunnel interface tunnel1.
[Hub1] interface tunnel1 mode advpn gre ipv6
[Hub1-Tunnel1] ipv6 address 192:168::1 64
[Hub1-Tunnel1] ipv6 address fe80::1 link-local
[Hub1-Tunnel1] vam ipv6 client Hub1
[Hub1-Tunnel1] ospfv3 1 area 0
[Hub1-Tunnel1] ospfv3 network-type p2mp
[Hub1-Tunnel1] source gigabitethernet 1/0
[Hub1-Tunnel1] tunnel protection ipsec profile abc
[Hub1-Tunnel1] quit
Configuring Hub 2
1. Configure IP addresses for the interfaces. (Details not shown.)
2. Configure the VAM client:
# Create VAM client Hub2.
<Hub2> system-view
[Hub2] vam client name Hub2
# Specify ADVPN domain abc for the VAM client.
[Hub2-vam-client-Hub2] advpn-domain abc
# Set the preshared key to 123456.
[Hub2-vam-client-Hub2] pre-shared-key simple 123456
# Set both the username and password to hub2.
[Hub2-vam-client-Hub2] user hub2 password simple hub2
# Specify the primary and secondary VAM servers.
[Hub2-vam-client-Hub2] server primary ipv6-address 1::11
[Hub2-vam-client-Hub2] server secondary ipv6-address 1::12
# Enable the VAM client.
[Hub2-vam-client-Hub2] client enable
[Hub2-vam-client-Hub2] quit
3. Configure an IPsec profile:
# Configure IKE.
[Hub2] ike keychain abc
[Hub2-ike-keychain-abc] pre-shared-key address ipv6 :: 0 key simple 123456
[Hub2-ike-keychain-abc] quit
[Hub2] ike profile abc
[Hub2-ike-profile-abc] keychain abc
[Hub2-ike-profile-abc] quit
# Configure the IPsec profile.
[Hub2] ipsec transform-set abc
[Hub2-ipsec-transform-set-abc] encapsulation-mode transport
[Hub2-ipsec-transform-set-abc] esp encryption-algorithm des-cbc
[Hub2-ipsec-transform-set-abc] esp authentication-algorithm sha1
[Hub2-ipsec-transform-set-abc] quit
[Hub2] ipsec profile abc isakmp
[Hub2-ipsec-profile-isakmp-abc] transform-set abc
[Hub2-ipsec-profile-isakmp-abc] ike-profile abc
[Hub2-ipsec-profile-isakmp-abc] quit
4. Configure OSPFv3.
[Hub2] ospfv3 1
[Hub2-ospfv3-1] router-id 0.0.0.2
[Hub2-ospfv3-1] area 0
[Hub2-ospfv3-1-area-0.0.0.0] quit
[Hub2-ospfv3-1] quit
5. Configure GRE-mode IPv6 ADVPN tunnel interface tunnel1.
[Hub2] interface tunnel1 mode advpn gre ipv6
[Hub2-Tunnel1] ipv6 address 192:168::2 64
[Hub2-Tunnel1] ipv6 address fe80::2 link-local
[Hub2-Tunnel1] vam ipv6 client Hub2
[Hub2-Tunnel1] ospfv3 1 area 0
[Hub2-Tunnel1] ospfv3 network-type p2mp
[Hub2-Tunnel1] source gigabitethernet 1/0
[Hub2-Tunnel1] tunnel protection ipsec profile abc
[Hub2-Tunnel1] quit
Configuring Spoke 1
1. Configure IP addresses for the interfaces. (Details not shown.)
2. Configure the VAM client:
# Create VAM client Spoke1.
<Spoke1> system-view
[Spoke1] vam client name Spoke1
# Specify ADVPN domain abc for the VAM client.
[Spoke1-vam-client-Spoke1] advpn-domain abc
# Set the preshared key to 123456.
[Spoke1-vam-client-Spoke1] pre-shared-key simple 123456
# Set both the username and password to spoke1.
[Spoke1-vam-client-Spoke1] user spoke1 password simple spoke1
# Specify the primary and secondary VAM servers.
[Spoke1-vam-client-Spoke1] server primary ipv6-address 1::11
[Spoke1-vam-client-Spoke1] server secondary ipv6-address 1::12
# Enable the VAM client.
[Spoke1-vam-client-Spoke1] client enable
[Spoke1-vam-client-Spoke1] quit
3. Configure an IPsec profile:
# Configure IKE.
[Spoke1] ike keychain abc
[Spoke1-ike-keychain-abc] pre-shared-key address ipv6 :: 0 key simple 123456
[Spoke1-ike-keychain-abc] quit
[Spoke1] ike profile abc
[Spoke1-ike-profile-abc] keychain abc
[Spoke1-ike-profile-abc] quit
# Configure the IPsec profile.
[Spoke1] ipsec transform-set abc
[Spoke1-ipsec-transform-set-abc] encapsulation-mode transport
[Spoke1-ipsec-transform-set-abc] esp encryption-algorithm des-cbc
[Spoke1-ipsec-transform-set-abc] esp authentication-algorithm sha1
[Spoke1-ipsec-transform-set-abc] quit
[Spoke1] ipsec profile abc isakmp
[Spoke1-ipsec-profile-isakmp-abc] transform-set abc
[Spoke1-ipsec-profile-isakmp-abc] ike-profile abc
[Spoke1-ipsec-profile-isakmp-abc] quit
4. Configure OSPFv3.
[Spoke1] ospfv3 1
[Spoke1-ospfv3-1] router-id 0.0.0.3
[Spoke1-ospfv3-1] area 0
[Spoke1-ospfv3-1-area-0.0.0.0] quit
[Spoke1-ospfv3-1] quit
5. Configure GRE-mode IPv6 ADVPN tunnel interface tunnel1.
[Spoke1] interface tunnel1 mode advpn gre ipv6
[Spoke1-Tunnel1] ipv6 address 192:168::3 64
[Spoke1-Tunnel1] ipv6 address fe80::3 link-local
[Spoke1-Tunnel1] vam ipv6 client Spoke1
[Spoke1-Tunnel1] ospfv3 1 area 0
[Spoke1-Tunnel1] ospfv3 network-type p2mp
[Spoke1-Tunnel1] source gigabitethernet 1/0
[Spoke1-Tunnel1] tunnel protection ipsec profile abc
[Spoke1-Tunnel1] quit
Configuring Spoke 2
1. Configure IP addresses for the interfaces. (Details not shown.)
2. Configure the VAM client:
# Create VAM client Spoke2.
<Spoke2> system-view
[Spoke2] vam client name Spoke2
# Specify ADVPN domain abc for the VAM client.
[Spoke2-vam-client-Spoke2] advpn-domain abc
# Set the preshared key to 123456.
[Spoke2-vam-client-Spoke2] pre-shared-key simple 123456
# Set both the username and password to spoke2.
[Spoke2-vam-client-Spoke2] user spoke2 password simple spoke2
# Specify the primary and secondary VAM servers.
[Spoke2-vam-client-Spoke2] server primary ipv6-address 1::11
[Spoke2-vam-client-Spoke2] server secondary ipv6-address 1::12
# Enable the VAM client.
[Spoke2-vam-client-Spoke2] client enable
[Spoke2-vam-client-Spoke2] quit
3. Configure an IPsec profile:
# Configure IKE.
[Spoke2] ike keychain abc
[Spoke2-ike-keychain-abc] pre-shared-key address ipv6 :: 0 key simple 123456
[Spoke2-ike-keychain-abc] quit
[Spoke2] ike profile abc
[Spoke2-ike-profile-abc] keychain abc
[Spoke2-ike-profile-abc] quit
# Configure the IPsec profile.
[Spoke2] ipsec transform-set abc
[Spoke2-ipsec-transform-set-abc] encapsulation-mode transport
[Spoke2-ipsec-transform-set-abc] esp encryption-algorithm des-cbc
[Spoke2-ipsec-transform-set-abc] esp authentication-algorithm sha1
[Spoke2-ipsec-transform-set-abc] quit
[Spoke2] ipsec profile abc isakmp
[Spoke2-ipsec-profile-isakmp-abc] transform-set abc
[Spoke2-ipsec-profile-isakmp-abc] ike-profile abc
[Spoke2-ipsec-profile-isakmp-abc] quit
4. Configure OSPFv3.
[Spoke2] ospfv3 1
[Spoke2-ospfv3-1] router-id 0.0.0.4
[Spoke2-ospfv3-1] area 0
[Spoke2-ospfv3-1-area-0.0.0.0] quit
[Spoke2-ospfv3-1] quit
5. Configure GRE-mode IPv6 ADVPN tunnel interface tunnel1.
[Spoke2] interface tunnel1 mode advpn gre ipv6
[Spoke2-Tunnel1] ipv6 address 192:168::4 64
[Spoke2-Tunnel1] ipv6 address fe80::4 link-local
[Spoke2-Tunnel1] vam ipv6 client Spoke2
[Spoke2-Tunnel1] ospfv3 1 area 0
[Spoke2-Tunnel1] ospfv3 network-type p2mp
[Spoke2-Tunnel1] source gigabitethernet 1/0
[Spoke2-Tunnel1] tunnel protection ipsec profile abc
[Spoke2-Tunnel1] quit
Verifying the configuration
# Display IPv6 address mapping information for all VAM clients registered with the primary VAM server.
[PrimaryServer] display vam server ipv6 address-map
ADVPN domain name: abc
Total private address mappings: 4
Group Private address Public address Type NAT Holding time
0 192:168::1 1::1 Hub No 0H 52M 7S
0 192:168::2 1::2 Hub No 0H 47M 31S
0 192:168::3 1::3 Spoke No 0H 28M 25S
0 192:168::4 1::4 Spoke No 0H 19M 15S
# Display IPv6 address mapping information for all VAM clients registered with the secondary VAM server.
[SecondaryServer] display vam server ipv6 address-map
ADVPN domain name: abc
Total private address mappings: 4
Group Private address Public address Type NAT Holding time
0 192:168::1 1::1 Hub No 0H 52M 7S
0 192:168::2 1::2 Hub No 0H 47M 31S
0 192:168::3 1::3 Spoke No 0H 28M 25S
0 192:168::4 1::4 Spoke No 0H 19M 15S
The output shows that Hub 1, Hub 2, Spoke 1, Spoke 2, and Spoke 3 all have registered their address mapping information with the VAM servers.
# Display IPv6 ADVPN tunnel information on Hubs. This example uses Hub 1.
[Hub1] display advpn ipv6 session
Interface : Tunnel1
Number of sessions: 3
Private address Public address Port Type State Holding time
192:168::2 1::2 -- H-H Success 0H 46M 8S
192:168::3 1::3 -- H-S Success 0H 27M 27S
192:168::4 1::4 -- H-S Success 0H 18M 18S
The output shows that Hub 1 has established a permanent tunnel to Hub 2, Spoke 1, and Spoke 2.
# Display IPv6 ADVPN tunnel information on Spokes. This example uses Spoke 1.
[Spoke1] display advpn ipv6 session
Interface : Tunnel1
Number of sessions: 2
Private address Public address Port Type State Holding time
192:168::1 1::1 -- S-H Success 0H 46M 8S
192:168::2 1::2 -- S-H Success 0H 46M 8S
The output shows that Spoke 1 has established a permanent hub-spoke tunnel to Hub 1 and Hub 2.
# Verify that Spoke 1 can ping the private address 192:168::4 of Spoke 2.
[Spoke1] ping ipv6 192:168::4
Ping6(56 data bytes) 192:168::4 --> 192:168::4, press CTRL_C to break
56 bytes from 192:168::4, icmp_seq=0 hlim=64 time=3.000 ms
56 bytes from 192:168::4, icmp_seq=1 hlim=64 time=0.000 ms
56 bytes from 192:168::4, icmp_seq=2 hlim=64 time=1.000 ms
56 bytes from 192:168::4, icmp_seq=3 hlim=64 time=1.000 ms
56 bytes from 192:168::4, icmp_seq=4 hlim=64 time=1.000 ms
--- Ping6 statistics for 192:168::4 ---
5 packets transmitted, 5 packets received, 0.0% packet loss
round-trip min/avg/max/std-dev = 0.000/1.200/3.000/0.980 ms
Example: Configuring IPv4 multi-hub-group ADVPN
Network configuration
As shown in Figure 11, the primary and secondary VAM servers manage and maintain VAM client information for all hubs and spokes. The AAA server performs authentication and accounting for VAM clients.
· Configure three hub groups to accommodate all ADVPN nodes:
¡ Hub group 0 contains Hub 1, Hub 2, and Hub 3.
¡ Hub group 1 contains Hub 1, Hub 2, Spoke 1, and Spoke 2. Hub 1 and Hub 2 back up each other.
¡ Hub group 2 contains Hub 3, Spoke 3, and Spoke 4. Hub groups 1 and 2 use full-mesh networking.
· Allow any two spokes to establish a direct spoke-spoke tunnel.

Table 5 Interface and IP address assignment
|
Device |
Interface |
IP address |
Device |
Interface |
IP address |
|
Hub 1 |
GE1/0 |
1.0.0.1/24 |
Spoke 1 |
GE1/0 |
1.0.0.4/24 |
|
|
Tunnel1 |
192.168.1.1/24 |
|
GE2/0 |
192.168.10.1/24 |
|
|
Tunnel2 |
192.168.0.1/24 |
|
Tunnel1 |
192.168.1.3/24 |
|
Hub 2 |
GE1/0 |
1.0.0.2/24 |
Spoke 2 |
GE1/0 |
1.0.0.5/24 |
|
|
Tunnel1 |
192.168.1.2/24 |
|
GE2/0 |
192.168.20.1/24 |
|
|
Tunnel2 |
192.168.0.2/24 |
|
GE3/0 |
192.168.30.1/24 |
|
Hub 3 |
GE1/0 |
1.0.0.3/24 |
|
Tunnel1 |
192.168.1.4/24 |
|
|
Tunnel1 |
192.168.2.1/24 |
Spoke 3 |
GE1/0 |
1.0.0.6/24 |
|
|
Tunnel2 |
192.168.0.3/24 |
|
GE2/0 |
192.168.40.1/24 |
|
AAA server |
|
1.0.0.10/24 |
|
Tunnel1 |
192.168.2.2/24 |
|
Primary server |
GE1/0 |
1.0.0.11/24 |
Spoke 4 |
GE1/0 |
1.0.0.7/24 |
|
Secondary server |
GE1/0 |
1.0.0.12/24 |
|
GE2/0 |
192.168.50.1/24 |
|
|
|
|
|
GE3/0 |
192.168.60.1/24 |
|
|
|
|
|
Tunnel1 |
192.168.2.3/24 |
Configuring the primary VAM server
1. Configure IP addresses for the interfaces. (Details not shown.)
2. Configure AAA:
# Configure RADIUS scheme abc.
<PrimaryServer> system-view
[PrimaryServer] radius scheme abc
[PrimaryServer-radius-abc] primary authentication 1.0.0.10 1812
[PrimaryServer-radius-abc] primary accounting 1.0.0.10 1813
[PrimaryServer-radius-abc] key authentication simple 123
[PrimaryServer-radius-abc] key accounting simple 123
[PrimaryServer-radius-abc] user-name-format without-domain
[PrimaryServer-radius-abc] quit
[PrimaryServer] radius session-control enable
# Configure AAA methods for ISP domain abc.
[PrimaryServer] domain abc
[PrimaryServer-isp-abc] authentication advpn radius-scheme abc
[PrimaryServer-isp-abc] accounting advpn radius-scheme abc
[PrimaryServer-isp-abc] quit
[PrimaryServer] domain default enable abc
3. Configure the VAM server:
# Create ADVPN domain abc.
[PrimaryServer] vam server advpn-domain abc id 1
# Create hub group 0.
[PrimaryServer-vam-server-domain-abc] hub-group 0
# Specify hub private IPv4 addresses.
[PrimaryServer-vam-server-domain-abc-hub-group-0] hub private-address 192.168.0.1
[PrimaryServer-vam-server-domain-abc-hub-group-0] hub private-address 192.168.0.2
[PrimaryServer-vam-server-domain-abc-hub-group-0] hub private-address 192.168.0.3
[PrimaryServer-vam-server-domain-abc-hub-group-0] quit
# Create hub group 1.
[PrimaryServer-vam-server-domain-abc] hub-group 1
# Specify hub private IPv4 addresses.
[PrimaryServer-vam-server-domain-abc-hub-group-1] hub private-address 192.168.1.1
[PrimaryServer-vam-server-domain-abc-hub-group-1] hub private-address 192.168.1.2
# Specify a spoke private IPv4 network.
[PrimaryServer-vam-server-domain-abc-hub-group-1] spoke private-address network 192.168.1.0 255.255.255.0
# Allow establishing direct spoke-spoke tunnels.
[PrimaryServer-vam-server-domain-abc-hub-group-1] shortcut interest all
[PrimaryServer-vam-server-domain-abc-hub-group-1] quit
# Create hub group 2.
[PrimaryServer-vam-server-domain-abc] hub-group 2
# Specify the hub private IPv4 address.
[PrimaryServer-vam-server-domain-abc-hub-group-2] hub private-address 192.168.2.1
# Specify a spoke private IPv4 network.
[PrimaryServer-vam-server-domain-abc-hub-group-2] spoke private-address network 192.168.2.0 255.255.255.0
# Allow establishing direct spoke-spoke tunnels.
[PrimaryServer-vam-server-domain-abc-hub-group-2] shortcut interest all
[PrimaryServer-vam-server-domain-abc-hub-group-2] quit
# Set the preshared key to 123456.
[PrimaryServer-vam-server-domain-abc] pre-shared-key simple 123456
# Set the authentication mode to CHAP.
[PrimaryServer-vam-server-domain-abc] authentication-method chap
# Enable the VAM server for the ADVPN domain.
[PrimaryServer-vam-server-domain-abc] server enable
[PrimaryServer-vam-server-domain-abc] quit
Configuring the secondary VAM server
# Configure the secondary VAM server in the same way that the primary server is configured. (Details not shown.)
Configuring Hub 1
1. Configure IP addresses for the interfaces. (Details not shown.)
2. Configure the VAM client:
# Create VAM client Hub1Group0.
<Hub1> system-view
[Hub1] vam client name Hub1Group0
# Specify ADVPN domain abc for the VAM client.
[Hub1-vam-client-Hub1Group0] advpn-domain abc
# Set the preshared key to 123456.
[Hub1-vam-client-Hub1Group0] pre-shared-key simple 123456
# Set both the username and password to hub1.
[Hub1-vam-client-Hub1Group0] user hub1 password simple hub1
# Specify the primary and secondary VAM servers.
[Hub1-vam-client-Hub1Group0] server primary ip-address 1.0.0.11
[Hub1-vam-client-Hub1Group0] server secondary ip-address 1.0.0.12
# Enable the VAM client.
[Hub1-vam-client-Hub1Group0] client enable
[Hub1-vam-client-Hub1Group0] quit
# Create VAM client Hub1Group1.
[Hub1] vam client name Hub1Group1
# Specify ADVPN domain abc for the VAM client.
[Hub1-vam-client-Hub1Group1] advpn-domain abc
# Set the preshared key to 123456.
[Hub1-vam-client-Hub1Group1] pre-shared-key simple 123456
# Set the username and password to hub1.
[Hub1-vam-client-Hub1Group1] user hub1 password simple hub1
# Specify the primary and secondary VAM servers.
[Hub1-vam-client-Hub1Group1] server primary ip-address 1.0.0.11
[Hub1-vam-client-Hub1Group1] server secondary ip-address 1.0.0.12
# Enable the VAM client.
[Hub1-vam-client-Hub1Group1] client enable
[Hub1-vam-client-Hub1Group1] quit
3. Configure an IPsec profile:
# Configure IKE.
[Hub1] ike keychain abc
[Hub1-ike-keychain-abc] pre-shared-key address 0.0.0.0 0.0.0.0 key simple 123456
[Hub1-ike-keychain-abc] quit
[Hub1] ike profile abc
[Hub1-ike-profile-abc] keychain abc
[Hub1-ike-profile-abc] quit
# Configure the IPsec profile.
[Hub1] ipsec transform-set abc
[Hub1-ipsec-transform-set-abc] encapsulation-mode transport
[Hub1-ipsec-transform-set-abc] esp encryption-algorithm des-cbc
[Hub1-ipsec-transform-set-abc] esp authentication-algorithm sha1
[Hub1-ipsec-transform-set-abc] quit
[Hub1] ipsec profile abc isakmp
[Hub1-ipsec-profile-isakmp-abc] transform-set abc
[Hub1-ipsec-profile-isakmp-abc] ike-profile abc
[Hub1-ipsec-profile-isakmp-abc] quit
4. Configure OSPF to advertise private networks.
[Hub1] ospf 1
[Hub1-ospf-1] area 0
[Hub1-ospf-1-area-0.0.0.0] network 192.168.0.0 0.0.0.255
[Hub1-ospf-1-area-0.0.0.0] quit
[Hub1-ospf-1] area 1
[Hub1-ospf-1-area-0.0.0.1] network 192.168.1.0 0.0.0.255
[Hub1-ospf-1-area-0.0.0.1] quit
[Hub1-ospf-1] quit
5. Configure ADVPN tunnels:
# Configure UDP-mode IPv4 ADVPN tunnel interface tunnel1.
[Hub1] interface tunnel1 mode advpn udp
[Hub1-Tunnel1] ip address 192.168.1.1 255.255.255.0
[Hub1-Tunnel1] vam client Hub1Group1
[Hub1-Tunnel1] ospf network-type broadcast
[Hub1-Tunnel1] source gigabitethernet 1/0
[Hub1-Tunnel1] tunnel protection ipsec profile abc
[Hub1-Tunnel1] quit
# Configure UDP-mode IPv4 ADVPN tunnel interface tunnel2.
[Hub1] interface tunnel2 mode advpn udp
[Hub1-Tunnel2] ip address 192.168.0.1 255.255.255.0
[Hub1-Tunnel2] vam client Hub1Group0
[Hub1-Tunnel2] ospf network-type broadcast
[Hub1-Tunnel2] source gigabitethernet 1/0
[Hub1-Tunnel2] tunnel protection ipsec profile abc
[Hub1-Tunnel2] quit
Configuring Hub 2
1. Configure IP addresses for the interfaces. (Details not shown.)
2. Configure the VAM client:
# Create VAM client Hub2Group0.
<Hub2> system-view
[Hub2] vam client name Hub2Group0
# Specify ADVPN domain abc for the VAM client.
[Hub2-vam-client-Hub2Group0] advpn-domain abc
# Set the preshared key to 123456.
[Hub2-vam-client-Hub2Group0] pre-shared-key simple 123456
# Set both the username and password to hub2.
[Hub2-vam-client-Hub2Group0] user hub2 password simple hub2
# Specify the primary and secondary VAM servers.
[Hub2-vam-client-Hub2Group0] server primary ip-address 1.0.0.11
[Hub2-vam-client-Hub2Group0] server secondary ip-address 1.0.0.12
# Enable the VAM client.
[Hub2-vam-client-Hub2Group0] client enable
[Hub2-vam-client-Hub2Group0] quit
# Create VAM client Hub2Group1.
[Hub2] vam client name Hub2Group1
# Specify ADVPN domain abc for the VAM client.
[Hub2-vam-client-Hub2Group1] advpn-domain abc
# Set the preshared key to 123456.
[Hub2-vam-client-Hub2Group1] pre-shared-key simple 123456
# Set both the username and password to hub2.
[Hub2-vam-client-Hub2Group1] user Hub2 password simple Hub2
# Specify the primary and secondary VAM servers.
[Hub2-vam-client-Hub2Group1] server primary ip-address 1.0.0.11
[Hub2-vam-client-Hub2Group1] server secondary ip-address 1.0.0.12
# Enable the VAM client.
[Hub2-vam-client-Hub2Group1] client enable
[Hub2-vam-client-Hub2Group1] quit
3. Configure an IPsec profile:
# Configure IKE.
[Hub2] ike keychain abc
[Hub2-ike-keychain-abc] pre-shared-key address 0.0.0.0 0.0.0.0 key simple 123456
[Hub2-ike-keychain-abc] quit
[Hub2] ike profile abc
[Hub2-ike-profile-abc] keychain abc
[Hub2-ike-profile-abc] quit
# Configure the IPsec profile.
[Hub2] ipsec transform-set abc
[Hub2-ipsec-transform-set-abc] encapsulation-mode transport
[Hub2-ipsec-transform-set-abc] esp encryption-algorithm des-cbc
[Hub2-ipsec-transform-set-abc] esp authentication-algorithm sha1
[Hub2-ipsec-transform-set-abc] quit
[Hub2] ipsec profile abc isakmp
[Hub2-ipsec-profile-isakmp-abc] transform-set abc
[Hub2-ipsec-profile-isakmp-abc] ike-profile abc
[Hub2-ipsec-profile-isakmp-abc] quit
4. Configure OSPF to advertise private networks.
[Hub2] ospf 1
[Hub2-ospf-1] area 0
[Hub2-ospf-1-area-0.0.0.0] network 192.168.0.0 0.0.0.255
[Hub2-ospf-1-area-0.0.0.0] quit
[Hub2-ospf-1] area 1
[Hub2-ospf-1-area-0.0.0.1] network 192.168.1.0 0.0.0.255
[Hub2-ospf-1-area-0.0.0.1] quit
[Hub2-ospf-1] quit
5. Configure ADVPN tunnels:
# Configure UDP-mode IPv4 ADVPN tunnel interface tunnel1.
[Hub2] interface tunnel 1 mode advpn gre
[Hub2-Tunnel1] ip address 192.168.0.2 255.255.255.0
[Hub2-Tunnel1] vam client Hub2
[Hub2-Tunnel1] ospf network-type broadcast
[Hub2-Tunnel1] source gigabitethernet 1/0
[Hub2-Tunnel1] tunnel protection ipsec profile abc
[Hub2-Tunnel1] quit
# Configure UDP-mode IPv4 ADVPN tunnel interface tunnel2.
[Hub2] interface tunnel2 mode advpn udp
[Hub2-Tunnel2] ip address 192.168.0.2 255.255.255.0
[Hub2-Tunnel2] vam client Hub2Group0
[Hub2-Tunnel2] ospf network-type broadcast
[Hub2-Tunnel2] source gigabitethernet 1/0
[Hub2-Tunnel2] tunnel protection ipsec profile abc
[Hub2-Tunnel2] quit
Configuring Hub 3
1. Configure IP addresses for the interfaces. (Details not shown.)
2. Configure the VAM client:
# Create VAM client Hub3Group0.
<Hub3> system-view
[Hub3] vam client name Hub3Group0
# Specify ADVPN domain abc for the VAM client.
[Hub3-vam-client-Hub3Group0] advpn-domain abc
# Set the preshared key to 123456.
[Hub3-vam-client-Hub3Group0] pre-shared-key simple 123456
# Set both the username and password to hub3.
[Hub3-vam-client-Hub3Group0] user hub3 password simple hub3
# Specify the primary and secondary VAM servers.
[Hub2-vam-client-Hub2Group0] server primary ip-address 1.0.0.11
[Hub2-vam-client-Hub2Group0] server secondary ip-address 1.0.0.12
# Enable the VAM client.
[Hub2-vam-client-Hub2Group0] client enable
[Hub2-vam-client-Hub2Group0] quit
# Create VAM client Hub3Group1.
[Hub3] vam client name Hub3Group1
# Specify ADVPN domain abc for the VAM client.
[Hub3-vam-client-Hub3Group1] advpn-domain abc
# Set the preshared key to 123456.
[Hub3-vam-client-Hub3Group1] pre-shared-key simple 123456
# Set both the username and password to hub3.
[Hub3-vam-client-Hub3Group1] user hub3 password simple hub3
# Specify the primary and secondary VAM servers.
[Hub3-vam-client-Hub3Group1] server primary ip-address 1.0.0.11
[Hub3-vam-client-Hub3Group1] server secondary ip-address 1.0.0.12
# Enable the VAM client.
[Hub2-vam-client-Hub2Group1] client enable
[Hub2-vam-client-Hub2Group1] quit
3. Configure an IPsec profile:
# Configure IKE.
[Hub3] ike keychain abc
[Hub3-ike-keychain-abc] pre-shared-key address 0.0.0.0 0.0.0.0 key simple 123456
[Hub3-ike-keychain-abc] quit
[Hub3] ike profile abc
[Hub3-ike-profile-abc] keychain abc
[Hub3-ike-profile-abc] quit
# Configure the IPsec profile.
[Hub3] ipsec transform-set abc
[Hub3-ipsec-transform-set-abc] encapsulation-mode transport
[Hub3-ipsec-transform-set-abc] esp encryption-algorithm des-cbc
[Hub3-ipsec-transform-set-abc] esp authentication-algorithm sha1
[Hub3-ipsec-transform-set-abc] quit
[Hub3] ipsec profile abc isakmp
[Hub3-ipsec-profile-isakmp-abc] transform-set abc
[Hub3-ipsec-profile-isakmp-abc] ike-profile abc
[Hub3-ipsec-profile-isakmp-abc] quit
4. Configure OSPF to advertise private networks.
[Hub3] ospf 1
[Hub3-ospf-1] area 0
[Hub3-ospf-1-area-0.0.0.0] network 192.168.0.0 0.0.0.255
[Hub3-ospf-1-area-0.0.0.0] quit
[Hub3-ospf-1] area 2
[Hub3-ospf-1-area-0.0.0.2] network 192.168.2.0 0.0.0.255
[Hub3-ospf-1-area-0.0.0.2] quit
[Hub3-ospf-1] quit
5. Configure ADVPN tunnels:
# Configure UDP-mode IPv4 ADVPN tunnel interface tunnel1.
[Hub3] interface tunnel1 mode advpn udp
[Hub3-Tunnel1] ip address 192.168.2.1 255.255.255.0
[Hub3-Tunnel1] vam client Hub3Group1
[Hub3-Tunnel1] ospf network-type broadcast
[Hub3-Tunnel1] source gigabitethernet 1/0
[Hub3-Tunnel1] tunnel protection ipsec profile abc
[Hub3-Tunnel1] quit
# Configure UDP-mode IPv4 ADVPN tunnel interface tunnel2.
[Hub3] interface tunnel2 mode advpn udp
[Hub3-Tunnel2] ip address 192.168.0.3 255.255.255.0
[Hub3-Tunnel2] vam client Hub3Group0
[Hub3-Tunnel2] ospf network-type broadcast
[Hub3-Tunnel2] source gigabitethernet 1/0
[Hub3-Tunnel2] tunnel protection ipsec profile abc
[Hub3-Tunnel2] quit
Configuring Spoke 1
1. Configure IP addresses for the interfaces. (Details not shown.)
2. Configure the VAM client:
# Create VAM client Spoke1.
<Spoke1> system-view
[Spoke1] vam client name Spoke1
# Specify ADVPN domain abc for the VAM client.
[Spoke1-vam-client-Spoke1] advpn-domain abc
# Set the preshared key to 123456.
[Spoke1-vam-client-Spoke1] pre-shared-key simple 123456
# Set both the username and password to spoke1.
[Spoke1-vam-client-Spoke1] user spoke1 password simple spoke1
# Specify the primary and secondary VAM servers.
[Spoke1-vam-client-Spoke1] server primary ip-address 1.0.0.11
[Spoke1-vam-client-Spoke1] server secondary ip-address 1.0.0.12
# Enable the VAM client.
[Spoke1-vam-client-Spoke1] client enable
[Spoke1-vam-client-Spoke1] quit
3. Configure an IPsec profile:
# Configure IKE.
[Spoke1] ike keychain abc
[Spoke1-ike-keychain-abc] pre-shared-key address 0.0.0.0 0.0.0.0 key simple 123456
[Spoke1-ike-keychain-abc] quit
[Spoke1] ike profile abc
[Spoke1-ike-profile-abc] keychain abc
[Spoke1-ike-profile-abc] quit
# Configure the IPsec profile.
[Spoke1] ipsec transform-set abc
[Spoke1-ipsec-transform-set-abc] encapsulation-mode transport
[Spoke1-ipsec-transform-set-abc] esp encryption-algorithm des-cbc
[Spoke1-ipsec-transform-set-abc] esp authentication-algorithm sha1
[Spoke1-ipsec-transform-set-abc] quit
[Spoke1] ipsec profile abc isakmp
[Spoke1-ipsec-profile-isakmp-abc] transform-set abc
[Spoke1-ipsec-profile-isakmp-abc] ike-profile abc
[Spoke1-ipsec-profile-isakmp-abc] quit
4. Configure OSPF to advertise private networks.
[Spoke1] ospf 1
[Spoke1-ospf-1] area 1
[Spoke1-ospf-1-area-0.0.0.1] network 192.168.1.0 0.0.0.255
[Spoke1-ospf-1-area-0.0.0.1] network 192.168.10.0 0.0.0.255
[Spoke1-ospf-1-area-0.0.0.1] quit
[Spoke1-ospf-1] quit
5. Configure UDP-mode IPv4 ADVPN tunnel interface tunnel1. Configure its DR priority as 0 so Spoke 1 will not participate in DR/BDR election.
[Spoke1] interface tunnel1 mode advpn udp
[Spoke1-Tunnel1] ip address 192.168.1.3 255.255.255.0
[Spoke1-Tunnel1] vam client Spoke1
[Spoke1-Tunnel1] ospf network-type broadcast
[Spoke1-Tunnel1] ospf dr-priority 0
[Spoke1-Tunnel1] advpn network 192.168.10.0 255.255.255.0
[Spoke1-Tunnel1] source gigabitethernet 1/0
[Spoke1-Tunnel1] tunnel protection ipsec profile abc
[Spoke1-Tunnel1] quit
Configuring Spoke 2
1. Configure IP addresses for the interfaces. (Details not shown.)
2. Configure the VAM client:
# Create VAM client Spoke2.
<Spoke2> system-view
[Spoke2] vam client name Spoke2
# Specify ADVPN domain abc for the VAM client.
[Spoke2-vam-client-Spoke2] advpn-domain abc
# Set the preshared key to 123456.
[Spoke2-vam-client-Spoke2] pre-shared-key simple 123456
# Set both the username and password to spoke2.
[Spoke2-vam-client-Spoke2] user spoke2 password simple spoke2
# Specify the primary and secondary VAM servers.
[Spoke2-vam-client-Spoke2] server primary ip-address 1.0.0.11
[Spoke2-vam-client-Spoke2] server secondary ip-address 1.0.0.12
# Enable the VAM client.
[Spoke2-vam-client-Spoke2] client enable
[Spoke2-vam-client-Spoke2] quit
3. Configure an IPsec profile:
# Configure IKE.
[Spoke2] ike keychain abc
[Spoke2-ike-keychain-abc] pre-shared-key address 0.0.0.0 0.0.0.0 key simple 123456
[Spoke2-ike-keychain-abc] quit
[Spoke2] ike profile abc
[Spoke2-ike-profile-abc] keychain abc
[Spoke2-ike-profile-abc] quit
# Configure the IPsec profile.
[Spoke2] ipsec transform-set abc
[Spoke2-ipsec-transform-set-abc] encapsulation-mode transport
[Spoke2-ipsec-transform-set-abc] esp encryption-algorithm des-cbc
[Spoke2-ipsec-transform-set-abc] esp authentication-algorithm sha1
[Spoke2-ipsec-transform-set-abc] quit
[Spoke2] ipsec profile abc isakmp
[Spoke2-ipsec-profile-isakmp-abc] transform-set abc
[Spoke2-ipsec-profile-isakmp-abc] ike-profile abc
[Spoke2-ipsec-profile-isakmp-abc] quit
4. Configure OSPF to advertise private networks.
[Spoke2] ospf 1
[Spoke2-ospf-1] area 1
[Spoke2-ospf-1-area-0.0.0.1] network 192.168.1.0 0.0.0.255
[Spoke2-ospf-1-area-0.0.0.1] network 192.168.20.0 0.0.0.255
[Spoke2-ospf-1-area-0.0.0.1] network 192.168.30.0 0.0.0.255
[Spoke2-ospf-1-area-0.0.0.1] quit
[Spoke2-ospf-1] quit
5. Configure UDP-mode IPv4 ADVPN tunnel interface tunnel1. Configure its DR priority as 0 so Spoke 2 will not participate in DR/BDR election.
[Spoke2] interface tunnel1 mode advpn udp
[Spoke2-Tunnel1] ip address 192.168.1.4 255.255.255.0
[Spoke2-Tunnel1] vam client Spoke2
[Spoke2-Tunnel1] ospf network-type broadcast
[Spoke2-Tunnel1] ospf dr-priority 0
[Spoke2-Tunnel1] advpn network 192.168.20.0 255.255.255.0
[Spoke2-Tunnel1] advpn network 192.168.30.0 255.255.255.0
[Spoke2-Tunnel1] source gigabitethernet 1/0
[Spoke2-Tunnel1] tunnel protection ipsec profile abc
[Spoke2-Tunnel1] quit
Configuring Spoke 3
1. Configure IP addresses for the interfaces. (Details not shown.)
2. Configure the VAM client:
# Create VAM client Spoke3.
<Spoke3> system-view
[Spoke3] vam client name Spoke3
# Specify ADVPN domain abc for the VAM client.
[Spoke3-vam-client-Spoke3] advpn-domain abc
# Set the preshared key to 123456.
[Spoke3-vam-client-Spoke3] pre-shared-key simple 123456
# Set both the username and password to spoke3.
[Spoke3-vam-client-Spoke3] user spoke3 password simple spoke3
# Specify the primary and secondary VAM servers.
[Spoke3-vam-client-Spoke3] server primary ip-address 1.0.0.11
[Spoke3-vam-client-Spoke3] server secondary ip-address 1.0.0.12
# Enable the VAM client.
[Spoke3-vam-client-Spoke3] client enable
[Spoke3-vam-client-Spoke3] quit
3. Configure an IPsec profile:
# Configure IKE.
[Spoke3] ike keychain abc
[Spoke3-ike-keychain-abc] pre-shared-key address 0.0.0.0 0.0.0.0 key simple 123456
[Spoke3-ike-keychain-abc] quit
[Spoke3] ike profile abc
[Spoke3-ike-profile-abc] keychain abc
[Spoke3-ike-profile-abc] quit
# Configure the IPsec profile.
[Spoke3] ipsec transform-set abc
[Spoke3-ipsec-transform-set-abc] encapsulation-mode transport
[Spoke3-ipsec-transform-set-abc] esp encryption-algorithm des-cbc
[Spoke3-ipsec-transform-set-abc] esp authentication-algorithm sha1
[Spoke3-ipsec-transform-set-abc] quit
[Spoke3] ipsec profile abc isakmp
[Spoke3-ipsec-profile-isakmp-abc] transform-set abc
[Spoke3-ipsec-profile-isakmp-abc] ike-profile abc
[Spoke3-ipsec-profile-isakmp-abc] quit
4. Configure OSPF to advertise private networks.
[Spoke3] ospf 1
[Spoke3-ospf-1] area 2
[Spoke3-ospf-1-area-0.0.0.2] network 192.168.2.0 0.0.0.255
[Spoke3-ospf-1-area-0.0.0.2] network 192.168.40.0 0.0.0.255
[Spoke3-ospf-1-area-0.0.0.2] quit
[Spoke3-ospf-1] quit
5. Configure UDP-mode IPv4 ADVPN tunnel interface tunnel1. Configure its DR priority as 0 so Spoke 3 will not participate in DR/BDR election.
[Spoke3] interface tunnel 1 mode advpn udp
[Spoke3-Tunnel1] ip address 192.168.2.2 255.255.255.0
[Spoke3-Tunnel1] vam client Spoke3
[Spoke3-Tunnel1] ospf network-type broadcast
[Spoke3-Tunnel1] ospf dr-priority 0
[Spoke3-Tunnel1] advpn network 192.168.40.0 255.255.255.0
[Spoke3-Tunnel1] source gigabitethernet 1/0
[Spoke3-Tunnel1] tunnel protection ipsec profile abc
[Spoke3-Tunnel1] quit
Configuring Spoke 4
1. Configure IP addresses for the interfaces. (Details not shown.)
2. Configure the VAM client:
# Create VAM client Spoke4.
<Spoke4> system-view
[Spoke4] vam client name Spoke4
# Specify ADVPN domain abc for the VAM client.
[Spoke4-vam-client-Spoke4] advpn-domain abc
# Set the preshared key to 123456.
[Spoke4-vam-client-Spoke4] pre-shared-key simple 123456
# Set both the username and password to spoke4.
[Spoke4-vam-client-Spoke4] user spoke4 password simple spoke4
# Specify the primary and secondary VAM servers.
[Spoke4-vam-client-Spoke4] server primary ip-address 1.0.0.11
[Spoke4-vam-client-Spoke4] server secondary ip-address 1.0.0.12
# Enable the VAM client.
[Spoke4-vam-client-Spoke4] client enable
[Spoke4-vam-client-Spoke4] quit
3. Configure an IPsec profile:
# Configure IKE.
[Spoke4] ike keychain abc
[Spoke4-ike-keychain-abc] pre-shared-key address 0.0.0.0 0.0.0.0 key simple 123456
[Spoke4-ike-keychain-abc] quit
[Spoke4] ike profile abc
[Spoke4-ike-profile-abc] keychain abc
[Spoke4-ike-profile-abc] quit
# Configure the IPsec profile.
[Spoke4] ipsec transform-set abc
[Spoke4-ipsec-transform-set-abc] encapsulation-mode transport
[Spoke4-ipsec-transform-set-abc] esp encryption-algorithm des-cbc
[Spoke4-ipsec-transform-set-abc] esp authentication-algorithm sha1
[Spoke4-ipsec-transform-set-abc] quit
[Spoke4] ipsec profile abc isakmp
[Spoke4-ipsec-profile-isakmp-abc] transform-set abc
[Spoke4-ipsec-profile-isakmp-abc] ike-profile abc
[Spoke4-ipsec-profile-isakmp-abc] quit
4. Configure OSPF to advertise private networks.
[Spoke4] ospf 1
[Spoke4-ospf-1] area 2
[Spoke4-ospf-1-area-0.0.0.2] network 192.168.2.0 0.0.0.255
[Spoke4-ospf-1-area-0.0.0.2] network 192.168.50.0 0.0.0.255
[Spoke4-ospf-1-area-0.0.0.2] network 192.168.60.0 0.0.0.255
[Spoke4-ospf-1-area-0.0.0.2] quit
[Spoke4-ospf-1] quit
5. Configure UDP-mode IPv4 ADVPN tunnel interface tunnel1. Configure its DR priority as 0 so Spoke 4 will not participate in DR/BDR election.
[Spoke4] interface tunnel1 mode advpn udp
[Spoke4-Tunnel1] ip address 192.168.2.3 255.255.255.0
[Spoke4-Tunnel1] vam client Spoke4
[Spoke4-Tunnel1] ospf network-type broadcast
[Spoke4-Tunnel1] ospf dr-priority 0
[Spoke4-Tunnel1] advpn network 192.168.50.0 255.255.255.0
[Spoke4-Tunnel1] advpn network 192.168.60.0 255.255.255.0
[Spoke4-Tunnel1] source gigabitethernet 1/0
[Spoke4-Tunnel1] tunnel protection ipsec profile abc
[Spoke4-Tunnel1] quit
Verifying the configuration
# Display IPv4 address mapping information for all VAM clients registered with the primary VAM server.
[PrimaryServer] display vam server address-map
ADVPN domain name: abc
Total private address mappings: 10
Group Private address Public address Type NAT Holding time
0 192.168.0.1 1.0.0.1 Hub No 0H 52M 7S
0 192.168.0.2 1.0.0.2 Hub No 0H 47M 31S
0 192.168.0.3 1.0.0.3 Hub No 0H 28M 25S
1 192.168.1.1 1.0.0.1 Hub No 0H 52M 7S
1 192.168.1.2 1.0.0.2 Hub No 0H 47M 31S
1 192.168.1.3 1.0.0.4 Spoke No 0H 18M 26S
1 192.168.1.4 1.0.0.5 Spoke No 0H 28M 25S
2 192.168.2.1 1.0.0.3 Hub No 0H 28M 25S
2 192.168.2.2 1.0.0.6 Spoke No 0H 25M 40S
2 192.168.2.3 1.0.0.7 Spoke No 0H 25M 31S
# Display IPv4 address mapping information for all VAM clients registered with the secondary VAM server.
[SecondaryServer] display vam server address-map
ADVPN domain name: abc
Total private address mappings: 10
Group Private address Public address Type NAT Holding time
0 192.168.0.1 1.0.0.1 Hub No 0H 52M 7S
0 192.168.0.2 1.0.0.2 Hub No 0H 47M 31S
0 192.168.0.3 1.0.0.3 Hub No 0H 28M 25S
1 192.168.1.1 1.0.0.1 Hub No 0H 52M 7S
1 192.168.1.2 1.0.0.2 Hub No 0H 47M 31S
1 192.168.1.3 1.0.0.4 Spoke No 0H 18M 26S
1 192.168.1.4 1.0.0.5 Spoke No 0H 28M 25S
2 192.168.2.1 1.0.0.3 Hub No 0H 28M 25S
2 192.168.2.2 1.0.0.6 Spoke No 0H 25M 40S
2 192.168.2.3 1.0.0.7 Spoke No 0H 25M 31S
The output shows that Hub 1, Hub 2, Hub3, Spoke 1, Spoke 2, Spoke 3, and Spoke4 all have registered their address mapping information with the VAM servers.
# Display IPv4 ADVPN tunnel information on Hubs. This example uses Hub 1.
[Hub1] display advpn session
Interface : Tunnel1
Number of sessions: 3
Private address Public address Port Type State Holding time
192.168.1.2 1.0.0.2 18001 H-H Success 0H 46M 8S
192.168.1.3 1.0.0.3 18001 H-S Success 0H 27M 27S
192.168.1.4 1.0.0.4 18001 H-S Success 0H 18M 18S
Interface : Tunnel2
Number of sessions: 2
Private address Public address Port Type State Holding time
192.168.0.2 1.0.0.2 18001 H-H Success 0H 46M 8S
192.168.0.3 1.0.0.3 18001 H-H Success 0H 27M 27S
The output shows that Hub 1 has established a permanent tunnel to Hub 2, Hub3, Spoke 1, and Spoke 2.
# Display IPv4 ADVPN tunnel information on Spoke 1 and Spoke 2. This example uses Spoke 1.
[Spoke1] display advpn session
Interface : Tunnel1
Number of sessions: 2
Private address Public address Port Type State Holding time
192.168.1.1 1.0.0.1 18001 S-H Success 0H 46M 8S
192.168.1.2 1.0.0.2 18001 S-H Success 0H 46M 8S
The output shows that Spoke 1 has established a permanent hub-spoke tunnel to Hub 1 and Hub 2.
# Display IPv4 ADVPN tunnel information on Spoke 3 and Spoke 4. This example uses Spoke 3.
[Spoke3] display advpn session
Interface : Tunnel1
Number of sessions: 1
Private address Public address Port Type State Holding time
192.168.2.1 1.0.0.3 18001 S-H Success 0H 46M 8S
The output shows that Spoke 3 has established a permanent hub-spoke tunnel to Hub 3.
Example: Configuring IPv6 multi-hub-group ADVPN
Network configuration
As shown in Figure 12, the primary and secondary VAM servers manage and maintain VAM client information for all hubs and spokes. The AAA server performs authentication and accounting for VAM clients.
· Configure three hub groups to accommodate all ADVPN nodes:
¡ Hub group 0 contains Hub1, Hub2, and Hub3.
¡ Hub group 1 contains Hub1, Hub2, Spoke1, and Spoke2. Hub 1 and Hub 2 back up each other.
¡ Hub group 2 contains Hub3, Spoke3, and Spoke4. Hub groups 1 and 2 use full-mesh networking.
· Allow any two spokes to establish a direct spoke-spoke tunnel.
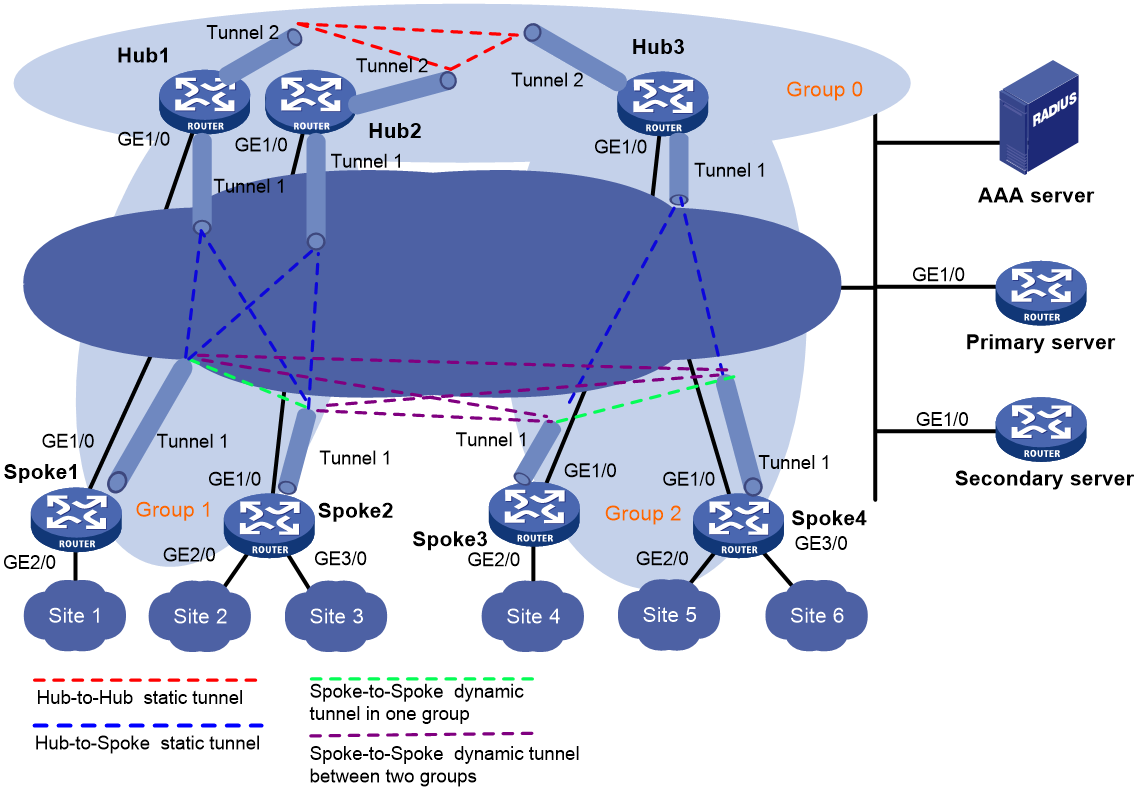
Table 6 Interface and IP address assignment
|
Device |
Interface |
IP address |
Device |
Interface |
IP address |
|
Hub 1 |
GE1/0 |
1::1/64 |
Spoke 1 |
GE1/0 |
1::4/64 |
|
|
Tunnel1 |
192:168:1::1/64 |
|
GE2/0 |
192:168:10::1/64 |
|
|
Tunnel2 |
192:168::1/64 |
|
Tunnel1 |
192:168:1::3/64 |
|
Hub 2 |
GE1/0 |
1::2/64 |
Spoke 2 |
GE1/0 |
1::5/64 |
|
|
Tunnel1 |
192:168:1::2/64 |
|
GE2/0 |
192:168:20::1/64 |
|
|
Tunnel2 |
192:168::2/64 |
|
GE3/0 |
192:168:30::1/64 |
|
Hub 3 |
GE1/0 |
1::3/64 |
|
Tunnel1 |
192:168:1::4/64 |
|
|
Tunnel1 |
192:168:2::1/64 |
Spoke 3 |
GE1/0 |
1::6/64 |
|
|
Tunnel2 |
192:168::3/64 |
|
GE2/0 |
192:168:40::1/64 |
|
AAA server |
|
1::10/64 |
|
Tunnel1 |
192:168:2::2/64 |
|
Primary server |
GE1/0 |
1::11/64 |
Spoke 4 |
GE1/0 |
1::7/64 |
|
Secondary server |
GE1/0 |
1::12/64 |
|
GE2/0 |
192:168:50::1/64 |
|
|
|
|
|
GE3/0 |
192:168:60::1/64 |
|
|
|
|
|
Tunnel1 |
192:168:2::3/64 |
Configuring the primary VAM server
1. Configure IP addresses for the interfaces. (Details not shown.)
2. Configure AAA:
# Configure RADIUS scheme abc.
<PrimaryServer> system-view
[PrimaryServer] radius scheme abc
[PrimaryServer-radius-abc] primary authentication ipv6 1::10 1812
[PrimaryServer-radius-abc] primary accounting ipv6 1::10 1813
[PrimaryServer-radius-abc] key authentication simple 123
[PrimaryServer-radius-abc] key accounting simple 123
[PrimaryServer-radius-abc] user-name-format without-domain
[PrimaryServer-radius-abc] quit
[PrimaryServer] radius session-control enable
# Configure AAA methods for ISP domain abc.
[PrimaryServer] domain abc
[PrimaryServer-isp-abc] authentication advpn radius-scheme abc
[PrimaryServer-isp-abc] accounting advpn radius-scheme abc
[PrimaryServer-isp-abc] quit
[PrimaryServer] domain default enable abc
3. Configure the VAM server:
# Create ADVPN domain abc.
[PrimaryServer] vam server advpn-domain abc id 1
# Create hub group 0.
[PrimaryServer-vam-server-domain-abc] hub-group 0
# Specify hub private IPv6 addresses.
[PrimaryServer-vam-server-domain-abc-hub-group-0] hub ipv6 private-address 192:168::1
[PrimaryServer-vam-server-domain-abc-hub-group-0] hub ipv6 private-address 192:168::2
[PrimaryServer-vam-server-domain-abc-hub-group-0] hub ipv6 private-address 192:168::3
[PrimaryServer-vam-server-domain-abc-hub-group-0] quit
# Create hub group 1.
[PrimaryServer-vam-server-domain-abc] hub-group 1
# Specify hub private IPv6 addresses.
[PrimaryServer-vam-server-domain-abc-hub-group-1] hub ipv6 private-address 192:168:1::1
[PrimaryServer-vam-server-domain-abc-hub-group-1] hub ipv6 private-address 192:168:1::2
# Specify a spoke private IPv6 network.
[PrimaryServer-vam-server-domain-abc-hub-group-1] spoke ipv6 private-address network 192:168:1::0 64
# Allow establishing spoke-spoke tunnels.
[PrimaryServer-vam-server-domain-abc-hub-group-1] shortcut ipv6 interest all
[PrimaryServer-vam-server-domain-abc-hub-group-1] quit
# Create hub group 2.
[PrimaryServer-vam-server-domain-abc] hub-group 2
# Specify the hub private IPv6 address.
[PrimaryServer-vam-server-domain-abc-hub-group-2] hub ipv6 private-address 192:168:2::1
# Specify a spoke private IPv6 network.
[PrimaryServer-vam-server-domain-abc-hub-group-2] spoke ipv6 private-address network 192:168:2::0 64
[PrimaryServer-vam-server-domain-abc-hub-group-2] quit
# Set the preshared key to 123456.
[PrimaryServer-vam-server-domain-abc] pre-shared-key simple 123456
# Set the authentication mode to CHAP.
[PrimaryServer-vam-server-domain-abc] authentication-method chap
# Enable the VAM server for the ADVPN domain.
[PrimaryServer-vam-server-domain-abc] server enable
[PrimaryServer-vam-server-domain-abc] quit
Configuring the secondary VAM server
# Configure the secondary VAM server in the same way that the primary server is configured. (Details not shown.)
Configuring Hub 1
1. Configure IP addresses for the interfaces. (Details not shown.)
2. Configure the VAM client:
# Create VAM client Hub1Group0.
<Hub1> system-view
[Hub1] vam client name Hub1Group0
# Specify ADVPN domain abc for the VAM client.
[Hub1-vam-client-Hub1Group0] advpn-domain abc
# Set the preshared key to 123456.
[Hub1-vam-client-Hub1Group0] pre-shared-key simple 123456
# Set both the username and password to hub1.
[Hub1-vam-client-Hub1Group0] user hub1 password simple hub1
# Specify the primary and secondary VAM servers.
[Hub1-vam-client-Hub1Group0] server primary ipv6-address 1::11
[Hub1-vam-client-Hub1Group0] server secondary ipv6-address 1::12
# Enable the VAM client.
[Hub1-vam-client-Hub1Group0] client enable
[Hub1-vam-client-Hub1Group0] quit
# Create VAM client Hub1Group1.
[Hub1] vam client name Hub1Group1
# Specify ADVPN domain abc for the VAM client.
[Hub1-vam-client-Hub1Group1] advpn-domain abc
# Set the preshared key to 123456.
[Hub1-vam-client-Hub1Group1] pre-shared-key simple 123456
# Set both the username and password to hub1.
[Hub1-vam-client-Hub1Group1] user hub1 password simple hub1
# Specify the primary and secondary VAM servers.
[Hub1-vam-client-Hub1Group1] server primary ipv6-address 1::11
[Hub1-vam-client-Hub1Group1] server secondary ipv6-address 1::12
# Enable the VAM client.
[Hub1-vam-client-Hub1Group1] client enable
[Hub1-vam-client-Hub1Group1] quit
3. Configure an IPsec profile:
# Configure IKE.
[Hub1] ike keychain abc
[Hub1-ike-keychain-abc] pre-shared-key address ipv6 :: 0 key simple 123456
[Hub1-ike-keychain-abc] quit
[Hub1] ike profile abc
[Hub1-ike-profile-abc] keychain abc
[Hub1-ike-profile-abc] quit
# Configure the IPsec profile.
[Hub1] ipsec transform-set abc
[Hub1-ipsec-transform-set-abc] encapsulation-mode transport
[Hub1-ipsec-transform-set-abc] esp encryption-algorithm des-cbc
[Hub1-ipsec-transform-set-abc] esp authentication-algorithm sha1
[Hub1-ipsec-transform-set-abc] quit
[Hub1] ipsec profile abc isakmp
[Hub1-ipsec-profile-isakmp-abc] transform-set abc
[Hub1-ipsec-profile-isakmp-abc] ike-profile abc
[Hub1-ipsec-profile-isakmp-abc] quit
4. Configure OSPFv3.
[Hub1] ospfv3 1
[Hub1-ospfv3-1] router-id 0.0.0.1
[Hub1-ospfv3-1] area 0
[Hub1-ospfv3-1-area-0.0.0.0] quit
[Hub1-ospfv3-1] area 1
[Hub1-ospfv3-1-area-0.0.0.1] quit
[Hub1-ospfv3-1] quit
5. Configure ADVPN tunnels:
# Configure UDP-mode IPv6 ADVPN tunnel interface tunnel1.
[Hub1] interface tunnel1 mode advpn udp ipv6
[Hub1-Tunnel1] ipv6 address 192:168:1::1 64
[Hub1-Tunnel1] ipv6 address fe80::1:1 link-local
[Hub1-Tunnel1] vam ipv6 client Hub1Group1
[Hub1-Tunnel1] ospfv3 1 area 1
[Hub1-Tunnel1] ospfv3 network-type broadcast
[Hub1-Tunnel1] source gigabitethernet 1/0
[Hub1-Tunnel1] tunnel protection ipsec profile abc
[Hub1-Tunnel1] quit
# Configure UDP-mode IPv6 ADVPN tunnel interface tunnel2.
[Hub1] interface tunnel2 mode advpn udp ipv6
[Hub1-Tunnel2] ipv6 address 192:168::1 64
[Hub1-Tunnel2] ipv6 address fe80::1 link-local
[Hub1-Tunnel2] vam ipv6 client Hub1Group0
[Hub1-Tunnel2] ospfv3 1 area 0
[Hub1-Tunnel2] ospfv3 network-type broadcast
[Hub1-Tunnel2] source gigabitethernet 1/0
[Hub1-Tunnel2] tunnel protection ipsec profile abc
[Hub1-Tunnel2] quit
Configuring Hub 2
1. Configure IP addresses for the interfaces. (Details not shown.)
2. Configure the VAM client:
# Create VAM client Hub2Group0.
<Hub2> system-view
[Hub2] vam client name Hub2Group0
# Specify ADVPN domain abc for the VAM client.
[Hub2-vam-client-Hub2Group0] advpn-domain abc
# Set the preshared key to 123456.
[Hub2-vam-client-Hub2Group0] pre-shared-key simple 123456
# Set both the username and password to hub2.
[Hub2-vam-client-Hub2Group0] user hub2 password simple hub2
# Specify the primary and secondary VAM servers.
[Hub2-vam-client-Hub2Group0] server primary ipv6-address 1::11
[Hub2-vam-client-Hub2Group0] server secondary ipv6-address 1::12
# Enable the VAM client.
[Hub2-vam-client-Hub2Group0] client enable
[Hub2-vam-client-Hub2Group0] quit
# Create VAM client Hub2Group1.
[Hub2] vam client name Hub2Group1
# Specify ADVPN domain abc for the VAM client.
[Hub2-vam-client-Hub2Group1] advpn-domain abc
# Set the preshared key to 123456.
[Hub2-vam-client-Hub2Group1] pre-shared-key simple 123456
# Set both the username and password to hub2.
[Hub2-vam-client-Hub2Group1] user Hub2 password simple Hub2
# Specify the primary and secondary VAM servers.
[Hub2-vam-client-Hub2Group1] server primary ipv6-address 1::11
[Hub2-vam-client-Hub2Group1] server secondary ipv6-address 1::12
# Enable the VAM client.
[Hub2-vam-client-Hub2Group1] client enable
[Hub2-vam-client-Hub2Group1] quit
3. Configure an IPsec profile:
# Configure IKE.
[Hub2] ike keychain abc
[Hub2-ike-keychain-abc] pre-shared-key address ipv6 :: 0 key simple 123456
[Hub2-ike-keychain-abc] quit
[Hub2] ike profile abc
[Hub2-ike-profile-abc] keychain abc
[Hub2-ike-profile-abc] quit
# Configure the IPsec profile.
[Hub2] ipsec transform-set abc
[Hub2-ipsec-transform-set-abc] encapsulation-mode transport
[Hub2-ipsec-transform-set-abc] esp encryption-algorithm des-cbc
[Hub2-ipsec-transform-set-abc] esp authentication-algorithm sha1
[Hub2-ipsec-transform-set-abc] quit
[Hub2] ipsec profile abc isakmp
[Hub2-ipsec-profile-isakmp-abc] transform-set abc
[Hub2-ipsec-profile-isakmp-abc] ike-profile abc
[Hub2-ipsec-profile-isakmp-abc] quit
4. Configure OSPFv3.
[Hub2] ospf 1
[Hub2-ospf-1] area 0
[Hub2-ospf-1-area-0.0.0.0] network 192.168.0.0 0.0.0.255
[Hub2-ospf-1-area-0.0.0.0] quit
[Hub2-ospf-1] area 1
[Hub2-ospf-1-area-0.0.0.1] network 192.168.1.0 0.0.0.255
[Hub2-ospf-1-area-0.0.0.1] quit
[Hub2-ospf-1] quit
5. Configure ADVPN tunnels:
# Configure UDP-mode IPv6 ADVPN tunnel interface tunnel1.
[Hub2] interface tunnel1 mode advpn udp ipv6
[Hub2-Tunnel1] ipv6 address 192:168:1::2 64
[Hub2-Tunnel1] ipv6 address fe80::1:2 link-local
[Hub2-Tunnel1] vam ipv6 client Hub2Group1
[Hub2-Tunnel1] ospfv3 1 area 1
[Hub2-Tunnel1] ospfv3 network-type broadcast
[Hub2-Tunnel1] source gigabitethernet 1/0
[Hub2-Tunnel1] tunnel protection ipsec profile abc
[Hub2-Tunnel1] quit
# Configure UDP-mode IPv6 ADVPN tunnel interface tunnel2.
[Hub2] interface tunnel2 mode advpn udp ipv6
[Hub2-Tunnel2] ipv6 address 192:168::2 64
[Hub2-Tunnel2] ipv6 address fe80::2 link-local
[Hub2-Tunnel2] vam ipv6 client Hub2Group0
[Hub2-Tunnel2] ospfv3 1 area 0
[Hub2-Tunnel2] ospfv3 network-type broadcast
[Hub2-Tunnel2] source gigabitethernet 1/0
[Hub2-Tunnel2] tunnel protection ipsec profile abc
[Hub2-Tunnel2] quit
Configuring Hub 3
1. Configure IP addresses for the interfaces. (Details not shown.)
2. Configure the VAM client:
# Create VAM client Hub3Group0.
<Hub3> system-view
[Hub3] vam client name Hub3Group0
# Specify ADVPN domain abc for the VAM client.
[Hub3-vam-client-Hub3Group0] advpn-domain abc
# Set the preshared key to 123456.
[Hub3-vam-client-Hub3Group0] pre-shared-key simple 123456
# Set both the username and password to hub3.
[Hub3-vam-client-Hub3Group0] user hub3 password simple hub3
# Specify the primary and secondary VAM servers.
[Hub3-vam-client-Hub3Group0] server primary ipv6-address 1::11
[Hub3-vam-client-Hub3Group0] server secondary ipv6-address 1::12
# Enable the VAM client.
[Hub2-vam-client-Hub2Group0] client enable
[Hub2-vam-client-Hub2Group0] quit
# Create VAM client Hub3Group1.
[Hub3] vam client name Hub3Group1
# Specify ADVPN domain abc for the VAM client.
[Hub3-vam-client-Hub3Group1] advpn-domain abc
# Set the preshared key to 123456.
[Hub3-vam-client-Hub3Group1] pre-shared-key simple 123456
# Set both the username and password to hub3.
[Hub3-vam-client-Hub3Group1] user hub3 password simple hub3
# Specify the primary and secondary VAM servers.
[Hub3-vam-client-Hub3Group1] server primary ipv6-address 1::11
[Hub3-vam-client-Hub3Group1] server secondary ipv6-address 1::12
# Enable the VAM client.
[Hub2-vam-client-Hub2Group1] client enable
[Hub2-vam-client-Hub2Group1] quit
3. Configure an IPsec profile:
# Configure IKE.
[Hub3] ike keychain abc
[Hub3-ike-keychain-abc] pre-shared-key address ipv6 :: 0 key simple 123456
[Hub3-ike-keychain-abc] quit
[Hub3] ike profile abc
[Hub3-ike-profile-abc] keychain abc
[Hub3-ike-profile-abc] quit
# Configure the IPsec profile.
[Hub3] ipsec transform-set abc
[Hub3-ipsec-transform-set-abc] encapsulation-mode transport
[Hub3-ipsec-transform-set-abc] esp encryption-algorithm des-cbc
[Hub3-ipsec-transform-set-abc] esp authentication-algorithm sha1
[Hub3-ipsec-transform-set-abc] quit
[Hub3] ipsec profile abc isakmp
[Hub3-ipsec-profile-isakmp-abc] transform-set abc
[Hub3-ipsec-profile-isakmp-abc] ike-profile abc
[Hub3-ipsec-profile-isakmp-abc] quit
4. Configure OSPFv3.
[Hub3] ospfv3 1
[Hub3-ospfv3-1] router-id 0.0.0.3
[Hub3-ospfv3-1] area 0
[Hub3-ospfv3-1-area-0.0.0.0] quit
[Hub3-ospfv3-1] area 2
[Hub3-ospfv3-1-area-0.0.0.2] quit
[Hub3-ospfv3-1] quit
5. Configure ADVPN tunnels:
# Configure UDP-mode IPv6 ADVPN tunnel interface tunnel1.
[Hub3] interface tunnel1 mode advpn udp ipv6
[Hub3-Tunnel1] ipv6 address 192:168:2::1 64
[Hub3-Tunnel1] ipv6 address fe80::2:1 link-local
[Hub3-Tunnel1] vam ipv6 client Hub3Group1
[Hub3-Tunnel1] ospfv3 1 area 2
[Hub3-Tunnel1] ospfv3 network-type broadcast
[Hub3-Tunnel1] source gigabitethernet 1/0
[Hub3-Tunnel1] tunnel protection ipsec profile abc
[Hub3-Tunnel1] quit
# Configure UDP-mode IPv6 ADVPN tunnel interface tunnel2.
[Hub3] interface tunnel2 mode advpn udp ipv6
[Hub3-Tunnel2] ipv6 address 192:168::3 64
[Hub3-Tunnel2] ipv6 address fe80::3 link-local
[Hub3-Tunnel2] vam ipv6 client Hub3Group0
[Hub3-Tunnel2] ospfv3 1 area 0
[Hub3-Tunnel2] ospfv3 network-type broadcast
[Hub3-Tunnel2] source gigabitethernet 1/0
[Hub3-Tunnel2] tunnel protection ipsec profile abc
[Hub3-Tunnel2] quit
Configuring Spoke 1
1. Configure IP addresses for the interfaces. (Details not shown.)
2. Configure the VAM client:
# Create VAM client Spoke1.
<Spoke1> system-view
[Spoke1] vam client name Spoke1
# Specify ADVPN domain abc for the VAM client.
[Spoke1-vam-client-Spoke1] advpn-domain abc
# Set the preshared key to 123456.
[Spoke1-vam-client-Spoke1] pre-shared-key simple 123456
# Set both the username and password to spoke1.
[Spoke1-vam-client-Spoke1] user spoke1 password simple spoke1
# Specify the primary and secondary VAM servers.
[Spoke1-vam-client-Spoke1] server primary ipv6-address 1::11
[Spoke1-vam-client-Spoke1] server secondary ipv6-address 1::12
# Enable the VAM client.
[Spoke1-vam-client-Spoke1] client enable
[Spoke1-vam-client-Spoke1] quit
3. Configure an IPsec profile:
# Configure IKE.
[Spoke1] ike keychain abc
[Spoke1-ike-keychain-abc] pre-shared-key address ipv6 :: 0 key simple 123456
[Spoke1-ike-keychain-abc] quit
[Spoke1] ike profile abc
[Spoke1-ike-profile-abc] keychain abc
[Spoke1-ike-profile-abc] quit
# Configure the IPsec profile.
[Spoke1] ipsec transform-set abc
[Spoke1-ipsec-transform-set-abc] encapsulation-mode transport
[Spoke1-ipsec-transform-set-abc] esp encryption-algorithm des-cbc
[Spoke1-ipsec-transform-set-abc] esp authentication-algorithm sha1
[Spoke1-ipsec-transform-set-abc] quit
[Spoke1] ipsec profile abc isakmp
[Spoke1-ipsec-profile-isakmp-abc] transform-set abc
[Spoke1-ipsec-profile-isakmp-abc] ike-profile abc
[Spoke1-ipsec-profile-isakmp-abc] quit
4. Configure OSPFv3.
[Spoke1] ospfv3 1
[Spoke1-ospfv3-1] router-id 0.0.0.4
[Spoke1-ospfv3-1] area 0
[Spoke1-ospfv3-1-area-0.0.0.0] quit
[Spoke1-ospfv3-1] area 1
[Spoke1-ospfv3-1-area-0.0.0.1] quit
[Spoke1-ospfv3-1] quit
[Spoke1] interface gigabitethernet 2/0
[Spoke1-GigabitEthernet2/0] ospfv3 1 area 1
[Spoke1-GigabitEthernet2/0] quit
5. Configure UDP-mode IPv6 ADVPN tunnel interface tunnel1. Configure its DR priority as 0 so Spoke 1 will not participate in DR/BDR election.
[Spoke1] interface tunnel1 mode advpn udp ipv6
[Spoke1-Tunnel1] ipv6 address 192:168:1::3 64
[Spoke1-Tunnel1] ipv6 address fe80::1:3 link-local
[Spoke1-Tunnel1] vam ipv6 client Spoke1
[Spoke1-Tunnel1] ospfv3 1 area 1
[Spoke1-Tunnel1] ospfv3 network-type broadcast
[Spoke1-Tunnel1] ospfv3 dr-priority 0
[Spoke1-Tunnel1] advpn ipv6 network 192:168:10::0 64
[Spoke1-Tunnel1] source gigabitethernet 1/0
[Spoke1-Tunnel1] tunnel protection ipsec profile abc
[Spoke1-Tunnel1] quit
Configuring Spoke 2
1. Configure IP addresses for the interfaces. (Details not shown.)
2. Configure the VAM client:
# Create VAM client Spoke2.
<Spoke2> system-view
[Spoke2] vam client name Spoke2
# Specify ADVPN domain abc for the VAM client.
[Spoke2-vam-client-Spoke2] advpn-domain abc
# Set the preshared key to 123456.
[Spoke2-vam-client-Spoke2] pre-shared-key simple 123456
# Set both the username and password to spoke2.
[Spoke2-vam-client-Spoke2] user spoke2 password simple spoke2
# Specify the primary and secondary VAM servers.
[Spoke2-vam-client-Spoke2] server primary ipv6-address 1::11
[Spoke2-vam-client-Spoke2] server secondary ipv6-address 1::12
# Enable the VAM client.
[Spoke2-vam-client-Spoke2] client enable
[Spoke2-vam-client-Spoke2] quit
3. Configure an IPsec profile:
# Configure IKE.
[Spoke2] ike keychain abc
[Spoke2-ike-keychain-abc] pre-shared-key address ipv6 :: 0 key simple 123456
[Spoke2-ike-keychain-abc] quit
[Spoke2] ike profile abc
[Spoke2-ike-profile-abc] keychain abc
[Spoke2-ike-profile-abc] quit
# Configure the IPsec profile.
[Spoke2] ipsec transform-set abc
[Spoke2-ipsec-transform-set-abc] encapsulation-mode transport
[Spoke2-ipsec-transform-set-abc] esp encryption-algorithm des-cbc
[Spoke2-ipsec-transform-set-abc] esp authentication-algorithm sha1
[Spoke2-ipsec-transform-set-abc] quit
[Spoke2] ipsec profile abc isakmp
[Spoke2-ipsec-profile-isakmp-abc] transform-set abc
[Spoke2-ipsec-profile-isakmp-abc] ike-profile abc
[Spoke2-ipsec-profile-isakmp-abc] quit
4. Configure OSPFv3.
[Spoke2] ospfv3 1
[Spoke2-ospfv3-1] router-id 0.0.0.5
[Spoke2-ospfv3-1] area 0
[Spoke2-ospfv3-1-area-0.0.0.0] quit
[Spoke2-ospfv3-1] area 1
[Spoke2-ospfv3-1-area-0.0.0.1] quit
[Spoke2-ospfv3-1] quit
[Spoke1] interface gigabitethernet 2/0
[Spoke1-GigabitEthernet2/0] ospfv3 1 area 1
[Spoke1-GigabitEthernet2/0] quit
[Spoke1] interface gigabitethernet 3/0
[Spoke1-GigabitEthernet3/0] ospfv3 1 area 1
[Spoke1-GigabitEthernet3/0] quit
5. Configure UDP-mode IPv6 ADVPN tunnel interface tunnel1. Configure its DR priority as 0 so Spoke 2 will not participate in DR/BDR election.
[Spoke2] interface tunnel1 mode advpn udp ipv6
[Spoke2-Tunnel1] ipv6 address 192:168:1::4 64
[Spoke2-Tunnel1] ipv6 address fe80::1:4 link-local
[Spoke2-Tunnel1] vam ipv6 client Spoke2
[Spoke2-Tunnel1] ospfv3 1 area 1
[Spoke2-Tunnel1] ospfv3 network-type broadcast
[Spoke2-Tunnel1] ospfv3 dr-priority 0
[Spoke2-Tunnel1] advpn ipv6 network 192:168:20::0 64
[Spoke2-Tunnel1] advpn ipv6 network 192:168:30::0 64
[Spoke2-Tunnel1] source gigabitethernet 1/0
[Spoke2-Tunnel1] tunnel protection ipsec profile abc
[Spoke2-Tunnel1] quit
Configuring Spoke 3
1. Configure IP addresses for the interfaces. (Details not shown.)
2. Configure the VAM client:
# Create VAM client Spoke3.
<Spoke3> system-view
[Spoke3] vam client name Spoke3
# Specify ADVPN domain abc for the VAM client.
[Spoke3-vam-client-Spoke3] advpn-domain abc
# Set the preshared key to 123456.
[Spoke3-vam-client-Spoke3] pre-shared-key simple 123456
# Set both the username and password to spoke3.
[Spoke3-vam-client-Spoke3] user spoke3 password simple spoke3
# Specify the primary and secondary VAM servers.
[Spoke3-vam-client-Spoke3] server primary ipv6-address 1::11
[Spoke3-vam-client-Spoke3] server secondary ipv6-address 1::12
# Enable the VAM client.
[Spoke3-vam-client-Spoke3] client enable
[Spoke3-vam-client-Spoke3] quit
3. Configure an IPsec profile:
# Configure IKE.
[Spoke3] ike keychain abc
[Spoke3-ike-keychain-abc] pre-shared-key address ipv6 :: 0 key simple 123456
[Spoke3-ike-keychain-abc] quit
[Spoke3] ike profile abc
[Spoke3-ike-profile-abc] keychain abc
[Spoke3-ike-profile-abc] quit
# Configure the IPsec profile.
[Spoke3] ipsec transform-set abc
[Spoke3-ipsec-transform-set-abc] encapsulation-mode transport
[Spoke3-ipsec-transform-set-abc] esp encryption-algorithm des-cbc
[Spoke3-ipsec-transform-set-abc] esp authentication-algorithm sha1
[Spoke3-ipsec-transform-set-abc] quit
[Spoke3] ipsec profile abc isakmp
[Spoke3-ipsec-profile-isakmp-abc] transform-set abc
[Spoke3-ipsec-profile-isakmp-abc] ike-profile abc
[Spoke3-ipsec-profile-isakmp-abc] quit
4. Configure OSPFv3.
[Spoke3] ospfv3 1
[Spoke3-ospfv3-1] router-id 0.0.0.6
[Spoke3-ospfv3-1] area 0
[Spoke3-ospfv3-1-area-0.0.0.0] quit
[Spoke3-ospfv3-1] area 2
[Spoke3-ospfv3-1-area-0.0.0.2] quit
[Spoke3-ospfv3-1] quit
[Spoke3] interface gigabitethernet 2/0
[Spoke3-GigabitEthernet2/0] ospfv3 1 area 2
[Spoke3-GigabitEthernet2/0] quit
5. Configure UDP-mode IPv6 ADVPN tunnel interface tunnel1. Configure its DR priority as 0 so Spoke 3 will not participate in DR/BDR election.
[Spoke3] interface tunnel1 mode advpn udp ipv6
[Spoke3-Tunnel1] ipv6 address 192:168:2::2 64
[Spoke3-Tunnel1] ipv6 address fe80::2:2 link-local
[Spoke3-Tunnel1] vam ipv6 client Spoke3
[Spoke3-Tunnel1] ospfv3 1 area 2
[Spoke3-Tunnel1] ospfv3 network-type broadcast
[Spoke3-Tunnel1] ospfv3 dr-priority 0
[Spoke3-Tunnel1] advpn ipv6 network 192:168:40::0 64
[Spoke3-Tunnel1] source gigabitethernet 1/0
[Spoke3-Tunnel1] tunnel protection ipsec profile abc
[Spoke3-Tunnel1] quit
Configuring Spoke 4
1. Configure IP addresses for the interfaces. (Details not shown.)
2. Configure the VAM client:
# Create VAM client Spoke4.
<Spoke4> system-view
[Spoke4] vam client name Spoke4
# Specify ADVPN domain abc for the VAM client.
[Spoke4-vam-client-Spoke4] advpn-domain abc
# Set the preshared key to 123456.
[Spoke4-vam-client-Spoke4] pre-shared-key simple 123456
# Set both the username and password to spoke4.
[Spoke4-vam-client-Spoke4] user spoke4 password simple spoke4
# Specify the primary and secondary VAM servers.
[Spoke4-vam-client-Spoke4] server primary ipv6-address 1::11
[Spoke4-vam-client-Spoke4] server secondary ipv6-address 1::12
# Enable the VAM client.
[Spoke4-vam-client-Spoke4] client enable
[Spoke4-vam-client-Spoke4] quit
3. Configure an IPsec profile:
# Configure IKE.
[Spoke4] ike keychain abc
[Spoke4-ike-keychain-abc] pre-shared-key address ipv6 :: 0 key simple 123456
[Spoke4-ike-keychain-abc] quit
[Spoke4] ike profile abc
[Spoke4-ike-profile-abc] keychain abc
[Spoke4-ike-profile-abc] quit
# Configure the IPsec profile.
[Spoke4] ipsec transform-set abc
[Spoke4-ipsec-transform-set-abc] encapsulation-mode transport
[Spoke4-ipsec-transform-set-abc] esp encryption-algorithm des-cbc
[Spoke4-ipsec-transform-set-abc] esp authentication-algorithm sha1
[Spoke4-ipsec-transform-set-abc] quit
[Spoke4] ipsec profile abc isakmp
[Spoke4-ipsec-profile-isakmp-abc] transform-set abc
[Spoke4-ipsec-profile-isakmp-abc] ike-profile abc
[Spoke4-ipsec-profile-isakmp-abc] quit
4. Configure OSPFv3.
[Spoke4] ospfv3 1
[Spoke4-ospfv3-1] router-id 0.0.0.7
[Spoke4-ospfv3-1] area 0
[Spoke4-ospfv3-1-area-0.0.0.0] quit
[Spoke4-ospfv3-1] area 2
[Spoke4-ospfv3-1-area-0.0.0.2] quit
[Spoke4-ospfv3-1] quit
[Spoke4] interface gigabitethernet 2/0
[Spoke4-GigabitEthernet2/0] ospfv3 1 area 2
[Spoke4-GigabitEthernet2/0] quit
[Spoke4] interface gigabitethernet 3/0
[Spoke4-GigabitEthernet3/0] ospfv3 1 area 2
[Spoke4-GigabitEthernet3/0] quit
5. Configure UDP-mode IPv6 ADVPN tunnel interface tunnel1. Configure its DR priority as 0 so Spoke 4 will not participate in DR/BDR election.
[Spoke4] interface tunnel1 mode advpn udp ipv6
[Spoke4-Tunnel1] ipv6 address 192:168:2::3 64
[Spoke4-Tunnel1] ipv6 address fe80::2:3 link-local
[Spoke4-Tunnel1] vam ipv6 client Spoke4
[Spoke4-Tunnel1] ospfv3 1 area 2
[Spoke4-Tunnel1] ospfv3 network-type broadcast
[Spoke4-Tunnel1] ospfv3 dr-priority 0
[Spoke4-Tunnel1] advpn ipv6 network 192:168:50::0 64
[Spoke4-Tunnel1] advpn ipv6 network 192:168:60::0 64
[Spoke4-Tunnel1] source gigabitethernet 1/0
[Spoke4-Tunnel1] tunnel protection ipsec profile abc
[Spoke4-Tunnel1] quit
Verifying the configuration
# Display IPv6 address mapping information for all VAM clients registered with the primary VAM server.
[PrimaryServer] display vam server ipv6 address-map
ADVPN domain name: abc
Total private address mappings: 10
Group Private address Public address Type NAT Holding time
0 192:168::1 1::1 Hub No 0H 52M 7S
0 192:168::2 1::2 Hub No 0H 47M 31S
0 192:168::3 1::3 Hub No 0H 28M 25S
1 192:168:1::1 1::1 Hub No 0H 52M 7S
1 192:168:1::2 1::2 Hub No 0H 47M 31S
1 192:168:1::3 1::4 Spoke No 0H 18M 26S
1 192:168:1::4 1::5 Spoke No 0H 28M 25S
2 192:168:2::1 1::3 Hub No 0H 28M 25S
2 192:168:2::2 1::6 Spoke No 0H 25M 40S
2 192:168:2::3 1::7 Spoke No 0H 25M 31S
# Display IPv6 address mapping information for all VAM clients registered with the secondary VAM server.
[SecondaryServer] display vam server ipv6 address-map
ADVPN domain name: abc
Total private address mappings: 10
Group Private address Public address Type NAT Holding time
0 192:168::1 1::1 Hub No 0H 52M 7S
0 192:168::2 1::2 Hub No 0H 47M 31S
0 192:168::3 1::3 Hub No 0H 28M 25S
1 192:168:1::1 1::1 Hub No 0H 52M 7S
1 192:168:1::2 1::2 Hub No 0H 47M 31S
1 192:168:1::3 1::4 Spoke No 0H 18M 26S
1 192:168:1::4 1::5 Spoke No 0H 28M 25S
2 192:168:2::1 1::3 Hub No 0H 28M 25S
2 192:168:2::2 1::6 Spoke No 0H 25M 40S
2 192:168:2::3 1::7 Spoke No 0H 25M 31S
The output shows that Hub 1, Hub 2, Hub3, Spoke 1, Spoke 2, Spoke 3, and Spoke4 all have registered their address mapping information with the VAM servers.
# Display IPv6 ADVPN tunnel information on Hubs. This example uses Hub 1.
[Hub1] display advpn ipv6 session
Interface : Tunnel1
Number of sessions: 3
Private address Public address Port Type State Holding time
192:168:1::2 1::2 18001 H-H Success 0H 46M 8S
192:168:1::3 1::3 18001 H-S Success 0H 27M 27S
192:168:1::4 1::4 18001 H-S Success 0H 18M 18S
Interface : Tunnel2
Number of sessions: 2
Private address Public address Port Type State Holding time
192:168::2 1::2 18001 H-H Success 0H 46M 8S
192:168::3 1::3 18001 H-H Success 0H 27M 27S
The output shows that Hub 1 has established a permanent tunnel to Hub 2, Hub3, Spoke 1, and Spoke 2.
# Display IPv6 ADVPN tunnel information on Spoke 1 and Spoke 2. This example uses Spoke 1.
[Spoke1] display advpn ipv6 session
Interface : Tunnel1
Number of sessions: 2
Private address Public address Port Type State Holding time
192:168:1::1 1::1 18001 S-H Success 0H 46M 8S
192:168:1::2 1::2 18001 S-H Success 0H 46M 8S
The output shows that Spoke 1 has established a permanent hub-spoke tunnel to Hub 1 and Hub 2.
# Display IPv6 ADVPN tunnel information on Spoke 3 and Spoke 4. This example uses Spoke 4.
[Spoke3] display advpn ipv6 session
Interface : Tunnel1
Number of sessions: 1
Private address Public address Port Type State Holding time
192:168:2::1 1::3 18001 S-H Success 0H 46M 8S
The output shows that Spoke 3 has established a permanent hub-spoke tunnel to Hub 3.
Example: Configuring IPv4 full-mesh NAT traversal ADVPN
Network configuration
As shown in Figure 13, all the VAM servers and VAM clients reside behind a NAT gateway. The primary and secondary VAM servers manage and maintain VAM client information for all hubs and spokes. The AAA server performs authentication and accounting for VAM clients. The two hubs back up each other, and perform data forwarding and route exchange.
· Establish a permanent ADVPN tunnel between each spoke and each hub.
· Establish a temporary ADVPN tunnel dynamically between the two spokes in the same ADVPN domain.
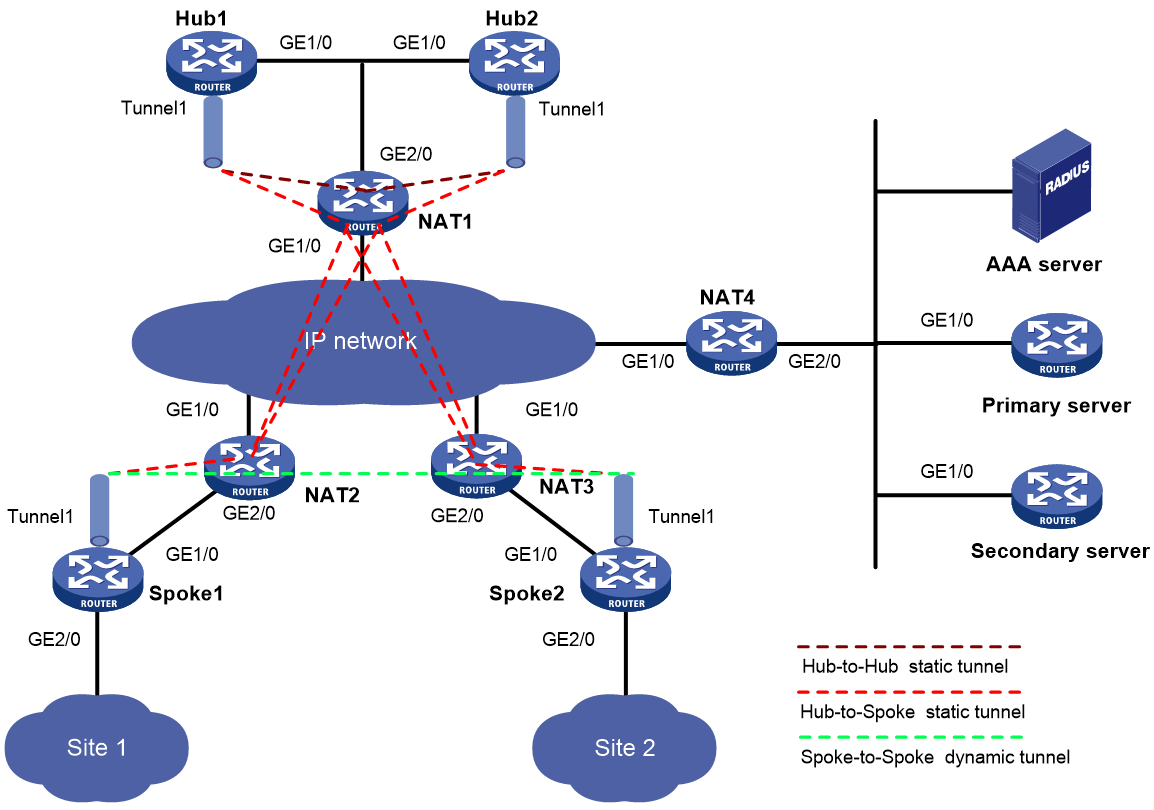
Table 7 Interface and IP address assignment
|
Device |
Interface |
IP address |
Device |
Interface |
IP address |
|
Hub 1 |
GE1/0 |
10.0.0.2/24 |
Spoke 1 |
GE1/0 |
10.0.0.2/24 |
|
|
Tunnel1 |
192.168.0.1/24 |
|
GE2/0 |
192.168.1.1/24 |
|
Hub 2 |
GE1/0 |
10.0.0.3/24 |
|
Tunnel1 |
192.168.0.3/24 |
|
|
Tunnel1 |
192.168.0.2/24 |
Spoke 2 |
GE1/0 |
10.0.0.2/24 |
|
NAT1 |
GE1/0 |
1.0.0.1/24 |
|
GE2/0 |
192.168.2.1/24 |
|
|
GE2/0 |
10.0.0.1/24 |
|
Tunnel1 |
192.168.0.4/24 |
|
NAT2 |
GE1/0 |
1.0.0.2/24 |
NAT4 |
GE1/0 |
1.0.0.4/24 |
|
|
GE2/0 |
10.0.0.1/24 |
|
GE2/0 |
10.0.0.1/24 |
|
NAT3 |
GE1/0 |
1.0.0.3/24 |
AAA server |
|
10.0.0.2/24 |
|
|
GE2/0 |
10.0.0.1/24 |
Primary server |
GE1/0 |
10.0.0.3/24 |
|
|
|
|
Secondary server |
GE1/0 |
10.0.0.4/24 |
Configuring the primary VAM server
1. Configure IP addresses for the interfaces. (Details not shown.)
2. Configure AAA:
# Configure RADIUS scheme abc.
<PrimaryServer> system-view
[PrimaryServer] radius scheme abc
[PrimaryServer-radius-abc] primary authentication 1.0.0.10 1812
[PrimaryServer-radius-abc] primary accounting 1.0.0.10 1813
[PrimaryServer-radius-abc] key authentication simple 123
[PrimaryServer-radius-abc] key accounting simple 123
[PrimaryServer-radius-abc] user-name-format without-domain
[PrimaryServer-radius-abc] quit
[PrimaryServer] radius session-control enable
# Configure AAA methods for ISP domain abc.
[PrimaryServer] domain abc
[PrimaryServer-isp-abc] authentication advpn radius-scheme abc
[PrimaryServer-isp-abc] accounting advpn radius-scheme abc
[PrimaryServer-isp-abc] quit
[PrimaryServer] domain default enable abc
3. Configure the VAM server:
# Create ADVPN domain abc.
[PrimaryServer] vam server advpn-domain abc id 1
# Create hub group 0.
[PrimaryServer-vam-server-domain-abc] hub-group 0
# Configure hubs in hub group 0:
¡ Configure Hub1. The private address is 192.168.0.1, the public address is 1.0.0.1 (after NAT), and the source port number of ADVPN packets is 4001 (after NAT).
[PrimaryServer-vam-server-domain-abc-hub-group-0] hub private-address 192.168.0.1 public-address 1.0.0.1 advpn-port 4001
¡ Configure Hub2. The private address is 192.168.0.2, the public address is 1.0.0.1 (after NAT), and the source port number of ADVPN packets is 4002 (after NAT).
[PrimaryServer-vam-server-domain-abc-hub-group-0] hub private-address 192.168.0.2 public-address 1.0.0.1 advpn-port 4002
# Specify a spoke private IPv4 network.
[PrimaryServer-vam-server-domain-abc-hub-group-0] spoke private-address network 192.168.0.0 255.255.255.0
[PrimaryServer-vam-server-domain-abc-hub-group-0] quit
# Set the preshared key to 123456.
[PrimaryServer-vam-server-domain-abc] pre-shared-key simple 123456
# Set the authentication mode to CHAP.
[PrimaryServer-vam-server-domain-abc] authentication-method chap
# Set the keepalive interval to 10 seconds and the maximum number of keepalive retries to 3.
[PrimaryServer-vam-server-domain-abc] keepalive interval 10 retry 3
# Enable the VAM server for the ADVPN domain.
[PrimaryServer-vam-server-domain-abc] server enable
[PrimaryServer-vam-server-domain-abc] quit
4. Configure a default route.
[PrimaryServer] ip route-static 0.0.0.0 0 10.0.0.1
Configuring the secondary VAM server
# Configure the secondary VAM server in the same way that the primary server is configured. (Details not shown.)
Configuring Hub 1
1. Configure IP addresses for the interfaces. (Details not shown.)
2. Configure the VAM client:
# Create VAM client Hub1.
<Hub1> system-view
[Hub1] vam client name Hub1
# Specify ADVPN domain abc for the VAM client.
[Hub1-vam-client-Hub1] advpn-domain abc
# Set the preshared key to 123456.
[Hub1-vam-client-Hub1] pre-shared-key simple 123456
# Set both the username and password to hub1.
[Hub1-vam-client-Hub1] user hub1 password simple hub1
# Specify the primary VAM server IP address as 1.0.0.4 (after NAT) and the port number as 4001 (after NAT).
[Hub1-vam-client-Hub1] server primary ip-address 1.0.0.4 port 4001
# Specify the secondary VAM server IP address as 1.0.0.4 (after NAT) and the port number as 4002 (after NAT).
[Hub1-vam-client-Hub1] server secondary ip-address 1.0.0.4 port 4002
# Enable the VAM client.
[Hub1-vam-client-Hub1] client enable
[Hub1-vam-client-Hub1] quit
3. Configure OSPF:
# Configure OSPF to advertise the private network.
[Hub1] ospf 1
[Hub1-ospf-1] area 0
[Hub1-ospf-1-area-0.0.0.0] network 192.168.0.0 0.0.0.255
[Hub1-ospf-1-area-0.0.0.0] quit
[Hub1-ospf-1] quit
# Configure a default route.
[Hub1] ip route-static 0.0.0.0 0 10.0.0.1
4. Configure UDP-mode IPv4 ADVPN tunnel interface tunnel1.
[Hub1] interface tunnel 1 mode advpn udp
[Hub1-Tunnel1] ip address 192.168.0.1 255.255.255.0
[Hub1-Tunnel1] vam client Hub1
[Hub1-Tunnel1] ospf network-type broadcast
[Hub1-Tunnel1] source gigabitethernet 1/0
[Hub1-Tunnel1] quit
Configuring Hub 2
1. Configure IP addresses for the interfaces. (Details not shown.)
2. Configure the VAM client:
# Create VAM client Hub2.
<Hub2> system-view
[Hub2] vam client name Hub2
# Specify ADVPN domain abc for the VAM client.
[Hub2-vam-client-Hub2] advpn-domain abc
# Set the preshared key to 123456.
[Hub2-vam-client-Hub2] pre-shared-key simple 123456
# Set both the username and password to hub2.
[Hub2-vam-client-Hub2] user hub2 password simple hub2
# Specify the primary and secondary VAM servers.
[Hub2-vam-client-Hub2] server primary ip-address 1.0.0.4 port 4001
[Hub2-vam-client-Hub2] server secondary ip-address 1.0.0.4 port 4002
# Enable the VAM client.
[Hub2-vam-client-Hub2] client enable
[Hub2-vam-client-Hub2] quit
3. Configure OSPF:
# Configure OSPF to advertise the private network.
[Hub1] ospf 1
[Hub1-ospf-1] area 0
[Hub1-ospf-1-area-0.0.0.0] network 192.168.0.0 0.0.0.255
[Hub1-ospf-1-area-0.0.0.0] quit
[Hub1-ospf-1] quit
# Configure a default route.
[Hub1] ip route-static 0.0.0.0 0 10.0.0.1
4. Configure UDP-mode IPv4 ADVPN tunnel interface tunnel1.
[Hub2] interface tunnel1 mode advpn udp
[Hub2-Tunnel1] ip address 192.168.0.2 255.255.255.0
[Hub2-Tunnel1] vam client Hub2
[Hub2-Tunnel1] ospf network-type broadcast
[Hub2-Tunnel1] source gigabitethernet 1/0
[Hub2-Tunnel1] quit
Configuring Spoke 1
1. Configure IP addresses for the interfaces. (Details not shown.)
2. Configure the VAM client:
# Create VAM client Spoke1.
<Spoke1> system-view
[Spoke1] vam client name Spoke1
# Specify ADVPN domain abc for the VAM client.
[Spoke1-vam-client-Spoke1] advpn-domain abc
# Set the preshared key to 123456.
[Spoke1-vam-client-Spoke1] pre-shared-key simple 123456
# Set both the username and password to spoke1.
[Spoke1-vam-client-Spoke1] user spoke1 password simple spoke1
# Specify the primary and secondary VAM servers.
[Spoke1-vam-client-Spoke1] server primary ip-address 1.0.0.4 port 4001
[Spoke1-vam-client-Spoke1] server secondary ip-address 1.0.0.4 port 4002
# Enable the VAM client.
[Spoke1-vam-client-Spoke1] client enable
[Spoke1-vam-client-Spoke1] quit
3. Configure OSPF:
# Configure OSPF to advertise the private network.
[Spoke1] ospf 1
[Spoke1-ospf-1] area 0
[Spoke1-ospf-1-area-0.0.0.0] network 192.168.0.0 0.0.0.255
[Spoke1-ospf-1-area-0.0.0.0] quit
[Spoke1-ospf-1] quit
# Configure a default route.
[Spoke1] ip route-static 0.0.0.0 0 10.0.0.1
4. Configure UDP-mode IPv4 ADVPN tunnel interface tunnel1. Configure its DR priority as 0 so Spoke 1 will not participate in DR/BDR election.
[Spoke1] interface tunnel1 mode advpn udp
[Spoke1-Tunnel1] ip address 192.168.0.3 255.255.255.0
[Spoke1-Tunnel1] vam client Spoke1
[Spoke1-Tunnel1] ospf network-type broadcast
[Spoke1-Tunnel1] ospf dr-priority 0
[Spoke1-Tunnel1] source gigabitethernet 1/0
[Spoke1-Tunnel1] quit
Configuring Spoke 2
1. Configure IP addresses for the interfaces. (Details not shown.)
2. Configure the VAM client:
# Create VAM client Spoke2.
<Spoke2> system-view
[Spoke2] vam client name Spoke2
# Specify ADVPN domain abc for the VAM client.
[Spoke2-vam-client-Spoke2] advpn-domain abc
# Set the preshared key to 123456.
[Spoke2-vam-client-Spoke2] pre-shared-key simple 123456
# Set both the username and password to spoke2.
[Spoke2-vam-client-Spoke2] user spoke2 password simple spoke2
# Specify the primary and secondary VAM servers.
[Spoke2-vam-client-Spoke2] server primary ip-address 1.0.0.4 port 4001
[Spoke2-vam-client-Spoke2] server secondary ip-address 1.0.0.4 port 4002
# Enable the VAM client.
[Spoke2-vam-client-Spoke2] client enable
[Spoke2-vam-client-Spoke2] quit
3. Configure OSPF:
# Configure OSPF to advertise the private network.
[Spoke2] ospf 1
[Spoke2-ospf-1] area 0
[Spoke2-ospf-1-area-0.0.0.0] network 192.168.0.0 0.0.0.255
[Spoke2-ospf-1-area-0.0.0.0] quit
[Spoke2-ospf-1] quit
# Configure a default route.
[Hub1] ip route-static 0.0.0.0 0 10.0.0.1
4. Configure UDP-mode IPv4 ADVPN tunnel interface tunnel1. Configure its DR priority as 0 so Spoke 2 will not participate in DR/BDR election.
[Spoke2] interface tunnel1 mode advpn udp
[Spoke2-Tunnel1] ip address 192.168.0.4 255.255.255.0
[Spoke2-Tunnel1] vam client Spoke2
[Spoke2-Tunnel1] ospf network-type broadcast
[Spoke2-Tunnel1] ospf dr-priority 0
[Spoke2-Tunnel1] source gigabitethernet 1/0
[Spoke2-Tunnel1] quit
Configuring NAT 1
1. Configure IP addresses for the interfaces. (Details not shown.)
2. Configure NAT internal servers:
# Configure ACL 2000 to permit packets sourced from 10.0.0.0/24.
<NAT1> system-view
[NAT1] acl basic 2000
[NAT1-acl-basic-2000] rule permit source 10.0.0.0 0.0.0.255
[NAT1-acl-basic-2000] quit
# Configure NAT internal servers on GigabitEthernet 1/0:
¡ Allow external ADVPN nodes to access Hub 1 and Hub 2 by using the public address 1.0.0.1.
¡ Specify the source UDP port number as 18001 for both Hub 1 and Hub 2.
¡ Specify the UDP port number after NAT as 4001 for Hub 1, and as 4002 for Hub 2.
[NAT1] interface gigabitethernet 1/0
[NAT1-GigabitEthernet1/0] nat server protocol udp global current-interface 4001 inside 10.0.0.2 18001
[NAT1-GigabitEthernet1/0] nat server protocol udp global current-interface 4002 inside 10.0.0.3 18001
[NAT1-GigabitEthernet1/0] nat outbound 2000
[NAT1-GigabitEthernet1/0] quit
# Enable NAT hairpin on GigabitEthernet 2/0.
[NAT1] interface gigabitethernet 2/0
[NAT1-GigabitEthernet2/0] nat hairpin enable
[NAT1-GigabitEthernet2/0] quit
Configuring NAT 2
1. Configure IP addresses for the interfaces. (Details not shown.)
2. Configure NAT internal servers:
# Configure ACL 2000 to permit packets sourced from 10.0.0.0/24.
<NAT2> system-view
[NAT2] acl basic 2000
[NAT2-acl-basic-2000] rule permit source 10.0.0.0 0.0.0.255
[NAT2-acl-basic-2000] quit
# Create address group 1.
[NAT2] nat address-group 1
# Add address 1.0.0.2 into the group.
[NAT2-nat-address-group-1] address 1.0.0.2 1.0.0.2
[NAT2-nat-address-group-1] quit
# Configure NAT on GigabitEthernet 1/0.
[NAT2] interface gigabitethernet 1/0
[NAT2-GigabitEthernet1/0] nat outbound 2000 address-group 1
[NAT2-GigabitEthernet1/0] quit
# Configure EIM for PAT to translate the source address and source port of packets matching ACL 2000 from the same address and port to the same source public address and port.
[NAT2] nat mapping-behavior endpoint-independent acl 2000
Configuring NAT 3
# Configure NAT 3 in the same way that NAT 2 is configured. (Details not shown.)
Configuring NAT 4
1. Configure IP addresses for the interfaces. (Details not shown.)
2. Configure NAT internal servers on GigabitEthernet 1/0:
¡ Allow external VAM clients to access VAM and AAA servers by using the public address 1.0.0.4.
¡ Specify the source UDP port number as 18000 for both the primary and secondary VAM servers.
¡ Specify the UDP port number after NAT as 4001 for the primary server, and as 4002 for the secondary server.
<NAT4> system-view
[NAT4] interface gigabitethernet 1/0
[NAT4-GigabitEthernet1/0] nat server protocol udp global current-interface 4001 inside 10.0.0.3 18000
[NAT4-GigabitEthernet1/0] nat server protocol udp global current-interface 4002 inside 10.0.0.4 18000
Verifying the configuration
# Display IPv4 address mapping information for all VAM clients registered with the primary VAM server.
[PrimaryServer] display vam server address-map
ADVPN domain name: abc
Total private address mappings: 4
Group Private address Public address Type NAT Holding time
0 192.168.0.1 1.0.0.1 Hub Yes 0H 52M 7S
0 192.168.0.2 1.0.0.1 Hub Yes 0H 47M 31S
0 192.168.0.3 1.0.0.2 Spoke Yes 0H 28M 25S
0 192.168.0.4 1.0.0.3 Spoke Yes 0H 19M 15S
# Display IPv4 address mapping information for all VAM clients registered with the secondary VAM server.
[SecondaryServer] display vam server address-map
ADVPN domain name: abc
Total private address mappings: 4
Group Private address Public address Type NAT Holding time
0 192.168.0.1 1.0.0.1 Hub Yes 0H 52M 7S
0 192.168.0.2 1.0.0.1 Hub Yes 0H 47M 31S
0 192.168.0.3 1.0.0.2 Spoke Yes 0H 28M 25S
0 192.168.0.4 1.0.0.3 Spoke Yes 0H 19M 15S
The output shows that Hub 1, Hub 2, Spoke 1, Spoke 2, and Spoke 3 all have registered their address mapping information with the VAM servers.
# Display IPv4 ADVPN tunnel information on Hubs. This example uses Hub 1.
[Hub1] display advpn session
Interface : Tunnel1
Number of sessions: 3
Private address Public address Port Type State Holding time
192.168.0.2 1.0.0.1 4002 H-H Success 0H 46M 8S
192.168.0.3 1.0.0.2 2001 H-S Success 0H 27M 27S
192.168.0.4 1.0.0.3 2001 H-S Success 0H 18M 18S
The output shows that Hub 1 has established a permanent tunnel to Hub 2, Spoke 1, and Spoke 2.
# Display IPv4 ADVPN tunnel information on Spokes. This example uses Spoke 1.
[Spoke1] display advpn session
Interface : Tunnel1
Number of sessions: 2
Private address Public address Port Type State Holding time
192.168.0.1 1.0.0.1 4001 S-H Success 0H 46M 8S
192.168.0.2 1.0.0.1 4002 S-H Success 0H 46M 8S
The output shows that Spoke 1 has established a permanent hub-spoke tunnel to Hub 1 and Hub 2.
# Verify that Spoke 1 can ping the private address 192.168.0.4 of Spoke 2.
[Spoke1] ping 192.168.0.4
Ping 192.168.0.4 (192.168.0.4): 56 data bytes, press CTRL_C to break
56 bytes from 192.168.0.4: icmp_seq=0 ttl=255 time=4.000 ms
56 bytes from 192.168.0.4: icmp_seq=1 ttl=255 time=0.000 ms
56 bytes from 192.168.0.4: icmp_seq=2 ttl=255 time=0.000 ms
56 bytes from 192.168.0.4: icmp_seq=3 ttl=255 time=0.000 ms
56 bytes from 192.168.0.4: icmp_seq=4 ttl=255 time=1.000 ms
--- Ping statistics for 192.168.0.4 ---
5 packets transmitted, 5 packets received, 0.0% packet loss
round-trip min/avg/max/std-dev = 0.000/1.000/4.000/1.549 ms
# Display IPv4 ADVPN tunnel information on Spokes. This example uses Spoke 1.
[Spoke1] display advpn session
Interface : Tunnel1
Number of sessions: 3
Private address Public address Port Type State Holding time
192.168.0.1 1.0.0.1 4001 S-H Success 0H 46M 8S
192.168.0.2 1.0.0.1 4002 S-H Success 0H 46M 8S
192.168.0.4 1.0.0.3 2001 S-S Success 0H 0M 1S
The output shows the following information:
· Spoke 1 has established a permanent hub-spoke tunnel to Hub 1 and Hub 2.
· Spoke 1 has established a temporary spoke-spoke tunnel to Spoke 2.