- Table of Contents
- Related Documents
-
| Title | Size | Download |
|---|---|---|
| 04-SNMP configuration | 171.93 KB |
MIB and view-based MIB access control
Configuring SNMP basic parameters
Configuring SNMPv3 basic parameters
Configuring SNMPv1 or SNMPv2c basic parameters
Switching the NM-specific interface index format
Configuring the SNMP agent to send traps to a host
Displaying and maintaining SNMP
SNMPv1/SNMPv2c configuration example
SNMP logging configuration example
Displaying and maintaining MIB style
This chapter provides an overview of the Simple Network Management Protocol (SNMP) and guides you through the configuration procedure.
Overview
SNMP is an Internet standard protocol widely used for a management station to access and operate the devices on a network, regardless of their vendors, physical characteristics and interconnect technologies.
SNMP enables network administrators to read and set the variables on managed devices for state monitoring, troubleshooting, statistics collection, and other management purposes.
SNMP framework
The SNMP framework comprises the following elements:
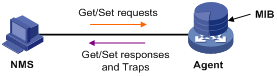
· SNMP manager—Works on an NMS to monitor and manage the SNMP-capable devices in the network.
· SNMP agent—Works on a managed device to receive and handle requests from the NMS, and send traps to the NMS when some events, such as an interface state change, occur.
· Management Information Base (MIB)—Specifies the variables (for example, interface status and CPU usage) maintained by the SNMP agent for the SNMP manager to read and set.
Figure 1 Relationship between an NMS, agent and MIB
MIB and view-based MIB access control
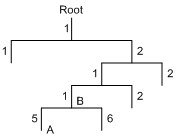
A MIB stores variables called "nodes" or "objects" in a tree hierarchy and identifies each node with a unique OID. An OID is a string of numbers that describes the path from the root node to a leaf node. For example, object B in Figure 2 is uniquely identified by the OID {1.2.1.1}.
A MIB view represents a set of MIB objects (or MIB object hierarchies) with certain access privilege and is identified by a view name. The MIB objects included in the MIB view are accessible while those excluded from the MIB view are inaccessible.
A MIB view can have multiple view records each identified by a view-name oid-tree pair.
You control access to the MIB by assigning MIB views to SNMP groups or communities.
SNMP operations
SNMP provides the following basic operations:
· Get—The NMS retrieves SNMP object nodes in an agent MIB.
· Set—The NMS modifies the value of an object node in an agent MIB.
· Notifications—Includes traps and informs. SNMP agent sends traps or informs to report events to the NMS. The difference between these two types of notification is that informs require acknowledgement but traps do not. The device supports only traps.
SNMP protocol versions
H3C supports SNMPv1, SNMPv2c, and SNMPv3. An NMS and an SNMP agent must use the same SNMP version to communicate with each other.
· SNMPv1—Uses community names for authentication. To access an SNMP agent, an NMS must use the same community name as set on the SNMP agent. If the community name used by the NMS is different from that set on the agent, the NMS cannot establish an SNMP session to access the agent or receive traps from the agent.
· SNMPv2c—Uses community names for authentication. SNMPv2c is compatible with SNMPv1, but supports more operation modes, data types, and error codes.
· SNMPv3—Uses a user-based security model (USM) to secure SNMP communication. You can configure authentication and privacy mechanisms to authenticate and encrypt SNMP packets for integrity, authenticity, and confidentiality.
SNMP configuration task list
|
Task |
Remarks |
|
Required. |
|
|
Optional. |
|
|
Optional. |
|
|
Optional. |
Configuring SNMP basic parameters
SNMPv3 differs from SNMPv1 and SNMPv2c in many ways. Their configuration procedures are described in separate sections.
Configuring SNMPv3 basic parameters
|
Step |
Command |
Remarks |
|
1. Enter system view. |
system-view |
N/A |
|
2. Enable the SNMP agent. |
snmp-agent |
Optional. By default, the SNMP agent is disabled. You can also enable the SNMP agent by using any command that begins with snmp-agent except the snmp-agent calculate-password and snmp-agent ifmib long-ifindex enable commands. |
|
3. Configure system information for the SNMP agent. |
snmp-agent sys-info { contact sys-contact | location sys-location | version { all | { v1 | v2c | v3 }* } } |
Optional. The defaults are as follows: · Contact—Hangzhou H3C Tech. Co., Ltd. · Location—Hangzhou China. · Version—SNMPv3. |
|
4. Configure the local engine ID. |
snmp-agent local-engineid engineid |
Optional. The default local engine ID is the company ID plus the device ID. After you change the local engine ID, the existing SNMPv3 users become invalid, and you must re-create the SNMPv3 users. |
|
5. Create or update a MIB view. |
snmp-agent mib-view { excluded | included } view-name oid-tree [ mask mask-value ] |
Optional. By default, the MIB view ViewDefault is predefined and its OID is 1. Each view-name oid-tree pair represents a view record. If you specify the same record with different MIB subtree masks multiple times, the last configuration takes effect. Except for the four subtrees in the default MIB view, you can create up to 16 unique MIB view records. |
|
6. Configure an SNMPv3 group. |
snmp-agent group v3 group-name [ authentication | privacy ] [ read-view read-view ] [ write-view write-view ] [ notify-view notify-view ] [ acl acl-number ] |
By default, no SNMP group exists. |
|
7. Convert a plaintext key to a ciphertext (encrypted) key. |
snmp-agent calculate-password plain-password mode { 3desmd5 | 3dessha | md5 | sha } { local-engineid | specified-engineid engineid } |
Optional. |
|
8. Add a user to the SNMPv3 group. |
snmp-agent usm-user v3 user-name group-name [ [ cipher ] authentication-mode { md5 | sha } auth-password [ privacy-mode { 3des | aes128 | des56 } priv-password ] ] [ acl acl-number ] |
N/A |
|
9. Configure the maximum SNMP packet size (in bytes) that the SNMP agent can handle. |
snmp-agent packet max-size byte-count |
Optional. By default, the SNMP agent can receive and send SNMP packets up to 1500 bytes. |
|
10. Set the DSCP value for SNMP responses. |
snmp-agent packet response dscp dscp-value |
Optional. By default, the DSCP value for SNMP responses is 0. |
Configuring SNMPv1 or SNMPv2c basic parameters
|
Step |
Command |
Remarks |
|
1. Enter system view. |
system-view |
N/A |
|
2. Enable the SNMP agent. |
snmp-agent |
Optional. By default, the SNMP agent is disabled. You can also enable the SNMP agent service by using any command that begins with snmp-agent except the snmp-agent calculate-password and snmp-agent ifmib long-ifindex enable commands. |
|
3. Configure system information for the SNMP agent. |
snmp-agent sys-info { contact sys-contact | location sys-location | version { all |{ v1 | v2c | v3 }* } } |
The defaults are as follows: · Contact—Hangzhou H3C Tech. Co., Ltd. · Location—Hangzhou China. · Version—SNMPv3. |
|
4. Configure the local engine ID. |
snmp-agent local-engineid engineid |
Optional. The default local engine ID is the company ID plus the device ID. |
|
5. Create or update a MIB view. |
snmp-agent mib-view { excluded | included } view-name oid-tree [ mask mask-value ] |
Optional. By default, the MIB view ViewDefault is predefined and its OID is 1. Each view-name oid-tree pair represents a view record. If you specify the same record with different MIB subtree masks multiple times, the last configuration takes effect. Except for the four subtrees in the default MIB view, you can create up to 16 unique MIB view records. |
|
6. Configure the SNMP access right. |
·
(Approach 1) Create an SNMP community: · (Approach 2) Create an SNMP group, and add a user to the SNMP group: a. snmp-agent group { v1 | v2c } group-name [ read-view read-view ] [ write-view write-view ] [ notify-view notify-view ] [ acl acl-number ] b. snmp-agent usm-user { v1 | v2c } user-name group-name [ acl acl-number ] |
Use either approach. By default, no SNMP group exists. In approach 2, the username is equivalent to the community name in approach 1, and must be the same as the community name configured on the NMS. |
|
7. Configure the maximum size (in bytes) of SNMP packets for the SNMP agent. |
snmp-agent packet max-size byte-count |
Optional. By default, the SNMP agent can receive and send the SNMP packets up to 1500 bytes. |
|
8. Set the DSCP value for SNMP responses. |
Optional. By default, the DSCP value for SNMP responses is 0. |
Switching the NM-specific interface index format
A network management (NM)-specific ifindex identifies an interface and is provided by the SNMP managed device to the NMS. A network management-specific ifindex takes one of the following two formats:
· 16-bit NM-specific ifindex—The system dynamically assigns 16-bit NM-specific ifindex values to uniquely identify its interfaces. The 16-bit NM-specific ifindex value starts from 1 and increments by 1.
· 32-bit NM-specific ifindex—A 32-bit NM-specific ifindex value comprises an Offset, Interface Type, Slot ID, and Chassis ID, as shown in Figure 3.
Figure 3 32-bit NM-specific ifindex
![]()
¡ Offset—This field is 16 bits long and distinguishes different interfaces of the same type on the same interface card.
¡ Interface type—This field is 7 bits long and contains the enumerated value specific to the interface type. It supports up to 128 different interface types and supports more than 80 interface types at present.
¡ Slot ID—This field is 5 bits long and contains the number of the physical slot that holds the interface.
Configuration guidelines
· Use the 32-bit NM-specific ifindex format if the NMS requires the format to get information such as the slot that contains a specific interface. If the network protocol operating on the NMS does not support 32-bit NM-specific ifindex values, make sure NM-specific ifindex values on the device are 16-bit. By default, the device adopts the 16-bit NM-specific ifindex format.
· If the device runs the version 5 or version 8 of NetStream, you must use the 16-bit format, because the two NetStream versions reserve only 16 bits for the ifindex. NetStream version 9 reserves 32 bits for the ifindex, so you can use either 16-bit or 32-bit NM-specific ifindex format.
· An NM-specific ifindex format change invalidates the NM-specific ifindex dependent settings, and these settings cannot become valid until you switch the format back. To use these settings in the new format, you must re-configure them. For example, if an RMON alarm group or private alarm group has alarm variables in the format OID/variable-name.NM-specific-ifindex, you must reconfigure these variables after an NM-specific ifindex format change.
Configuration procedure
To switch the NM-specific ifindex format:
|
Step |
Command |
Remarks |
|
1. Enter system view. |
system-view |
N/A |
|
2. Switch the format of an NM-specific ifindex from 16-bit to 32-bit. |
snmp-agent ifmib long-ifindex enable |
Optional. By default, an NM-specific ifindex is in 16-bit format. |
|
3. Switch the format of an NM-specific ifindex from 32-bit to 16-bit. |
undo snmp-agent ifmib long-ifindex enable |
Optional. By default, an NM-specific ifindex is in 16-bit format. |
Configuring SNMP logging
Disable SNMP logging in normal cases to prevent a large amount of SNMP logs from decreasing device performance.
The SNMP logging function logs Get requests, Set requests, and Set responses, but does not log Get responses.
· Get operation—The agent logs the IP address of the NMS, name of the accessed node, and node OID.
· Set operation—The agent logs the NMS' IP address, name of accessed node, node OID, variable value, and error code and index for the Set operation.
The SNMP module sends these logs to the information center as informational messages. You can configure the information center to output these messages to certain destinations, for example, the console and the log buffer. The total output size for the node field (MIB node name) and the value field (value of the MIB node) in each log entry is 1024 bytes. If this limit is exceeded, the information center truncates the data in the fields. For more information about the information center, see "Configuring the information center."
|
Step |
Command |
Remarks |
|
1. Enter system view. |
system-view |
N/A |
|
2. Enable SNMP logging. |
snmp-agent log { all | get-operation | set-operation } |
By default, SNMP logging is disabled. |
Configuring SNMP traps
The SNMP agent sends traps to inform the NMS of important events, such as a reboot.
Traps fall into generic traps and vendor-specific traps. Generic traps include authentication, coldstart, linkdown, linkup and warmstart. All other traps are vendor-defined.
SNMP traps generated by a module are sent to the information center. You can configure the information center to enable or disable outputting the traps from a module by severity and set output destinations. For more information about the information center, see "Configuring the information center."
Enabling SNMP traps
Enable SNMP traps only if necessary. SNMP traps are memory-intensive and may affect device performance.
To generate linkUp or linkDown traps when the link state of an interface changes, you must enable the linkUp or linkDown trap function globally by using the snmp-agent trap enable [ standard [ linkdown | linkup ] * ] command and on the interface by using the enable snmp trap updown command.
After you enable a trap function for a module, whether the module generates traps also depends on the configuration of the module. For more information, see the configuration guide for each module.
To enable traps:
|
Step |
Command |
Remarks |
|
1. Enter system view. |
system-view |
N/A |
|
2. Enable traps globally. |
snmp-agent trap enable [ acfp [ client | policy | rule | server ] | arp rate-limit | configuration | default-route | flash | standard [ authentication | coldstart | linkdown | linkup | warmstart ] * | system [ authfailure | newmaster ] ] |
By default, all traps are enabled. |
|
3. Enter Layer 2 Ethernet interface view or VLAN interface view. |
interface interface-type interface-number |
N/A |
|
4. Enable link state traps. |
enable snmp trap updown |
By default, the link state traps are enabled. |
Configuring the SNMP agent to send traps to a host
The SNMP module buffers the traps received from a module in a trap queue. You can set the size of the queue, the duration that the queue holds a trap, and trap target (destination) hosts, typically the NMS.
To successfully send traps, you must also perform the following tasks:
· Complete the basic SNMP settings and verify that they are the same as on the NMS. If SNMPv1 or SNMPv2c is used, you must configure a community name. If SNMPv3 is used, you must configure an SNMPv3 user and MIB view.
· Make sure the device and the NMS can reach each other.
To configure the SNMP agent to send traps to a host:
|
Step |
Command |
Remarks |
|
1. Enter system view. |
system-view |
N/A |
|
2. Configure a target host. |
snmp-agent target-host trap address udp-domain ip-address [ udp-port port-number ] [ dscp dscp-value ] params securityname security-string [ v1 | v2c | v3 [ authentication | privacy ] ] |
N/A |
|
3. Configure the source address for traps. |
snmp-agent trap source interface-type interface-number |
Optional. By default, SNMP chooses the IP address of an interface to be the source IP address of traps. |
|
4. Extend the standard linkUp/linkDown traps. |
snmp-agent trap if-mib link extended |
Optional. By default, standard linkUp/linkDown traps are used. Extended linkUp/linkDown traps add interface description and interface type to standard linkUp/linkDown traps. If the NMS does not support extended SNMP messages, use standard linkUp/linkDown traps. |
|
5. Configure the trap queue size. |
snmp-agent trap queue-size size |
Optional. The default trap queue size is 100. When the trap queue is full, the oldest traps are automatically deleted for new traps. |
|
6. Configure the trap holding time. |
snmp-agent trap life seconds |
Optional. The default setting is 120 seconds. A trap is deleted when its holding time expires. |
Displaying and maintaining SNMP
|
Command |
Remarks |
|
|
Display SNMP agent system information, including the contact, physical location, and SNMP version. |
display snmp-agent sys-info [ contact | location | version ]* [ | { begin | exclude | include } regular-expression ] |
Available in any view. |
|
Display SNMP agent statistics. |
display snmp-agent statistics [ | { begin | exclude | include } regular-expression ] |
Available in any view. |
|
Display the local engine ID. |
display snmp-agent local-engineid [ | { begin | exclude | include } regular-expression ] |
Available in any view. |
|
Display SNMP group information. |
display snmp-agent group [ group-name ] [ | { begin | exclude | include } regular-expression ] |
Available in any view. |
|
Display basic information about the trap queue. |
display snmp-agent trap queue [ | { begin | exclude | include } regular-expression ] |
Available in any view. |
|
Display the modules that can send traps and their trap status (enable or disable). |
display snmp-agent trap-list [ | { begin | exclude | include } regular-expression ] |
Available in any view. |
|
Display SNMPv3 user information. |
display snmp-agent usm-user [ engineid engineid | username user-name | group group-name ] * [ | { begin | exclude | include } regular-expression ] |
Available in any view. |
|
Display SNMPv1 or SNMPv2c community information. |
display snmp-agent community [ read | write ] [ | { begin | exclude | include } regular-expression ] |
Available in any view. |
|
Display MIB view information. |
display snmp-agent mib-view [ exclude | include | viewname view-name ] [ | { begin | exclude | include } regular-expression ] |
Available in any view. |
SNMP configuration examples
This section gives examples of how to configure SNMPv1 or SNMPv2c, SNMPv3, and SNMP logging.
SNMPv1/SNMPv2c configuration example
Network requirements
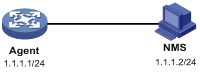
As shown in Figure 4, the NMS (1.1.1.2/24) uses SNMPv1 or SNMPv2c to manage the SNMP agent (1.1.1.1/24), and the agent automatically sends traps to report events to the NMS.
Configuration procedure
1. Configure the SNMP agent:
# Configure the IP address of the agent, and make sure the agent and the NMS can reach each other. (Details not shown.)
# Specify SNMPv1 and SNMPv2c, and create a read-only community public and a read and write community private.
<Agent> system-view
[Agent] snmp-agent sys-info version v1 v2c
[Agent] snmp-agent community read public
[Agent] snmp-agent community write private
# Configure contact and physical location information for the agent.
[Agent] snmp-agent sys-info contact Mr.Wang-Tel:3306
[Agent] snmp-agent sys-info location telephone-closet,3rd-floor
# Enable SNMP traps, set the NMS at 1.1.1.2 as an SNMP trap destination, and use public as the community name. (To make sure the NMS can receive traps, specify the same SNMP version in the snmp-agent target-host command as is configured on the NMS.)
[Agent] snmp-agent trap enable
[Agent] snmp-agent target-host trap address udp-domain 1.1.1.2 params securityname public v1
[Agent] quit
2. Configure the SNMP NMS:
# Configure the SNMP version for the NMS as v1 or v2c, create a read-only community and name it public, and create a read and write community and name it private. For information about configuring the NMS, see the NMS manual.
|
|
NOTE: The SNMP settings on the agent and the NMS must match. |
3. Verify the configuration:
# Try to get the count of sent traps from the agent. The attempt succeeds.
Send request to 1.1.1.1/161 ...
Protocol version: SNMPv1
Operation: Get
Request binding:
1: 1.3.6.1.2.1.11.29.0
Response binding:
1: Oid=snmpOutTraps.0 Syntax=CNTR32 Value=18
Get finished
# Use a wrong community name to get the value of a MIB node from the agent. You can see an authentication failure trap on the NMS.
1.1.1.1/2934 V1 Trap = authenticationFailure
SNMP Version = V1
Community = public
Command = Trap
Enterprise = 1.3.6.1.4.1.43.1.16.4.3.50
GenericID = 4
SpecificID = 0
Time Stamp = 8:35:25.68
SNMPv3 configuration example
Network requirements
As shown in Figure 5, the NMS (1.1.1.2/24) uses SNMPv3 to monitor and manage the interface status of the agent (1.1.1.1/24), and the agent automatically sends traps to report events to the NMS.
The NMS and the agent perform authentication when they set up an SNMP session. The authentication algorithm is MD5 and the authentication key is authkey. The NMS and the agent also encrypt the SNMP packets between them by using the DES algorithm and the privacy key prikey.
Configuration procedure
1. Configure the agent:
# Configure the IP address of the agent and make sure the agent and the NMS can reach each other. (Details not shown.)
# Assign the NMS read and write access to the objects under the snmp node (OID 1.3.6.1.2.1.11), and deny its access to any other MIB object.
<Agent> system-view
[Agent] undo snmp-agent mib-view ViewDefault
[Agent] snmp-agent mib-view included test snmp
[Agent] snmp-agent group v3 managev3group read-view test write-view test
# Set the username to managev3user, authentication algorithm to MD5, authentication key to authkey, encryption algorithm to DES56, and privacy key to prikey.
[Agent] snmp-agent usm-user v3 managev3user managev3group authentication-mode md5 authkey privacy-mode des56 prikey
# Configure contact person and physical location information for the agent.
[Agent] snmp-agent sys-info contact Mr.Wang-Tel:3306
[Agent] snmp-agent sys-info location telephone-closet,3rd-floor
# Enable traps, specify the NMS at 1.1.1.2 as a trap destination, and set the username to managev3user for the traps.
[Agent] snmp-agent trap enable
[Agent] snmp-agent target-host trap address udp-domain 1.1.1.2 params securityname managev3user v3 privacy
2. Configure the SNMP NMS:
¡ Specify the SNMP version for the NMS as v3.
¡ Create two SNMP users: managev3user and public.
¡ Enable both authentication and privacy functions.
¡ Use MD5 for authentication and DES for encryption.
¡ Set the authentication key to authkey and the privacy key to prikey.
¡ Set the timeout time and maximum number of retries.
For information about configuring the NMS, see the NMS manual.
|
|
NOTE: The SNMP settings on the agent and the NMS must match. |
3. Verify the configuration:
# Try to get the count of sent traps from the agent. The get attempt succeeds.
Send request to 1.1.1.1/161 ...
Protocol version: SNMPv3
Operation: Get
Request binding:
1: 1.3.6.1.2.1.11.29.0
Response binding:
1: Oid=snmpOutTraps.0 Syntax=CNTR32 Value=18
Get finished
# Try to get the device name from the agent. The get attempt fails because the NMS has no access right to the node.
Send request to 1.1.1.1/161 ...
Protocol version: SNMPv3
Operation: Get
Request binding:
1: 1.3.6.1.2.1.1.5.0
Response binding:
1: Oid=sysName.0 Syntax=noSuchObject Value=NULL
Get finished
# Execute the shutdown or undo shutdown command on an idle interface on the agent. You can see the interface state change traps on the NMS:
1.1.1.1/3374 V3 Trap = linkdown
SNMP Version = V3
Community = managev3user
Command = Trap
1.1.1.1/3374 V3 Trap = linkup
SNMP Version = V3
Community = managev3user
Command = Trap
SNMP logging configuration example
Network requirements
Configure the SNMP agent (1.1.1.1/24) in Figure 6 to log the SNMP operations performed by the NMS.

Configuration procedure
This example assumes that you have configured all required SNMP settings for the NMS and the agent (see "SNMPv1/SNMPv2c configuration example" or "SNMPv3 configuration example").
# Enable displaying log messages on the configuration terminal. (This function is enabled by default. Skip this step if you are using the default.)
<Agent> terminal monitor
<Agent> terminal logging
# Enable the information center to output system information with severity level equal to or higher than informational to the console.
<Agent> system-view
[Agent] info-center source snmp channel console log level informational
# Enable logging GET and SET operations.
[Agent] snmp-agent log all
# Verify the configuration:
Use the NMS to get a MIB variable from the agent. The following is a sample log message displayed on the configuration terminal:
%Jan 1 02:49:40:566 2013 Sysname SNMP/6/GET:
seqNO = <10> srcIP = <1.1.1.2> op = <get> node = <sysName(1.3.6.1.2.1.1.5.0)> value=<>
Use the NMS to set a MIB variable on the agent. The following is a sample log message displayed on the configuration terminal:
%Jan 1 02:59:42:576 2013 Sysname SNMP/6/SET:
seqNO = <11> srcIP = <1.1.1.2> op = <set> errorIndex = <0> errorStatus =<noError> node = <sysName(1.3.6.1.2.1.1.5.0)> value = <Agent>
Table 1 SNMP log message field description
|
Field |
Description |
|
Jan 1 02:49:40:566 2013 |
Time when the SNMP log was generated. |
|
seqNO |
Serial number automatically assigned to the SNMP log, starting from 0. |
|
srcIP |
IP address of the NMS. |
|
op |
SNMP operation type (GET or SET). |
|
node |
MIB node name and OID of the node instance. |
|
errorIndex |
Error index, with 0 meaning no error. |
|
errorStatus |
Error status, with noError meaning no error. |
|
value |
Value set by the SET operation. This field is null for a GET operation. If the value is a character string that has invisible characters or characters beyond the ASCII range 0 to 127, the string is displayed in hexadecimal format, for example, value = <81-43>[hex]. |
The information center can output system event messages to several destinations, including the terminal and the log buffer. In this example, SNMP log messages are output to the terminal. To configure other message destinations, see "Configuring the information center."
MIBs include public MIBs and private MIBs. A private MIB is attached to a sub-node under the enterprises MIB node (1.3.6.1.4.1). The H3C private MIB has two styles: the H3C compatible MIB style and the H3C new MIB style:
· In the H3C compatible MIB style, the device public MIB is under the H3C's enterprise ID 25506, and the private MIB is under the enterprise ID 2011.
· In the H3C new MIB style, both the device public MIB and the private MIB are under the H3C's enterprise ID 25506.
These two styles of MIBs implement the same management function. Your device comes with a MIB loaded but the MIB style depends on the device model. You can change the MIB style as needed, but must make sure the device is using the same MIB style as the NMS.
Setting the MIB style
|
Step |
Command |
Remarks |
|
1. Enter system view. |
system-view |
N/A |
|
2. Set the MIB style. |
mib-style [ compatible | new ] |
By default, H3C new MIB style is used. |
After changing the MIB style, reboot the device to validate the change.
Displaying and maintaining MIB style
|
Task |
Command |
Remarks |
|
Display the MIB style. |
display mib-style [ | { begin | exclude | include } regular-expression ] |
Available in any view. |