- Table of Contents
- Related Documents
-
| Title | Size | Download |
|---|---|---|
| 04-H3C Wi-Fi 5 Access Points Operating Mode Switching Guide | 360.10 KB |
Operating Mode Switching Guide
Copyright © 2022 New H3C Technologies Co., Ltd. All rights reserved
No part of this manual may be reproduced or transmitted in any form or by any means without prior written consent of New H3C Technologies Co., Ltd.
Except for the trademarks of New H3C Technologies Co., Ltd., any trademarks that may be mentioned in this document are the property of their respective owners.
The information in this document is subject to change without notice.
Contents
Determining the current operating mode of the AP
From the BootWare menu of the AP
By checking the default wireless service
Hardware and mode compatibility
Switching the operating mode from the BootWare menu
Switching the operating mode from fit to fat
Switching the operating mode from fit to fat
Upgrading from the BootWare menu
Switching the operating mode from fit to anchor AP
Switching the operating mode from fit to anchor AP
Upgrading from the BootWare menu
Switching the operating mode from fit to cloud
Switching the operating mode from the Cloudnet platform
Switching the operating mode from fit to cloud
Logging in to the Cloudnet platform
About AP operating modes
Introduction
|
|
NOTE: Supported operating modes vary by AP model. For more information, see the AP release notes. |
Wi-Fi 5 APs can operate in fat, fit, cloud, anchor AP, or anchor AC mode.
The following are the supported operating modes:
· Fat—The AP operates independently to provide wireless access, DHCP, security, and authentication services.
· Fit—The AP is managed and controlled by an AC.
· Cloud—The AP can be managed from Cloudnet or from its Web interface.
· Anchor AP—The AP acts as a fit AP to provide the wireless access service.
· Anchor AC—The AP acts as an AC to manage fit APs. An anchor AC automatically creates a manual AP whose name is the local MAC address and the serial number is the local serial number to manage radios on the AC.
An AP operating in anchor AC mode will switch to fit mode and associate with an AC if it does not have persistent mode configured and discovers another AC in the network.
Determining the current operating mode of the AP
|
|
NOTE: The supported methods vary by AP version and model. If one method is not supported, you can use another method. |
From the CLI of the AP
# Log in to the AP from the console port, and then execute the display wlan device role command in any view.
<AP> display wlan device role
Current device role: Cloud AP
Table 1 Command output
|
Field |
Description |
|
Current device role |
· Anchor AC—AC in an AC hierarchy network. · Anchor AP—AC in an AC hierarchy network. · FIT AP. · FAT AP. · Cloud AP. |
From the BootWare menu of the AP
# Press Ctrl + B when "Press Ctrl+B to access EXTENDED-BOOTWARE MENU..." is displayed during the power-on and restart process of the AP.
==========================<EXTENDED-BOOTWARE MENU>======================
|<1> Boot System |
|<2> Enter Serial SubMenu |
|<3> Enter Ethernet SubMenu |
|<4> File Control |
|<5> Restore to Factory Default Configuration |
|<6> Skip Current System Configuration |
|<7> BootWare Operation Menu |
|<8> Skip Authentication for Console Login |
|<9> Storage Device Operation |
|<0> Reboot |
=======================================================================
Ctrl+Z: Access EXTENDED ASSISTANT MENU
Ctrl+F: Format File System
Ctrl+C: Display Copyright
Ctrl+Y: Change AP Mode
Enter your choice(0-9):
# Press Ctrl + Y at the main menu.
Please select the new mode
Current mode is Oasis Mode
============================================================================
|NO. Mode |
|1 Fat Mode |
|2 Fit Mode |
|3 Anchor-AC (Virtual AC Mode) |
|4 Anchor-Fit |
|5 Oasis Mode |
|0 Exit |
============================================================================
Enter your choice(0-5):
By checking the default wireless service
Use this method to identify whether an AP is operating in cloud or fat mode. After the AP is powered on, use a client to search for this network:
· If the SSID is in the H3C_xxxxxx format, the AP is operating in cloud mode. xxxxxx represents the last six digits of the AP’s MAC address.
· If the SSID is H3C, the AP is operating in fat mode.
Hardware and mode compatibility
|
|
NOTE: The supported modes might vary by software or hardware version. For more information, see the AP release notes. |
Table 2 Hardware and operating mode compatibility
|
Mode |
Compatible models |
|
FAT |
WA530X-WW, WA5330, WA536-WW, WA538-JP, WA538-WW, WA5530i, and WA5530X |
|
Cloud |
WA530-WW and WA538-JP |
|
Anchor |
WA530X-WW, WA5330, WA536-WW, WA538-JP, WA538-WW, WA5530i, and WA5530X |
Software image downloading
To download a software image, access the H3C official website at:
http://www.h3c.com/en/Support/Resource_Center/Software_Download/Wireless/
Switching the operating mode from the BootWare menu
|
|
NOTE: The system output in this section is for illustration only. |
Restrictions and guidelines
· You can use the BootWare menu to switch between any two operating modes.
· During mode switching, improper operations of unexpected power-off might cause device restart. Please be cautious.
· Make sure the device has sufficient space for storing the boot file of the target mode.
· The system output varies by device model and software version.
· You cannot log in to an AP in fit AP mode through the Console port once the AP is associated with an AC.
· This document uses fit-to-fat, fit-to-cloud, and fit-to-anchor switching as examples.
Switching the operating mode from fit to fat
Prerequisites
Before mode switching, connect your PC to the console port of an AP by using a console cable.
Figure 1 Network diagram

Switching the operating mode from fit to fat
# Restart the AP. The following output will be displayed.
System is starting...
Press Ctrl+D to access BASIC-BOOTWARE MENU
Booting Normal Extended BootWare
The Extended BootWare is self-decompressing.................................
...Done.
****************************************************************************
* *
* H3C WA5530i BootWare, Version 7.09 *
* *
****************************************************************************
Copyright (c) 2004-2017 New H3C Technologies Co., Ltd.
Compiled Date : Jun 23 2017
CPU Type : ARM
CPU L1 Cache : 32KB
CPU L2 Cache : 256KB
CPU Clock Speed : 710MHz
Memory Type : DDR3 SDRAM
Memory Size : 512MB
Memory Speed : 667MHz
Flash Size : 128MB
PCB Version : Ver.A
BootWare Validating...
Press Ctrl+B to access EXTENDED-BOOTWARE MENU...
# Press Ctrl + B when “Press Ctrl+B to access EXTENDED-BOOTWARE MENU...” is displayed.
Password recovery capability is enabled.
Note: The current operating device is flash
Enter < Storage Device Operation > to select device.
==========================<EXTENDED-BOOTWARE MENU>==========================
|<1> Boot System |
|<2> Enter Serial SubMenu |
|<3> Enter Ethernet SubMenu |
|<4> File Control |
|<5> Restore to Factory Default Configuration |
|<6> Skip Current System Configuration |
|<7> BootWare Operation Menu |
|<8> Skip Authentication for Console Login |
|<9> Storage Device Operation |
|<0> Reboot |
============================================================================
Ctrl+Z: Access EXTENDED ASSISTANT MENU
Ctrl+F: Format File System
Ctrl+C: Display Copyright
Ctrl+Y: Change AP Mode
Enter your choice(0-9):
Table 3 EXTENDED-BOOTWARE menu
|
Item |
Description |
|
<1> Boot System |
Boot the system software image. |
|
<2> Enter Serial SubMenu |
Access the Serial submenu. |
|
<3> Enter Ethernet SubMenu |
Access the Ethernet submenu. |
|
<4> File Control |
Access the File Control submenu. |
|
<5> Restore to Factory Default Configuration |
Restore the factory-default configuration. |
|
<6> Skip Current System Configuration |
Start the device with the factory default configuration. This is a one-time operation and does not take effect at the next reboot. You can use this option when you forget the login password. |
|
<7> BootWare Operation Menu |
Access the BootWare Operation menu for backing up, restoring, or upgrading BootWare. When you upgrade the system software image, BootWare is automatically upgraded. As a best practice, do not upgrade BootWare separately. |
|
<8> Skip Authentication for Console Login |
Clear the login password on the console port. |
|
<9> Storage Device Operation |
Access the Storage Device Operation menu to manage storage devices. |
|
<0> Reboot |
Restart the device. |
|
Ctrl+Z: Access EXTENDED ASSISTANT MENU |
Access the Extended Assistant BootWare menu. |
|
Ctrl+F: Format File System |
Format the file system. |
|
Ctrl+C: Display Copyright |
Display copyright information. |
|
Ctrl+Y: Change AP Mode |
Change the AP mode. |
# Press Ctrl + F at the main menu and enter Y to format the storage media.
Warning:All files on flash will be lost! Are you sure to format? [Y/N]Y.....
............................................................................
..................
Format success.
# Press Ctrl + Y at the main menu.
Please select the new mode
Current mode is Fit
============================================================================
|NO. Mode |
|1 Fat Mode |
|2 Fit Mode |
|0 Exit |
============================================================================
Enter your choice(0-2):
# Enter 1. The switching is successful when the following message displayed.
Enter your choice(0-2):1
Changed to fat mode successfully!
# Load a fat AP image from the BootWare menu for the AP to start in fat mode. For more information, see "Upgrading from the BootWare menu."
Upgrading from the BootWare menu
Entering the EXTENDED-BOOTWARE menu
1. Reboot the AP.
System is starting...
Press Ctrl+D to access BASIC-BOOTWARE MENU
Booting Normal Extended BootWare
The Extended BootWare is self-decompressing.................................
...Done.
****************************************************************************
* *
* H3C WA5530i BootWare, Version 7.09 *
* *
****************************************************************************
Copyright (c) 2004-2017 New H3C Technologies Co., Ltd.
Compiled Date : Jun 23 2017
CPU Type : ARM
CPU L1 Cache : 32KB
CPU L2 Cache : 256KB
CPU Clock Speed : 710MHz
Memory Type : DDR3 SDRAM
Memory Size : 512MB
Memory Speed : 667MHz
Flash Size : 128MB
PCB Version : Ver.A
BootWare Validating...
Press Ctrl+B to access EXTENDED-BOOTWARE MENU...
2. Press Ctrl+B at the prompt to access the EXTENDED-BOOTWARE menu.
Password recovery capability is enabled.
Note: The current operating device is flash
Enter < Storage Device Operation > to select device.
==========================<EXTENDED-BOOTWARE MENU>==========================
|<1> Boot System |
|<2> Enter Serial SubMenu |
|<3> Enter Ethernet SubMenu |
|<4> File Control |
|<5> Restore to Factory Default Configuration |
|<6> Skip Current System Configuration |
|<7> BootWare Operation Menu |
|<8> Skip Authentication for Console Login |
|<9> Storage Device Operation |
|<0> Reboot |
============================================================================
Ctrl+Z: Access EXTENDED ASSISTANT MENU
Ctrl+F: Format File System
Ctrl+C: Display Copyright
Ctrl+Y: Change AP Mode
Enter your choice(0-9):
Using TFTP/FTP to upgrade software through an Ethernet port
1. In the EXTENDED-BOOTWARE menu, enter 3 to access the Ethernet submenu.
==========================<Enter Ethernet SubMenu>==========================
|Note:the operating device is flash |
|<1> Download Image Program To SDRAM And Run |
|<2> Update Main Image File |
|<3> Update Backup Image File |
|<4> Download Files(*.*) |
|<5> Modify Ethernet Parameter |
|<0> Exit To Main Menu |
|<Ensure The Parameter Be Modified Before Downloading!> |
============================================================================
Enter your choice(0-5):
Table 4 Ethernet submenu options
|
Item |
|
|
<1> Download Image Program To SDRAM And Run |
Download a system software image to the SDRAM and run the image. |
|
<2> Update Main Image File |
Upgrade the main system software image. |
|
<3> Update Backup Image File |
Upgrade the backup system software image. |
|
<4> Download Files(*.*) |
Download a system software image to the Flash or CF card. |
|
<5> Modify Ethernet Parameter |
Modify network settings. |
|
<0> Exit To Main Menu |
Return to the EXTENDED-BOOTWARE menu. |
2. Enter 5 to configure the network settings.
==========================<ETHERNET PARAMETER SET>==========================
|Note: '.' = Clear field. |
| '-' = Go to previous field. |
| Ctrl+D = Quit. |
============================================================================
Protocol (FTP or TFTP) :tftp
Load File Name :wa5300-fat.ipe
:
Target File Name :wa5300-fat.ipe
:
Server IP Address :192.168.0.2
Local IP Address :192.168.0.50
Subnet Mask :0.0.0.0
Gateway IP Address :0.0.0.0
Table 5 Network parameter fields and shortcut keys
|
Field |
Description |
|
'.' = Clear field |
Press dot (.) and then Enter to clear the setting for a field. |
|
'-' = Go to previous field |
Press hyphen (-) and then Enter to return to the previous field. |
|
Ctrl+D = Quit |
Press Ctrl + D to exit the Ethernet Parameter Set menu. |
|
Protocol (FTP or TFTP) |
Set the file transfer protocol to FTP or TFTP. |
|
Load File Name |
Set the name of the file to be downloaded. |
|
Target File Name |
Set a file name for saving the file on the device. By default, the target file name is the same as the source file name. |
|
Server IP Address |
Set the IP address of the FTP or TFTP server. If a mask must be set, use a colon (:) to separate the mask length from the IP address. For example, 160.2.1.100:24. |
|
Local IP Address |
Set the IP address of the device. |
|
Subnet Mask |
Subnet Mask of the local IP address. |
|
Gateway IP Address |
Set a gateway IP address if the device is on a different network than the server. |
|
FTP User Name |
Set the username for accessing the FTP server. This username must be the same as configured on the FTP server. This field is not available for TFTP. |
|
FTP User Password |
Set the password for accessing the FTP server. This password must be the same as configured on the FTP server. This field is not available for TFTP. |
3. Select option 2 or 3 in the Ethernet submenu to upgrade a system software image. For example, enter 2 to upgrade the main system software image.
Loading.....................................................................
............................................................................
............................................................................
............................................................................
............................................................................
............................................................................
............................................................................
............................................................................
............................................................................
.......................................................Done.
37386240 bytes downloaded!
Image file wa5300-fat-boot.bin is self-decompressing...
Saving file flash:/wa5300-fat-boot.bin ................Done.
Image file wa5300-fat-system.bin is self-decompressing...
Saving file flash:/wa5300-fat-system.bin ...................................
........................................................Done.
4. Enter 0 to return to the EXTENDED-BOOTWARE menu.
Enter your choice(0-5): 0
==========================<EXTENDED-BOOTWARE MENU>==========================
|<1> Boot System |
|<2> Enter Serial SubMenu |
|<3> Enter Ethernet SubMenu |
|<4> File Control |
|<5> Restore to Factory Default Configuration |
|<6> Skip Current System Configuration |
|<7> BootWare Operation Menu |
|<8> Skip Authentication for Console Login |
|<9> Storage Device Operation |
|<0> Reboot |
============================================================================
Ctrl+Z: Access EXTENDED ASSISTANT MENU
Ctrl+F: Format File System
Ctrl+C: Display Copyright
Ctrl+Y: Change AP Mode
Enter your choice(0-9):
5. Enter 1 to boot the system.
Enter your choice(0-9): 1
Loading the main image files...
Loading file flash:/wa5300-fat-system.bin.................................
Done.
Loading file flash:/wa5300-fat-boot.bin........Done.
Image file flash:/wa5300-fat-boot.bin is self-decompressing.................
............................................................................
............................................................................
............................................................................
............................................................................
............................................................................
............................................................................
......................Done.
System image is starting...
Startup configuration file doesn't exist or is invalid.
Line con0 is available.
Press ENTER to get started.
Switching the operating mode from fit to anchor AP
Prerequisites
Before mode switching, connect your PC to the console port of an AP by using a console cable.
Figure 2 Network diagram

Switching the operating mode from fit to anchor AP
# Restart the AP. The following output will be displayed.
Starting......
Press Ctrl+D to access BASIC BOOT MENU
****************************************************************************
* *
* H3C WA538-WW BootWare, Version 7.23 *
* *
****************************************************************************
Copyright (c) 2004-2018 New H3C Technologies Co., Ltd.
Compiled Date : Dec 19 2017
CPU Type : ARM
CPU L1 Cache : 32KB
CPU L2 Cache : 256KB
CPU Clock Speed : 710MHz
Memory Type : DDR3 SDRAM
Memory Size : 512MB
Memory Speed : 667MHz
Flash Size : 128MB
PCB Version : Ver.A
Press Ctrl+B to access EXTENDED 4
# Press Ctrl + B when "Press Ctrl+B to access EXTENDED-BOOTWARE MENU..." is displayed.
Password recovery capability is enabled.
Note: The current operating device is flash
Enter < Storage Device Operation > to select device.
==========================<EXTENDED-BOOTWARE MENU>==========================
|<1> Boot System |
|<2> Enter Serial SubMenu |
|<3> Enter Ethernet SubMenu |
|<4> File Control |
|<5> Restore to Factory Default Configuration |
|<6> Skip Current System Configuration |
|<7> BootWare Operation Menu |
|<8> Skip Authentication for Console Login |
|<9> Storage Device Operation |
|<0> Reboot |
============================================================================
Ctrl+Z: Access EXTENDED ASSISTANT MENU
Ctrl+F: Format File System
Ctrl+C: Display Copyright
Ctrl+Y: Change AP Mode
Enter your choice(0-9):
Table 6 EXTENDED-BOOTWARE menu options
|
Item |
Description |
|
<1> Boot System |
Boot the system software image. |
|
<2> Enter Serial SubMenu |
Access the Serial submenu. |
|
<3> Enter Ethernet SubMenu |
Access the Ethernet submenu. |
|
<4> File Control |
Access the File Control submenu. |
|
<5> Restore to Factory Default Configuration |
Restore the factory-default configuration. |
|
<6> Skip Current System Configuration |
Start the device with the factory default configuration. This is a one-time operation and does not take effect at the next reboot. You can use this option when you forget the login password. |
|
<7> BootWare Operation Menu |
Access the BootWare Operation menu for backing up, restoring, or upgrading BootWare. When you upgrade the system software image, BootWare is automatically upgraded. As a best practice, do not upgrade BootWare separately. |
|
<8> Skip Authentication for Console Login |
Clear the login password on the console port. |
|
<9> Storage Device Operation |
Access the Storage Device Operation menu to manage storage devices. |
|
<0> Reboot |
Restart the device. |
# Press Ctrl + Y at the main menu.
Please select the new mode
Current mode is FIT Mode
============================================================================
|NO. Mode |
|1 Fat Mode |
|2 Fit Mode |
|3 Anchor-AC (Virtual AC Mode) |
|4 Anchor-Fit |
|5 Oasis Mode |
|0 Exit |
============================================================================
Enter your choice(0-5):
# Enter 4 to switch the mode to anchor fit. The switching is successful when the following message displayed.
Enter your choice(0-5):4
Changed to fat mode successfully!
Upgrading from the BootWare menu
1. In the EXTENDED-BOOTWARE menu, enter 3 to access the Ethernet submenu.
==========================<Enter Ethernet SubMenu>==========================
|Note:the operating device is flash |
|<1> Download Image Program To SDRAM And Run |
|<2> Update Main Image File |
|<3> Update Backup Image File |
|<4> Download Files(*.*) |
|<5> Modify Ethernet Parameter |
|<0> Exit To Main Menu |
|<Ensure The Parameter Be Modified Before Downloading!> |
============================================================================
Enter your choice(0-5):
Table 7 Ethernet submenu options
|
Item |
Description |
|
<1> Download Image Program To SDRAM And Run |
Download a system software image to the SDRAM and run the image. |
|
<2> Update Main Image File |
Upgrade the main system software image. |
|
<3> Update Backup Image File |
Upgrade the backup system software image. |
|
<4> Download Files(*.*) |
Download a system software image to the Flash or CF card. |
|
<5> Modify Ethernet Parameter |
Modify network settings. |
|
<0> Exit To Main Menu |
Return to the EXTENDED-BOOTWARE menu. |
2. Enter 5 to configure the network settings.
=========================<ETHERNET PARAMETER SET>=========================
|Note: '.' = Clear field. |
| '-' = Go to previous field. |
| Ctrl+D = Quit. |
==========================================================================
Protocol (FTP or TFTP) :ftp
Load File Name :wa5300-anchor.ipe
:
Target File Name :wa5300-anchor.ipe
:
Server IP Address :192.168.0.2
Local IP Address :192.168.0.50
Subnet Mask :255.255.255.0
Gateway IP Address :0.0.0.0
FTP User Name :user001
FTP User Password :********
Table 8 Network parameter fields and shortcut keys
|
Field |
Description |
|
'.' = Clear field |
Press dot (.) and then Enter to clear the setting for a field. |
|
'-' = Go to previous field |
Press hyphen (-) and then Enter to return to the previous field. |
|
Ctrl+D = Quit |
Press Ctrl + D to exit the Ethernet Parameter Set menu. |
|
Protocol (FTP or TFTP) |
Set the file transfer protocol to FTP or TFTP. |
|
Load File Name |
Set the name of the file to be downloaded. |
|
Target File Name |
Set a file name for saving the file on the device. By default, the target file name is the same as the source file name. |
|
Server IP Address |
Set the IP address of the FTP or TFTP server. If a mask must be set, use a colon (:) to separate the mask length from the IP address. For example, 160.2.1.100:24. |
|
Local IP Address |
Set the IP address of the device. |
|
Subnet Mask |
Subnet Mask of the local IP address. |
|
Gateway IP Address |
Set a gateway IP address if the device is on a different network than the server. |
|
FTP User Name |
Set the username for accessing the FTP server. This username must be the same as configured on the FTP server. This field is not available for TFTP. |
|
FTP User Password |
Set the password for accessing the FTP server. This password must be the same as configured on the FTP server. This field is not available for TFTP. |
3. Select option 2 or 3 in the Ethernet submenu to upgrade a system software image. For example, enter 2 to upgrade the main system software image.
Loading.....................................................................
............................................................................
............................................................................
...................................................Done.
13736960 bytes downloaded!
Image file wa5300anchor-boot.bin is self-decompressing...
Saving file flash:/wa5300-anchor-boot.bin .........................................
............................................................................
............................................................................
............................................................................
................................................Done.
Image file wa5300anchor-system.bin is self-decompressing...
Saving file flash:/wa5300-anchor-system.bin .......................................
............................................................................
............................................................................
............................................................................
............................................................................
............................................................................
............................................................................
............................................................................
..............Done.
==========================<Enter Ethernet SubMenu>==========================
|Note:the operating device is flash |
|<1> Download Image Program To SDRAM And Run |
|<2> Update Main Image File |
|<3> Update Backup Image File |
|<4> Download Files(*.*) |
|<5> Modify Ethernet Parameter |
|<0> Exit To Main Menu |
|<Ensure The Parameter Be Modified Before Downloading!> |
============================================================================
Enter your choice(0-5):
4. Enter 0 to return to the EXTENDED-BOOTWARE menu.
Enter your choice(0-5): 0
===========================<EXTENDED-BOOTWARE MENU>==========================
|<1> Boot System |
|<2> Enter Serial SubMenu |
|<3> Enter Ethernet SubMenu |
|<4> File Control |
|<5> Modify BootWare Password |
|<6> Skip Current System Configuration |
|<7> BootWare Operation Menu |
|<8> Skip Authentication for Console Login |
|<9> Storage Device Operation |
|<0> Reboot |
============================================================================
Ctrl+Z: Access EXTENDED ASSISTANT MENU
Ctrl+F: Format File System
Ctrl+C: Display Copyright
Ctrl+Y: Change AP Mode
Enter your choice(0-9):
5. Enter 1 to boot the system.
Enter your choice(0-9): 1
Loading the main image files...
Loading file flash:/wa5300-anchor-system.bin.................................
...Done.
Loading file flash:/wa5300-anchor-boot.bin........Done.
Image file flash:/wa5300-anchor-boot.bin is self-decompressing...............
............................................................................
............................................................................
............................................................................
............................................................................
............................................................................
............................................................................
......Done.
System image is starting...
Startup configuration file doesn't exist or is invalid.
Line con0 is available.
Press ENTER to get started.
6. After the upgrade, verify that the AP's firmware has been upgraded to the most recent version.
<Sysname>display version
H3C Comware Software, Version 7.1.064, Release 2436
Copyright (c) 2004-2020 New H3C Technologies Co., Ltd. All rights reserved.
H3C WA538-WW uptime is 0 weeks, 0 days, 0 hours, 1 minute
Last reboot reason : User soft reboot
Boot image: flash:/wa5300-anchor-boot.bin
Boot image version: 7.1.064, Release 2436
Compiled Aug 27 2020 16:00:00
System image: flash:/wa5300-anchor-system.bin
System image version: 7.1.064, Release 2436
Compiled Aug 27 2020 16:00:00
with 1 ARM 710MHz Processor
512M bytes DDR3
4M bytes NorFlash Memory
128M bytes NandFlash Memory
Hardware Version is Ver.A
Basic Bootrom Version is 7.13
Extend Bootrom Version is 7.23
[Subslot 0]H3C WA5530 Hardware Version is Ver.A
[SLOT 1]GE1/0/1 (Hardware)Ver.A, (Driver)1.0
[SLOT 1]GE1/0/2 (Hardware)Ver.A, (Driver)1.0
[SLOT 1]RADIO1/0/1 (Hardware)Ver.A, (Driver)1.0
[SLOT 1]RADIO1/0/2 (Hardware)Ver.A, (Driver)1.0
[SLOT 1]RADIO1/0/3 (Hardware)Ver.A, (Driver)1.0
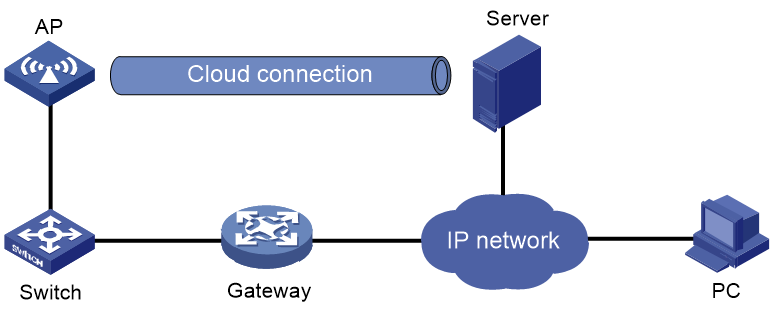
Switching the operating mode from fit to cloud
Prerequisites
· Make sure the device and the file server can reach each other.
· Enable TFTP or FTP Server on the file server.
· Copy the boot file of the AP to the file server and set the TFTP or FTP server access path.
· Before mode switching, connect your PC to the console port of an AP by using a console cable.
Figure 3 Network diagram

Procedure
Upgrading BootWare
|
|
NOTE: For BootWare versions that support the cloud mode, see the software release notes. You can skip this section if the AP's BootWare version supports the cloud mode. |
1. Identify the current BootWare version. Log in to the AP and view the BootWare version of the AP.
<AP> display version
……………………………………………………
Extend Bootrom Version is 7.27
2. Read the version compatibility matrixes of the AP and identify if the current BootWare version supports the cloud mode. If the cloud mode is supported, skip the BootWare upgrade procedures. If the cloud mode is not supported, proceed to the next step.
3. Download the software image for BootWare from the H3C official website. The image is compressed in the same package as the Oasis software image.
4. Power on and restart the AP. The following output is displayed:
System is starting...
Press Ctrl+D to access BASIC-BOOTWARE MENU
Booting Normal Extend BootWare....
The Extend BootWare is self-decompressing.........................Done!
****************************************************************************
* *
* H3C WA530-WW BootWare, Version 7.15 *
* *
****************************************************************************
Copyright (c) 2004-2018 New H3C Technologies Co., Ltd.
Compiled Date : Aug 21 2018
CPU Type : ARM
CPU L1 Cache : 32KB
CPU L2 Cache : 256KB
CPU Clock Speed : 710MHz
Memory Type : DDR3 SDRAM
Memory Size : 256MB
Memory Speed : 533MHz
Flash Size : 32MB
PCB Version : Ver.B
BootWare Validating...
Press Ctrl+B to access EXTENDED-BOOTWARE MENU...
5. Press Ctrl + B when "Press Ctrl+B to access EXTENDED-BOOTWARE MENU..." is displayed.
Password recovery capability is enabled.
Note: The current operating device is flash
Enter < Storage Device Operation > to select device.
==========================<EXTENDED-BOOTWARE MENU>==========================
|<1> Boot System |
|<2> Enter Serial SubMenu |
|<3> Enter Ethernet SubMenu |
|<4> File Control |
|<5> Restore to Factory Default Configuration |
|<6> Skip Current System Configuration |
|<7> BootWare Operation Menu |
|<8> Skip Authentication for Console Login |
|<9> Storage Device Operation |
|<0> Reboot |
============================================================================
Ctrl+Z: Access EXTENDED ASSISTANT MENU
Ctrl+F: Format File System
Ctrl+C: Display Copyright
Ctrl+Y: Change AP Mode
Enter your choice(0-9): 7
6. Press 7 at the main menu.
===================================================
|Note:the operating device is flash |
|<1> Backup Full BootWare |
|<2> Restore Full BootWare |
|<3> Update BootWare By Serial |
|<4> Update BootWare By Ethernet |
|<0> Exit To Main Menu |
============================================================================
Enter your choice(0-4): 4
7. Enter 4 to access the Ethernet submenu.
======================================
|<1> Update Full BootWare |
|<2> Update Extend BootWare |
|<3> Update Basic BootWare |
|<4> Modify Ethernet Parameter |
|<0> Exit To Main Menu |
============================================================================
Enter your choice(0-4): 4
8. Enter 4 to modify network parameters.
====================================================
|Note: "." = Clear field. |
| "-" = Go to previous field. |
| Ctrl+D = Quit. |
============================================================================
Protocol (FTP or TFTP) :tftp
Load File Name :wa5300.ipe
:apwa5300_v7.19.btw
Target File Name :wa5300.ipe
:apwa5300_v7.19.btw
Server IP Address :192.168.0.99 192.168.100.31
Local IP Address :192.168.0.98 192.168.100.244
Subnet Mask :255.255.255.0
Gateway IP Address :0.0.0.0
======================================
|<1> Update Full BootWare |
|<2> Update Extended BootWare |
|<3> Update Basic BootWare |
|<4> Modify Ethernet Parameter |
|<0> Exit To Main Menu |
============================================================================
Enter your choice(0-4): 1
9. Enter 1 to update the BootWare version.
Loading...........................Done.
1233920 bytes downloaded!
Updating Basic BootWare? [Y/N]Y
Updating Basic BootWare.....Done.
Updating Extended BootWare? [Y/N]Y
Updating Extended BootWare.........Done.
Switching from fit to cloud
1. At the EXTENDED-BOOTWARE menu, enter 0 to restart the AP. You can view that the BootWare version is updated.
System is starting...
Press Ctrl+D to access BASIC-BOOTWARE MENU...
Booting Normal Extended BootWare
The Extended BootWare is self-decompressing..........................Done.
****************************************************************************
* *
* H3C WA530-WW BootWare, Version 7.19 *
* *
****************************************************************************
Copyright (c) 2004-2019 New H3C Technologies Co., Ltd.
Compiled Date : Mar 8 2019
CPU Type : ARM
CPU L1 Cache : 32KB
CPU L2 Cache : 256KB
CPU Clock Speed : 710MHz
Memory Type : DDR3 SDRAM
Memory Size : 256MB
Memory Speed : 533MHz
Flash Size : 32MB
PCB Version : Ver.B
BootWare Validating...
Press Ctrl+B to access EXTENDED-BOOTWARE MENU...
2. Press Ctrl + B when "Press Ctrl+B to access EXTENDED-BOOTWARE MENU..." is displayed.
Password recovery capability is enabled.
Note: The current operating device is flash
Enter < Storage Device Operation > to select device.
====================================================
|<1> Boot System |
|<2> Enter Serial SubMenu |
|<3> Enter Ethernet SubMenu |
|<4> File Control |
|<5> Restore to Factory Default Configuration |
|<6> Skip Current System Configuration |
|<7> BootWare Operation Menu |
|<8> Skip Authentication for Console Login |
|<9> Storage Device Operation |
|<0> Reboot |
============================================================================
Ctrl+Z: Access EXTENDED ASSISTANT MENU
Ctrl+F: Format File System
Ctrl+C: Display Copyright
Ctrl+Y: Change AP Mode
Enter your choice(0-9):
3. Press Ctrl + F and then enter Y to format the storage media.
Warning:All files on flash will be lost! Are you sure to format? [Y/N]Y.....
............................................................................
..................
Format success.
4. Press Ctrl + Y and then enter 1 to change the AP mode to cloud (Oasis).
Please select the new mode
Current mode is Fit
============================================================================
|NO. Mode |
|1 Oasis Mode |
|2 Fit Mode |
|0 Exit |
============================================================================
Enter your choice(0-2):1
Changed to oasis mode successfully!
5. Enter 3 at the EXTENDED-BOOTWARE menu to access the Ethernet submenu.
====================================================
|Note:the operating device is flash |
|<1> Download Image Program To SDRAM And Run |
|<2> Update Main Image File |
|<3> Update Backup Image File |
|<4> Download Files(*.*) |
|<5> Modify Ethernet Parameter |
|<0> Exit To Main Menu |
| |
============================================================================
Enter your choice(0-5): 5
6. Enter 5 to modify network parameters. Change the AP file name to wa5300-oasis.ipe.
====================================================
|Note: "." = Clear field. |
| "-" = Go to previous field. |
| Ctrl+D = Quit. |
============================================================================
Protocol (FTP or TFTP) :tftp
Load File Name :apwa5300_v7.19.btw
:wa5300-oasis.ipe
Target File Name :apwa5300_v7.19.btw
:wa5300-oasis.ipe
Server IP Address :192.168.100.31
Local IP Address :192.168.100.244
Subnet Mask :255.255.255.0
Gateway IP Address :0.0.0.0
====================================================
|Note:the operating device is flash |
|<1> Download Image Program To SDRAM And Run |
|<2> Update Main Image File |
|<3> Update Backup Image File |
|<4> Download Files(*.*) |
|<5> Modify Ethernet Parameter |
|<0> Exit To Main Menu |
| |
============================================================================
Enter your choice(0-5): 2
7. Select option 2 or 3 in the Ethernet submenu to upgrade a system software image. For example, enter 2 to upgrade the main system software image.
Loading.....................................................................
............................................................................
............................................................................
............................................................................
............................................................................
............................................................................
............................................................................
..............Done.
27445248 bytes downloaded!
Image file wa5300-oasis-boot.bin is self-decompressing...
Saving file flash:/wa5300-oasis-boot.bin ...................................
.............................Done.
Image file wa5300-oasis-system.bin is self-decompressing...
Saving file flash:/wa5300-oasis-system.bin .................................
............................................................................
............................................................................
............................................................................
............................................................................
...........................Done.
====================================================
|Note:the operating device is flash |
|<1> Download Image Program To SDRAM And Run |
|<2> Update Main Image File |
|<3> Update Backup Image File |
|<4> Download Files(*.*) |
|<5> Modify Ethernet Parameter |
|<0> Exit To Main Menu |
| |
============================================================================
Enter your choice(0-5): 0
8. Enter 0 to return to the EXTENDED-BOOTWARE menu.
====================================================
|<1> Boot System |
|<2> Enter Serial SubMenu |
|<3> Enter Ethernet SubMenu |
|<4> File Control |
|<5> Restore to Factory Default Configuration |
|<6> Skip Current System Configuration |
|<7> BootWare Operation Menu |
|<8> Skip Authentication for Console Login |
|<9> Storage Device Operation |
|<0> Reboot |
============================================================================
Ctrl+Z: Access EXTENDED ASSISTANT MENU
Ctrl+F: Format File System
Ctrl+C: Display Copyright
Ctrl+Y: Change AP Mode
Enter your choice(0-9): 0
9. Enter 0 to reboot the device.
System is starting...
Press Ctrl+D to access BASIC-BOOTWARE MENU
Booting Normal Extended BootWare
The Extended BootWare is self-decompressing.................................
.Done.
****************************************************************************
* *
* H3C WA530-WW BootWare, Version 7.19 *
* *
****************************************************************************
Copyright (c) 2004-2019 New H3C Technologies Co., Ltd.
Compiled Date : Mar 8 2019
CPU Type : ARM
CPU L1 Cache : 32KB
CPU L2 Cache : 256KB
CPU Clock Speed : 710MHz
Memory Type : DDR3 SDRAM
Memory Size : 256MB
Memory Speed : 533MHz
Flash Size : 32MB
PCB Version : Ver.B
BootWare Validating...
Press Ctrl+B to access EXTENDED-BOOTWARE MENU...
Loading the main image files...
Loading file flash:/wa5300-oasis-system.bin.................................
............................................................................
...........................................................................
Done.
Loading file flash:/wa5300-oasis-boot.bin...................................
Done.
Image file flash:/wa5300-oasis-boot.bin is self-decompressing...............
............................................................................
............................................................................
............................................................................
............................................................................
...............................Done.
System image is starting...
Startup configuration file doesn"t exist or is invalid.
Line con0 is available.
Press ENTER to get started.
10. Verify that you can detect the wireless network with SSID H3C_xxxxxx, where xxxxxx represents the last six digits of the AP's MAC address.
Switching the operating mode from the Cloudnet platform
Restrictions and guidelines
Only devices of version R2433 or later support this method.
This method can only switch the operating mode from fit to cloud.
Prerequisites
· Make sure the AP is not registered to an AC.
· Connect the AP to the network and enable it to obtain an IP address through DHCP. Make sure the obtained IP address and public network are reachable to each other.
· Connect the fit AP to Cloudnet. Make sure the DNS server can translate the Cloudnet server address correctly.
Figure 4 Network diagram
Switching the operating mode from fit to cloud
|
|
NOTE: The procedure is the same for using the Cloudnet Web interface and using the Cloudnet app. This section uses the Cloudnet Web interface as an example. |
Logging in to the Cloudnet platform
To use the Cloudnet Web interface, connect the AP to the Internet, enter cloudnet.h3c.com in the browser bar, and then enter the username and password.
To use the Cloudnet app, connect your mobile phone to the network, open the Cloudnet App Int app, and then enter the username and password.
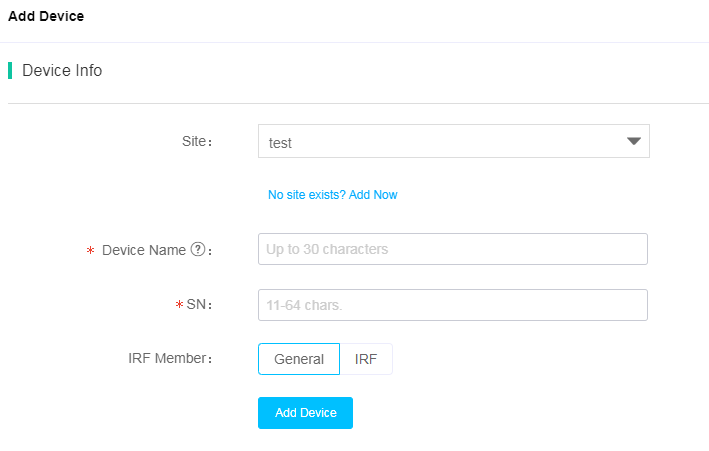
Adding a device
1. On the top navigation bar, click Network.
2. From the left navigation pane, select Network > Devices.
3. Select a branch and a site from the top of the work pane.
4. Click Add. Select a site, and enter the device name and serial number.
Figure 5 Adding a device
5. Start the AP. If the AP cannot discover an AC, it will switch to cloud mode at first-time connection to the Cloudnet platform.
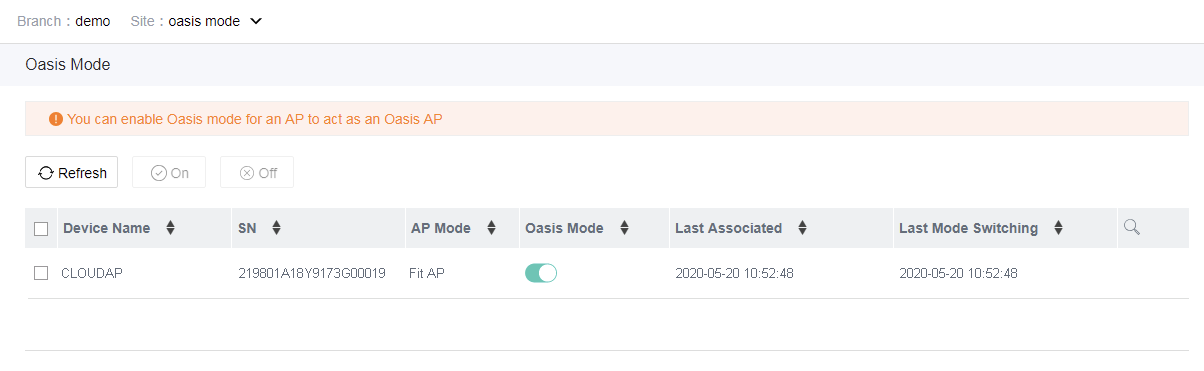
6. To manually switch the AP to cloud mode:
a. On the top navigation bar, click Network.
b. From the left navigation pane, select Settings > Cloud APs > Oasis Mode.
c. Click the toggle button in the Oasis Mode column for an AP.
Figure 6 Manually switching the operating mode for an AP