- Table of Contents
-
- 05-AP Management
- 01-CAPWAP Tunnel Establishment Through DHCP Configuration Example
- 02-CAPWAP Tunnel Establishment Through DHCPv6 Configuration Example
- 03-CAPWAP Tunnel Establishment Through DNS Configuration Example
- 04-CAPWAP Tunnel Establishment Through DNSv6 Configuration Example
- 05-Auto AP Configuration Example
- 06-AP Group Configuration Example
- Related Documents
-
| Title | Size | Download |
|---|---|---|
| 05-Auto AP Configuration Example | 244.07 KB |
|
|
|
H3C Access Controllers |
|
Comware 7 Auto AP Configuration Example |
|
|
Copyright © 2024 New H3C Technologies Co., Ltd. All rights reserved.
No part of this manual may be reproduced or transmitted in any form or by any means without prior written consent of New H3C Technologies Co., Ltd.
Except for the trademarks of New H3C Technologies Co., Ltd., any trademarks that may be mentioned in this document are the property of their respective owners.
The information in this document is subject to change without notice.
Overview
The following information provides an example for configuring auto AP.
Prerequisites
The following information applies to Comware 7-based access controllers. Procedures and information in the examples might be slightly different depending on the software or hardware version of the H3C access controllers.
The configuration examples were created and verified in a lab environment, and all the devices were started with the factory default configuration. When you are working on a live network, make sure you understand the potential impact of every command on your network.
The following information is provided based on the assumption that you have basic knowledge of auto AP.
Example: Configuring auto AP
Network configuration
As shown in Figure 1, the AC assigns an IP address to the AP as a DHCP server. Enable auto AP on the AC for the AP to establish a CAPWAP tunnel with the AC automatically.

Procedures
Specifying an IP address for the AC
1. Click the System View tab at the bottom of the page.
2. From the navigation pane, select Network Configuration > VLAN.
a. Click the Add button ![]() and create VLAN 10.
and create VLAN 10.
Figure 2 Creating a VLAN

b. Click the Edit
icon ![]() for VLAN 10 and configure GE1/0/3 as an untagged port.
for VLAN 10 and configure GE1/0/3 as an untagged port.
Figure 3 Adding an untagged port

c. Select Create VLAN interface and specify the IPv4 address as 192.168.1.1/24.
Figure 4 Configuring a VLAN interface

Configuring the DHCP service
1. From the navigation pane, select Network Configuration > Network Services > DHCP/DNS.
2. Click the Enable DHCP button.
3. Configure VLAN-interface 10 to operate in DHCP server mode.
4. Click Address pool.
5. On the Assigned Address tab, create an address pool named pool1, and then specify 192.168.1.0/24 as the network segment for dynamic address assignment.
Figure 5 Configuring a DHCP address pool

6. Configure DHCP Option 43:
c. Click the DHCP Options tab.
d. Configure the gateway address as 192.168.1.1, and configure DHCP Option 43 to specify the AC's IP address in the hexadecimal format. The option content is 8007000001c0a80101 in this example.
Figure 6 Configuring DHCP Option 43

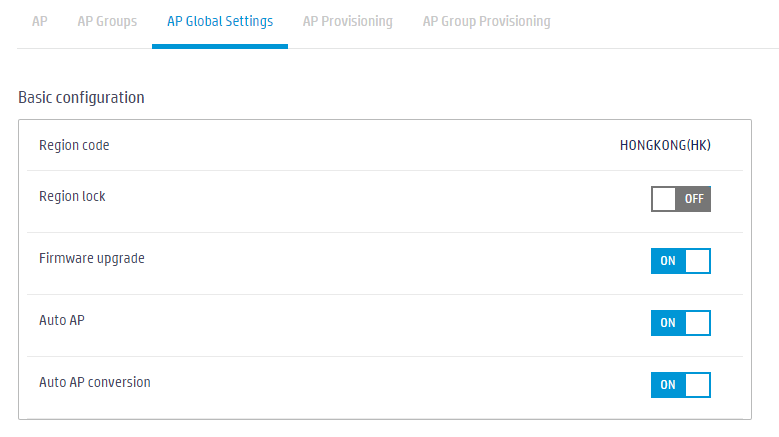
Configuring auto AP
1. Click the Network View tab at the bottom of the page.
2. From the navigation pane, select Wireless Configuration > AP Management.
3. Click the AP Global Settings tab and enable auto AP.
Figure 7 Enabling auto AP
Verifying the configuration
1. Click the Network View tab at the bottom of the page.
2. From the navigation pane, select Wireless Configuration > AP Management.
3. Verify that the AP is online and the AP type is Auto AP.
Figure 8 Displaying online AP information

Related documentation
H3C Access Controllers Web-Based Configuration Guide
