- Table of Contents
- Related Documents
-
| Title | Size | Download |
|---|---|---|
| 02-Trusted access control configuration | 195.32 KB |
Configuring IAM trusted access control
About IAM trusted access control
Configuring an IAM trusted access controller
IAM trusted access controller tasks at a glance
Creating an IAM trusted access controller
Specifying the local service URL
Specifying the peer service URL
Enabling a trusted access controller
Restrictions: Licensing requirements for trusted proxies
Trusted proxy tasks at a glance
Creating a trusted application proxy
Configuring the IP address and port number for a trusted proxy
Specifying an IAM trusted access controller for a trusted proxy
Configuring connection parameters
Specifying a parameter profile
Specifying an LB connection limit policy
Specifying an HTTP protection policy
Specifying a DPI application profile
Display and maintenance commands for IAM trusted access control
Configuring CSAP trusted access control
About CSAP trusted access control
Configuring CSAP trusted access control settings
Configuring a CSAP trusted access policy
Configuring IAM trusted access control
About IAM trusted access control
Identity and Access Management (IAM) trusted access control enables the device to act as a trusted proxy and collaborate with the IAM server. With IAM trusted access control, the device can implement authentication and authorization for application or API requests to prevent illegal user accesses.
Network structure
In the typical IAM trusted access control network as shown in Figure 1, the IAM trusted access controller and trusted proxy are the essential components that provide services for external users.
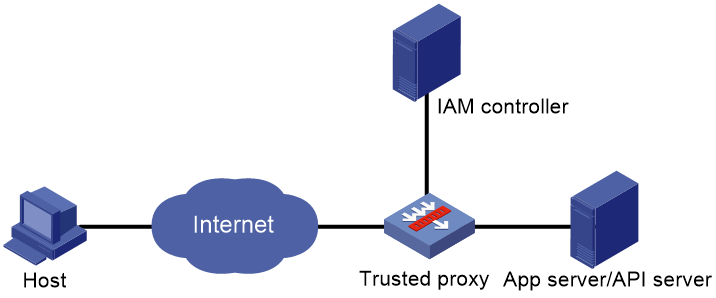
IAM trusted access controller
The IAM trusted access controller is a third-party device that authenticates user identities and validates user access permissions. It has a unique identity and permission management system. The administrator can configure identity information and resource access permissions for users on the IAM controller.
Trusted proxy
The trusted proxy performs authentication and authorization with the IAM controller for matching application or API requests received from clients, and forwards the requests if the authentication and authorization succeed.
The trusted proxy uses SSL policies, load balancing policies, protection policies, and DPI application profiles to provide data encryption, load balancing, and security protection capabilities for application or API requests.
A trusted proxy can be one of the following types:
· Trusted application proxy—A proxy for processing application requests.
· Trusted API proxy—A proxy for processing API requests.
You can deploy a trusted application proxy and trusted API proxy separately on two devices or on one device.
Workflow
Figure 2 shows the workflow of IAM trusted access control.
Figure 2 Trusted access control workflow
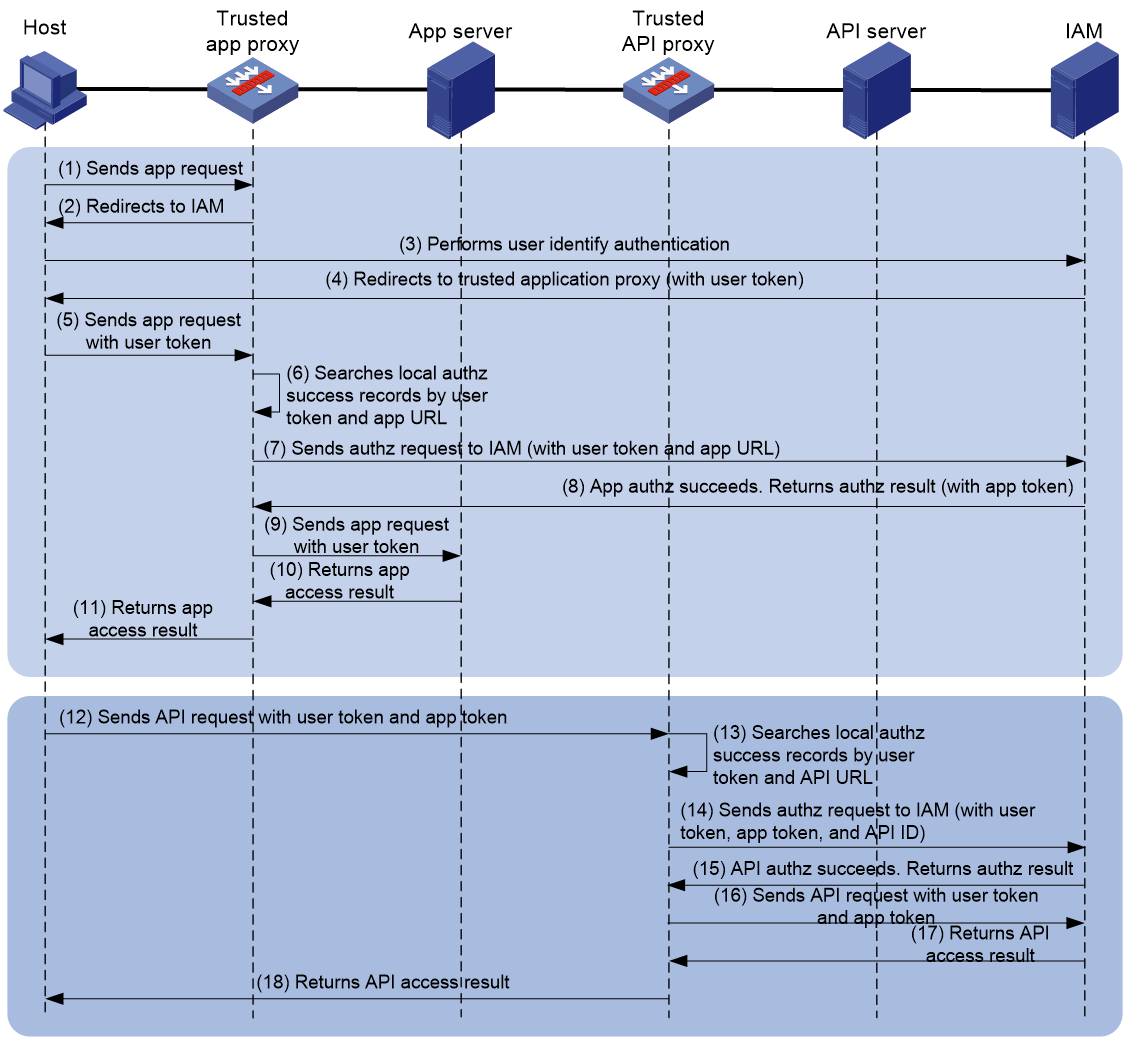
The following describes the workflow for IAM trusted access control. Steps 1 through 11 are for the trusted application proxy, and steps 12 through 18 are for the trusted API proxy.
1. The host initiates an application request.
2. The trusted proxy redirects traffic matching the proxy IP address and port number to the authentication page provided by the IAM controller.
3. The host uses the specified username and password to perform login authentication on the authentication page provided by the IAM controller.
5. The host initiates an application request carrying the user token.
6. The trusted application proxy searches the local authorization success records based on the user token and application URL. If a match is found, the authorization succeeds, and the workflow proceeds to step 9. If no match is found, the workflow proceeds to step 7.
7. The trusted application proxy sends an authorization request to the IAM controller carrying the user token and application URL.
8. If the authorization succeeds, the IAM controller returns the authorization result to the trusted application proxy.
9. If the access is permitted in the authorization result, the trusted application proxy records the user information and application URL, and sends an application request on behalf of the host.
10. The application server returns the access result to the trusted application proxy.
11. The trusted application proxy returns the access result to the host.
12. The host sends an API request carrying the user token and application token. The trusted API proxy processes the traffic matching the proxy IP address and port number.
13. The trusted API proxy searches the local authorization success records based on the user token and API URL. If a match is found, the authorization succeeds, and the workflow proceeds to step 16. If no match is found, the workflow proceeds to step 14.
14. The trusted API proxy sends an authorization request to the IAM controller carrying the user token, application token, and API ID.
15. If the authorization succeeds, the IAM controller returns the authorization result to the trusted API proxy.
16. If the access is permitted in the authorization result, the trusted API proxy records the user information and API URL, and sends an API request on behalf of the host.
17. The API server returns the access result to the trusted API proxy.
18. The trusted API proxy returns the access result to the host.
Before the local authorization success records expire, the trusted proxy can perform authorization through local search without using the IAM controller. If a user offline or permission change event occurs, the IAM controller will notify the trusted proxy in time so that it can update the associated local record.
Configuring an IAM trusted access controller
IAM trusted access controller tasks at a glance
To configure an IAM trusted access controller, perform the following tasks:
1. Creating an IAM trusted access controller
2. Specifying the local service URL
3. Specifying the peer service URL
4. Enabling a trusted access controller
Creating an IAM trusted access controller
1. Enter system view.
system-view
2. Create an IAM trusted access controller, and enter IAM trusted access controller view.
trusted-access controller controller-name type iam
To create an IAM trusted access controller, you must specify the controller type. The controller type is not required when you enter the view of an existing trusted access controller. To specify the controller type, make sure it is the same as the one you specified upon creating the controller.
3. (Optional.) Configure a description for the trusted access controller.
description text
By default, no description is configured for the trusted access controller.
Specifying the local service URL
About this task
The local service URL is used to collaborate with the trusted access controller. The trusted access controller can notify the device of events such as user offline and user permission changes through the local service URL.
Restrictions and guidelines
You cannot specify the same local service URL for different trusted access controllers on a device.
Procedure
1. Enter system view.
system-view
2. Enter IAM trusted access controller view.
trusted-access controller controller-name
3. Specify the local service URL used to collaborate with the trusted access controller.
local-service url service-url
By default, no local service URL is specified.
4. (Optional.) Specify an SSL server policy used for establishing an SSL connection to the trusted access controller.
ssl-server-policy policy-name
By default, no SSL server policy is specified for establishing an SSL connection to the trusted access controller.
This command is required if the protocol type is HTTPS for the local service URL.
Specifying the peer service URL
About this task
The device uses the peer service URL to perform registration and authorization with the trusted access controller.
Procedure
1. Enter system view.
system-view
2. Enter IAM trusted access controller view.
trusted-access controller controller-name
3. Specify the peer service URL used for providing trusted access control services.
peer-service url service-url
By default, no peer service URL is specified.
4. (Optional.) Specify an SSL client policy used for establishing an SSL connection to the trusted access controller.
ssl-client-policy policy-name
By default, no SSL client policy is specified for establishing an SSL connection to the trusted access controller.
This command is required if the protocol type is HTTPS for the peer service URL.
Enabling a trusted access controller
1. Enter system view.
system-view
2. Enter IAM trusted access controller view.
trusted-access controller controller-name
3. Enable the trusted access controller.
service enable
By default, the trusted access controller is disabled.
Configuring a trusted proxy
About trusted proxies
Trusted access proxies implement access control based on user authentication. A trusted proxy can forward matching traffic to the IAM trusted access controller for identity authentication. For users that pass the authentication, the trusted proxy sends an authorization request to the IAM trusted access controller based on the user token for validating user permissions on the requested resource.
Restrictions: Licensing requirements for trusted proxies
The trusted proxy feature requires a license to run on the device. For information about feature licensing, see Fundamentals Configuration Guide.
Trusted proxy tasks at a glance
To configure a trusted proxy, perform the following tasks:
1. Creating a trusted proxy
Choose at least one of the following tasks:
¡ Creating a trusted application proxy
¡ Creating a trusted API proxy
2. Configuring the IP address and port number for a trusted proxy
3. Specifying an IAM trusted access controller for a trusted proxy
4. (Optional.) Configuring connection parameters
5. (Optional.) Specifying a policy or profile
The trusted proxy uses the following policies or profiles to provide data encryption, load balancing, and security protection capabilities for application or API requests:
¡ Specifying a parameter profile
¡ Specifying an LB connection limit policy
¡ Specifying an HTTP protection policy
¡ Specifying a DPI application profile
Creating a trusted application proxy
1. Enter system view.
system-view
2. Create a trusted application proxy, and enter trusted application proxy view.
trusted-app-proxy proxy-name type http
To create a trusted application proxy, you must specify the proxy type. The proxy type is not required when you enter the view of an existing trusted application proxy. To specify the proxy type, make sure it is the same as the one you specified upon creating the trusted application proxy.
Creating a trusted API proxy
1. Enter system view.
system-view
2. Create a trusted API proxy, and enter trusted API proxy view.
trusted-api-proxy proxy-name type http
To create a trusted API proxy, you must specify the proxy type. The proxy type is not required when you enter the view of an existing trusted API proxy. To specify the proxy type, make sure it is the same as the one you specified upon creating the trusted API proxy.
Configuring the IP address and port number for a trusted proxy
About this task
Perform this task to configure the IP address and port number used for providing trusted application proxy or trusted API proxy services.
Procedure
1. Enter system view.
system-view
2. Enter trusted application proxy view or trusted API proxy view.
¡ Enter trusted application proxy view.
trusted-app-proxy proxy-name
¡ Enter trusted API proxy view.
trusted-api-proxy proxy-name
3. Configure the IP address for the trusted proxy.
IPv4:
proxy ip address ipv4-address
IPv6:
proxy ipv6 address ipv6-address
By default, no IP address is configured for a trusted proxy.
4. Configure the port number for the trusted proxy.
port port-number
By default, the port number is 80 for a trusted proxy.
Specifying an IAM trusted access controller for a trusted proxy
About this task
This task enables a trusted application proxy or trusted API proxy to use an IAM trusted access controller for implementing access control on traffic accessing the trusted proxy.
Procedure
1. Enter system view.
system-view
2. Enter trusted application proxy or trusted API proxy view.
¡ Enter trusted application proxy view.
trusted-app-proxy proxy-name
¡ Enter trusted API proxy view.
trusted-api-proxy proxy-name
3. Specify a trusted access controller for the trusted proxy.
trusted-access-controller iam controller-name
By default, no trusted access controller is specified for a trusted proxy.
Configuring connection parameters
1. Enter system view.
system-view
2. Enter trusted application proxy or trusted API proxy view.
¡ Enter trusted application proxy view.
trusted-app-proxy proxy-name
¡ Enter trusted API proxy view.
trusted-api-proxy proxy-name
3. Configure the maximum number of connections for the trusted proxy.
connection-limit max max-number
By default, the maximum number of connections is 0 (not limited) for the trusted proxy.
4. Configure the maximum connection rate for the trusted proxy.
rate-limit connection connection-rate
By default, the maximum connection rate is 0 (not limited) for the trusted proxy.
Specifying a parameter profile
About this task
A parameter profile is used to analyze, process, and optimize traffic received by the trusted proxy. The trusted proxy uses the settings in the parameter profile to process traffic that has successfully passed the authorization.
If you specify a client-side TCP parameter profile for the trusted proxy, the system optimizes and processes TCP connections between the client and the device. If you specify a server-side TCP parameter profile for the trusted proxy, the system optimizes and processes TCP connections between the device and the server.
For more information about parameter profiles, see server load balancing configuration in Load Balancing Configuration Guide.
Procedure
1. Enter system view.
system-view
2. Enter trusted application proxy view or trusted API proxy view.
¡ Enter trusted application proxy view.
trusted-app-proxy proxy-name
¡ Enter trusted API proxy view.
trusted-api-proxy proxy-name
3. Specify a TCP parameter profile for the trusted proxy.
parameter tcp profile-name [ client-side | server-side ]
By default, no parameter profile is specified for a trusted proxy.
Specify an SSL policy
About this task
When the trusted proxy acts as an SSL client, you can specify an SSL client policy for the trusted proxy to encrypt the traffic exchanged with the SSL server.
When the trusted proxy acts as an SSL server, you can specify an SSL server policy for the trusted proxy to encrypt the traffic exchanged with the SSL client.
For more information about SSL policies, see SSL configuration in Security Configuration Guide.
Restrictions and guidelines
After modifying the SSL client or server policy for a trusted proxy, you must disable and then enable the trusted proxy for the modification to take effect. To disable the trusted proxy, use the undo service enable command in trusted proxy view. To enable the trusted proxy, use the service enable command in trusted proxy view.
Procedure
1. Enter system view.
system-view
2. Enter trusted application proxy view or trusted API proxy view.
¡ Enter trusted application proxy view.
trusted-app-proxy proxy-name
¡ Enter trusted API proxy view.
trusted-api-proxy proxy-name
3. Specify an SSL client policy for the trusted proxy.
ssl-client-policy policy-name
By default, no SSL client policy is specified for a trusted proxy.
4. Specify an SSL server policy for the trusted proxy.
ssl-server-policy policy-name [ sni server-name ]
By default, no SSL server policy is specified for a trusted proxy.
Specifying an LB policy
About this task
This task enables the trusted proxy to perform load balancing for packets matching the specified LB policy. The trusted proxy will process those packets that have successfully passed the authorization based on their content.
For more information about LB policies, see server load balancing configuration in Load Balancing Configuration Guide.
Procedure
1. Enter system view.
system-view
2. Enter trusted application proxy view or trusted API proxy view.
¡ Enter trusted application proxy view.
trusted-app-proxy proxy-name
¡ Enter trusted API proxy view.
trusted-api-proxy proxy-name
3. Specify an LB policy for the trusted proxy.
lb-policy policy-name
By default, no LB policy is specified for a trusted proxy.
Specifying an LB connection limit policy
About this task
Perform this task to limit the number of connections for traffic matching a trusted proxy.
For more information about LB connection limit policies, see server load balancing configuration in Load Balancing Configuration Guide.
Procedure
1. Enter system view.
system-view
2. Enter trusted application proxy view or trusted API proxy view.
¡ Enter trusted application proxy view.
trusted-app-proxy proxy-name
¡ Enter trusted API proxy view.
trusted-api-proxy proxy-name
3. Specify an LB connection limit policy for the trusted proxy.
lb-limit-policy policy-name
By default, no LB connection limit policy is specified for a trusted proxy.
Specifying an HTTP protection policy
About this task
Perform this task to protect URLs specified in an HTTP protection policy in order to prevent the application and API servers from being overwhelmed by a large number of forged requests.
For more information about HTTP protection policies, see server load balancing configuration in Load Balancing Configuration Guide.
Procedure
1. Enter system view.
system-view
2. Enter trusted application proxy or trusted API proxy view.
¡ Enter trusted application proxy view.
trusted-app-proxy proxy-name
¡ Enter trusted API proxy view.
trusted-api-proxy proxy-name
3. Specify an HTTP protection policy for the trusted proxy.
protection-policy http policy-name
By default, no HTTP protection policy is specified for a trusted proxy.
Specifying a DPI application profile
About this task
This task allows you to perform DPI on the traffic matching a trusted proxy, including IPS, anti-virus, and WAF. DPI helps you identify network attacks and security risks to secure the application servers and API servers. For more information about DPI application profiles, see DPI engine in DPI Configuration Guide.
Procedure
1. Enter system view.
system-view
2. Enter trusted application proxy view or trusted API proxy view.
¡ Enter trusted application proxy view.
trusted-app-proxy proxy-name
¡ Enter trusted API proxy view.
trusted-api-proxy proxy-name
3. Specify a DPI application profile for the trusted proxy.
dpi-app-profile app-profile-name
By default, no DPI application profile is specified for a trusted proxy.
Enabling a trusted proxy
1. Enter system view.
system-view
2. Enter trusted application proxy view or trusted API proxy view.
¡ Enter trusted application proxy view.
trusted-app-proxy proxy-name
¡ Enter trusted API proxy view.
trusted-api-proxy proxy-name
3. Enable the trusted proxy.
service enable
By default, the trusted proxy is disabled.
Display and maintenance commands for IAM trusted access control
Execute display commands in any view and execute reset commands in user view.
|
Task |
Command |
|
Display IAM trusted access controller information. |
display trusted-access controller [ name controller-name ] |
|
Display user authorization success records. |
display trusted-access permitted-record { api-auth | app-auth } user { brief | user-name } [ slot slot-number ] |
|
Display API ID-to-URL mappings. |
display trusted-access api-id-url [ name controller-name ] [ slot slot-number ] |
|
Display trusted application proxy information. |
display trusted-app-proxy [ brief | name trusted-proxy-name ] |
|
Display trusted API proxy information. |
display trusted-api-proxy [ brief | name trusted-proxy-name ] |
|
Display trusted application proxy statistics. |
display trusted-app-proxy statistics [ name trusted-proxy-name ] [ slot slot-number ] |
|
Display trusted API proxy statistics. |
display trusted-api-proxy statistics [ name trusted-proxy-name ] [ slot slot-number ] |
|
Clear user authorization success records. |
reset trusted-access permitted-record { api-auth | app-auth } user user-name |
|
Clear trusted application proxy statistics. |
reset trusted-app-proxy statistics [ trusted-proxy-name ] |
|
Clear trusted API proxy statistics. |
reset trusted-api-proxy statistics [ trusted-proxy-name ] |
Configuring CSAP trusted access control
About CSAP trusted access control
Threat Discovery and Security Operations Platform (CSAP) trusted access control enables the device to collaborate with the CSAP trusted access controller to obtain security status of users and assets. Upon receiving an access request from a user, the device takes relevant action based on the user and asset security status and the specified trusted access policy.
In the zero trust scenario, you can use this feature to control access permissions for users to specific assets.
Configuring CSAP trusted access control settings
About this task
The device collaborates with the CSAP trusted access controller to obtain security status of users and assets, and controls access permissions for users to specific assets based on the specified trusted access policy.
Procedure
1. Enter system view.
system-view
2. Enter CSAP trusted access controller view.
trusted-access controller csap
3. Specify the peer service URL used for providing trusted access control services.
peer-service url service-url
By default, no peer service URL is specified.
4. (Optional.) Specify an SSL client policy used for establishing an SSL connection to the trusted access controller.
ssl-client-policy policy-name
By default, no SSL client policy is specified for establishing an SSL connection to the trusted access controller.
This command is required if the protocol type is HTTPS for the peer service URL.
5. (Optional.) Specify a VPN instance for the trusted access controller.
vpn-instance vpn-instance-name
By default, no VPN instance is specified for the trusted access controller.
Configuring a CSAP trusted access policy
About this task
A CSAP trusted access policy defines user access permissions to assets based on the security status of users and assets.
Perform this task to configure trusted access rules that specify the actions to take on user requests to access assets based on their security statuses.
Restrictions and guidelines
The device predefines 16 trusted access rules that can be edited. You cannot create or delete rules.
Procedure
1. Enter system view.
system-view
2. Enter CSAP trusted access policy view.
trusted-access policy csap
3. Configure a trusted access rule.
rule user-risk-level { fallen | high-risk | low-risk | trust } asset-risk-level { fallen | high-risk | low-risk | trust } action { allow | deny }
By default, the trusted access rule settings are as shown in Table 1.
Table 1 Default trusted access rule settings
|
User security status |
Asset security status |
Action |
|
Compromised |
Compromised |
Deny |
|
Compromised |
High risk |
Deny |
|
Compromised |
Low risk |
Deny |
|
Compromised |
Trusted |
Deny |
|
High risk |
Compromised |
Deny |
|
High risk |
High risk |
Deny |
|
High risk |
Low risk |
Deny |
|
High risk |
Trusted |
Deny |
|
Low risk |
Compromised |
Deny |
|
Low risk |
High risk |
Deny |
|
Low risk |
Low risk |
Allow |
|
Low risk |
Trusted |
Allow |
|
Trusted |
Compromised |
Deny |
|
Trusted |
High risk |
Deny |
|
Trusted |
Low risk |
Allow |
|
Trusted |
Trusted |
Allow |
4. Enable the CSAP trusted access policy.
service enable
By default, the CSAP trusted access policy is disabled.
