- Table of Contents
-
- 17-BRAS Services Configuration Guide
- 00-Preface
- 01-AAA configuration
- 02-ANCP configuration
- 03-PPP configuration
- 04-Value-added services configuration
- 05-DHCP configuration
- 06-DHCPv6 configuration
- 07-User profile configuration
- 08-Connection limit configuration
- 09-L2TP configuration
- 10-PPPoE configuration
- 11-IPoE configuration
- 12-802.1X configuration
- 13-UCM configuration
- Related Documents
-
| Title | Size | Download |
|---|---|---|
| 04-Value-added services configuration | 249.78 KB |
Configuring value-added services
Configuring ITA service policies
Feature and hardware compatibility
Display and maintenance commands for ITA service policies
Example: Configuring ITA for IPoE users
Example: Configuring dynamic ITA policy assignment for PPPoE users
Configuring EDSG service policies
Feature and hardware compatibility
Configuring an EDSG service policy
Display and maintenance commands for EDSG service policies
Example: Configuring EDSG for IPoE users
Configuring value-added services
About value-added services
Value-added services refer to customized services provided based on users' basic services.
The following value-added services are available:
· Intelligent Target Accounting (ITA)—Provides a flexible accounting solution for users that request services of different charge rates. By defining different traffic levels based on the destination addresses of users' traffic, you can use ITA to separate the traffic accounting statistics of different levels for each user.
· Enhanced Dynamic Service Gateway (EDSG)—Identifies the traffic of different services for a user and provides independent authentication, accounting, and rate limit for the traffic of each service.
Configuring ITA service policies
About ITA service policies
Intelligent Target Accounting (ITA) provides a flexible accounting solution for users that request services of different charge rates. By defining different traffic levels based on the destination addresses of users' traffic, you can use ITA to separate the traffic accounting statistics of different levels for each user.
You must deploy an ITA policy to implement ITA services. ITA accounting is separated from accounting of other services. However, you can configure the device to include the amount of ITA traffic in the overall traffic statistics sent to the accounting server.
To apply ITA accounting levels and traffic policying parameters to traffic of different ITA services on a user group basis, you can specify user groups for an ITA policy.
Feature and hardware compatibility
This feature is available only for the following cards:
|
Card category |
Cards |
|
CEPC |
CEPC-XP4LX, CEPC-XP24LX, CEPC-XP48RX, CEPC-CP4RX, CEPC-CP4RX-L |
|
CSPEX |
CSPEX-1304X, CSPEX-1404X, CSPEX-1502X, CSPEX-1504X, CSPEX-1602X, CSPEX-1804X, CSPEX-1512X, CSPEX-1612X, CSPEX-1812X, CSPEX-1802X, CSPEX-1812X-E, CSPEX-2304X-G |
|
SPE |
RX-SPE200, RX-SPE200-E |
The supported accounting levels vary by module model and ITA user access type. See Table 1 to identify the supported levels.
Table 1 Supported accounting levels
|
ITA user |
Supported accounting levels |
|
|
CSPEX-1304X, CSPEX-1404X, CSPEX-1502X, CSPEX-1504X, CSPEX-1602X, CSPEX-1804X, CSPEX-1512X, CSPEX-1612X, CSPEX-1812X, RX-SPE200, CEPC-XP4LX, CEPC-XP24LX, CEPC-XP48RX, CEPC-CP4RX, CEPC-CP4RX-L |
CSPEX-1802X, CSPEX-1812X-E, CSPEX-2304X-G, RX-SPE200-E |
|
|
4 levels from level 1 to level 4 |
4 levels from level 1 to level 4 |
|
Restrictions and guidelines
ITA services are supported only in standard mode. For more information about the system operating mode, see managing the device in Fundamentals Configuration Guide.
ITA services are supported only by IPoE and PPPoE users.
For dual-stack PPPoE users, do not specify the same accounting level for IPv4 and IPv6 traffic. If you specify the same accounting level for IPv4 and IPv6 traffic, the most recent configuration takes effect.
If you do not specify the ipv4 or ipv6 keyword for level-based accounting, the system does not perform accounting.
Configuring an ITA policy
1. Configure a QoS policy.
Use this QoS policy to remark traffic destined for different IP addresses or subnets with different levels. For more information about QoS, see ACL and QoS Configuration Guide.
2. Apply the QoS policy to a user profile, to an interface, or globally to all interfaces.
Apply the QoS policy to a user profile:
a. Configure a user profile and apply the QoS policy to the user profile.
For more information about user profiles, see BRAS Services Configuration Guide.
b. Authorize the user profile to authenticated users. Choose one of the following tasks:
- Configure the RADIUS server (in remote authentication) or the device (in local authentication) to assign the user profile.
After a user passes authentication, the RADIUS server or the device assigns a user profile to the user. For more information about using a remote server to assign a user profile, see related documents about the server. For more information about configuring the attributes for network access local users, see BRAS Services Configuration Guide.
- Specify the user profile in the authentication domain.
If the RADIUS server or the device does not assign a user profile to a user, the user profile specified for the authentication domain is assigned to the user. For more information about specifying the user profile in an authentication domain, see BRAS Services Configuration Guide.
The user profile assigned by a remote server or the device takes precedence over the user profile specified in the authentication domain.
Apply the QoS policy to an interface or globally:
The QoS policy applied to an interface takes effect on all users attached to that interface. For more information about QoS, see ACL and QoS Configuration Guide.
3. Configure an ITA policy.
a. Enter system view.
system-view
b. Create an ITA policy and enter ITA policy view.
ita policy policy-name
c. Specify accounting methods in the ITA policy.
accounting-method { none | radius-scheme radius-scheme-name [ none ] }
By default, the accounting method is none.
d. Specify a traffic level for ITA accounting.
accounting-level level { { ipv4 | ipv6 } | [ car { inbound cir committed-information-rate [ pir peak-information-rate ] | outbound cir committed-information-rate [ pir peak-information-rate ] } * } *
By default, no traffic levels are specified for ITA accounting.
e. (Optional.) Enable accounting merge.
accounting-merge enable
By default, accounting merge is disabled.
f. (Optional.) Configure access control for users that have used up their ITA data quotas.
traffic-quota-out { offline | online } [ no-accounting-update ]
By default, the device sends accounting-update packets to the server to request new data quotas for the users that have used up their data quotas. A user cannot access the authorized IP subnets if the device does not receive any new data quota from the server for the user.
g. (Optional.) Specify a user group for the ITA policy.
user-group name group-name [ nat-instance instance-name ]
By default, no user groups are specified for an ITA policy.
h. (Optional.) Exclude the amount of specific-level ITA traffic from the overall traffic statistics that are sent to the accounting server.
traffic-separate enable [ level level&<1-8> ]
By default, the amount of ITA traffic is included in the overall traffic statistics that are sent to the accounting server.
4. Specify the ITA policy on the RADIUS server or in the authentication domain on the device.
The ITA policy assigned by a RADIUS server takes precedence over the ITA policy specified in the authentication domain.
Display and maintenance commands for ITA service policies
Execute display commands in any view.
|
Task |
Command |
|
Display ITA policy information. |
display ita policy [ policy-name ] |
|
Display statistics about ITA service users. |
display value-added-service user ita |
|
Display information about an ITA service user that uses a specific IP address. |
display value-added-service user { ip-address ipv4-address | ipv6-address ipv6-address } [ vpn-instance vpn-instance-name ] [ verbose ] |
|
Display information about an ITA service user that uses a specific ID. |
display value-added-service user user-id user-id ita-level level |
|
Display information about an ITA service user that uses a specific username. |
display value-added-service user username username [ verbose ] |
|
|
NOTE: For more information about commands used to display ITA service user information, see AAA commands in BRAS Services Command Reference. |
Example: Configuring ITA for IPoE users
Network configuration
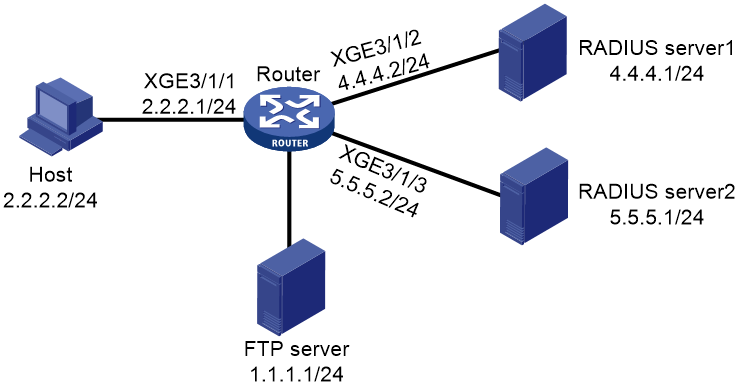
As shown in Figure 1, the router performs IPoE authentication.
Configure the router to meet the following requirements:
· Use RADIUS server 1 to perform authentication, authorization, and accounting for IPoE users.
· Use RADIUS server 2 to perform ITA accounting for IPoE users. The traffic destined for the FTP server is configured as level 1 traffic. The router counts the traffic as IPv4 traffic.
· Exclude ITA traffic statistics from the overall traffic statistics reported to RADIUS server 1.
· Prohibit users from accessing the FTP server after their level-1 data quotas are used up.
The RADIUS servers are FreeRADIUS servers.
Prerequisites
# Configure IP addresses for interfaces, and make sure the network connections are available.
Configuring RADIUS servers
Configure RADIUS client information on RADIUS server 1 and RADIUS server 2.
# Configure the clients.conf file.
client 4.4.4.2/32 {
ipaddr = 4.4.4.2
netmask=32
secret=radius
}
client 5.5.5.2/32 {
ipaddr = 5.5.5.2
netmask=32
secret=radius
}
# Add the IP address of the user and the user password in the users file.
2.2.2.2 Cleartext-Password :="radius"
Configuring the router
1. Configure a RADIUS scheme for AAA:
# Create a RADIUS scheme named rs1 and enter RADIUS scheme view.
<Router> system-view
[Router] radius scheme rs1
# Specify the primary RADIUS authentication server at 4.4.4.1.
[Router-radius-rs1] primary authentication 4.4.4.1
# Specify the primary RADIUS accounting server at 4.4.4.1.
[Router-radius-rs1] primary accounting 4.4.4.1
# Set the authentication shared key to radius in plaintext form for secure communication between the router and RADIUS server 1.
[Router-radius-rs1] key authentication simple radius
# Set the accounting shared key to radius in plaintext form for secure communication between the router and RADIUS server 1.
[Router-radius-rs1] key accounting simple radius
# Exclude domain names from the usernames sent to RADIUS server 1.
[Router-radius-rs1] user-name-format without-domain
[Router-radius-rs1] quit
2. Configure a RADIUS scheme for the ITA service:
# Create a RADIUS scheme named rs2 and enter RADIUS scheme view.
[Router] radius scheme rs2
# Specify the primary accounting server at 5.5.5.1.
[Router-radius-rs2] primary accounting 5.5.5.1
# Set the accounting shared key to radius in plaintext form for secure communication between the router and RADIUS server 2.
[Router-radius-rs2] key accounting simple radius
# Exclude domain names from the usernames sent to RADIUS server 2.
[Router-radius-rs1] user-name-format without-domain
[Router-radius-rs1] quit
3. Configure a packet matching rule.
# Configure traffic classifier class1 to match data packets of IPoE or PPPoE authenticated users and match ACL 3000.
[Router] traffic classifier class1 operator and
[Router-classifier-class1] if-match authenticated-user
[Router-classifier-class1] if-match acl 3000
[Router-classifier-class1] quit
4. Configure a QoS policy for the ITA service:
# Configure IPv4 advanced ACL 3000 and enter its view.
[Router] acl advanced 3000
# Permit all packets destined for 1.1.1.1.
[Router-acl-ipv4-adv-3000] rule 0 permit ip destination 1.1.1.1 0
[Router-acl-ipv4-adv-3000] quit
# Create a traffic class named classifier_1.
[Router] traffic classifier classifier_1
# Define a match criterion for traffic class classifier_1 to match advanced ACL 3000.
[Router-classifier-classifier_1] if-match acl 3000
[Router-classifier-classifier_1] quit
# Create a traffic behavior named behavior_1 and enter traffic behavior view.
[Router] traffic behavior behavior_1
# Mark level-1 traffic for ITA accounting.
[Router-behavior-behavior_1] remark account-level 1
# Measure the traffic in bytes.
[Router-behavior-behavior_1] accounting byte
[Router-behavior-behavior_1] quit
# Define a QoS policy named policy and enter QoS policy view.
[Router] qos policy policy
# Associate traffic class classifier_1 with traffic behavior behavior_1 in the QoS policy.
[Router-qospolicy-policy] classifier classifier_1 behavior behavior_1
[Router-qospolicy-policy] quit
# Apply QoS policy policy to all inbound traffic on the interface.
[Router] interface gigabitethernet 3/1/1
[Router-GigabitEthernet3/1/1] qos apply policy policy inbound
[Router–GigabitEthernet3/1/1] quit
5. Configure an ITA policy:
# Create an ITA policy named ita and enter ITA policy view.
[Router] ita policy ita
# Configure the accounting method for users that match the ITA policy.
[Router-ita-policy-ita] accounting-method radius-scheme rs2
# Specify level-1 traffic for ITA accounting and count the traffic as IPv4 traffic.
[Router-ita-policy-ita] accounting-level 1 ipv4
# Exclude the amount of ITA traffic from the overall traffic statistics that are sent to RADIUS server 1.
[Router-ita-policy-ita] traffic-separate enable
# Prohibit users from accessing the authorized IP subnets after their ITA data quotas are used up.
[Router-ita-policy-ita] traffic-quota-out offline
[Router-ita-policy-ita] quit
6. Configure an ISP domain:
# Create an ISP domain named dm1 and enter ISP domain view.
[Router] domain name dm1
# Configure the authentication, authorization, and accounting methods for IPoE users in the domain.
[Router-isp-dm1] authentication ipoe radius-scheme rs1
[Router-isp-dm1] authorization ipoe radius-scheme rs1
[Router-isp-dm1] accounting ipoe radius-scheme rs1
# Apply ITA policy ita to the ISP domain.
[Router-isp-dm1] ita-policy ita
[Router-isp-dm1] quit
7. Configure IPoE:
# Enter the view of Ten-GigabitEthernet 3/1/1.
[Router] interface ten-gigabitethernet 3/1/1
# Enable IPoE and configure Layer 3 access mode on the port.
[Router–ten-GigabitEthernet3/1/1] ip subscriber routed enable
# Enable the unclassified-IP users.
[Router–ten-GigabitEthernet3/1/1] ip subscriber initiator unclassified-ip enable
# Specify dm1 as the ISP domain.
[Router–ten-GigabitEthernet3/1/1] ip subscriber unclassified-ip domain dm1
# Set the password to radius in plaintext form for IPoE authentication.
[Router–ten-GigabitEthernet3/1/1] ip subscriber password plaintext radius
[Router–ten-GigabitEthernet3/1/1] quit
Verifying the configuration
# Use password radius to pass IPoE authentication on the host. (Details not shown.)
# Verify that RADIUS server 2 performs accounting for the IPoE user when the user accesses the FTP server at 1.1.1.1. (Details not shown.)
# Verify that RADIUS server 1 performs accounting for the non-ITA traffic of the IPoE user. (Details not shown.)
# Display statistics about value-added-service users. Verify that the online IPoE user is assigned an ITA policy.
<Router> display value-added-service user
Example: Configuring dynamic ITA policy assignment for PPPoE users
Network configuration
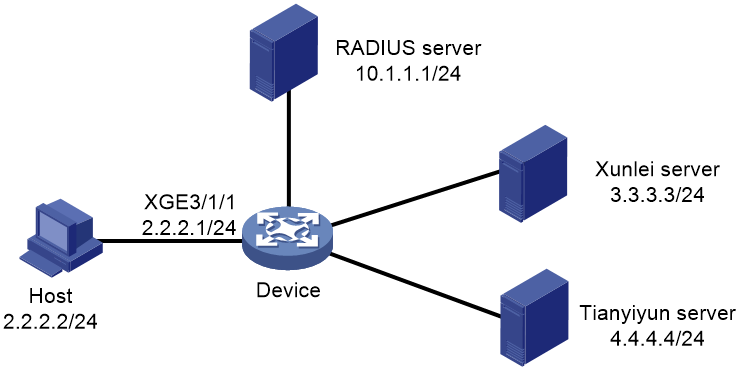
As shown in Figure 2, the host accesses the device through PPPoE. The device acts as a BRAS device and provides address translation services for the host through CGN cards.
Configure the device to meet the following requirements:
· The device acts as the PPPoE server and uses CHAP to perform RADIUS-based authentication for the host user. After the user passes authentication, the device assigns an IP address to the host from the IP pool.
· The device uses the RADIUS server to perform authentication, authorization, and accounting for the host user. The shared key is expert for securing the communication between the device and the RADIUS server. The device sends the username with the domain name to the RADIUS server.
· NAT on the device cooperates with BRAS. When the user passes authentication, the device assigns public address 111.8.0.200 and a port block to the host in addition to a private address.
· When the user is online, the device cooperates with the RADIUS server to dynamically assign ITA policies to the user. Multiple ITA policies are configured on the device. A traffic level is defined for each of them.
¡ Level-3 traffic is destined for and originated from the Xunlei server. The downstream CIR is 30 M.
¡ Level-1 traffic is destined for and originated from the Tianyiyun server. The upstream CIR is 20 M and the downstream CIR is 20 M.
¡ Level-4 traffic is destined for and originated from the Xunlei server or the Tianyiyun server. The upstream CIR is 20 M and the downstream CIR is 30 M.
· The device excludes the amount of ITA traffic from the overall traffic statistics that are sent to the RADIUS server. ITA traffic and non-ITA traffic are separated in accounting.
The RADIUS server can assign an ITA policy that does not have any configuration on the device (default in this example) to remove the ITA policies that have been assigned to a user.
Configuring the RADIUS server
# Set the shared keys to expert for secure communication with the device, add an account for the PPP user, and specify the user password. (Details not shown.)
Configuring the device
1. Configure user groups:
# Create user group nat1.
<Device> system-view
[Device] user-group nat1
[Device-ugroup-nat1] quit
# Create user group nat1_xunlei.
[Device] user-group nat1_xunlei
[Device-ugroup-nat1_xunlei] quit
# Create user group nat1_tianyiyun.
[Device] user-group nat1_tianyiyun
[Device-ugroup-nat1_tianyiyun] quit
# Create user group nat1_allapp.
[Device] user-group nat1_allapp
[Device-ugroup-nat1_allapp] quit
2. Configure the authentication domain:
# Create RADIUS scheme rad and enter its view.
[Device] radius scheme rad
# Specify the RADIUS server at 10.1.1.1 as the primary RADIUS accounting server and set the accounting port number to 1813 (the default value).
[Device-radius-rad] primary accounting 10.1.1.1 1813
# Specify the RADIUS server at 10.1.1.1 as the primary RADIUS authentication server and set the authentication port number to 1812 (the default value).
[Device-radius-rad] primary authentication 10.1.1.1 1812
# Set the authentication shared key to expert in plaintext form for secure communication between the device and the RADIUS authentication server.
[Device-radius-rad] key authentication simple expert
# Set the accounting shared key to expert in plaintext form for secure communication between the device and the RADIUS accounting server.
[Device-radius-rad] key accounting simple expert
# Include the domain name in the username sent to the RADIUS server.
[Device-radius-rad] user-name-format with-domain
[Device-radius-rad] quit
# Create ISP domain pppoe and enter its view.
[Device] domain name pppoe
# Bind user group nat1 to NAT instance nat1.
[Device-isp-pppoe] user-group name nat1 bind nat-instance nat1
# Configure the ISP domain to use RADIUS scheme rad for PPP user authentication, authorization, and accounting.
[Device-isp-pppoe] authentication ppp radius-scheme rad
[Device-isp-pppoe] authorization ppp radius-scheme rad
[Device-isp-pppoe] accounting ppp radius-scheme rad
# Specify the private IPv4 address type for users in the ISP domain. The device will trigger NAT address assignment for users that use this type of addresses after they pass authentication.
[Device-isp-pppoe] user-address-type private-ipv4
# Configure IP pool1 as the authorization IP address pool in ISP domain pppoe.
[Device-isp-pppoe] authorization-attribute ip-pool pool1
[Device-isp-pppoe] quit
3. Configure ITA policies:
# Create ITA policy nat1_xunlei and enter its view.
[Device] ita policy nat1_xunlei
# Configure the accounting method for users that match the ITA policy.
[Device-ita-policy-nat1_xunlei] accounting-method radius-scheme rad
# Specify level-3 traffic for ITA accounting, count the traffic as IPv4 traffic, and set the outbound CIR to 30720 kbps (30 M).
[Device-ita-policy-nat1_xunlei] accounting-level 3 ipv4 car outbound cir 30720
# Specify user group nat1_xunlei for the ITA policy and bind the user group to NAT instance nat1 in the ITA policy.
[Device-ita-policy-nat1_xunlei] user-group name nat1_xunlei nat-instance nat1
# Enable the accounting merge feature.
[Device-ita-policy-nat1_xunlei] accounting-merge enable
# Exclude the amount of level-3 ITA traffic from the overall traffic statistics that are sent to the accounting server.
[Device-ita-policy-nat1_xunlei] traffic-separate enable level 3
[Device-ita-policy-nat1_xunlei] quit
# Create ITA policy nat1_tianyiyun and enter its view.
[Device] ita policy nat1_tianyiyun
# Configure the accounting method for users that match the ITA policy.
[Device-ita-policy-nat1_tianyiyun] accounting-method radius-scheme rad
# Specify level-1 traffic for ITA accounting, count the traffic as IPv4 traffic, set the inbound CIR to 20480 kbps (20 M), and set the outbound CIR to 20480 kbps (20 M).
[Device-ita-policy-nat1_tianyiyun] accounting-level 1 ipv4 car inbound cir 20480 outbound cir 20480
# Specify user group nat1_tianyiyun for the ITA policy and bind the user group to NAT instance nat1 in the ITA policy.
[Device-ita-policy-nat1_tianyiyun] user-group name nat1_tianyiyun nat-instance nat1
# Enable the accounting merge feature.
[Device-ita-policy-nat1_tianyiyun] accounting-merge enable
# Exclude the amount of level-1 ITA traffic from the overall traffic statistics that are sent to the accounting server.
[Device-ita-policy-nat1_tianyiyun] traffic-separate enable level 1
[Device-ita-policy-nat1_tianyiyun] quit
# Create ITA policy nat1_allapp and enter its view.
[Device] ita policy nat1_allapp
# Configure the accounting method for users that match the ITA policy.
[Device-ita-policy-nat1_allapp] accounting-method radius-scheme rad
# Specify level-4 traffic for ITA accounting, count the traffic as IPv4 traffic, set the inbound CIR to 20480 kbps (20 M), and set the outbound CIR to 30720 kbps (30 M).
[Device-ita-policy-nat1_allapp] accounting-level 4 ipv4 car inbound cir 20480 outbound cir 30720
# Specify user group nat1_allapp for the ITA policy and bind the user group to NAT instance nat1 in the ITA policy.
[Device-ita-policy-nat1_allapp] user-group name nat1_allapp nat-instance nat1
# Enable the accounting merge feature.
[Device-ita-policy-nat1_allapp] accounting-merge enable
# Exclude the amount of level-4 ITA traffic from the overall traffic statistics that are sent to the accounting server.
[Device-ita-policy-nat1_allapp] traffic-separate enable level 4
[Device-ita-policy-nat1_allapp] quit
# Create an ITA policy named default. Do not configure the ITA policy. The ITA policy will be used by the RADIUS server to remove ITA policies that have been assigned to a user.
[Device] ita policy default
[Device-ita-policy-default] quit
4. Configure ACLs to match ITA traffic:
# Create advanced ACL 3000, and configure the ACL to permit all packets destined for 3.3.3.3 from users in user group nat1_xunlei.
[Device] acl advanced 3000
[Device-acl-ipv4-adv-3000] rule 0 permit ip destination 3.3.3.3 0 user-group nat1_xunlei
[Device-acl-ipv4-adv-3000] quit
# Create advanced ACL 3001, and configure the ACL to permit all packets originated from 3.3.3.3 to users in user group nat1_xunlei.
[Device] acl advanced 3001
[Device-acl-ipv4-adv-3001] rule 0 permit ip source 3.3.3.3 0 user-group nat1_xunlei
[Device-acl-ipv4-adv-3001] quit
# Create advanced ACL 3100, and configure the ACL to permit all packets destined for 4.4.4.4 from users in user group nat1_tianyiyun.
[Device] acl advanced 3100
[Device-acl-ipv4-adv-3100] rule 0 permit ip destination 4.4.4.4 0 user-group nat1_tianyiyun
[Device-acl-ipv4-adv-3100] quit
# Create advanced ACL 3101, and configure the ACL to permit all packets originated from 4.4.4.4 to users in user group nat1_tianyiyun.
[Device] acl advanced 3101
[Device-acl-ipv4-adv-3101] rule 0 permit ip source 4.4.4.4 0 user-group nat1_tianyiyun
[Device-acl-ipv4-adv-3101] quit
# Create advanced ACL 3200, and configure the ACL to permit all packets destined for 3.3.3.3 and 4.4.4.4 from users in user group nat1_allapp.
[Device] acl advanced 3200
[Device-acl-ipv4-adv-3200] rule 0 permit ip destination 3.3.3.3 0 user-group nat1_allapp
[Device-acl-ipv4-adv-3200] rule 5 permit ip destination 4.4.4.4 0 user-group nat1_allapp
[Device-acl-ipv4-adv-3200] quit
# Create advanced ACL 3201, and configure the ACL to permit all packets originated from 3.3.3.3 and 4.4.4.4 to users in user group nat1_allapp.
[Device] acl advanced 3201
[Device-acl-ipv4-adv-3201] rule 0 permit ip source 3.3.3.3 0 user-group nat1_allapp
[Device-acl-ipv4-adv-3201] rule 5 permit ip source 4.4.4.4 0 user-group nat1_allapp
[Device-acl-ipv4-adv-3201] quit
# Create advanced ACL 3301, and configure the ACL to permit all packets originated from and destined for the users in user group nat1 to pass through.
[Device] acl advanced 3301
[Device-acl-ipv4-adv-3301] rule 0 permit ip user-group nat1
[Device-acl-ipv4-adv-3301] quit
5. Configure QoS policies:
# Create traffic class nat1_xunlei_shangxing_class and configure the traffic class to match ACL 3000.
[Device] traffic classifier nat1_xunlei_shangxing_class
[Device-classifier-nat1_xunlei_shangxing_class] if-match acl 3000
[Device-classifier-nat1_xunlei_shangxing_class] quit
# Create traffic behavior nat1_xunlei_shangxing_action, and configure a traffic accounting action in the traffic behavior to count traffic in bytes. Configure the traffic behavior to mark matching packets with accounting level 3, and configure a NAT instance binding action for the traffic behavior.
[Device] traffic behavior nat1_xunlei_shangxing_action
[Device-behavior-nat1_xunlei_shangxing_action] accounting byte
[Device-behavior-nat1_xunlei_shangxing_action] remark account-level 3
[Device-behavior-nat1_xunlei_shangxing_action] bind nat-instance nat1
[Device-behavior-nat1_xunlei_shangxing_action] quit
# Create traffic class nat1_xunlei_xiaxing_class and configure the traffic class to match ACL 3001.
[Device] traffic classifier nat1_xunlei_xiaxing_class
[Device-classifier-nat1_xunlei_xiaxing_class] if-match acl 3001
[Device-classifier-nat1_xunlei_xiaxing_class] quit
# Create traffic behavior nat1_xunlei_xiaxing_action, and configure a traffic accounting action in the traffic behavior to count traffic in bytes, and configure the traffic behavior to mark matching packets with accounting level 3.
[Device] traffic behavior nat1_xunlei_xiaxing_action
[Device-behavior-nat1_xunlei_xiaxing_action] accounting byte
[Device-behavior-nat1_xunlei_xiaxing_action] remark account-level 3
[Device-behavior-nat1_xunlei_xiaxing_action] quit
# Create traffic class nat1_tianyiyun_shangxing_class and configure the traffic class to match ACL 3100.
[Device] traffic classifier nat1_tianyiyun_shangxing_class
[Device-classifier-nat1_tianyiyun_shangxing_class] if-match acl 3100
[Device-classifier-nat1_tianyiyun_shangxing_class] quit
# Create traffic behavior nat1_tianyiyun_shangxing_action, and configure a traffic accounting action in the traffic behavior to count traffic in bytes. Configure the traffic behavior to mark matching packets with accounting level 1, and configure a NAT instance binding action for the traffic behavior.
[Device] traffic behavior nat1_tianyiyun_shangxing_action
[Device-behavior-nat1_tianyiyun_shangxing_action] accounting byte
[Device-behavior-nat1_tianyiyun_shangxing_action] remark account-level 1
[Device-behavior-nat1_tianyiyun_shangxing_action] bind nat-instance nat1
[Device-behavior-nat1_tianyiyun_shangxing_action] quit
# Create traffic class nat1_tianyiyun_xiaxing_class and configure the traffic class to match ACL 3101.
[Device] traffic classifier nat1_tianyiyun_xiaxing_class
[Device-classifier-nat1_tianyiyun_xiaxing_class] if-match acl 3101
[Device-classifier-nat1_tianyiyun_xiaxing_class] quit
# Create traffic behavior nat1_tianyiyun_xiaxing_action, and configure a traffic accounting action in the traffic behavior to count traffic in bytes, and configure the traffic behavior to mark matching packets with accounting level 1.
[Device] traffic behavior nat1_tianyiyun_xiaxing_action
[Device-behavior-nat1_tianyiyun_xiaxing_action] accounting byte
[Device-behavior-nat1_tianyiyun_xiaxing_action] remark account-level 1
[Device-behavior-nat1_tianyiyun_xiaxing_action] quit
# Create traffic class nat1_allapp_shangxing_class and configure the traffic class to match ACL 3200.
[Device] traffic classifier nat1_allapp_shangxing_class
[Device-classifier-nat1_allapp_shangxing_class] if-match acl 3200
[Device-classifier-nat1_allapp_shangxing_class] quit
# Create traffic behavior nat1_allapp_shangxing_action, and configure a traffic accounting action in the traffic behavior to count traffic in bytes. Configure the traffic behavior to mark matching packets with accounting level 4, and configure a NAT instance binding action for the traffic behavior.
[Device] traffic behavior nat1_allapp_shangxing_action
[Device-behavior-nat1_allapp_shangxing_action] accounting byte
[Device-behavior-nat1_allapp_shangxing_action] remark account-level 4
[Device-behavior-nat1_allapp_shangxing_action] bind nat-instance nat1
[Device-behavior-nat1_allapp_shangxing_action] quit
# Create traffic class nat1_allapp_xiaxing_class and configure the traffic class to match ACL 3201.
[Device] traffic classifier nat1_allapp_xiaxing_class
[Device-classifier-nat1_allapp_xiaxing_class] if-match acl 3201
[Device-classifier-nat1_allapp_xiaxing_class] quit
# Create traffic behavior nat1_allapp_xiaxing_action, configure a traffic accounting action in the traffic behavior to count traffic in bytes, and configure the traffic behavior to mark matching packets with accounting level 4.
[Device] traffic behavior nat1_allapp_xiaxing_action
[Device-behavior-nat1_allapp_xiaxing_action] accounting byte
[Device-behavior-nat1_allapp_xiaxing_action] remark account-level 4
[Device-behavior-nat1_allapp_xiaxing_action] quit
# Create traffic class nat1_class and configure the traffic class to match ACL 3301.
[Device] traffic classifier nat1_class
[Device-classifier-nat1_class] if-match acl 3301
[Device-classifier-nat1_class] quit
# Create traffic behavior nat1_action, configure a traffic accounting action in the traffic behavior to count traffic in bytes, and configure a NAT instance binding action for the traffic behavior.
[Device] traffic behavior nat1_action
[Device-behavior-nat1_action] accounting byte
[Device-behavior-nat1_action] bind nat-instance nat1
[Device-behavior-nat1_action] quit
# Create QoS policy shangxing and associate traffic classes that match inbound traffic with traffic behaviors.
[Device] qos policy shangxing
[Device-qospolicy-shangxing] classifier nat1_xunlei_shangxing_class behavior nat1_xunlei_shangxing_action
[Device-qospolicy-shangxing] classifier nat1_tianyiyun_shangxing_class behavior nat1_tianyiyun_shangxing_action
[Device-qospolicy-shangxing] classifier nat1_allapp_shangxing_class behavior nat1_allapp_shangxing_action
[Device-qospolicy-shangxing] classifier nat1_class behavior nat1_action
[Device-qospolicy-shangxing] quit
# Create QoS policy xiaxing and associate traffic classes that match outbound traffic with traffic behaviors.
[Device] qos policy xiaxing
[Device-qospolicy-xiaxing] classifier nat1_xunlei_xiaxing_class behavior nat1_xunlei_xiaxing_action
[Device-qospolicy-xiaxing] classifier nat1_tianyiyun_xiaxing_class behavior nat1_tianyiyun_xiaxing_action
[Device-qospolicy-xiaxing] classifier nat1_allapp_xiaxing_class behavior nat1_allapp_xiaxing_action
[Device-qospolicy-xiaxing] quit
# Apply the QoS policies globally.
[Device] qos apply policy shangxing global inbound
[Device] qos apply policy xiaxing global outbound
6. Configure PPPoE:
# Enable the DHCP service.
[Device] dhcp enable
# Create IP pool pool1 and the IP addresses are in the range of 2.2.2.2 to 2.2.2.255.
[Device] ip pool pool1
[Device-ip-pool-pool1] network 2.2.2.2 24
[Device-ip-pool-pool1] gateway-list 2.2.2.1
# Exclude IP address 2.2.2.1 from dynamic allocation in IP pool pool1.
[Device-ip-pool-pool1] forbidden-ip 2.2.2.1
[Device-ip-pool-pool1] quit
# Create interface Virtual-Template 1, configure the interface to authenticate the peer by using CHAP in ISP domain pppoe, and enable PPP accounting on the interface.
[Device] interface virtual-template 1
[Device-Virtual-Template1] ppp authentication-mode chap domain pppoe
[Device-Virtual-Template1] quit
# Enable the PPPoE server on Ten-GigabitEthernet 3/1/1 and bind the interface with Virtual-Template 1.
[Device] interface ten-gigabitethernet 3/1/1
[Device-ten-GigabitEthernet3/1/1] pppoe-server bind virtual-template 1
[Device-ten-GigabitEthernet3/1/1] quit
7. Configure CGN cards to provide NAT services:
# Create failover group failgrp with group ID 1 and enter its view.
[Device] failover group failgrp id 1
# Configure slot 2 as the primary node and slot 3 as the secondary node in failover group failgrp.
[Device-failover-group-failgrp] bind slot 2 primary
[Device-failover-group-failgrp] bind slot 3 secondary
[Device-failover-group-failgrp] quit
# Create service instance group sgrp and enter its view.
[Device] service-instance-group sgrp
# Associate failover group failgrp with service instance group sgrp.
[Device-service-instance-group-sgrp] failover-group failgrp
[Device-service-instance-group-sgrp] quit
# Create advanced ACL 3600, and configure the ACL to permit packets from 2.2.2.0/24 to pass through.
[Device] acl advanced 3600
[Device-acl-ipv4-adv-3600] rule permit ip source 2.2.2.0 0.0.0.255
[Device-acl-ipv4-adv-3600] quit
# Create a NAT address group numbered 1, add IP address 111.8.0.200 to the address group, specify a port range, and set the port block size to 2048.
[Device] nat address-group 1
[Device-address-group-1] port-block block-size 2048
[Device-address-group-1] port-range 1024 65535
[Device-address-group-1] address 111.8.0.200 111.8.0.200
[Device-address-group-1] quit
# Create NAT instance nat1 and enter its view.
[Device] nat instance nat1 id 1
# Associate NAT instance nat1 with service instance group sgrp.
[Device-nat-instance-nat1] service-instance-group sgrp
# Configure an outbound dynamic NAT rule for NAT instance nat1 to translate the source addresses of outgoing packets permitted by ACL 3600 into the addresses in address group 1.
[Device-nat-instance-nat1] nat outbound 3600 address-group 1
[Device-nat-instance-nat1] quit
# Configure IP prefix list prefix-a to permit routes destined for 111.8.0.200.
[Device] ip prefix-list prefix-a index 10 permit 111.8.0.200 32 less-equal 32
# Configure a routing policy.
[Device] route-policy 1 permit node 1
[Device-route-policy-1-1] if-match ip address prefix-list prefix-a
[Device-route-policy-1-1] quit
# Redistribute direct routes that match the routing policy.
[Device] ospf 99
[Device-ospf-99] import-route direct route-policy 1
[Device-ospf-99] quit
8. Configure the RADIUS DAS feature:
# Enable the RADIUS DAS feature and enter RADIUS DAS view.
[Device] radius dynamic-author server
# Specify the RADIUS server at 10.1.1.1 as a DAC and set the shared key to expert in plaintext form.
[Device-radius-da-server] client ip 10.1.1.1 key simple expert
[Device-radius-da-server] quit
[Device] quit
Verifying the configuration
# The PPP user accesses the device and passes authentication. (Details not shown.)
# Display information about the PPP user.
<Device> display access-user user-type pppoe interface ten-gigabitethernet 3/1/1
UserID Interface IP address MAC address S-/C-VLAN
Username Access type
IPv6 address
0x1 XGE3/1/1 2.2.2.2 0010-9400-0051 -/-
PPPOE@pppoe PPPoE
-
# Display detailed information about value-added-service user named PPPOE@pppoe before the RADIUS server deploys ITA policy nat1_xunlei. Verify that no ITA service is assigned to the user.
<Device> display value-added-service user username PPPOE@pppoe verbose
No users
# Use the RADIUS server to assign ITA policy nat1_xunlei to the online user. (Details not shown.)
# Display detailed information about value-added-service user named PPPOE@pppoe.
<Device> display value-added-service user username PPPOE@pppoe verbose
Basic:
User ID : 0x1
User name : PPPOE@pppoe
IP address : 2.2.2.2
IPv6 address : -
Service type : ITA
ITA:
Policy name : nat1_xunlei
Accouting merge : Enable
Traffic quota-out action : Offline
Level-3 State : Online(active)
Inbound CAR : -
Outbound CAR : CIR 30720 kbps PIR 30720 kbps
CBS -
Uplink packets/bytes : 0/0
Downlink packets/bytes : 0/0
IPv6 uplink packets/bytes : 0/0
IPv6 downlink packets/bytes : 0/0
Accounting start time : 2022-08-03 15:03:16
Online time (hh:mm:ss) : 0:01:39
Accounting state : Accounting
Session timeout : Unlimited
Time remained : Unlimited
Realtime accounting interval: -
Traffic separate : Enabled
Traffic quota : Unlimited
Traffic remained : Unlimited
Configuring EDSG service policies
About EDSG service policies
Enhanced Dynamic Service Gateway (EDSG) identifies the traffic of different services for a user and provides independent authentication, accounting, and rate limit for the traffic of each service.
After a user passes RADIUS authentication, the RADIUS server assigns EDSG service policies to the user. Then, the device uses the matching local EDSG service policies to provide the following service-based functions for the user:
· Independent authentication—Provides independent authentication for each EDSG service of the user. The device performs authentication on each EDSG service of the user based on the EDSG authentication methods specified in the corresponding EDSG service policy. The EDSG authentication methods might differ from those used for non-EDSG services. The user is authorized to use the EDSG service after passing the EDSG authentication for the service. The user's access to the EDSG service is restricted to the authorization attributes for the service.
If an EDSG username and an EDSG password are specified for a user, the RADIUS server uses the username and password to authenticate the user. If no username or password is specified for the user, the RADIUS server uses the username and password that the user enters during login.
· Independent accounting—Provides independent accounting for each EDSG service of the user. The device performs accounting on each EDSG service of the user based on the EDSG accounting methods specified in the corresponding EDSG service policy. The EDSG accounting methods might differ from those used for non-EDSG services. For example, EDSG can identify intranet traffic and extranet traffic as two different EDSG services and use different charging levels to charge traffic of the two EDSG services.
· Independent rate limit—Provides independent rate limit for each EDSG service of the user. For example, if a user subscribes an online video service from a website, the service provider authorizes the corresponding EDSG service policy to the user. The policy will perform independent accounting on the online video service and preferentially guarantee the bandwidth for the service when congestion occurs.
· Dynamic authorization—Authorizes one or more EDSG service policies to a user based on the service requirements of the user. If the user stops an EDSG service, the device cancels authorization of the corresponding EDSG service policies.
Feature and hardware compatibility
This feature is available only for the following cards:
|
Card category |
Cards |
|
CEPC |
CEPC-XP4LX, CEPC-XP24LX, CEPC-XP48RX, CEPC-CP4RX, CEPC-CP4RX-L |
|
CSPEX |
CSPEX-1304X, CSPEX-1404X, CSPEX-1502X, CSPEX-1504X, CSPEX-1602X, CSPEX-1804X, CSPEX-1512X, CSPEX-1612X, CSPEX-1812X, CSPEX-1802X, CSPEX-1812X-E, CSPEX-2304X-G |
|
SPE |
RX-SPE200, RX-SPE200-E |
The supported number of EDSG service policies and policy priorities vary by rate limit mode and module model. See Table 2 to identify the supported levels.
Table 2 Supported number of EDSG service policies and policy priorities
|
EDSG service policies |
Out-of-band rate limit |
In-band rate limit |
|
Policy IDs |
1 to 4 |
1 to 4 |
|
Number of policies |
1 to 4 |
1 to 4 |
|
Policy priority |
Same priority |
Larger the ID, higher the policy |
For more information about EDSG rate limit mode (in-band or out-of-band), see configuring AAA in BRAS Services Configuration Guide.
Restrictions and guidelines
EDSG services are supported only in standard mode. For more information about the system operating mode, see managing the device in Fundamentals Configuration Guide.
EDSG services are supported only for IPoE and PPPoE users. IPoE users include static users, unknown sourced users, DHCP users, and IPoE Web-authenticated users.
For a user, the priorities of ITA policies and EDSG service policies are as follows:
· If the RADIUS server assigns both an ITA policy and EDSG service policies to the user, only the ITA policy takes effect.
· If the RADIUS server assigns only EDSG service policies to the user, the EDSG policies take effect.
EDSG policies and inbound rate limit (configured by using qos lr inbound) cannot take effect at the same time. If both features are configured, EDSG policies take effect.
You cannot configure EDSG policies and the following user-based QoS policies at the same time:
· User-based GTS (configured by using qos gts in user profile view).
· Queue configuration for session packets that use the user profile (configured by using qos queue in user profile view).
· QoS outbound weight (configured by using qos weight outbound in user profile view).
· Applying a queue scheduling profile (configured by using qos apply qmprofile in user profile view).
For EDSG service policies to take effect correctly, make sure the enabling status of dual-stack separate rate limit (configured by using rate-limit dual-stack separate) is the same for different EDSG service policies.
For the same user, do not configure EDSG service policies and interface-based QoS policy application (qos apply scheduler-policy in interface view) at the same time.
When the RADIUS server assigns EDSG service policies, follow these restrictions and guidelines:
· If the RADIUS server assigns multiple EDSG service policies that have different IDs, all the assigned EDSG service policies take effect. If the RADIUS server assigns multiple EDSG service policies that have the same ID, the EDSG service policy that successfully triggers EDSG authentication takes effect.
· If the RADIUS server authorizes CAR parameters to a user after the user passes EDSG authentication, the assigned CAR parameters take priority over those specified in the EDSG service policy.
· The device supports EDSG service policy names and EDSG usernames and passwords assigned by the RADIUS server only through proprietary attributes H3C-AV-Pair and Cisco-AVPair. If the RADIUS server assigns the information through other attributes, you must enable the RADIUS attribute translation feature and configure attribute conversion rules on the device.
· The EDSG username specified on the RADIUS server cannot contain more than 253 characters. The password for a PPP user cannot contain more than 128 characters and the password for an IPoE user cannot contain more than 64 characters.
· If the RADIUS server assigns multiple EDSG service policies, make sure all the policies have the same rate limit mode for IPv4 and IPv6 EDSG traffic.
The device stops to provide an EDSG service for a user when one of the following conditions exists:
· The route between the device and the RADIUS server becomes unreachable.
· The user has used up all the data quota.
· The user's session timer expires.
· The start-accounting or update-accounting process for the EDSG service fails.
· The user's non-EDSG session is terminated.
When you configure EDSG service traffic rate limit, follow these restrictions and guidelines:
· For the same user, EDSG in-band rate limit takes precedence over the following group-based QoS policies:
¡ GTS configured for a session group profile (configured by using qos gts in session group profile view).
¡ QoS outbound weight for a session group profile (configured by using qos weight outbound in session group profile view).
¡ Queue scheduling profile applied to a session group profile (configured by using qos apply qmprofile in session group profile view).
· EDSG in-band inbound rate limit (car inbound) can take effect at the same time with the user priority (authorization-attribute user-priority), but outbound rate limit (car outbound) cannot. EDSG in-band outbound rate limit takes precedence over the user priority configuration.
· For EDSG policies to take effect, do not configure the following features if in-band EDSG rate limit is configured:
¡ Priority trust mode for an interface (qos trust).
¡ CBQ queue. For more information about CBQ queue, see configuring QoS in ACL and QoS Configuration Guide.
¡ Local precedence marking action in a traffic behavior (remark local-precedence).
¡ Action of marking a forwarding class (remark forwarding-class).
¡ Local QoS ID marking action in a traffic behavior (remark qos-local-id).
For more information about EDSG rate limit mode (in-band or out-of-band), see configuring AAA in BRAS Services Configuration Guide.
Configuring an EDSG service policy
Prerequisites
Before configuring EDSG service policies on the device, perform the following tasks:
· On the RADIUS server, specify EDSG service policies to be assigned to users.
· To use an EDSG username and an EDSG password to perform EDSG authentication on a user, specify the username and password on the RADIUS server.
· To perform independent AAA on an EDSG service of a user, configure the authentication, authorization, and accounting methods for the EDSG service on the RADIUS server.
Procedure
1. Enter system view.
system-view
2. Create an EDSG service policy and enter EDSG service policy view.
service policy policy-name
3. Set the ID for the EDSG service policy.
service-id number
By default, no ID is set for an EDSG service policy.
You can set only one ID for an EDSG service policy.
4. (Optional.) Specify authentication methods for the EDSG service.
authentication-method { none | radius-scheme radius-scheme-name [ none ] }
By default, the device does not perform authentication on the EDSG service.
5. (Optional.) Specify accounting methods for the EDSG service.
accounting-method { none | radius-scheme radius-scheme-name [ none ] }
By default, the device does not perform accounting on the EDSG service.
6. Set the rate limit mode for EDSG services.
service rate-limit mode { merge | separate }
By default, the rate limit mode in ISP domain view is used for EDSG services.
The rate limit mode set in EDSG service policy view takes precedence over the rate limit mode set in ISP domain view.
7. (Optional.) Set CAR parameters for the EDSG service.
car { inbound | outbound } cir cir-value [ pir pir-value ] [ cbs cbs-value ] [ ebs ebs-value ]
By default, no CAR parameters are set for the EDSG service.
8. (Optional.) Set the EDSG traffic statistics mode.
traffic statistics { merge | separate }
By default, the separate mode is used for EDSG traffic statistics. The device excludes the amount of EDSG traffic from the overall traffic.
9. (Optional.) Enable separate mode to separately limit the rates of IPv4 and IPv6 EDSG traffic.
rate-limit dual-stack separate
By default, separate rate limit mode for IPv4 and IPv6 EDSG traffic is disabled. The device collectively limits the rate of IPv4 and IPv6 EDSG traffic.
This feature takes effect only when the rate limit mode for EDSG services is set to in-band. To set the rate limit mode for EDSG services to in-band, use the service rate-limit mode merge command in ISP domain view or EDSG service policy view.
Display and maintenance commands for EDSG service policies
Execute display commands in any view.
|
Task |
Command |
|
Display EDSG service policy information. |
display service policy [ policy-name ] |
|
Display statistics about EDSG service users. |
display value-added-service user edsg |
|
Display information about an EDSG user that uses a specific IP address. |
display value-added-service user { ip-address ipv4-address | ipv6-address ipv6-address } [ vpn-instance vpn-instance-name ] [ verbose ] |
|
Display information about an EDSG user that uses a specific ID. |
display value-added-service user user-id user-id edsg [ service-id service-id ] |
|
Display information about an EDSG user that uses a specific username. |
display value-added-service user username username [ verbose ] |
|
|
NOTE: For more information about commands used to display ITA service user information, see AAA commands in BRAS Services Command Reference. |
Example: Configuring EDSG for IPoE users
|
|
NOTE: This configuration example is applicable only to the following cards: · CSPEX: CSPEX-1304X, CSPEX-1404X, CSPEX-1502X, CSPEX-1504X, CSPEX-1602X, CSPEX-1804X, CSPEX-1512X, CSPEX-1612X, CSPEX-1812X, CSPEX-1812X-E, CSPEX-2304X-G. · CEPC: CEPC-XP4LX, CEPC-XP24LX, CEPC-XP48RX, CEPC-CP4RX, CEPC-CP4RX-L. · SPE: RX-SPE200, RX-SPE200-E. |
Network configuration
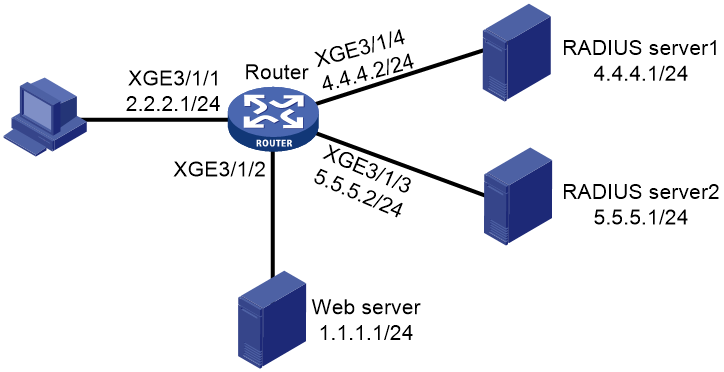
As shown in Figure 3, the router performs IPoE authentication. The router marks user packets destined for the Web server and those originated from the Web server as EDSG service packets.
RADIUS server 1 uses attributes H3C-AV-Pair, Cisco-AVPair, and H3c-Server-String to assign EDSG usernames, EDSG passwords, and EDSG policy names, respectively.
Configure the router to meet the following requirements:
· Use RADIUS server 1 to perform authentication, authorization, and accounting on non-EDSG services.
· Use RADIUS server 2 to perform authentication, authorization, and accounting on EDSG services.
· Use RADIUS server 2 to assign CAR parameters for EDSG services.
· Enable the attribute translation feature and configure a RADIUS attribute conversion rule to convert the H3c-Server-String attribute to the H3c-AVPair attribute.
The RADIUS servers are FreeRADIUS servers.
Prerequisites
Configure IP addresses for interfaces, and make sure the network connections are available.
Restrictions and guidelines
The EDSG username for a user cannot contain more than 253 characters. The EDSG password for a PPP user cannot contain more than 128 characters, and that for an IPoE user cannot contain more than 64 characters.
Configuring the RADIUS servers
1. Add the following RADIUS client information to the clients.conf files on RADIUS server 1 and RADIUS server 2.
client 4.4.4.2/32 {
ipaddr = 4.4.4.2
netmask=32
secret=radius
}
client 5.5.5.2/32 {
ipaddr = 5.5.5.2
netmask=32
secret=radius
}
2. Add the following information to the users file on RADIUS server 1.
2.2.2.2 Cleartext-Password :="radius"
H3C-AV-Pair := "edsg-policy:activelist=sp1",
Cisco-AVPair := "edsg-policy:username=[sp1]edsg",
H3c-Server-String := "edsg-policy:password=[sp1]abc"
The information indicates the following:
¡ The password of the IPoE user at 2.2.2.2 is radius.
¡ The authorization EDSG service policy for the user is EDSG service policy sp1.
¡ The EDSG username and password for the user is edsg and abc, respectively.
3. Add the following information to the users file on RADIUS server 2.
edsg Cleartext-Password := "abc"
H3c-Input-Average-Rate := 700000,
H3c-Input-Peak-Rate := 800000,H3C-Output-Average-Rate = 1000003
H3C-Output-Peak-Rate = 1000004
The information indicates that the EDSG password of EDSG user edsg is abc and the authorization CAR parameters for the user are as follows:
¡ For upstream traffic, the CIR is 700000 bps and the PIR is 800000 bps.
¡ For downstream traffic, the CIR is 1000003 bps, and the PIR is 1000004 bps.
Configuring the router
1. Configure a RADIUS scheme:
# Create a RADIUS server named rs1 and enter its view.
<Router> system-view
[Router] radius scheme rs1
# Specify the primary authentication server.
[Router-radius-rs1] primary authentication 4.4.4.1
# Specify the primary accounting server.
[Router-radius-rs1] primary accounting 4.4.4.1
# Set the shared key to radius in plaintext form for secure RADIUS communication.
[Router-radius-rs1] key authentication simple radius
# Set the shared key to radius in plaintext form for secure RADIUS communication.
[Router-radius-rs1] key accounting simple radius
# Exclude domain names from the usernames sent to the RADIUS server.
[Router-radius-rs1] user-name-format without-domain
# Enable the RADIUS attribute translation feature.
[Router-radius-rs1] attribute translate
# Configure a RADIUS attribute conversion rule to replace the H3c-Server-String attribute of received RADIUS packets with the H3c-AVPair attribute.
[Router-radius-rs1] attribute convert H3c-Server-String to H3c-AVPair received
[Router-radius-rs1] quit
# Create a RADIUS scheme named rs2.
[Router] radius scheme rs2
# Specify the primary authentication server.
[Router-radius-rs2] primary authentication 5.5.5.1
# Set the shared key to radius in plaintext form for secure RADIUS communication with the authentication server.
[Router-radius-rs2] key authentication simple radius
# Specify the primary accounting server.
[Router-radius-rs2] primary accounting 5.5.5.1
# Set the shared key to radius in plaintext form for secure RADIUS communication with the accounting server.
[Router-radius-rs2] key accounting simple radius
# Exclude domain names from the usernames sent to the RADIUS server.
[Router-radius-rs1] user-name-format without-domain
[Router-radius-rs1] quit
2. Configure an EDSG service policy:
# Create an EDSG service policy named sp1 and enter its view.
[Router] service policy sp1
# Configure the authentication and accounting methods for EDSG users.
[Router-service-policy-sp1] authentication-method radius-scheme rs2
[Router-service-policy-sp1] accounting-method radius-scheme rs2
# Set the EDSG service ID to 1.
[Router-service-policy-sp1] service-id 1
[Router-service-policy-sp1] quit
3. Configure an authentication domain:
# Create an ISP domain named dm1 and enter its view.
[Router] domain name dm1
# Configure the ISP domain to use RADIUS scheme rs1 for authentication, authorization, and accounting of IPoE users.
[Router-isp-dm1] authentication ipoe radius-scheme rs1
[Router-isp-dm1] authorization ipoe radius-scheme rs1
[Router-isp-dm1] accounting ipoe radius-scheme rs1
[Router-isp-dm1] quit
4. Configure IPoE authentication:
# Enter the view of Ten-GigabitEthernet 3/1/1.
[Router] interface ten-gigabitethernet 3/1/1
# Enable IPoE and configure the Layer 3 access mode for all IPv4 users on Ten-GigabitEthernet 3/1/1.
[Router–ten-GigabitEthernet3/1/1] ip subscriber routed enable
# Enable the IPv4 unclassified-IP user.
[Router–ten-GigabitEthernet3/1/1] ip subscriber initiator unclassified-ip enable
# Configure ISP domain dm1 for IPv4 unclassified-IP users.
[Router–ten-GigabitEthernet3/1/1] ip subscriber unclassified-ip domain dm1
# Configure the plaintext password as radius for IPv4 individual users.
[Router–ten-GigabitEthernet3/1/1] ip subscriber password plaintext radius
[Router–ten-GigabitEthernet3/1/1] quit
5. Configure a QoS policy:
# Create advanced ACL 3000, and configure a permit rule to match packets destined for the Web server.
[Router] acl advanced 3000
[Router-acl-ipv4-adv-3000] rule 0 permit ip destination 1.1.1.1 0
[Router-acl-ipv4-adv-3000] quit
# Create advanced ACL 3001, and configure a permit rule to match packets originated from the Web server.
[Router] acl advanced 3001
[Router-acl-ipv4-adv-3001] rule 0 permit ip source 1.1.1.1 0
[Router-acl-ipv4-adv-3001] quit
# Create a traffic class named sp1, and use advanced ACL 3000 as the match criterion in the traffic class.
[Router] traffic classifier sp1
[Router-classifier-sp1] if-match acl 3000
[Router-classifier-sp1] quit
# Create a traffic class named sp2, and use advanced ACL 3001 as the match criterion in the traffic class.
[Router] traffic classifier sp2
[Router-classifier-sp2] if-match acl 3001
[Router-classifier-sp2] quit
# Create a traffic behavior named sp1, and configure the action of marking the EDSG service ID as 1.
[Router] traffic behavior sp1
[Router-behavior-sp1] remark service-id 1
[Router-behavior-sp1] quit
# Create a traffic behavior named sp2, and configure the action of marking the EDSG service ID as 1.
[Router] traffic behavior sp2
[Router-behavior-sp2] remark service-id 1
[Router-behavior-sp2] quit
# Create a QoS policy named sp1, and associate traffic class sp1 with traffic behavior sp1 in the QoS policy.
[Router] qos policy sp1
[Router-qospolicy-sp1] classifier sp1 behavior sp1
[Router-qospolicy-sp1] quit
# Create a QoS policy named sp2, and associate traffic class sp2 with traffic behavior sp2 in the QoS policy.
[Router] qos policy sp2
[Router-qospolicy-sp2] classifier sp2 behavior sp2
[Router-qospolicy-sp2] quit
# Apply QoS policy sp1 to the incoming traffic of Ten-GigabitEthernet 3/1/1 and QoS policy sp2 to the outgoing traffic of Ten-GigabitEthernet 3/1/1.
[Router] interface ten-gigabitethernet 3/1/1
[Router–ten-GigabitEthernet3/1/1] qos apply policy sp1 inbound
[Router–ten-GigabitEthernet3/1/1] qos apply policy sp2 outbound
[Router–ten-GigabitEthernet3/1/1] quit
Verifying the configuration
# Display statistics about value-added-service users. Verify that the IPoE user has been assigned EDSG service policies.
[Router] display value-added-service user
