- Table of Contents
- Related Documents
-
| Title | Size | Download |
|---|---|---|
| 01-Text | 2.00 MB |
Operating environment configuration
Installing the license server by using a .zip file
Installing the license server by using an .iso file (versions earlier than E1206)
Installing the license server by using an .iso file (E1206 and later versions)
Permitting license server's ports, address, and protocol
Logging in to the license server
Deploying a license server HA cluster
Uninstalling the license server
Upgrading the license server between E12XX versions
Upgrading the license server in standalone mode
Upgrading the license servers deployed in HA by using a method other than ISSU
Upgrading the license servers deployed in HA by using ISSU
Upgrading the license server from an E11XX version to an E12XX version
Upgrading the license server in standalone mode
Upgrading the license servers in HA mode
Rolling back after a failed upgrade
How to change the hardware after a license is installed?
How to reinstall the operating system after a license is installed?
Reinstall the operating system in a standalone deployment
Reinstall the operating system in an HA deployment
How to reinstall the operating system and upgrade the license server?
How to replace the abnormal license server in a license server cluster?
How to change the IP of the license server after the license server has been deployed?
Changing the physical IP of the license server in standalone deployment
Changing the physical IP of one or both of the license server nodes in the HA cluster
Changing the virtual IP of the license server HA cluster
Changing the IP during upgrade from standalone mode to HA mode
Can licenses continue to be used after the license server is uninstalled and reinstalled?
Overview
H3C license server is license management software developed by H3C. It provides centralized management on licensing, licensing for services on the network, and HA clusters. This product simplifies licensing workflow and automates services licensing.
The license server provides the following features:
· Allows you to apply for licenses based on the hardware of the server where the license server resides.
· Allows you to install and store the licenses on the license server.
· Supports licensing service backup, which avoids service interruption.
Preparing for installation
Network requirements
Before you install a license server, plan your network. Make sure the server where the license server resides is accessible in the network.
Server requirements
Hardware requirements
For a license server to function correctly, install the license server on a physical server.
Table 1 shows the recommended and minimum hardware requirements for a server to host the license server.
Table 1 Recommended and minimum hardware requirements
|
Item |
Recommended requirements |
Minimum requirements |
|
CPU |
x86-64 (Intel 64/AMD 64) or ARM 64, 16 cores with a CPU clock speed of 2.0 GHz |
x86-64 (Intel 64/AMD 64) or ARM 64, dual cores with a CPU clock speed of 2.0 GHz |
|
Memory size |
32 GB |
4 GB |
|
Available disk space |
64 GB for the partition where the root directory resides |
64 GB for the partition where the root directory resides |
|
NIC speed |
1 to 10 Gbps |
1 to 10 Gbps |
|
Remarks |
If the recommended requirements are met, the license server supports a maximum of 2000 connected clients. |
If the minimum requirements are met, the license server supports a maximum of 20 connected clients. |
Software requirements
The server to host a license server must be installed with one of the following operating systems:
· H3Linux Release 1.1.2 x86-64.
· H3Linux Release 1.3.1 x86-4.
· H3Linux 1.1.2 ARM 64.
· H3Linux 2.0.2 x86_64.
· H3Linux 2.0.2 ARM64.
· Kylin Linux Advanced Server release V10 x86-64.
· Kylin Linux Advanced Server release V10 ARM 64.
Table 2 displays the required dependencies for installing the license server.
Table 2 Dependency version number
|
Dependency |
Version number |
|
unzip |
6.0 |
Web browser requirements
You can log in to the license server through a Web browser.
The license server supports the following Web browsers:
· Google Chrome 55 and later.
· Internet Explorer 11 and later.
Operating environment configuration
Disabling SELinux
1. Edit the configuration file.
vi /etc/selinux/config
2. Set SELINUX to disabled.
SELINUX=disabled
3. Save the settings. Then exit and restart the system.
Configuring DNS
For automatic installation of the license file for the license server, you must configure an IP address for the DNS server to resolve the domain name of H3C License Management Platform. On the Linux operating system, use the /etc/resolv.conf configuration file on the DNS client to set an IP address for the DNS server.
[root@localhost opt]# cat /etc/resolv.conf
search localdomain
nameserver 192.168.1.1
nameserver represents the IP address of the DNS server. Repeat this command to configure multiple IP addresses for the DNS server. The system searches for IP addresses in the order they are configured in the configuration and stops once a match is found.
Installing the license server
Installation methods
|
|
CAUTION: · If you install the license server by using a .zip file, correct the system time for the operating system before installation. To avoid data disorganization, do not change the system time after installation. · If you install the license server by using an .iso file, correct the system time during operating system installation or before starting the newly-installed license server. To avoid data disorganization, do not change the system time after the license server starts up. |
You can install the license server by using the following methods:
· Installing the license server by using a .zip file—Install the license server installation package on the existing operating system.
· Installing the license server by using an .iso file (versions earlier than E1206)- Install the license server by using an ISO image(versions earlier than E1206). This method installs both the operating system and the license server.
· Installing the license server by using an .iso file (E1206 and later versions)—Install the license server by using an ISO image(E1206 and later versions). This method installs both the operating system and the license server.
Installing the license server
Installing the license server by using a .zip file
Restrictions and guidelines
Both the root user and non-root users of the operating system can install an .rpm file on the server. As a best practice, log in as the root user and install the .rpm file.
To allow non-root users to install an .rpm file, perform the following tasks:
1. In root user view, execute the visudo command to open the configuration file.
2. Enter <username> ALL=(root) NOPASSWD:/bin/bash at the end of configuration file, where username represents the name of the non-root user.
When you install an .rpm file as the privileged non-root user, add the sudo keyword to the beginning of the command for installing an .rpm file.
Uploading the license server installation package
Copy the license server installation package to the license server installation directory on the server.
If you use FTP or TFTP to upload the installation package to the directory, use the binary mode to avoid damaging the installation package.
Installing the license server on the server
1. Access the directory where the license server installation package (.zip file) resides and decompress the installation package.
The license server installation package is named in the format of LICENSE_SERVER-version-arch.zip, where version represents the version number and arch represents the operating system version (x86-64 or ARM 64) .
The following example uses the /root directory.
[root@localhost ~]# unzip LICENSE_SERVER-E1201-x86_64.zip
Archive: LICENSE_SERVER-E1201-x86_64.zip
inflating: LICENSE_SERVER-E1201-x86_64/install.sh
inflating: LICENSE_SERVER-E1201-x86_64/LICENSE_SERVER.tar.gz
2. Access the directory where the decompressed installation package resides.
[root@localhost ~]# cd LICENSE_SERVER-E1201-x86_64
3. Execute the installation script.
¡ Install the Chinese version of license server.
[root@localhost LICENSE_SERVER-E1201-x86_64]# ./install.sh
…
¡ Install the English version of license server.
[root@localhost LICENSE_SERVER-E1201-x86_64]# ./install.sh --lang=en
…
4. Enter the service port number at the prompt:
Type the license service port (1024-65535, default:5555) :
Make sure the service port number is idle. If you press Enter without entering a port number, the default port number 5555 is used.
5. Enter the HTTPS port number for Web login at the prompt:
Type the HTTPS port for the Web login (1-65535, default:28443) :
Make sure the specified HTTPS port number is idle.
If you press Enter without entering a port number, the default HTTPS port number 28443 is used.
6. Enter the HTTPS port number for Monitor login at the prompt:
Type the HTTPS port for the Monitor login (1-65535, default:38443) :
Make sure the specified HTTPS port number is idle.
If you press Enter without entering a port number, the default HTTPS port number 38443 is used.
Verifying the installation
Identify whether the licsmgr, licsmonitor, licsmariadb, and licsredis services are running. If these services are running, the license server service is running.
[root@localhost ~]# service licsmgr status
Redirecting to /bin/systemctl status licsmgr.service
licsmgr.service - LICS Manager
Loaded: loaded (/usr/lib/systemd/system/licsmgr.service; enabled; vendor preset: disabled)
Active: active (running) since Mon 2021-01-04 10:10:41 EST; 9min ago
...
[root@localhost ~]# service licsmonitor status
Redirecting to /bin/systemctl status licsmonitor.service
licsmonitor.service - LICS Monitor
Loaded: loaded (/usr/lib/systemd/system/licsmonitor.service; enabled; vendor preset: disabled)
Active: active (running) since Mon 2021-01-04 10:10:41 EST; 10min ago
...
[root@localhost ~]# service licsmariadb status
Redirecting to /bin/systemctl status licsmariadb.service
licsmariadb.service - Lics Mariadb
Loaded: loaded (/usr/lib/systemd/system/licsmariadb.service; enabled; vendor preset: disabled)
Active: active (running) since Mon 2021-01-04 12:52:01 EST; 22h ago
...
[root@localhost ~]# service licsredis status
Redirecting to /bin/systemctl status licsredis.service
licsredis.service - Lics Redis
Loaded: loaded (/usr/lib/systemd/system/licsredis.service; enabled; vendor preset: disabled)
Active: active (running) since Mon 2021-01-04 10:05:48 EST; 16min ago
...
Installing the license server by using an .iso file (versions earlier than E1206)
1. Use the remote console of the server to load the license server installation package in ISO format through a virtual drive.
2. Restart the server to enter the system loading process.
3. After the loading completes, the WELCOME TO H3LINUX page opens.
Figure 1 WELCOME TO H3LINUX page
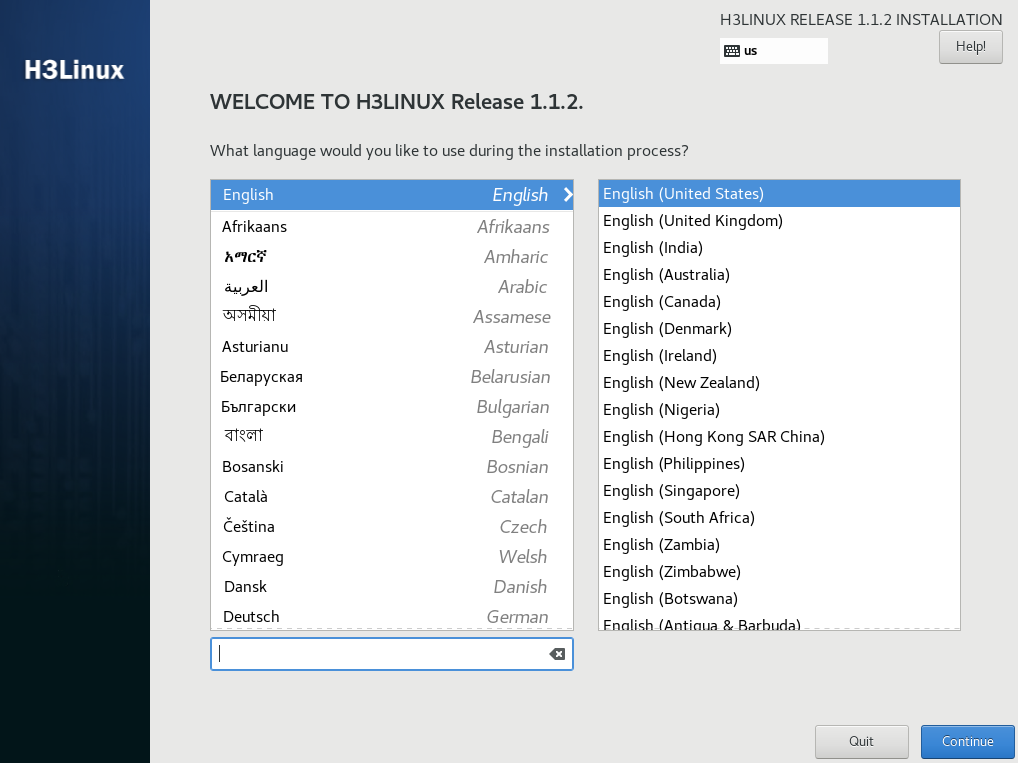
4. Select a language, and then click Continue. In this example, English is selected.
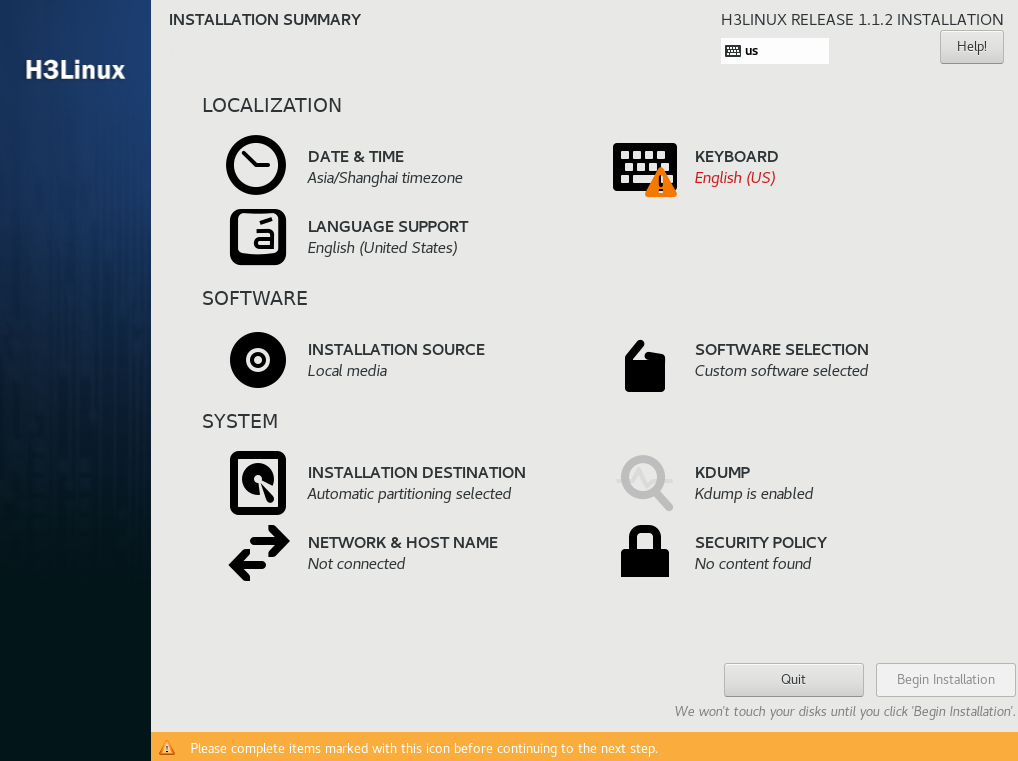
The INSTALLATION SUMMARY page opens.
Figure 2 INSTALLATION SUMMARY page
5. Click DATE & TIME in the LOCALIZATION area. Select the time zone and set the time and then click Done to return to the INSTALLATION SUMMARY page.
Select the time zone of the local region. For example, if you are in China, select the Asia/Shanghai time zone.
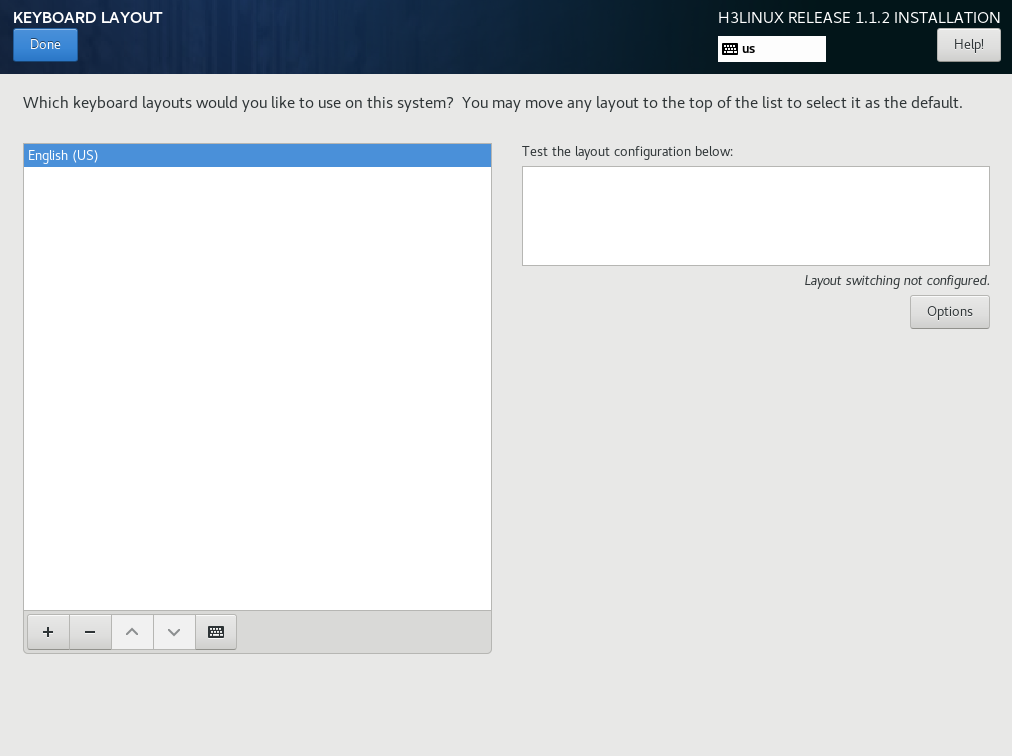
6. Click KEYBOARD in the LOCALIZATION area. On the KEYBOARD LAYOUT page that opens, select English (US) as the keyboard layout, and then click Done.
The system returns to the INSTALLATION SUMMARY page.
Figure 3 KEYBOARD LAYOUT page
7. Click SOFTWARE SELECTION in the SOFTWARE area.
On the SOFTWARE SELECTION page that opens, select Minimal Install in the Base Environment area, and click Done.
The system returns to the INSTALLATION SUMMARY page.
Figure 4 SOFTWARE SELECTION page

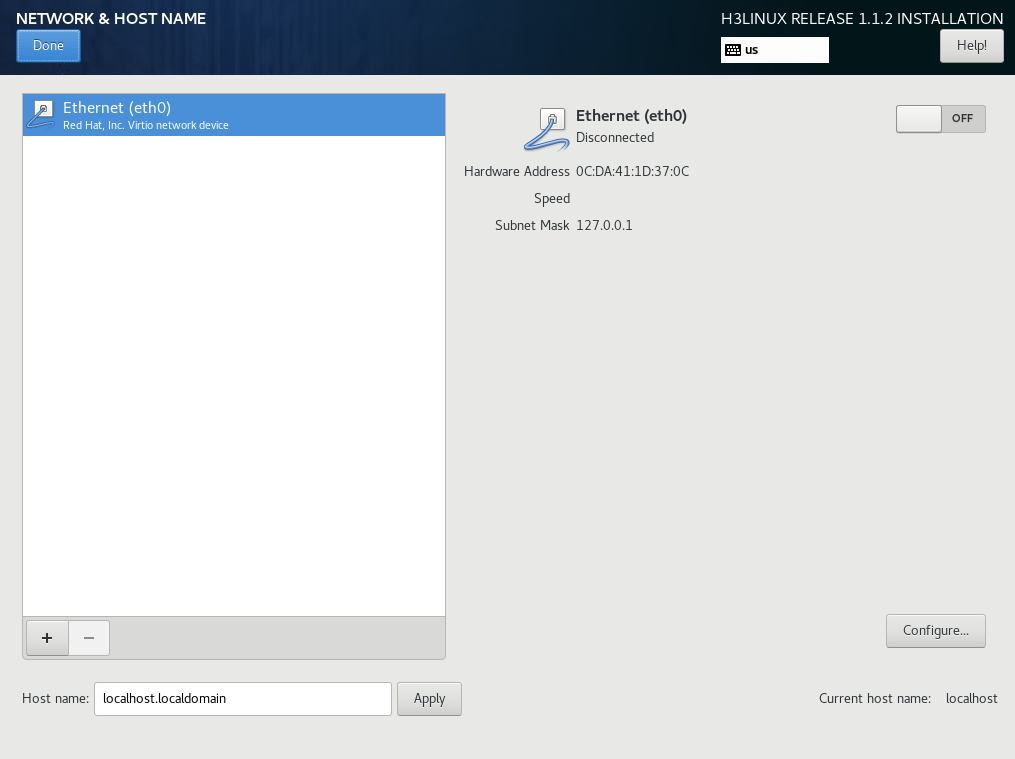
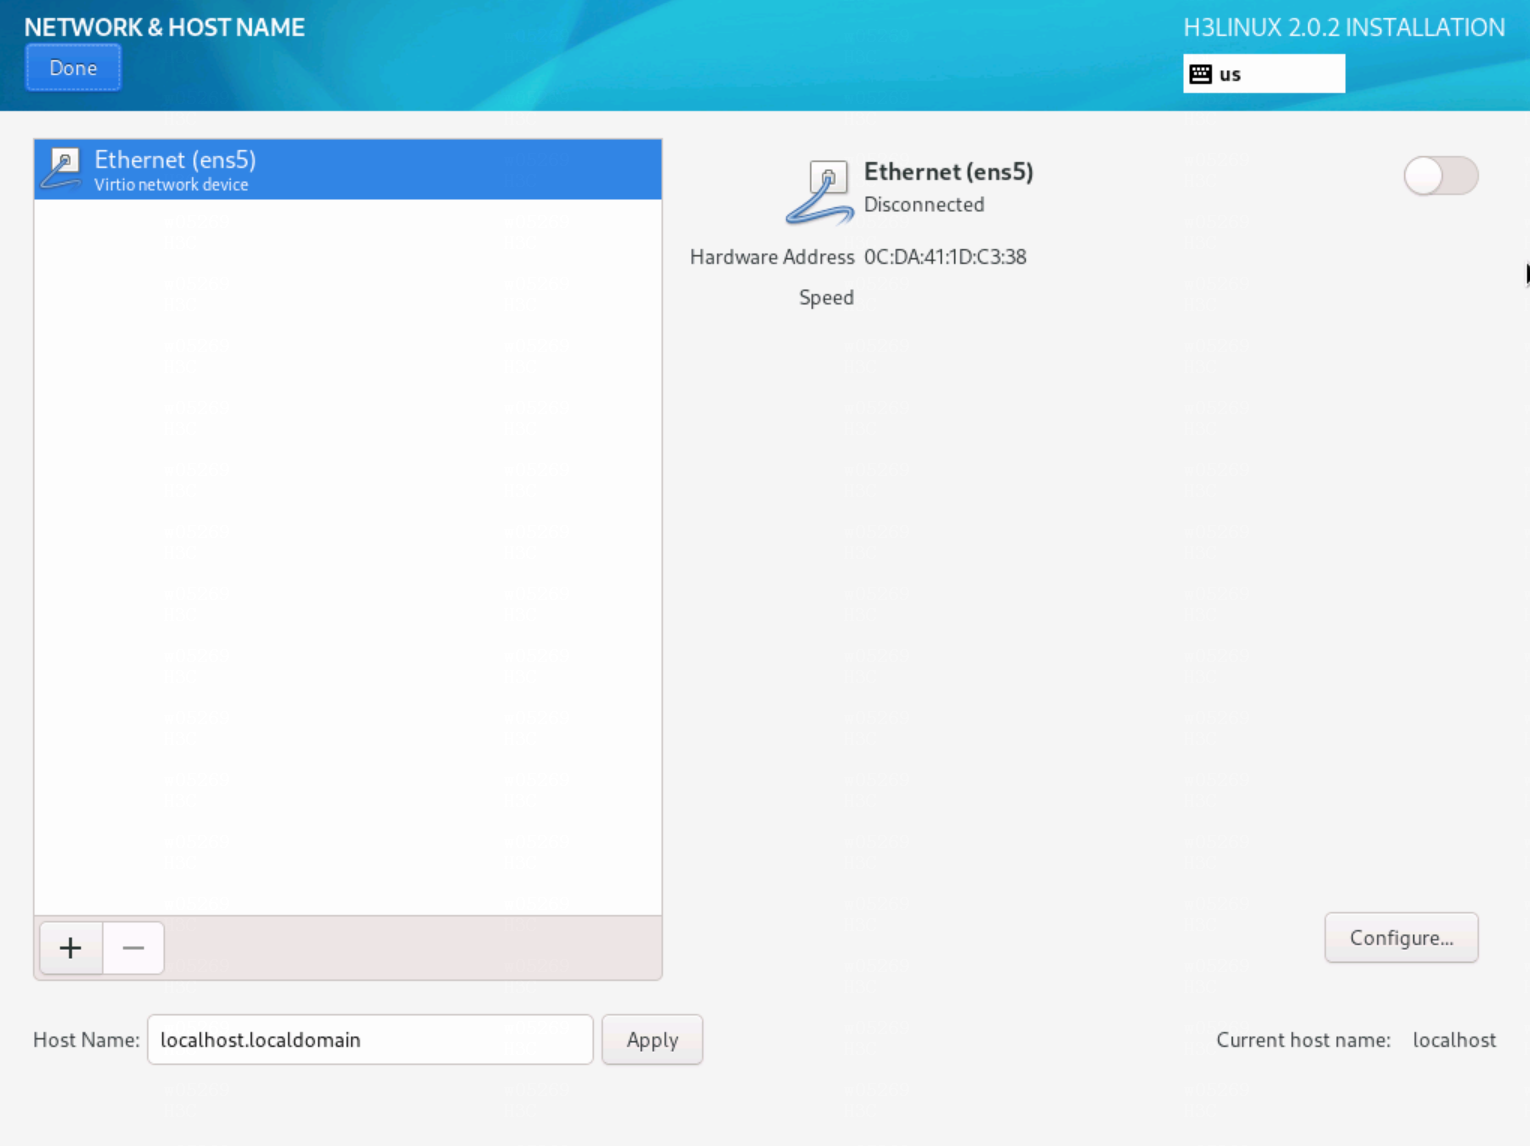
8. Click NETWORK & HOST NAME in the SYSTEM area.
On the NETWORK & HOST NAME page that opens, perform the following tasks and then click Done to return to the INSTALLATION SUMMARY page.
¡ To edit the host name, enter a new host name and click Apply.
Figure 5 NETWORK & HOST NAME page
¡ To edit the network settings, click Configure.
On the page that opens, perform the following tasks:
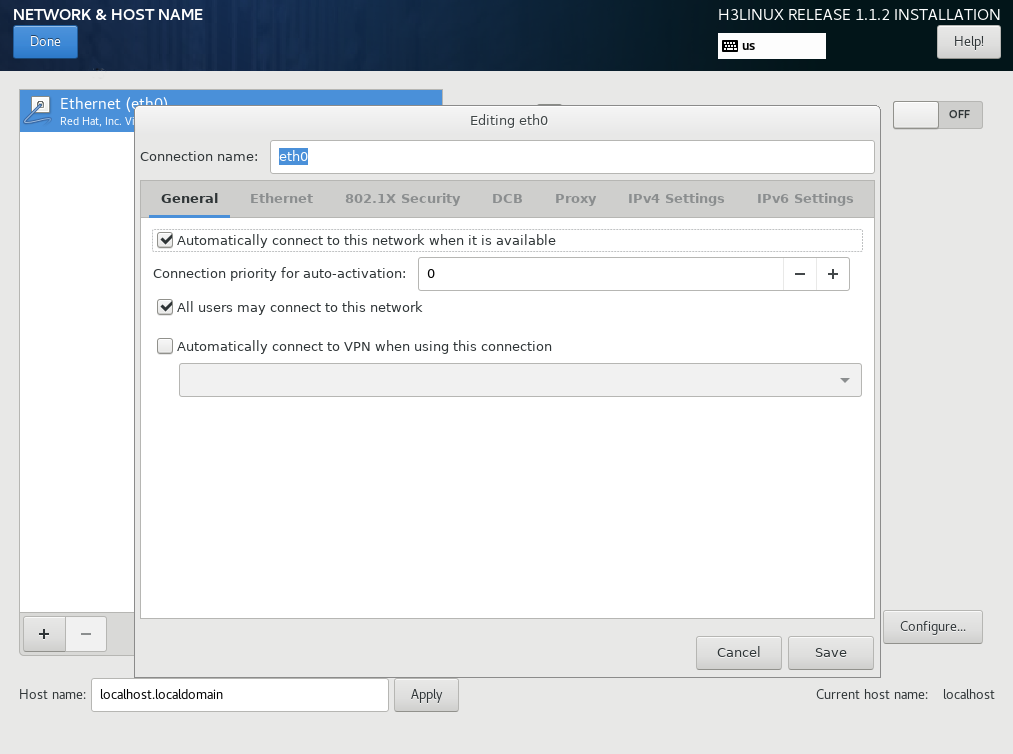
- On the General tab, select Automatically connect to this network when it is available.
Figure 6 General settings
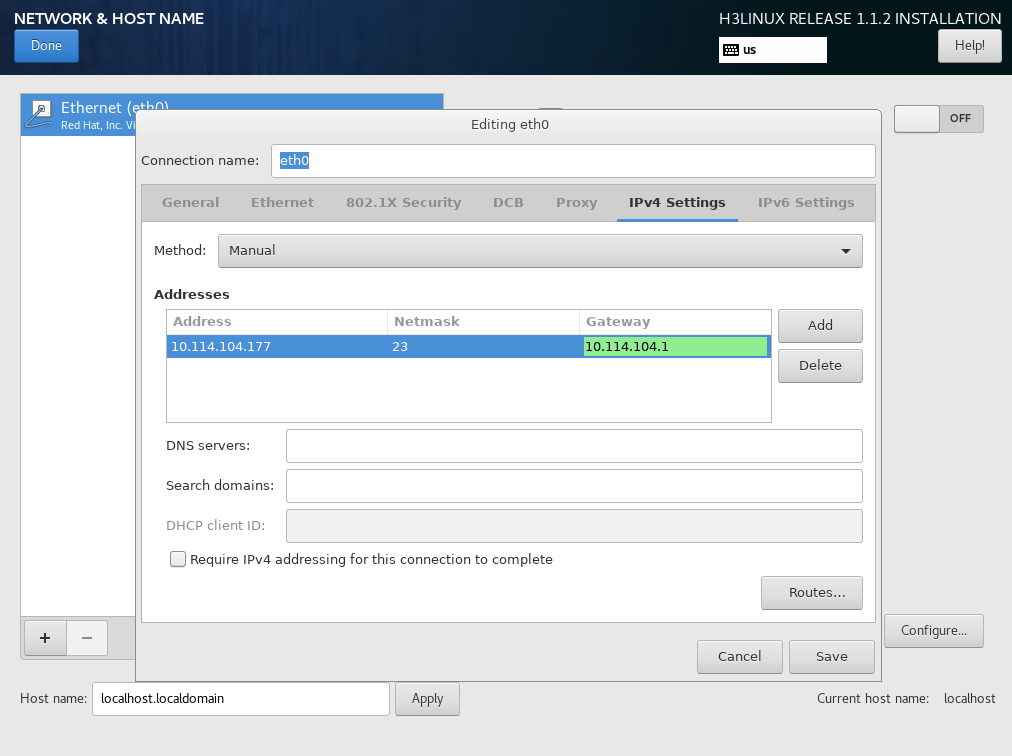
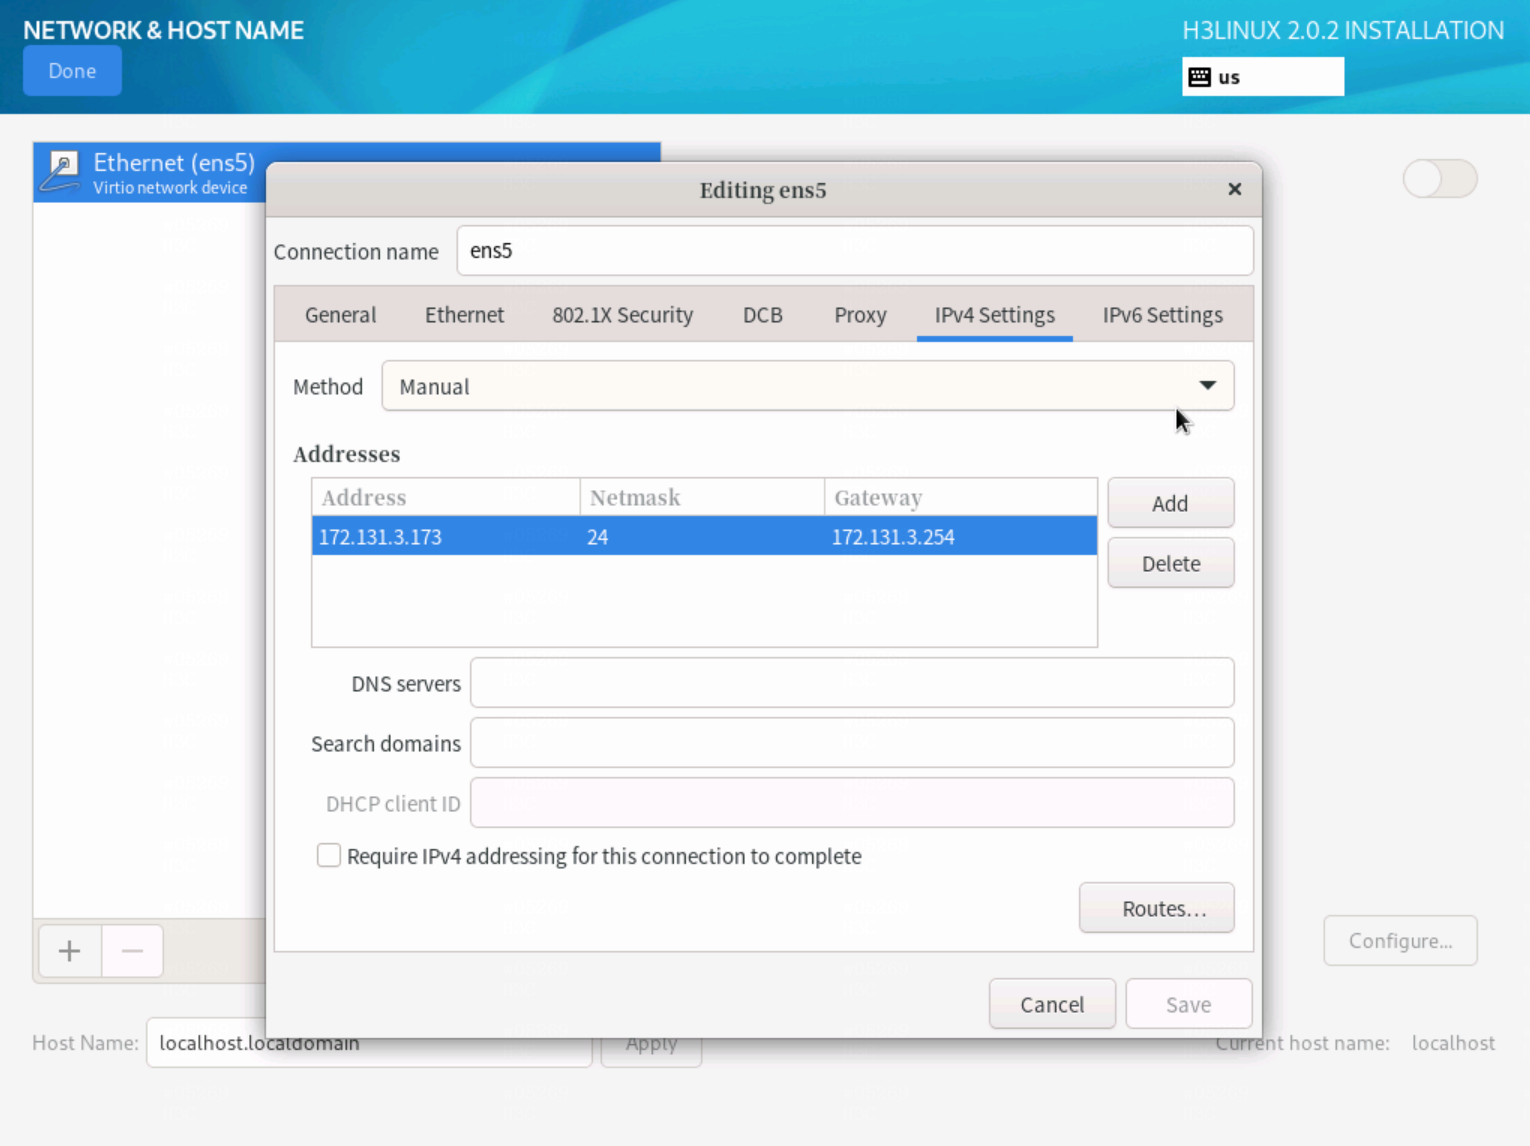
- Click the IPv4 Settings tab and edit IPv4 settings, as shown in Figure 15.
Figure 7 IPv4 settings
- Click Save after finishing the configuration.
9. On the INSTALLATION SUMMARY page, click Begin Installation.
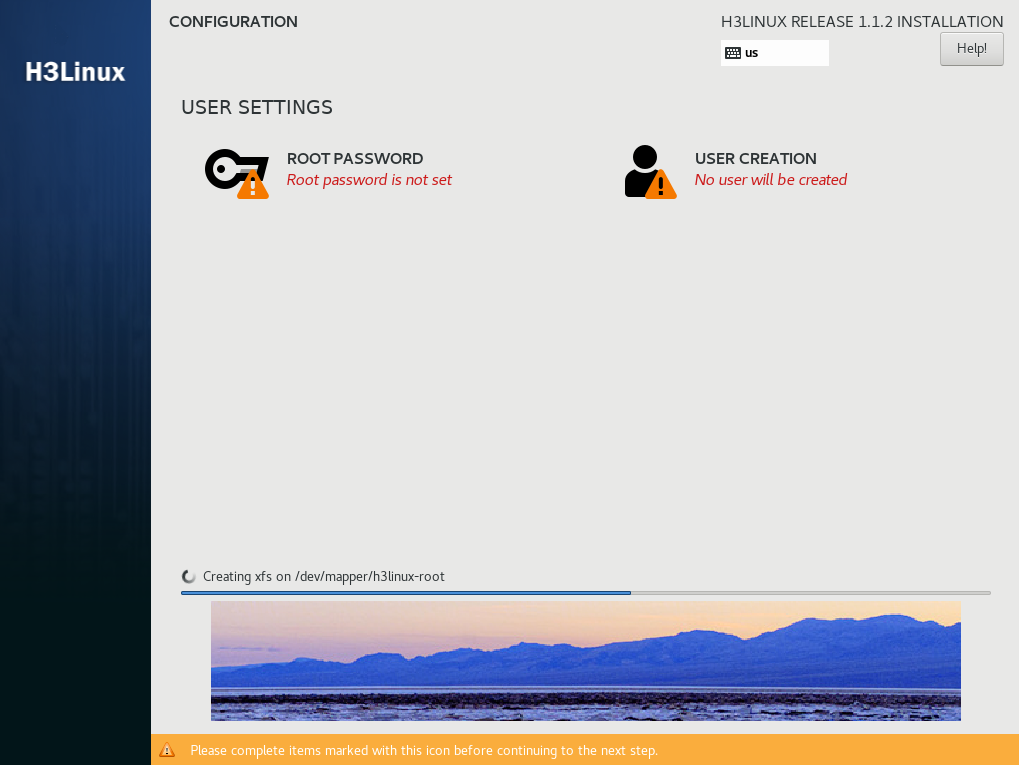
During the installation, the Configuration page opens and you can configure the root password and create users.
Figure 8 Configuration page
10. After the installation completes, the server will restart automatically to finish installation of the operating system and license server.
Installing the license server by using an .iso file (E1206 and later versions)
1. Use the remote console of the server to load the license server installation package in ISO format through a virtual drive.
2. Restart the server to enter the system loading process.
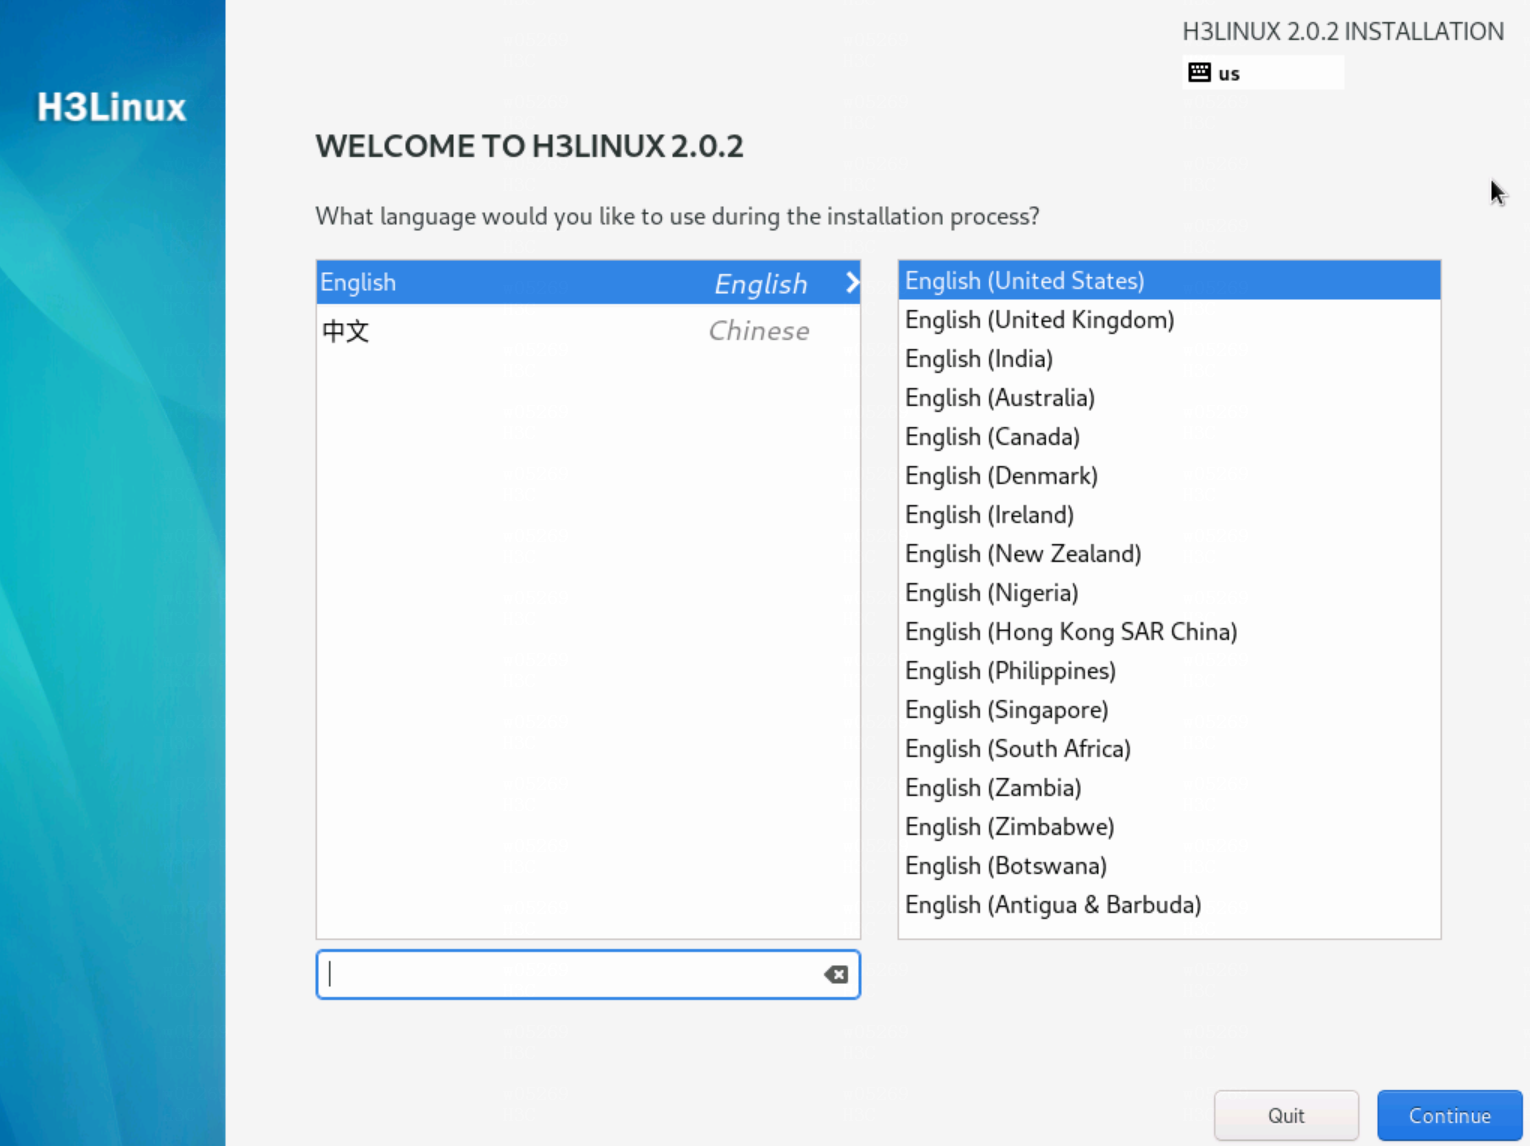
3. After the loading completes, the WELCOME TO H3LINUX page opens. Select a language, and then click Continue. In this example, English is selected.
Figure 9 WELCOME TO H3LINUX page
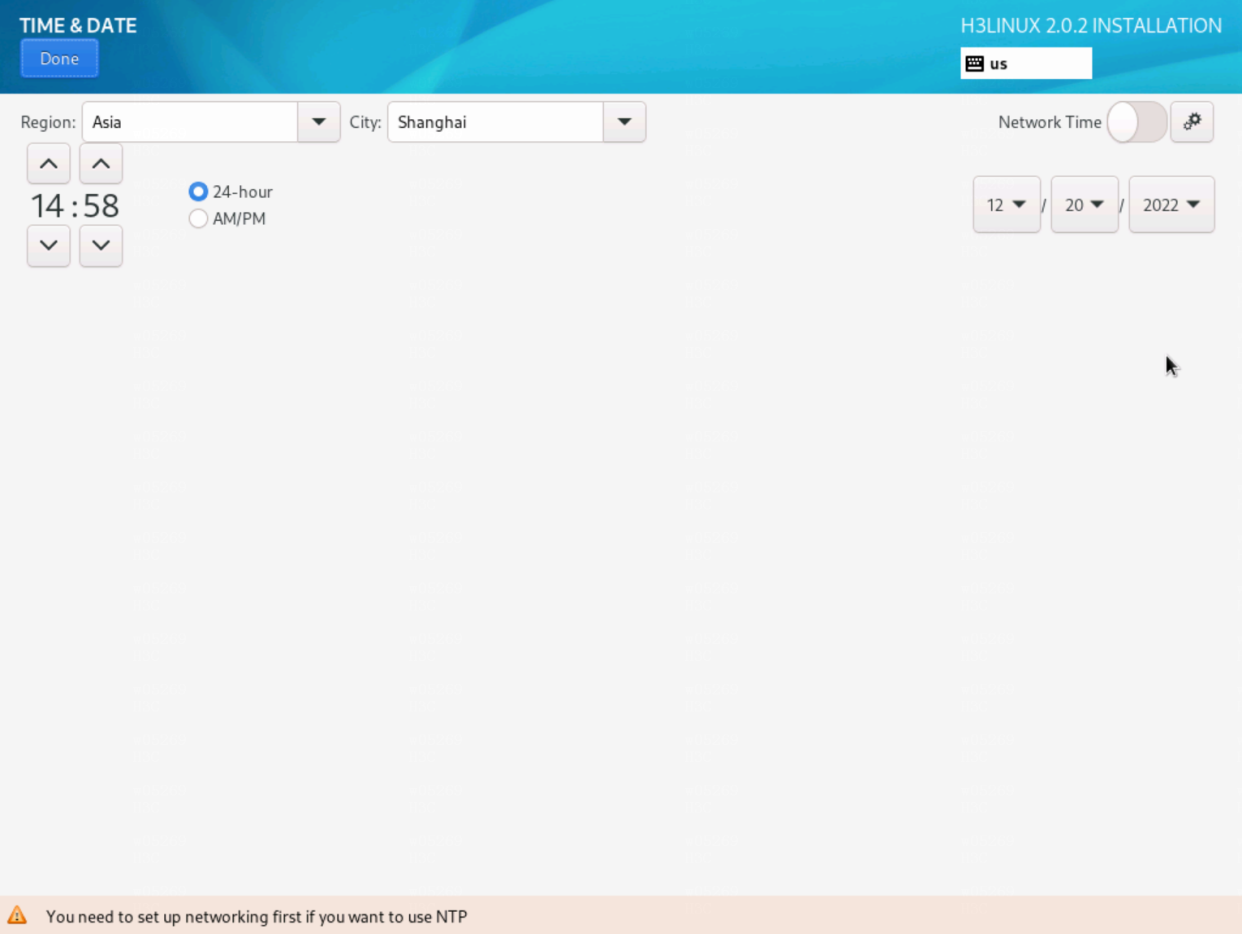
4. On the INSTALLATION SUMMARY page that opens, click Time & Date in the LOCALIZATION area. Select the time zone and set the time and then click Done to return to the INSTALLATION SUMMARY page.
Select the time zone of the local region. For example, if you are in China, select the Asia/Shanghai time zone.
Figure 10 INSTALLATION SUMMARY page
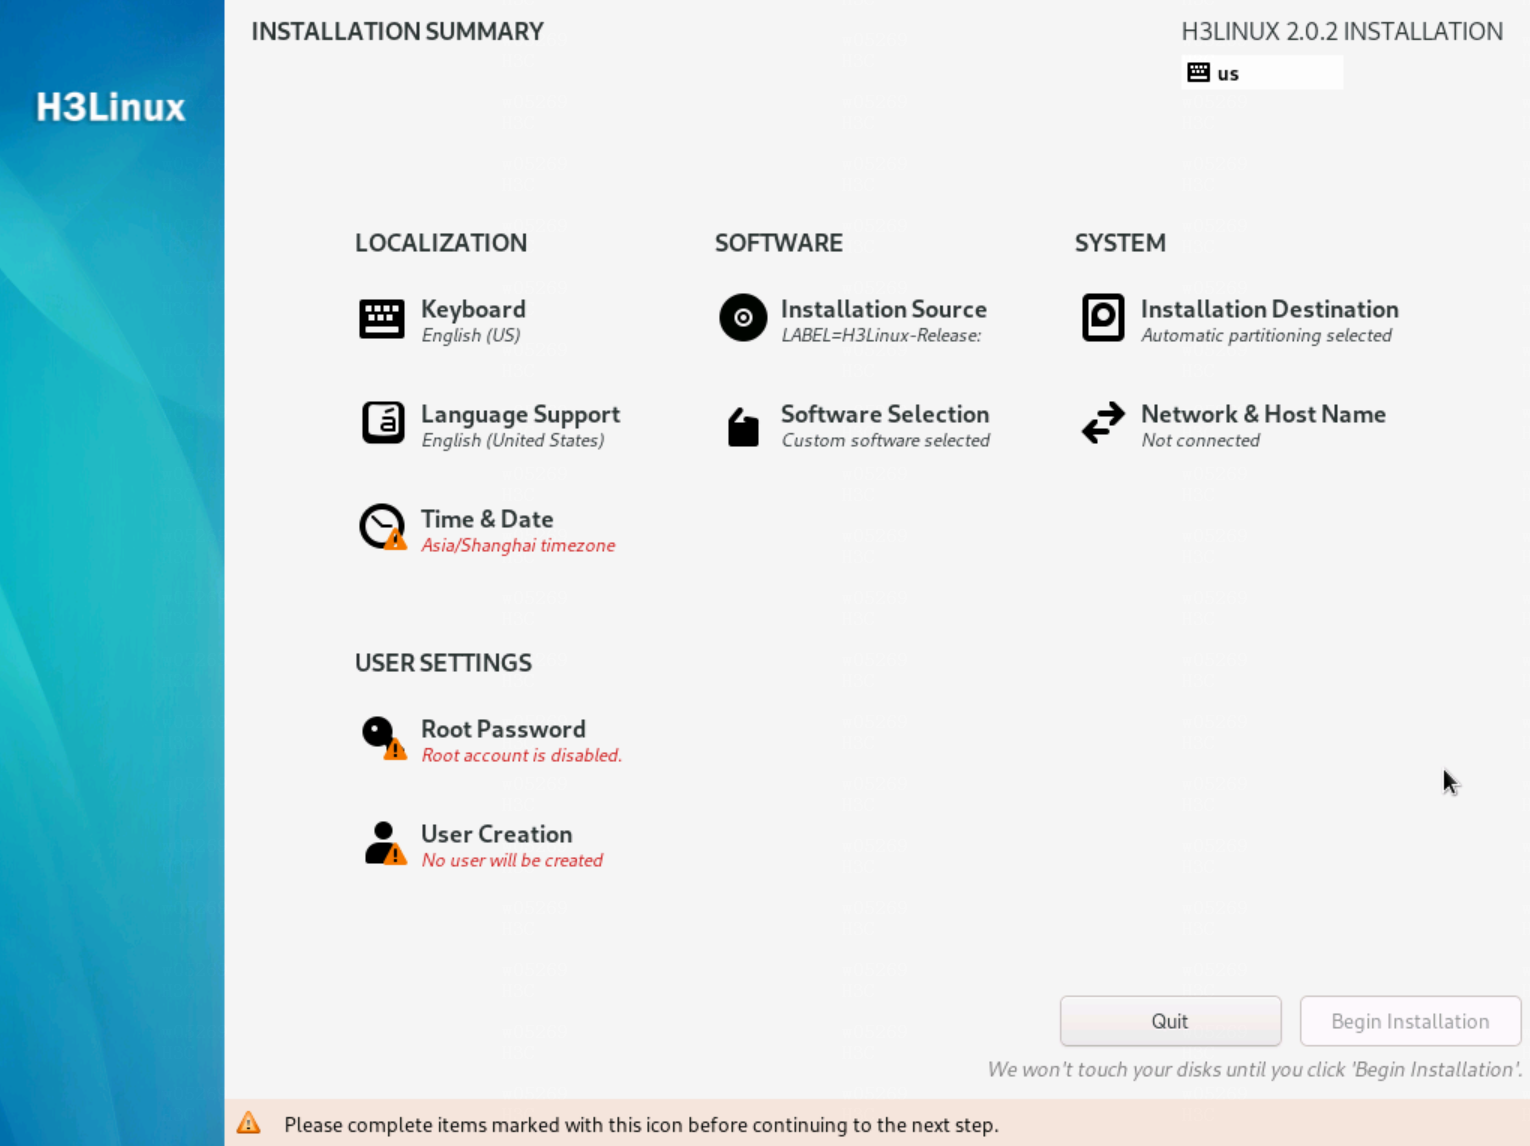
Figure 11 Setting the time zone and system time
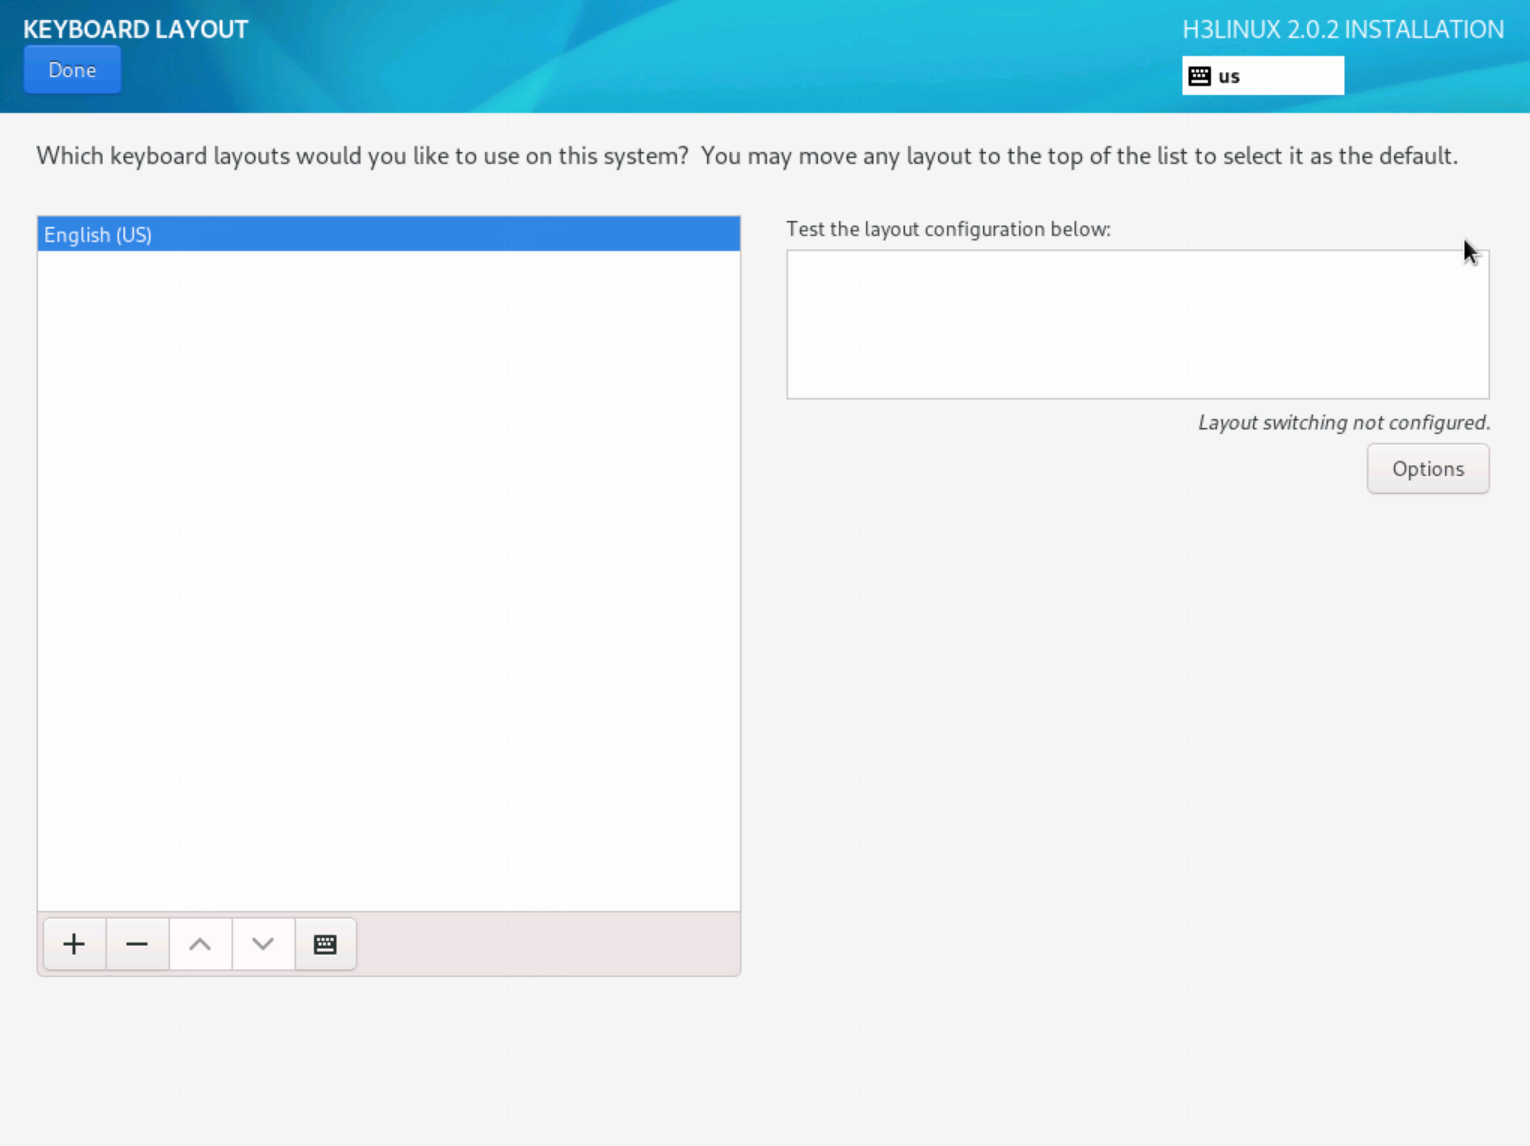
5. Click Keyboard in the LOCALIZATION area. On the KEYBOARD LAYOUT page that opens, select English (US) as the keyboard layout, and click Done.
The system returns to the INSTALLATION SUMMARY page.
Figure 12 KEYBOARD LAYOUT page
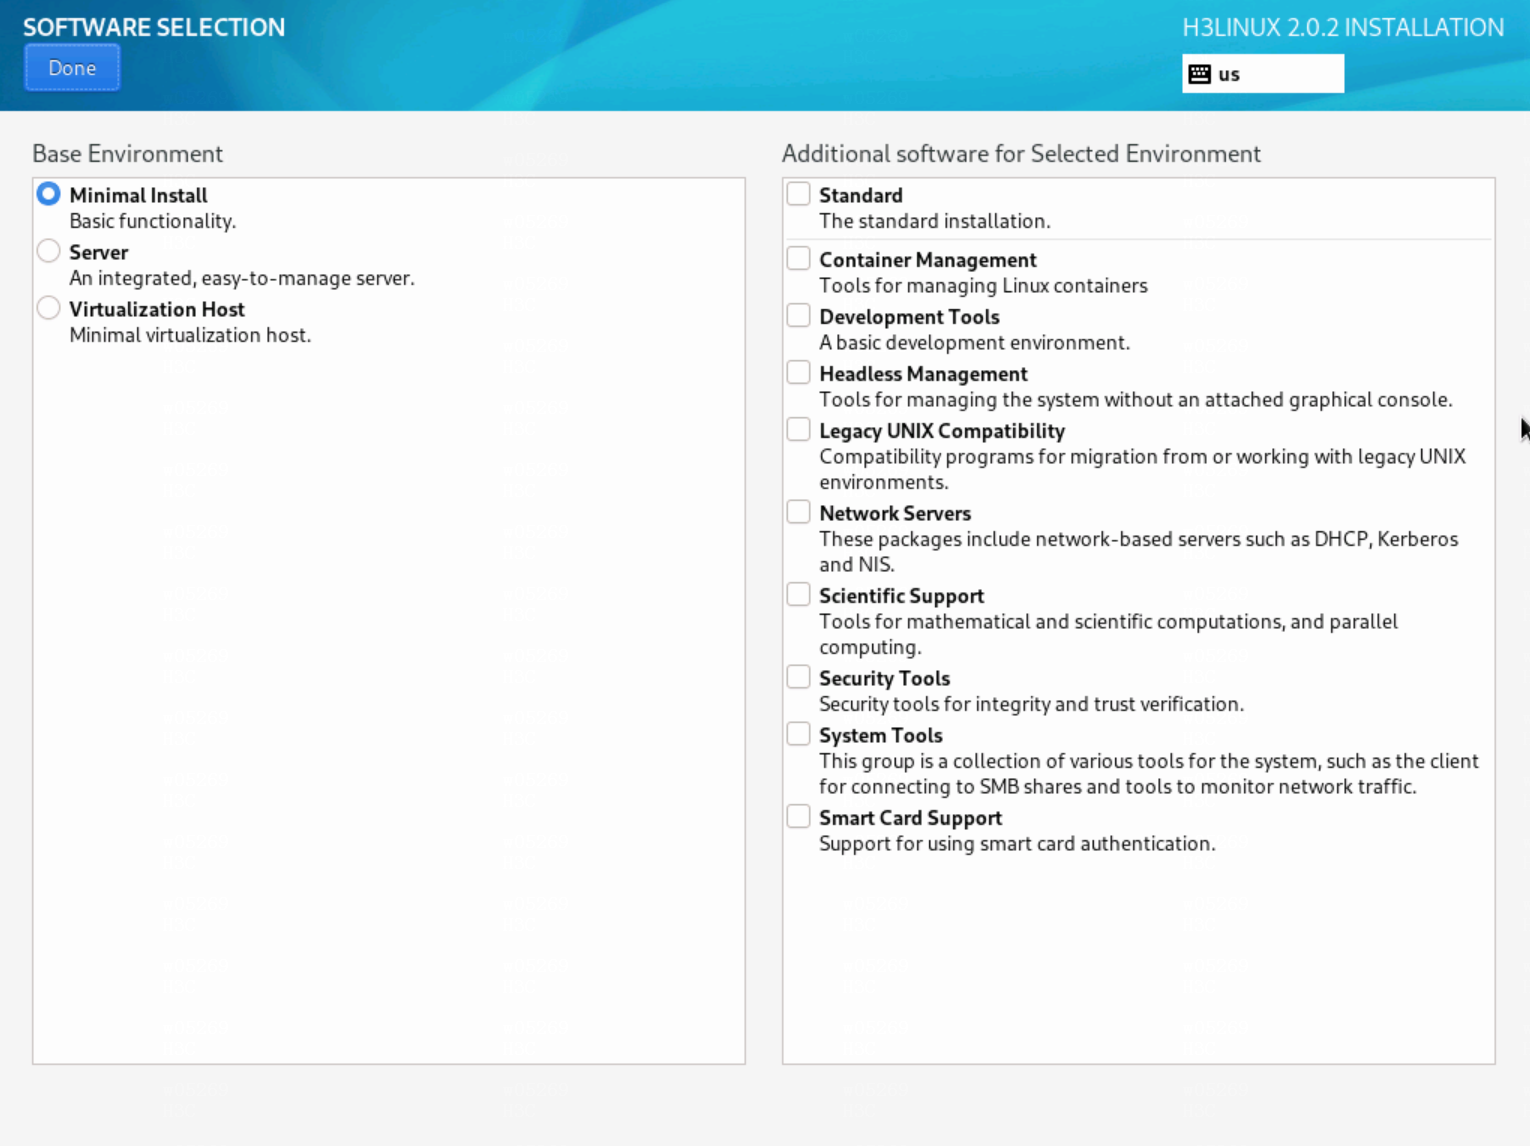
6. Click Software Selection in the SOFTWARE area.
On the SOFTWARE SELECTION page that opens, select Minimal Install in the Base Environment area, and click Done.
The system returns to the INSTALLATION SUMMARY page.
Figure 13 SOFTWARE SELECTION page
7. Click Network & Host Name in the SYSTEM area.
On the NETWORK & HOST NAME page that opens, perform the following tasks and then click Done to return to the INSTALLATION SUMMARY page.
¡ To edit the host name, enter a new host name and click Apply.
Figure 14 NETWORK & HOST NAME page
¡ To edit the network settings, click Configure. On the page that opens, click the IPv4 Settings tab and edit IPv4 settings and click Save.
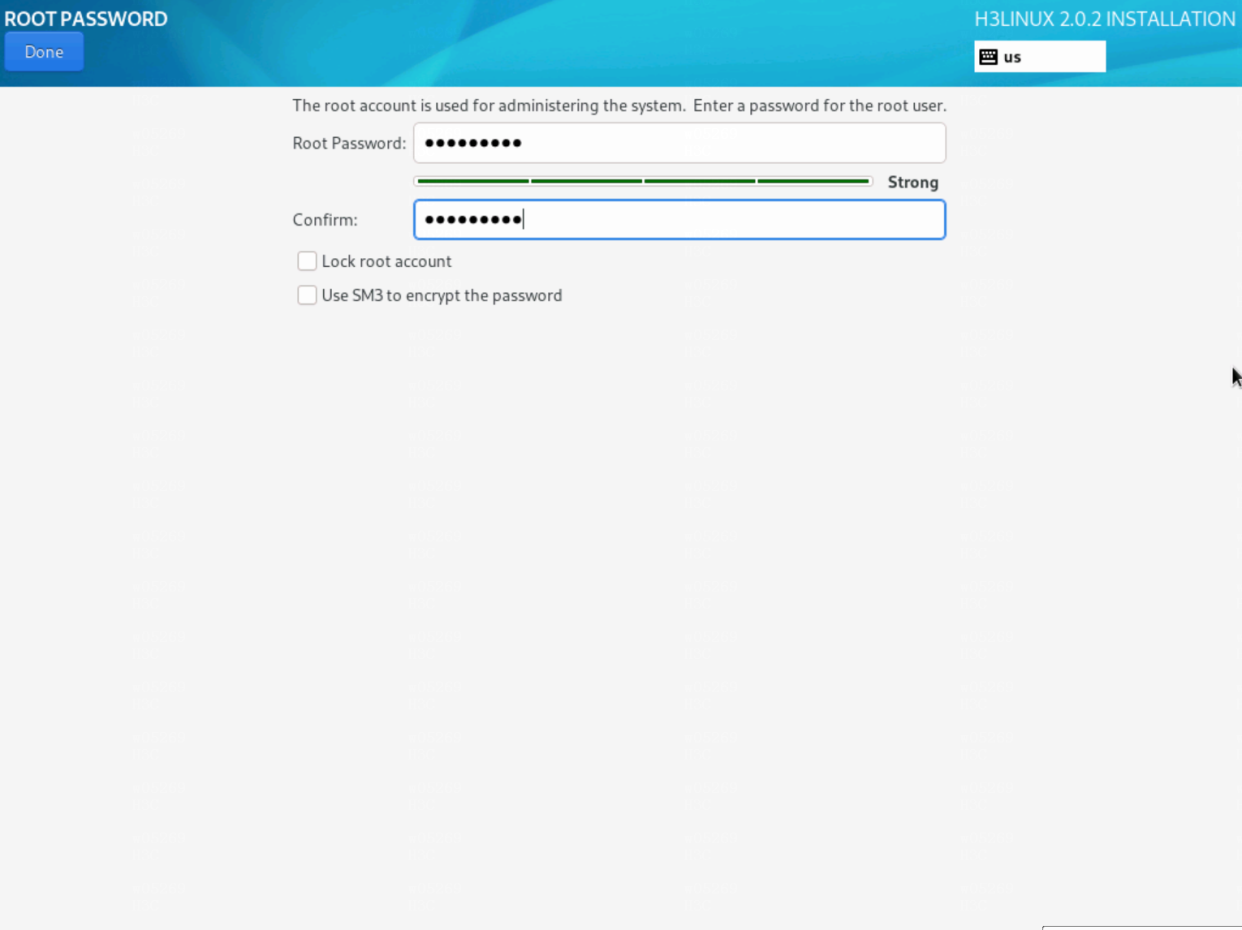
8. Click Root password in the USER SETTINGS area. Set and confirm the root password and then click Done.
Figure 16 Setting the root password
9. Click Begin Installation.
10. After the installation completes, click Reboot System to reboot the operating system.
To avoid exceptions, do not use other methods such as performing a power-cycle of the server to reboot it.
Permitting license server's ports, address, and protocol
The firewalld and iptables services are available to fulfill the firewall function. Select a service according to your server configuration and permit license server's ports, address, and protocol by the firewall.
After the installation, verify the firewalld or iptables service status on the physical server.
· If the service is disabled permanently, you can skip this task. If the service is disabled temporarily, it will become enabled after device reboot. In this case, the license server cannot run correctly. As a best practice, enable the service for security purposes if the license server has risks of exposures to public networks.
· If the service is enabled, for the license server to operate correctly, make sure related license server's ports are opened, and addresses and protocols are permitted by the firewall.
The following ports, address, and protocol must be permitted:
· HTTPS port for Web login.
· HTTPS port for Monitor login.
· License service port.
· MariaDB port 23306.
· Multicast IPv6 address ff02::12 for HA Keepalived packets and the VRRP protocol.
Configuring the firewalld service
1. Verify that the firewalld service is active. The field value active (running) indicates that the service is active.
[root@localhost ~]# service firewalld status
Redirecting to /bin/systemctl status firewalld.service
firewalld.service - firewalld - dynamic firewall daemon
Loaded: loaded (/usr/lib/systemd/system/firewalld.service; disabled)
Active: active (running) since Thu 2015-07-30 12:33:26 CST; 20s ago
...
2. Open the license service port and HTTPS ports:
a. Examine whether the license service port and HTTPS ports are blocked. In this example, the license service port is 5555, the HTTPS port for Web login is 28443, and the HTTPS port for Monitor login is 38443. The field value no indicates that the port is blocked.
[root@localhost ~]# firewall-cmd --query-port=5555/tcp
no
[root@localhost ~]# firewall-cmd --query-port=28443/tcp
no
[root@localhost ~]# firewall-cmd --query-port=38443/tcp
no
b. Open the related ports. The field value success indicates that the operation is successful.
[root@localhost ~]# firewall-cmd --permanent --add-port=5555/tcp
success
[root@localhost ~]# firewall-cmd --permanent --add-port=28443/tcp
success
[root@localhost ~]# firewall-cmd --permanent --add-port=38443/tcp
success
c. Reload the configuration to have the configuration take effect.
[root@localhost ~]# firewall-cmd –reload
success
d. Verify that the ports are successfully opened. The field value yes indicates that the ports are opened.
[root@localhost ~]# firewall-cmd --query-port=5555/tcp
yes
[root@localhost ~]# firewall-cmd --query-port=28443/tcp
yes
[root@localhost ~]# firewall-cmd --query-port=38443/tcp
yes
3. Open the MariaDB service port for HA.
If HA is required, make sure port 23306 used by the MariaDB service for HA is opened. To ensure database security, open this port only between the primary license server and the standby license server. On the physical server hosting the primary license server, open the Redis service port only for the standby license server. On the physical server hosting the standby license server, open the Redis service port only for the primary license server.
a. Examine whether the MariaDB service port (port 23306) is blocked. The field value no indicates that the port is blocked.
[root@localhost ~]# firewall-cmd --permanent --query-port=23306/tcp
no
b. If the field value is yes, remove port 23306 from the blocked port list.
[root@localhost ~]# firewall-cmd --permanent --remove-port=23306/tcp
success
c. Open port 23306 only for the primary or standby license server.
In this example, the IPv4 address of the primary license server or standby license server uses 192.168.109.15.
[root@localhost ~]# firewall-cmd --permanent --add-rich-rule="rule family="ipv4" source address="192.168.109.15" port protocol="tcp" port="23306" accept"
success
In this example, the IPv6 address of the primary license server or standby license server uses 2001::141.
[root@localhost ~]# firewall-cmd --permanent --add-rich-rule="rule family="ipv6" source address="2001::141" port protocol="tcp" port="23306" accept"
success
d. Reload the configuration to have the configuration take effect.
[root@localhost ~]# firewall-cmd –reload
success
e. Verify that port 23306 is successfully opened.
[root@localhost ~]# firewall-cmd --list-all
...
rule family="ipv4" source address="192.168.109.15" port port="23306" protocol="tcp" accept
rule family="ipv6" source address="2001::141" port port="23306" protocol="tcp" accept
4. Permit the multicast address for the HA Keepalived packets and the VRRP protocol.
You must permit multicast address for Keepalived packets and the VRRP protocol if the license server is to be configured with the HA feature.
a. Examine whether permit rules are configured for the Keepalived multicast address and the VRRP protocol. If the output shows that no permit rules are configured for the Keepalived multicast address and the VRRP protocol, the multicast address and the VRRP protocol are not permitted.
- IPv4:
[root@localhost ~]# firewall-cmd --query-rich-rule="rule family="ipv4" destination address="224.0.0.18" protocol value="vrrp" accept"
no
- IPv6:
[root@localhost ~]# firewall-cmd --query-rich-rule="rule family="ipv6" destination address="ff02::12" protocol value="vrrp" accept"
no
b. Configure permit rules for the Keepalived multicast address and the VRRP protocol.
- IPv4:
[root@localhost ~]# firewall-cmd --permanent --add-rich-rule="rule family="ipv4" destination address="224.0.0.18" protocol value="vrrp" accept"
success
- IPv6:
[root@localhost ~]# firewall-cmd --permanent --add-rich-rule="rule family="ipv6" destination address="ff02::12" protocol value="vrrp" accept"
success
c. Reload the configuration to have the configuration take effect.
[root@localhost ~]# firewall-cmd –reload
Success
Configuring the iptables service (IPv4 address)
1. Verify that the iptables service is enabled. The field value active (exited) indicates that the service is enabled.
[root@localhost ~]# service iptables status
Redirecting to /bin/systemctl status iptables.service
iptables.service - IPv4 firewall with iptables
Loaded: loaded (/usr/lib/systemd/system/iptables.service; disabled; vendor preset: disabled)
Active: active (exited) since Thu 2020-01-16 10:11:01 EST; 11s ago
...
2. Open the license service port and HTTPS ports:
a. Examine whether the license service port and HTTPS ports are blocked. In this example, the license service port is 5555, the HTTPS port for Web login is 28443, and the HTTPS port for Monitor login is 38443. If the field value shows that no rule is configured or a rule in other state than ACCEPT exists for the port, the port is blocked.
[root@localhost ~]# iptables -nvL | grep 5555
0 0 DROP tcp -- * * 0.0.0.0/0 0.0.0.0/0 tcp dpt:5555
[root@localhost ~]# iptables -nvL | grep 28443
[root@localhost ~]# iptables -nvL | grep 38443
b. If no rule is specified, first specify a rule to open the port. If a rule for other actions than ACCEPT is specified for the port, first delete the rule and then add a rule to open the port.
[root@localhost ~]# iptables -I INPUT -p tcp --dport 5555 -j ACCEPT
[root@localhost ~]# iptables -I INPUT -p tcp --dport 28443 -j ACCEPT
[root@localhost ~]# iptables -I INPUT -p tcp --dport 38443 -j ACCEPT
c. Save rules.
[root@localhost ~]# service iptables save
iptables: Saving firewall rules to /etc/sysconfig/iptables:[ OK ]
d. Restart the iptables service to have the configuration take effect.
[root@localhost ~]# service iptables restart
Redirecting to /bin/systemctl restart iptables.service
e. Verify that the ports are successfully opened. The field value ACCEPT indicates that the ports are opened.
[root@localhost ~]# iptables -nvL | grep 5555
0 0 ACCEPT tcp -- * * 0.0.0.0/0 0.0.0.0/0 tcp dpt:5555
[root@localhost ~]# iptables -nvL | grep 28443
0 0 ACCEPT tcp -- * * 0.0.0.0/0 0.0.0.0/0 tcp dpt:28443
[root@localhost ~]# iptables -nvL | grep 38443
0 0 ACCEPT tcp -- * * 0.0.0.0/0 0.0.0.0/0 tcp dpt:38443
3. Open the MariaDB service port for HA.
If HA is required, make sure port 23306 used by the MariaDB service for HA is opened. To ensure database security, open this port only between the primary license server and the standby license server. On the physical server hosting the primary license server, open the MariaDB service port only for the standby license server. On the physical server hosting the standby license server, open the MariaDB service port only for the primary license server.
a. Examine whether the MariaDB service port (port 23306) is blocked. If the output shows that no rule is configured or a rule in other state than ACCEPT exists for the port, the port is blocked.
[root@localhost ~]# iptables -nvL | grep 23306
b. If no rule is specified, first specify a rule to open the port. If a rule for other actions than ACCEPT is specified for the port, first delete the rule and then add a rule to open the port.
[root@localhost ~]# iptables -I INPUT -s 192.168.109.15 -p tcp --dport 23306 -j ACCEPT
c. Save the rule.
[root@localhost ~]# service iptables save
iptables: Saving firewall rules to /etc/sysconfig/iptables:[ OK ]
d. Restart the iptables service to have the configuration take effect.
[root@localhost ~]# service iptables restart
Redirecting to /bin/systemctl restart iptables.service
e. Verify that port 23306 is successfully opened.
[root@localhost ~]# iptables -nvL | grep 23306
0 0 ACCEPT tcp -- * * 192.168.109.15 0.0.0.0/0 tcp dpt: 23306
0 0 DROP tcp -- * * 0.0.0.0/0 0.0.0.0/0 tcp dpt: 23306
4. Permit the multicast address for the HA Keepalived packets and the VRRP protocol.
You must permit multicast address 244.0.0.18 for Keepalived packets and the VRRP protocol if the license server is to be configured with the HA feature.
a. Examine whether the Keepalived multicast address and the VRRP protocol are permitted. If the output shows that no rule is configured or a rule in other state than ACCEPT exists for the Keepalived multicast address and the VRRP protocol, the multicast address and the VRRP protocol are not permitted.
[root@localhost ~]# iptables -nvL
Chain INPUT (policy ACCEPT 0 packets, 0 bytes)
pkts bytes target prot opt in out source destination
348 25382 ACCEPT all -- * * 0.0.0.0/0 0.0.0.0/0 state RELATED,ESTABLISHED
0 0 ACCEPT icmp -- * * 0.0.0.0/0 0.0.0.0/0
32 2336 ACCEPT all -- lo * 0.0.0.0/0 0.0.0.0/0
...
b. If no rule is specified, first specify a rule to permit the Keepalived multicast address. If a rule for other actions than ACCEPT is specified for the Keepalived multicast address, first delete the rule and then add a rule to permit the Keepalived multicast address.
[root@localhost ~]# iptables -I INPUT -d 244.0.0.18/8 -j ACCEPT
[root@localhost ~]# iptables -I INPUT -p vrrp -j ACCEPT
c. Save rules.
[root@localhost ~]# service iptables save
iptables: Saving firewall rules to /etc/sysconfig/iptables:[ OK ]
d. Restart the iptables service to have the configuration take effect.
[root@localhost ~]# service iptables restart
Redirecting to /bin/systemctl restart iptables.service
Configuring the iptables service (IPv6 address)
1. Verify that the iptables service is enabled. The field value active (exited) indicates that the service is enabled.
[root@localhost ~]# service ip6tables status
Redirecting to /bin/systemctl status ip6tables.service
ip6tables.service - IPv6 firewall with ip6tables
Loaded: loaded (/usr/lib/systemd/system/ip6tables.service; disabled; vendor preset: disabled)
Active: active (exited) since Fri 2020-07-03 06:22:04 EDT; 31min ago
...
2. Open the license service port and HTTPS ports:
a. Examine whether the license service port and HTTPS ports are blocked. In this example, the license service port is 5555, the HTTPS port for Web login is 28443, and the HTTPS port for Monitor login is 38443. If the field value shows that no rule is configured or a rule in other state than ACCEPT exists for the port, the port is blocked.
[root@localhost ~]# ip6tables -nvL | grep 5555
0 0 DROP tcp -- * * 0.0.0.0/0 0.0.0.0/0 tcp dpt:5555
[root@localhost ~]# ip6tables -nvL | grep 28443
[root@localhost ~]# ip6tables -nvL | grep 38443
b. If no rule is specified, first specify a rule to open the port. If a rule for other actions than ACCEPT is specified for the port, first delete the rule and then add a rule to open the port.
[root@localhost ~]# ip6tables -I INPUT -p tcp --dport 5555 -j ACCEPT
[root@localhost ~]# ip6tables -I INPUT -p tcp --dport 28443 -j ACCEPT
[root@localhost ~]# ip6tables -I INPUT -p tcp --dport 38443 -j ACCEPT
c. Save rules.
[root@localhost ~]# service ip6tables save
ip6tables: Saving firewall rules to /etc/sysconfig/ip6table[ OK ]
d. Restart the iptables service to have the configuration take effect.
[root@localhost ~]# service ip6tables restart
Redirecting to /bin/systemctl restart ip6tables.service
e. Verify that the ports are successfully opened. The field value ACCEPT indicates that the ports are opened.
[root@localhost ~]# ip6tables -nvL | grep 5555
0 0 ACCEPT tcp * * ::/0 ::/0 tcp dpt:5555
[root@localhost ~]# ip6tables -nvL | grep 28443
0 0 ACCEPT tcp * * ::/0 ::/0 tcp dpt:28443
[root@localhost ~]# ip6tables -nvL | grep 38443
0 0 ACCEPT tcp * * ::/0 ::/0 tcp dpt:38443
3. Open the MariaDB service port for HA.
If HA is required, make sure port 23306 used by the MariaDB service for HA is opened. To ensure database security, open this port only between the primary license server and the standby license server. On the physical server hosting the primary license server, open the MariaDB service port only for the standby license server. On the physical server hosting the standby license server, open the MariaDB service port only for the primary license server.
a. Examine whether the MariaDB service port (port 23306) is blocked. If the output shows that no rule is configured or a rule in other state than ACCEPT exists for the port, the port is blocked.
[root@localhost ~]# ip6tables -nvL | grep 23306
b. If no rule is specified, first specify a rule to open the port. If a rule for other actions than ACCEPT is specified for the port, first delete the rule and then add a rule to open the port.
[root@localhost ~]# ip6tables -I INPUT -s 2001::142 -p tcp --dport 23306 -j ACCEPT
c. Save the rule.
[root@localhost ~]# service ip6tables save
ip6tables: Saving firewall rules to /etc/sysconfig/ip6table[ OK ]
d. Restart the iptables service to have the configuration take effect.
[root@localhost ~]# service ip6tables restart
Redirecting to /bin/systemctl restart ip6tables.service
e. Verify that port 23306 is successfully opened.
[root@localhost ~]# ip6tables -nvL | grep 23306
0 0 ACCEPT tcp * * 2001::142 ::/0 tcp dpt:23306
0 0 ACCEPT tcp * * 2001::186 ::/0 tcp dpt:23306
4. Permit the multicast address for the HA Keepalived packets and the VRRP protocol.
You must permit multicast address ff02::12 for Keepalived packets and the VRRP protocol if the license server is to be configured with the HA feature.
a. Examine whether the Keepalived multicast address and the VRRP protocol are permitted. If the output shows that no rule is configured or a rule in other state than ACCEPT exists for the Keepalived multicast address and the VRRP protocol, the multicast address and the VRRP protocol are not permitted.
[root@localhost ~]# ip6tables -nvL
Chain INPUT (policy ACCEPT 0 packets, 0 bytes)
pkts bytes target prot opt in out source destination
0 0 ACCEPT tcp * * ::/0 ::/0 tcp dpt:28443
0 0 ACCEPT tcp * * ::/0 ::/0 tcp dpt:38443
0 0 ACCEPT tcp * * ::/0 ::/0 tcp dpt:5555
0 0 ACCEPT all * * ::/0 ::/0 state RELATED,ESTABLISHED
4 272 ACCEPT icmpv6 * * ::/0 ::/0
0 0 ACCEPT all lo * ::/0 ::/0
...
b. If no rule is specified, first specify a rule to permit the Keepalived multicast address. If a rule for other actions than ACCEPT is specified for the Keepalived multicast address, first delete the rule and then add a rule to permit the Keepalived multicast address.
[root@localhost ~]# ip6tables -I INPUT -d ff02::12/64 -j ACCEPT
[root@localhost ~]# ip6tables -I INPUT -p vrrp -j ACCEPT
c. Save rules.
[root@localhost ~]# service ip6tables save
ip6tables: Saving firewall rules to /etc/sysconfig/ip6table[ OK ]
d. Restart the iptables service to have the configuration take effect.
[root@localhost ~]# service ip6tables restart
Redirecting to /bin/systemctl restart ip6tables.service
Logging in to the license server
1. Enter the login address in the Web browser's address bar, and then press Enter. The security certificate verification page opens.
Figure 17 Security certificate verification page
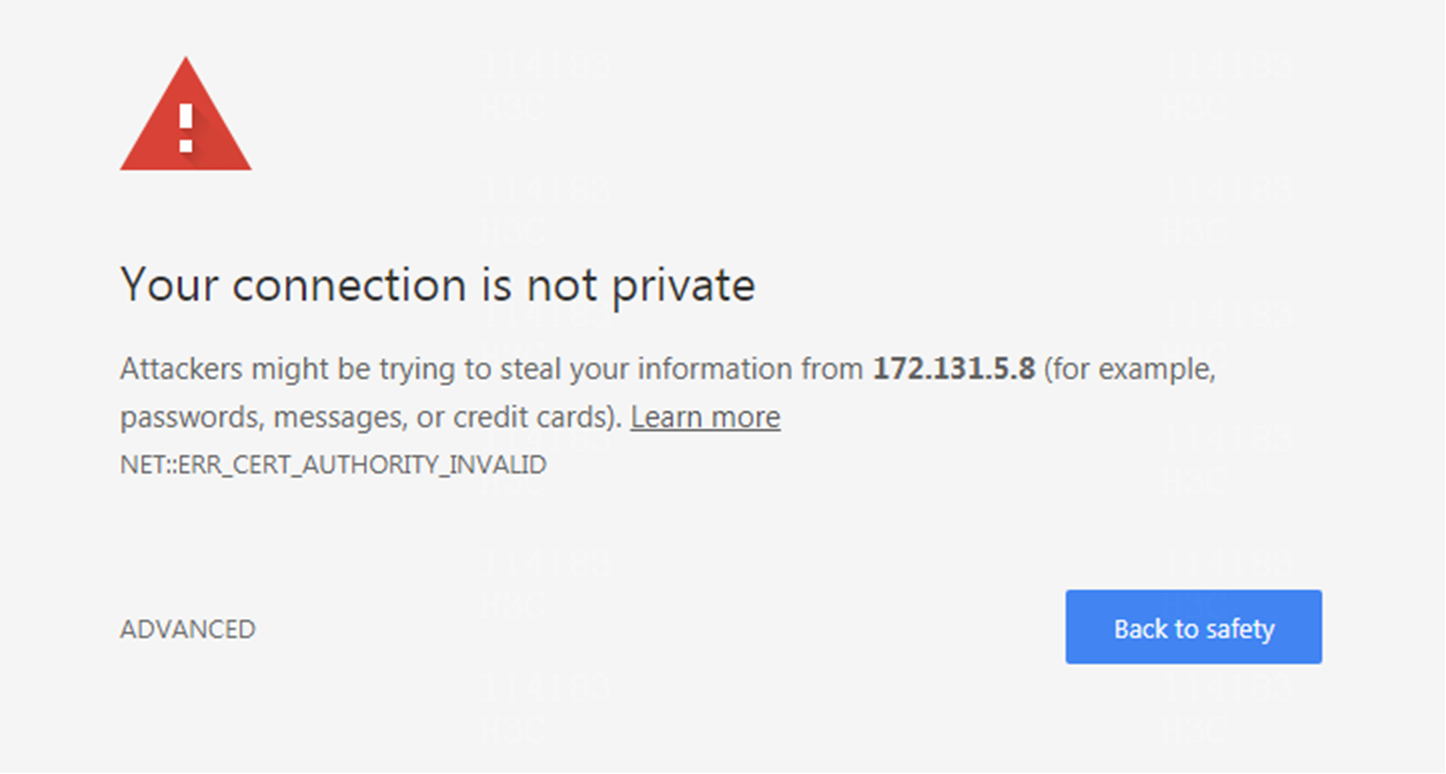
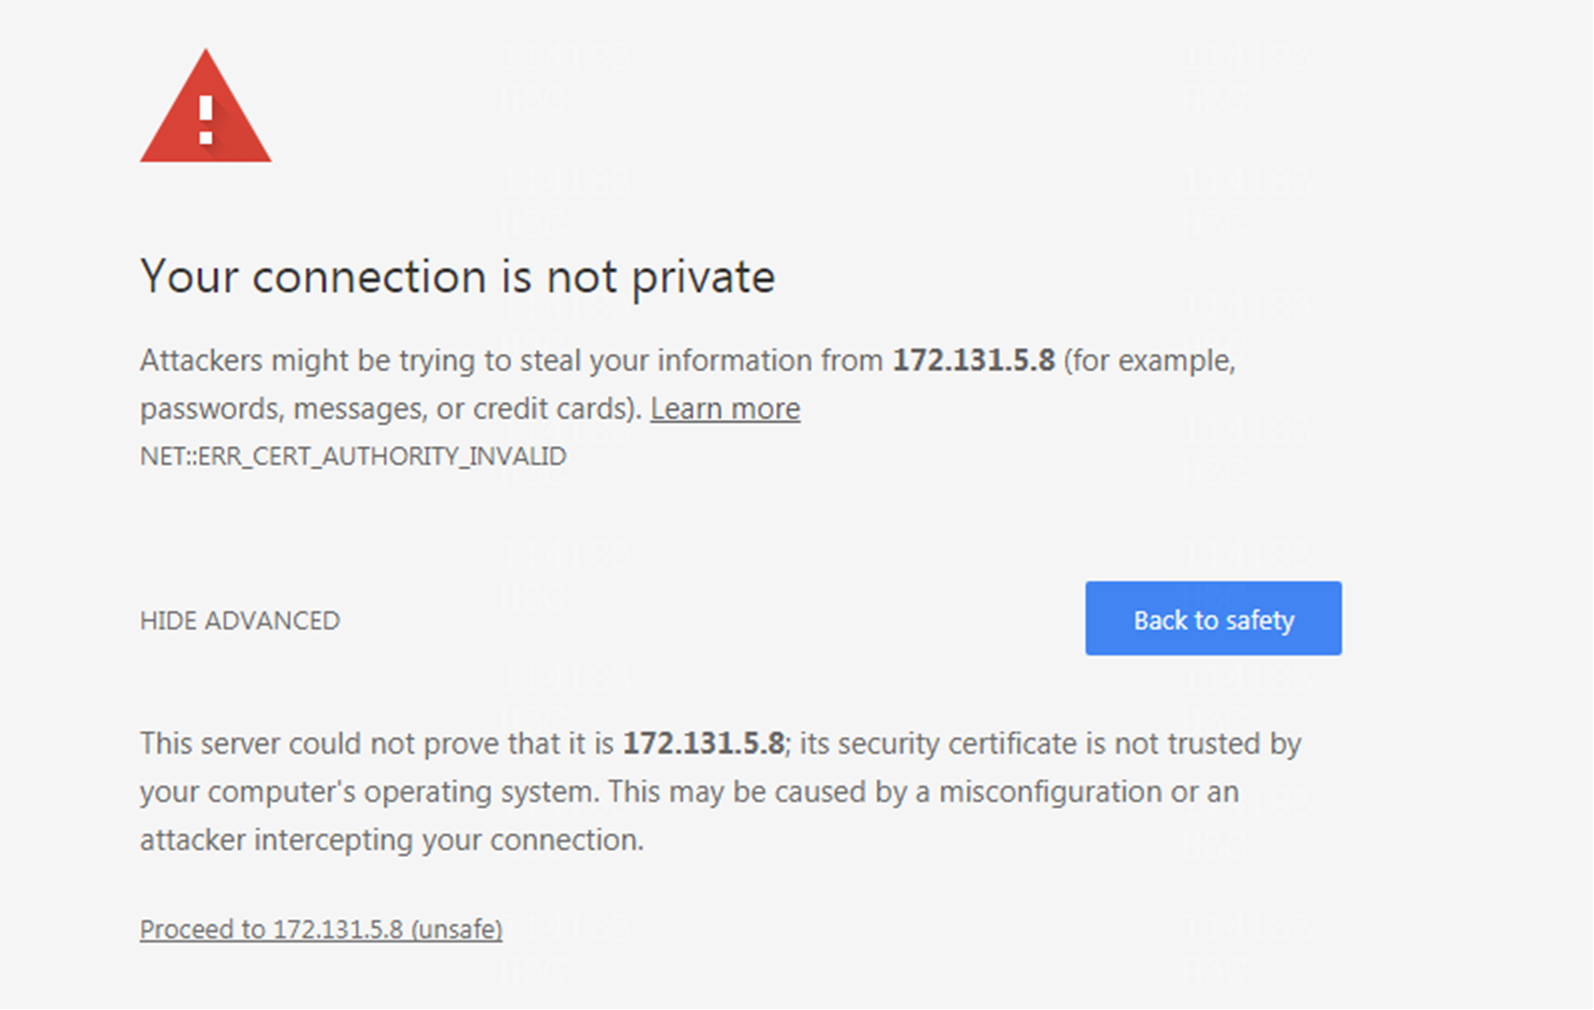
Table 3 shows the login address format for versions earlier than E1205. Table 4 shows the login address format for E1205 and later versions.
Table 3 Login address format for versions earlier than E1205
|
IP version |
Login address format |
|
IPv4 |
https://lics_ipv4_address:port/licsmgr |
|
IPv6 |
https://[lics_ipv6_address]:port/licsmgr |
Table 4 Login address format for E1205 and later versions
|
IP version |
Login address format |
|
IPv4 |
https://lics_ipv4_address:port/ https://lics_ipv4_address:port/licsmgr https://lics_ipv4_address:port/licsmanager |
|
IPv6 |
https://[lics_ipv6_address]:port/ https://[lics_ipv6_address]:port/licsmgr https://[lics_ipv6_address]:port/licsmanager |
¡ The lics_ip4_address or lics_ipv6_address argument represents the IPv4 or IPv6 address of the server that hosts the license server. If HA is configured, the IP address represents the virtual IP address or the IP address of the primary license server.
¡ The port argument represents the port number. The default HTTPS port number is 28443.
2. On the verification page, click ADVANCED, and then click Proceed to IP address (unsafe). The license server login page opens.
Figure 18 License server login page
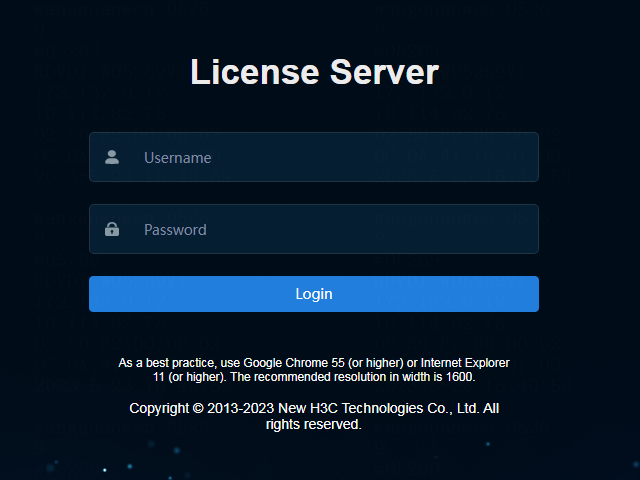
3. On the login page, perform the following tasks:
a. Enter the administrator's username and password.
The default username is admin and password is admin@123.
b. Click Login.
Deploying a license server HA cluster
A license server HA cluster contains two member nodes. The primary license server processes services and backs up data to the standby license server. The cluster uses a virtual IP address to provide services. When the primary license server fails, the standby license server takes over to ensure service continuity. As a best practice, deploy an HA cluster to avoid licensing service interruption caused by single point of failure.
Restrictions and guidelines
Make sure the primary and standby license servers have the same port number configuration.
Before configuring HA, make sure the system time is the same on the primary and standby license servers.
Use the static IP addresses of the license servers when you configure HA.
After the HA configuration, the licsmgr service becomes inactive but others remain active on the standby license server. For correct operation of the HA feature, do not edit the configuration file for the NIC on the server.
When HA is configured, increase the following priority values of the ports on the switch that connects the two physical servers where the license servers are installed:
· Local precedence.
· 802.1p priority.
· DSCP priority.
Larger port priority values ensure the performance of information exchange between member license servers.
As a best practice, configure a license server to receive system logs from the license server cluster for monitoring the HA status and licensing status.
Deploying the HA cluster
1. Install two license servers on two separate servers.
2. Specify one license server as the primary license server:
¡ If both license servers are newly installed, you can specify either of them as the primary license server.
¡ If you enable HA for the license server in standalone mode, specify the license server as the primary license server.
¡ If none of the license servers is newly installed, check the data on each license server carefully. Specify the license server on which data will be retained as the primary license server.
3. Log in to the primary license server, and then select HA.
4. On the HA page, click Create HA. In the dialog box that opens, select the IP version and enter the HA ID, virtual IP, primary address, and standby address.
5. Click OK.
6. Verify the HA configuration and license server status. Make sure the primary license server is in Active status and its role is Primary, and the standby license server is in Active status and its role is Standby.
Uninstalling the license server
About this task
When you uninstall the license server, you can choose to back up the port configuration of the license server or not.
· If you choose to back up the port configuration, the system backs up the license service port number, the HTTPS port number for Web login, and the HTTPS port number for Monitor login when uninstalling the license server. When you reinstall the license server, the system automatically detects the port backup file for restoring the port configuration.
· If you choose not to back up the port configuration, the system does not back up the license service port number, the HTTPS port number for Web login, and the HTTPS port number for Monitor login when uninstalling the license server. When you reinstall the license server, you must manually specify the port numbers.
Procedure
1. Access the directory where the license server installation package resides.
[root@localhost ~]# cd /opt/license-server/
2. Execute the uninstallation script to remove the installation package.
[root@localhost license-server]# ./uninstall.sh
3. Enter y as prompted, and then press Enter, or directly press Enter. To quit uninstallation, enter n.
Do you really want to uninstall license-server? (y/n, default:n) :y
...
4. Back up the port configuration or not. To back up the port configuration, enter y as prompted or directly press Enter. To not back up the port configuration, enter n.
¡ Back up the port configuration when uninstalling the license server.
Do you wish to backup the port configuration of license-server for automatic recovery? (y/n, default:y) : y
The backup file of port configuration is '/opt/license-server/backup/port.conf'.
Complete!
¡ Do not back up the port configuration when uninstalling the license server.
Do you wish to backup the port configuration of license-server for automatic recovery? (y/n, default:y) : n
The backup file of port configuration is '/opt/license-server/backup/port.conf'.
Complete!
|
|
NOTE: · The activation file is retained after you uninstall the license server. It is automatically uploaded when you reinstall the license server. · When you uninstall the license server by using an .iso file, reserve the port configuration and uninstall the license server without prompting. |
Upgrading the license server
Upgrading the license server between E12XX versions
Restrictions and guidelines
The clients will automatically reconnect to the license server after the license server upgrade. The license services obtained by the clients during the upgrade will not be interrupted. As a best practice, do not disconnect the clients from the license server during license server upgrade. The manual disconnection will cause the license server to reclaim all licenses from the clients, which causes license-based services to malfunction on the clients.
When you upgrade a license server HA cluster, ISSU is not supported in the following cases:
· Upgrade from a version earlier than E1204 to E1204 or a later version.
· Upgrade from a version earlier than E1206P02 to E1206P02 or a later version.
· Upgrade from a version earlier than E1207 to E1207 or a later version.
To minimize the license service interruption period during the upgrade, follow "Upgrading the license servers deployed in HA by using a method other than ISSU" to upgrade the license server HA cluster.
Upgrading the license server in standalone mode
1. Remove the old version of the license server. For more information, see "Uninstalling the license server."
2. Install the new version of the license server. For more information, see "Installing the license server by using a .zip file."
Upgrading the license servers deployed in HA by using a method other than ISSU
1. Log in to the license server HA cluster from the virtual IP address. Verify the HA configuration and license server status. Make sure the primary and standby license servers are both in Active status and their roles are Primary and Standby, respectively.
2. Remove the old license server version from the standby license server node. For more information, see "Uninstalling the license server."
3. Remove the old license server version from the primary license server node. For more information, see "Uninstalling the license server."
4. Install the new license server versions on the primary and standby license server nodes in sequence. For more information, see "Installing the license server by using a .zip file."
5. Log in to the license server HA cluster again from the virtual IP address. Verify the HA configuration and the license server status. Make sure the primary and standby license servers are both in Active status and their roles are Primary and Standby, respectively.
Upgrading the license servers deployed in HA by using ISSU
1. Uninstall the old license server version from the standby license server node. For more information, see "Uninstalling the license server."
2. Install the new license server version on the standby license server node. For more information, see "Installing the license server by using a .zip file."
3. Log in to the license server HA cluster from the virtual IP address. View the HA configuration and license server status on the HA page. Make sure the primary and standby license servers are both in Active status and their roles are Primary and Standby, respectively.
4. Uninstall the old license server version from the primary license server node. For more information, see "Uninstalling the license server."
5. Install the new license server version on the primary license server node. For more information, see "Installing the license server by using a .zip file."
6. Log in to the license server cluster HA again from the virtual IP address. View the HA configuration and license server status on the HA page. Make sure the primary and standby license servers in the HA cluster are both in Active status and their roles are Primary and Standby, respectively.
Upgrading the license server from an E11XX version to an E12XX version
When you upgrade the license server from an E11XX version to an E12XX version, you remove the old version, install the new version, and then write the data to the new version by using the data upgrading tool provided with the new version.
Restrictions and guidelines
Restrictions and guidelines for the E11XX version
For a license server in a version earlier than E1150, upgrade the license server to E1150 or its later versions first. Then upgrade the license server to the target version.
Restrictions and guidelines for the operating environment
The server on which the license server to be upgraded resides must meet the following E12XX version requirements:
· Hardware requirements.
· Software requirements.
· Operating environment configuration.
For more information, see "Preparing for installation."
Restrictions and guidelines for the upgrading procedure
· If the upgrading requirements are not met, you can transfer data to the new version of the license server through license transfer.
a. Uninstall the activation file on the old version and export the Uninstall file.
b. Uninstall the license server in the E11XX version without deleting the configuration.
c. Install the license server in the E12XX version.
d. Obtain the new DID file for the license server.
e. Use the Uninstall file and DID file to request license transfer and obtain a new activation file.
f. Install the new activation file on the license server.
g. Configure clients on the license server.
· If the license server in the E11XX version is in fail-permit state, resolve the issue before upgrading the license server.
· To avoid changing the service port of the license server to which the clients connect, configure the same service port for the new license server as that for the old license server.
· If you fail to upgrade the license server by using the data upgrading tool, roll back the license server to the E11XX version. After the rollback, transfer data to the new license server through license transfer. For example, an upgrade fails if the DID file to which the installed activation file is bound for the license server of the old version is not the DID file for the current device. This might be because the current device is not the device where the license was installed.
· A DID is a string of characters that uniquely identifies a hardware device. A DID file stores the DID and other information. The product comes with a DID or DID file. You must provide the DID or DID file when you request a license for the device on H3C License Management Platform.
Restrictions and guidelines for the data upgrading tool
The data upgrading tool does not support upgrading the following data to the new version:
· HTTPS port number for Web login and service port number—Configured on the new version of the license server.
· Administrator and password—Automatically created on the new version of the license server. The new version uses the default password. You can change the password as required.
· HA—Configured on the new version of the license server.
· System log filtering—Configured on the new version of the license server as required.
· Log proxy—Not supported in E12XX versions.
· Operation log messages and system log messages—Backed up and exported on the E11XX version of the license server.
The data upgrading tool supports upgrading the following data to the new version:
· License data.
· Activation file.
· Client connections.
· Client configuration.
· Log server configuration.
· License notification detection period.
· License seat notification configuration.
· Activation file expiration notification days.
Preparing for upgrading
1. Make sure the upgrading requirements are met. For more information, see "Restrictions and guidelines."
2. Verify and record the license server operating status.
To upgrade the license server, you must uninstall the old version of the license server and suspend license services. To guarantee a short recovery time, check the following operating status information for the license server before the upgrade:
¡ Service port number—To view the service port number, select Configuration > System Configuration or view the number on the client.
¡ HA cluster state—Records HA configuration and HA state information.
¡ Activation file state—Records the number of activation files and basic information for each activation file on the activation file list (including license barcodes, state, and validity period).
¡ Client state—Records the client connection information and license state.
¡ Configuration—Records supported configuration information.
Upgrading the license server in standalone mode
Uninstalling the license server in the E11XX version
If you choose to back up the configuration when you uninstall the license server, the activation file and system settings will be retained for version rollback.
To uninstall the license server in the E11XX version:
1. Remove the license server installation package.
[root@localhost ~] rpm -e license-server
2. Enter y and press Enter or press Enter as prompted.
Do you really want to uninstall license-server? (y/n, default:y) :y
3. Enter y and press Enter or press Enter as prompted.
Do you want to backup the configuration? (y/n, default:y) : y
The backup path is '/opt/LicServer/uninstallbackup/'.
Uninstalling license-server...
...
Uploading the license server installation package
Copy the license server installation package to the license server installation directory on the server.
If you use FTP or TFTP to upload the installation package to the directory, use the binary mode to avoid damaging the installation package.
Upgrading the license server to version E12XX
|
|
IMPORTANT: · Configure the same service port number for the new license server as the old version of the license server. The default service port numbers are both 5555 for the license servers in the E11XX version and E12XX version. If you have not changed the port number for the old version of the license server, use the default value during installation. · To upgrade the license server from E11XX to E12XX, execute script install_and_upgrade_from_E11xx.sh. |
1. Access the directory where the license server installation package (.zip file) resides and decompress the installation package.
The following example uses the /root directory.
[root@localhost ~]# unzip LICENSE_SERVER-E1205-x86_64.zip
Archive: LICENSE_SERVER-E1205-x86_64.zip
inflating: LICENSE_SERVER-E1205-x86_64/install_and_upgrade_from_E11xx.sh
inflating: LICENSE_SERVER-E1205-x86_64/install.sh
inflating: LICENSE_SERVER-E1205-x86_64/LICENSE_SERVER.tar.gz
2. Access the directory where the decompressed installation package resides.
[root@localhost ~]# cd LICENSE_SERVER-E1205-x86_64
3. Execute the installation script.
[root@localhost LICENSE_SERVER-E1205-x86_64]# ./install_and_upgrade_from_E11xx.sh
...
4. Enter the service port number at the prompt:
Type the license service port (1024-65535, default:5555) :
Make sure the service port number is the same as that in version E11XX.
5. Enter the HTTPS port number for Web login at the prompt:
Type the HTTPS port for the Web login (1-65535, default:28443) :
Make sure the HTTPS port number is the same as that in version E11XX.
6. Enter the HTTPS port number for Monitor login at the prompt:
Type the HTTPS port for the Monitor login (1-65535, default:38443) :
Make sure the specified HTTPS port number is idle.
If you press Enter without entering a port number, the default HTTPS port number 38443 is used.
Wait for a while and observe the output. When the system outputs Complete!, the upgrade is complete.
[Upgrade] : Check data ... OK
...
[Upgrade] : Complete!
Verifying the upgrade
For more information, see "Installing the license server by using a .zip file."
Upgrading the license servers in HA mode
1. Uninstall the license servers in the E11XX version.
Uninstall the old versions of the standby license server and primary license server in sequence with the configuration retained. For more information, see "Uninstalling the license server in the E11XX version."
2. Upgrade the license servers to version E12XX.
Perform this step on the original primary license server and the original standby license server in sequence, and then verify the upgrade. For more information, see "Upgrading the license server in standalone mode."
3. Permit license servers' ports, addresses, and protocols in the new version.
Perform this step on both the license servers. For more information, see "Permitting license server's ports, address, and protocol."
4. Re-create the HA cluster.
Specify the original primary license server as the new primary license server in the HA cluster. For more information, see "Deploying a license server HA cluster."
Verifying the upgrade
Check the following items after the upgrade:
· HA cluster state.
· Service state.
· Activation file state.
· Client state.
· Configuration information.
· License server connection and license state on the client.
Rolling back after a failed upgrade
· Standalone mode—Uninstall the license server in the E12XX version and install the license server in the E11XX version.
· HA mode—Uninstall the license servers in the E12XX version and install the E11XX versions of the original primary and standby license servers in sequence.
FAQ
What should I do if I cannot install a license file because hardware has changed after I obtained the license file?
You need to contact Technical Support to apply for license change.
If hardware change as follows occurs on the server after you obtain the license file, the license file will become invalid and you cannot install the license file on the license server:
· NIC change (NIC forbidden, new NIC enabled, NIC replaced, or NIC damaged).
· MPU replacement.
· Processor replacement.
· BIOS upgrade.
How to change the hardware after a license is installed?
After a license is installed on the license server, a hardware change such as system board replacement, processor replacement, or BIOS upgrade might cause the license file to be invalid.
To change the hardware after a license is installed on the license server:
|
|
CAUTION: If a license transfer operation affect services, take preventive measures before the operation, such as apply for and install a trail license for use during the operation. |
1. Log in to the license server, select Licenses > Activation Files. Uninstall all formal licenses and export the Uninstall files.
2. Change the hardware and log in to the license server. Select Licenses > Activation Files. On the page that opens, click Export DID to obtain the DID file.
3. Access H3C License Management Platform at http://www.h3c.com/en/License. Click Device License Transfer Requests. Use the Uninstall files and new DID file to request license transfer and obtain a new activation file.
4. Log in to the license server after the hardware changes, and then select Licenses > Activation Files. On the page that opens, click Install Activation Files. In the dialog box that opens, select the locally saved activation file and then click Install.
How to reinstall the operating system after a license is installed?
Reinstall the operating system in a standalone deployment
To reinstall the operating system after a license is installed on the license server, request license transfer for the installed formal license.
To reinstall the operating system after a license is installed on the license server:
1. Log in to the license server, and then select System Management > Backup and Restoration. Click Save Running Configuration to obtain the configuration file.
2. Select Licenses > Activation Files. Uninstall all formal licenses and export the Uninstall files.
3. If the license server is deployed in HA mode, record the HA configuration.
4. Log in to the license server. Select Licenses > Activation Files. On the page that opens, click Export DID to obtain the DID file.
5. Access H3C License Management Platform at http://www.h3c.com/en/License. Click Device License Transfer Requests. Use the Uninstall files and new DID file to request license transfer and obtain a new activation file.
6. If the license server is deployed in HA mode, reconfigure HA.
7. Log in to the newly-installed license server. Select Licenses > Activation Files. On the page that opens, click Install Activation Files. In the dialog box that opens, select the locally saved activation file and then click Install.
8. Select System Management > Backup and Restoration. Click Import Configuration File. In the dialog box that opens, select the configuration file, and then click Import.
Reinstall the operating system in an HA deployment
To reinstall the operating system on one license server after a license is installed, make sure the physical hardware, IP address, and the version of the license server are the same before and after the reinstallation.
To reinstall the operating system on one license server after a license is installed:
1. Verify that the HA state of the license server is normal as follows:
Log in to the license server by the virtual IP address, and view the HA configuration and state on the HA page: The primary license server is in active state, and its role is Primary. The secondary license server is in active state, and its role is Standby.
2. Reinstall the operating system and reinstall the license server.
3. Wait several minutes, and verify that the HA state of the license server is normal.
If you reinstall the operating systems for both license servers, first reinstall the operating system for the secondary license server.
How to reinstall the operating system and upgrade the license server?
1. Reinstall the operating system. For more information, see "How to reinstall the operating system after a license is installed?."
2. Upgrade the license server. For more information, see "Upgrading the license server."
How to replace the abnormal license server in a license server cluster?
1. Prepare a new node and install the license server.
2. Delete the abnormal license server.
a. Log in to the license server by using the virtual IP address.
b. On the HA page, click Delete Standby Node to delete the standby node.
3. Add a new license server.
a. On the HA page, click Add Standby Node to add the new license server to the HA cluster.
b. Wait for several minutes, and then click Refresh. Make sure the new license server is in Active status and its role is Standby.
4. Check the license state.
Select Licenses > Activation Files. On the page that opens, check the activation file state. If it is in normal state, the replacement is successful. If it is in fail-permit state, perform the following steps to uninstall the activation file and transfer it to the new license server:
a. Select Licenses > Activation Files. On the page that opens, uninstall the activation file and export the Uninstall file.
b. Click Export DID to obtain the DID file.
c. Access H3C License Management Platform at http://www.h3c.com/en/License. Click Device License Transfer Requests. Use the Uninstall files and new DID file to request license transfer and obtain a new activation file.
If a license transfer operation affect services, take preventive measures before the operation, such as applying for and installing a trail license for use during the operation.
d. Select Licenses > Activation Files. On the page that opens, click Install Activation Files. In the dialog box that opens, select the locally saved activation file and click Install.
How to change the IP of the license server after the license server has been deployed?
|
|
CAUTION: After you change the IP of the license server, the client is disconnected from the license server, and you might need to reconnect the client to the license server. Before performing this operation, contact the client technical support to assess the impact. |
Changing the physical IP of the license server in standalone deployment
Change the physical IP of the license server directly. After the change, reconfigure the new IP of the license server on the client and connect the client to the license server.
Changing the physical IP of one or both of the license server nodes in the HA cluster
1. Verify that the HA configuration and status are normal.
Access the license server HA cluster from the virtual IP address. View the HA configuration and status on the HA page. Make sure the primary license server is in Active status and its role is Primary, and the standby license server is in Active status and its role is Standby.
2. Delete HA on the HA page. Then, access each node by using the physical IP of that node and verify that the HA configuration has been deleted.
3. Change the physical IP of the specified nodes and then make the change to take effect.
4. Use the original primary license server as the primary license server to re-create an HA cluster.
Log in to the original primary license server from its physical IP. On the HA page, enter the original HA ID, original virtual IP, (new, if changed) primary IP address, and (new, if changed) standby IP address to create a new HA cluster. Then, verify that the HA cluster status is normal.
5. Verify that the connection status and licensing status are normal on the client.
Changing the virtual IP of the license server HA cluster
1. Verify that the HA configuration and status are normal.
Access the license server HA cluster from the virtual IP address. View the HA configuration and status on the HA page. Make sure the primary license server is in Active status and its role is Primary, and the standby license server is in Active status and its role is Standby.
2. Delete HA on the HA page. Then, access each node by using the physical IP of that node and verify that the HA configuration has been deleted.
3. Use the original primary license server as the primary license server to re-create an HA cluster.
Log in to the original primary license server from its physical IP. On the HA page, enter the original HA ID, new virtual IP, primary IP address, and standby IP address to create a new HA cluster. Then, verify that the HA status is normal.
4. Reconfigure the new license server IP on the client and connect the client to the license server. Verify that the connection status and licensing status are normal on the client.
Changing the IP during upgrade from standalone mode to HA mode
During an upgrade from standalone mode to HA mode, you can use the following procedure so that you do not need to change the license server IP on the client:
1. Change the physical IP of the license server in standalone mode and make the new IP to take effect.
2. Use the license server as the primary license server to create an HA cluster.
Log in to the primary license server from the new IP and create the HA cluster from the HA page. Use the original IP of the server as the virtual IP.
3. Verify that the HA configuration and status are normal.
Access the license server HA cluster from the virtual IP address. View the HA configuration and status on the HA page. Make sure the primary license server is in Active status and its role is Primary, and the standby license server is in Active status and its role is Standby.
4. Verify that the connection status and licensing status are normal on the client.
Can licenses continue to be used after the license server is uninstalled and reinstalled?
Yes. License information is not deleted after the license server is uninstalled.
Can license information be restored after a backup file is used for restoring the configuration of the license server?
No. Only client settings, system settings, and log settings are restored.
