- Table of Contents
- Related Documents
-
| Title | Size | Download |
|---|---|---|
| 01-Text | 8.51 MB |
Contents
Setting the number of file descriptors and user processes
Setting the number of file descriptors and user processes in RHEL 7.x
Setting the number of file descriptors and user processes in RHEL 8.x
Checking the required software packages
Required software packages in RHEL 7.x
Required software packages in RHEL 8.x
Creating operating system users and groups
Modifying the permissions on the Oracle home directory
Configuring the Oracle database installation directory
Verifying the environment variable settings
Setting environment variables for the Oracle database
Setting environment variables for the oracle user
Setting the NLS_LANG environment variable
Adding the IP-to-host name mapping in /etc/hosts
Resolving software compatibility issues in RHEL 8.x
Preparing the installation package
Database installation requirements for IMC
Installing and configuring the Oracle database server
Installing the Oracle database server
Configuring the Oracle database listener
Configuring the network service name of the database
Configuring access control parameters
Installing and configuring the Oracle database client
Installing the Oracle database client
Configuring the Oracle database client
Testing the connectivity to the server
Starting the Oracle database service manually
Stopping the Oracle database service manually
Setting the maximum number of Oracle database processes and connections
Automating Oracle database startup on Linux
Automating PDB database startup
Adding storage space to the database
Modifying database memory settings
Configuring network service names by using Oracle Net Configuration Assistant
Overview
H3C Intelligent Management Center (IMC) supports use of Oracle Database 19c. The installation of Oracle Database 19c is supported by RHEL 7.5/7.6/7.9, as well as RHEL 8.1/8.2/8.3.
This guide describes the installation of Oracle Database 19c for IMC on RHEL 7.6. If your installation of Oracle Database 19c uses a different RHEL version, see the Oracle database installation documents for your Linux version.
To achieve optimized performance of the system running the Oracle database, see Oracle Database 19c Install and Upgrade and Oracle Database Globalization Support Guide 19c at the official Oracle website.
After you install Oracle Database 19c, configure the following Oracle management features to ensure correct operation of IMC:
· Setting the maximum number of Oracle database processes and connections
· Adding storage space to the database
· Modifying database memory settings
To install IMC, you must restart the operating system after configuring these features.
Preparing for installation
The following information describes the tasks you must complete in Linux as the root user before installing Oracle Database 19c.
To avoid installation errors, use the keyboard to type your entries rather than using cut-and-paste for user input.
Oracle Database 19c can be installed in RHEL 7.5 or operating systems of higher versions. The Oracle Database 19c server is supported only on 64-bit Linux, and the Oracle Database 19c client is supported on both 64-bit Linux and 32-bit Linux. For more information, see Database Installation Guide for Linux 19.
Disabling the firewall
Log in to the system as a root user and execute the following commands to disable the firewall:
systemctl stop firewalld.service
systemctl disable firewalld.service
To view the firewall status, use the following command:
systemctl status firewalld.service
As shown in Figure1-1, disabled is displayed for the Loaded field, and inactive (dead) is displayed for the Active field. The firewall is permanently disabled.

Disabling SELinux
1. Open the SELinux configuration file.
vim /etc/selinux/config
2. Set the value for the SELINUX parameter to disabled.
SELINUX=disabled
3. Save the configuration and restart the system.
Setting the number of file descriptors and user processes
Setting the number of file descriptors and user processes in RHEL 7.x
Setting the number of file descriptors
1. Log in to the system as a root user to view the number of file descriptors.
ulimit –n
2. If the number of file descriptors is less than 65535, open the limits.conf file.
vim /etc/security/limits.conf
3. Add the following parameter settings at the end of the file. If the parameters already exist, make sure the parameter values are greater than 65535.
* soft nofile 65535
* hard nofile 65535
4. Save the configuration and restart the system.
Setting the number of user processes
1. Log in to the system as a root user to open the 20-nproc.conf file.
vim /etc/security/limits.d/20-nproc.conf
2. Change the default value to 40960.
* soft nproc 40960
root soft nproc unlimited
3. Save the configuration and restart the system.
Setting the number of file descriptors and user processes in RHEL 8.x
To set the number of file descriptors and user processes, edit the system.conf file as follows:
1. Log in to the system to view the number of file descriptors.
ulimit –n
2. View the number of user processes.
ulimit –u
3. If the number of file descriptors or user processes is less than 65535, open the system.conf file.
vim /etc/systemd/system.conf
4. Add the following parameter settings at the end of the file. If the parameters already exist, make sure the parameter values are greater than 65535.
DefaultLimitNOFILE=65535
DefaultLimitNPROC=65535
The DefaultLimitNOFILE parameter specifies the number of file descriptors. The DefaultLimitNPROC parameter specifies the number of user processes.
5. Save the configuration and restart the system.
6. Perform steps 1 and 2 to verify that your configuration has taken effect.
Checking the required software packages
Before installing the Oracle database and IMC, make sure you have installed all required packages on the Linux operating system.
The software packages are stored in the Packages directory of the Linux installation drive. Use the rpm -ivh --nodeps xxx.rpm command to install the packages without a package dependency check.
|
|
IMPORTANT: · To identify all packages that are already installed on the system, use the rpm –qa command. To determine whether a required software package has been installed, use the rpm -q command. · RHEL 7.x and RHEL 8.x do not provide the compat-libstdc++-33 installation package. RHEL 8.x does not provide the compat-libcap1 installation package. To ensure correct operation of IMC, locate the package in RHEL 6.x or RHEL 7.x, or download it from the associated website. |
Required software packages in RHEL 7.x
The following 64-bit software packages, or later packages, are required:
· binutils-2.27-34.base.el7.x86_64.rpm
· compat-libcap1-1.10-7.el7.x86_64.rpm
· elfutils-libelf-0.172-2.el7.x86_64.rpm
· elfutils-libelf-devel-0.172-2.el7.x86_64.rpm
· glibc-2.17-260.el7.x86_64.rpm
· glibc-common-2.17-260.el7.x86_64.rpm
· glibc-devel-2.17-260.el7.x86_64.rpm
· libaio-0.3.109-13.el7.x86_64.rpm
· libaio-devel-0.3.109-13.el7.x86_64.rpm
· libgcc-4.8.5-36.el7.x86_64.rpm
· libstdc++-4.8.5-36.el7.x86_64.rpm
· make-3.82-23.el7.x86_64.rpm
· mpfr-3.1.1-4.el7.x86_64.rpm
· cpp-4.8.5-36.el7.x86_64.rpm
· gcc-4.8.5-36.el7.x86_64.rpm
· gcc-c++-4.8.5-36.el7.x86_64.rpm
· ksh-20120801-139.el7.x86_64.rpm
· libstdc++-devel-4.8.5-36.el7.x86_64.rpm
· libXext-1.3.3-3.el7.x86_64.rpm
· sysstat-10.1.5-17.el7.x86_64.rpm
· unixODBC-2.3.1-11.el7.x86_64.rpm
· unixODBC-devel-2.3.1-11.el7.x86_64.rpm
· compat-libstdc++-33-3.2.3-72.el7.x86_64.rpm
The following 32-bit software packages, or later packages, are required:
· glibc-2.17-260.el7.i686.rpm
· glibc-devel-2.17-260.el7.i686.rpm
· libaio-0.3.109-13.el7.i686.rpm
· libao-1.1.0-8.el7.i686.rpm
· libgcc-4.8.5-36.el7.i686.rpm
· libstdc++-4.8.5-36.el7.i686.rpm
· nss-softokn-freebl-devel-3.36.0-5.el7_5.i686.rpm
· compat-libstdc++-33-3.2.3-72.el7.i686.rpm
Required software packages in RHEL 8.x
In RHEL 8.x, the software source is classified into two main repositories, BaseOS and AppStream.
· BaseOS—Content in the BaseOS repository is intended to provide the core set of the underlying OS functionality that provides the foundation for all installations.
· AppStream—Content in the AppStream repository includes additional user space applications, runtime languages, and databases in support of the varied workloads and use cases. Content in AppStream is available in one of two formats: the RPM format and an extension to the RPM format called modules. A module is a set of RPM packages that represent a component and are usually installed together. A typical module contains packages with an application, packages with the application-specific dependency libraries, packages with documentation for the application, and packages with helper utilities.
The following software packages, or later packages, are required for RHEL 8.1:
· BaseOS repository
¡ 64-bit software packages
- binutils-2.30-58.el8.x86_64.rpm
- elfutils-libelf-0.176-5.el8.x86_64.rpm
- elfutils-libelf-devel-0.176-5.el8.x86_64.rpm
- glibc-2.28-72.el8.x86_64.rpm
- glibc-common-2.28-72.el8.x86_64.rpm
- glibc-devel-2.28-72.el8.x86_64.rpm
- libaio-0.3.112-1.el8.x86_64.rpm
- libaio-devel-0.3.112-1.el8.x86_64.rpm
- libgcc-8.3.1-4.5.el8.x86_64.rpm
- libstdc++-8.3.1-4.5.el8.x86_64.rpm
- make-4.2.1-9.el8.x86_64.rpm
- mpfr-3.1.6-1.el8.x86_64.rpm
- libnsl-2.28-72.el8.x86_64.rpm
¡ 32-bit software packages
- glibc-2.28-72.el8.i686.rpm
- glibc-devel-2.28-72.el8.i686.rpm
- libaio-0.3.112-1.el8.i686.rpm
- libgcc-8.3.1-4.5.el8.i686.rpm
- libstdc++-8.3.1-4.5.el8.i686.rpm
- libnsl-2.28-72.el8.i686.rpm
· AppStream repository
¡ 64-bit software packages
- cpp-8.3.1-4.5.el8.x86_64.rpm
- gcc-8.3.1-4.5.el8.x86_64.rpm
- gcc-c++-8.3.1-4.5.el8.x86_64.rpm
- ksh-20120801-252.el8.x86_64.rpm
- libstdc++-devel-8.3.1-4.5.el8.x86_64.rpm
- libXext-1.3.3-9.el8.x86_64.rpm
- sysstat-11.7.3-2.el8.x86_64.rpm
- unixODBC-2.3.7-1.el8.x86_64.rpm
- unixODBC-devel-2.3.7-1.el8.x86_64.rpm
¡ 32-bit software packages
- libao-1.2.0-10.el8.i686.rpm
- nss-softokn-freebl-devel-3.44.0-8.el8.i686.rpm
· Software packages that require manual download and installation
¡ 64-bit software packages
- compat-libcap1-1.10-7.el7.x86_64.rpm
- compat-libstdc++-33-3.2.3-72.el7.x86_64.rpm
¡ 32-bit software packages
- compat-libstdc++-33-3.2.3-72.el7.i686.rpm
Checking the disk space
Check the amount of free disk space on the system by using the df –k command.
The following disk space requirements must be met for Oracle installation:
· A minimum of 10 GB of free space in the /home directory.
· A minimum of 1 GB of free space in the /tmp directory.
The actual disk space requirements depend on the numbers of managed devices and performance monitoring instances. For more information, see the H3C IMC deployment guides.
Creating operating system users and groups
Create the oracle user, the oinstall group, and the dba group before installing Oracle.
· Only the oracle user can install, start, or stop the Oracle database.
· The oinstall group users can install Oracle database software.
· The dba group users can manage the database.
To create the required users and groups:
1. Create the oinstall and the dba groups.
groupadd oinstall
groupadd dba
2. Create the oracle user and set the password of the user.
useradd -g oinstall -G dba –d /home/oracle –m –s /bin/bash oracle
passwd oracle
Modifying the permissions on the Oracle home directory
Grant the oracle user permissions to run the database installation program from the Oracle installation directory (/home/oracle).
chown -R oracle:oinstall /home/oracle/
chmod -R 775 /home/oracle/
Configuring the Oracle database installation directory
1. Create the Oracle database installation directory.
mkdir -p /u01/app/oracle/product/19.3.0
2. Set the directory owner and owner permissions.
chown -R oracle:oinstall /u01/app/
chmod -R 775 /u01/app/
Adjusting kernel parameters
To ensure normal operation of the Oracle database, adjust the kernel parameters:
1. Open the sysctl.conf file.
vi /etc/sysctl.conf
2. Set the following variable values:
kernel.shmall=4118456
kernel.shmmax=16869195776
kernel.shmmni=4096
kernel.sem=250 32000 100 128
fs.file-max=6815744
fs.suid_dumpable=1
fs.aio-max-nr=1048576
net.ipv4.ip_local_port_range=9000 65500
net.core.rmem_default=4194304
net.core.rmem_max=4194304
net.core.wmem_default=262144
net.core.wmem_max=1048576
3. Save and close the file.
4. Validate the new settings.
/sbin/sysctl -p /etc/sysctl.conf
|
|
NOTE: This example uses the minimum values for the kernel parameters. As a best practice, tune these values for optimal system performance. |
Verifying the environment variable settings
Log in to the system as a root user to verify that the environment variables have taken effect as follows:
/u01/app/oracle/product/19.3.0
echo $LD_LIBRARY_PATH
/u01/app/oracle/product/19.3.0/lib
echo $ORACLE_SID
orcl
Setting environment variables for the Oracle database
1. Open the profile file.
¡ To deploy the Oracle database on the same host as the IMC server, edit the /etc/profile file. Execute the following command to open the profile file.
vi /etc/profile
¡ To deploy the Oracle database on a separate host than the IMC server, edit the /home/oracle/.bash_profile file. Execute the following command to open the profile file.
vi /home/oracle/.bash_profile
2. Add the following content to the profile file:
ORACLE_BASE=/u01/app/oracle
ORACLE_HOME=$ORACLE_BASE/product/19.3.0
ORACLE_SID=orcl
PATH=$PATH:$ORACLE_HOME/bin:$HOME/bin
LD_LIBRARY_PATH=$ORACLE_HOME/lib
export ORACLE_BASE ORACLE_HOME ORACLE_SID PATH LD_LIBRARY_PATH
The variable description is as follows:
¡ ORACLE_BASE—Oracle base directory.
¡ ORACLE_HOME—Oracle home directory.
¡ ORACLE_SID—Oracle database instance ID. Use the same instance ID for Oracle database installation.
3. Save and close the file.
Setting environment variables for the oracle user
1. Open the .bash_profile file.
vi /home/oracle/.bash_profile
2. Set the language variable according to the language your system supports.
LANG=en_US.UTF-8
export LANG
3. Add the following content to the end of the file:
umask 022
4. Save the file.
5. Switch to oracle and validate the new settings.
su – oracle
export DISPLAY=localhost:0.0
6. Switch to root.
exit
Setting the NLS_LANG environment variable
|
|
IMPORTANT: · To correctly display Oracle database and IMC data, set the correct value for the NLS_LANG environment variable. For more information about the NLS_LANG value, see Database Globalization Support Guide 19. · If the Oracle database is deployed on the same server as the IMC server, set the NLS_LANG environment variable. |
To set the NLS_LANG environment variable:
1. Open the profile file.
vi /etc/profile
2. Add the following content to the file:
NLS_LANG=AMERICAN_AMERICA.WE8ISO8859P15
export NLS_LANG
3. Save and close the file.
The environment variable automatically takes effect at Linux startup.
Adding the IP-to-host name mapping in /etc/hosts
1. Open the /etc/hosts file.
vi /etc/hosts
2. Add a line of text in the format ip-address localhost localhost.localdomain.
As shown in Figure1-2, enter 10.114.119.42 iMCServer iMCServer.h3c to map 10.114.119.42 to the host name iMCServer in the h3c domain.
Figure1-2 Modifying the /etc/hosts file

If IMC products use a remote database, add another line of mapping between the IP address of the remote database server and the host name for fast DNS resolution.
3. Save and close the file.
Resolving software compatibility issues in RHEL 8.x
This task is required for RHEL 8.x. For RHEL 7.x, you can skip this task. For more information about this task, see Requirements for Installing Oracle Database/Client 19c on OL8 or RHEL8 64-bit (x86-64) at the official Oracle website.
During installation of Oracle 19c in RHEL 8.x, when the OS compatibility warning message is displayed that Unexpected error while executing the action at state: 'supportedOSCheck', execute the following command to resolve the issue:
|
|
CAUTION: In the command, enter the two greater-than signs (>>) correctly. If you enter only one greater-than sign (>), the original content in the /home/oracle/.bash_profile file will be overwritten. |
echo "export CV_ASSUME_DISTID=OEL7" >> /home/oracle/.bash_profile
source /home/oracle/.bash_profile
Preparing the installation package
Reboot the operating system, log in to the system as an Oracle user, copy the Oracle database installation package to the /home/oracle directory, and decompress the package with the following command:
unzip LINUX.X64_193000_db_home(2.85GB).zip –d /u01/app/oracle/product/19.3.0
The LINUX.X64_193000_db_home(2.85GB).zip and /u01/app/oracle/product/19.3.0 settings can be edited according to the Oracle 19c installation package name and directory structure.
If you use an installation CD, follow the instructions on the CD.
Database installation requirements for IMC
Install the Oracle database before you install IMC. IMC supports both local and remote databases.
To install a local Oracle database for IMC, perform the steps in "Installing and configuring the Oracle database server."
To install a remote Oracle database for IMC:
1. Install the database server on the remote server.
See "Installing and configuring the Oracle database server" for the operation procedure.
2. Configure the following items on the database server:
¡ A listener for receiving remote database connection request.
¡ A network service name.
¡ A data storage file folder for storing IMC data. You will need to specify the path to the folder during IMC installation. For more information, see the H3C IMC deployment guides.
3. On the server where you plan to install IMC, install the Oracle database client for IMC to connect to the Oracle database.
The client version must match the version of the Oracle database server. IMC uses the client to connect to the Oracle database.
4. Configure the network service name on the client. It must be the same as the network service name that is configured on the database server.
For information about installing the Oracle client and configuring the network service name for the client, see "Installing and configuring the Oracle database client."
If you plan to deploy IMC in distributed mode, be sure to configure the correct network service names on the IMC servers for them to connect to the database. During IMC installation, you need to specify the network service name to be used by IMC for database connection.
The network service name configuration varies depending on whether IMC uses local or remote databases, as illustrated in the following examples.
· Example 1:
IMC server A (master server), and server B and C (subordinate servers) use their respective local databases.
For each database, you must assign a unique network service name. In this example, TNSNAME_A, TNSNAME_B, and TNSNAME_C are the network service names for accessing the databases on servers A, B, and C, respectively.
For the servers to communicate with each other, you must configure all these network service names on each IMC server. Make sure the settings for each network service name are the same across all servers.
· Example 2:
IMC server A (master server), and servers B and C (subordinate servers) share a remote database server, DBServer_D.
In this scenario, you must configure the servers as follows:
¡ Install the Oracle client on each IMC server to connect to the remote database server.
¡ Configure the same network service name (for example, TNSNAME_D) for accessing the database across all servers, including the IMC servers (Oracle clients) and the database server.
Installing and configuring the Oracle database server
To install and configure the database, log in to Linux as oracle. Execute commands in subsequent sections as oracle, unless otherwise specified.
Installing the Oracle database server
1. Complete all preparation tasks in "Preparing for installation."
2. Log in to Linux as oracle, and then start the database installation wizard in the Oracle installation directory.
./runInstaller
The Select Configuration Option page opens, as shown in Figure1-1.
Figure1-3 Select Configuration Option page
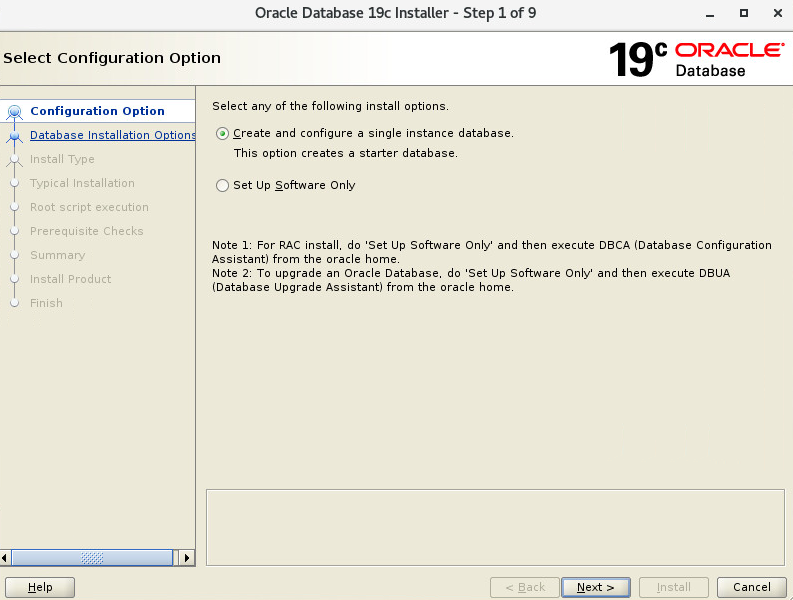
3. Select Create and configure a single instance database and click Next.
The Select System Class page opens, as shown in Figure1-2.
Figure1-4 Select System Class page
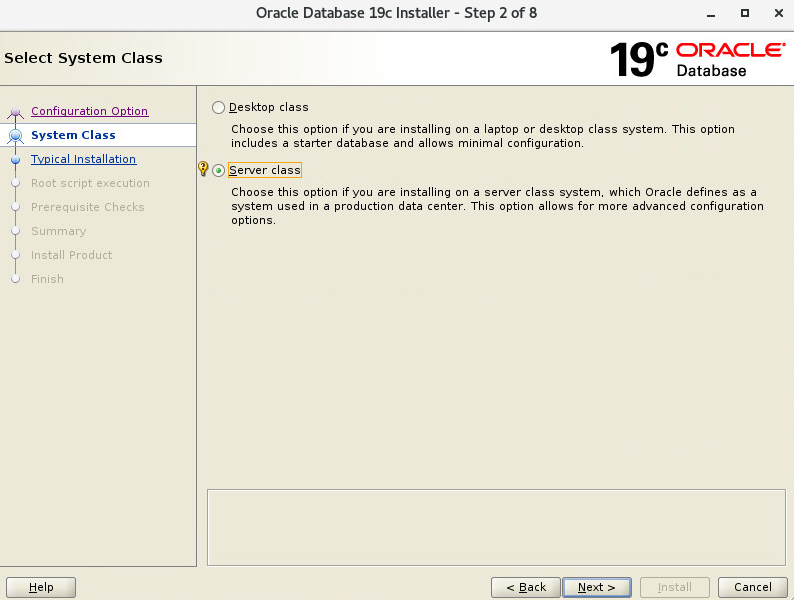
4. Select Server class and click Next.
The Select Database Edition page opens, as shown in Figure1-3.
Figure1-5 Select Database Edition page

5. Select Enterprise Edition and click Next.
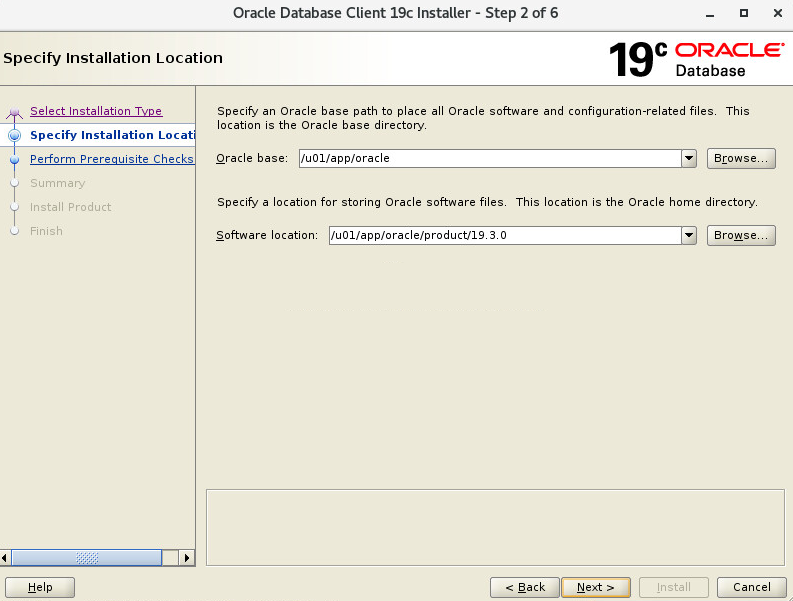
The Specify Installation Location page opens, as shown in Figure1-4.
Figure1-6 Specify Installation Location page
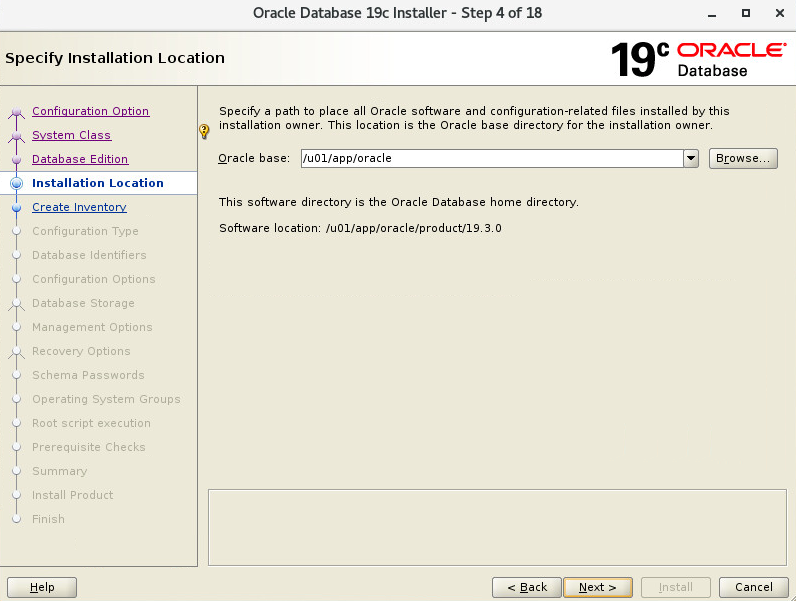
6. Click Next, with the default settings unchanged.
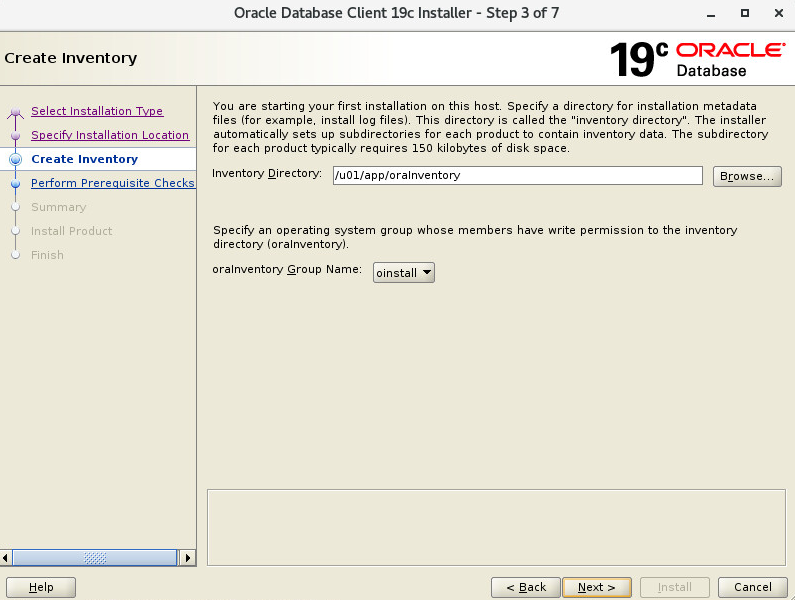
The Create Inventory page opens, as shown in Figure1-5.
Figure1-7 Create Inventory page
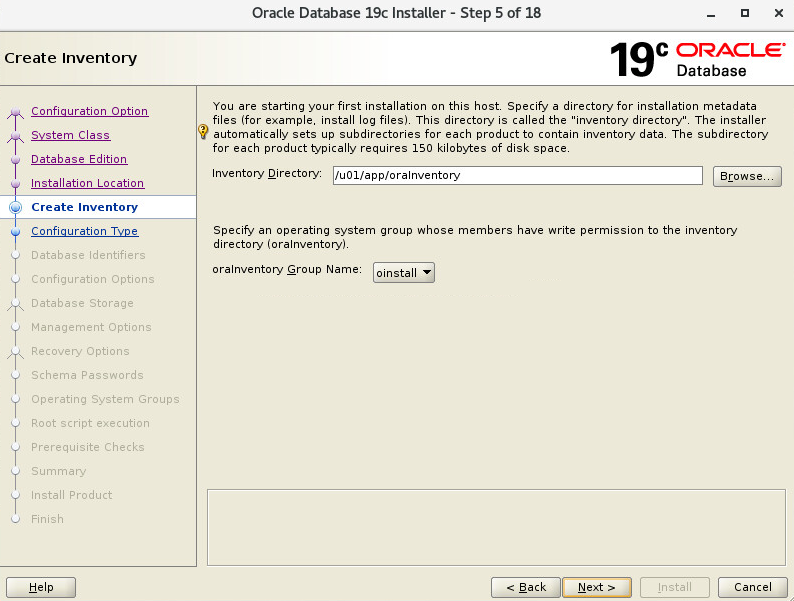
7. Click Next, with the default settings unchanged.
The Select Configuration Type page opens, as shown in Figure1-6.
Figure1-8 Select Configuration Type page
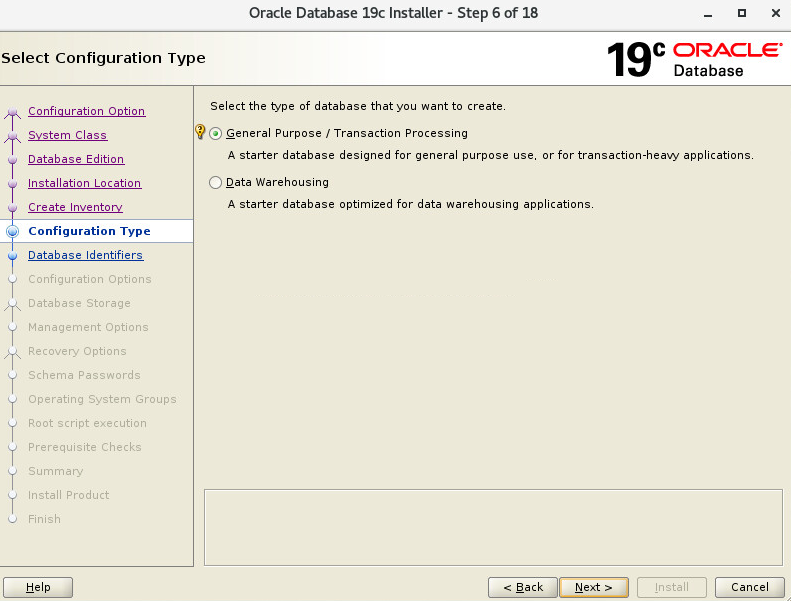
8. Select General Purpose / Transaction Processing and click Next.
The Specify Database Identifiers page opens, as shown in Figure1-7.
Figure1-9 Specify Database Identifiers page
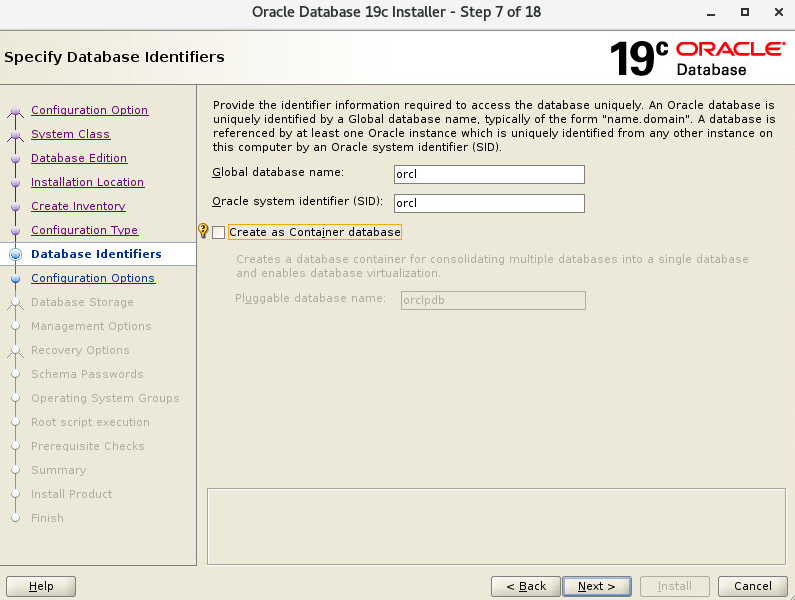
9. Configure the following parameters:
¡ Enter the global database name. This example uses orcl.
¡ Enter the oracle system identifier (SID), which must be consistent with the ORACLE_SID variable setting in the profile file. This example uses orcl. For more information, see "Setting environment variables for the Oracle database."
¡ Clear the Create as Container database option to create a non-container database.
The Create as Container database option is selected by default to create a container database. When this option is selected, configure the pluggable database name in the Pluggable database name field or use the default name. IMC communicates with the pluggable database during operation. The configurations of the listener and network service name differ for the container database and non-container database. For more information, see "Configuring the Oracle database listener" and "Configuring the network service name of the database."
10. Click Next.
The Specify Configuration Options page opens, as shown in Figure1-8.
Figure1-10 Specify Configuration Options page
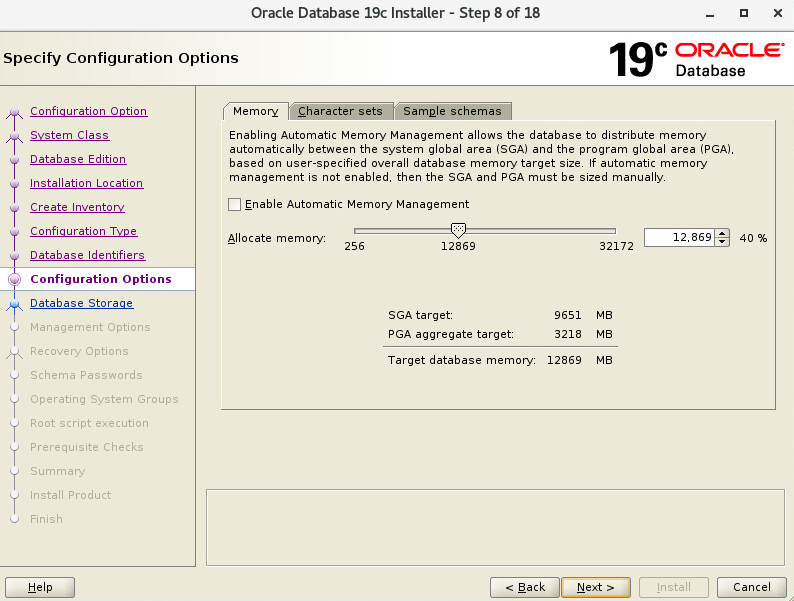
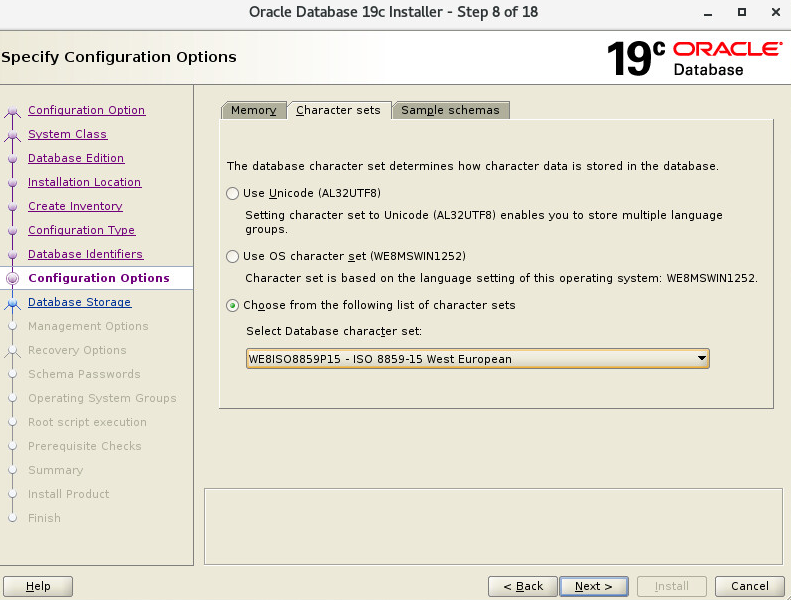
11. Use default settings on the Memory tab, and click the Character sets tab to specify the character set for the database, as shown in Figure1-9.
|
|
IMPORTANT: By default, the minimum value is used for the Allocate memory setting in Figure1-8. If the physical memory is large enough, you set a larger value, but make sure the value is smaller than the available space for the /dev/shm directory. For more information, see managing memory in Database Administrator’s Guide at the official Oracle website. |
To prevent unreadable characters, set the correct character set for the database. This example uses WE8ISO8859P15.
If you are not sure of the language, select Use Unicode (AL32UTF8).
For more information about setting the database character sets, see Database Globalization Support Guide 19.
Figure1-11 Setting the character set
12. Click Next.
The Specify Database Storage Options page opens, as shown in Figure1-10.
Figure1-12 Specify Database Storage Options page
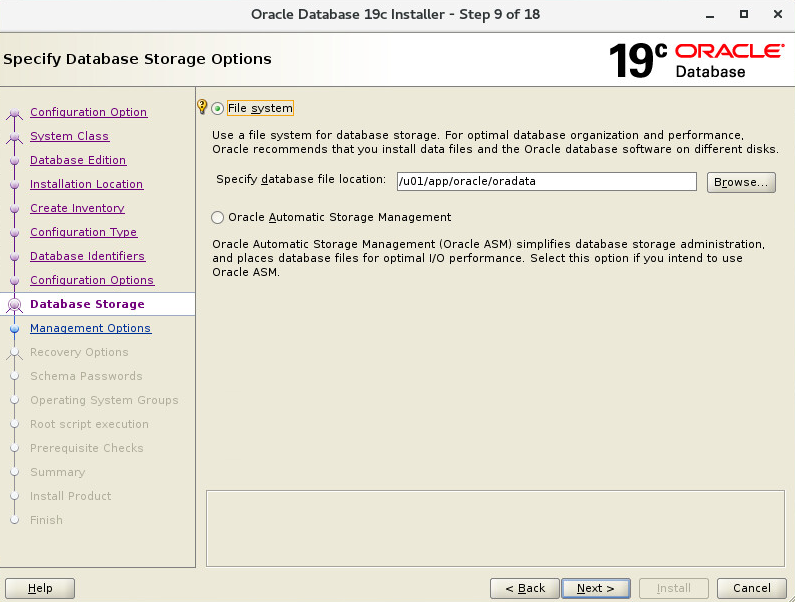
13. Select File system, use the default database file location, and click Next.
The Specify Management Options page opens, as shown in Figure1-11.
Figure1-13 Specify Management Options page
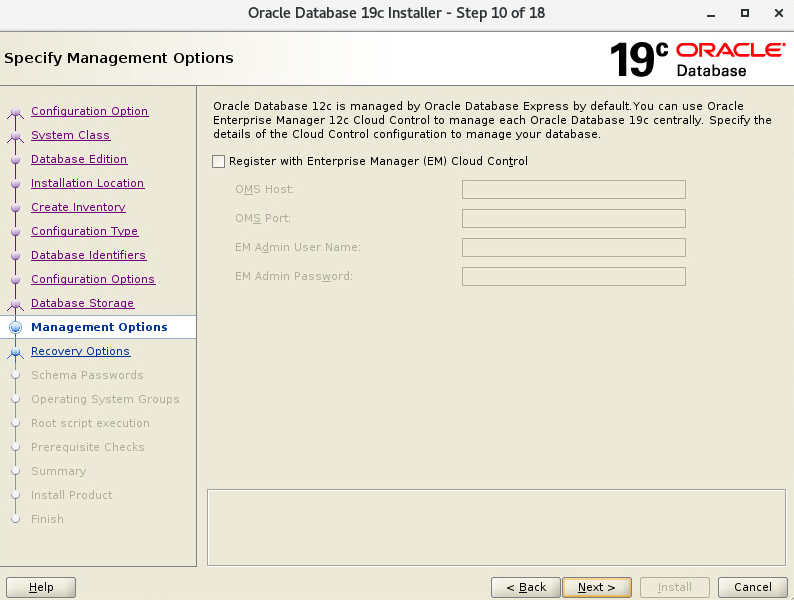
14. Click Next, with the default settings unchanged.
The Specify Recovery Options page opens, as shown in Figure1-12.
Figure1-14 Specify Recovery Options page
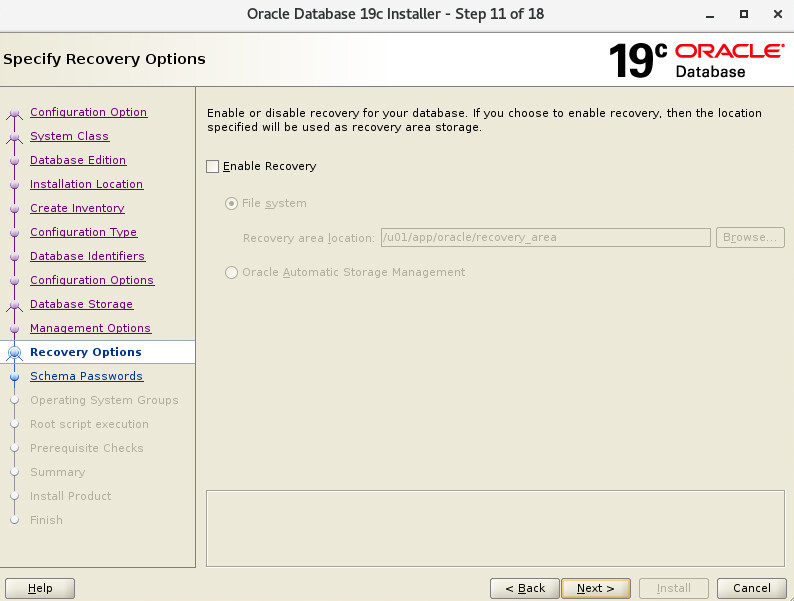
15. Click Next, with the default settings unchanged.
The Specify Schema Passwords page opens, as shown in Figure1-13.
Figure1-15 Specify Schema Passwords page
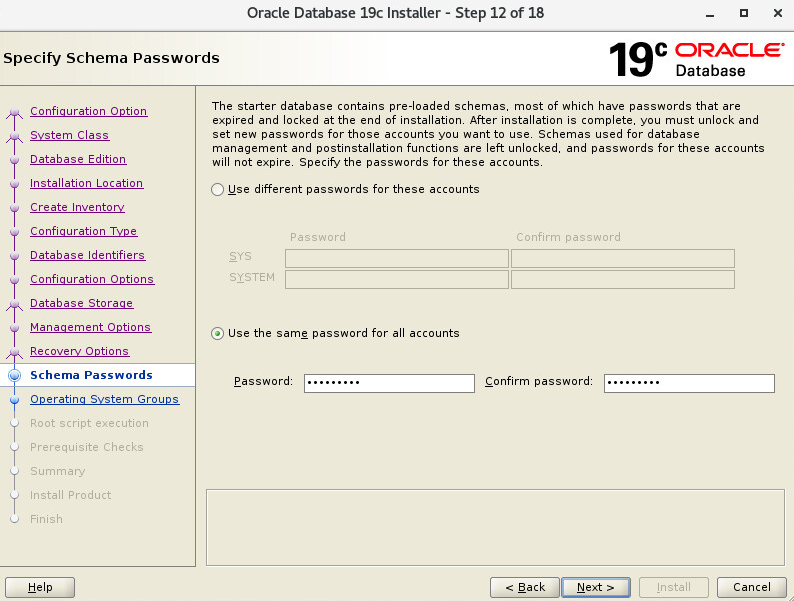
16. Set passwords.
¡ You can set different passwords for the database accounts SYS, SYSTEM, and DBSNMP, or use the same password for all accounts.
¡ For IMC to correctly identify the password of the SYS account during installation, make sure the password does not contain spaces, tabs, or any of the following characters:
` ' " ! ( ) & | \ $ ; @ < > / ^
¡ If you do not want to change the password of the SYS account, create a user account with the same privileges as the SYS account. Make sure the password of the user account does not contain any of the previous characters."
¡ As a best practice to enhance the database security, use a password that meets the Oracle requirement.
17. Click Next.
The Privileged Operating System groups page opens, as shown in Figure1-14.
Figure1-16 Privileged Operating System groups page
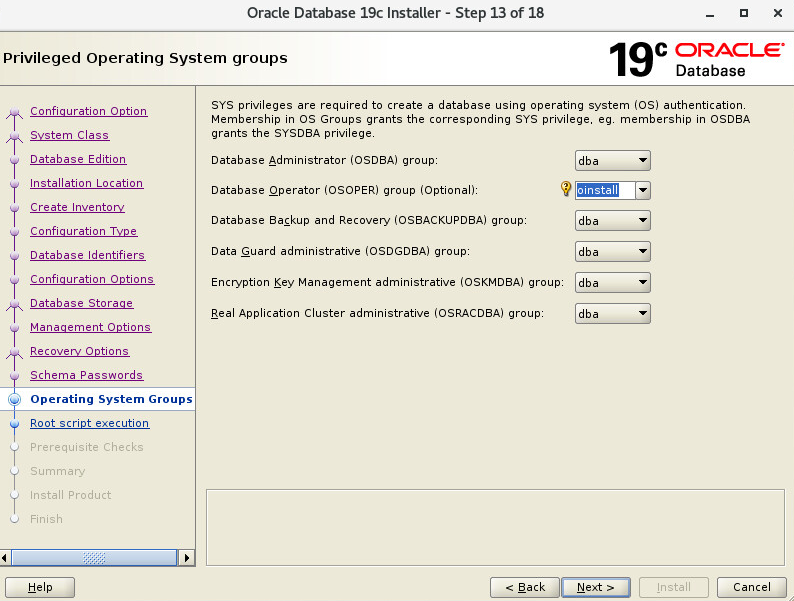
18. Set the database operator (OSOPER) group to oinstall, use the default settings for other parameters, and click Next.
The Root script execution configuration page opens, as shown in Figure1-15.
Figure1-17 Root script execution configuration page

During the product installation and prerequisite check process, the Execute Configuration Scripts or Fixup Script dialog box might open, asking you to run the associated scripts as the root user. You need to open a terminal window, switch to root, and execute the required scripts as prompted.
If you want to automatically execute the scripts during installation without manual inputs, you can select the Automatically run configuration scripts option in Figure1-15, and enter the correct password.
19. Click Next, with the default settings unchanged.
The Perform Prerequisite Checks page opens, as shown in Figure1-16.
Figure1-18 Perform Prerequisite Checks page
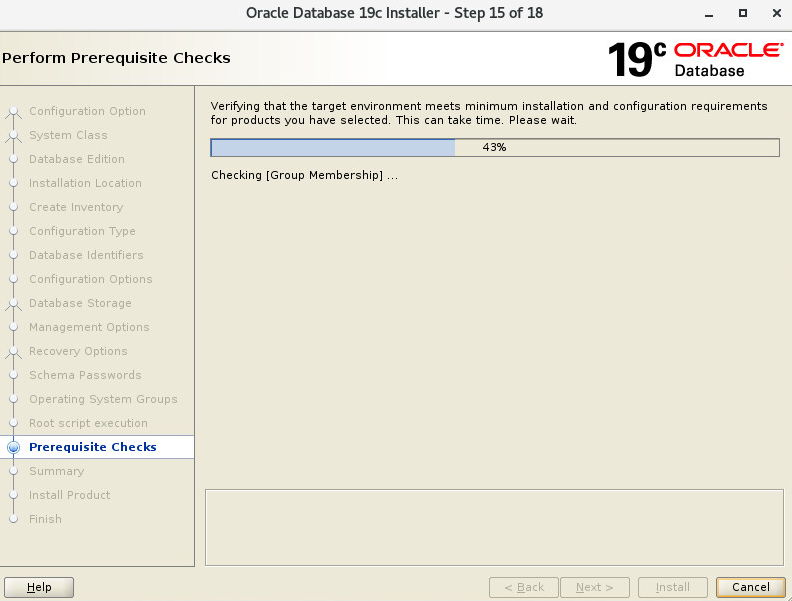
If the software package check fails because later versions of packages are installed, click Ignore all. Because the compat-libstdc++-33 package is not provided in RHEL 7.x and RHEL 8.x, download and install the package if required in the prerequisites check.
For an insufficient swap space warning, change the swap space by following the steps described in "What should I do if insufficient swap space is detected in the prerequisites check?."
In RHEL 7.x and RHEL 8.x, if the kernel parameter or software package check fails, switch to root user and execute the script as instructed on the Fixup Script dialog box.
If the system displays Soft Limit: maximum stack size during prerequisites check, execute the fixup script and check again. If the issue persists, you can click Ignore all to continue the installation. You might need to restart the system to resolve the issue.
The installation program checks the system environment and displays the check results.
The system directly displays the Summary page as shown in Figure1-17 if the check results are as required. If failed check items exit, edit the system environment settings as prompted and then continue the installation.
Figure1-19 Summary page
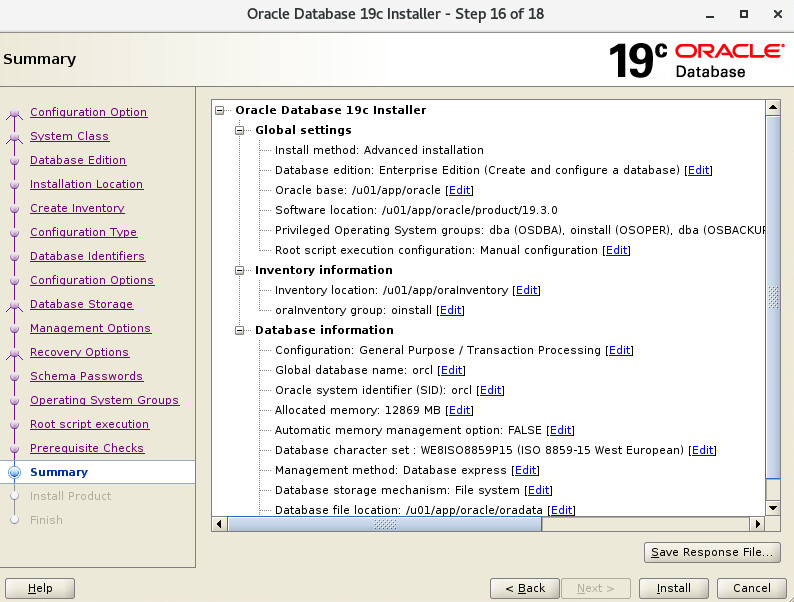
20. Click Install.
The Install Product page opens, as shown in Figure1-18.
Figure1-20 Install Product page
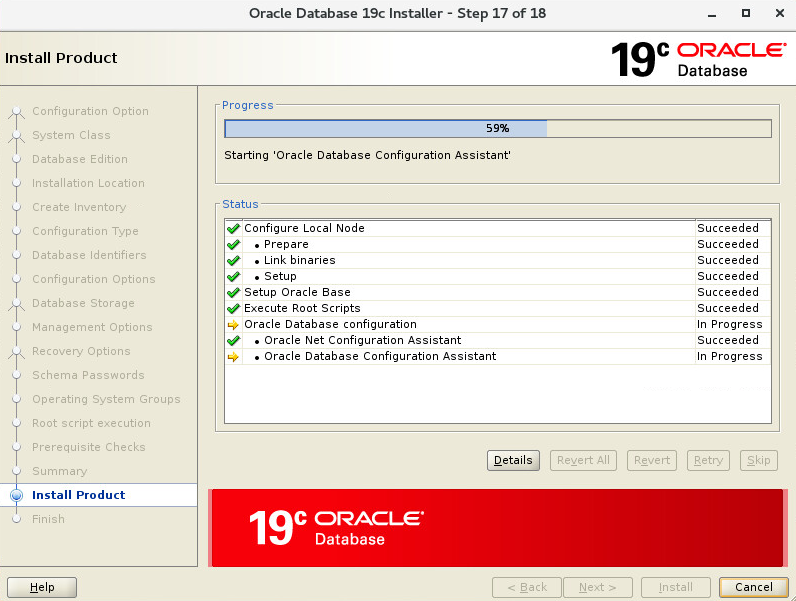
The installation program starts to install the database and displays the installation progress. When Oracle Net Configuration Assistant starts during the installation, the Execute Configuration Scripts dialog box opens, as shown in Figure1-19.
Figure1-21 Execute Configuration Scripts dialog box

21. Open a terminal window, switch to root, and execute the scripts instructed in Figure1-20.
Figure1-22 Executing configuration scripts
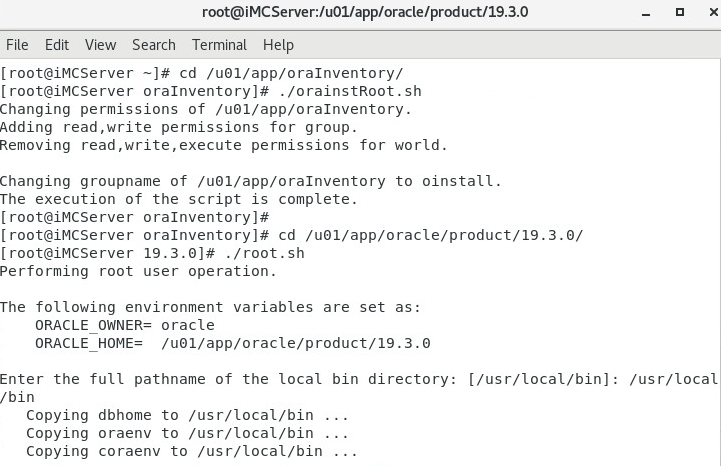
22. Close the terminal window.
23. In the Execute Configuration Scripts dialog box, click OK.
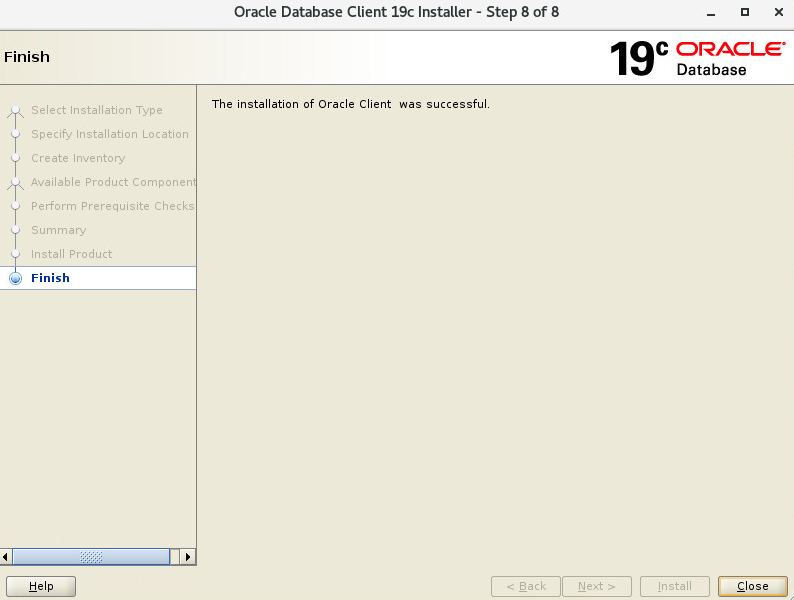
When the database installation is complete, the Finish page opens, as shown in Figure1-21.
Figure1-23 Finish page
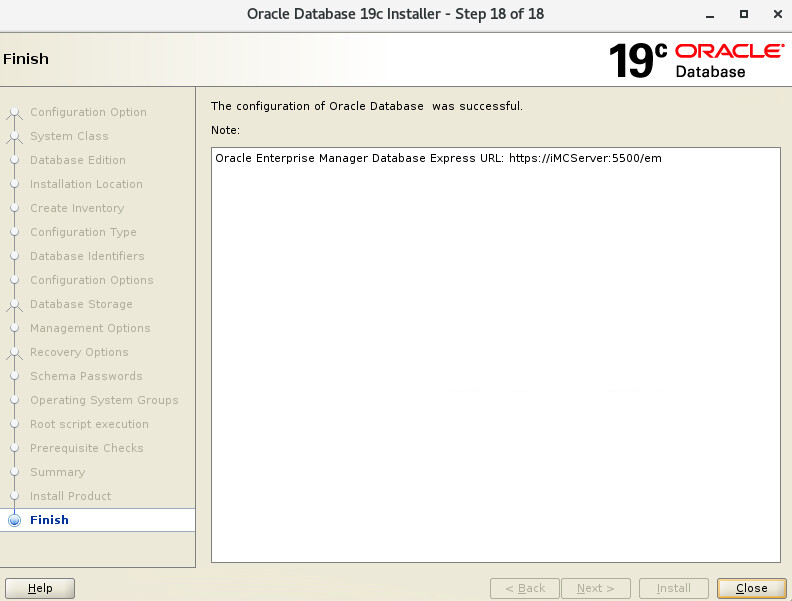
24. Click Close.
25. Reboot Linux.
To adjust the database settings to meet your requirements, see "Managing Oracle Database 19c."
Configuring the Oracle database listener
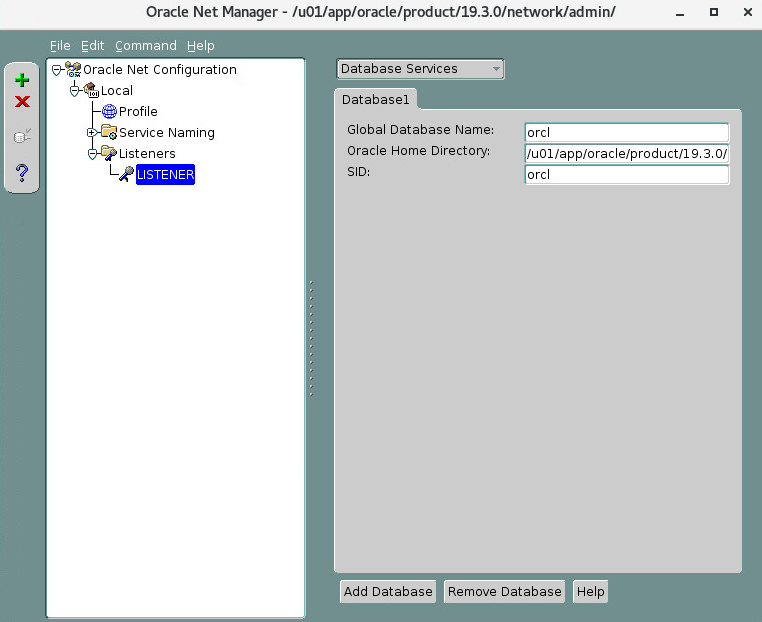
1. Start Oracle Net Manager in the $ORACLE_HOME/bin directory.
cd $ORACLE_HOME/bin/
./netmgr
2. From the navigation tree, select Oracle Net Configuration > Local > Listeners > LISTENER.
3. In the right pane, select Database Services from the list, and then click Add Database.
A new database tab opens.
4. Configure the global database name, location of the Oracle database home directory, and the SID of the database instance, as shown in Figure1-22. The global database name and SID must be the same as the global database name and SID specified during database installation.
For a container database, create a global database and enter the global database name of the pluggable database in the Global Database Name field.
Figure1-24 Configuring the listener
Configuring the network service name of the database
After the database installation is complete, the system automatically creates a default network service name, which is the same as the global database name. By default, the value for HOST is host name. For IMC to operate correctly, change the value for HOST to the IP address of the local host.
To edit the network service name:
1. Open a terminal window and then open the tnsnames.ora file:
cd $ORACLE_HOME/network/admin/
vi tnsnames.ora
2. Edit the HOST value, as shown in Figure1-23:
Figure1-25 Editing the default network service name
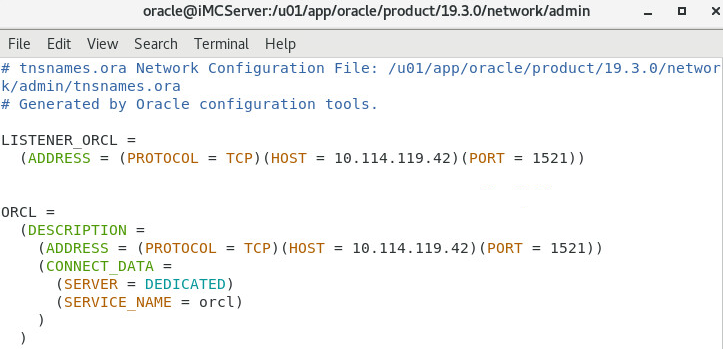
3. Enter :wq to save your setting.
If the created database is a container database, you must create a new network service name with the service name set to the pluggable database name for communication with IMC. For more information, see "How do I add the network service name of the pluggable database for communication with IMC?."
Configuring access control parameters
This configuration sets the minimum authentication protocol allowed for clients when connecting to Oracle database instances. The authentication will fail if the authentication protocol version of the client does not match the specified value. For correct startup of IMC components and processes, perform the following steps:
1. Open a terminal window and then open the sqlnet.ora file:
cd $ORACLE_HOME/network/admin/
vi sqlnet.ora
2. Add the following parameters to the file, as shown in Figure1-24:
SQLNET.ALLOWED_LOGON_VERSION_SERVER = 10
SQLNET.ALLOWED_LOGON_VERSION_CLIENT = 10
Figure1-26 Configuring access control parameters
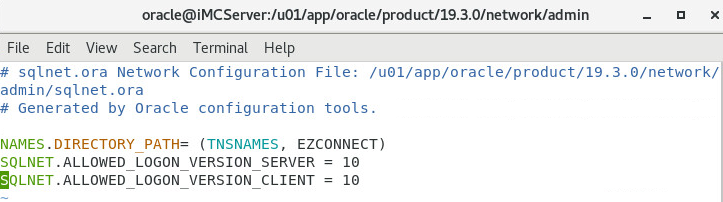
3. Enter :wq to save your setting.
If the EIA component is deployed, but the access control parameters are not configured or incorrectly configured, startup error or failure might occur for some processes. For more information about the access control parameters, see Database Net Services Reference at the official Oracle website.
Installing and configuring the Oracle database client
To enable IMC to connect to a remote Oracle database server, you must install a compatible Oracle database 19c client on the server that will host IMC.
Installing the Oracle database client
1. Complete the tasks described in "Preparing for installation."
2. Restart the operating system, and then log in as Oracle.
3. Run the installation program from the Oracle database client installation directory.
./runInstaller
The Select Installation Type page opens, as shown in Figure1-25.
Figure1-27 Select Installation Type page

4. Select Custom and click Next.
The Specify Installation Location page opens, as shown in Figure1-26.
Figure1-28 Specify Installation Location page
5. Click Next, with the default settings unchanged.
The Create Inventory page opens, as shown in Figure1-27.
Figure1-29 Create Inventory page
6. Click Next, with the default settings unchanged.
The Available Product Components page opens, as shown in Figure1-28.
Figure1-30 Available Product Components page
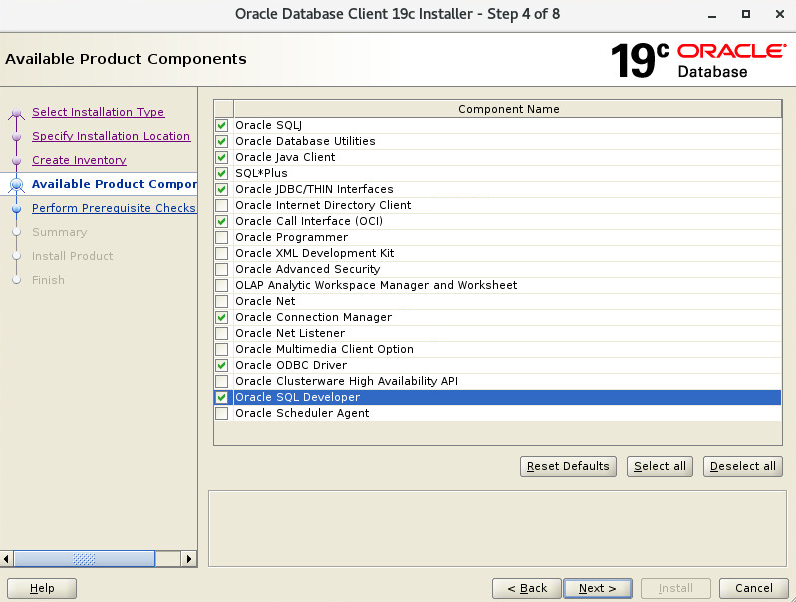
7. Select the following components:
¡ Oracle SQLJ
¡ Oracle Database Utilities
¡ Oracle Java Client
¡ SQL*Plus
¡ Oracle JDBC/THIN Interfaces
¡ Oracle Call Interface(OCI)
¡ Oracle Connection Manager
¡ Oracle ODBC Driver
¡ Oracle SQL Developer
The Perform Prerequisite Checks page opens, as shown in Figure1-29.
Figure1-31 Perform Prerequisite Checks page

9. Fix up any failed check items, and then click Next.
The Summary page opens, as shown in Figure1-30.
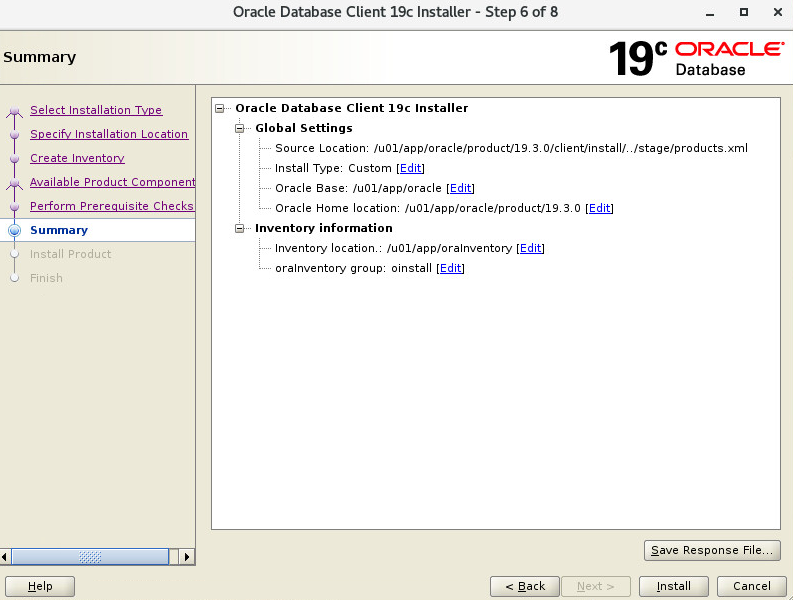
10. Click Install.
The Install Product page opens, as shown in Figure1-31.
Figure1-33 Install Product page
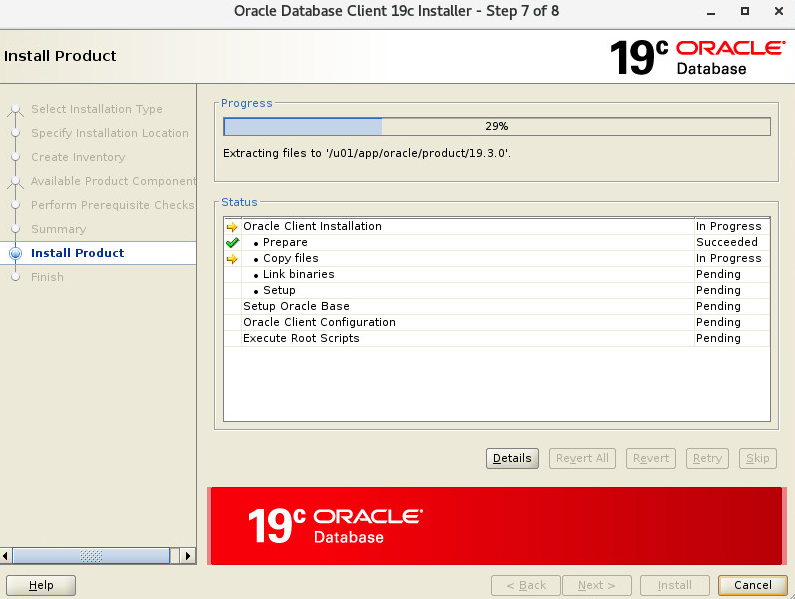
The system starts installing the Oracle database client and displays the installation progress. During installation, the Execute Configuration Scripts dialog box opens, as shown in Figure1-32.
Figure1-34 Execute Configuration Scripts dialog box
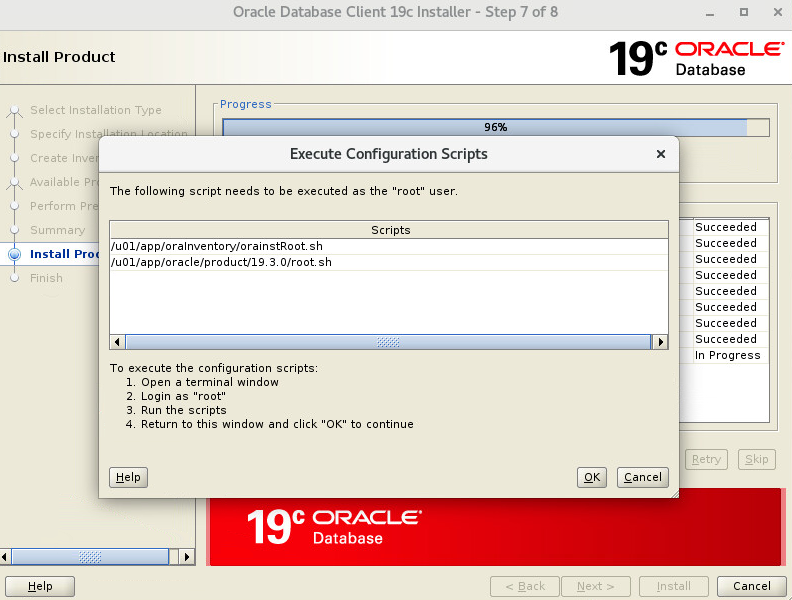
11. Open a terminal window, switch to root, and execute the scripts instructed in Figure1-33.
Figure1-35 Executing configuration scripts
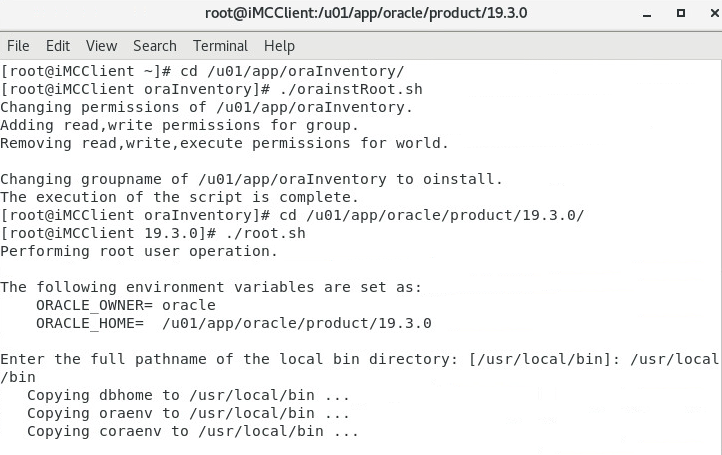
12. Close the terminal window.
13. In the Execute Configuration Scripts dialog box, click OK.
14. Click Close on the Finish page, as shown in Figure1-34.
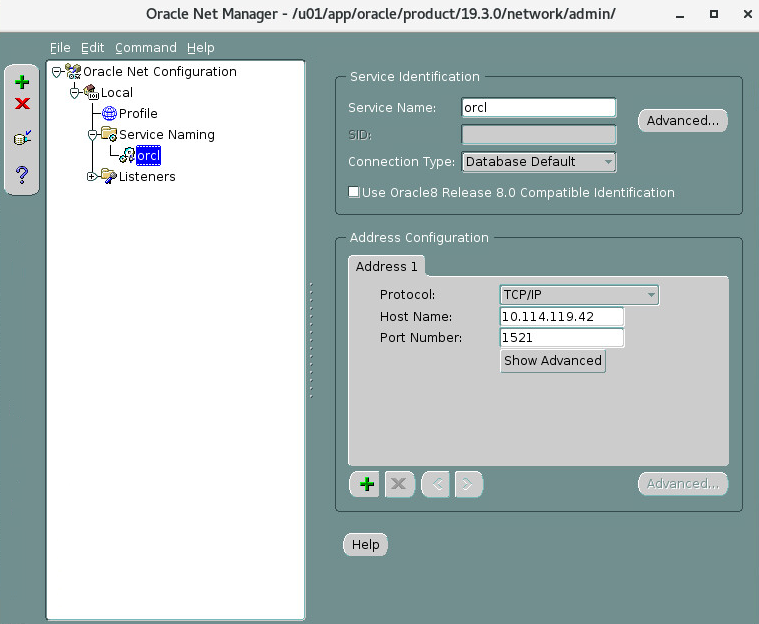
Configuring the Oracle database client
Configure a network service name for the Oracle database client to connect to the database server.
You can configure the network service name by modifying the tnsnames.ora file, or by using Oracle Net Manager. To modify the tnsnames.ora file, see "Configuring the network service name of the database."
To configure the network service name by using Oracle Net Manager:
1. Go to the $ORACLE_HOME/bin directory and start Oracle Net Manager.
cd $ORACLE_HOME/bin/
./netmgr
2. From the navigation tree, select Oracle Net Configuration > Local > Service Naming, as shown in Figure1-35.

3. Click the Create icon ![]() in the toolbar.
in the toolbar.
The Net Service Name Wizard opens, as shown in Figure1-36.
Figure1-38 Net Service Name Wizard
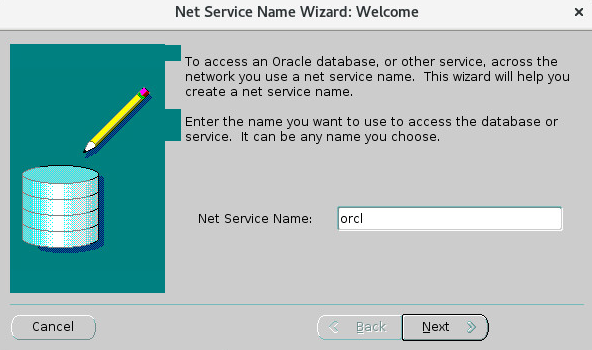
4. In the Net Service Name field, enter orcl, and click Next. The network service name must be the same as the name configured on the database server.
The Protocol page opens, as shown in Figure1-37.
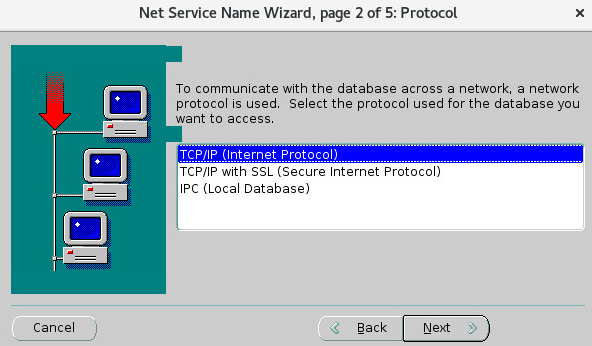
5. Select TCP/IP (Internet Protocol) and click Next.
The Protocol Settings page opens, as shown in Figure1-38.
Figure1-40 Protocol Settings page
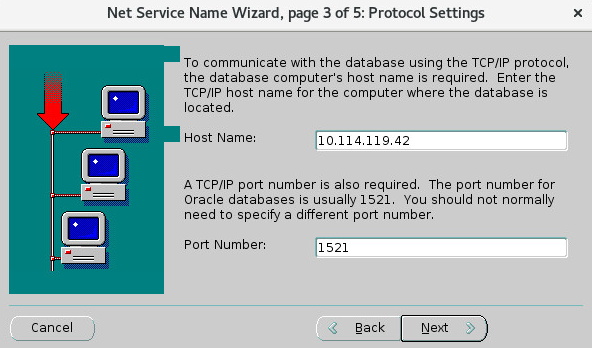
6. In the Host Name field, enter the database server IP address, use the default port number 1521, and click Next.
The Service page opens, as shown in Figure1-39.
Figure1-41 Service page
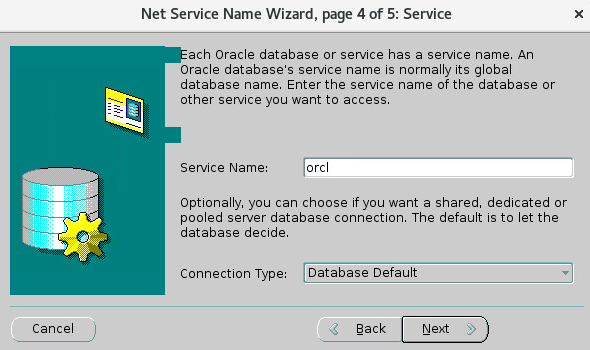
7. In the Service Name field, enter the global database name of the database server, use the default connection type, and click Next. If the database server uses a container database, enter the pluggable database name in the Service Name field.
The Test page opens, as shown in Figure1-40.

8. Click Test to test the connectivity to the database server, or click Finish to run the test later. For more information about running the test, see "Testing the connectivity to the server."
The Net Service Name Wizard closes.
9. View the service name configuration by selecting Oracle Net Configuration > Local > Service Naming > orcl from the navigation tree, as shown in Figure1-41.
Figure1-43 Viewing the service configuration
Testing the connectivity to the server
1. Log in to Linux as oracle.
2. In the terminal window, log in to the database to test the connectivity. In this example, the username is sys, the password is iMC123, and the network service name is orcl.
Managing Oracle Database 19c
For correct operation of IMC, make sure you follow the procedures in this chapter to set the maximum number of Oracle processes and Oracle connection limit, add storage space to the database, modify database memory settings, add redo log groups, and disable database auditing and tracing. After complete the settings, you must restart the operating system before installing IMC.
To configure the database, you must log in to the system as oracle. Execute the configuration commands in the subsequent sections as oracle unless specified otherwise.
In the following examples, sys is the username of the Oracle database administrator and iMC123 is the user password.
Starting the Oracle database service manually
1. Start the listener control utility.
cd $ORACLE_HOME/bin
./lsnrctl start
2. Verify that the listener control utility is started.
./lsnrctl service
3. Start the Oracle database.
cd $ORACLE_HOME/bin
./sqlplus sys/iMC123 as sysdba
SQL>startup
SQL>exit
4. Start the pluggable database. This step is required if the Oracle database is a container database.
cd $ORACLE_HOME/bin
./sqlplus sys/iMC123@ORCLPDB as sysdba
SQL>startup
SQL>exit
In the commands, ORCLPDB is the network service name of the pluggable database.
Stopping the Oracle database service manually
1. Stop the Oracle database.
cd $ORACLE_HOME/bin
./sqlplus sys/iMC123 as sysdba
SQL>shutdown immediate
SQL>exit
2. Stop the listener control utility.
cd $ORACLE_HOME/bin
./lsnrctl stop
Setting the maximum number of Oracle database processes and connections
By default, the Oracle database allows a maximum of 150 connections.
In centralized IMC deployment or when a database error occurs, you might need to modify the Oracle database process and connection limits according to the number of deployed IMC components. The number of Oracle connections must be not less than 800.
Table1-1 lists the Oracle connection limit required by IMC modules.
Table1-1 Oracle connection limit on IMC modules
|
IMC module |
Oracle connection limit |
|
IMC platform |
14 |
|
Alarm management |
24 |
|
Syslog management |
9 |
|
Performance management |
11 |
|
Report management |
10 |
|
Guest Access Manager |
5 |
|
User self-service management |
5 |
|
Network asset manager |
5 |
|
Virtual Resource Management |
9 |
|
Configuration center |
9 |
|
ACL management |
7 |
|
VLAN management |
11 |
|
Security control center |
5 |
|
Server & Storage Automation |
6 |
|
VXLAN management |
4 |
|
VAN Fabric Manager |
27 |
|
Resource Automation Manager |
16 |
|
QoS manager |
5 |
|
Service Health Manager |
60 |
|
User access management/CAMS accounting manager |
100 |
|
EAD security policy configuration |
25 |
|
Desktop asset manager |
40 |
|
MPLS VPN manager |
9 |
|
L2VPN manager |
17 |
|
Application Manager |
10 |
|
Branch Intelligent Management System |
10 |
|
IPsec VPN manager |
8 |
|
VAN Connection Manager |
5 |
|
Security Service Manager |
10 |
|
Load Balancing Manager |
5 |
|
Wireless Service Manager |
50 |
To view and modify the maximum number of Oracle database processes and connections:
1. Switch to the oracle user.
su – oracle
2. Log in to the Oracle database as sysdba.
sqlplus sys/iMC123 as sysdba
In the command, the database username is sys and password is iMC123.
3. View the number of Oracle database processes and connections.
¡ View the number of Oracle database processes.
SQL>show parameter processes;
¡ View the number of Oracle database connections.
SQL>show parameter sessions;
4. Change the maximum number of Oracle database processes and connections according to the installed IMC modules.
¡ Change the maximum number of Oracle database processes. Replace 600 with another value as needed.
SQL>alter system set processes=600 scope=spfile;
¡ Change the Oracle database connection limit. Replace 600 with another value as needed.
SQL>alter system set sessions=600 scope=spfile;
5. Restart the Oracle database to have the changes take effect.
Automating Oracle database startup on Linux
1. Log in to Linux as root.
2. Copy the Oracle database startup script oracled.tar.gz from the /manual directory of the IMC installation package to the Linux operating system.
3. Decompress the script file.
tar -xzf oracled.tar.gz
4. Copy the decompressed file to the /etc/rc.d/init.d directory.
cp oracled /etc/rc.d/init.d/
5. Change the file permissions.
chmod –R 755 oracled
6. Add the script to the startup configuration file of the Linux operating system.
chkconfig --add oracled
7. Open the Oracle database configuration file /etc/oratab.
vi /etc/oratab
8. Set the following line to Y.
orcl:/u01/app/oracle/product/19.3.0:Y
9. Save and close the file.
The Oracle database automatically starts at the Linux startup.
10. To manually start or stop the Oracle database, use the following commands:
service oracled start
service oracled stop
Automating PDB database startup
This task allows you to create a trigger to open all pluggable databases (PDBs) after container database (CDB) startup.
To automate PDB database startup:
1. Log in to the Oracle database as sys.
sqlplus sys/iMC123 as sysdba
In the command, sys is the database user name, iMC123 is the password.
2. Execute the following commands:
CREATE TRIGGER open_all_pdbs
AFTER STARTUP
ON DATABASE
BEGIN
EXECUTE IMMEDIATE 'alter pluggable database all open';
END open_all_pdbs;
/
Adding storage space to the database
The amount of storage space available on the database for IMC depends on the number of data files in the USERS tablespace. By default, the USERS tablespace has a single data file with a size limit of 32 GB. You can add data files to the USERS tablespace to provide additional storage.
The number of data files to add depends on the disk space required by the IMC components. For example, if IMC requires 300 GB for device management, create a minimum of ten data files (300 GB/32 GB = 9.375). If a database is used by multiple IMC components, create data files according to the total disk space required by the installed components.
You can add data files to the USERS tablespace by using SQL statements.
To add database storage space through SQL statements:
1. Log in to Linux as oracle.
2. Log in to the Oracle database as sys.
sqlplus sys/iMC123@orcl as sysdba
In the command, sys is the database username, iMC123 is the password, and orcl is the network service name of the database server.
3. Display existing data files in the USERS tablespace.
SQL>select file_name from dba_data_files where tablespace_name='USERS';
FILE_NAME
-----------------------------------------------------------
/u01/app/oracle/oradata/ORCL/user01.dbf
The output shows that the USERS tablespace contains only one data file in the /u01/app/oracle/oradata/ORCL directory.
4. Add a new data file named users02.dbf to the directory.
SQL>alter tablespace USERS add datafile '/u01/app/oracle/oradata/ORCL/user02.dbf' size 100M autoextend on next 100M maxsize UNLIMITED;
5. Add user03.dbf, user04.dbf, and more data files to the directory. (Details not shown.)
Modifying database memory settings
1. Log in to Linux as oracle.
2. Log in to the Oracle database as sys.
sqlplus sys/iMC123@orcl as sysdba
In the command, sys is the database username, iMC123 is the password, and orcl is the network service name of the database server.
3. View the sga_target value.
SQL>show parameter sga_target;
NAME TYPE VALUE
---- ---- -----
sga_target_ big integer 9664M
4. View the pga_aggregate_target value.
SQL>show parameter pga_aggregate_target;
NAME TYPE VALUE
---- ---- -----
pga_aggregate_target_ big integer 3218M
5. Set the value of MEMORY_TARGET.
SQL>alter system set MEMORY_TARGET=12882M scope=spfile;
The MEMORY_TARGET value equals the sga_target value plus the pga_aggregate_target value.
|
|
IMPORTANT: In this example, the minimum MEMORY_TARGET value is used. If the physical memory is large enough, you set a larger value, but make sure the value is smaller than the available space for the /dev/shm directory. For more information, see managing memory in Database Administrator’s Guide at the official Oracle website. |
Adding redo log groups
Redo logs record changes made to the database (such as data rollback) and can be used for data recovery. By default, three groups of redo logs are available. Each group contains 50 MB log files. To improve the write efficiency if an excessive amount of data needs to be written, add redo log groups after Oracle database installation.
To add redo log groups:
1. Switch to the oracle user.
su – oracle
2. Log in to the Oracle database as sys.
sqlplus sys/iMC123@orcl as sysdba
In the command, sys is the database username, iMC123 is the password, and orcl is the network service name of the database server.
3. Locate the storage directory of redo log files.
SQL>select MEMBER from v$logfile;
MEMBER
---------------------------------------
/u01/app/oracle/oradata/ORCL/redo03.log
/u01/app/oracle/oradata/ORCL/redo02.log
/u01/app/oracle/oradata/ORCL/redo01.log
Redo log files are stored in the directory /u01/app/oracle/oradata/ORCL.
4. Use the following commands to add three redo log groups, each with a size of 2048 MB.
SQL>alter database add logfile group 4('/u01/app/oracle/oradata/ORCL/redo04.log') SIZE 2048M;
SQL>alter database add logfile group 5('/u01/app/oracle/oradata/ORCL/redo05.log') SIZE 2048M;
SQL>alter database add logfile group 6('/u01/app/oracle/oradata/ORCL/redo06.log') SIZE 2048M;
Disabling database auditing
Database auditing records database activities and monitors user operations, such as database connection, SQL statement executions, and data access. Database auditing is enabled by default and it can produce a large number of audit files. To save system resources, disable the auditing feature as follows:
1. Log in to the Oracle database.
sqlplus sys/iMC123@orcl as sysdba
In the command, sys is the database username, iMC123 is the password, and orcl is the network service name of the database server.
2. View the database auditing status.
SQL>show parameter audit_trail;
NAME TYPE VALUE
---- ---- -----
audit_trail string DB
The VALUE field value for audit_trail is DB, which indicates that database auditing is enabled.
3. Disable the database auditing.
SQL>alter system set audit_trail=NONE scope=spfile;
System altered.
4. Restart the database.
SQL>shutdown immediate;
SQL>startup;
5. Verify that the database auditing feature is disabled.
SQL>show parameter audit_trail;
NAME TYPE VALUE
---- ---- -----
audit_trail string NONE
The VALUE field value for audit_trail is NONE, which indicates that database auditing is disabled.
Disabling database tracing
The database tracing feature trails the execution history and code paths of Oracle database and provides information for debugging. This feature is enabled by default and it affects the database operation performance. To upgrade the performance, disable this feature as follows:
1. Log in to the Oracle database.
sqlplus sys/iMC123@orcl as sysdba
In the command, sys is the database username, iMC123 is the password, and orcl is the network service name of the database server.
2. View the database tracing status.
SQL>show parameter trace;
NAME TYPE VALUE
------------------------------- ------- -----
log_archive_trace integer 0
sec_protocol_error_trace_action string TRACE
sql_trace bollean FALSE
trace_enabled boolean TRUE
tracefile_identifier string
The VALUE field value for trace_enabled is TRUE, which indicates that the tracing is enabled.
3. Disable database tracing.
SQL>alter system set trace_enabled=FALSE scope=spfile;
System altered.
4. Restart the database.
SQL>shutdown immediate;
SQL>startup;
5. Verify that the database tracing feature is disabled.
SQL>show parameter trace_enabled;
NAME TYPE VALUE
------------- ------- -----
trace_enabled boolean FALSE
The VALUE field value for trace_enabled is FALSE, which indicates that database tracing is disabled.
Configuring network service names by using Oracle Net Configuration Assistant
|
|
IMPORTANT: If IMC servers use different Oracle databases in a distributed deployment, you must configure a unique network service name for each database. |
To enable IMC to connect to remote databases, you must configure correct network service names on the Oracle database server and client.
You can configure network service names by using Oracle Net Manager or Oracle Net Configuration Assistant, or by modifying the tnsnames.ora file. This procedure uses Oracle Net Configuration Assistant as an example.
· To use Oracle Net Manager, see "Configuring the Oracle database client"
· To modify the tnsnames.ora file, see "How do I add the network service name of the pluggable database for communication with IMC?."
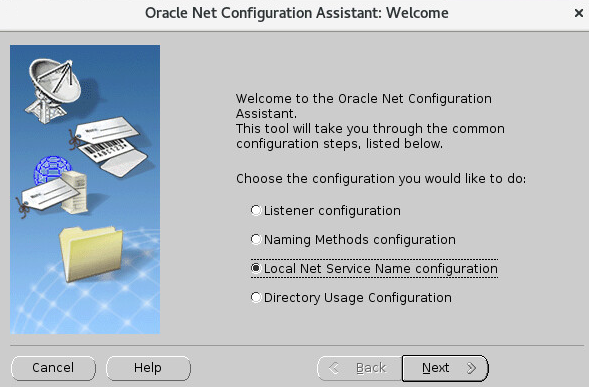
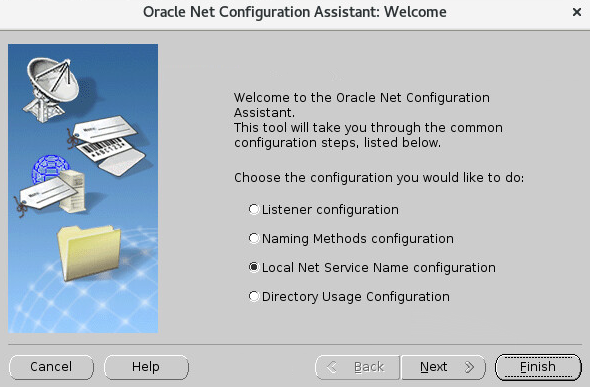
To configure the network service name by using Oracle Net Configuration Assistant:
1. Start the database service.
See "Starting the Oracle database service manually" for the operation procedure.
2. Start Oracle Net Configuration Assistant.
cd $ORACLE_HOME/bin
./netca
The Welcome page opens.
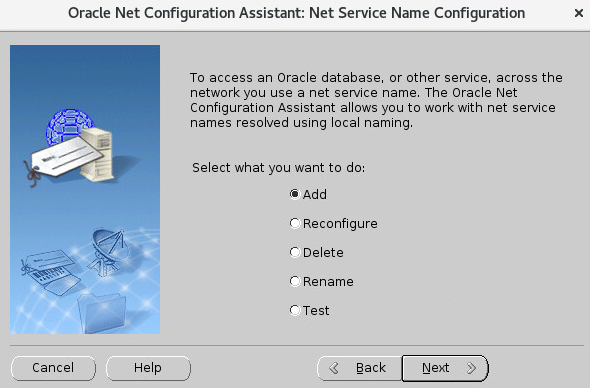
3. Select Local Net Service Name configuration and click Next, as shown in Figure1-42.
4. Select Add and click Next, as shown in Figure1-43.
Figure1-45 Net Service Name Configuration page
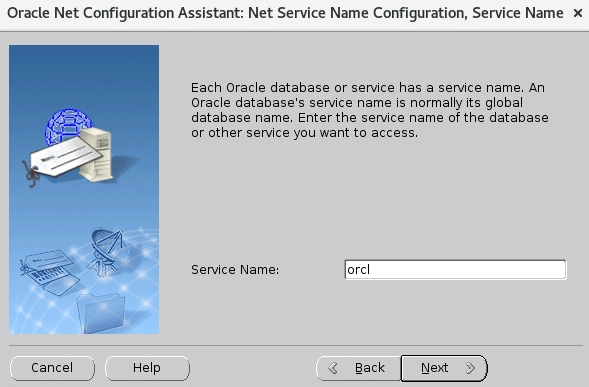
5. Enter the database service name orcl and click Next, as shown in Figure1-44.
The service name must be the same as the previously configured global database name or pluggable database name.
Figure1-46 Configuring a service name
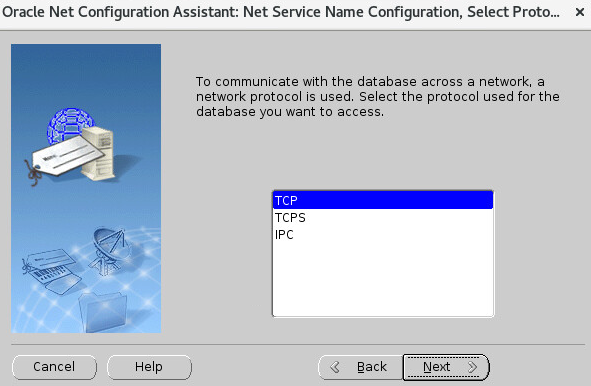
6. Select transmission protocol TCP and click Next, as shown in Figure1-45.
Figure1-47 Selecting a protocol
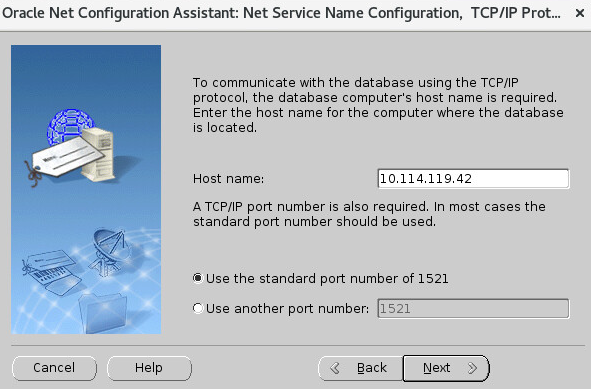
7. On the page that opens, configure the following parameters, as shown in Figure1-46:
¡ In the Host name field, enter the IP address of the database server.
¡ Select Use the standard port number of 1521. This option is selected by default.
Figure1-48 Configuring the host name and port number
8. Click Next.
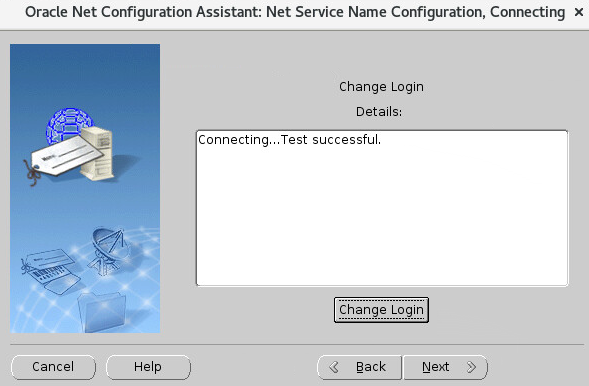
9. Select Yes, perform a test, and then click Next, as shown in Figure1-47.and Figure1-48.
Figure1-49 Testing connectivity to the database server


10. Click Change Login to change the login username and password, as shown in Figure1-49.
Figure1-51 Changing login credentials
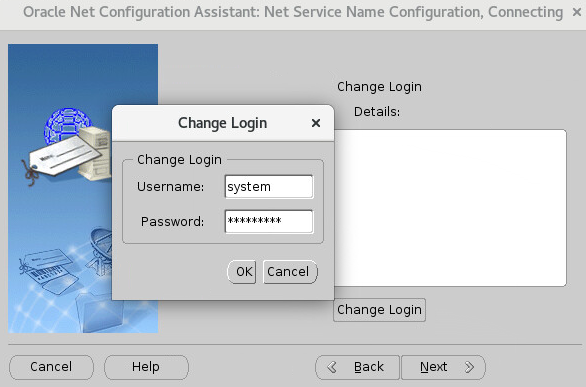
11. Enter the correct password of the user system, and then click OK.
Oracle Net Configuration Assistant performs a new connection test.
12. When you see a successful test result, click Next, as shown in Figure1-50.
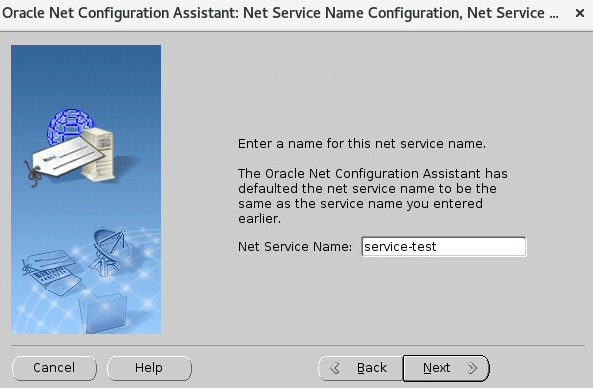
13. Enter a network service name, as shown in Figure1-51.
The network service name must be different from the service name orcl. This name is automatically added to the list for selecting a network service name when you install IMC.
Figure1-53 Specifying a network service name
14. Click Next.
The page for adding network service names opens, as shown in Figure1-52.
Figure1-54 Adding network service names as needed
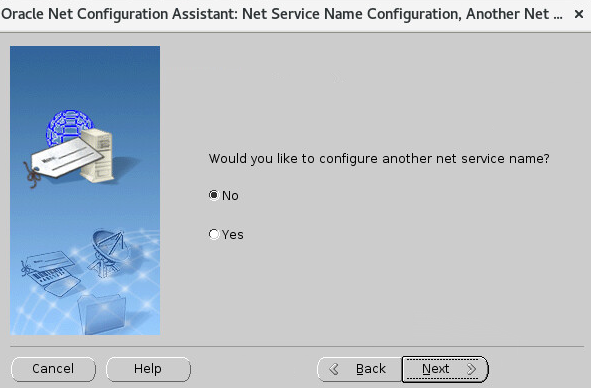
15. To add additional network service names, select Yes. If additional network service names are not needed, click No. In this example, select No, and then click Next.
The configuration complete page opens, as shown in Figure1-53.
Figure1-55 Completing the network service name configuration
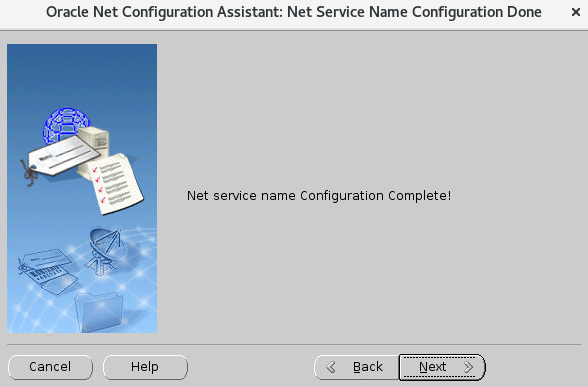
16. Click Next.
17. On the page that opens, click Finish, as shown in Figure1-54.
Removing Oracle Database 19c
You can remove the Oracle database by using the uninstall script deinstall provided by the database, or remove Oracle program files, users, and user groups by executing commands as root. To use the uninstall script, see Database Installation Guide for Linux 19.
To manually remove Oracle Database 19c:
18. Log in to Linux as root.
19. Stop the Oracle database service.
sqlplus sys/imc123 as sysdba
SQL>shutdown
In the command, imc123 is the password of the sys user.
20. Stop the listener.
cd $ORACLE_HOME/bin
./lsnrctl stop
21. Delete the Oracle database installation directory /u01 in the root directory.
rm –rf /u01
22. Delete the directory /usr/local/bin/oracle (the default is /user/local/bin). This is the directory created by the configuration script during database installation (see Figure1-20). The string of asterisks (*) in the command represents the name of the file to delete.
rm –rf ****
23. Delete files oratab and oraInst.loc in the /etc directory.
cd /etc
rm –rf oratab
rm –rf oraInst.loc
24. Delete the oracle user.
userdel oracle
25. Delete the oinstall user group.
groupdel oinstall
26. Delete the dba user group.
groupdel dba
27. Delete the /home/oracle directory.
cd /home
rm –rf oracle/
28. Delete the startup service.
chkconfig -–del oracled
29. Reboot Linux.
FAQ
Why does the system display an insufficient disk space error when creating the database instance?
Verify that the etc/sysctl.conf file is correctly configured. For more information, see "Adjusting kernel parameters."
Why are there unreadable characters displayed on IMC that uses the Oracle database?
The following issues can cause unreadable characters:
· Incorrect character set for the database.
The character set selected for the Oracle database during installation is incompatible with the language setting of IMC. For example, the Oracle database uses the English character set, but IMC uses a non-English language coding. To resolve the issue, reinstall the Oracle database and select the correct character set.
· Incorrect NLS_LANG variable setting.
The NLS_LANG environment variable is not set correctly. To resolve the issue, correct the NLS_LANG setting, and then restart the server and IMC. For information about setting the NLS_LANG variable, see "Setting the NLS_LANG environment variable."
· Incorrect LANG variable setting for the Oracle database server that uses the default character set.
The LANG variable is not set correctly for a database server that is configured to use the default character set during installation. The default character set is determined by the LANG variable. For more information about setting the LANG variable, see "Setting environment variables for the oracle user."
For example, the LANG variable is set to LANG=en_US.UTF-8 for a database that requires a non-English character set. If the database is configured to use the default character set, which is WE8ISO8859P15 in this example, unreadable characters will be displayed.
To resolve the issue, reinstall the Oracle database with the correct character set. For more information, see "Installing and configuring the Oracle database server."
For more information about setting the database and client character sets, see Database Globalization Support Guide 19 at the official Oracle website.
How do I update database passwords for IMC?
After the database password of an IMC component is changed by using the database management tool, execute pwdmgr.bat to update the password in the server-addr.xml file. The file is located in /common/conf/ in the IMC installation path. It stores database passwords of all IMC components in ciphertext.
The following is an example for updating the password of the config_db database stored in IMC:
cd [IMC installation directory]/deploy/
./pwdmgr.sh –modify 127.0.0.1 config_db imc_config dbpasswd
Change password successfully
In the example, the dbpasswd string represents the new password of the imc_config user. The config_db string represents the database name. The 127.0.0.1 string represents the IP address of the database. The database IP address and name can be retrieved from the $IMCROOT/common/conf/server-addr.xml file in the IMC installation path.
If IMC is deployed in distributed mode, you must update the database password on every IMC server.
What should I do if the connection to the database server fails or takes a long time?
By default, DNS first searches the /etc/hosts file for the matching entry of the database server. If no matching entry exists, a resolution request is sent to a DNS server configured in the /etc/resolv.conf file. This file has a maximum of three DNS servers. When resolution fails on one DNS server, the resolution request is sent to another DNS server.
If the host name in the tnsnames.ora file is used for connecting to the database server, verify that the DNS settings are correctly configured in the /etc/resolv.conf file:
vi /etc/resolv.conf
search h3c
nameserver 10.72.66.36
nameserver 10.72.66.37
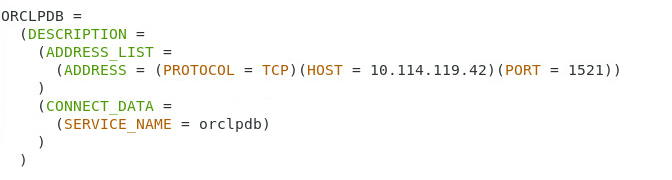
How do I add the network service name of the pluggable database for communication with IMC?
1. Open a terminal window and open the tnsnames.ora file.
cd $ORACLE_HOME/network/admin/
vi tnsnames.ora
2. Add the network service name to the file, as shown in Figure1-55.
¡ ORCLPDB is the network service name for connecting to the database. If the database is a remote database for IMC, make sure you configure the same network service name on the Oracle database server and client.
¡ Set SERVICE_NAME to the pluggable database name. This example uses orclpdb.
Figure1-57 Adding a network service name
What should I do if the IMC deployment encounters an interruption in a container database environment?
Figure1-58 Interrupted IMC deployment
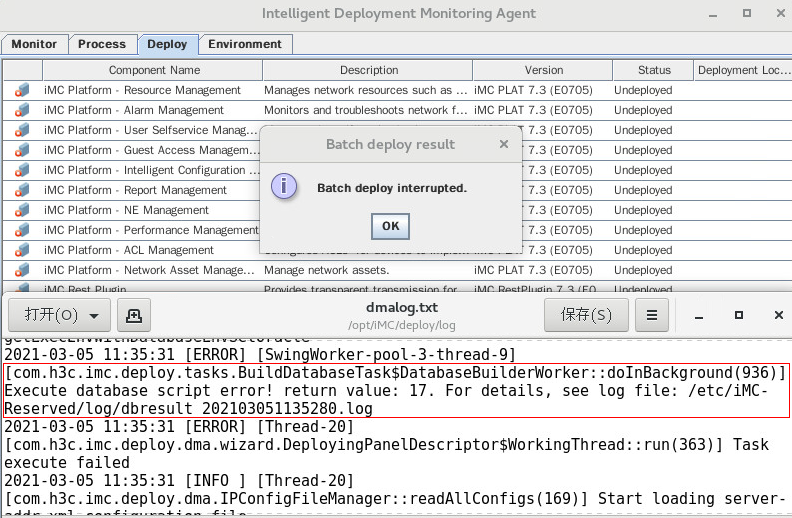
Figure1-56 shows that the deployment of IMC is interrupted because of the incorrect database connection configuration.
To resolve the problem:
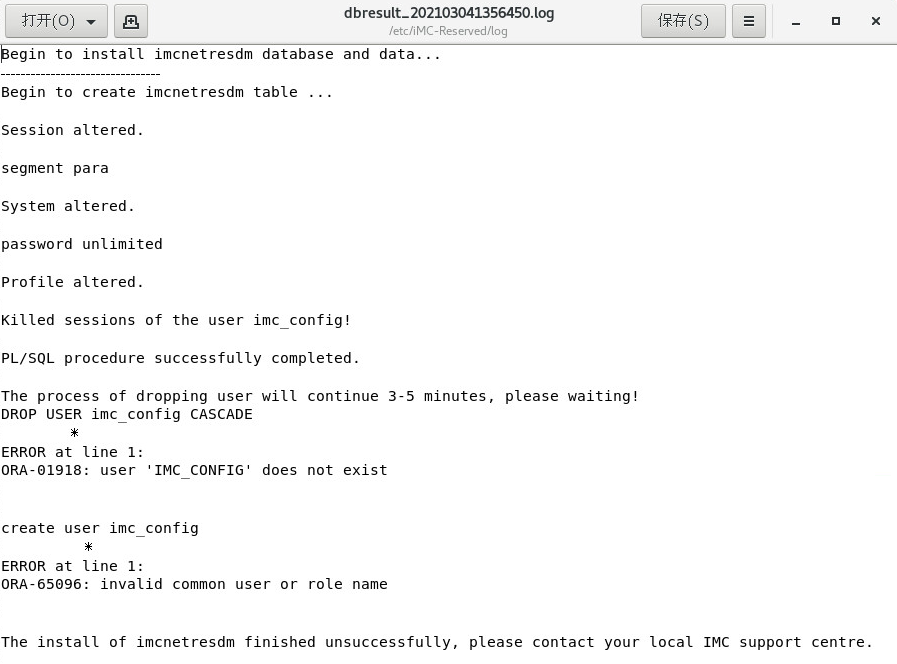
1. Open a terminal window and view the log details, as shown in Figure1-57:
vi /etc/iMC-Reserved/log/dbresult_202103051135280.log
The file name dbresult_202103051135280.log is used for illustration only. Edit the file name as needed.
Figure1-59 Log for deployment interruption
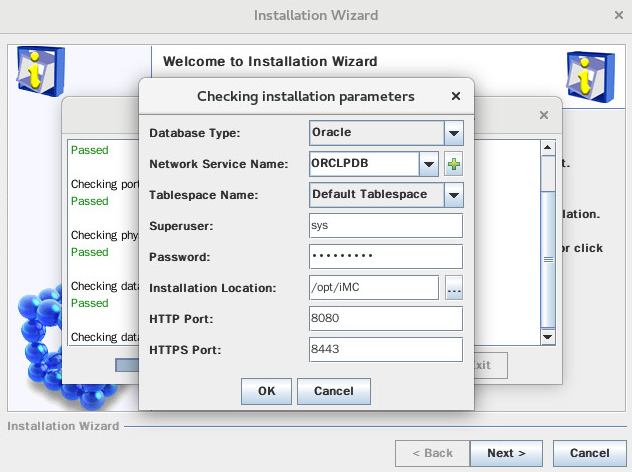
The log is generated because the network service name of the pluggable database is not correctly specified for checking installation parameters during IMC installation. The pluggable database communicates with IMC if Create as Container database is selected during Oracle database installation.
2. Configure the pluggable database correctly during database installation.
3. Select the network service name of the pluggable database during IMC installation, as shown in Figure1-58.
Figure1-60 Checking installation parameters
What should I do if insufficient swap space is detected in the prerequisites check?
Figure1-61 Insufficient swap space
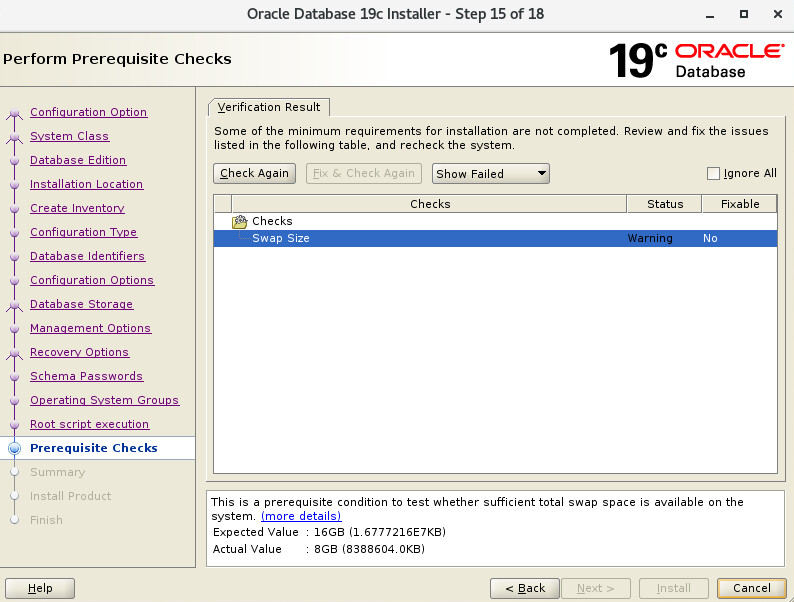
As shown in Figure1-59, the expected swap space of Oracle database 19c is 16 GB, but the actual swap space is 8 GB. An additional 8-GB swap space is required to complete the prerequisites check. This example illustrates how to manually add an 8-GB swap space.
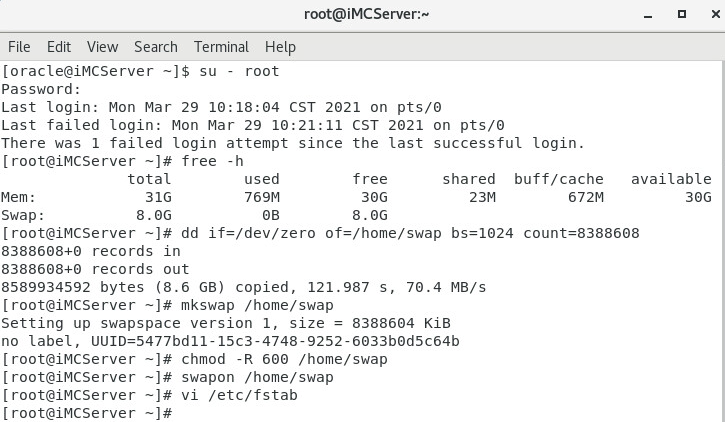
To resolve the problem:
1. Switch to root.
su – root
2. Check the partition information.
free –m
3. Add a swap file with a specific size. The count value specifies the block size of the file. In this example, a file of 8 GB is added.
dd if=/dev/zero of=/home/swap bs=1024 count=8388608
4. Set up the swap file.
mkswap /home/swap
5. Edit the swap file privileges.
chmod –R 600 /home/swap
6. Enable the swap file immediately, as shown in Figure1-60.
swapon /home/swap
Figure1-62 Adding a swap file and enabling the file immediately
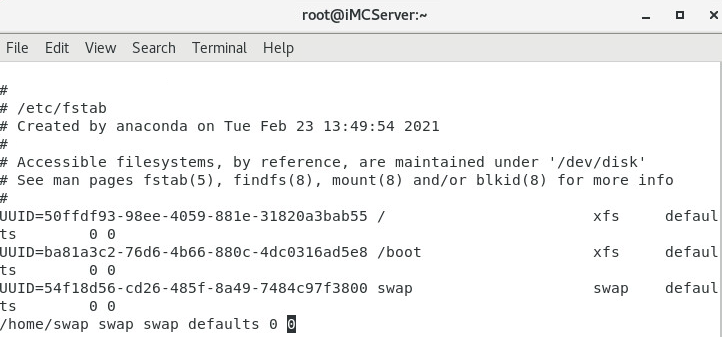
7. Add the following line to the /etc/fstab file to enable the swap file at the next boot, as shown in Figure1-61.
/home/swap swap swap defaults 0 0
Figure1-63 Enabling the swap file at the next boot
After you modify the swap space, run the prerequisites check again.
