- Table of Contents
- Related Documents
-
| Title | Size | Download |
|---|---|---|
| 01-Text | 6.15 MB |
Plan the IP address assignment scheme
Kylin V10SP02 operating system
Configure the management networks
Deploy the simulation service on the controller
Preconfigure the simulation network
Enable the design mode for the tenant
Configure tenant service simulation
Evaluate the simulation and view the simulation result
Deploy configuration and view deployment details
Synchronize date with the production environment
Introduction
In the DC scenario, the SeerEngine-DC services are complicated, and hard to operate. After complicated operations, you might fail to achieve the expected results. As a result, a large number of human and material resources are wasted. Therefore, it is necessary to perform a rehearsal before deploying actual services. During the rehearsal process, you can learn and avoid risks, so that you can reduce the risk possibilities for the production environment to the maximum extent. The simulation function is introduced for this purpose. The simulation function simulates a service and estimates resource consumption before you deploy the service. It helps users to determine whether the current service orchestration can achieve the expected effect and affect existing services, and estimate the device resources to be used.
The simulation function provides the following features:
· Simulation network—The simulation network model is built in a 1:1 ratio to the real network through vSwitches. The simulation system is built based on the simulation network model, which needs highly automated management.
· Tenant service simulation—This function mainly orchestrates and configures the logical network and application network. This function simulates a service and estimates resource consumption before you deploy the service. It helps users to determine whether the current service orchestration can achieve the expected effect and affect existing services. This function includes capacity simulation, connectivity simulation, and network-wide impact analysis. You can deploy the service configuration to real devices when the simulation evaluation result is as expected.
· Data synchronization with the production environment—Synchronizes specific configuration data in the production environment to the simulation environment.
· Simulation records—Displays the simulation records of users and provides the advanced search function.
This document describes how to deploy the DTN hosts and build a simulation network on the controller.
Environment setup workflow
Table 1 shows the workflow to set up a simulation environment.
Table 1 Environment deployment workflow
|
Step |
Tasks |
Remarks |
|
Deploy the Unified Platform |
See H3C Unified Platform Deployment Guide. |
N/A |
|
Deploy the SeerEngine-DC and DTN components |
See H3C SeerEngine-DC Installation Guide (Unified Platform). |
N/A |
|
N/A |
||
|
N/A |
||
|
When the DTN host is deployed on a VM, you must enable the nested virtualization feature. For more information, see “When I deploy a DTN host on a VM, how can I enable the nested virtualization feature for VMware and the DTN host?.” |
||
|
N/A |
||
|
N/A |
||
|
N/A |
||
|
N/A |
||
|
N/A |
||
|
N/A |
Plan the network
Plan network topology
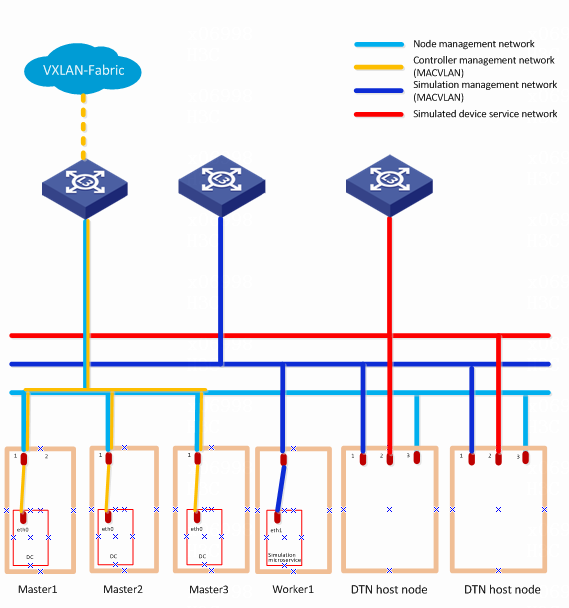
A simulation network includes four types of networks, including node management network, controller management network, simulation management network, and simulated device service network.
· Node management network—Network over which you can log in to servers to perform routine maintenance.
· Controller management network—Network for cluster communication between controllers and device management.
· Simulation management network—Network over which the digital twin network (DTN) microservice component and DTN hosts exchange management information.
· Simulated device service network—Network over which the DTN hosts exchange service data.
Before you deploy the simulation system, plan the simulation management network and simulated device service network.
Figure 1 Typical simulation network topology design for the Cloud DC scenario in non-remote disaster recovery mode
|
|
CAUTION: · If the controller management network and simulation management network use the same management switch, configure VLANs for isolation on the management switch to isolate the simulation network from the production network. If the controller management network uses the Layer 3 networking mode, you must also configure VPN instances for isolation on the management switch to prevent IP address conflicts from affecting the services. If the controller management network and simulation management network use different management switches, physically isolate these switches. For information about Layer 3 network configuration, see "Configure the management networks." · Configure routes to provide Layer 3 connectivity between simulation management IPs and simulated device management IPs. · On the port connecting the switch to the service interface of a DTN host, execute the port link-type trunk command to configure the link type of the port as trunk, and execute the port trunk permit vlan vlan-id-list command to assign the port to 150 contiguous VLAN IDs. Among these VLAN IDs, the start ID is the VLAN ID specified when installing the DTN host, and the end VLAN ID is the start VLAN ID+149. For example, if the start VLAN ID is 11, the permitted VLAN ID range is 11 to 160. When you plan the network, do not use any VLAN ID permitted by the port. |
Plan the IP address assignment scheme
As a best practice, use Table 2 to calculate the minimum number of IP addresses on subnets in each network for deployment of a SeerEngine-DC controller cluster and DTN Manager.
Table 2 Number of addresses in subnet IP address pools
|
Component/Node name |
Network name (type) |
Max number of cluster members |
Default number of cluster members |
Calculation method |
Remarks |
|
SeerEngine-DC |
Controller management network (MACVLAN) |
32 |
3 |
1 x cluster member count + 1 (cluster IP) |
N/A |
|
DTN component |
Simulation management network (MACVLAN) |
1 |
1 |
Single node deployment, which requires only one IP. |
Used by the simulation microservice deployed on the controller node |
|
DTN host |
Simulation management network |
Number of DTN hosts |
Number of DTN hosts |
Number of DTN hosts |
Used by the DTN microservice component to incorporate DTN hosts |
|
Simulated device service network |
Number of DTN hosts |
Number of DTN hosts |
Number of DTN hosts |
IPv4 addresses used for service communication between simulated devices. Configure these addresses in "Deploy DTN hosts." |
|
|
Node management network |
Number of DTN hosts |
Number of DTN hosts |
Number of DTN hosts |
Use for logging in to the host remotely for routine maintenance |
This document uses the IP address plan in Table 3 for example.
Table 3 IP address plan example
|
Component/node name |
Network name (type) |
IP address |
|
SeerEngine-DC |
Controller management network (MACVLAN) |
Subnet: 192.168.12.0/24 (gateway address: 192.168.12.1) |
|
Network address pool: 192.168.12.101/24 to 192.168.12.132/24 (gateway address: 192.168.12.1) |
||
|
DTN component |
Simulation management network (MACVLAN) |
Subnet: 192.168.15.0/24 (gateway address: 192.168.15.1) |
|
Network address pool: 192.168.15.133/24 to 192.168.15.133/24 (gateway address: 192.168.15.1) |
||
|
DTN host |
Simulation management network |
Network address pool: 192.168.12.134/24 to 192.168.12.144/24 (gateway address: 192.168.12.1) |
|
Simulated device service network |
Network address pool: 192.168.11.134/24 to 192.168.11.144/24 (gateway address: 192.168.11.1) |
|
|
Node management network |
Network address pool: 192.168.10.110/24 to 192.168.10.120/24 (gateway address: 192.168.10.1) |
|
|
IMPORTANT: The node management network, simulation management network, and simulated device service network of a DTN host must be on different network segments. |
Deploy DTN hosts
Server requirements
Hardware requirements
For the hardware requirements for the DTN hosts and DTN components, see H3C SeerEngine-DC Installation Guide (Unified Platform).
Software requirements
The DTN hosts must install an operating system that meets the requirements in Table 4.
Table 4 Operating systems and versions supported by the host
|
OS name |
Version number |
Kernel version |
|
H3Linux |
V1.3.1 |
5.10 |
|
NeoKylin |
V10SP02 |
4.19 |
Install the operating system
H3Linux operating system
|
|
CAUTION: Before you install H3Linux on a server, back up server data. H3Linux will replace the original OS (if any) on the server with data removed. |
The H3Linux_K510_version.iso (where version is the version number) image is the H3Linux operating system installation package. The following information uses a server without an OS installed for example to describe the installation procedure of the H3Linux_K510_version.iso image.
1. Obtain the required H3Linux_K510_version.iso image in ISO format.
2. Access the remote console of the server, and then mount the ISO image as a virtual optical drive.
3. Configure the server to boot from the virtual optical drive, and then restart the sever.
After the ISO image is loaded, the INSTALLATION SUMMARY page opens.
Figure 2 INSTALLATION SUMMARY page
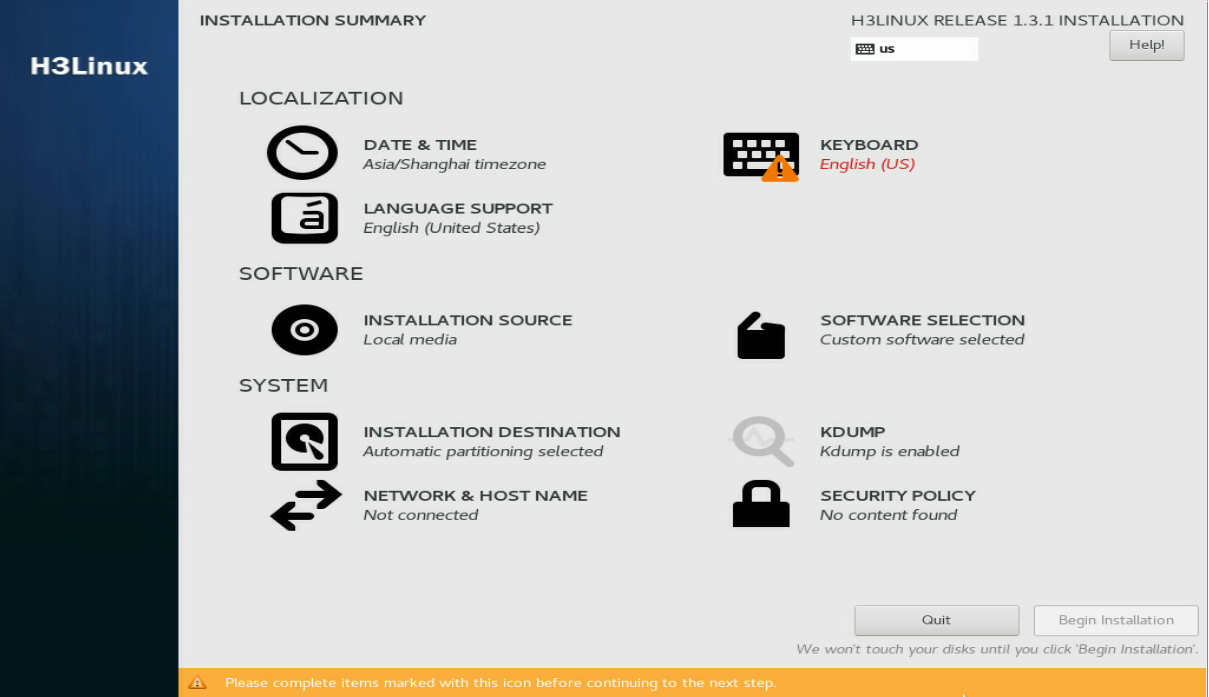
4. In the LOCALIZATION area, perform the following steps:
¡ Click DATE & TIME to modify the date and time settings.
¡ Click KEYBOARD to modify keyboard settings as needed.
¡ Click LANGUAGE SUPPORT to select your preferred language.
|
|
IMPORTANT: Make sure you select the same time zone across the hosts. In this document, [Asia/Shanghai] is selected for example. |
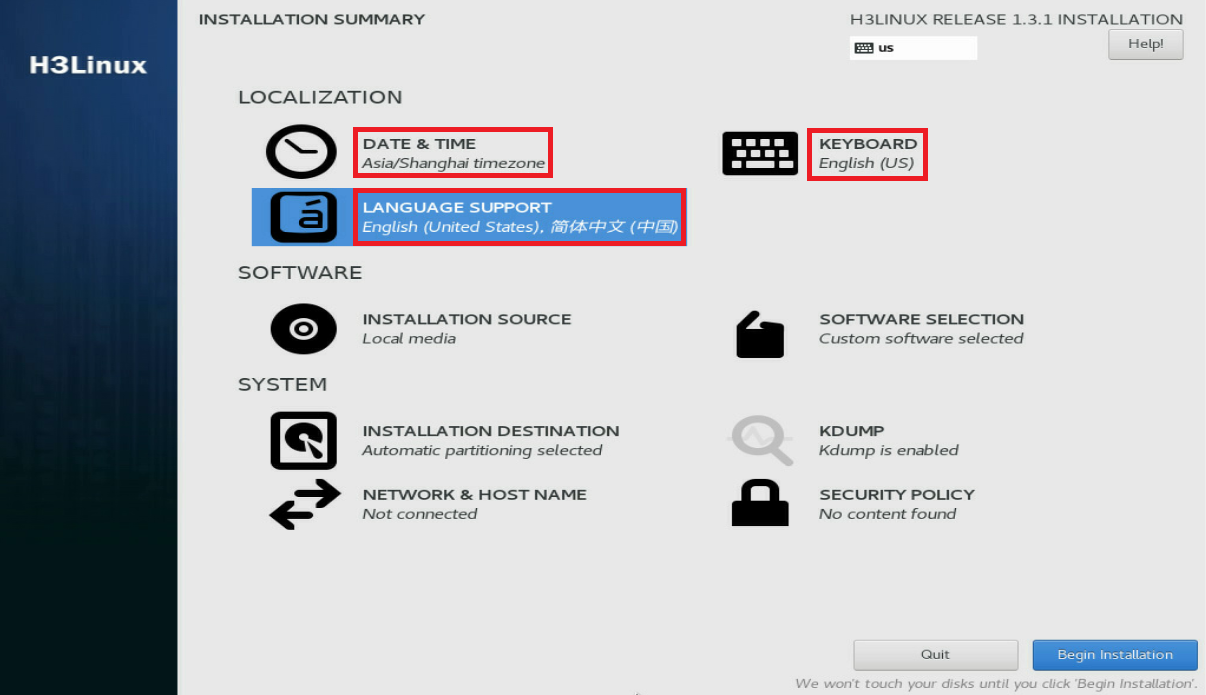
Figure 3 INSTALLATION SUMMARY page
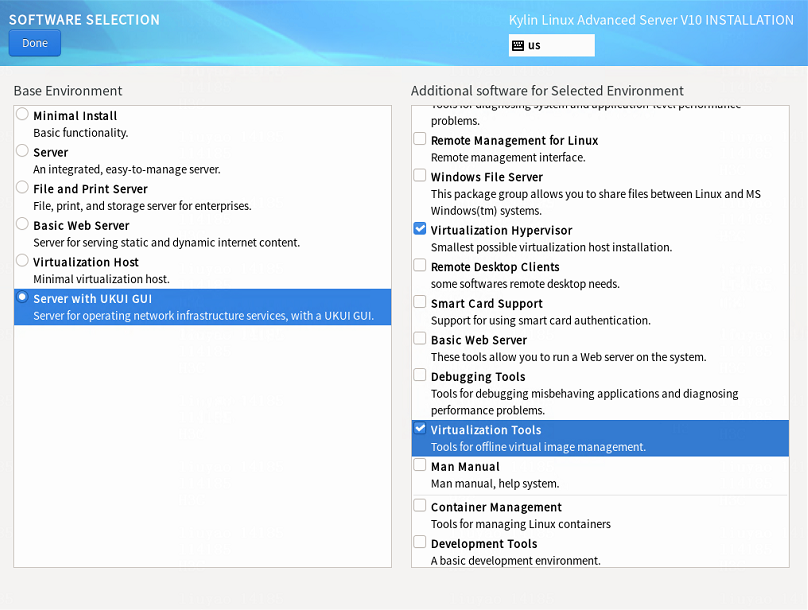
5. Click SOFTWARE SELECTION in the SOFTWARE area to enter the page for selecting software. Select the Server with GUI base environment and the File and Storage Server, Virtualization Client, Virtualization Hypervisor, and Virtualization Tools add-ons. Then, click Done to return to the INSTALLATION SUMMARY page.
Figure 4 SOFTWARE SELECTION page (1)
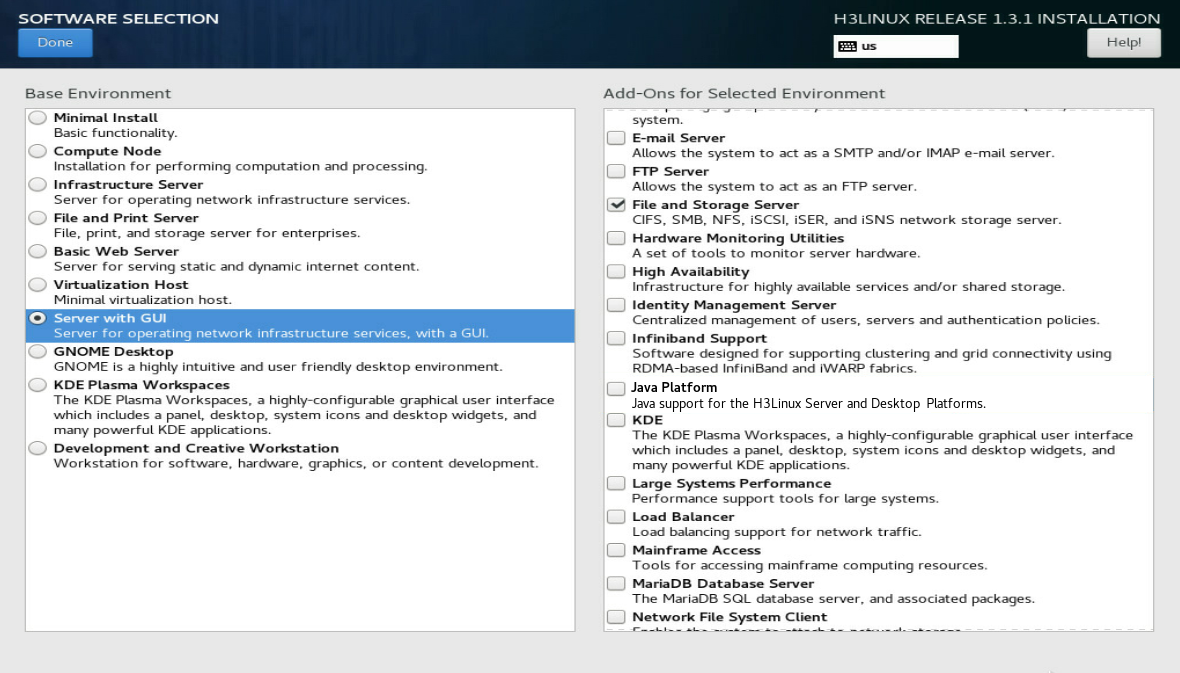
Figure 5 SOFTWARE SELECTION page (2)

6. In the SYSTEM area, click INSTALLATION DESTINATION.
Figure 6 INSTALLATION DESTINATION dialog box
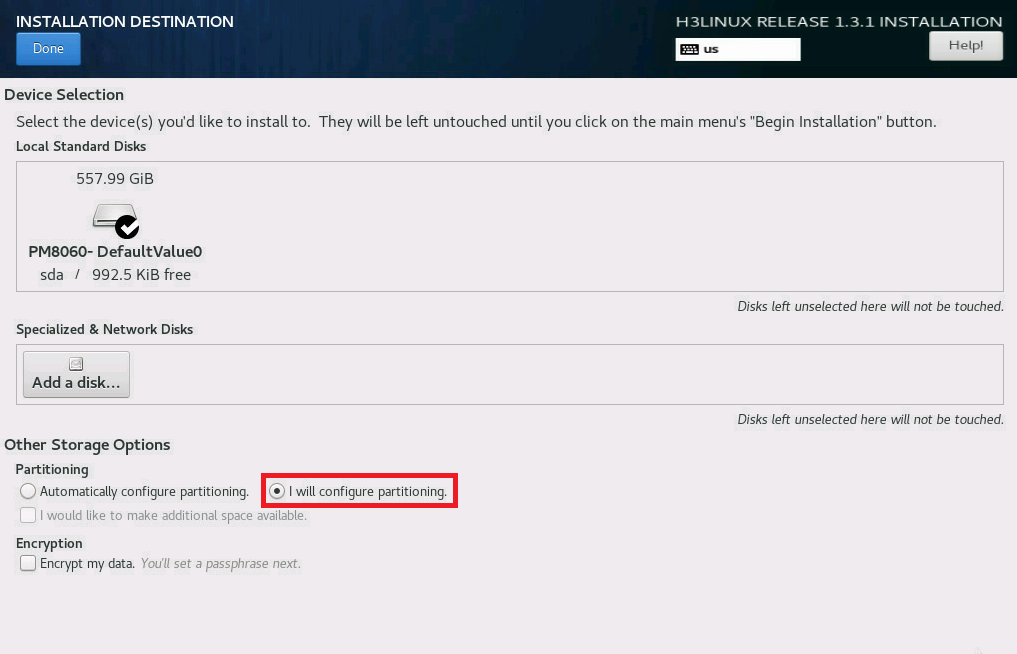
7. In the dialog box that opens, perform the following operations:
a. Select a local disk from the Local Standard Disks area.
b. In the Other Storage Options area, select I will configure partitioning.
c. Click Done.
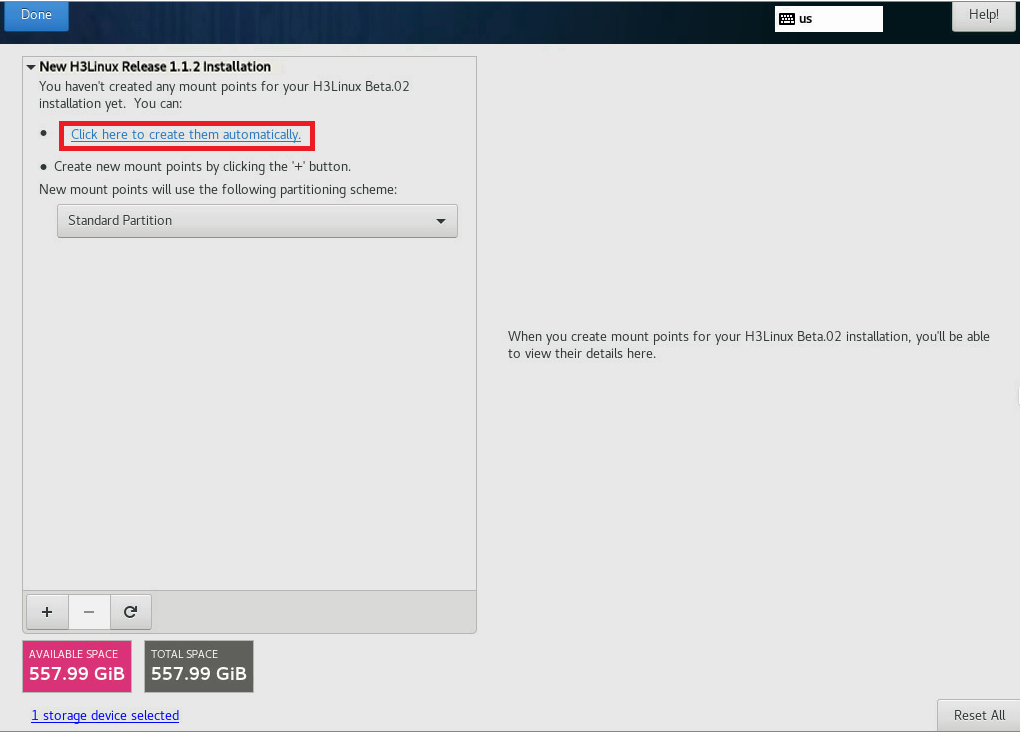
8. In the MANUAL PARTITIONING dialog box, click Click here to create them automatically to automatically generate recommended partitions.
Figure 7 MANUAL PARTITIONING dialog box
The list of automatically created partitions opens. Figure 8 shows the list of automatically created partitions when the disk size is 600 GiB.
|
|
IMPORTANT: The /boot/efi partition is available only if UEFI mode is enabled for OS installation. |
Figure 8 Automatically created partition list

9. Set the device type and file system of a partition. As a best practice, set the device type to Standard Partition to improve system stability. Table 5 shows the device type and file system of each partition used in this document.
|
Partition name |
Device type |
File system |
|
/boot |
Standard Partition |
xfs |
|
/boot/efi (UEFI mode) |
Standard Partition |
EFI System Partition |
|
/ |
Standard Partition |
xfs |
|
/swap |
Standard Partition |
swap |
10. Edit the device type and file system of a partition as shown in Table 6. Take the /boot partition for example. Select a partition on the left, and select Standard Partition from the Device Type list and xfs from the File System list. Then, click Update Settings.
Table 6 Configuring partitions

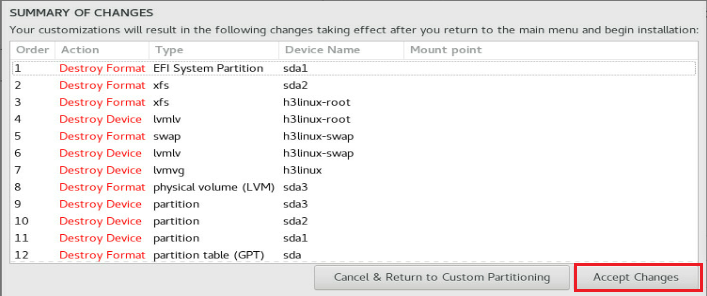
11. After you finish the partitioning task, click Done in the upper left corner. In the dialog box that opens, select Accept Changes.
Figure 9 Accepting changes
12. In the INSTALLATION SUMMARY window that opens, click NETWORK & HOSTNAME in the SYSTEM area to configure the host name and network settings.
13. In the Host name field, enter the host name (for example, host01) for this server, and then click Apply.
Figure 10 Setting the host name

14. Configure the network settings:
|
|
IMPORTANT: Configure network ports as planned. The server requires a minimum of three network ports. · The network port IP for the simulation management network is used for communication with the DTN component. · The network port IP for the simulated device service network is used for service communication between simulated devices. Specify this IP address in the installation script in “Deploy the DTN host”, and you do not need to specify this IP address in this section. · The network port IP for the node management network is used for routine maintenance of servers. |
a. Select a network port and then click Configure.
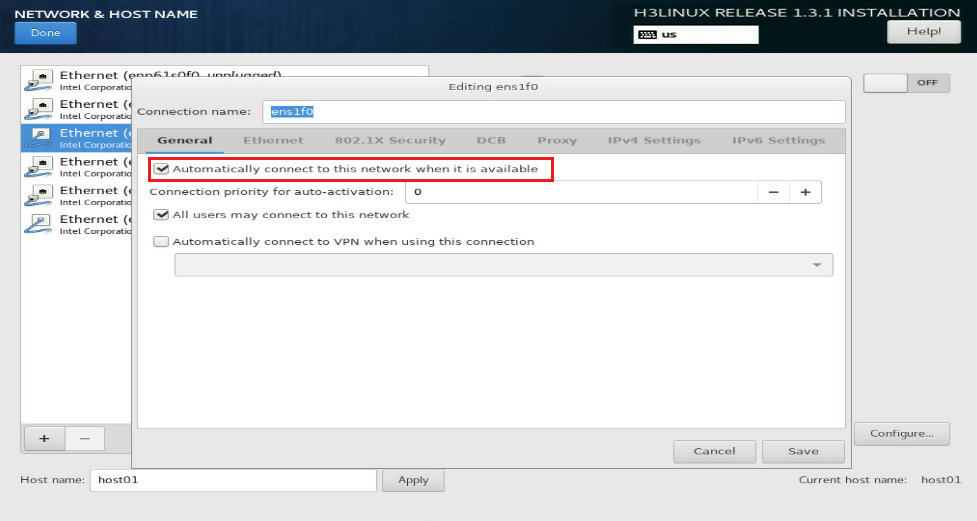
b. In the dialog box that opens, configure basic network port settings on the General tab:
- Select the Automatically connect to this network when it is available option .
- Verify that the All users may connect to this network option is selected. By default, this option is selected.
Figure 11 General settings for a network port
15. Configure IP address settings:
a. Click the IPv4 Settings or IPv6 Settings tab.
b. From the Method list, select Manual.
c. Click Add, assign a simulation management IP address to the DTN host, and then click Save.
d. Click Done in the upper left corner of the dialog box.
|
|
IMPORTANT: DTN service supports IPv4 and IPv6. In the current software version, only a single stack is supported. |
Figure 12 Configuring IPv4 address settings for a network port

16. Repeat Step 14 and Step 15 to configure the management IP addresses for other DTN hosts. The IP addresses must be in the network address pool containing IP addresses 192.168.10.110 to 192.168.10.120, for example, 192.168.10.110.
17. Click Begin Installation to install the OS.
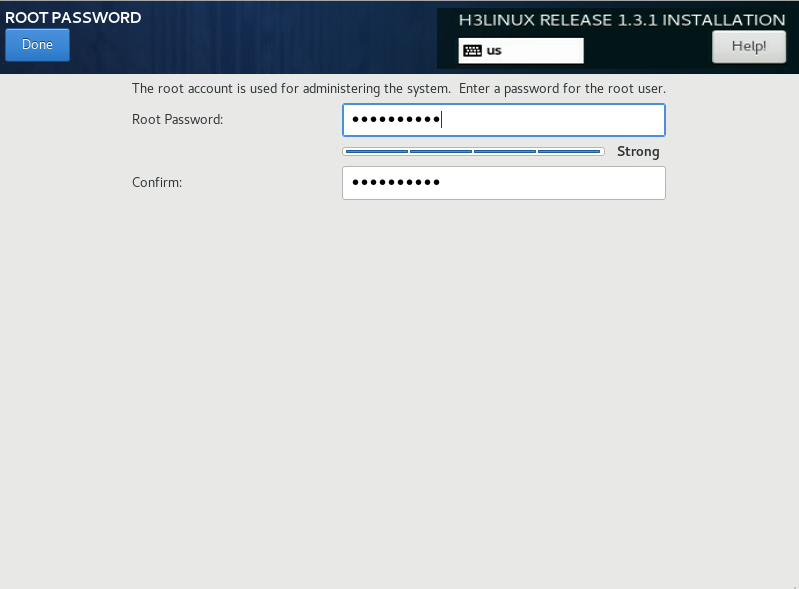
18. During the installation, configure the root password as prompted:
|
|
IMPORTANT: You must configure a root password before you can continue with the installation. |
a. In the USER SETTINGS area, click ROOT PASSWORD.
b. In the dialog box that opens, set the root password for the system, and then click Done in the upper left corner.
Figure 13 Configuration window for H3Linux OS installation
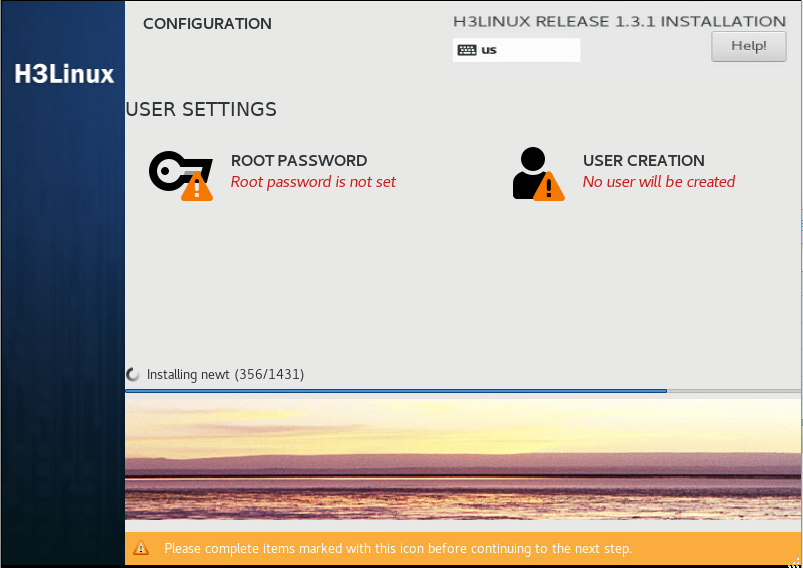
Figure 14 Setting the root password
Then, the system automatically reboots to finish OS installation.
Kylin V10SP02 operating system
Installing the Kylin V10SP02 operating system
|
|
IMPORTANT: Before you install the Kylin V10SP02 operating system on a server, back up server data. Kylin will replace the original OS (if any) on the server with data removed. |
The Kylin operating system installation package is named in the Kylin-Server-version.iso (where version is the version number) format. The following information uses a server without an OS installed as an example to describe the installation procedure for the Kylin V10SP02 operating system.
1. Obtain the required version of the Kylin-Server-version.iso image.
2. Access the remote console of the server, and then mount the ISO image on a virtual optical drive.
3. Configure the server to boot from the virtual optical drive, and then restart the sever.
4. After the ISO image is loaded, select a language used during the installation process.
English is selected in this example.
Figure 15 Selecting a language used during the installation process

5. The INSTALLATION SUMMARY page opens.
Figure 16 INSTALLATION SUMMARY page

6. In the LOCALIZATION area, perform the following tasks:
¡ Click KEYBOARD to select the keyboard layout.
¡ Click LANGUAGE SUPPORT to select your preferred language.
¡ Click TIME & DATE to set the system date and time. Make sure you configure the same time zone for all hosts. The Asia/Shanghai timezone is specified in this example.
Figure 17 INSTALLATION SUMMARY page

7. Click SOFTWARE SELECTION in the SOFTWARE area to enter the page for selecting software. Select the Server with UKUI GUI base environment and the File and Storage Server, Virtualization Hypervisor, and Virtualization Tools additional software for the selected environment. Then, click Done to return to the INSTALLATION SUMMARY page.
Figure 18 Selecting software (1)
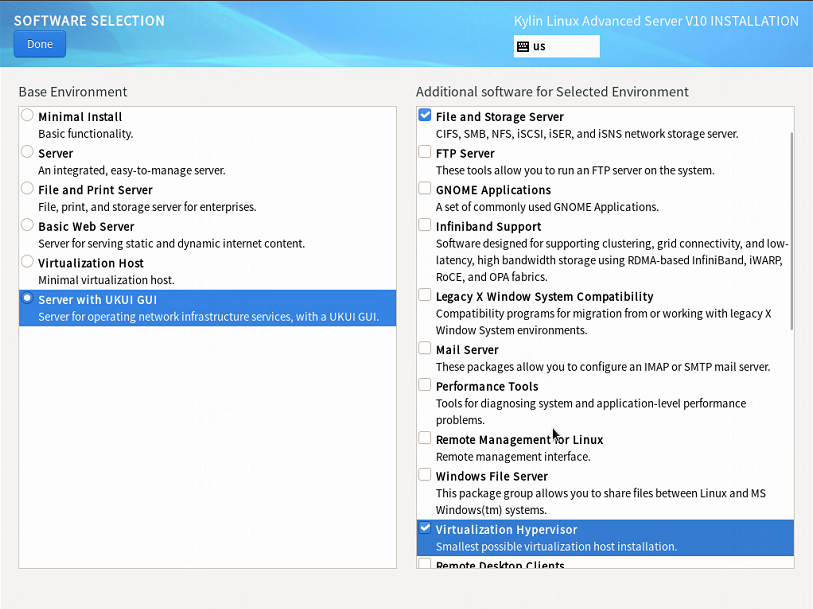
Figure 19 Selecting software (2)
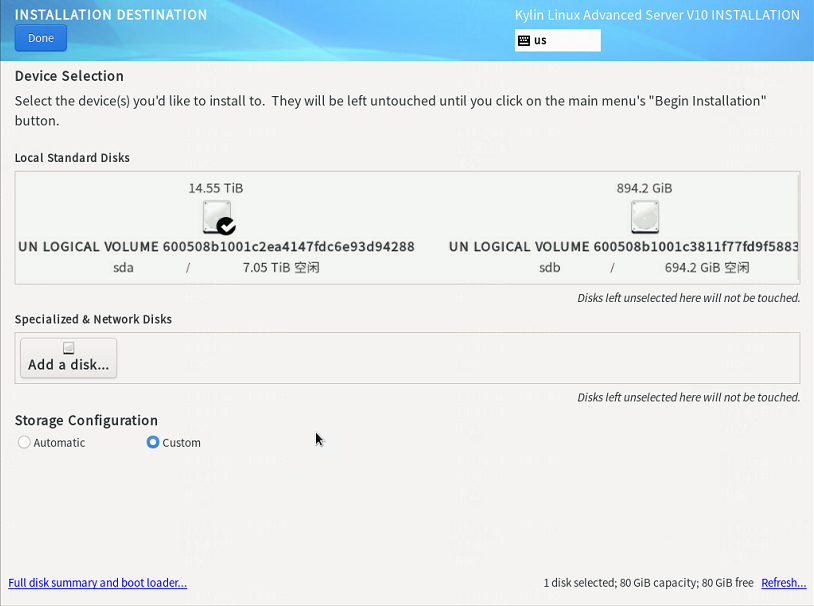
8. In the SYSTEM area, click INSTALLATION DESTINATION.
9. On the INSTALLATION DESTINATION page, perform the following tasks:
a. Select the target disk from the Local Standard Disks area.
b. Select Custom in the Storage Configuration area.
c. Click Done.
Figure 20 INSTALLATION DESTINATION page
10. On the MANUAL PARTITIONING page, select the Standard Partition partitioning scheme and then click Click here to create them automatically to automatically generate recommended partitions.
Figure 21 MANUAL PARTITIONING page
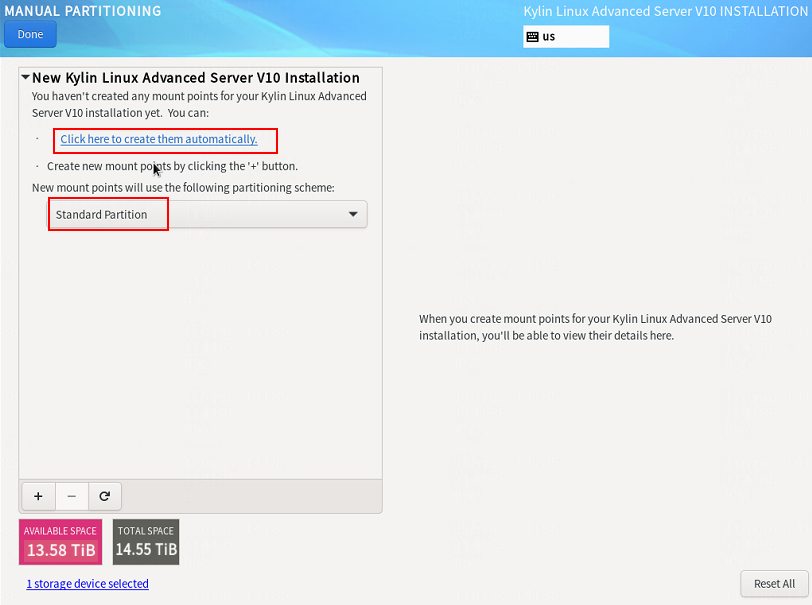
11. The list of automatically created partitions is displayed.
The /boot/efi partition is available only if UEFI mode is enabled for OS installation. If this partition does not exist, add it manually.
Figure 22 Automatically created partition list

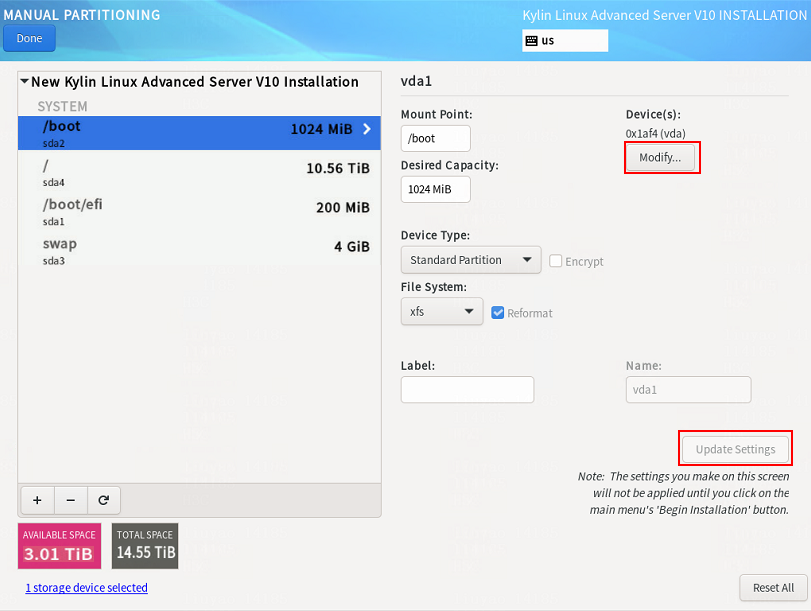
12. Set the device type and file system for each partition. As a best practice, set the device type to Standard Partition to improve system stability. Table 5 shows the device type and file system of each partition used in this document.
Table 7 Partition settings
|
Partition name |
Device type |
File system |
|
/boot |
Standard Partition |
xfs |
|
/boot/efi (UEFI mode) |
Standard Partition |
EFI System Partition |
|
/ |
Standard Partition |
xfs |
|
/swap |
Standard Partition |
swap |
13. Edit the device type and file system of a partition as shown in Table 6. Take the /boot partition for example. Select a partition on the left, and select Standard Partition from the Device Type list and xfs from the File System list. Then, click Update Settings.
Figure 23 Configuring partitions
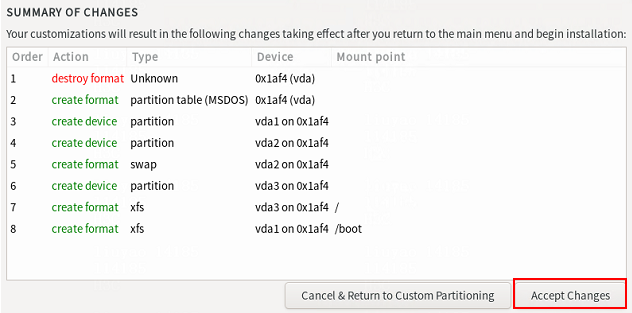
14. After you finish the partitioning task, click Done in the upper left corner. In the dialog box that opens, select Accept Changes.
Figure 24 Accepting changes
15. In the INSTALLATION SUMMARY window that opens, click NETWORK & HOSTNAME in the SYSTEM area to configure the host name and network settings.
16. In the Host name field, enter the host name (for example, host01) for this server, and then click Apply.
Figure 25 Setting the host name

17. Configure the network settings:
|
|
IMPORTANT: Configure network ports as planned. The server requires a minimum of three network ports. · The network port IP for the simulation management network is used for communication with the DTN component. · The network port IP for the simulated device service network is used for service communication between simulated devices. Specify this IP address in the installation script in “Deploy the DTN host”, and you do not need to specify this IP address in this section. · The network port IP for the node management network is used for routine maintenance of servers. |
a. Select a network port and then click Configure.
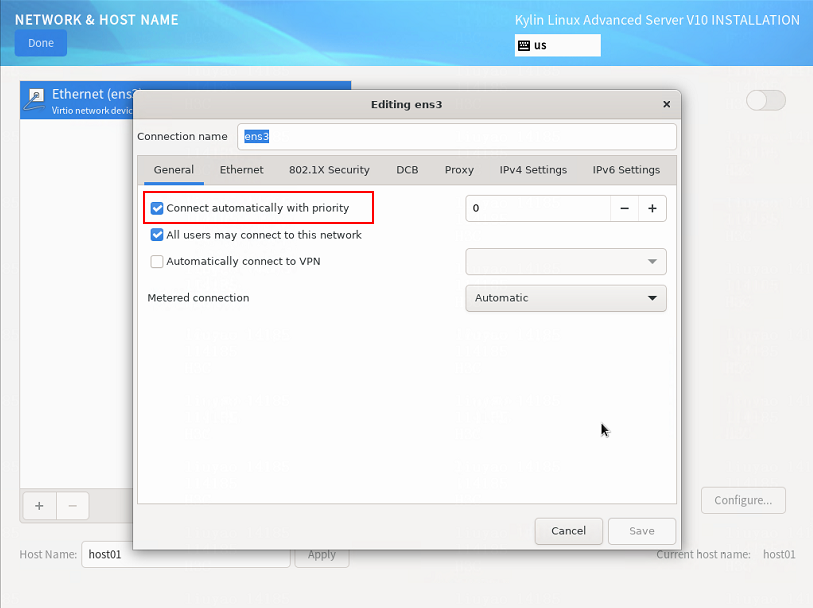
b. In the dialog box that opens, configure basic network port settings on the General tab:
- Select the Connect automatically with priority option.
- Verify that the All users may connect to this network option is selected. By default, this option is selected.
Figure 26 General settings for a network port
18. Configure IP address settings:
a. Click the IPv4 Settings or IPv6 Settings tab.
b. From the Method list, select Manual.
c. Click Add, assign a simulation management IP address to the DTN host, and then click Save.
d. Click Done in the upper left corner of the dialog box.
|
|
IMPORTANT: DTN service supports IPv4 and IPv6. In the current software version, only a single stack is supported. |
Figure 27 Configuring IPv4 address settings for a network port

Figure 28 Enabling Ethernet connection

19. Repeat step 17 and step 18 to configure the management IP addresses for other DTN hosts. The IP addresses must be in the network address pool containing IP addresses 192.168.10.110 to 192.168.10.120, for example, 192.168.10.110.
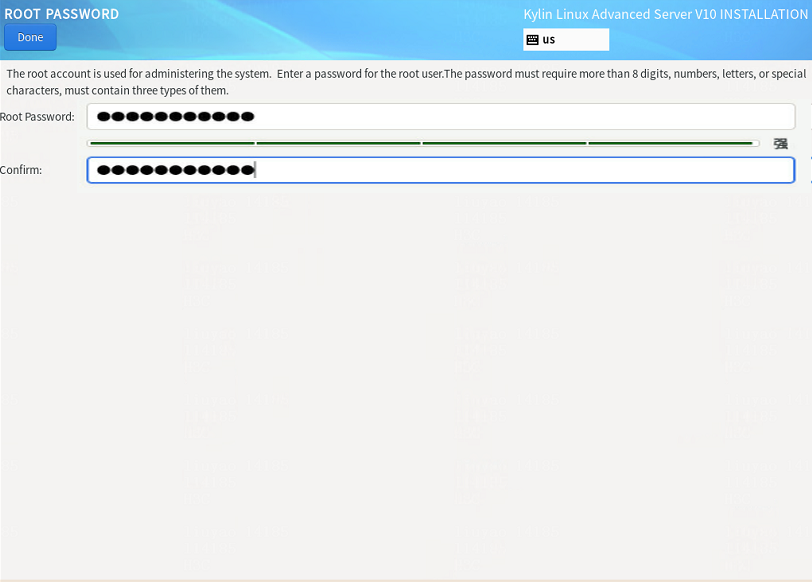
20. On the INSTALLATION SUMMARY page, click Root Password in the USER SETTINGS area. In the dialog box that opens, set the root password for the system, and then click Done in the upper left corner.
Figure 29 Setting the root password
21. Click Begin Installation to install the OS. After the installation is complete, click Reboot System in the lower right corner.
Figure 30 Installation in progress

Disabling the auditd service
The auditd service might be memory intensive. If you are not to use the auditd service on the Kylin V10SP02 operating system, disable the auditd service.
To disable the auditd service:
1. Stop the auditd service.
[root@uc log]# systemctl stop auditd
2. Disable the auditd service.
[root@uc log]# systemctl disable auditd
3. Confirm the state of the auditd service.
[root@uc log]# systemctl status auditd
Figure 31 Disabling the auditd service

Installing the dependency package
For the simulation network to run correctly on the Kylin hosts, upgrade the libndp dependency package that comes with the system.
To upgrade the libndp dependency package for the Kylin system:
1. Obtain the most recent version of the libndp dependency package.
The address for the x86 package is https://vault.centos.org/centos/8/BaseOS/x86_64/os/Packages/libndp-1.7-6.el8.x86_64.rpm. The address for the ARM package is https://vault.centos.org/centos/8/BaseOS/aarch64/os/Packages/libndp-1.7-6.el8.aarch64.rpm. This section takes the x86 package as an example.
2. Install the dependency package.
[root@localhost ~]# rpm -ivh --force libndp-1.7-6.el8.x86_64.rpm
Verifying... ################################# [100%]
Preparing for installation... ################################# [100%]
Upgrading/Installing...
1:libndp-1.7-6.el8 ################################# [100%]
3. View the libndp dependency packages in the system.
In this example, libndp-1.7-3.ky10.x86_64 is the dependency package that came with the system and libndp-1.7-6.el8.x86_64 is the newly installed package.
[root@localhost ~]# rpm -qa | grep ndp
libndp-1.7-3.ky10.x86_64
libndp-1.7-6.el8.x86_64
4. Uninstall the libndp dependency package that came with the system.
[root@localhost ~]# rpm -e libndp-1.7-3.ky10.x86_64
5. (Optional.) Execute the ndptool –help command to view whether the following fields are displayed in the command output.
[root@localhost ~]# ndptool --help
ndptool [options] command
-h --help Show this help
-v --verbose Increase output verbosity
-t --msg-type=TYPE Specify message type
("rs", "ra", "ns", "na")
-D --dest=DEST Dest address in IPv6 header for NS or NA
-T --target=TARGET Target address in ICMPv6 header for NS or NA
-i --ifname=IFNAME Specify interface name
-U --unsolicited Send Unsolicited NA
Available commands:
monitor
send
Deploy the DTN hosts
|
|
CAUTION: · Execution of the DTN host installation script will cause the network service to restart and the SSH connection to disconnect. To avoid this situation, configure the DTN host from the remote console of the server. · You must configure each DTN host as follows. |
1. Obtain the DTN host installation package, upload it to the server, and then decompress it. The installation package is named in the SeerEngine_DC_DTN_HOST-version.zip format.
[root@host01 root]# unzip SeerEngine_DC_DTN_HOST-E6205.zip
2. Execute the chmod command to assign permissions to the user.
[root@host01 root]# chmod +x -R SeerEngine_DC_DTN_HOST-E6205
3. Access the SeerEngine_DC_DTN_HOST-version/ directory of the decompressed installation package, and execute the ./install.sh management_nic service_nic vlan_start service_cidr command to install the package.
Parameters:
management_nic: Simulation management network interface name.
service_nic: Simulation service network interface name.
vlan_start: Start VLAN ID.
service_cidr: CIDR for service communication among simulated devices.
[root@host01 SeerEngine_DC_DTN_HOST-E6205]# ./install.sh ens1f0 ens1f1 11 192.168.11.134/24
Installing ...
check network service ok.
check libvirtd service ok.
check management bridge ok.
check sendip ok.
check vlan interface ok.
Complete!
|
|
IMPORTANT: VLANs are used for service isolation and is in the range of vlan_start to vlan_start+149 |
|
CAUTION: When the DTN host is deployed on a VM, you must enable the nested virtualization feature. For more information, see “When I deploy a DTN host on a VM, how can I enable the nested virtualization feature for VMware and the DTN host?.” |
Configure the management networks
Network configuration
In this example, the controller management network, node management network, simulation management network, and simulated device service network share one switch to deploy the Layer 3 management networks for simulation.
Figure 32 Management network diagram

Table 8 IP planning for the simulation management network
|
Component/node name |
IP address plan |
Interfaces |
|
DTN component |
IP address: 192.168.15.133/24 (gateway address: 192.168.15.1) |
Ten-GigabitEthernet 1/0/25, VLAN 40 |
|
DTN host 1 |
IP address: 192.168.12.134/24 (gateway address: 192.168.12.1, NIC: ens1f0) |
Ten-GigabitEthernet 1/0/26, VLAN 40 |
|
DTN host 2 |
IP address: 192.168.12.135/24 (gateway address: 192.168.12.1, NIC: ens1f0) |
Ten-GigabitEthernet 1/0/27, VLAN 40 |
|
Simulated device 1 |
IP address: 192.168.11.136/24 (gateway address: 192.168.11.1) |
N/A |
|
Simulated device 2 |
IP address: 192.168.11.137/24 (gateway address: 192.168.11.1) |
N/A |
|
Simulated device 3 |
IP address: 192.168.21.134/24 (gateway address: 192.168.21.1) |
N/A |
|
Simulated device 4 |
IP address: 192.168.21.135/24 (gateway address: 192.168.21.1) |
N/A |
Table 9 IP planning for the simulated device service network
|
Component/node name |
IP address plan |
Interfaces |
|
DTN host 1 |
IP address: 192.168.11.134/24 (gateway address: 192.168.11.1) |
Ten-GigabitEthernet 1/0/28, VLAN 30 |
|
DTN host 2 |
IP address: 192.168.11.135/24 (gateway address: 192.168.11.1) |
Ten-GigabitEthernet 1/0/29, VLAN 30 |
Table 10 IP planning for the node management network
|
Component/node name |
IP address plan |
Interfaces |
|
DTN component |
IP address: 192.168.10.111/24 (gateway address: 192.168.10.1) |
Ten-GigabitEthernet 1/0/22, VLAN 10 |
|
DTN host 1 |
IP address: 192.168.10.112/24 (gateway address: 192.168.10.1) |
Ten-GigabitEthernet 1/0/23, VLAN 10 |
|
DTN host 2 |
IP address: 192.168.10.113/24 (gateway address: 192.168.10.1) |
Ten-GigabitEthernet 1/0/24, VLAN 10 |
Configuration example
In the simulation environment, the interfaces that connect the management switch to the same type of network of the DTN component and different DTN hosts must belong to the same VLAN. More specifically, the interfaces that connect to the simulation management network belong to VLAN 40, the interfaces that connect to the simulated device service network belong to VLAN 30, and the interfaces that connect to the node management network belong to VLAN 10.
Perform the following tasks on the management switch:
1. Create VLANs 40, 30, and 10 for the simulation management network, simulated device service network, and node management network, respectively.
[device] vlan 40
[device-vlan40] quit
[device] vlan 30
[device-vlan30] quit
[device] vlan 10
[device-vlan10] quit
2. Assign to VLAN 40 the interface connecting the management switch to the simulation management network of the DTN component, Ten-GigabitEthernet 1/0/25 in this example. Assign to VLAN 10 the interface connecting the management switch to the node management network of the DTN component, Ten-GigabitEthernet 1/0/22 in this example.
[device] interface Ten-GigabitEthernet1/0/25
[device-Ten-GigabitEthernet1/0/25] port link-mode bridge
[device-Ten-GigabitEthernet1/0/25] port access vlan 40
[device-Ten-GigabitEthernet1/0/25] quit
[device] interface Ten-GigabitEthernet1/0/22
[device-Ten-GigabitEthernet1/0/22] port link-mode bridge
[device-Ten-GigabitEthernet1/0/22] port access vlan 10
[device-Ten-GigabitEthernet1/0/22] quit
3. Assign to VLAN 40 the interface connecting the management switch to the simulation management network of DTN host 1, Ten-GigabitEthernet 1/0/26 in this example. Assign to VLAN 30 the interface connecting the management switch to the simulated device service network of DTN host 1, Ten-GigabitEthernet 1/0/28 in this example. Assign to VLAN 10 the interface connecting the management switch to the node management network of DTN host 1, Ten-GigabitEthernet 1/0/23 in this example.
[device] interface Ten-GigabitEthernet1/0/26
[device-Ten-GigabitEthernet1/0/26] port link-mode bridge
[device-Ten-GigabitEthernet1/0/26] port access vlan 40
[device-Ten-GigabitEthernet1/0/26] quit
[device] interface Ten-GigabitEthernet1/0/28
[device-Ten-GigabitEthernet1/0/26] port link-mode bridge
[device-Ten-GigabitEthernet1/0/26] port access vlan 30
[device-Ten-GigabitEthernet1/0/26] quit
[device] interface Ten-GigabitEthernet1/0/23
[device-Ten-GigabitEthernet1/0/23] port link-mode bridge
[device-Ten-GigabitEthernet1/0/23] port access vlan 10
[device-Ten-GigabitEthernet1/0/23] quit
4. Assign to VLAN 40 the interface connecting the management switch to the simulation management network of DTN host 2, Ten-GigabitEthernet 1/0/27 in this example. Assign to VLAN 30 the interface connecting the management switch to the simulated device service network of DTN host 2, Ten-GigabitEthernet 1/0/29 in this example. Assign to VLAN 10 the interface connecting the management switch to the node management network of DTN host 2, Ten-GigabitEthernet 1/0/24 in this example.
[device] interface Ten-GigabitEthernet1/0/27
[device-Ten-GigabitEthernet1/0/27] port link-mode bridge
[device-Ten-GigabitEthernet1/0/27] port access vlan 40
[device-Ten-GigabitEthernet1/0/27] quit
[device] interface Ten-GigabitEthernet1/0/29
[device-Ten-GigabitEthernet1/0/27] port link-mode bridge
[device-Ten-GigabitEthernet1/0/27] port access vlan 30
[device-Ten-GigabitEthernet1/0/27] quit
[device] interface Ten-GigabitEthernet1/0/24
[device-Ten-GigabitEthernet1/0/24] port link-mode bridge
[device-Ten-GigabitEthernet1/0/24] port access vlan 10
[device-Ten-GigabitEthernet1/0/24] quit
5. Create a VPN instance.
[device] ip vpn-instance simulation
[device-vpn-instance-simulation] quit
6. Create a VLAN interface, and bind it to the VPN instance. Assign all gateway IP addresses to the VLAN interface.
[device] interface Vlan-interface40
[device-Vlan-interface40] ip binding vpn-instance simulation
[device-Vlan-interface40] ip address 192.168.12.1 255.255.255.0
[device-Vlan-interface40] ip address 192.168.11.1 255.255.255.0 sub
[device-Vlan-interface40] ip address 192.168.15.1 255.255.255.0 sub
[device-Vlan-interface40] ip address 192.168.21.1 255.255.255.0 sub
[device-Vlan-interface40] quit
When the DTN host management network and DTN component management network are deployed across a Layer 3 network, you must perform the following tasks on DTN host 1 and DTN host 2.
1. Add the static route to the DTN component management network.
[root@host01 ~]# route add -host 192.168.15.133 dev mge_bridge
2. Make the static route to the DTN component management network persistent.
[root@host01 ~]#cd etc/sysconfig/network-scripts/
[root@host01 network-scripts]# vi route-ens1f0
3. Enter 192.168.15.133/32 via 192.168.12.1 dev mge_bridge in the file, save the file, and exit.
[root@host01 network-scripts]# cat route-ens1f0
192.168.15.133/32 via 192.168.12.1 dev mge_bridge
Deploy the simulation service on the controller
|
|
CAUTION: · Make sure SeerEngine-DC and DTN have been deployed. For the deployment procedure, see H3C SeerEngine-DC Installation Guide (Unified Platform). · In the current software version, the system administrator and tenant administrator can perform tenant service simulation. |
Preconfigure the simulation network
Preconfiguring a simulation network includes adding DTN hosts, uploading simulation images, and configuring parameters.
· Adding DTN hosts—A host refers to a physical server installed with a Linux system and configured with related settings. The simulated devices in the simulation network model are created on the host. If multiple hosts are available, the controller selects a host with optimal resources for creating simulated devices.
· Uploading simulation images—Simulation images are used to build simulation devices corresponding to the physical devices in the production environment.
· Configuring parameters—You can view or edit the values for parameters such as device information (flavor), UDP port, and ED interconnect port address on the parameter setting page.
Add DTN hosts
1. Log in to the controller. Navigate to the Automation > Data Center Networks > Simulation > Build Simulation Network page. Click Preconfigure. The DTN host management page opens.
2. Click Add. In the dialog box that opens, configure the host name, IP address, username, and password.
Figure 33 Adding DTN hosts
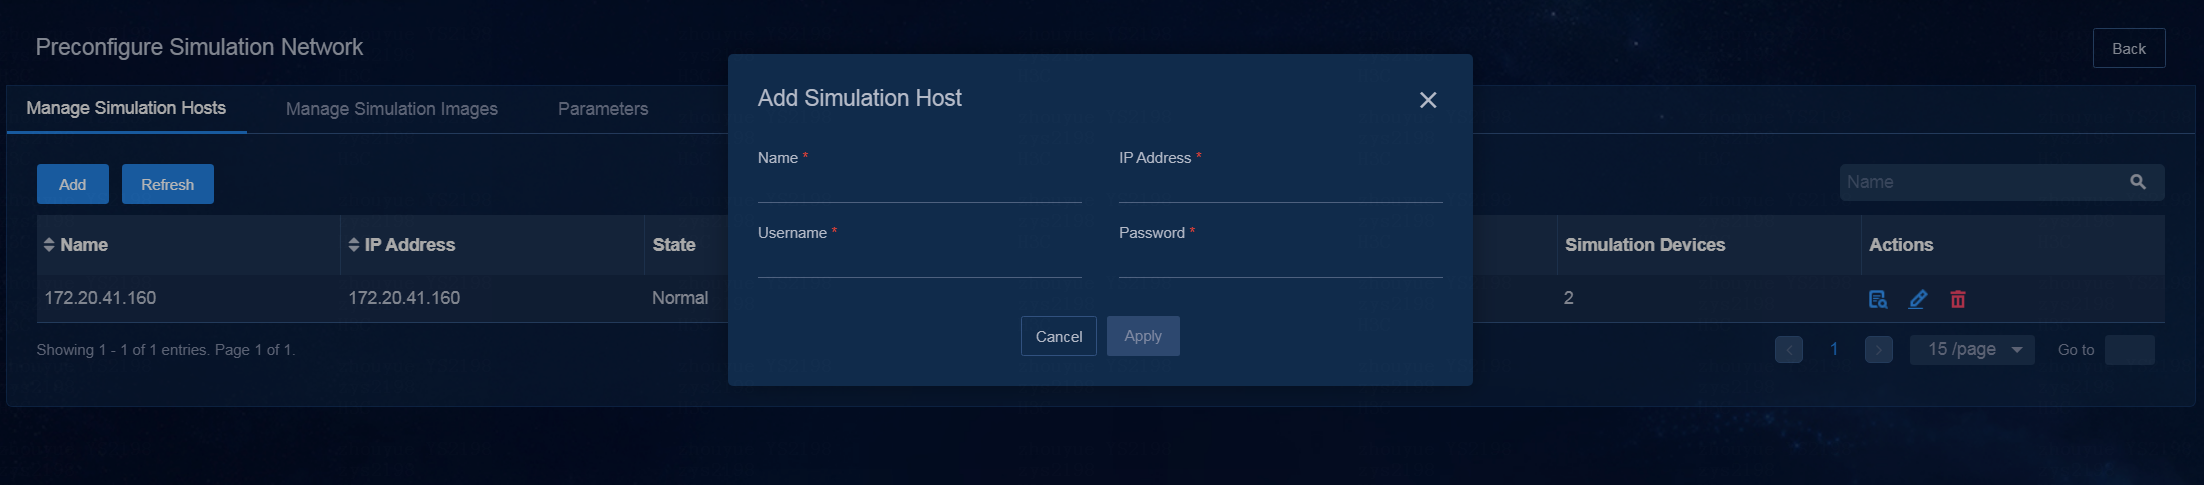
3. Click Apply.
|
|
NOTE: · A host can be incorporated by only one cluster. · The controller allows you to incorporate DTN hosts as a root user or non-root user. To incorporate DTN hosts as a non-root user, first add the non-root user permission by executing the ./addPermission.sh username command in the SeerEngine_DC_DTN_HOST-version/tool/ directory of the decompressed DTN host package. · If the settings of a DTN host are modified, you must re-incorporate the DTN host. |
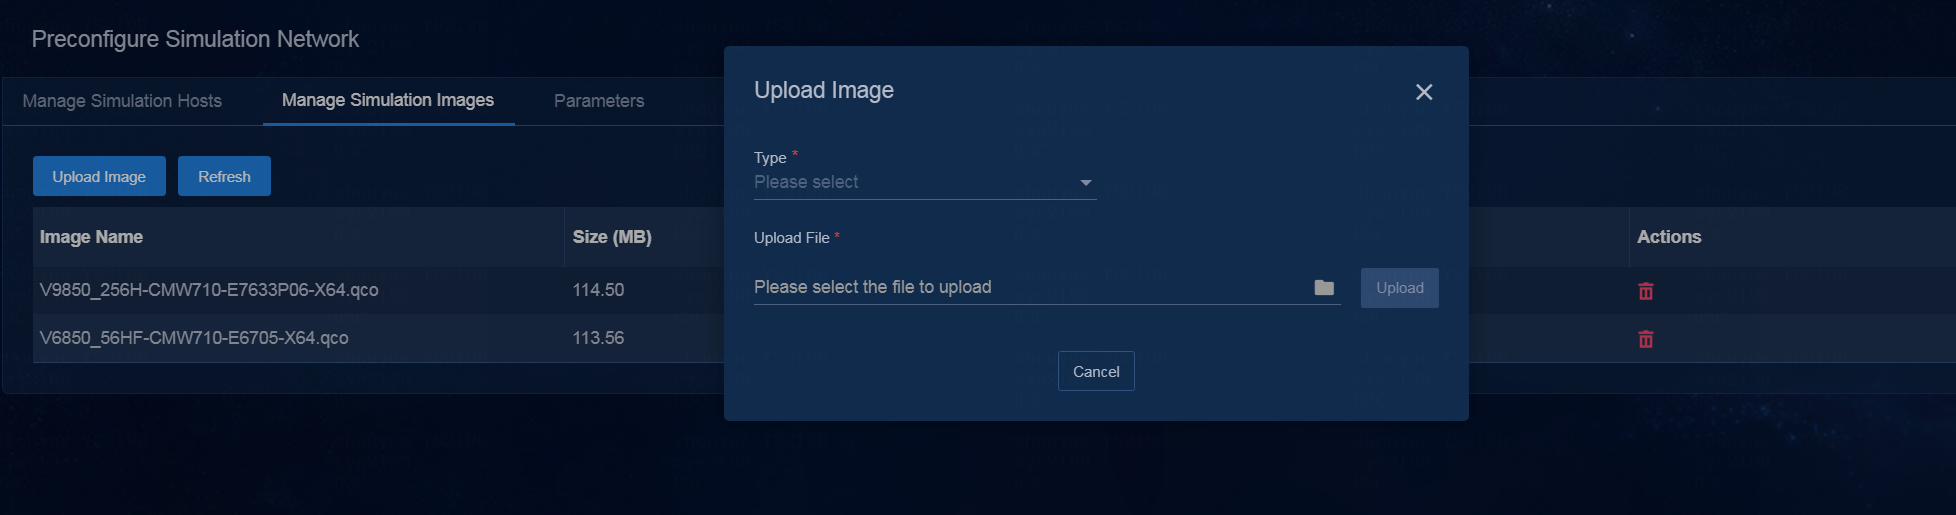
Upload simulation images
1. Log in to the controller. Navigate to the Automation > Data Center Networks > Simulation > Build Simulation Network page. After clicking Preconfigure, click the Manage Simulation Images tab. The page for uploading simulation images opens.
2. Click Upload Image. In the dialog box that opens, select the type of the image to be uploaded and image of the corresponding type, and then click Upload.
Figure 34 Uploading simulation images
Configure parameters
Deploy the license server on a DTN host
Because the simulation network is isolated from the controller network, simulated devices cannot connect to the license server configured for the SeerEngine-DC controller. Therefore, you must separately deploy a license server for the simulated devices. The license server provides licensing services for simulated devices.
Obtain the license server installation package and upload it to the server where the DTN host resides. If there are multiple DTN hosts, upload the package to any server. For more information, see H3C License Server Installation Guide.
|
|
NOTE: In the address bar of the browser, enter the Web login address for the license server in the format of https://lics_ipv4_address:port/licsmgr or https://[lics_ipv6_address]:port/licsmgr. In the Web login address, the lics_ip4_address/lics_ipv6_address parameter specifies the management IP address of the DTN host node where the license server is deployed, and the port parameter specifies the HTTPS port for the Web login when the license server is deployed. |
Configure parameters
1. Navigate to the Automation > Data Center Networks > Simulation > Build Simulation Network page. Click Preconfigure. On the page that opens, click the Parameters tab.
2. On this page, you can view and edit the values for the device information (flavor), UDP port, and ED interconnect interface address parameters, and configure license server parameters.
|
|
NOTE: As a best practice, select the flavor named 1_cpu_4096MB_memory_2048MB_storage. The flavor named 1_cpu_2048MB_memory_2048MB_storage is applicable in the scenario where the number of each type of logical resources (vRouters, vNetworks, or vSubnets) is not greater than 1000. |
Figure 35 Page for configuring parameters

3. Click Apply.
Retain ports in the configuration file
1. Access the operating system of the DTN host.
2. Execute the vim /etc/sysctl.conf command to access the sysctl.conf configuration file. Add the following contents to the configuration file.
NOTE: Use the port range in the following configuration as an example. In an actual configuration file, the retained port range must be the same as the default UDP port range on the simulation network preconfiguration page.
[root@node1 ~]# vim /etc/sysctl.conf
…
net.ipv4.ip_local_reserved_ports=10000-15000
3. If you change the UDP port range on the simulation network preconfigure page, change also the retained port range in the sysctl.conf configuration file and save the change.
4. Execute the /sbin/sysctl –p command for the change to take effect.
5. Execute the cat /proc/sys/net/ipv4/ip_local_reserved_ports command to view the retained ports. If the returned result is consistent with your change, the change is successful.
Build a simulation network
(Optional.) Back up and restore the DC environment, and obtain the link information and device configuration files
To use the offline data to build a simulation network, first back up and restore the environment, and obtain the link information and device configuration files before building a simulation network. More specifically:
Back up the SeerEngine-DC environment
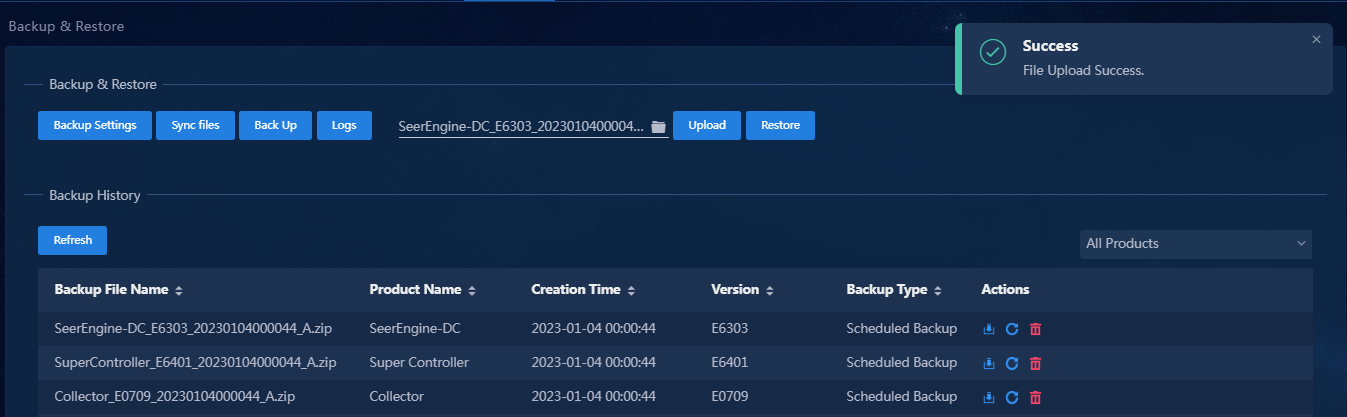
1. Log in to the controller that is operating normally. Navigate to the System > Backup & Restore page.
2. Click Start Backup. In the dialog box that opens, select SeerEngine-DC. Click Backup to start backup.
Figure 36 Back up SeerEngine-DC

3. After the backup is completed, click Download in the Actions column for the backup file to download it.
Obtain the link information file
1. In the address bar of the browser, enter http://ip_address:port/sdn/ctl/rest/topologydata/all_link_info.
Link information of all fabrics in the environment will be displayed.
¡ ip_address: IP address of the controller.
¡ port: Port number.
Figure 37 Link info

2. Copy the obtained link information to a .txt file, and save the file.
The file name is not limited. The file is the link information file.
Obtain the device configuration file
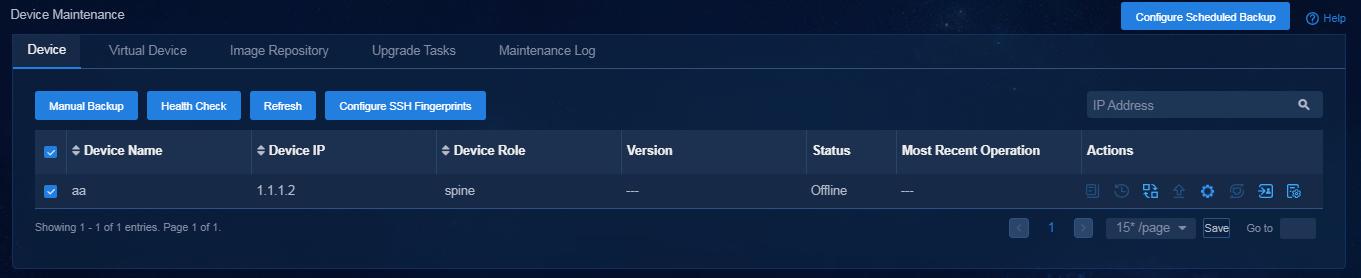
1. Log in to the controller that is operating normally. Navigate to the Automation > Configuration Deployment > Device Maintenance > Physical Devices page.
2. Select all devices, and click Manual Backup.
Figure 38 Manually backing up all device information
3. Click the ![]() icon in the Actions column for a device. The configuration file
management page opens. Click Download to download
the configuration file of the specified device to your local host.
icon in the Actions column for a device. The configuration file
management page opens. Click Download to download
the configuration file of the specified device to your local host.
4. Compress all download configuration files into one .zip package.
The .zip package name is not limited. The .zip package is the device configuration file.
Restore the SeerEngine-DC environment
1. Log in to the environment where you want to build a simulation network based on offline data.
2. Navigate to the System > Backup & Restore page. Use the backup file to restore the environment.
Figure 39 Restore the environment
Build a simulation network
Enter the simulation page. Build a simulation network based on offline data. For more information, see “Build a simulation network.”
Build a simulation network
|
|
CAUTION: · If the local licensing method is used, you must reinstall licenses for all simulated devices after rebuilding the simulation network. · If the webpage for building simulation networks cannot display information correctly after a DTN component upgrade, clear the cache in your Web browser and log in again. |
1. Log in to the controller. Navigate to the Automation > Data Center Networks > Simulation > Build Simulation Network page.
2. Click Build on the page for building a simulation network.
Building a simulation network includes the following steps: select the data source and select fabrics. The data source can be online data or offline data.
¡ Online Data: After you select this option, directly click Next.
Figure 40 Selecting a data source

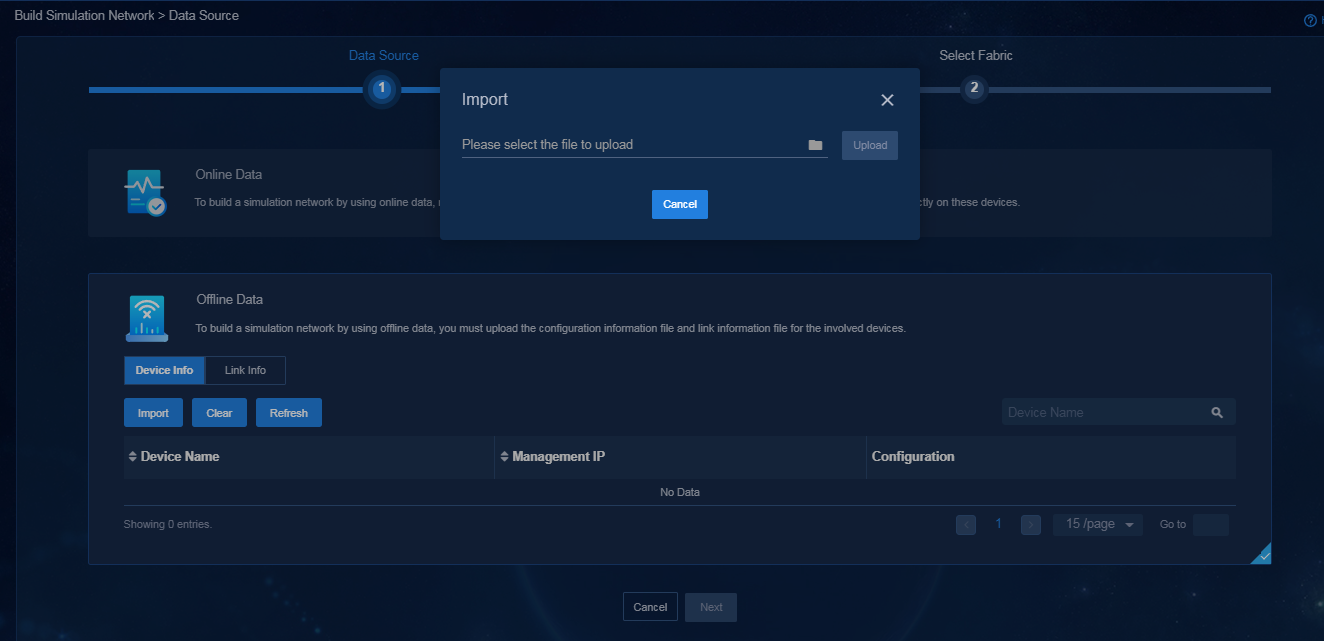
¡ Offline Data: After you select this option, perform the following tasks:
- On the Device Info page, click Import. In the dialog box that opens, import and upload the device configuration file.
Figure 41 Importing and uploading the device configuration file
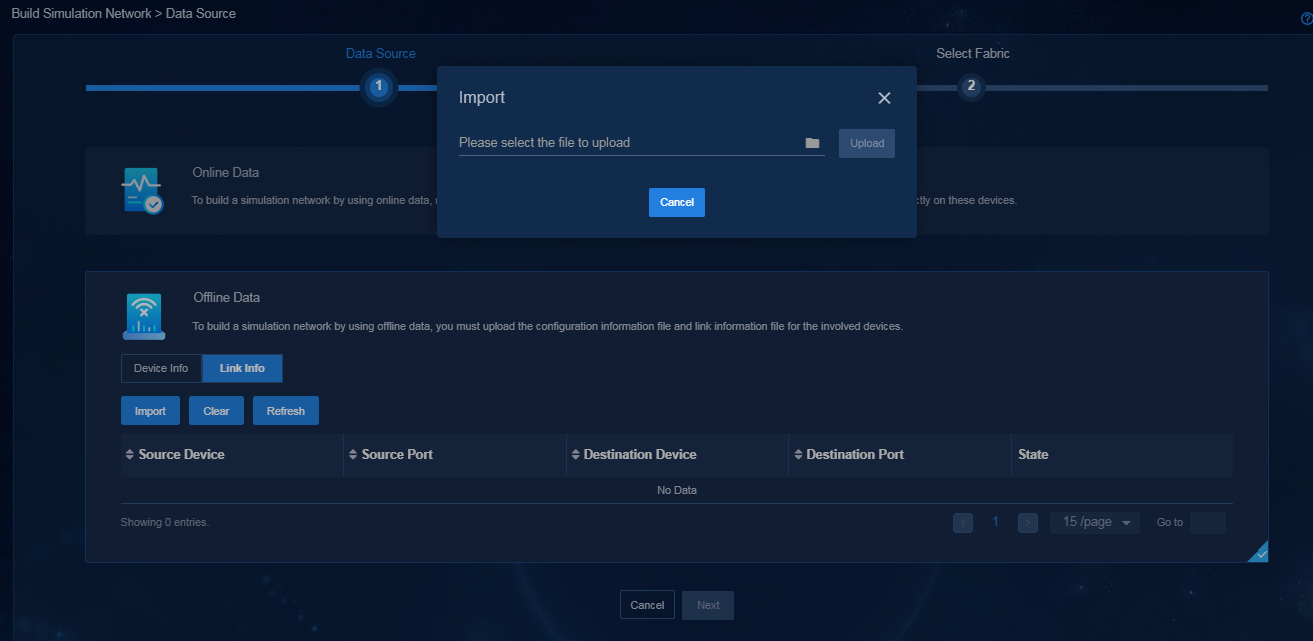
- Down Link Info page, click Import. In the dialog box that opens, import and upload the link information file.
Figure 42 Importing and uploading the link information file
- Click Next.
3. Select fabrics as needed, and click Start Building to start building the simulation network. You can select multiple fabrics.
Figure 43 Selecting fabrics

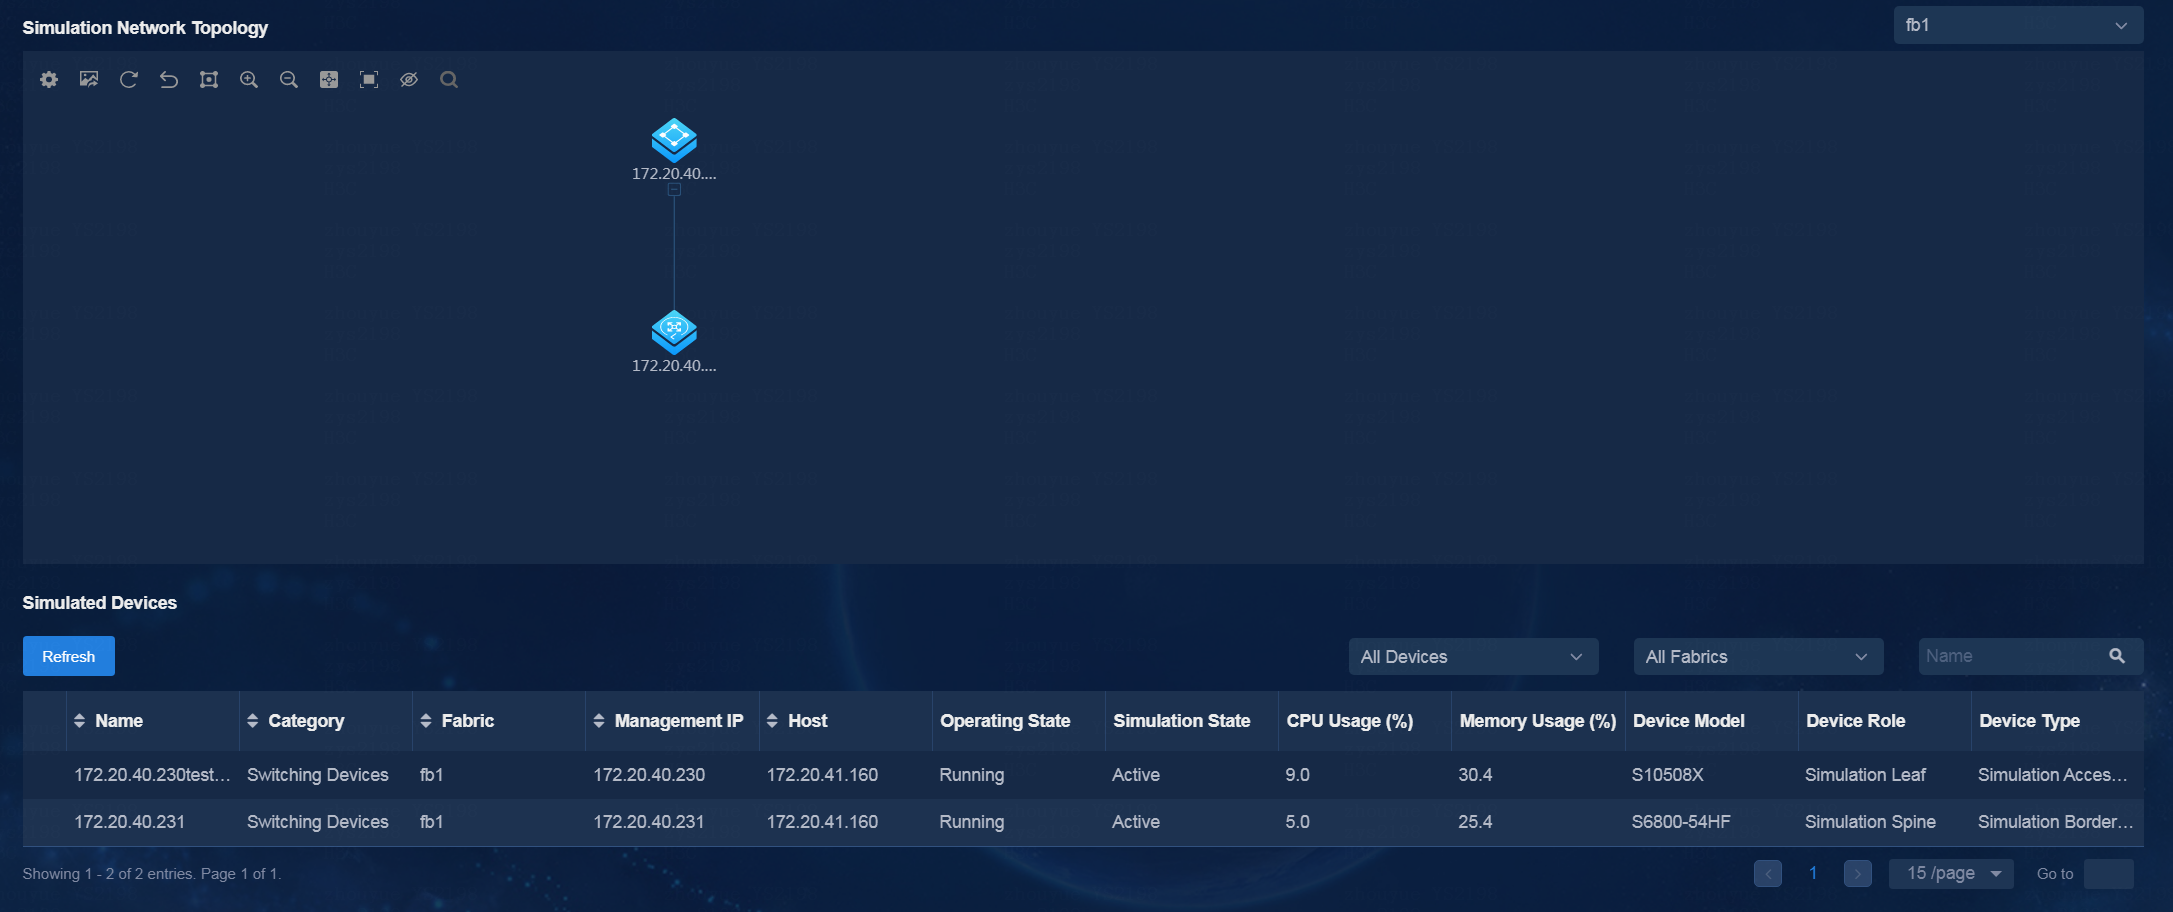
After the simulation network is built successfully, its state is displayed as Built on the page.
Figure 44 Simulation network built successfully
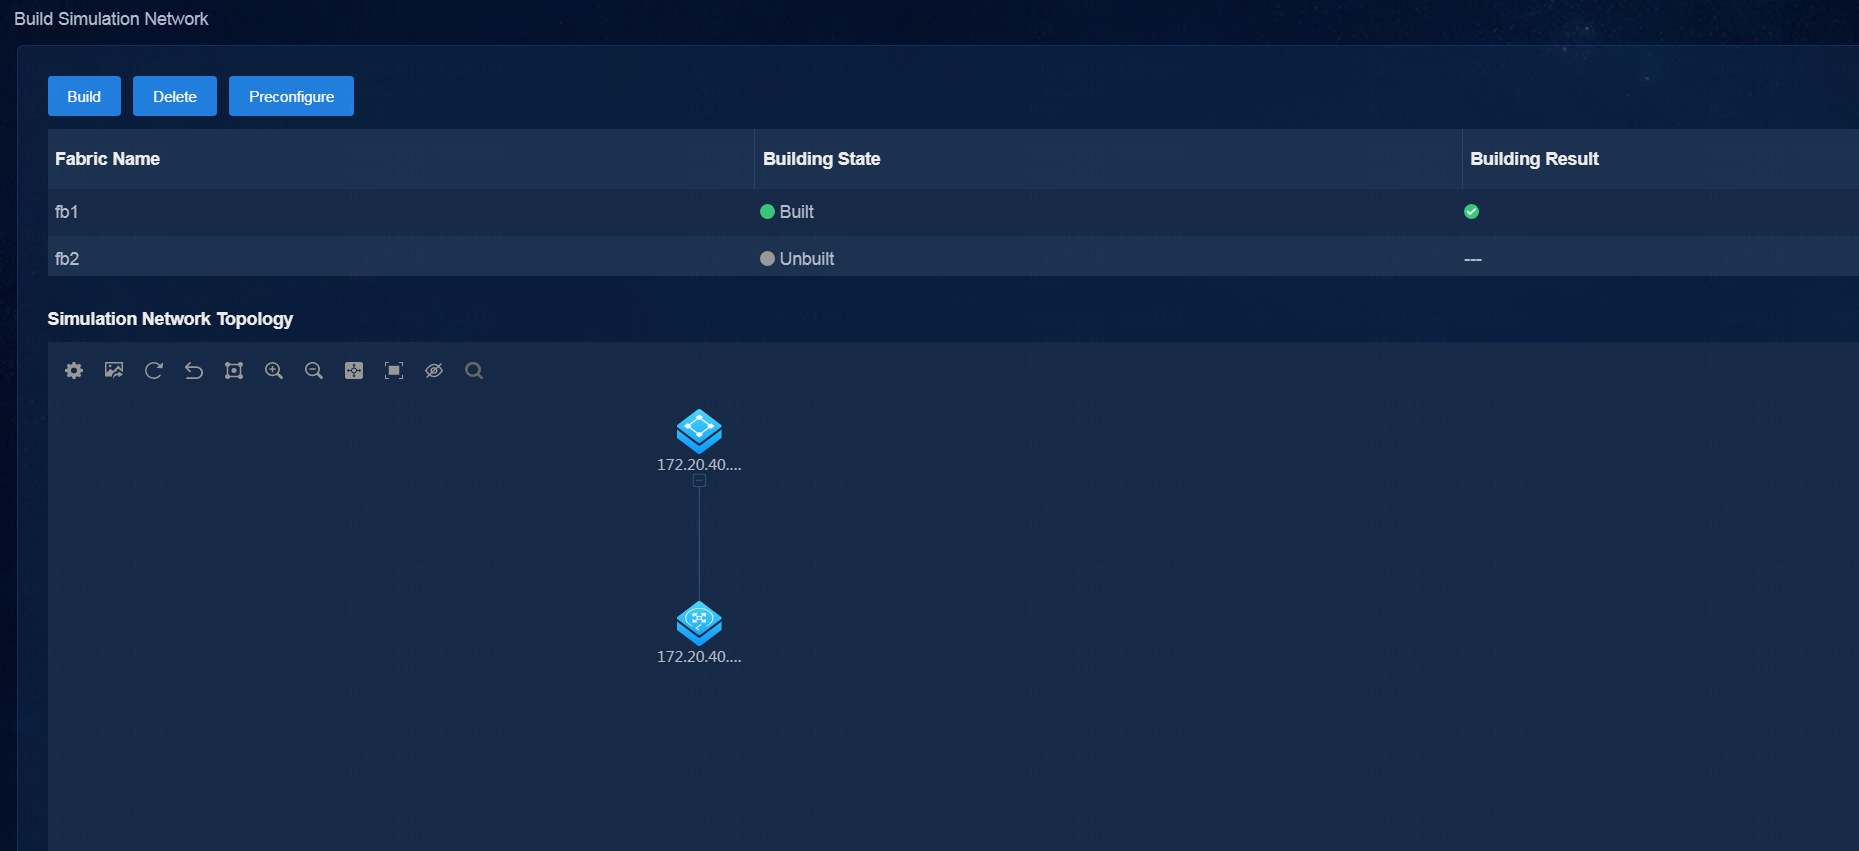
4. After the simulation network is built successfully, you can view the simulated device information:
¡ The simulated device running state is Active.
¡ The device model is displayed correctly on the real network and the simulation network.
The VMs in the simulation network model are created on the host created. If multiple hosts are available, the controller selects a host with optimal resources for creating VMs.
Figure 45 Viewing simulated devices
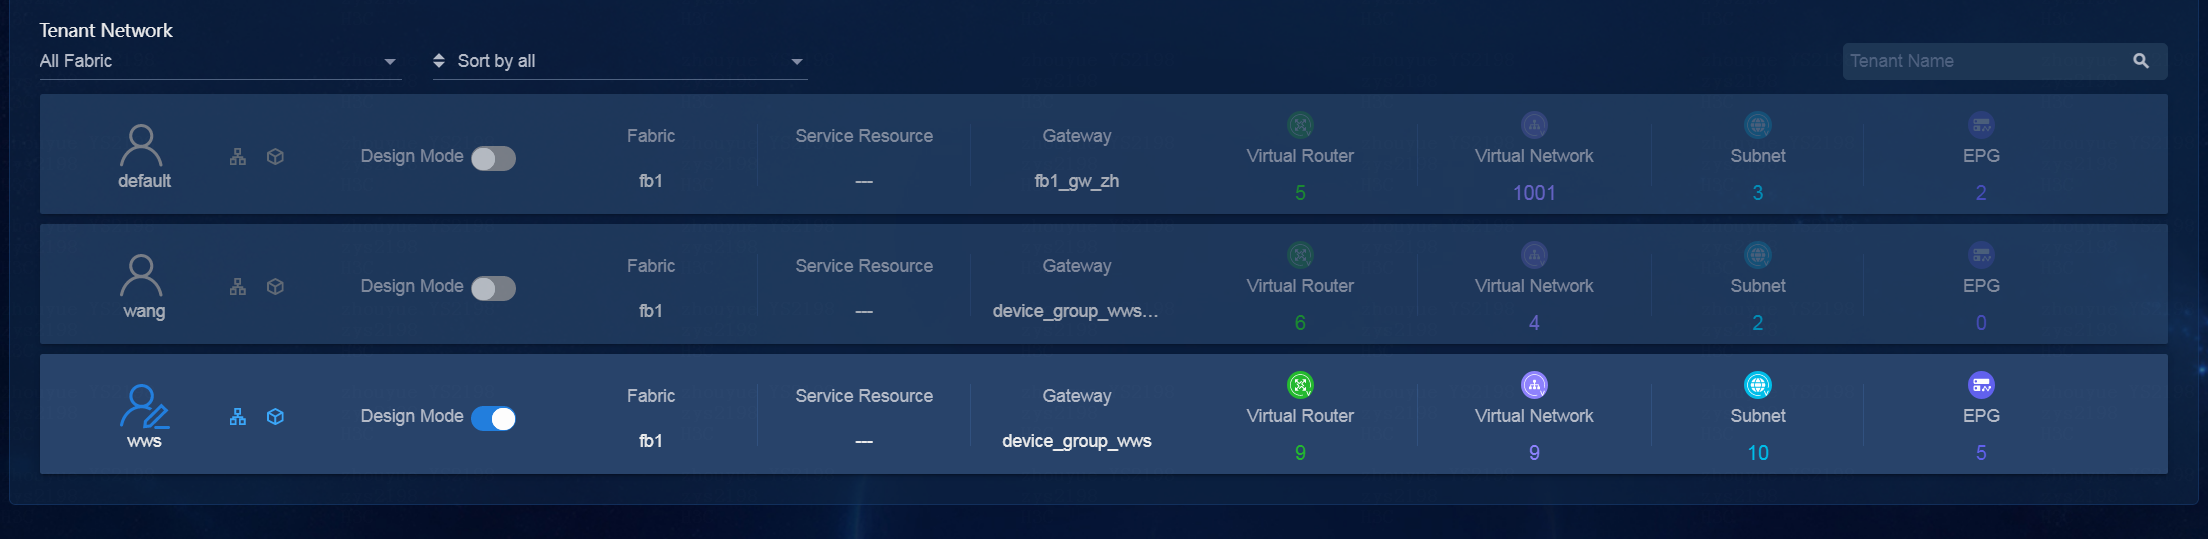
Simulate the tenant service
After the simulation network is successfully built, you can perform tenant service simulation. Tenant service simulation involves the following steps:
1. Enable the design mode for the specified tenant
To perform tenant simulation service orchestration and simulation service verification, make sure the design mode is enabled for the specified tenant.
The services orchestrated in design mode are deployed only to simulated devices rather than real devices. To deploy the orchestrated services to real devices, click Deploy Configuration.
After you disable the design mode for a tenant, service data that has not been deployed or failed to be deployed in the tenant service simulation will be cleared.
2. Configure tenant service simulation
This feature allows you to orchestrate and configure logical network and application network resources, including vRouters, vNetworks, subnets, EPGs, and application policies. After the configuration is completed, evaluate the simulation.
3. Evaluate the simulation and view the simulation result
The simulation evaluation function allows you to evaluate the configured resources. After simulation evaluation is completed, you can view the simulation evaluation results, including the capacity and configuration changes, connectivity simulation results, and network-wide impact analysis results.
4. Deploy configuration and view deployment details
You can deploy the service configuration to real devices when the simulation evaluation result is as expected.
Enable the design mode for the tenant
1. Navigate to the Automation
> Data Center Networks > Simulation > Tenant Service Simulation page. Click the design mode
icon for a tenant to enable or disable design mode for the tenant. After design
mode is enabled for a tenant, the tenant icon becomes ![]() , which
means that the tenant is editable. After design mode is disabled for a tenant,
the tenant icon becomes
, which
means that the tenant is editable. After design mode is disabled for a tenant,
the tenant icon becomes ![]() , which indicates that the tenant is not editable.
, which indicates that the tenant is not editable.
2. Click the icon for the tenant to enter the Tenant Service Simulation (Tenant Name) > Logical Networks page. On this page, you can perform tenant service simulation.
|
|
NOTE: You can enable the design mode and then perform tenant service simulation only when the simulation network is built normally. |
Figure 46 Enabling the design mode for the tenant
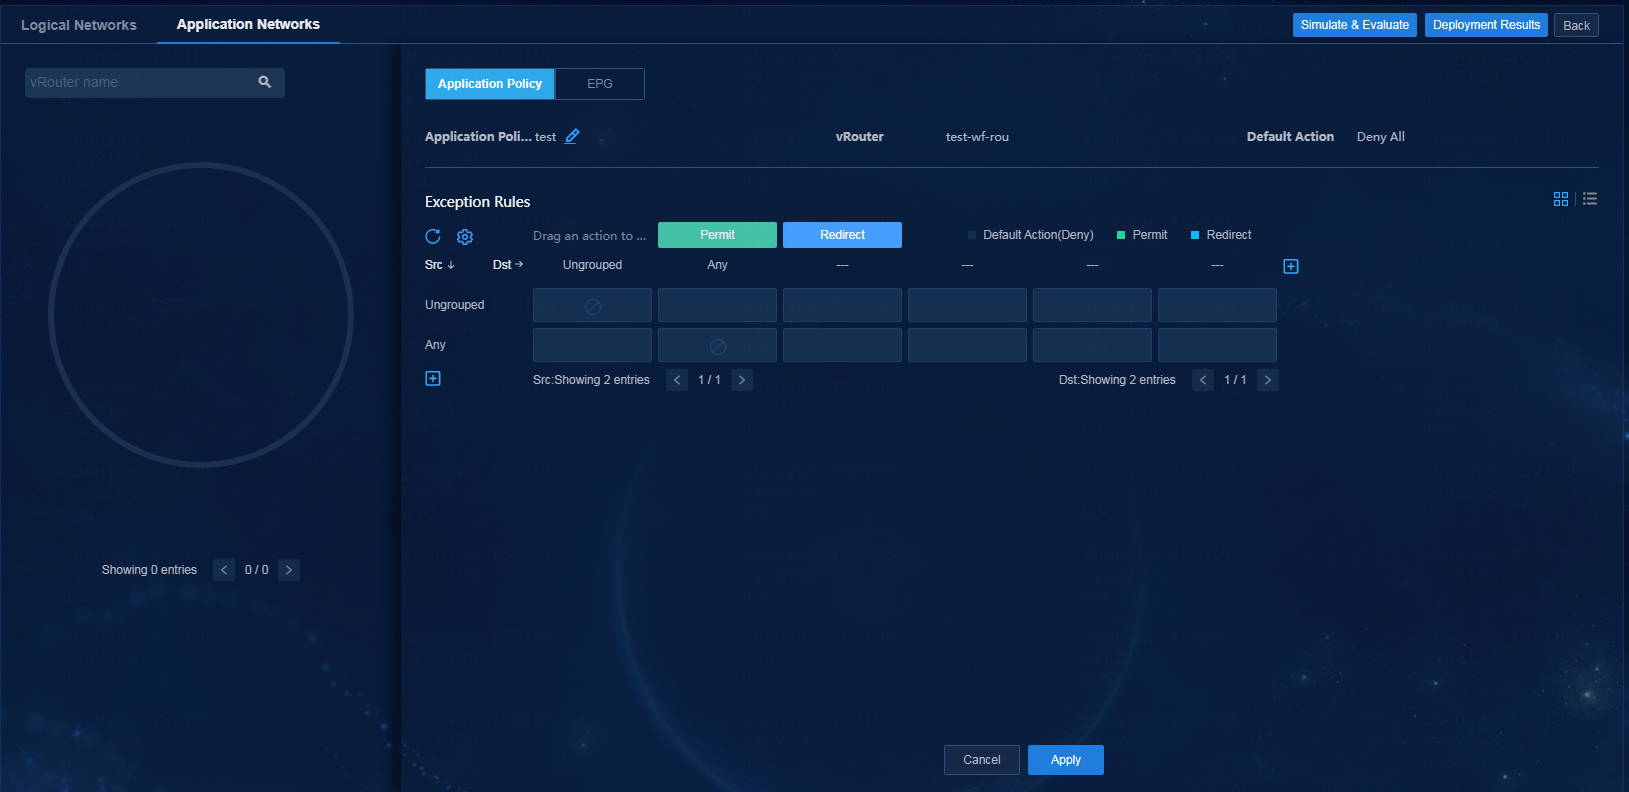
Configure tenant service simulation
1. On the logical network page, you can perform the following operations:
¡ Drag a resource icon in the Resources area to the canvas area. Then, a node of this resource is generated in the canvas area, and the configuration panel for the resource node opens on the right.
¡ In the canvas area, you can adjust node locations, bind/unbind resource, and zoom in/out the topology.
Figure 47 Logical networks

2. On the application network page, configure EPGs and application policies in a graphical way.
Figure 48 Application networks > EPGs

Figure 49 Application networks > Application policies
Evaluate the simulation and view the simulation result
Simulate and evaluate services
After resource configuration, click Simulate & Evaluate. In the dialog box that opens, select Network-Wide Impact Analysis, and click Start. In the left area of the Simulate & Evaluate dialog box, the progress in percentage is displayed. In the right area, the corresponding resource changes are displayed.
Figure 50 Simulating and evaluating services (1)
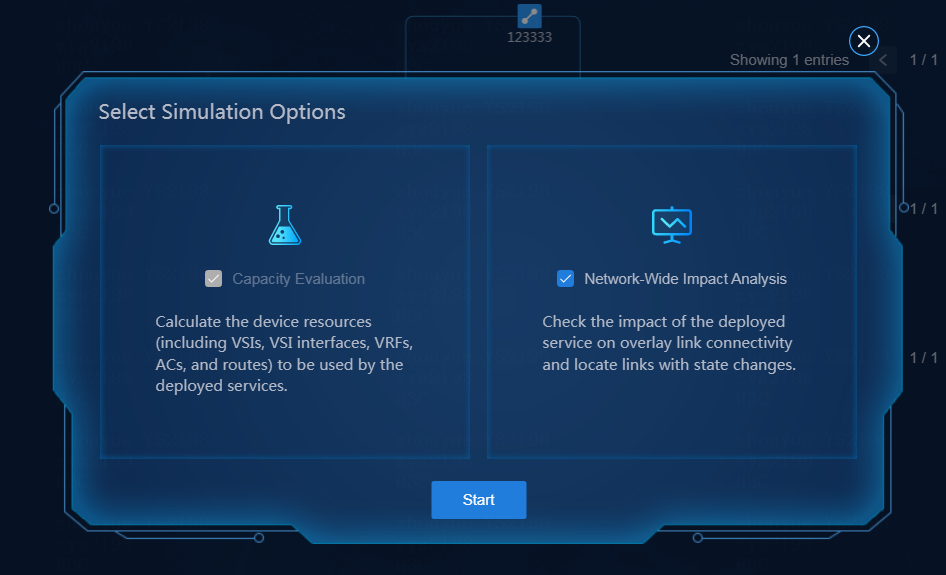
Figure 51 Simulating and evaluating services (2)

View the simulation result
After simulation evaluation is completed, click Simulation Results to enter the simulation result page. On this page, you can view the following simulation results:
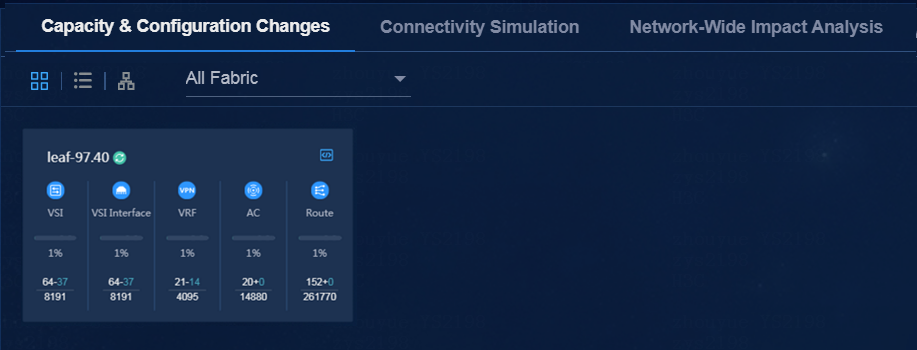
· Capacity & Configuration Changes—This page displays resource usages and the configuration changes before and after simulation in a list or block diagrams.
Figure 52 Capacity and configuration changes
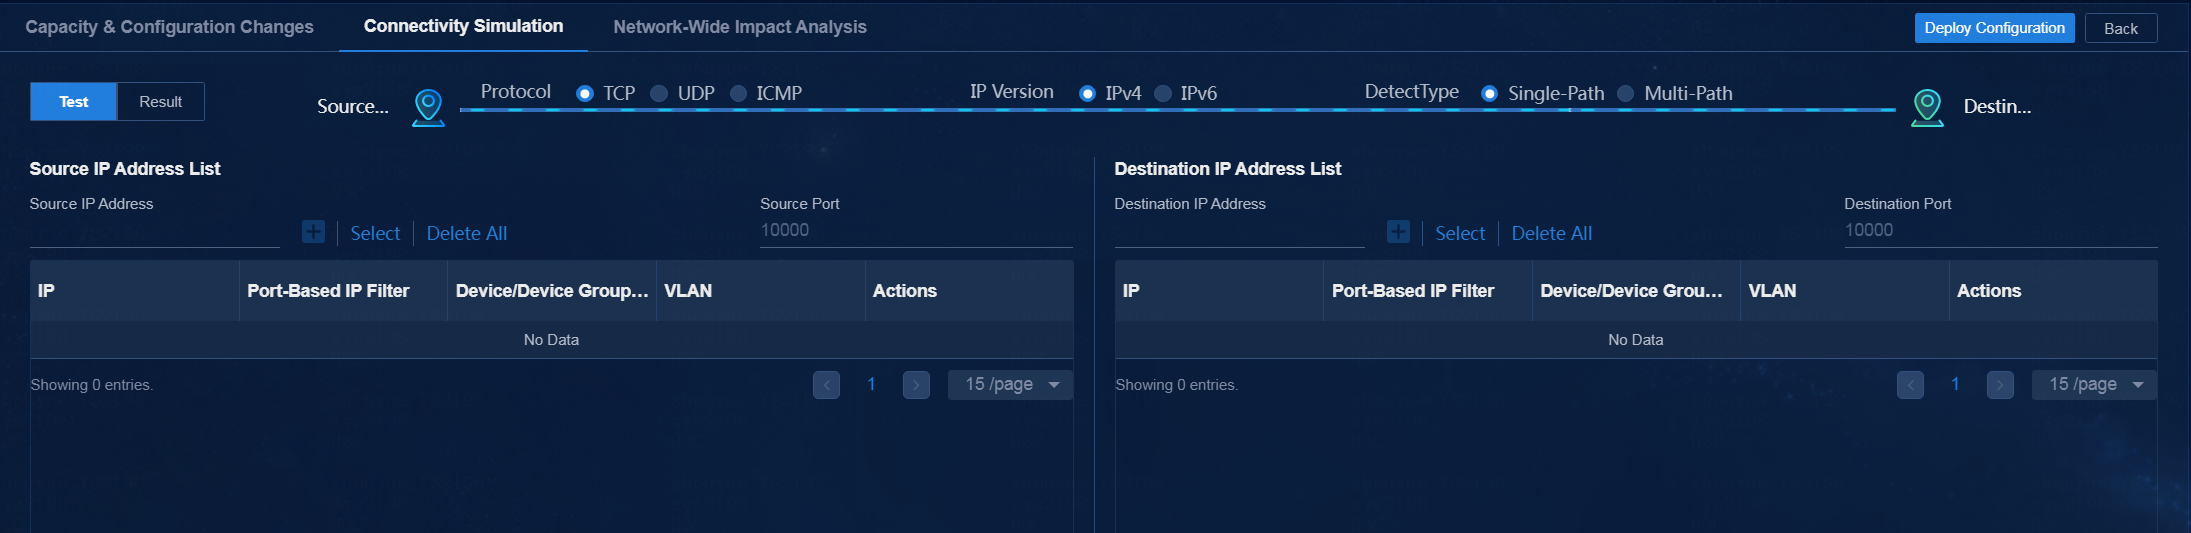
· Connectivity Simulation—Perform this task to detect connectivity between source addresses and destination addresses. When specifying the source/destination addresses, you can input IP addresses or click Select and configure filter conditions in the dialog box that opens. Then, all the specified IP addresses are displayed on the source or destination IP address list. After completing the configuration, click Test to detect connectivity.
Figure 53 Connectivity detection
· Network-Wide Impact Analysis—From this tab, you can view details of network information and perform a detection again. A single tenant supports performing network-wide impact analysis for up to 254 ports.
Figure 54 Network-wide impact analysis

Deploy configuration and view deployment details
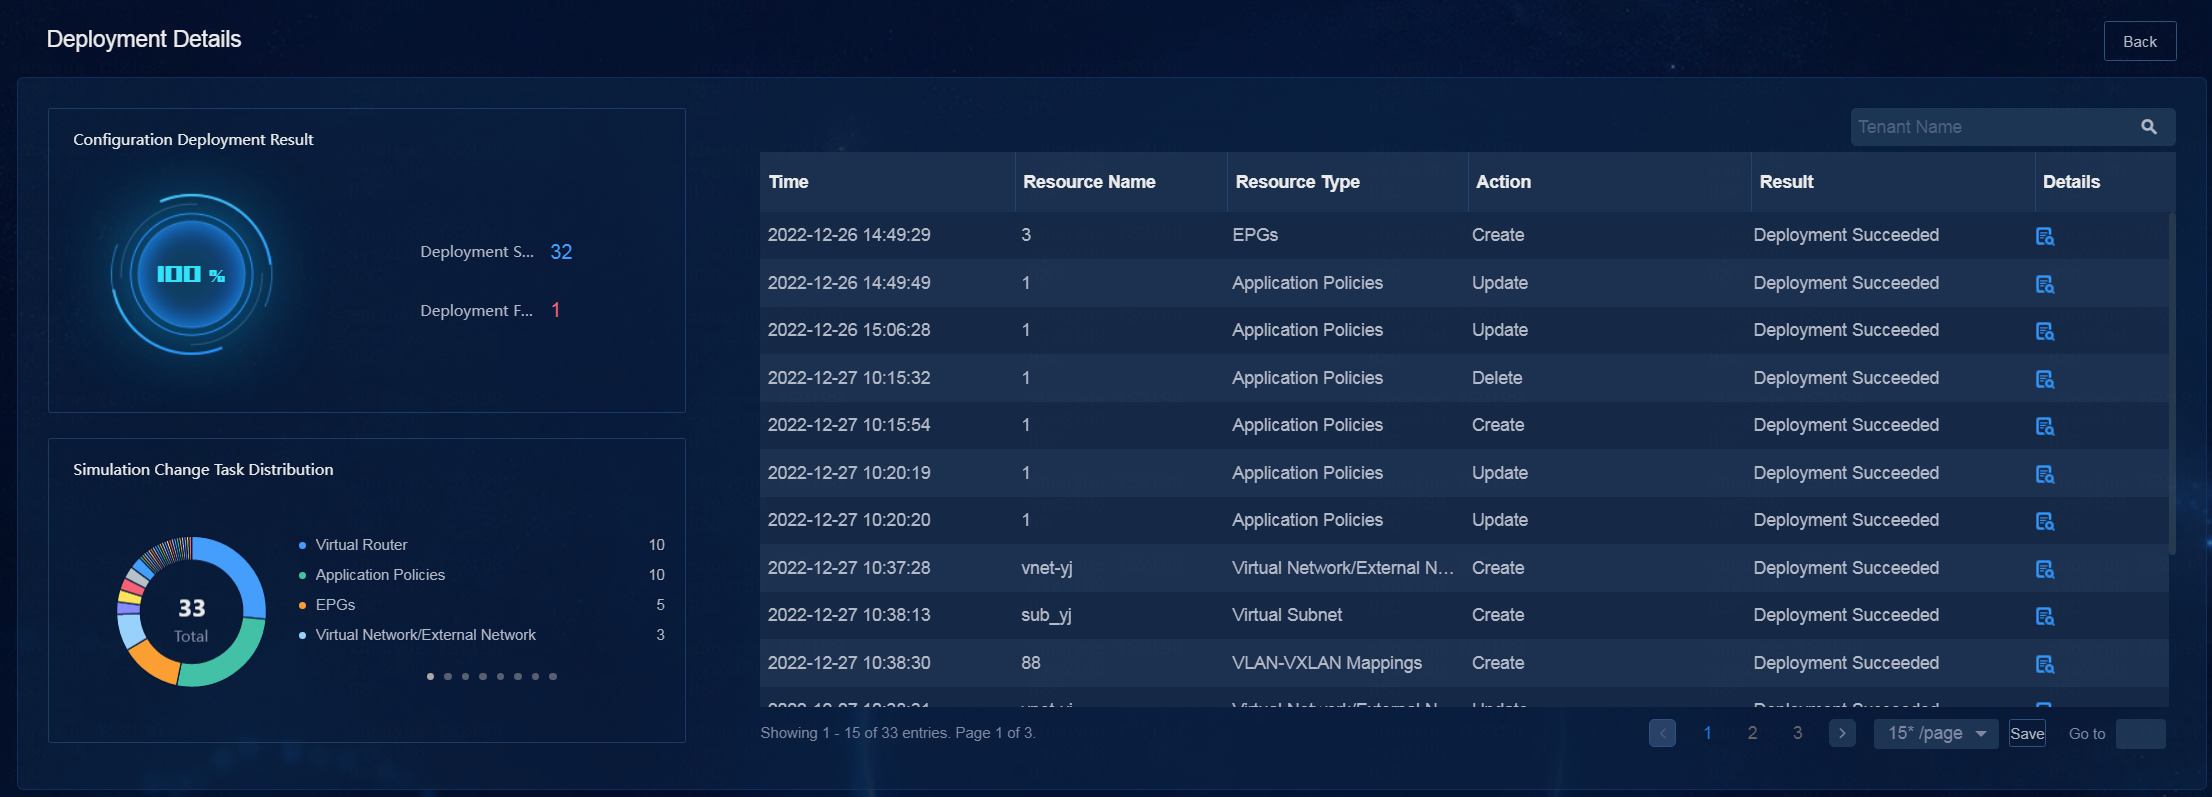
You can click Deploy Configuration to deploy the service configuration to real devices when the simulation evaluation result is as expected. Additionally, you can view details on the deployment details page.
Figure 55 Viewing deployment details
Synchronize date with the production environment
Typically, if the configuration data in the controller production environment changes after the simulation network is built, the user must rebuild the simulation network and then synchronize the incremented configuration data into the simulation environment.
The simulation data consistency feature is developed to resolve this issue. This feature supports synchronizing the configuration data within the specified range of the production environment to the simulation environment without rebuilding the simulation network.
To synchronize simulation date with that in the production environment:
1. Log in to the controller. Navigate to the Automation > Data Center Networks > Simulation > Tenant Service Simulation page. Then click Uniformity of Simulation in the upper right corner of the page.
2. Click Audit to audit the configuration between the simulation network and production environment and display the incremental configuration data after the simulation network is built.
Figure 56 Auditing the configuration between the simulation network and production environment

3. Synchronize the configuration data manually or automatically.
¡ To synchronize the configuration data manually, click Manual Sync.
¡ To synchronize the configuration data automatically, click Auto Sync and configure the parameters. The system will synchronize incremental data in the specified range from the production environment to the simulation network periodically or at a specified time.
4. View the synchronization task details and synchronization records.
¡ The Sync Task Detail page displays information of a synchronization task, including the overall progress and synchronization status of each configuration item.
¡ The Sync Task Record page displays the synchronization tasks in progress and completed synchronization tasks. The synchronization results are arranged in chronological order.
Figure 57 Viewing synchronization task details

Figure 58 Viewing the synchronization records

Delete a simulation network
1. Log in to the controller. Navigate to the Automation > Data Center Networks > Simulation > Build Simulation Network page.
2. Click Delete. In the dialog box that opens, the fabric for which a simulation network has been built is selected by default.
Figure 59 Deleting a simulation network
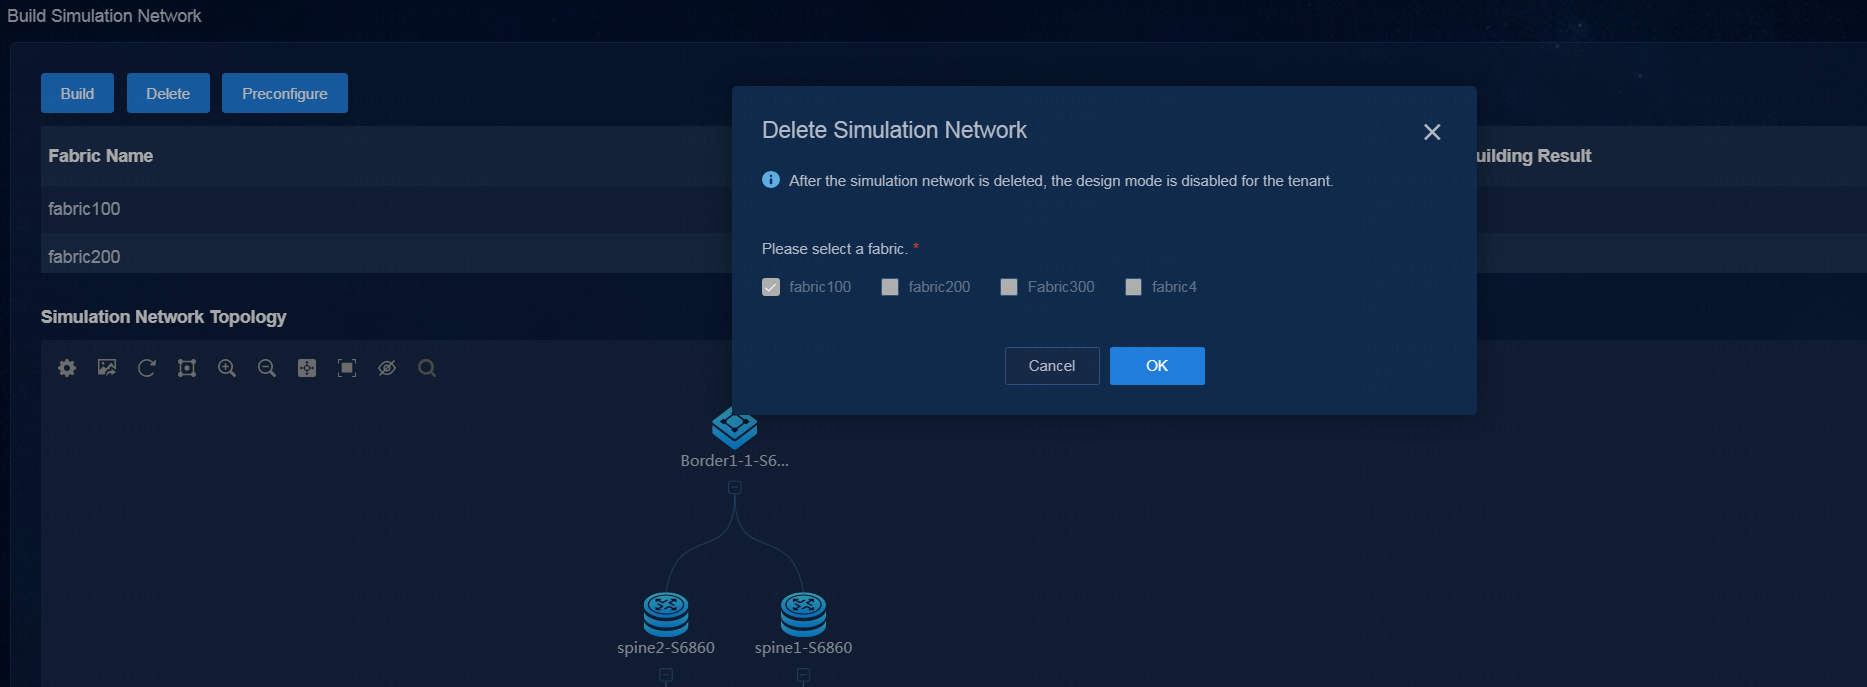
3. Click OK to start deleting the simulation network. When all operation results are displayed as Succeeded and the progress is 100%, the simulation network is deleted completely.
Upgrade and uninstall the DTN hosts
Upgrade a DTN host
1. Obtain the new version of the DTN host installation package, upload it to the server, and decompress it. The package is named in the SeerEngine_DC_DTN_HOST-version.zip format.
[root@host01 root]# unzip SeerEngine_DC_DTN_HOST-E6205.zip
2. Execute the chmod command to assign permissions to the user.
[root@host01 root]# chmod +x -R SeerEngine_DC_DTN_HOST-E6205
3. Access the SeerEngine_DC_DTN_HOST-version/ directory of the decompressed installation package, and then execute the ./upgrade.sh command to upgrade the host.
[root@host01 SeerEngine_DC_DTN_HOST-E6205]# ./upgrade.sh
check network service ok.
check libvirtd service ok.
check management bridge ok.
check sendip ok.
check vlan interface ok.
Complete!
|
|
IMPORTANT: To upgrade the DTN component from E6202 or an earlier version to E6203 or later, you must uninstall the DTN host and then reconfigure it. After the upgrade, you must delete the original host from the simulation network and then re-incorporate it. |
Uninstall a DTN host
|
|
IMPORTANT: · Execution of the DTN host uninstall script will cause the network service to restart and the SSH connection to disconnect. To avoid this situation, uninstall a DTN host from the remote console of the server. · To uninstall a DTN host in E6202 and an earlier version, you are to execute the ./uninstall.sh management_nic service_nic command. |
To uninstall a host, access the SeerEngine_DC_DTN_HOST-version/ directory and execute the ./uninstall.sh command.
[root@host01 SeerEngine_DC_DTN_HOST-E6205]# ./uninstall.sh
Uninstalling ...
Bridge rollback succeeded.
Restarting network, please wait.
Complete!
FAQ
Deploying a DTN host on a VM
When I deploy a DTN host on a VM, how can I enable the nested virtualization feature for VMware and the DTN host?
To enable the nested virtualization feature for VMware and the DTN host:
1. Enable the nested virtualization feature for Vmware:
a. Log in to the back end of the host of VMware. View the file named config in the /etc/vmware directory.
Figure 60 File named config in the /etc/vmware directory

a. Execute the vi command to enter the configuration file named config. Add the following configuration to the end of the configuration file: vhv.enable = ”TRUE”
Figure 61 Editing the configuration file named config

a. After the operation, execute the reboot command to restart the ESXi server.
2. Enable the nested virtualization feature on the DTN host:
a. In the back end of the DTN host, enter the /vmfs/volumes folder.
In this folder, there is a folder corresponding to the DTN host. The folder name is the DTN host ID.
Figure 62 Viewing the DTN host folder name

a. Enter the DTN host folder, and execute the vim command to edit the dtn_host.vmx file. Add the following configuration to the end of the configuration file: vhv.enable = ”TRUE”
b. After the configuration is completed, add a port group on VMware. The port group name is DTN Network in this example. Make sure the VLAN ID of the newly added port group is 4095 (the VLAN ID of 4095 means all VLANs are permitted).
Figure 63 Adding a port group

a. After the port group is added, change the port group bound to the NIC of the DTN host.
Figure 64 Configuring the DTN host NIC

|
|
NOTE: · The network bound to the port group named DTN Network is used as the simulation management network and simulated device service network. The network bound to the port group named VM Network is used as the node management network. · If multiple DTN hosts are bound to the port group named DTN Network, make sure each physical network associated with the port group is reachable. |
