- Table of Contents
- Related Documents
-
| Title | Size | Download |
|---|---|---|
| 01-Text | 697.22 KB |
Contents
Running on the same server with the controller or analyzer
Deploying installation packages
Registering and installing licenses
Installing the activation file on the license server
Backing up and restoring Supper Controller configuration
Upgrading and uninstalling Supper Controller
Uninstalling Supper Controller
Obtaining the plugin installation packages
About Super Controller
Super Controller is designed for Data Center Interconnect (DCI) scenarios. It enables southbound service orchestration and O&M for controllers across DCs and provides a northbound unified network view for the cloud platform. It also provides a unified portal for service deployment.
Preparing for installation
Hardware requirements
You can deploy Super Controller independently or deploy it together with the data center controller or analyzer.
You can deploy a standalone super controller on one server or deploy a super controller cluster on multiple servers. As a best practice, deploy a three-node super controller cluster.
Running on the server alone
Table 1 through Table 9 show the hardware requirements for a server to host Super Controller only.
|
Item |
Requirements |
||
|
Drive: · The drives must be configured in RAID 1, 5, or 10. · Use SSDs or 7.2K RPM or above HDDs. · When HDDs are used, the storage controller must have 1 GB cache and be power fail protected with a supercapacitor installed. |
System drive |
SSD |
A minimum total size of 1920 GB after RAID configuration: · RAID 5: 3 × 960 GB or 5 × 480GB · RAID 10: 4 × 960GB or 8 × 480GB |
|
HDD |
A minimum total size of 1920 GB after RAID configuration: · RAID 5: 3 × 1200GB or 5 × 600GB · RAID 10: 4 × 1200GB or 8 × 600GB |
||
|
ETCD drive |
SSD |
A minimum total size of 50 GB after RAID configuration. RAID 1: 2 × 480GB |
|
|
HDD |
A minimum total size of 50 GB after RAID configuration. RAID 1: 2 × 600GB |
||
|
NIC |
· Non-bonding mode: 1 × 10 Gbps or above Ethernet port · Bonding mode: 2 × 10 Gbps or above Linux bonding interfaces |
||
|
Remarks: · To deploy the general_PLAT_kernel-region application package, add one more CPU core and 6 GB more memory. · To deploy the general_PLAT_network application package, add three more CPU cores and 16 GB more memory. · Deploy Supper Controller in a version earlier than E3105 on Unified Platform in a version earlier than E0706 (including E06xx). Make sure etcd has an exclusive use of a physical disk. · Deploy Supper Controller in E3105 or a later version on Unified Platform in E0706 or a later version. etcd can share a physical disk with other partitions. As a best practice, use a physical disk exclusively for etcd. |
|||
Table 2 Hardware requirements for super controller cluster deployment (Intel64/AMD64 server)
|
Item |
Requirements |
|
Node name |
Super controller node |
|
Node quantity |
3 |
|
CPU |
x86-64 (Intel64/AMD64) 16 cores 2.0 GHz or above |
|
Memory |
128 GB or above |
|
Drive |
· System drive: A minimum total size of 1920 GB after RAID configuration. · etcd drive: A minimum total size of 50 GB after RAID configuration. |
Table 3 Hardware requirements for super controller standalone deployment (Intel64/AMD64 server)
|
Item |
Requirements |
|
Node name |
Super controller node |
|
Node quantity |
1 |
|
CPU |
x86-64 (Intel64/AMD64) 16 cores 2.0 GHz or above |
|
Memory |
128 GB or above |
|
Drive |
· System drive: A minimum total size of 1920 GB after RAID configuration. · etcd drive: A minimum total size of 50 GB after RAID configuration. |
Table 4 Hardware requirements for super controller cluster deployment (x86-64 Haiguang server)
|
Item |
Requirements |
|
Node name |
Super controller node |
|
Node quantity |
3 |
|
CPU |
2 × Hygon G5 5380 16 cores 2.5 GHz |
|
Memory |
128 GB or above |
|
Drive |
· System drive: A minimum total size of 1920 GB after RAID configuration. · etcd drive: A minimum total size of 50 GB after RAID configuration. |
Table 5 Hardware requirements for super controller standalone deployment (x86-64 Haiguang server)
|
Item |
Requirements |
|
Node name |
Super controller node |
|
Node quantity |
1 |
|
CPU |
2 ×Hygon G5 5380 16 cores 2.5 GHz |
|
Memory |
128 GB or above |
|
Drive |
· System drive: A minimum total size of 1920 GB after RAID configuration. · etcd drive: A minimum total size of 50 GB after RAID configuration. |
Table 6 Hardware requirements for super controller cluster deployment (ARM Kunpeng server)
|
Item |
Requirements |
|
Node name |
Super controller node |
|
Node quantity |
3 |
|
CPU |
2 × Kunpeng 920 24 cores 2.6 GHz or above |
|
Memory size |
128 GB or above |
|
Drive |
· System drive: A minimum total size of 1920 GB after RAID configuration. · etcd drive: A minimum total size of 50 GB after RAID configuration. |
Table 7 Hardware requirements for super controller standalone deployment (ARM Kunpeng server)
|
Item |
Requirements |
|
Node name |
Super controller node |
|
Node quantity |
1 |
|
CPU |
2 × Kunpeng 920 24 cores 2.6 GHz or above |
|
Memory size |
128 GB or above |
|
Drive |
· System drive: A minimum total size of 1920 GB after RAID configuration. · etcd drive: A minimum total size of 50 GB after RAID configuration. |
Table 8 Hardware requirements for super controller cluster deployment (ARM Phytium server)
|
Item |
Requirements |
|
Node name |
Super controller node |
|
Node quantity |
3 |
|
CPU |
2 ×Phytium S2500 64 cores 2.1 GHz or above |
|
Memory size |
128 GB or above |
|
Drive |
· System drive: A minimum total size of 1920 GB after RAID configuration. · etcd drive: A minimum total size of 50 GB after RAID configuration. |
Table 9 Hardware requirements for super controller standalone deployment (ARM Phytium server)
|
Item |
Requirements |
|
Node name |
Super controller node |
|
Node quantity |
1 |
|
CPU |
2 ×Phytium S2500 64 cores 2.1 GHz or above |
|
Memory size |
128 GB or above |
|
Drive |
· System drive: A minimum total size of 1920 GB after RAID configuration. · etcd drive: A minimum total size of 50 GB after RAID configuration. |
Running on the same server with the controller or analyzer
Table 10 and Table 11 show the additional hardware requirements for a server to host Supper Controller in addition to the controller or analyzer.
Table 10 Additional hardware requirements for super controller cluster deployment
|
Item |
Requirements |
|
Node name |
Super controller node |
|
Node quantity |
3 |
|
CPU |
· x86-64 (Intel64/AMD64): 8 cores · x86-64 Haiguang: 10 cores · ARM Kunpeng: 20 cores |
|
Memory size |
64 GB or more |
|
Drive |
A total drive size of 100 GB at minimum for the system drive |
Table 11 Additional hardware requirements for super controller standalone deployment
|
Item |
Requirements |
|
Node name |
Super controller node |
|
Node quantity |
1 |
|
CPU |
· x86-64 (Intel64/AMD64): 8 cores · x86-64 Haiguang: 10 cores · ARM Kunpeng: 20 cores |
|
Memory size |
64 GB or more |
|
Drive |
A total drive size of 100 GB at minimum for the system drive |
Software requirements
Supper Controller runs on Unified Platform as a component. Before deploying Supper Controller, first install Unified Platform.
Client requirements
You can access Unified Platform from a Web browser without installing any client. As a best practice, use Google Chrome 70 or a later version.
Installing Unified Platform
Supper Controller runs on Unified Platform as a component. Before deploying Supper Controller, first install Unified Platform. For more information, see H3C Unified Platform Deployment Guide.
Partitioning drives
Configure drives as described in "Hardware requirements." Partition the drives as described in Table 12 or Table 13.
Table 12 Drive partition settings (2400 GB system drive)
|
RAID configuration |
Partition name |
Mounting point |
Minimum size |
Remarks |
|
RAID 10, with a total drive size ≥ 2400 GB |
/dev/sda1 |
/boot/efi |
200 MiB |
EFI system partition, required only in UEFI mode |
|
/dev/sda2 |
/boot |
1024 MiB |
N/A |
|
|
/dev/sda3 |
/ |
1000 GiB |
Supports capacity expansion when the drive size is sufficient |
|
|
/dev/sda4 |
/var/lib/docker |
500 GiB |
Supports capacity expansion when the drive size is sufficient |
|
|
/dev/sda6 |
swap |
1024 MiB |
Swap partition |
|
|
/dev/sda7 |
/var/lib/ssdata |
550 GiB |
Supports capacity expansion when the drive size is sufficient |
|
|
/dev/sda8 |
N/A |
300 GiB |
Reserved for GlusterFS. Configuration for this partition is not required during operating system installation. |
|
|
RAID 1, with a total drive size ≥ 50 GB |
/dev/sdb |
/var/lib/etcd |
50 GiB |
· Deploy Supper Controller in a version earlier than E3105 on Unified Platform in a version earlier than E0706 (including E06xx). Make sure etcd has an exclusive use of a physical disk. · Deploy Supper Controller in E3105 or a later version on Unified Platform in E0706 or a later version. etcd can share a physical disk with other partitions. As a best practice, use a physical disk exclusively for etcd. |
Table 13 Drive partition settings (1920 GB system drive)
|
RAID configuration |
Partition name |
Mounting point |
Minimum capacity |
Remarks |
|
RAID 10, with a total drive size ≥ 1920 GB |
/dev/sda1 |
/boot/efi |
200 MiB |
EFI system partition This partition is required only in UEFI mode. |
|
/dev/sda2 |
/boot |
1024MiB |
N/A |
|
|
/dev/sda3 |
/ |
700 GiB |
Supports capacity expansion when the drive size is sufficient |
|
|
/dev/sda4 |
/var/lib/docker |
450 GiB |
Supports capacity expansion when the drive size is sufficient |
|
|
/dev/sda6 |
swap |
1024 MiB |
Swap partition |
|
|
/dev/sda7 |
/var/lib/ssdata |
500 GiB |
Supports capacity expansion when the drive size is sufficient |
|
|
/dev/sda8 |
N/A |
220 GiB |
Reserved for GlusterFS. Configuration for this partition is not required during operating system installation. |
|
|
RAID 1, with a total drive size ≥ 50 GB |
/dev/sdb |
/var/lib/etcd |
50 GiB |
· Deploy Supper Controller in a version earlier than E3105 on Unified Platform in a version earlier than E0706 (including E06xx). Make sure etcd has an exclusive use of a physical disk. · Deploy Supper Controller in E3105 or a later version on Unified Platform in E0706 or a later version. etcd can share a physical disk with other partitions. As a best practice, use a physical disk exclusively for etcd. |
Deploying installation packages
Select the installation packages as described in Table 14 and upload the selected packages. For the installation procedures for the packages, see H3C Unified Platform Deployment Guide.
The common_PLAT_GlusterFS_2.0, general_PLAT_portal_2.0, and general_PLAT_kernel_2.0 installation packages are required and must be deployed during Unified Platform deployment. For the installation package deployment procedure, see "Deploying the applications" in H3C Unified Platform Deployment Guide.
The general_PLAT_kernel-base_2.0, general_PLAT_Dashboard_2.0, and general_PLAT_widget_2.0 installation packages are required. They will be installed automatically during the Supper Controller deployment process. You only need to upload the packages.
To use the general_PLAT_network_2.0 installation package, deploy it manually after Supper Controller is deployed. For the deployment procedure, see "Deploying the applications" in H3C Unified Platform Deployment Guide.
Table 14 Installation packages required by Supper Controller
|
Installation package |
Description |
|
· x86: common_PLAT_GlusterFS_2.0_version_x86.zip ARM: common_PLAT_GlusterFS_2.0_version_arm.zip |
Provides local shared storage functionalities. |
|
· x86: general_PLAT_portal_2.0_version_x86.zip ARM: general_PLAT_portal_2.0_version_arm.zip |
Provides portal, unified authentication, user management, service gateway, and help center functionalities. |
|
· x86: general_PLAT_kernel_2.0_version_x86.zip ARM: general_PLAT_kernel_2.0_version_arm.zip |
Provides access control, resource identification, license, configuration center, resource group, and log functionalities. |
|
· x86: general_PLAT_kernel-base_2.0_version_x86.zip ARM: general_PLAT_kernel-base_2.0_version_arm.zip |
Provides alarm, access parameter template, monitoring template, report, email, and SMS forwarding functionalities. |
|
· x86: general_PLAT_kernel-region_2.0_version_x86.zip ARM: general_PLAT_kernel-region_2.0_version_arm.zip |
(Optional.) Provides the hierarchical management functionality. If you are using hierarchical management, install the general_PLAT_network_2.0 application package and use it together with Supper Controller component for Supper Controller to manage DC networks. |
|
· x86: general_PLAT_network_2.0_version_x86.zip ARM: general_PLAT_network_2.0_version_arm.zip |
(Optional.) Provides basic management of network resources, network performance, network topology, and iCC. Install this application if you are checking compatibility of the software versions with the solution. |
|
· x86: general_PLAT_Dashboard_2.0_version_x86.zip ARM: general_PLAT_Dashboard_2.0_version_arm.zip |
Provides the dashboard framework. |
|
· x86: general_PLAT_widget_2.0_version_x86.zip ARM: general_PLAT_widget_2.0_version_arm.zip |
Provides dashboard widget management. |
|
|
NOTE: · To deploy the general_PLAT_kernel-region application package on a physical server, one more CPU core and 6 GB more memory are required. · To deploy the general_PLAT_network application package on a physical server, three more CPU cores and 16 GB more memory are required. |
Deploying Supper Controller
|
|
CAUTION: To avoid system anomaly, do not use the ifconfig command to enable or disable NICs after super controller deployment. |
|
|
IMPORTANT: Supper Controller runs on Unified Platform. You can deploy, upgrade, and uninstall it only on Unified Platform. |
You can deploy Supper Controller on Unified Platform as a root user or non-root user.
1. Obtain the Supper Controller installation package. Use Table 15 to select an installation package matching the server architecture.
Table 15 Supper Controller installation packages
|
Server architecture |
Supper Controller installation package |
|
x86 |
SUPER_CONTROLLER-version-MATRIX.zip |
|
ARM |
SUPER_CONTROLLER-version-ARM64.zip |
|
|
NOTE: For some Super Controller versions, the installation package is released only for one server architecture. |
2. Log in to Unified Platform. Click System > Deployment.
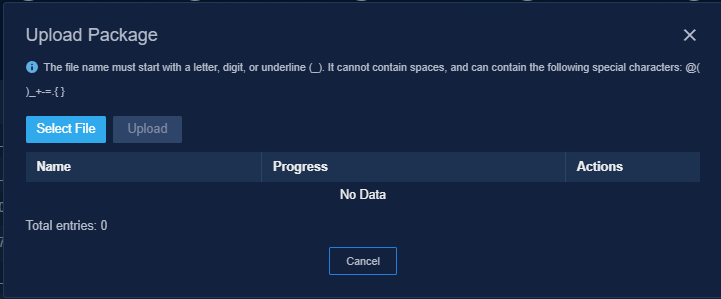
3. Click Upload. In the dialog box that opens, click Select File to select the installation package and then click Upload. After the installation package is uploaded, click Next.
Figure 1 Uploading the installation package
4. Select Cloud Data Center and then select Super Controller and the Super Controller version to be installed.
Figure 2 Selecting the component

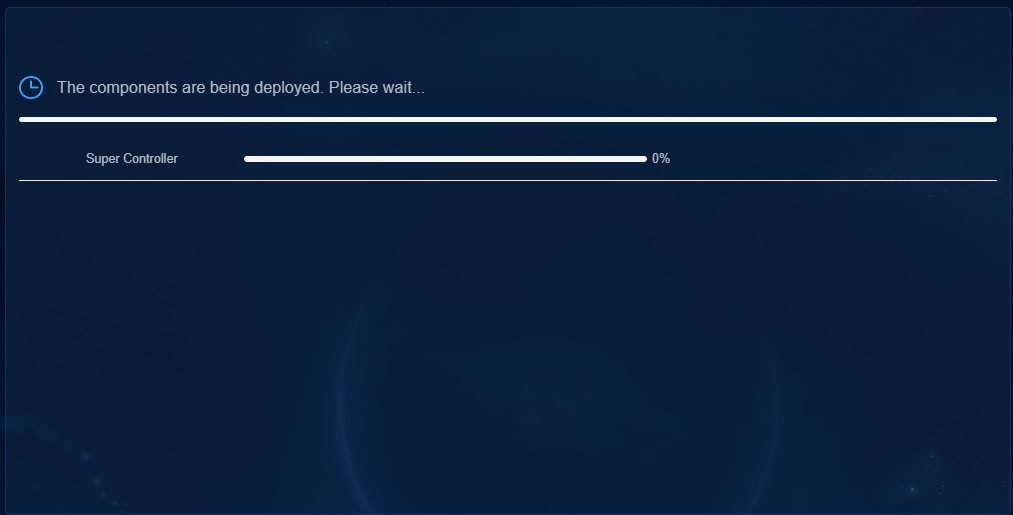
5. Click Next until you reach the Confirm Parameters page, and then click Deploy.
Figure 3 Deployment in progress
Accessing Supper Controller
After Supper Controller is deployed on Unified Platform, Supper Controller menu items will be loaded on Unified Platform. Then you can access Unified Platform to control and manage Supper Controller.
To access Supper Controller:
1. Enter the address for accessing Unified Platform in the address bar and then press Enter.
By default, the login address is http://ip_address:30000/central/index.html.
¡ ip_address represents the northbound virtual IP address of Unified Platform.
¡ 30000 is the port number.
Figure 4 Super Controller login page

2. Enter the username and password, and then click Login.
The default username is admin and the default password is Pwd@12345.
Registering and installing licenses
After you install Super Controller, you can use its complete features and functions for a 180-day trial period. After the trial period expires, you must get it licensed.
Installing the activation file on the license server
For the activation file request and installation procedure, see H3C Software Products Remote Licensing Guide.
Obtaining licenses
1. Log in to Unified Platform. Navigate to the System > License Management > License Information page.
2. Configure the parameters for the license server as described in Table 16.
Table 16 License server parameters
|
Item |
Description |
|
IP Address |
Specify the IP address configured on the license server used for internal communication in the Super Controller cluster. |
|
Port |
Specify the service port number of the license server. The default value is 5555. |
|
Username |
Specify the client username configured on the license server. |
|
Password |
Specify the client password configured on the license server. |
3. Click Connect to connect Super Controller to the license server.
Super Controller will automatically obtain licensing information after connecting to the license server.
Backing up and restoring Supper Controller configuration
You can back up and restore the Supper Controller configuration on Unified Platform. For the procedures, see H3C Unified Platform Deployment Guide.
|
|
IMPORTANT: When you backup and restore the Supper Controller configuration, the plugin versions will be restored automatically. If a plugin version is consistent with the Supper Controller version after a restoration, upgrade the plugin version. |
Upgrading and uninstalling Supper Controller
This section describes the procedures for upgrading and uninstalling Supper Controller. For the upgrading and uninstallation procedures for Unified Platform, see H3C Unified Platform Deployment Guide.
Upgrading Supper Controller
|
|
CAUTION: The upgrade might cause service interruption. Be cautious when you perform this operation. |
Supper Controller can be upgraded on Unified Platform with the configuration retained.
To upgrade Supper Controller:
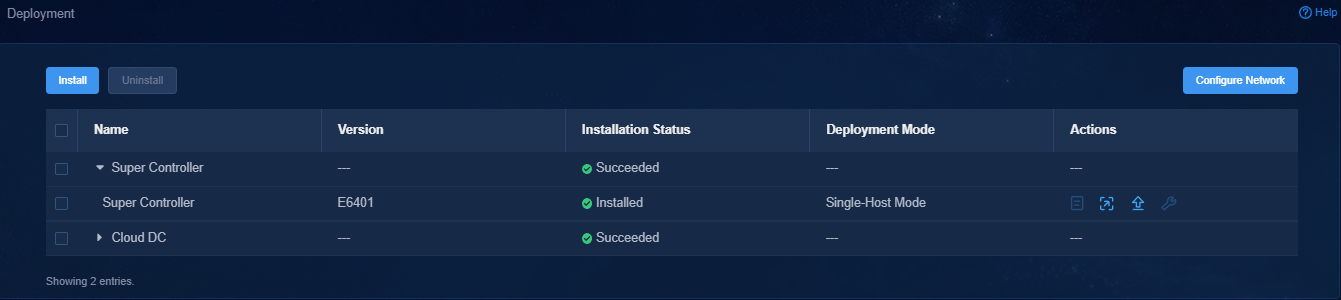
1. Log in to Unified Platform. Click System > Deployment.
Figure 5 Deployment page
2. Click the left chevron button ![]() for Supper Controller to expand controller
information, and then click the upgrade icon
for Supper Controller to expand controller
information, and then click the upgrade icon ![]() .
.
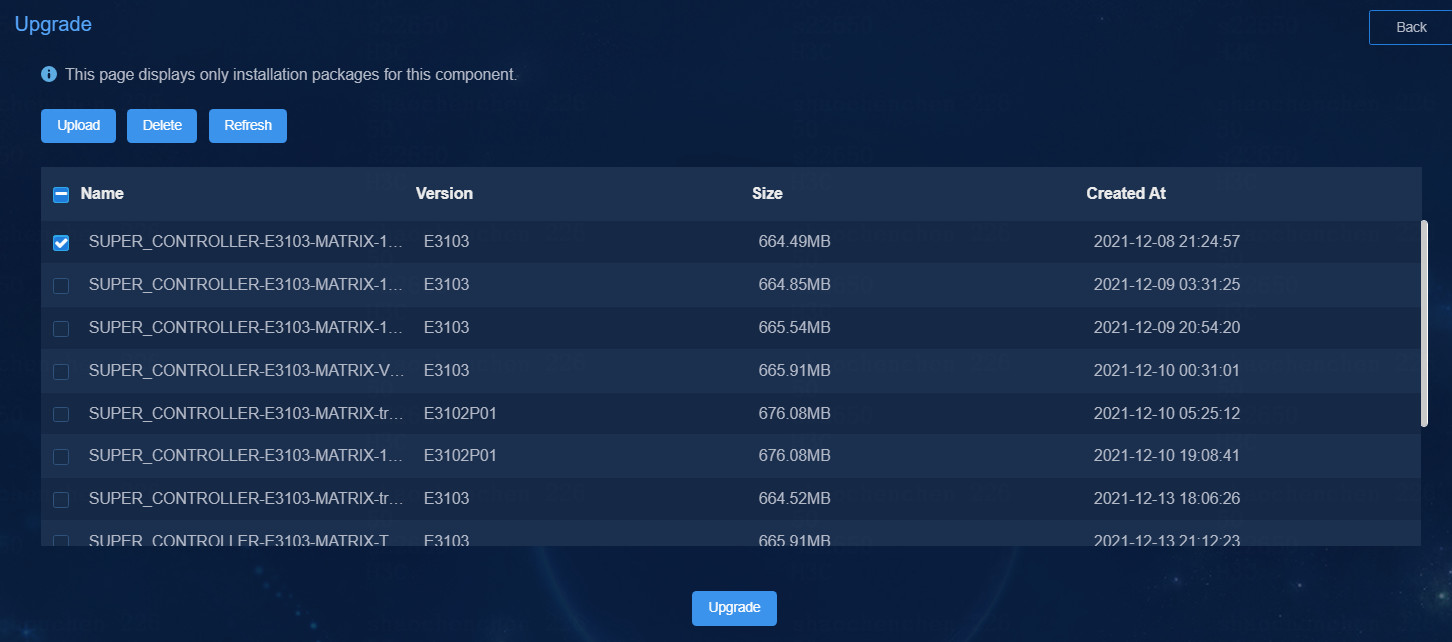
3. Upload and select the installation package.
Figure 6 Upgrading page
4. Click Upgrade.
5. If the upgrade fails, click Roll Back to roll back to the previous version.
Uninstalling Supper Controller
1. Log in to Unified Platform. Click System > Deployment.
2. Click the ![]() icon to the left of Supper Controller name and
then click Uninstall.
icon to the left of Supper Controller name and
then click Uninstall.
Figure 7 Uninstalling Supper Controller

Scaling out Super Controller
Super Controller can be scaled out from standalone mode to cluster mode.
To scale out Super Controller from standalone mode to cluster mode, add two master nodes on Matrix to form a three-host cluster with the existing master node. Then scale out Unified Platform and Super Controller sequentially.
To scale out Super Controller from standalone mode to cluster mode:
1. Scale out Matrix. For more information, see H3C Unified Platform Deployment Guide.
2. Scale out Unified Platform. For more information, see H3C Unified Platform Deployment Guide.
3. Scale out Super Controller.
a. On the top navigation bar, click System, and then select Deployment from the left navigation pane.
Figure 8 Deployment management page
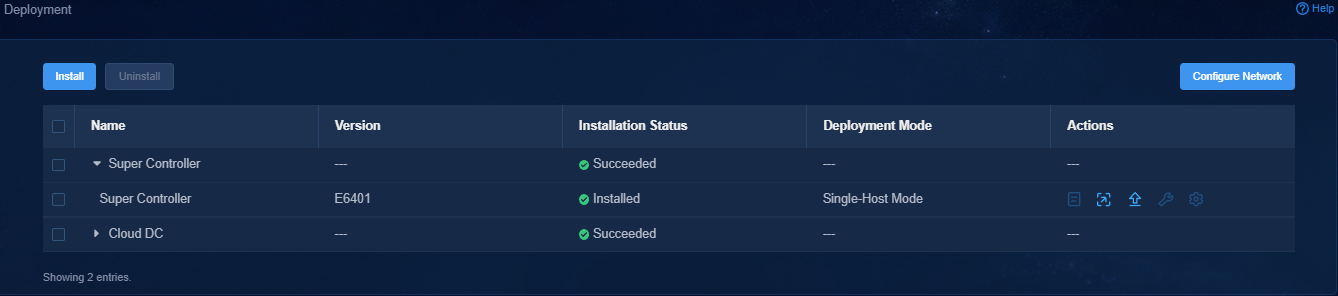
b. Select Super Controller, and then click the ![]() icon in the Actions column.
icon in the Actions column.
c. Click Scale out.
Managing plugins
You can install plugins for Supper Controller to manage multiple controllers from different vendors. After plugins are installed, you can select a plugin for a site from the site management page, and the site service deployment can be completed through the plugin.
From Super Controller, you can manage plugins including uploading, starting, upgrading and deleting plugins.
Obtaining the plugin installation packages
Obtain the Super Controller plugins based on the controllers to manage. You can contact Technical Support to obtain the plugin installation packages, or develop plugins yourself according to H3C Super Controller Driver Plugin Development Guide.
Use Table 17 to select the plugin installation package matching the server architecture.
Table 17 Super Controller plugin installation package
|
Server architecture |
Supper Controller installation package |
|
x86 |
SUPER_CONTROLLER_DRIVER_SeerEngine-version.tar |
|
ARM |
SUPER_CONTROLLER_DRIVER_SeerEngine-version-ARM64.tar |
|
|
IMPORTANT: For successful site service deployment through a plugin, make sure the plugin and Super Controller are consistent in version. |
|
|
NOTE: For some Super Controller versions, the installation package is released only for one server architecture. |
Installing and starting a plugin
1. Log in to Unified Platform. Navigate to the Automation > Data Center Networks > Multi-Data Center > Settings page.
2. Expand the Plugins item and then click Add. In the dialog box that opens, select the plugin file and then click Upload.
Figure 9 Plugins management
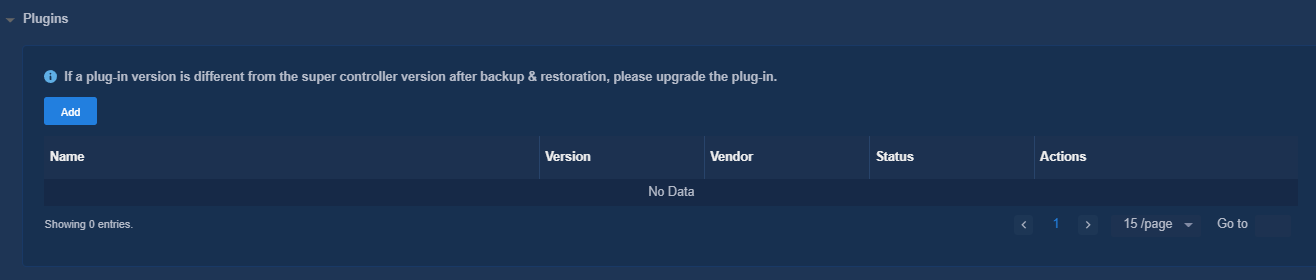
Figure 10 Uploading the plugin

3. After the plugin is uploaded, click Start to start the plugin.
Upgrading a plugin
1. Log in to Unified Platform. Navigate to the Automation > Data Center Networks > Multi-Data Center > Settings page.
2. Expand the Plugins item. Click the upgrade icon ![]() in
the Actions column for the target plugin. In the dialog box that opens, select the
plugin file for upgrade and then click Upload.
in
the Actions column for the target plugin. In the dialog box that opens, select the
plugin file for upgrade and then click Upload.
Figure 11 Plugins management

Figure 12 Uploading the plugin file

3. Click Upgrade.
Deleting a plugin
1. Log in to Unified Platform. Navigate to the Automation > Data Center Networks > Multi-Data Center > Settings page.
2. Expand the Plugins item. Click the delete icon ![]() in the Actions column
for the target plugin.
in the Actions column
for the target plugin.
Figure 13 Plugins management
