- Table of Contents
-
- 09-Security Configuration Guide
- 00-Preface
- 01-AAA configuration
- 02-802.1X configuration
- 03-MAC authentication configuration
- 04-Portal configuration
- 05-Web authentication configuration
- 06-Triple authentication configuration
- 07-Port security configuration
- 08-User profile configuration
- 09-Password control configuration
- 10-Keychain configuration
- 11-Public key management
- 12-PKI configuration
- 13-IPsec configuration
- 14-SSH configuration
- 15-SSL configuration
- 16-Attack detection and prevention configuration
- 17-TCP attack prevention configuration
- 18-IP source guard configuration
- 19-ARP attack protection configuration
- 20-ND attack defense configuration
- 21-uRPF configuration
- 22-SAVI configuration
- 23-SAVA configuration
- 24-MFF configuration
- 25-Crypto engine configuration
- 26-FIPS configuration
- 27-MACsec configuration
- 28-802.1X client configuration
- 29-Microsegmentation configuration
- Related Documents
-
| Title | Size | Download |
|---|---|---|
| 05-Web authentication configuration | 241.02 KB |
Contents
Configuring Web authentication
Advantages of Web authentication
Web authentication support for EAP
Web authentication support for VLAN assignment
Web authentication support for authorization ACLs
Web authentication support for microsegment assignment
Restrictions and guidelines: Web authentication configuration
Web authentication tasks at a glance
Prerequisites for Web authentication
Configuring a remote Web server for Web authentication
Configuring a remote portal authentication server
Obtaining user information from ARP or ND entries
Configuring a local Web server for Web authentication
Configuring a local portal service
Specifying a Web authentication domain
Setting the redirection wait time
Configuring the aging timer for temporary MAC address entries
Configuring Web authentication-free subnets or host names
Configuring a Web authentication-free subnet
Configuring a Web authentication-free host name
Setting the maximum number of Web authentication users
Configuring online Web authentication user detection
Enabling MAC-based VLAN for Web authentication
Configuring Web authentication multi-VLAN mode
Configuring Web authentication to support Web proxy
Applying a portal MAC binding server for Web authentication
Display and maintenance commands for Web authentication
Web authentication configuration examples
Example: Configuring local Web authentication by using the AAA local authentication method
Example: Configuring local Web authentication by using the AAA remote authentication method
Example: Configuring remote Web authentication by using the AAA local authentication method
Example: Configuring remote Web authentication by using the AAA remote authentication method
Troubleshooting Web authentication
Failure to come online (local authentication interface using the default ISP domain
Configuring Web authentication
About Web authentication
Web authentication is deployed on Layer 2 interfaces of the access device to control user access to networks. The access device redirects unauthenticated users to the specified website. The users can access the resources on the website without authentication. If the users want to access other network resources, they must pass authentication.
Advantages of Web authentication
Web authentication has the following advantages:
· Allows users to perform authentication through webpages without installing client software.
· Provides ISPs with diversified management choices and extended functions. For example, the ISPs can place advertisements, provide community services, and publish information on the authentication page.
Web authentication system
A typical Web authentication system consists of four basic components: authentication client, access device, Web server for Web authentication, and AAA server.
Figure 1 Web authentication system using the local portal server
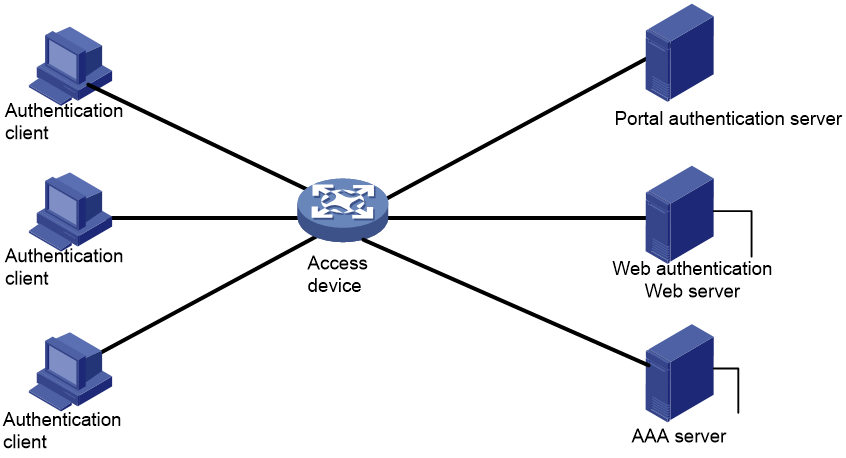
Authentication client
An authentication client is a Web browser that runs HTTP or HTTPS on the user endpoint.
Access device
An access device has the following functions:
· Redirects all user HTTP or HTTPS requests that do not match authentication-free rules to the Web authentication page before authentication.
· Interacts with the AAA server to complete authentication, authorization, and accounting. For more information about AAA, see "Configuring AAA."
· Allows users that pass authentication to access authorized network resources.
Web server for Web authentication
A Web server pushes the Web authentication page to authentication clients and obtains user authentication information (username and password).
A Web server for Web authentication can be a local Web server or a remote Web server. A local Web server is usually integrated into the access device. A remote Web server is a portal Web server.
Portal authentication server
Web authentication uses a portal authentication server as the authentication server, which exchanges client authentication information with the access device.
AAA server
An AAA server interacts with the access device to implement user authentication, authorization, and accounting. A RADIUS server can perform authentication, authorization, and accounting for Web authentication users. An LDAP server can perform authentication for Web authentication users.
Web authentication process
Figure 2 Web authentication process
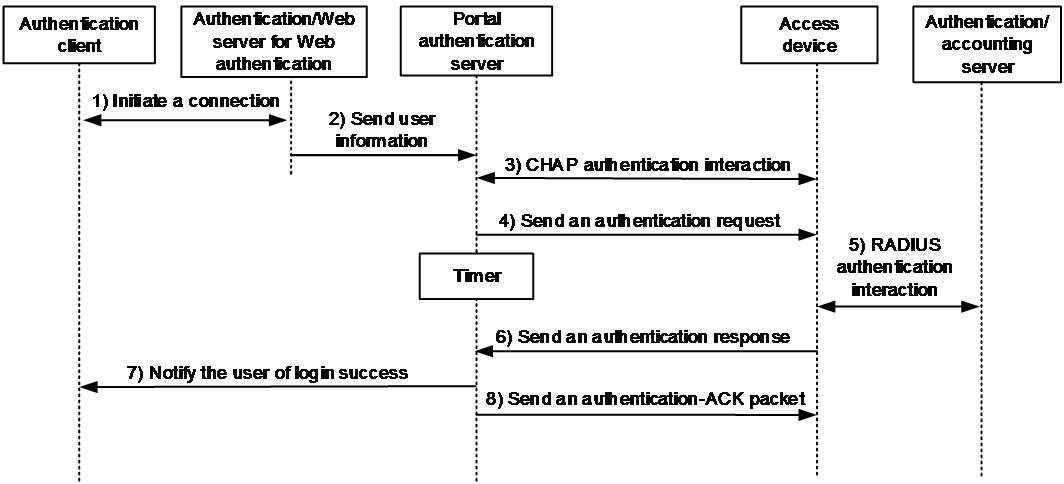
The Web authentication process is as follows:
1. An unauthenticated user sends an HTTP or HTTPS request. When the access device receives the HTTP or HTTPS request on a Layer 2 Ethernet interface enabled with Web authentication, the request, it redirects the request to the Web authentication page. The user enters the username and password on the Web authentication page.
If the user requests the Web authentication page or free Web resources, the access device permits the request. No Web authentication is performed.
2. The Web server for Web authentication sends the user information to the portal authentication.
3. The portal authentication server and the access device interact with each other to perform CHAP authentication. This step is skipped if PAP authentication is used. The authentication interaction type is determined by the portal authentication server.
4. The portal authentication sends an authentication request that contains the username and password of the user to the access device and starts a timer to wait for an authentication response.
5. The access device and the AAA server exchange RADIUS packets to authenticate the user.
6. The access device sends an authentication response indicating authentication success or failure to the portal authentication server.
7. The portal authentication server notifies the authentication result to the client. If the user passes RADIUS authentication, the portal authentication server also sends an authentication-ACK packet to the access device.
Web authentication support for EAP
This feature is supported only when Web authentication uses a remote IMC portal authentication server and an iNode portal client.
Compared with username and password based authentication, digital certificate-based authentication ensures higher security.
The Extensible Authentication Protocol (EAP) supports several digital certificate-based authentication methods, for example, EAP-TLS. Working together with EAP, Web authentication can implement digital certificate-based user authentication.
Figure 3 Web authentication support for EAP protocol exchanges
![]()
As shown in Figure 3, the authentication client and the portal authentication server exchange EAP authentication packets. The portal authentication server and the access device exchange portal authentication packets that carry the EAP-Message attributes. The access device and the RADIUS server exchange RADIUS packets that carry the EAP-Message attributes. The RADIUS server that supports the EAP server function processes the EAP packets encapsulated in the EAP-Message attributes, and provides the EAP authentication result.
The access device does not process but only transports EAP-Message attributes between the portal authentication server and the RADIUS server. Therefore, the access device requires no additional configuration to support EAP authentication.
Web authentication support for VLAN assignment
Authorization VLAN
Web authentication uses VLANs authorized by the AAA server or the access device to control network resource access of authenticated users.
After a user passes Web authentication, the AAA server or the access device authorizes the user to access a VLAN. If the authorization VLAN does not exist, the access device first creates the VLAN and then assigns the user access interface as an untagged member to the VLAN. If the authorization VLAN already exists, the access device directly assigns the user access interface as an untagged member to the VLAN. Then, the user can access resources in the authorization VLAN.
Table 1 describes the way the access device handles authorization VLANs for Web authenticated users.
|
Port type |
VLAN manipulation |
|
· Access port · Trunk port · Hybrid port with MAC-based-VLAN disabled |
The device assigns the port to the first authenticated user's authorization VLAN. The authorization VLAN becomes the PVID. All Web authentication users on the port must be assigned the same authorization VLAN. If a different authorization VLAN is assigned to a subsequent user, the user cannot pass Web authentication. |
|
Hybrid port with MAC-based VLAN enabled |
The device maps the MAC address of each user to its own authorization VLAN regardless of whether the port is a tagged member. The PVID of the port does not change. |
Auth-Fail VLAN
An Auth-Fail VLAN is a VLAN assigned to users who fail authentication. The Auth-Fail VLAN provides network resources such as the patch server, virus definitions server, client software server, and anti-virus software server to the users. The users can use these resources to upgrade their client software or other programs.
Web authentication supports Auth-Fail VLAN on an interface that performs MAC-based access control. If a user on the interface fails authentication, the access devices creates a MAC VLAN entry based on the MAC address of the user and adds the user to the Auth-Fail VLAN. Then, the user can access the authentication-free IP resources in the Auth-Fail VLAN. All HTTP or HTTPS requests to non-authentication-free IP resources will be redirected to the authentication page. If the user still fails authentication, the interface remains in the Auth-Fail VLAN. If the user passes authentication, the access device removes the interface from the Auth-Fail VLAN and assigns the interface to a VLAN as follows:
· If the authentication server assigns an authorization VLAN to the user, the access device assigns the interface to the authorization VLAN.
· If the authentication server does not assign an authorization VLAN to the user, the access device assigns the interface to the default VLAN.
Web authentication multi-VLAN mode
Web authentication supports single-VLAN or multi-VLAN mode on a port.
In multi-VLAN mode, the port forwards traffic from a user in different VLANs without reauthentication if the user has been authenticated and come online in any VLAN on the port.
In single-VLAN mode, the port reauthenticates an online user when traffic received from that user contains a VLAN tag different from the VLAN in which the user was authenticated. The authentication process differs depending on the MAC move setting in port security and the authorization VLAN assignment status, as follows:
· If no authorization VLAN has been assigned to the online user, the device first logs off the user and then reauthenticates the user in the new VLAN.
· If the online user has been assigned an authorization VLAN, the device handles the user depending on the MAC move setting in port security.
¡ If MAC move is disabled in port security, the user cannot pass authentication and come online from the new VLAN until after it goes offline from the port.
¡ If MAC move is enabled in port security, the user can pass authentication on the new VLAN and come online without having to first go offline from the port. After the user passes authentication on the new VLAN, the original authentication session of the user is deleted from the port.
To enable the port security MAC move feature, use the port-security mac-move permit command.
Web authentication support for authorization ACLs
Web authentication uses ACLs authorized by the AAA server or the access device to control user access to network resources and limit user access rights. When a user passes authentication, the AAA server and the access device assigns an authorization ACL to the access interface of the user. The access device filters traffic from the user on the access interface according to the authorized ACL.
You must configure the authorization ACLs on the access device if you specify authorization ACLs on the authentication server.
To change the access control criteria for the user, you can specify a different authorization ACL on the authentication server or change rules in the authorization ACL on the access device.
The device supports the following types of authorization ACLs:
· Basic ACLs (ACL 2000 to ACL 2999).
· Advanced ACLs (ACL 3000 to ACL 3999).
· Layer 2 ACLs (ACL 4000 to ACL 4999).
For an authorization ACL to take effect, make sure the ACL exists and has ACL rules excluding rules configured with the counting, established, fragment, source-mac, or logging keyword. For more information about ACL rules, see ACL commands in ACL and QoS Command Reference.
In a microsegment network, if a user is assigned both an authorization microsegment and ACL, the authorization ACL does not take effect.
Web authentication support for microsegment assignment
To implement fine-grained isolation of Web authentication user traffic, users are usually assigned to different groups based on their business requirements for group-based user access control. The IDs of the groups are called microsegments, which can be assigned to users by the RADIUS server. When a user comes online, the RADIUS server assigns an authorization microsegment to the user. The access device filters traffic from the user on the access port according to the authorization microsegment. The user can access the network resources in the microsegment.
In a non-microsegment network, do not configure authorization microsegments for users.
Restrictions and guidelines: Web authentication configuration
To redirect HTTPS requests for unauthenticated users correctly, make sure the packet incoming VLANs or VSIs have Layer 3 interfaces (VLAN or VSI interfaces) configured.
To access the resources in the authorization or Auth-Fail VLAN, a user must update the IP address of the client after being assigned to the authorization or Auth-Fail VLAN.
As a best practice, perform Web authentication on users directly connected to the device. As shown in Figure 4, if you enable Web authentication on Port B to authenticate non-directly connected users (the hosts), you must follow these restrictions and guidelines:
· If the RADIUS server assigns an authorization VLAN to the users, make sure the following conditions are met:
¡ The link between Device A and Device B is a trunk link.
¡ The PVIDs of Port A1 and Port B are the same as the authorization VLAN ID.
· If the RADIUS server does not assign an authorization VLAN to the users, make sure the PVIDs of Port A1 and Port B are the same.
Figure 4 Web authentication for non-directly connected users

Web authentication tasks at a glance
To configure Web authentication, perform the following tasks:
1. Configuring a remote Web authentication service
Perform this task if a remote Web server is deployed on the network for Web authentication.
a. Configuring a remote portal authentication server
b. Configuring a remote Web server for Web authentication
c. Obtaining user information from ARP or ND entries
2. Configuring a local Web authentication service
Perform this task if the device is used as the local Web server for Web authentication.
a. Configuring a local Web server for Web authentication
b. Configuring a local portal service
3. Enabling Web authentication
4. (Optional.) Specifying a Web authentication domain
5. (Optional.) Setting the redirection wait time
6. (Optional.) Configuring the aging timer for temporary MAC address entries
7. (Optional.) Configuring Web authentication-free subnets or host names
8. (Optional.) Setting the maximum number of Web authentication users
9. (Optional.) Configuring online Web authentication user detection
10. (Optional.) Enabling MAC-based VLAN for Web authentication
11. (Optional.) Configuring an Auth-Fail VLAN
12. (Optional.) Configuring Web authentication to support Web proxy
13. Applying a portal MAC binding server for Web authentication
This task is required to perform the MAC-based quick authentication.
Prerequisites for Web authentication
The device supports two methods for Web authentication, which are local authentication and RADIUS authentication.
To use the RADIUS authentication method, you must complete the following tasks:
· Install a RADIUS server and configure the RADIUS server properly.
· Make sure the authentication client, the access device, and the RADIUS server can reach each other.
· Configure user accounts on the RADIUS server and configure the RADIUS client information on the access device.
To use the local authentication method, you must configure local users on the access device.
For more information about RADIUS clients and local users, see "Configuring AAA."
Configuring a remote Web server for Web authentication
About this task
In the view of a remote Web server, you can configure the Web server IP address, redirection URL, and the parameters to be carried in the redirection URL.
By default, the state of the Web server specified by the redirection URL is always active. The device cannot obtain the real server state. When primary and secondary Web servers are deployed for continuous authentication service, the device needs to quickly obtain the primary server's state changes to perform primary/secondary switchovers accordingly.
You can associate the Web server with a track entry that is associated with NQA, so the device can periodically detect the reachability of the server through NQA.
· The Track module changes the state of the track entry according to the NQA detection result. The device changes the state of the Web server according to the state of the track entry.
· In this way, if NQA detects that the Web server becomes reachable, the device will set the server state to active. If NQA detects that the Web server becomes unreachable, the device will set the server state to inactive.
For more information about the Track configuration, see High Availability Configuration Guide.
Restrictions and guidelines
To deploy both primary and secondary Web servers, you must associate the primary Web server with a track entry to monitor the reachability status of the server. Otherwise, the device cannot sense the reachability state changes of the primary server to perform primary/secondary switchovers.
The NQA detection for server reachability is performed according to the nqa schedule configuration, which schedules the NQA operation associated with the track entry. Configure the NQA operation time and other detection parameters as needed.
Procedure
1. Enter system view.
system-view
2. Create a remote Web server for Web authentication and enter Web authentication remote Web server view.
web-auth remote server server-name
The local and remote Web servers cannot use the same name.
3. Specify the IP address of the remote Web server for Web authentication.
IPv4:
ip ipv4-address
IPv6:
ipv6 ipv6-address
By default, no IP address is specified for the remote Web server for Web authentication.
The IP address of the remote Web server must be the IP address of the portal Web server used for Web authentication.
You can configure one IPv4 address and one IPv6 address for a remote Web server.
4. Configure the redirection URL of the remote Web server for Web authentication.
url url-string [ track track-entry-number ]
By default, no redirection URL is specified for a Web server for Web authentication.
To provide Web authentication pages for both IPv4 and IPv6 Web authentication users, configure the redirection URL to carry the domain name of the Web server. For example: http://abc.com, where abc.com is the domain name of the Web server.
A Web server can be associated with only one track entry. If you associate Track with the Web server multiple times, the most recent configuration takes effect.
5. (Optional.) Add parameters to the redirection URL of the remote Web server.
url-parameter parameter-name { original-url | source-address | source-mac | value expression }
By default, no parameters are added to the redirection URL of a Web server.
You must use the URL parameter name supported by the Web browser. Different Web browsers support different URL parameter names.
Configuring a remote portal authentication server
For information about configuring a remote portal authentication server, see "Configuring portal authentication."
Obtaining user information from ARP or ND entries
About this task
By default, the device obtains user information required by the portal authentication server from MIB entries. However, MIB entries do not contain the Layer 2 user information (such as MAC address and Layer 2 access interface) required for Web authentication. Users will fail the Web authentication as a result.
To resolve this issue, configure the device to obtain user information from ARP or ND entries.
Procedure
1. Enter system view.
system-view
2. Configure the device to obtain portal user information from ARP or ND entries.
portal access-info trust { arp | nd }
By default, the device obtains user information from FIB entries.
For more information about the configuration, see "Configuring portal authentication."
Configuring a local Web server for Web authentication
Restrictions and guidelines
Specify the IP address of a Layer 3 interface on the device that is routable to the Web client as the listening IP address of the local Web server for Web authentication. As a best practice, use the IP address of a loopback interface. A loopback interface has the following advantages:
· The status of a loopback interface is stable. There will be no authentication page access failures caused by interface failures.
· A loopback interface does not forward received packets to any networks, avoiding impact on system performances when there are many network access requests.
Procedure
1. Enter system view.
system-view
2. Create a local Web server for Web authentication and enter Web authentication local Web server view.
web-auth server server-name
The local and remote Web servers cannot use the same name.
3. Specify the IP address and port number of the local Web server.
IPv4:
ip ipv4-address port port-number
IPv6:
ipv6 ipv6-address port port-number
The port number of the local Web server must be the same as the listening port number of the local portal Web service.
You can configure one IPv4 address and one IPv6 address for a local Web server.
4. Specify the redirection URL for the local Web server.
url url-string
By default, no redirection URL is specified for a Web server for Web authentication.
The redirection URL must start with http:// or https://. The IP address and port number in the specified redirection URL must be the same as those of the local Web server for Web authentication.
To provide Web authentication pages for both IPv4 and IPv6 Web authentication users, configure the redirection URL to carry the domain name of the Web server.
5. (Optional.) Add parameters to the redirection URL of the local Web server.
url-parameter parameter-name { original-url | source-address | source-mac | value expression }
By default, no parameters are added to the redirection URL of a Web server.
You must use the URL parameter name supported by the Web browser. Different Web browsers support different URL parameter names.
6. (Optional.) Configure the local Web server to support the Oasis platform.
server-type oauth
By default, a local Web authentication server does not support the Oasis platform.
To use an oasis server as a local Web authentication server, execute this command to support the oasis platform.
Configuring a local portal service
For information about the local portal service configuration, see "Configuring portal authentication."
Enabling Web authentication
Restrictions and guidelines
For Web authentication to operate correctly, do not enable port security or configure the port security mode on the Layer 2 interface enabled with Web authentication. For more information about port security, see "Configuring port security."
To deploy both primary and secondary Web servers, follow these restrictions and guidelines:
· Only a remote Web server can be used as the primary Web server. A remote or local Web server can be used as the secondary Web server.
· Associate the primary Web server with a track entry (by using the url url-string track track-entry-number command) to monitor the reachability status of the server. Otherwise, the device cannot sense the reachability state changes of the primary server to perform primary/secondary switchovers.
The default HTTPS redirect listening port number on the device is 6654. To change the HTTPS redirect listening port number, see HTTP redirect configuration in Layer 3—IP Services Configuration Guide.
Procedure
1. Enter system view.
system-view
2. Enter interface view.
interface interface-type interface-number
3. Enable Web authentication and specify Web servers for Web authentication.
web-auth enable apply server primary-server-name [ secondary-server secondary-server-name ]
By default, Web authentication is disabled.
Specifying a Web authentication domain
About this task
You can specify different authentication domains for Web authentication users on different interfaces. After you specify a Web authentication domain on an interface, the device uses the authentication domain for AAA of all Web authentication users on the interface, ignoring the domain names carried in the usernames.
The device selects the authentication domain for a Web authentication user on an interface in this order:
1. The authentication domain specified for the interface.
2. The authentication domain carried in the username.
3. The system default authentication domain.
4. The ISP domain configured to accommodate users assigned to nonexistent domains.
If the selected domain does not exist on the device, user authentication fails. For information about ISP domains, see "Configuring AAA."
Procedure
1. Enter system view.
system-view
2. Enter interface view.
interface interface-type interface-number
3. Specify an authentication domain for Web authentication users on the interface.
web-auth domain domain-name
By default, no authentication domain is specified for Web authentication users.
Setting the redirection wait time
About this task
The redirection wait time determines the length of time that the device waits to redirect a user to the specified webpage after the user passes Web authentication.
You need to change the redirection wait time in some scenarios, for example, when a user needs to update the client IP address after passing local Web authentication. To ensure that the specified webpage can be successfully opened, set the redirection wait time to be greater than the time that the user takes to update the IP address of the client.
Procedure
1. Enter system view.
system-view
2. Enter Web authentication local Web server view.
web-auth server server-name
3. Set the redirection wait time.
redirect-wait-time period
By default, the redirection wait time for authenticated users is 5 seconds.
Configuring the aging timer for temporary MAC address entries
About this task
If Web authentication is enabled, the device generates a temporary MAC address entry when it detects traffic from a user for the first time. The entry records the MAC address, access interface, and VLAN ID of the user, as well as the aging time of the entry.
The aging timer works as follows:
· If the user does not initiate authentication when the aging timer expires, the device deletes the temporary entry.
· If the user passes authentication before the aging timer expires, the device delete the aging timer and records online information for the Web authentication user.
· If the user fails authentication before the aging timer expires and an Auth-Fail VLAN is specified for Web authentication, the device binds the MAC address of the user to the Auth-fail VLAN and reset the aging timer. If the user still fails authentication when the aging timer expires, the device deletes the temporary entry for the user.
Restrictions and guidelines
As a best practice, change the aging timer to a bigger value in the following cases:
· Web authentication users without access rights frequently send traffic in a short time. As a result, the access device continuously initiates the web authentication process, increasing the load on the device.
· When a user fails authentication, the user does not have enough time to obtain resources from the Auth-Fail VLAN, for example, it failed to download the virus patches.
Procedure
1. Enter system view.
system-view
2. Configure the aging timer for temporary MAC address entries.
web-auth timer temp-entry-aging aging-time-value
By default, the aging timer for temporary MAC address entries is 60 seconds.
Configuring Web authentication-free subnets or host names
Configuring a Web authentication-free subnet
About this task
You can configure a Web authentication-free subnet so that users can freely access the network resources in the subnet without being authenticated.
Restrictions and guidelines
As a best practice, do not configure the same address value for a Web authentication-free subnet and a 802.1X free IP. Otherwise, when you cancel one of the configuration, the other configuration does not take effect, either.
Procedure
1. Enter system view.
system-view
2. Configure a Web authentication-free subnet.
web-auth free-ip ip-address { mask-length | mask }
By default, no Web authentication-free subnets exist.
Configuring a Web authentication-free host name
About this task
You can configure Web authentication-free host names so that users can freely access the specified host resources without being authenticated.
Restrictions and guidelines
Web authentication-free host names support only precise matching. For example, Web authentication-free host name abc.com.cn matches only HTTP/HTTPS request packets that contain the host name of abc.com.cn. It does not match packets that contain host name dfabc.com.cn.
Prerequisites
Before configuring Web authentication-free destination host names, make sure a DNS server has been deployed on the network, or the host name-to-IPv4 address mappings have been configured by using the ip host command. For more information about the ip host command, see DNS commands in Layer 3—IP Services Command Reference.
Procedure
1. Enter system view.
system-view
2. Configure a Web authentication-free host name.
web-auth free-host host-name
By default, no Web authentication-free host names exist.
Setting the maximum number of Web authentication users
Restrictions and guidelines
If the maximum number of online Web authentication users you set is less than that of the current online Web authentication users, the limit can be set successfully and does not impact the online Web authentication users. However, the system does not allow new Web authentication users to log in until the number drops down below the limit.
Procedure
1. Enter system view.
system-view
2. Enter interface view.
interface interface-type interface-number
3. Set the maximum number of Web authentication users on the interface.
web-auth max-user max-number
By default, the maximum number of Web authentication users is 1024.
Configuring online Web authentication user detection
About this task
This feature enables the device to detect packets of an online user at the specified detection interval. If no packet from the user is received within the interval, the device logs out the user and notifies the RADIUS server to stop accounting for the user.
Restrictions and guidelines
To prevent the device from mistakenly logging out users, set the detection interval to be the same as the aging time of MAC address entries.
On a Layer 2 aggregate interface, the real interval for logging out a user is greater than the specified detection interval. The maximum delay is 300 seconds.
Procedure
1. Enter system view.
system-view
2. Enter interface view.
interface interface-type interface-number
3. Enable online Web authentication user detection.
web-auth offline-detect interval interval
By default, online Web authentication user detection is disabled.
Enabling MAC-based VLAN for Web authentication
About this task
In non-microsegmentation scenarios, you must enable MAC-based VLAN for Web authentication if you enable both Web authentication and MAC-based VLAN on a Layer 2 interface. In microsegmentation scenario, disable MAC-based VLAN for Web authentication as a best practice. For more information about the MAC-based VLAN feature, see the VLAN configuration in Layer 2—LAN Switching Configuration Guide.
Restrictions ang guidelines
Enabling or disabling MAC-based VLAN for Web authentication on an interface will log out online Web authentication users on the interface. As a best practice, execute this command before you enable Web authentication
Procedure
1. Enter system view.
system-view
2. Enter interface view.
interface interface-type interface-number
3. Enable MAC-based VLAN for Web authentication.
web-auth mac-vlan enable
By default, MAC-based VLAN is disabled..
Configuring an Auth-Fail VLAN
Restrictions and guidelines
To make the Auth-Fail VLAN take effect, you must also enable MAC-based VLAN on the interface, and set the subnet of the Auth-Fail VLAN as the Web authentication-free subnet.
Because MAC-based VLAN takes effect only on Hybrid ports, Auth-Fail VLAN also takes effect only on Hybrid ports.
If a VLAN is specified as the super VLAN, do not configure the VLAN as an Auth-Fail VLAN of an interface. If a VLAN is specified as an Auth-Fail VLAN of an interface, do not configure the VLAN as a super VLAN.
Do not delete the VLAN that has been configured as an Auth-Fail VLAN. To delete this VLAN, first cancel the Auth-Fail VLAN configuration by using undo web-auth auth-fail vlan command.
Procedure
1. Enter system view.
system-view
2. Enter interface view.
interface interface-type interface-number
3. Configure an Auth-Fail VLAN.
web-auth auth-fail vlan authfail-vlan-id
By default, no Auth-Fail VLAN is configured on an interface.
Configuring Web authentication multi-VLAN mode
1. Enter system view.
system-view
2. Enter interface view.
interface interface-type interface-number
3. Enable the multi-VLAN mode for Web authentication on the port.
web-auth host-mode multi-vlan
By default, Web authentication operates in single-VLAN mode on a port.
Configuring Web authentication to support Web proxy
About this task
By default, proxied HTTP or HTTPS requests cannot trigger Web authentication but are silently dropped. To allow such HTTP or HTTPS requests to trigger Web authentication, specify the port numbers of the Web proxy servers on the device.
Restrictions and guidelines
If a user's browser uses the Web Proxy Auto-Discovery (WPAD) protocol to discover Web proxy servers, follow these restrictions and guidelines:
· Add the port numbers of the Web proxy servers on the device.
· Configure a Web authentication-free rule on the device to allow user packets destined for the IP address of the WPAD server to pass without authentication.
· Users must add the IP address of the Web server for Web authentication as a proxy exception in their browsers. Then, HTTP or HTTPS packets that the users send to the Web server for Web authentication will not be sent to Web proxy servers.
Procedure
1. Enter system view.
system-view
2. Add a Web proxy server port number.
web-auth proxy [ https ] port port-number
By default, no Web proxy server port numbers are configured on the device.
Do not specify port number 80 or 443 because 80 and 443 are port numbers reserved for Web authentication.
Do not specify the same Web proxy server port number for HTTP and HTTPS.
Applying a portal MAC binding server for Web authentication
About this task
In Web authentication scenarios where valid users need to frequently access the network, you can configure MAC-based quick authentication to allow the users to pass Web authentication without manually entering the authentication information.
MAC-based quick authentication is also called MAC-trigger authentication or transparent authentication. It requires a portal MAC binding server.
When a user accesses the network, the access device sends the user's MAC address in a query message to the portal MAC binding server. If the portal MAC binding server finds user authentication information bound to the MAC address, it sends the user authentication information to the access device to initiate Web authentication. The user is authenticated without entering the username and password.
Restrictions and guidelines
This feature supports only IPv4 portal MAC binding servers, and the server type must be Oasis platform.
To make the MAC-based quick authentication take effect, complete the following tasks:
· Complete the normal Layer 2 Web authentication configuration.
· Configure the IP address and port number of the portal MAC binding server to be used.
· Apply the portal MAC binding server to a Layer 2 Ethernet interface or Layer 2 aggregate interface.
Prerequisites
Before apply a portal MAC binding server for Web authentication, deploy the portal MAC binding server on the network.
Procedure
1. Enter system view.
system-view
2. Enter interface view.
interface interface-type interface-number
3. Apply a portal MAC binding server to the interface.
web-auth apply portal mac-trigger-server server-name
By default, no portal MAC binding server is applied for Web authentication.
Display and maintenance commands for Web authentication
Execute display commands in any view.
|
Task |
Command |
|
Display Web authentication configuration information on interfaces. |
display web-auth [ interface interface-type interface-number ] |
|
Display Web authentication-free subnets. |
display web-auth free-ip |
|
Display information about Web servers for Web authentication. |
display web-auth server [ server-name ] |
|
Display Web authentication user information. |
display web-auth user [ drni [ local | peer ] ] [ interface interface-type interface-number | slot slot-number ] |
Web authentication configuration examples
Example: Configuring local Web authentication by using the AAA local authentication method
Network configuration
As shown in Figure 5, the host is directly connected to the device through Ten-GigabitEthernet 1/0/1.
Configure local Web authentication on Ten-GigabitEthernet 1/0/1, and configure the device to perform local authentication and authorization for the local Web authentication users.
Configure a local Web server on the device that uses the IP address of Loopback 0 and port 80 for Web authentication. Configure the device to use HTTP to transfer the authentication data.

Prerequisites
Create VLANs, assign IP addresses to the VLAN interfaces, and assign interfaces to the VLANs.
Procedure
1. Configure a local user:
# Create a local network access user named localuser.
<Device>system-view
[Device] local-user localuser class network
# Set the password for user localuser.
[Device-luser-network-localuser] password simple 123456TESTplat&!
# Authorize the user to use LAN access services.
[Device-luser-network-localuser] service-type lan-access
[Device-luser-network-localuser] quit
2. Configure an ISP domain:
# Create an ISP domain named local.
[Device] domain local
# Configure the ISP domain to perform local authentication, authorization, and accounting for LAN access users.
[Device-isp-local] authentication lan-access local
[Device-isp-local] authorization lan-access local
[Device-isp-local] accounting lan-access local
[Device-isp-local] quit
3. Configure a local portal Web service:
# Create an HTTP-based local portal Web service and enter its view.
[Device] portal local-web-server http
# Specify file defaultfile.zip as the default authentication page file for the local portal Web service. (Make sure the authentication page file already exists in the root directory of the storage medium on the device.)
[Device-portal-local-websvr-http] default-logon-page defaultfile.zip
# Specify the HTTP listening port number as 80 for the portal Web service.
[Device–portal-local-websvr-http] tcp-port 80
[Device-portal-local-websvr-http] quit
4. Configure local Web authentication:
# Create a local Web server named user for Web authentication and enter its view.
[Device] web-auth server user
# Configure the redirection URL for the local Web server as http://20.20.0.1:8080/portal/.
[Device-web-auth-server-user] url http://20.20.0.1:8080/portal/
# Specify the IP address of the local Web server as 20.20.0.1 (the IP address of Loopback 0) and the port number as 80.
[Device-web-auth-server-user] ip 20.20.0.1 port 80
[Device-web-auth-server-user] quit
# Specify ISP domain local as the Web authentication domain.
[Device] interface ten-gigabitethernet 1/0/1
[Device-Ten-GigabitEthernet1/0/1] web-auth domain local
# Enable Web authentication that uses local Web server user.
[Device-Ten-GigabitEthernet1/0/1] web-auth enable apply server user
[Device-Ten-GigabitEthernet1/0/1] quit
Verifying the configuration
# Display online Web authentication user information after user localuser passes Web authentication.
[Device] display web-auth user
Total online web-auth users: 1
User Name: localuser
MAC address: acf1-df6c-f9ad
Access interface: Ten-GigabitEthernet1/0/1
Initial VLAN: 100
Authorization VLAN: N/A
Authorization ACL ID: N/A
Authorization user profile: N/A
Example: Configuring local Web authentication by using the AAA remote authentication method
Network configuration
As shown in Figure 6, the host is directly connected to the device through Ten-GigabitEthernet 1/0/1.
Configure local Web authentication on Ten-GigabitEthernet 1/0/1, and use a remote RADIUS server to perform authentication, authorization, and accounting for the local Web authentication users.
Configure a local Web server on the device that uses the IP address of Loopback 0 and port 80 for Web authentication. Configure the device to use HTTP to transfer the authentication data.
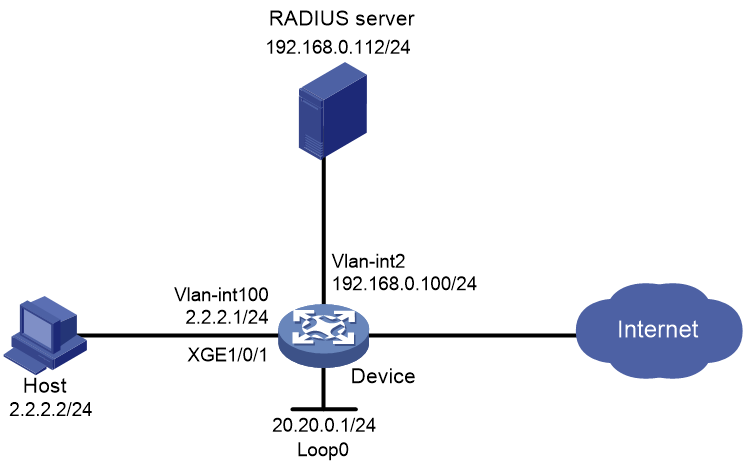
Prerequisites
Configure the RADIUS server properly to provide authentication, authorization, and accounting functions for users. In this example, the username is configured as user1 on the RADIUS server.
Create VLANs, assign IP addresses to the VLAN interfaces, and assign interfaces to the VLANs. Make sure the host, the RADIUS server, and the device can reach each other.
Procedure
1. Configure a RADIUS scheme:
# Create a RADIUS scheme named rs1.
<Device> system-view
[Device] radius scheme rs1
# Specify the primary authentication server and primary accounting server, and configure the keys for communication with the servers.
[Device-radius-rs1] primary authentication 192.168.0.112
[Device-radius-rs1] primary accounting 192.168.0.112
[Device-radius-rs1] key authentication simple radius
[Device-radius-rs1] key accounting simple radius
# Exclude the ISP domain name from the username sent to the RADIUS server.
[Device-radius-rs1] user-name-format without-domain
[Device-radius-rs1] quit
2. Configure an authentication domain:
# Create an ISP domain named dm1.
[Device] domain dm1
# Configure AAA methods for the ISP domain
[Device-isp-dm1] authentication lan-access radius-scheme rs1
[Device-isp-dm1] authorization lan-access radius-scheme rs1
[Device-isp-dm1] accounting lan-access radius-scheme rs1
[Device-isp-dm1] quit
3. Configure a local portal Web service:
# Create an HTTP-based local portal Web service.
[Device] portal local-web-server http
# Specify the file defaultfile.zip as the default authentication page file for the local portal Web service. (Make sure the authentication page file already exists in the root directory of the storage medium on the device.)
[Device-portal-local-websvr-http] default-logon-page defaultfile.zip
# Specify 80 as the port number listened by the local portal Web service.
[Device–portal-local-websvr-http] tcp-port 80
[Device-portal-local-websvr-http] quit
4. Configure local Web authentication:
# Create a local Web server named user for Web authentication and enter its view.
[Device] web-auth server user
# Specify http://20.20.0.1:8080/portal/ as the redirection URL for the local Web server.
[Device-web-auth-server-user] url http://20.20.0.1:8080/portal/
# Specify the IP address of the local Web server as 20.20.0.1 (the IP address of Loopback 0) and the port number as 80.
[Device-web-auth-server-user] ip 20.20.0.1 port 80
[Device-web-auth-server-user] quit
# Specify domain dml as the Web authentication domain.
[Device] interface ten-gigabitethernet 1/0/1
[Device-Ten-GigabitEthernet1/0/1] web-auth domain dm1
# Enable Web authentication that uses local Web server user.
[Device-Ten-GigabitEthernet1/0/1] web-auth enable apply server user
[Device-Ten-GigabitEthernet1/0/1] quit
Verifying the configuration
# Display Web authentication user information after user user1 passes Web authentication.
[Device] display web-auth user
Total online web-auth users: 1
User Name: user1
MAC address: acf1-df6c-f9ad
Access interface: Ten-GigabitEthernet1/0/1
Initial VLAN: 100
Authorization VLAN: N/A
Authorization ACL ID: N/A
Authorization user profile: N/A
Example: Configuring remote Web authentication by using the AAA local authentication method
Network configuration
As shown in Figure 7, the host is directly connected to the device through Ten-GigabitEthernet 1/0/1.
Configure remote Web authentication on Ten-GigabitEthernet 1/0/1, and configure the device to perform local authentication and authorization for the remote Web authentication users.
The remote Web server pushes Web authentication pages to users.
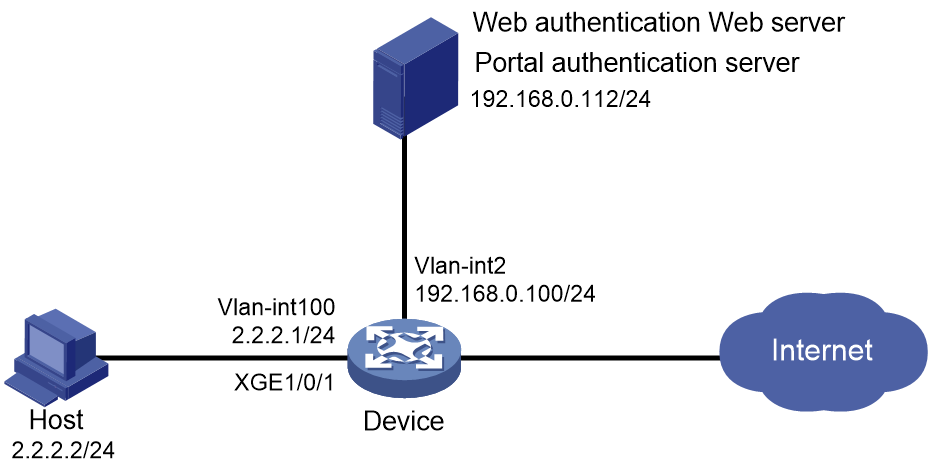
Prerequisites
Configure the portal authentication server properly to provide normal portal functions for users.
Create VLANs, assign IP addresses to the VLAN interfaces, and assign interfaces to the VLANs. Make sure the host, the RADIUS server, and the device can reach each other.
Procedure
1. Configure a local user:
# Create a local network access user named localuser.
<Device>system-view
[Device] local-user localuser class network
# Set the password for user localuser.
[Device-luser-network-localuser] password simple 123456TESTplat&!
# Authorize the user to use LAN access services.
[Device-luser-network-localuser] service-type lan-access
[Device-luser-network-localuser] quit
2. Configure an ISP domain:
# Create an ISP domain named local.
[Device] domain local
# Configure the ISP domain to perform local authentication, authorization, and accounting for LAN access users.
[Device-isp-local] authentication lan-access local
[Device-isp-local] authorization lan-access local
[Device-isp-local] accounting lan-access local
[Device-isp-local] quit
3. Configure the portal authentication server:
[Device] portal server newpt
[Device-portal-server-newpt] ip 192.168.0.112 key simple portal
[Device-portal-server-newpt] port 50100
[Device-portal-server-newpt] quit
4. Configure remote Web authentication:
# Create a remote Web server named user for Web authentication and enter its view.
[Device] web-auth remote server user
# Configure the redirection URL of the remote Web server as http://192.168.0.112:8080/portal/.
[Device-web-auth-remote-server-user] url http://192.168.0.112:8080/portal/
# Configure the IP address of the remote Web server as 192.168.0.112.
[Device-web-auth-remote-server-user] ip 192.168.0.112
[Device-web-auth-remote-server-user] quit
# Specify an authentication domain for Web authentication users.
[Device] interface gigabitethernet 1/0/1
[Device-GigabitEthernet1/0/1] web-auth domain local
# Enable Web authentication that uses remote Web server user.
[Device-GigabitEthernet1/0/1] web-auth enable apply server user
[Device-GigabitEthernet1/0/1] quit
5. Configure the device to obtain user information from ARP entries.
[Device] portal access-info trust arp
Verifying the configuration
# Display Web authentication user information after user user1 passes Web authentication.
[Device] display web-auth user
Total online web-auth users: 1
User Name: user1
MAC address: acf1-df6c-f9ad
Access interface: GigabitEthernet1/0/1
Initial VLAN: 100
Authorization VLAN: N/A
Authorization ACL ID: N/A
Authorization user profile: N/A
Example: Configuring remote Web authentication by using the AAA remote authentication method
Network configuration
As shown in Figure 8, the host is directly connected to the device through Ten-GigabitEthernet 1/0/1.
Configure remote Web authentication on Ten-GigabitEthernet 1/0/1, and use a remote RADIUS server to perform authentication, authorization, and accounting for the remote Web authentication users.
The remote Web server pushes Web authentication pages to users.
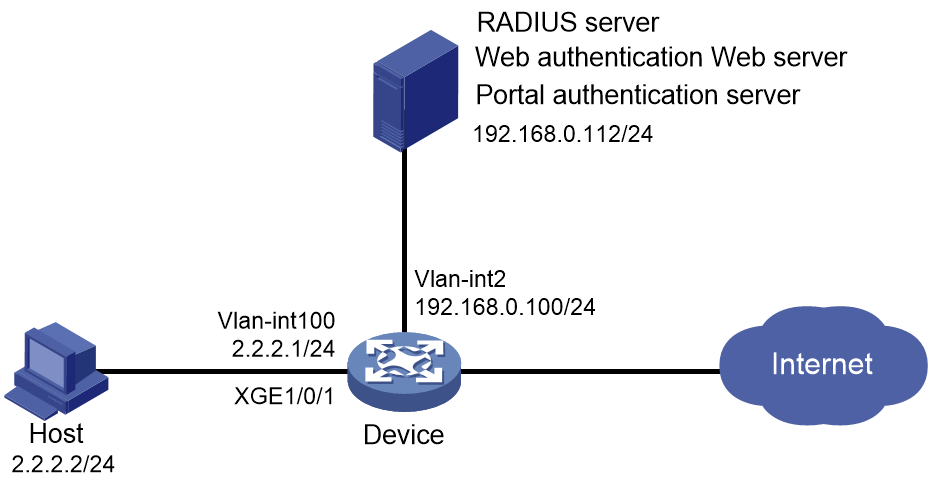
Prerequisites
Configure the RADIUS server properly to provide authentication, authorization, and accounting functions for users. In this example, the username is configured as user1 on the RADIUS server.
Configure the portal authentication server properly to provide normal portal functions for users.
Create VLANs, assign IP addresses to the VLAN interfaces, and assign interfaces to the VLANs. Make sure the host, the RADIUS server, and the device can reach each other.
Procedure
1. Configure a RADIUS scheme:
# Create a RADIUS scheme named rs1.
<Device> system-view
[Device] radius scheme rs1
# Specify the primary authentication server and primary accounting server, and configure the keys for communication with the servers.
[Device-radius-rs1] primary authentication 192.168.0.112
[Device-radius-rs1] primary accounting 192.168.0.112
[Device-radius-rs1] key authentication simple radius
[Device-radius-rs1] key accounting simple radius
# Exclude the ISP domain name from the username sent to the RADIUS server.
[Device-radius-rs1] user-name-format without-domain
[Device-radius-rs1] quit
2. Configure an authentication domain:
# Create an ISP domain named dm1.
[Device] domain dm1
# Configure AAA methods for the ISP domain
[Device-isp-dm1] authentication lan-access radius-scheme rs1
[Device-isp-dm1] authorization lan-access radius-scheme rs1
[Device-isp-dm1] accounting lan-access radius-scheme rs1
[Device-isp-dm1] quit
3. Configure the portal authentication server:
[Device] portal server newpt
[Device-portal-server-newpt] ip 192.168.0.112 key simple portal
[Device-portal-server-newpt] port 50100
[Device-portal-server-newpt] quit
4. Configure remote Web authentication:
# Create a remote Web server named user for Web authentication and enter its view.
[Device] web-auth remote server user
# Configure the redirection URL of the remote Web server as http://192.168.0.112:8080/portal/.
[Device-web-auth-remote-server-user] url http://192.168.0.112:8080/portal/
# Configure the IP address of the remote Web server as 192.168.0.112.
[Device-web-auth-remote-server-user] ip 192.168.0.112
[Device-web-auth-remote-server-user] quit
# Specify an authentication domain for Web authentication users.
[Device] interface gigabitethernet 1/0/1
[Device-GigabitEthernet1/0/1] web-auth domain dm1
# Enable Web authentication that uses remote Web server user.
[Device-GigabitEthernet1/0/1] web-auth enable apply server user
[Device-GigabitEthernet1/0/1] quit
5. Configure the device to obtain user information from ARP entries.
[Device] portal access-info trust arp
Verifying the configuration
# Display Web authentication user information after user user1 passes Web authentication.
[Device] display web-auth user
Total online web-auth users: 1
User Name: user1
MAC address: acf1-df6c-f9ad
Access interface: GigabitEthernet1/0/1
Initial VLAN: 100
Authorization VLAN: N/A
Authorization ACL ID: N/A
Authorization user profile: N/A
Troubleshooting Web authentication
Failure to come online (local authentication interface using the default ISP domain
Symptom
No authentication domain is specified for the local authentication interface. A user fails to pass Web authentication to come online.
Analysis
If no Web authentication domain is specified, the system default ISP domain (domain system) is used for Web authentication. The system default domain uses the local authentication method by default. Using these default domain settings, the local authentication should have operated correctly.
The local authentication fails might because that the authentication method of the system default domain is changed or the system default domain is changed.
Solution
To resolve the problem, perform the following tasks:
1. Use the display domain command to identify whether the AAA methods for Web users in the system default domain are local.
2. If the AAA methods for Web users in the system default domain are not local, reconfigure the AAA methods as local.
