- Table of Contents
-
- 03-Security Configuration Guide
- 00-Preface
- 01-Security zone configuration
- 02-Security policy configuration
- 03-Object group configuration
- 04-Object policy configuration
- 05-AAA configuration
- 06-IPoE configuration
- 07-Portal configuration
- 08-MAC authentication configuration
- 09-User identification configuration
- 10-Password control configuration
- 11-Public key management
- 12-PKI configuration
- 13-SSH configuration
- 14-SSL configuration
- 15-ASPF configuration
- 16-APR configuration
- 17-Session management
- 18-Connection limit configuration
- 19-Attack detection and prevention configuration
- 20-DDoS protection configuration
- 21-uRPF configuration
- 22-ARP attack protection configuration
- 23-ND attack defense configuration
- 24-IP-MAC binding configuration
- 25-IP reputation configuration
- 26-Keychain configuration
- 27-Crypto engine configuration
- Related Documents
-
| Title | Size | Download |
|---|---|---|
| 25-IP reputation configuration | 90.38 KB |
Contents
Restrictions: Hardware compatibility with IP reputation
Restrictions: Licensing requirements for IP reputation
IP reputation tasks at a glance
Enabling IP reputation globally
Specifying actions for an attack category
Specifying an exception IP address
Enabling the top hit ranking feature
Display and maintenance commands for IP reputation
IP reputation configuration examples
Example: Configuring IP reputation
Configuring IP reputation
About IP reputation
The IP reputation feature uses IP addresses on the IP reputation list to filter network traffic. The list contains IP addresses with poor reputation, which are vulnerable to DDoS attacks, command injection attacks, Trojan virus download attacks, and port scan attacks. Each IP address entry on the reputation list contains the attributes of the attack category, match field, and actions for matching packets..
IP reputation workflow
Figure 1 describes the IP reputation workflow.
Figure 1 IP reputation workflow

After receiving a packet, the device performs the following operations:
1. Determines whether the source or destination IP address of the packet matches an exception IP address.
¡ If a match is found, the device forwards the packet.
¡ If no match exists, the device proceeds to the next step.
2. Determines whether the packet matches an IP address on the IP reputation list.
Whether an IP address on the list is compared to the source or destination IP address in the packet depends on the match field attribute of the IP address entry. If the match field attribute is bidirectional, the reputation IP address is compared with both the source and destination IP addresses in the packet. A match is found when this reputation IP address is the same as either the source or destination IP address in the packet.
¡ If a match is found, the device takes actions for the attack category of the IP address. The device supports the following actions:
- Permit—Allows packets to pass through.
- Drop—Drops packets.
- Logging—Generates IP reputation logs for the matching IP address.
¡ If no match is found, the device forwards the packet.
Restrictions: Hardware compatibility with IP reputation
|
Hardware platform |
Module type |
IP reputation compatibility |
|
M9006 M9010 M9014 |
Blade III firewall module |
Yes |
|
Blade IV firewall module |
Yes |
|
|
Blade V firewall module |
Yes |
|
|
NAT module |
No |
|
|
Application delivery engine (ADE) module |
Yes |
|
|
Anomaly flow cleaner (AFC) module |
No |
|
|
M9010-GM |
Encryption module |
Yes |
|
M9016-V |
Blade V firewall module |
Yes |
|
M9008-S M9012-S |
Blade IV firewall module |
Yes |
|
Application delivery engine (ADE) module |
Yes |
|
|
Intrusion prevention service (IPS) module |
Yes |
|
|
Video network gateway module |
Yes |
|
|
Anomaly flow cleaner (AFC) module |
No |
|
|
M9008-S-6GW |
IPv6 module |
Yes |
|
M9008-S-V |
Firewall module |
Yes |
|
M9000-AI-E8 M9000-AI-E16 |
Blade V firewall module |
Yes |
Restrictions: Licensing requirements for IP reputation
To use the IP reputation feature, you must purchase a license for the feature and install it on the device. If the license expires, the IP reputation feature can operate normally for a grace period of seven days with the existing IP reputation list on the device. After seven days, the existing IP reputation list will be cleared if still no valid license is installed, and the IP reputation feature becomes unavailable. For more information about licenses, see license management in Fundamentals Configuration Guide.
IP reputation tasks at a glance
To configure IP reputation, perform the following tasks:
1. Enabling IP reputation globally
2. Specifying actions for an attack category
3. (Optional.) Specifying an exception IP address
4. (Optional.) Enabling the top hit ranking feature
Enabling IP reputation globally
About this task
This feature identifies packets based on the source or destination IP address on the reputation list and processes the matching packets based on the attack category of the IP address.
Procedure
1. Enter system view.
system-view
2. Enter IP reputation view.
ip-reputation
3. Enable IP reputation globally.
global enable
By default, IP reputation is disabled globally.
Specifying actions for an attack category
About this task
On the IP reputation list, an IP address can belong to multiple attack categories. Each attack category has its own actions.
If an IP address belongs to only one attack category, the device takes the actions in this attack category. If an IP address belongs to multiple attack categories, the device takes an action that has higher priority among all actions in those attack categories. The drop action has higher priority than the permit action.
If logging is enabled for one of attack categories to which an IP address belongs, the device generates a log when the IP address is matched.
The device supports fast output of IP reputation logs. For more information about fast log output, see fast log output configuration in Network Management and Monitoring Configuration Guide.
Procedure
1. Enter system view.
system-view
2. Enter IP reputation view.
ip-reputation
3. Specify actions for an attack category.
attack-category attack-id { action { deny | permit } | logging { disable | enable } } *
By default, no actions are configured for an attack category and each attack category has its own pre-defined actions.
Specifying an exception IP address
About this task
The device forwards a packet if the source or destination IP address of the packet is an exception IP address.
Procedure
1. Enter system view.
system-view
2. Enter IP reputation view.
ip-reputation
3. Specify an exception IP address.
exception ipv4 ipv4-address
By default, no exception IP address is specified.
Enabling the top hit ranking feature
About this task
This feature enables the device to collect hit statistics for IP addresses on the IP reputation list and rank them. After you disable this feature, the device clears hit statistics for IP reputation.
Procedure
1. Enter system view.
system-view
2. Enter IP reputation view.
ip-reputation
3. Enabling the top hit ranking feature.
top-hit-statistics enable
By default, the top hit ranking feature is disabled.
Display and maintenance commands for IP reputation
Execute display commands in any view.
|
Task |
Command |
|
Display information about attack categories for IP reputation. |
display ip-reputation attack-category |
|
Display exception IP addresses. |
display ip-reputation exception |
|
Display statistics for IP addresses with the highest hits on the IP reputation list. |
In standalone mode: display ip-reputation top-hit-statistics [ top-number ] [ slot slot-number ] In IRF mode: display ip-reputation top-hit-statistics [ top-number ] [chassis chassis-number slot slot-number [ cpu cpu-number ] ] |
|
Display IP reputation information about an IP address. |
display ip-reputation ipv4 ipv4-address |
IP reputation configuration examples
Example: Configuring IP reputation
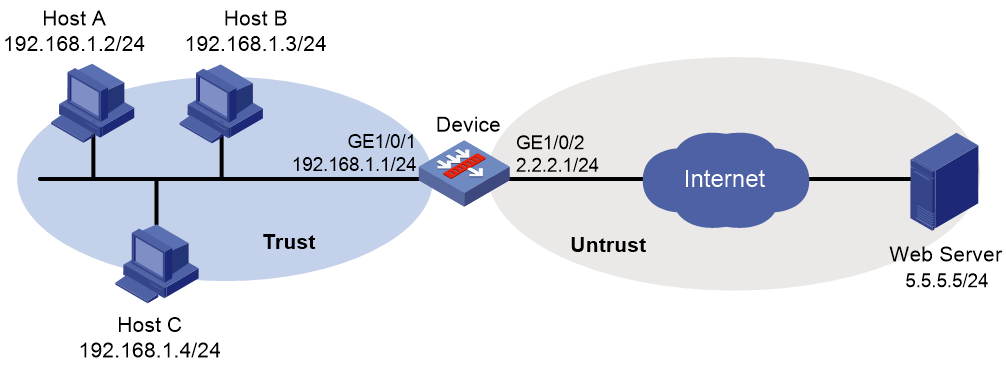
Network configuration
As shown in Figure 2, the device connects to the LAN and Internet through security zones Trust and Untrust, respectively. Configure IP reputation on the device to filter incoming and outgoing traffic on the device, and enable the top hit ranking feature to collect hit statistics.
Procedure
1. Assign IP addresses to interfaces:
# Assign an IP address to interface GigabitEthernet 1/0/1.
<Device> system-view
[Device] interface gigabitethernet 1/0/1
[Device-GigabitEthernet1/0/1] ip address 192.168.1.1 255.255.255.0
[Device-GigabitEthernet1/0/1] quit
# Assign IP addresses to other interfaces in the same way. (Details not shown.)
2. Configure settings for routing.
This example configures static routes, and the next hop in the routes is 2.2.2.2 to the external Web server.
[Device] ip route-static 5.5.5.0 24 2.2.2.2
3. Add interfaces to security zones.
[Device] security-zone name trust
[Device-security-zone-Trust] import interface gigabitethernet 1/0/1
[Device-security-zone-Trust] quit
[Device] security-zone name untrust
[Device-security-zone-Untrust] import interface gigabitethernet 1/0/2
[Device-security-zone-Untrust] quit
4. Configure a security policy:
# Create security policy ip and enter its view. Create a rule named trust-untrust to allow the internal users to access the Internet.
[Device] security-policy ip
[Device-security-policy-ip] rule name trust-untrust
[Device-security-policy-ip-10-trust-untrust] source-zone trust
[Device-security-policy-ip-10-trust-untrust] source-ip-subnet 192.168.1.0 24
[Device-security-policy-ip-10-trust-untrust] destination-zone untrust
[Device-security-policy-ip-10-trust-untrust] action pass
[Device-security-policy-ip-10-trust-untrust] quit
[Device] security-policy ip
[Device-security-policy-ip] rule na
# Activate the security policy configuration.
[Device-security-policy-ip] accelerate enhanced enable
[Device-security-policy-ip] quit
5. Configure IP reputation.
# Enable the top hit ranking feature.
[Device] ip-reputation
[Device-ip-reputation] global enable
[Device-ip-reputation] top-hit-statistics enable
# Specify actions deny and logging for attack category 1.
[Device-ip-reputation] attack-category 1 action deny logging enable
Verifying the configuration
Verify that the device drops packets that match attack category 1 and generates logs for IP addresses that are matched. You can view the top hit ranks for IP addresses on the IP reputation list on the Web interface.