- Table of Contents
- Related Documents
-
| Title | Size | Download |
|---|---|---|
| 03-IPS configuration | 225.21 KB |
Contents
IPS signature library management
Restrictions: Hardware compatibility with IPS
Restrictions: Licensing requirements for IPS
Configuring IPS signature filtering criteria for an IPS policy
Configuring IPS actions for an IPS policy
Specifying a parameter profile for an IPS action
Applying an IPS policy to a DPI application profile
Activating IPS policy settings
Applying a DPI application profile to an object policy rule
Managing the IPS signature library
Scheduling automatic IPS signature library update
Triggering an immediate IPS signature update
Performing an IPS signature manual update
Rolling back the IPS signature library
Importing and deleting Snort IPS signatures
Importing Snort IPS signatures
Managing a user-configured IPS signature
Creating a user-defined IPS signature
Configuring attributes in a user-defined IPS signature
Configuring rules for a user-defined IPS signature
Display and maintenance commands for IPS
Example: Using the default IPS policy in an object policy
Example: Using a user-defined IPS policy in an object policy
Example: Manually updating the IPS signature library
Example: Configuring automatic IPS signature library update
Configuring IPS
About IPS
Intrusion prevention system (IPS) is a security feature that enables devices to monitor network traffic for malicious activity and to proactively take prevention actions.
IPS functions
IPS provides the following functions:
· In-depth protection—IPS inspects the application layer data of packets, performs protocol analysis and reassembly on network traffic flows, and takes actions according to the analysis results.
· Real-time protection—IPS monitors network traffic in real-time and can take actions on detected attacks.
· All-around protection—IPS can detect and prevent the following types of attacks:
¡ Malicious software such as worms, viruses, Trojan, bots, spyware, adware, scanners, and backdoors.
¡ Malicious attacks such as common gateway interface (CGI) attacks, cross-site scripting attacks, injection attacks, directory traversal attacks, information leakage attacks, remote file inclusion attacks, buffer overflow attacks, code execution attacks, and DoS attacks.
· Bidirectional protection—IPS monitors both incoming and outgoing traffic to prevent attacks arising from the internal and external networks.
IPS policies
IPS is implemented based on IPS policies. An IPS policy contains a set of IPS signatures for matching packets and the actions for the packets.
IPS signatures
The device compares packets with IPS signatures to detect, classify, and prevent network attacks.
Each IPS signature contains various attributes, including attack category, action, protected target, severity level, and direction. You can filter the IPS signatures that an IPS policy uses based on the IPS signature attributes.
The device supports the following types of IPS signatures:
· Predefined IPS signatures—Automatically generated by the device based on the local signature library. You cannot add, modify, or delete a predefined IPS signature.
· User-defined IPS signatures—For new attacks that cannot be detected by predefined signatures, you can customize IPS signatures. The user-defined IPS signatures include Snort signatures that are imported from a Snort file and user-configured signatures that are manually configured.
IPS actions
When the device detects a matching packet for an IPS signature, it takes the actions specified for the signature on the packet.
The device supports the following signature actions:
· Reset—Closes the TCP connections for matching packets by sending TCP reset messages.
· Redirect—Redirects matching packets to a webpage.
· Block-source—Drops matching packets and adds the sources of the packets to the IP blacklist. If the IP blacklist feature is enabled, packets from the blacklisted sources will be blocked for a duration set by the block-period command. If the IP blacklist feature is not enabled, packets from the blacklisted sources are not blocked.
To enable the IP blacklist feature, use the blacklist global enable command. For more information about the IP blacklist feature, see Security Configuration Guide.
For more information about the block-period command, see DPI Command Reference.
· Drop—Drops matching packets.
· Permit—Permits matching packets to pass.
· Capture—Captures matching packets.
· Logging—Logs matching packets.
IPS mechanism
IPS takes effect after you apply an IPS policy to a DPI application profile and use the DPI application profile in an object policy rule.
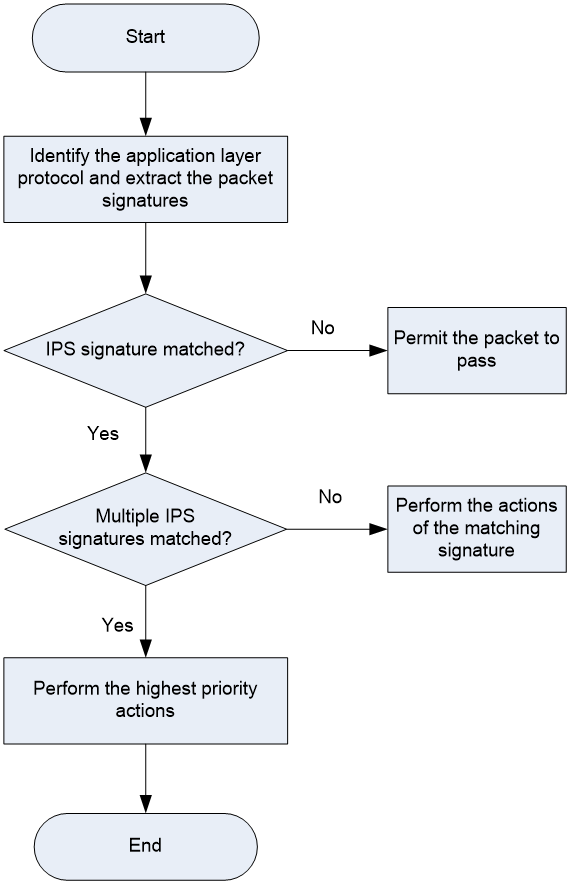
As shown in Figure 1, upon receiving a packet, the device performs the following operations:
1. The device identifies the packet application layer protocol and extracts the packet signatures.
2. The device determines the actions for the packet by comparing the extracted packet signatures with the IPS signatures in the IPS policy:
¡ If the packet does not match any IPS signatures, the device permits the packet to pass.
¡ If the packet matches only one IPS signature, the device takes the signature actions.
¡ If the packet matches multiple IPS signatures, the device uses the following rules to select the actions:
- If the matching IPS signatures have two or more actions, including redirect, drop, permit, and reset, the device takes the action of the highest priority. The actions in descending order of priority are reset, redirect, drop, and permit.
- The device will execute the block-source, capture, and logging actions if they are in the matching IPS signatures.
IPS signature library management
The device uses IPS signatures to inspect application layer traffic for malicious threats and attacks.
You can update the device IPS signature library to the latest version or roll back the library to the previous or the factory default version.
Updating the IPS signature library
The following methods are available for updating the IPS signature library on the device:
· Automatic update.
The device automatically downloads the most up-to-date IPS signature file to update its local signature library periodically.
· Triggered update.
The device downloads the most up-to-date IPS signature file to update its local signature library immediately after you trigger the operation.
· Manual update.
Use this method when the device cannot obtain the IPS signature file automatically.
You must manually download the most up-to-date IPS signature file, and then use the file to update the signature library on the device.
Rolling back the IPS signature library
If filtering false alarms or filtering exceptions occur frequently, you can roll back the IPS signature library to the previous version or to the factory default version.
Restrictions: Hardware compatibility with IPS
|
Hardware |
IPS compatibility |
|
MSR810, MSR810-W, MSR810-W-DB, MSR810-LM, MSR810-W-LM, MSR810-10-PoE, MSR810-LM-HK, MSR810-W-LM-HK, MSR810-LM-CNDE-SJK, MSR810-CNDE-SJK |
Yes |
|
MSR810-LMS, MSR810-LUS |
No |
|
MSR810-LMS-EA, MSR810-LME |
Yes |
|
MSR2600-6-X1, MSR2600-10-X1 |
Yes |
|
MSR 2630 |
Yes |
|
MSR3600-28, MSR3600-51 |
Yes |
|
MSR3600-28-SI, MSR3600-51-SI |
No |
|
MSR3600-28-X1, MSR3600-28-X1-DP, MSR3600-51-X1, MSR3600-51-X1-DP |
Yes |
|
MSR3610-I-DP, MSR3610-IE-DP, MSR3610-IE-ES, MSR3610-IE-EAD, MSR3610-I-IG, MSR3610-IE-IG |
Yes |
|
MSR3610-X1, MSR3610-X1-DP, MSR3610-X1-DC, MSR3610-X1-DP-DC |
Yes |
|
MSR 3610, MSR 3620, MSR 3620-DP, MSR 3640, MSR 3660 |
Yes |
|
MSR3610-G, MSR3620-G |
Yes |
|
Hardware |
IPS compatibility |
|
MSR810-W-WiNet, MSR810-LM-WiNet |
Yes |
|
MSR830-4LM-WiNet |
Yes |
|
MSR830-5BEI-WiNet, MSR830-6EI-WiNet, MSR830-10BEI-WiNet |
Yes |
|
MSR830-6BHI-WiNet, MSR830-10BHI-WiNet |
Yes |
|
MSR2600-6-WiNet, MSR2600-10-X1-WiNet |
Yes |
|
MSR2630-WiNet |
Yes |
|
MSR3600-28-WiNet |
Yes |
|
MSR3610-X1-WiNet |
Yes |
|
MSR3610-WiNet, MSR3620-10-WiNet, MSR3620-DP-WiNet, MSR3620-WiNet, MSR3660-WiNet |
Yes |
|
Hardware |
IPS compatibility |
|
MSR2630-XS |
Yes |
|
MSR3600-28-XS |
Yes |
|
MSR3610-XS |
Yes |
|
MSR3620-XS |
Yes |
|
MSR3610-I-XS |
Yes |
|
MSR3610-IE-XS |
Yes |
|
Hardware |
IPS compatibility |
|
MSR810-LM-GL |
Yes |
|
MSR810-W-LM-GL |
Yes |
|
MSR830-6EI-GL |
Yes |
|
MSR830-10EI-GL |
Yes |
|
MSR830-6HI-GL |
Yes |
|
MSR830-10HI-GL |
Yes |
|
MSR2600-6-X1-GL |
Yes |
|
MSR3600-28-SI-GL |
No |
Restrictions: Licensing requirements for IPS
The IPS module requires a license to run on the device. If the license expires, you can still use the IPS functions but you can no longer upgrade the IPS signature library on the device. For more information about licenses, see license management in Fundamentals Configuration Guide.
IPS tasks at a glance
To configure IPS, perform the following tasks:
2. Applying an IPS policy to a DPI application profile
3. Activating IPS policy settings
4. Applying a DPI application profile to an object policy rule
5. Managing the IPS signature library
6. (Optional.) Importing and deleting Snort IPS signatures
7. (Optional.) Managing a user-configured IPS signature
Configuring an IPS policy
Creating an IPS policy
About this task
By default, a newly created IPS policy uses all enabled IPS signatures and applies to the packet matching a signature the default signature action. You can filter the IPS signatures used by the IPS policy and change the signature actions.
Procedure
1. Enter system view.
system-view
2. Create an IPS policy and enter its view.
ips policy policy-name
A default IPS policy named default exists. The default IPS policy uses all enabled IPS signatures on the device and cannot be modified or deleted.
Configuring IPS signature filtering criteria for an IPS policy
About this task
By default, an IPS policy uses all enabled IPS signatures on the device. You can set criteria to filter IPS signatures that an IPS policy uses based on the signature attributes.
An IPS policy uses an IPS signature only if the signature matches all the configured criteria.
For certain attribute-based criterion (such as the action, object direction, or severity level criterion), you can specify multiple attribute values. An IPS signature matches the criterion if it matches any of the specified attribute values.
Procedure
1. Enter system view.
system-view
2. Enter IPS policy view.
ips policy policy-name
3. Configure the IPS signature filtering criteria.
¡ Set a target criterion.
protect-target { target [ subtarget | all ] }
By default, the target attribute is not used for IPS signature filtering.
¡ Set an attack category criterion.
attack-category { category [ subcategory ] | all }
By default, the attack category attribute is not used for IPS signature filtering.
¡ Set an action criterion.
action { block-source | drop | permit | reset } *
By default, the action attribute is not used for IPS signature filtering.
¡ Set an object direction criterion.
object-dir { client | server } *
By default, the object direction attribute is not used for IPS signature filtering.
¡ Set a severity level criterion.
severity-level { critical | high | low | medium } *
By default, the severity level attribute is not used for IPS signature filtering.
Configuring IPS actions for an IPS policy
About this task
By default, the system applies the default actions of an IPS signature to packets matching the signature.
You can also configure global actions for an IPS policy or change the actions for individual IPS signatures in the policy.
The system selects the actions for packets matching an IPS signature in the following order:
1. Actions configured for the IPS signature in the IPS policy.
2. Actions configured for the IPS policy.
3. Default actions of the IPS signature.
Restrictions and guidelines
The logging keyword enables the IPS module to log packet matching events and send log messages to the information center.
With the information center, you can set log message filtering and output rules, including output destinations.
The information center can output IPS logs to any destinations except the console and the monitor terminal. If you configure the console or monitor terminal as an output destination, the output destination setting will not take effect.
To view IPS logs stored on the device, use the display logbuffer command. Make sure you do not disable log output to the log buffer, which is enabled by default.
For more information about configuring the information center, see Network Management and Monitoring Configuration Guide.
Procedure
1. Enter system view.
system-view
2. Enter the view of an IPS policy.
ips policy policy-name
3. Specify the global packet processing actions for the IPS policy.
signature override all { { block-source | drop | permit | redirect | reset } | capture | logging } *
By default, no actions are specified for an IPS policy and the default actions of IPS signatures are applied to matching packets.
4. (Optional.) Change the state or actions for an IPS signature.
signature override { pre-defined | user-defined } signature-id { { disable | enable } [ { block-source | drop | permit | redirect | reset } | capture | logging ] * }
By default:
¡ Predefined IPS signatures use the actions and states defined by the system.
¡ User-defined IPS signatures use the actions and states defined in the IPS signature file from which the signatures are imported.
You cannot change the state or actions for an IPS signature in the default IPS policy.
5. (Optional.) Specify the number of the captured packets to be cached for threat analysis.
ips capture-cache number
By default, the number of the captured packets to be cached for threat analysis is not specified, and the device does not cache any captured packets.
This command enables the device to cache the IPS captured packets. After caching the specified number of the captured packets, the device writes all cached packets and the hit packet into the capture file for threat analysis.
Specifying a parameter profile for an IPS action
About this task
The block source, capture, and logging actions take effect only after a parameter profile is specified. You can specify a parameter profile for an IPS action as follows:
· Specify a global parameter profile in system view. The setting takes effect in all IPS policies.
· Specify a parameter profile in IPS policy view, which a policy-specific setting. Only the email action supports specifying a parameter profile in IPS policy view.
Restrictions and guidelines
· The global parameter profile for an IPS action takes precedence over a policy-specific parameter profile for the action.
· To have a parameter profile for an IPS action in an IPS policy take effect, make sure the global parameter profile is disabled.
· As a best practice, enable the global parameter profile after the global parameter profile configuration is completed.
Specifying a global parameter profile for an IPS action
1. Enter system view.
system-view
2. Specify a global parameter profile for an IPS action.
ips { block-source | capture | email | logging | redirect } parameter-profile parameter-name
By default, no global parameter profile is specified for an IPS action.
If you do not specify a parameter profile for an action, or if the specified profile does not exist, the default action parameter settings are used. For more information about configuring an action parameter profile, see DPI engine commands in DPI Command Reference.
Specifying an action parameter profile in an IPS policy
1. Enter system view.
system-view
2. Enter IPS policy view.
ips policy policy-name
3. Specify the log output method.
log { email | syslog }
By default, the IPS log output method is syslog.
4. (Optional.) Specify the lowest severity level of the matching IPS signatures for log output via email.
email severity-level { critical | high | low | medium }
By default, the lowest severity level of the matching IPS signatures for log output via email is low.
This command is available only when the log output method is email. The system sends emails for IPS logs only when the severity levels of the matching IPS signatures are not lower than specified severity level.
5. (Optional.) Specify a parameter profile for the email action.
email parameter-profile parameter-profile-name
By default, no parameter profile is specified for the email action.
This command is available only when the log output method is email. For more information about configuring an email parameter profile, see DPI engine commands in DPI Command Reference.
6. (Optional.) Disable the global parameter profile.
undo global-parameter enable
By default, global parameter profiles are enabled.
Applying an IPS policy to a DPI application profile
About this task
An IPS policy must be applied to a DPI application profile to take effect.
Restrictions and guidelines
A DPI application profile can use only one IPS policy. If you apply different IPS policies to the same DPI application profile, only the most recent configuration takes effect.
Procedure
1. Enter system view.
system-view
2. Enter DPI application profile view.
app-profile profile-name
For more information about this command, see DPI engine commands in DPI Command Reference.
3. Apply an IPS policy to the DPI application profile.
ips apply policy policy-name mode { protect | alert }
By default, no IPS policy is applied to the DPI application profile.
Activating IPS policy settings
About this task
After you edit the IPS policy settings, perform this task to activate the settings.
Restrictions and guidelines
This task can cause temporary outage for all DPI services. As a best practice, perform the task after all DPI service policy and rule settings are complete.
For more information about activating DPI service module configuration, see "Configuring the DPI engine."
Procedure
1. Enter system view.
system-view
2. Activate IPS policy settings.
inspect activate
By default, IPS policy settings do not take effect.
Applying a DPI application profile to an object policy rule
1. Enter system view.
system-view
2. Enter object policy view.
object-policy { ip | ipv6 } object-policy-name
3. Use a DPI application profile in an object policy rule.
rule [ rule-id ] inspect app-profile-name
By default, no DPI application profile is used in an object policy rule.
4. Return to system view.
quit
5. Create a zone pair and enter zone pair view.
zone-pair security source source-zone-name destination destination-zone-name
For more information about zone pairs, see security zone configuration in Security Configuration Guide.
6. Apply the object policy to the zone pair.
object-policy apply { ip | ipv6 } object-policy-name
By default, no object policy is applied to a zone pair.
Managing the IPS signature library
You can update or roll back the version of the IPS signature library on the device.
Restrictions and guidelines
· Do not delete the /dpi/ folder in the root directory of the storage medium.
· Do not perform IPS signature update or rollback when the device's free memory is below the normal state threshold. For more information about device memory thresholds, see device management in Fundamentals Configuration Guide.
· For successful automatic and immediate signature update, make sure the device can resolve the domain name of the company's website into an IP address through DNS. For more information about DNS, see DNS configuration in Layer 3—IP Services Configuration Guide.
· Update only one signature library at a time. Do not perform signature library update until the existing signature library update is completed.
Scheduling automatic IPS signature library update
About this task
You can schedule automatic IPS signature library update if the device can access the signature database services on the company's website. The device periodically obtains the latest signature file from the company's website to update its local signature library according to the update schedule.
Procedure
1. Enter system view.
system-view
2. Enable automatic IPS signature library update and enter automatic IPS signature library update configuration view.
ips signature auto-update
By default, automatic IPS signature library update is disabled.
3. Schedule the update time.
update schedule { daily | weekly { fri | mon | sat | sun | thu | tue | wed } } start-time time tingle minutes
By default, the device updates the IPS signature library at a random time between 01:00:00 and 03:00:00 every day.
4. (Optional.) Configure the device to overwrite the current IPS signature library without backing up the library during an automatic signature library update.
override-current
By default, the device backs up the current IPS signature library as the previous version before performing an automatic IPS signature library update.
Triggering an immediate IPS signature update
About this task
Anytime you find a release of new signature version on the company's website, you can trigger the device to immediately update the local signature library.
Procedure
1. Enter system view.
system-view
2. Trigger an immediate IPS signature library update.
ips signature auto-update-now
Performing an IPS signature manual update
About this task
If the device cannot access the signature database services on the company's website, use one of the following methods to manually update the IPS signature library on the device:
· Local update—Updates the IPS signature library by using a locally stored update IPS signature file.
(In IRF mode.) Store the update file on the master device for successful signature library update.
· FTP/TFTP update—Updates the IPS signature library by using the file stored on the FTP or TFTP server.
Procedure
1. Enter system view.
system-view
2. Manually update the IPS signature library on the device.
ips signature update [ override-current ] file-path
Rolling back the IPS signature library
About this task
If an IPS signature library update causes exceptions or a high false alarm rate, you can roll back the IPS signature library.
Before rolling back the IPS signature library, the device backs up the current signature library as the previous version. For example, the previous library version is V1 and the current library version is V2. If you perform a rollback to the previous version, library version V1 becomes the current version and library version V2 becomes the previous version. If you perform a rollback to the previous version again, the library rolls back to library version V2.
Procedure
1. Enter system view.
system-view
2. Roll back the IPS signature library to the previous version or to the factory default version.
ips signature rollback { factory | last }
Importing and deleting Snort IPS signatures
Importing Snort IPS signatures
About this task
To add your own IPS signatures, create an IPS signature file in the Snort format and import the signatures from the file to the device.
Restrictions and guidelines
Make sure the IPS signature file contains all Snort signatures that you want to use. All existing Snort signatures on the device will be overwritten by the imported signatures.
For a signature defined by a Snort rule to be imported correctly from the IPS signature file, make sure Snort rule is valid.
Procedure
1. Enter system view.
system-view
2. Import Snort IPS signatures from a Snort file.
ips signature import snort file-path
Deleting Snort IPS signatures
1. Enter system view.
system-view
2. Delete all Snort IPS signatures.
ips signature remove snort
Managing a user-configured IPS signature
Creating a user-defined IPS signature
About this task
You can create signatures that do not exist in the current signature library.
Procedure
1. Enter system view.
system-view
2. Create an IPS signature and enter its view.
ips signature user-defined name signature-name
By default, no user-configured IPS signatures exist.
3. (Optional.) Configure the description for the user-defined IPS signature.
description text
Configuring attributes in a user-defined IPS signature
About this task
Each IPS signature contains various attributes, including action, direction, severity level, and the logical operator between the rules in the signature.
You can create multiple rules in a user-defined IPS signature. If the logical AND operator is specified, a packet matches the signature only when the packet matches all rules in the signature. If the logical OR operator is specified, a packet matches the signature when the packet matches any rule in the signature.
Procedure
1. Enter system view.
system-view
2. Enter the view of a user-defined IPS signature.
ips signature user-defined name signature-name
By default, no user-defined IPS signatures exist.
3. Configure the attributes for the user-defined IPS signature.
¡ Set the actions for packets matching the IPS signature.
action { block-source | drop | permit | reset } [ capture | logging ] *
By default, the action for a user-defined IPS signature is permit.
¡ Set the traffic direction attribute.
direction { any | to-client | to-server }
By default, both client-to-server and server-to-client directions are defined for a user-defined IPS signature.
¡ Set a severity level.
severity-level { critical | high | low | medium } *
By default, the low severity level attribute is specified for a user-defined IPS signature.
¡ Set a logical operator between the rules in the signature.
rule-logic { and | or }
By default, the logical OR operator is specified between the rules in a user-defined IPS signature.
Configuring rules for a user-defined IPS signature
About this task
A user-defined IPS signature rule can be one of the following types:
· Keyword.
· Integer.
A user-defined signature rule might contain filtering criteria, detection items, and a detection trigger condition. The device uses the rule for packet filtering as follows:
1. The device compares the packet with the filtering criteria.
¡ If the packet matches all filtering criteria, the device goes to the next step.
¡ If the packet does not match all filtering criteria, IPS does not process the packet.
2. The device compares the packet with the detection trigger condition.
This step is available only for a rule of the keyword type.
¡ If the packet matches the detection trigger condition, the device goes to the next step.
¡ If the packet does not match the detection trigger condition, IPS does not process the packet.
3. The device compares the packet with the detection items.
The detection items are used to match the specified contents in a packet. A packet matches a rule only when the packet matches all detection items in the rule. The match order of the detection items is their configuration order.
Restrictions and guidelines
A detection item compares its keyword with the contents in the specified protocol field.
To avoid detection errors, configure detection items based on the sequence of protocol fields in the HTTP protocol.
In a signature rule of the keyword match pattern type, a detection trigger condition must be configured before detection item configuration. If you delete the detection trigger condition, all detection items in the rule will also be deleted.
To define the start and end positions for the match operation, use either the offset and depth, or the relative offset and relative depth.
Procedure
1. Enter system view.
system-view
2. Enter the view of a user-defined IPS signature.
ips signature user-defined name signature-name
3. Create a user-defined IPS signature rule and enter its view.
rule rule-id l4-protocol l4-protocol-name l5-protocol l5-protocol-name pattern-type { keyword | integer }
By default, no user-defined IPS signature rules exist.
4. Configure the filtering criteria for the rule.
¡ Set a source IP address filtering criterion.
source-address ip ip-address
By default, a user-defined IPS signature rule matches all source IP addresses.
¡ Set a destination IP address filtering criterion.
destination-address ip ip-address
By default, a user-defined IPS signature rule matches all destination IP addresses.
¡ Set source port filtering criteria.
source-port start-port [ to end-port ]
By default, a user-defined IPS signature rule matches all source ports.
¡ Set destination port filtering criteria.
destination-port start-port [ to end-port ]
By default, a user-defined IPS signature rule matches all destination ports.
¡ Set an HTTP request method filtering criterion.
http-method method-name
By default, a user-defined IPS signature rule matches all HTTP request methods.
5. Configure the detection trigger condition and detection items for a rule in a signature of the keyword type.
a. Create a detection trigger condition.
trigger field field-name include { hex hex-string | text text-string } [ offset offset-value ] [ depth depth-value ]
b. Create a detection item.
detection-keyword detection-id field field-name match-type { exclude | include } { hex hex-string | regex regex-pattern | text text-string } [ offset offset-value [ depth depth-value ] | relative-offset relative-offset-value [ relative-depth relative-depth-value ] ]
6. Configure detection items for a rule in a signature of the integer type.
detection-integer field field-name match-type { eq | gt | gt-eq | lt | lt-eq | nequ } number
Configuring IPS whitelist
About this task
If false alarms exist in IPS logs, you can enable the IPS whitelist feature, and add the detected IPS signature IDs or URLs to the IPS whitelist. The IPS signature IDs and URLs are recorded in the IPS logs. The device permits packets matching the IPS signatures or URLs on the IPS whitelist to pass through, reducing false alarms.
Procedure
1. Enter system view.
system-view
2. Enable the IPS whitelist feature.
ips whitelist enable
By default, the IPS whitelist feature is disabled.
3. Create an IPS whitelist entry and enter its view.
ips whitelist entry-id
4. Configure the IPS whitelist entry. Choose the options to configure as needed:
¡ Add a signature ID to the IPS whitelist entry.
signature-id sig-id
By default, no signature ID exists in an IPS whitelist entry.
¡ Add a URL to the IPS whitelist entry.
url match-type { accurate | substring } url-text
By default, no URL exists in an IPS whitelist entry.
If an IPS whitelist entry contains both a signature ID and a URL, a packet matches this entry only when it matches both criteria.
5. Return to system view.
quit
6. Activate the IPS whitelist configuration.
ips whitelist activate
After you create or edit an IPS whitelist entry that contains a URL, you must execute this command to have the configuration take effect.
Display and maintenance commands for IPS
Execute display commands in any view.
|
Task |
Command |
|
Display IPS policy information. |
display ips policy policy-name |
|
Display IPS signature library information. |
display ips signature library |
|
Display IPS signature information. |
display ips signature [ pre-defined | user-defined { snort | user-config } ] [ direction { any | to-client | to-server } ] [ category category-name | fidelity { high | low | medium } | protocol { icmp | ip | tcp | udp } | severity { critical | high | low | medium } ] * |
|
Display detailed information about an IPS signature. |
display ips signature { pre-defined | user-defined } signature-id |
|
Display information about IPS signatures that failed to be parsed during signature import. |
display ips signature user-defined parse-failed |
IPS configuration examples
Example: Using the default IPS policy in an object policy
Network configuration
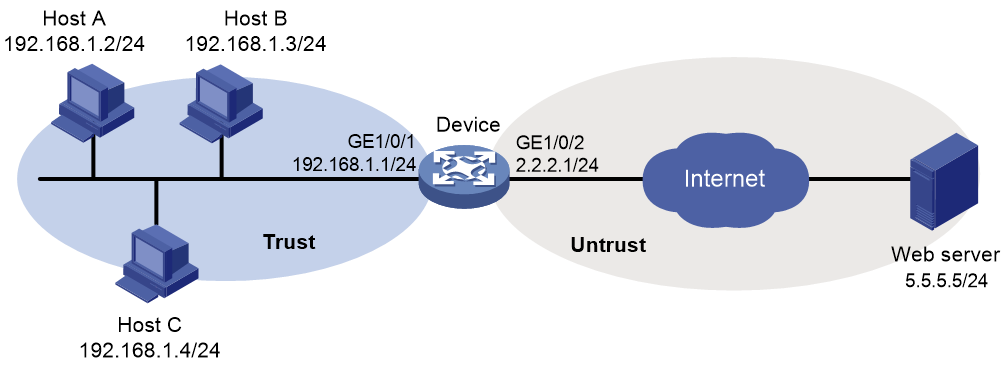
As shown in Figure 2, the device connects to the LAN and Internet through security zones Trust and Untrust, respectively.
Configure the device to use the default IPS policy for attack detection and prevention.
Procedure
1. Assign IP addresses to interfaces, as shown in Figure 2. (Details not shown.)
2. Configure the security zones:
# Assign GigabitEthernet 1/0/1 to security zone Trust.
<Device> system-view
[Device] security-zone name trust
[Device-security-zone-Trust] import interface gigabitethernet 1/0/1
[Device-security-zone-Trust] quit
# Assign GigabitEthernet 1/0/2 to security zone Untrust.
[Device] security-zone name untrust
[Device-security-zone-Untrust] import interface gigabitethernet 1/0/2
[Device-security-zone-Untrust] quit
3. Create an IP address object group named ipsfilter and configure an IP address object with subnet 192.168.1.0/24.
[Device] object-group ip address ipsfilter
[Device-obj-grp-ip-ipsfilter] network subnet 192.168.1.0 24
[Device-obj-grp-ip-ipsfilter] quit
4. Apply the default IPS policy to a DPI application profile:
# Create a DPI application profile named sec and enter its view.
[Device] app-profile sec
# Apply the default IPS policy to the DPI application profile and set the policy mode to protect.
[Device-app-profile-sec] ips apply policy default mode protect
[Device-app-profile-sec] quit
5. Activate the IPS policy settings.
[Device] inspect activate
6. Configure an object policy:
# Create an IPv4 object policy named ipsfilter and enter its view.
[Device] object-policy ip ipsfilter
# Configure an object policy rule to apply DPI application profile sec to packets with source IP addresses contained in IP address object group ipsfilter.
[Device-object-policy-ip-ipsfilter] rule inspect sec source-ip ipsfilter destination-ip any
[Device-object-policy-ip-ipsfilter] quit
7. Create a zone pair between source security zone Trust and destination security zone Untrust, and apply object policy ipsfilter to the zone pair.
[Device] zone-pair security source trust destination untrust
[Device-zone-pair-security-Trust-Untrust] object-policy apply ip ipsfilter
[Device-zone-pair-security-Trust-Untrust] quit
Verifying the configuration
# Verify that the device can use the default IPS policy to detect and prevent known network attacks. (Details not shown.)
For example, if an incoming attack packet matches predefined IPS signature GNU_Bash_Local_Memory_Corruption_Vulnerability(CVE-2014-718), the device automatically applies the signature actions (reset and logging) to the packet.
Example: Using a user-defined IPS policy in an object policy
Network configuration
As shown in Figure 3, the device connects to the LAN and Internet through security zones Trust and Untrust, respectively.
Perform the following tasks:
1. Create IPS policy ips1 and modify its signature action and state settings as follows:
¡ Enable predefined IPS signature 2 and specify actions drop, capture, and logging for the signature.
¡ Disable predefined IPS signature 4.
¡ Enable predefined IPS signature 6.
2. Apply IPS policy ips1 to zone pair between source security zone Trust and destination security zone Untrust.

Procedure
1. Assign IP addresses to interfaces, as shown in Figure 3. (Details not shown.)
2. Configure the security zones:
# Assign GigabitEthernet 1/0/1 to security zone Trust.
<Device> system-view
[Device] security-zone name trust
[Device-security-zone-Trust] import interface gigabitethernet 1/0/1
[Device-security-zone-Trust] quit
# Assign GigabitEthernet 1/0/2 to security zone Untrust.
[Device] security-zone name untrust
[Device-security-zone-Untrust] import interface gigabitethernet 1/0/2
[Device-security-zone-Untrust] quit
3. Create an IP address object group named ipsfilter and configure an IP address object with subnet 192.168.1.0/24.
[Device] object-group ip address ipsfilter
[Device-obj-grp-ip-ipsfilter] network subnet 192.168.1.0 24
[Device-obj-grp-ip-ipsfilter] quit
4. Configure an IPS policy:
# Create an IPS policy named ips1 and enter its view.
[Device] ips policy ips1
# Configure the IPS policy to use IPS signatures with all target and subtarget attributes.
[Device-ips-policy-ips1] protect-target all
# Enable predefined IPS signature 2 and specify actions drop, capture, and logging for the signature.
[Device-ips-policy-ips1] signature override pre-defined 2 enable drop capture logging
# Disable predefined IPS signature 4.
[Device-ips-policy-ips1] signature override pre-defined 4 disable
# Enable predefined IPS signature 6.
[Device-ips-policy-ips1] signature override pre-defined 6 enable
[Device-ips-policy-ips1] quit
5. Apply IPS policy ips1 to a DPI application profile:
# Create a DPI application profile named sec.
[Device] app-profile sec
# Apply IPS policy ips1 to the DPI application profile and set the policy mode to protect.
[Device-app-profile-sec] ips apply policy ips1 mode protect
[Device-app-profile-sec] quit
6. Activate the IPS policy settings.
[Device] inspect activate
7. Configure an object policy:
# Create an IPv4 object policy named ipsfilter and enter its view.
[Device] object-policy ip ipsfilter
# Configure an object policy rule to apply DPI application profile sec to packets with source IP addresses contained in IP address object group ipsfilter.
[Device-object-policy-ip-ipsfilter] rule inspect sec source-ip ipsfilter destination-ip any
[Device-object-policy-ip-ipsfilter] quit
8. Create a zone pair between source security zone Trust and destination security zone Untrust, and apply object policy ipsfilter to the zone pair.
[Device] zone-pair security source trust destination untrust
[Device-zone-pair-security-Trust-Untrust] object-policy apply ip ipsfilter
[Device-zone-pair-security-Trust-Untrust] quit
Verifying the configuration
# Verify that IPS policy ips1 is successfully configured.
<Device> display ips policy ips1
Example: Manually updating the IPS signature library
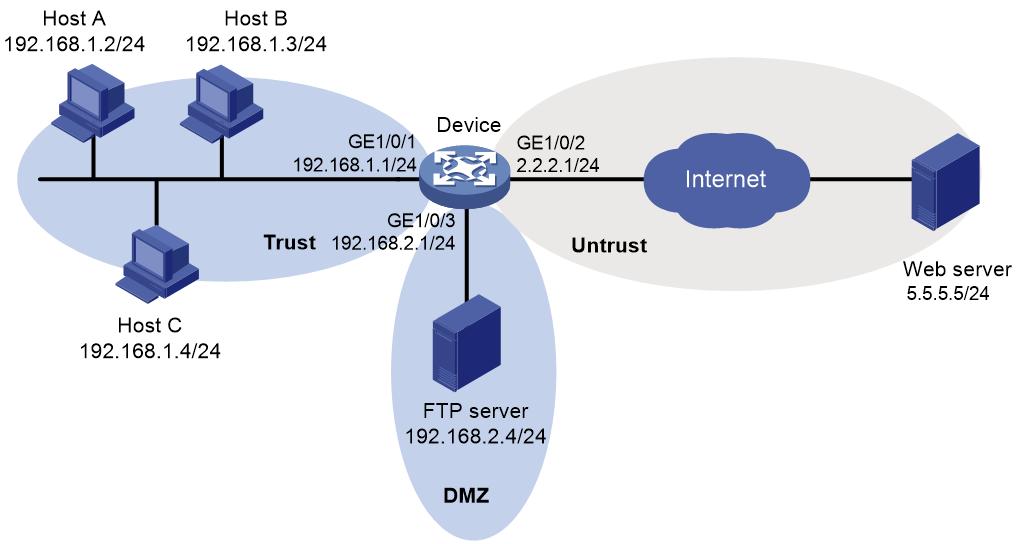
Network configuration
As shown in Figure 4, LAN users in security zone Trust can access the following resources:
· Internet resources in security zone Untrust.
· The FTP server at 192.168.2.1/24 in security zone DMZ. The FTP login username and password are ips and 123, respectively.
Perform the following tasks:
· Manually update the IPS signature library by using the latest IPS signature file stored on the FTP server.
· Configure the device to use the default IPS policy to detect and prevent known attacks on the network.
Procedure
1. Assign IP addresses to interfaces, as shown in Figure 4. (Details not shown.)
2. Enable the device to communicate with the FTP server:
# Configure ACL 2001 to permit all traffic.
<Device> system-view
[Device] acl basic 2001
[Device-acl-ipv4-basic-2001] rule permit
[Device-acl-ipv4-basic-2001] quit
# Assign GigabitEthernet 1/0/3 to zone DMZ.
[Device] security-zone name dmz
[Device-security-zone-DMZ] import interface gigabitethernet 1/0/3
[Device-security-zone-DMZ] quit
# Create a zone pair between source security zone Local and destination security zone DMZ, and then apply ACL 2001 to the zone pair.
[Device] zone-pair security source local destination dmz
[Device-zone-pair-security-Local-DMZ] packet-filter 2001
[Device-zone-pair-security-Local-DMZ] quit
# Create a zone pair between source security zone DMZ and destination security zone Local, and the apply ACL 2001 to the zone pair.
[Device] zone-pair security source dmz destination local
[Device-zone-pair-security-DMZ-Local] packet-filter 2001
[Device-zone-pair-security-DMZ-Local] quit
3. Update the device IPS signature library by using IPS signature file ips-1.0.8-encrypt.dat on the FTP server.
[Device] ips signature update ftp://ips:[email protected]/ips-1.0.8-encrypt.dat
Verifying the configuration
# Verify that the device IPS signature library is updated.
<Device> display ips signature library
Example: Configuring automatic IPS signature library update
Network configuration
As shown in Figure 5, LAN users in security zone Trust can access Internet resources in security zone Untrust.
Configure the device to automatically update the local IPS signature library at a random time between 08:30 a.m. and 09:30 a.m. every Saturday.

Procedure
1. Assign IP addresses to interfaces, as shown in Figure 5. (Details not shown.)
2. Configure DNS for the device to resolve the domain name of the company's website into the IP address. (Details not shown.)
3. Configure an object policy to allow LAN users in security zone Trust to access Internet resources in security zone Untrust. (Details not shown.)
4. Configure automatic IPS signature library update:
# Enable automatic IPS signature library update.
<Device> system-view
[Device] ips signature auto-update
[Device-ips-autoupdate]
# Configure the device to perform automatic update at a random time between 08:30 a.m. and 09:30 a.m. every Saturday.
[Device-ips-autoupdate] update schedule weekly sat start-time 9:00:00 tingle 60
[Device-ips-autoupdate] quit
Verifying the configuration
# Verify that the device IPS signature library is updated as scheduled.
<Device> display ips signature library
