- Table of Contents
- Related Documents
-
| Title | Size | Download |
|---|---|---|
| 04-IKEv2 configuration | 245.39 KB |
Prerequisites for IKEv2 configuration
Specifying the local and remote identity authentication methods
Configuring the IKEv2 keychain or PKI domain
Configuring the local ID for the IKEv2 profile
Configuring peer IDs for the IKEv2 profile
Specifying a VPN instance for the IKEv2 profile
Specifying an inside VPN instance for the IKEv2 profile
Configuring optional features for the IKEv2 profile
Configure global IKEv2 parameters
Enabling the cookie challenging feature
Configuring the IKEv2 DPD feature
Configuring the IKEv2 NAT keepalive feature
Configuring IKEv2 address pools
Verifying and maintaining IKEv2
Example: Configuring IKEv2 with preshared key authentication
Example: Configuring IKEv2 with RSA signature authentication
IKEv2 negotiation failed because no matching IKEv2 proposals were found
IPsec SA negotiation failed because no matching IPsec transform sets were found
IPsec tunnel establishment failed
Configuring IKEv2
About IKEv2
Internet Key Exchange version 2 (IKEv2) is an enhanced version of IKEv1. The same as IKEv1, IKEv2 has a set of self-protection mechanisms and can be used on insecure networks for reliable identity authentication, key distribution, and IPsec SA negotiation. IKEv2 provides stronger protection against attacks and higher key exchange ability and needs fewer message exchanges than IKEv1.
IKEv2 negotiation process
Compared with IKEv1, IKEv2 simplifies the negotiation process and is much more efficient.
IKEv2 defines three types of exchanges: initial exchanges, CREATE_CHILD_SA exchange, and INFORMATIONAL exchange.
As shown in Figure 1, IKEv2 uses two exchanges during the initial exchange process: IKE_SA_INIT and IKE_AUTH, each with two messages.
· IKE_SA_INIT exchange—Negotiates IKE SA parameters and exchanges keys.
· IKE_AUTH exchange—Authenticates the identity of the peer and establishes IPsec SAs.
After the four-message initial exchanges, IKEv2 sets up one IKE SA and one pair of IPsec SAs. For IKEv1 to set up one IKE SA and one pair of IPsec SAs, it must go through two phases that use a minimum of six messages.
To set up one more pair of IPsec SAs within the IKE SA, IKEv2 goes on to perform an additional two-message exchange—the CREATE_CHILD_SA exchange. One CREATE_CHILD_SA exchange creates one pair of IPsec SAs. IKEv2 also uses the CREATE_CHILD_SA exchange to rekey IKE SAs and Child SAs.
IKEv2 uses the INFORMATIONAL exchange to convey control messages about errors and notifications.
Figure 1 IKEv2 Initial exchange process

New features in IKEv2
DH guessing
In the IKE_SA_INIT exchange, the initiator guesses the DH group that the responder is most likely to use and sends it in an IKE_SA_INIT request message. If the initiator's guess is correct, the responder responds with an IKE_SA_INIT response message and the IKE_SA_INIT exchange is finished. If the guess is wrong, the responder responds with an INVALID_KE_PAYLOAD message that contains the DH group that it wants to use. The initiator then uses the DH group selected by the responder to reinitiate the IKE_SA_INIT exchange. The DH guessing mechanism allows for more flexible DH group configuration and enables the initiator to adapt to different responders.
Cookie challenging
Messages for the IKE_SA_INIT exchange are in plain text. An IKEv1 responder cannot confirm the validity of the initiators and must maintain half-open IKE SAs, which makes the responder susceptible to DoS attacks. An attacker can send a large number of IKE_SA_INIT requests with forged source IP addresses to the responder, exhausting the responder's system resources.
IKEv2 introduces the cookie challenging mechanism to prevent such DoS attacks. When an IKEv2 responder maintains a threshold number of half-open IKE SAs, it starts the cookie challenging mechanism. The responder generates a cookie and includes it in the response sent to the initiator. If the initiator initiates a new IKE_SA_INIT request that carries the correct cookie, the responder considers the initiator valid and proceeds with the negotiation. If the carried cookie is incorrect, the responder terminates the negotiation.
The cookie challenging mechanism automatically stops working when the number of half-open IKE SAs drops below the threshold.
IKEv2 SA rekeying
For security purposes, both IKE SAs and IPsec SAs have a lifetime and must be rekeyed when the lifetime expires. An IKEv1 SA lifetime is negotiated. An IKEv2 SA lifetime, in contrast, is configured. If two peers are configured with different lifetimes, the peer with the shorter lifetime always initiates the SA rekeying. This mechanism reduces the possibility that two peers will simultaneously initiate a rekeying. Simultaneous rekeying results in redundant SAs and SA status inconsistency on the two peers.
IKEv2 message retransmission
Unlike IKEv1 messages, IKEv2 messages appear in request/response pairs. IKEv2 uses the Message ID field in the message header to identify the request/response pair. If an initiator sends a request but receives no response with the same Message ID value within a specific period of time, the initiator retransmits the request.
It is always the IKEv2 initiator that initiates the retransmission, and the retransmitted message must use the same Message ID value.
Protocols and standards
· RFC 2408, Internet Security Association and Key Management Protocol (ISAKMP)
· RFC 4306, Internet Key Exchange (IKEv2) Protocol
· RFC 4718, IKEv2 Clarifications and Implementation Guidelines
· RFC 2412, The OAKLEY Key Determination Protocol
· RFC 5996, Internet Key Exchange Protocol Version 2 (IKEv2)
IKEv2 tasks at a glance
To configure IKEv2, perform the following tasks:
1. Configuring an IKEv2 profile
b. Specifying the local and remote identity authentication methods
c. Configuring the IKEv2 keychain or PKI domain
d. Configuring the local ID for the IKEv2 profile
e. Configuring peer IDs for the IKEv2 profile
f. Specifying a VPN instance for the IKEv2 profile
g. Specifying an inside VPN instance for the IKEv2 profile
h. Configuring optional features for the IKEv2 profile
2. Configuring an IKEv2 policy
3. Configuring an IKEv2 proposal
If you specify an IKEv2 proposal in an IKEv2 policy, you must configure the IKEv2 proposal.
4. Configuring an IKEv2 keychain
This task is required when either end or both ends use the preshared key authentication method.
5. (Optional.) Enabling the cookie challenging feature
The cookie challenging feature takes effect only on IKEv2 responders.
6. (Optional.) Configuring the IKEv2 DPD feature
7. (Optional.) Configuring the IKEv2 NAT keepalive feature
8. (Optional.) Configuring IKEv2 address pools
Prerequisites for IKEv2 configuration
Determine the following parameters prior to IKEv2 configuration:
· The strength of the algorithms for IKEv2 negotiation, including the encryption algorithms, integrity protection algorithms, PRF algorithms, and DH groups. Different algorithms provide different levels of protection. A stronger algorithm means better resistance to decryption of protected data but requires more resources. Typically, the longer the key, the stronger the algorithm.
· The local and remote identity authentication methods.
¡ To use the preshared key authentication method, you must determine the preshared key.
¡ To use the RSA digital signature authentication method, you must determine the PKI domain for the local end to use. For information about PKI, see Security Configuration Guide.
Configuring an IKEv2 profile
Creating an IKEv2 profile
About this task
An IKEv2 profile is intended to provide a set of parameters for IKEv2 negotiation.
Procedure
1. Enter system view.
system-view
2. Create an IKEv2 profile and enter its view.
ikev2 profile profile-name
Specifying the local and remote identity authentication methods
Restrictions and guidelines
The local and remote identity authentication methods must both be specified and they can be different. You can specify only one local identity authentication method and multiple remote identity authentication methods.
Procedure
1. Enter system view.
system-view
2. Enter IKEv2 profile view.
ikev2 profile profile-name
3. Specify the local and remote identity authentication methods.
authentication-method { local | remote } { dsa-signature | ecdsa-signature | pre-share | rsa-signature }
By default, no local or remote identity authentication method is configured.
Configuring the IKEv2 keychain or PKI domain
Restrictions and guidelines
Configure the IKEv2 keychain or PKI domain for the IKEv2 profile to use. To use digital signature authentication, configure a PKI domain. To use preshared key authentication, configure an IKEv2 keychain.
Procedure
1. Enter system view.
system-view
2. Enter IKEv2 profile view.
ikev2 profile profile-name
3. Specify the keychain for preshared key authentication or the PKI domain used to request a certificate for digital signature authentication.
¡ Specify the keychain.
keychain keychain-name
¡ Specify the PKI domain.
certificate domain domain-name [ sign | verify ]
By default, no IKEv2 keychain or PKI domain is specified for an IKEv2 profile.
Configuring the local ID for the IKEv2 profile
Restrictions and guidelines
For digital signature authentication, the device can use an ID of any type. If the local ID is an IP address that is different from the IP address in the local certificate, the device uses the FQDN as the local ID. The FQDN is the device name configured by using the sysname command.
For preshared key authentication, the device can use an ID of any type other than the DN.
Procedure
1. Enter system view.
system-view
2. Enter IKEv2 profile view.
ikev2 profile profile-name
3. Configure the local ID.
identity local { address { ipv4-address | ipv6 ipv6-address } | dn | email email-string | fqdn fqdn-name | key-id key-id-string }
By default, no local ID is configured, and the device uses the IP address of the interface where the IPsec policy applies as the local ID.
Configuring peer IDs for the IKEv2 profile
About this task
Perform this task to configure the peer ID for IKEv2 profile matching. When the device needs to select an IKEv2 profile for IKEv2 negotiation with a peer, it compares the received peer ID with the peer IDs of its local IKE profiles. If a match is found, it uses the IKEv2 profile with the matching peer ID for negotiation. IKEv2 profiles will be compared in descending order of their priorities.
Procedure
1. Enter system view.
system-view
2. Enter IKEv2 profile view.
ikev2 profile profile-name
3. Configure a peer ID.
match remote { certificate policy-name | identity { address { { ipv4-address [ mask | mask-length ] | range low-ipv4-address high-ipv4-address } | ipv6 { ipv6-address [ prefix-length ] | range low-ipv6-address high-ipv6-address } } | fqdn fqdn-name | email email-string | key-id key-id-string } }
You must configure a minimum of one peer ID on each of the two peers.
Specifying a VPN instance for the IKEv2 profile
About this task
After you specify a VPN instance for an IKEv2 profile, the IKEv2 profile can be used for IKEv2 negotiation only on the interfaces that belong to the VPN instance.
Procedure
1. Enter system view.
system-view
2. Enter IKEv2 profile view.
ikev2 profile profile-name
3. Specify a VPN instance for the IKEv2 profile.
match vrf { name vrf-name | any }
By default, an IKEv2 profile belongs to the public network.
Specifying an inside VPN instance for the IKEv2 profile
About this task
The inside VPN instance determines where the device should forward received IPsec packets after it de-encapsulates the packets. If you specify an inside VPN instance, the device looks for a route in the specified VPN instance to forward the packets. If you do not specify an inside VPN instance, the internal and external networks are in the same VPN instance. The device looks for a route in this VPN instance to forward the packets.
Procedure
1. Enter system view.
system-view
2. Enter IKEv2 profile view.
ikev2 profile profile-name
3. Specify an inside VPN instance.
inside-vrf vrf-name
By default, no inside VPN instance is specified for an IKEv2 profile. The internal and external networks are in the same VPN instance. The device forwards protected data to this VPN instance.
Configuring optional features for the IKEv2 profile
1. Enter system view.
system-view
2. Enter IKEv2 profile view.
ikev2 profile profile-name
3. Configure optional features as needed.
¡ Configure IKEv2 DPD.
dpd interval interval [ retry seconds ] { on-demand | periodic }
By default, IKEv2 DPD is not configured for an IKEv2 profile and an IKEv2 profile uses the DPD settings configured in system view. If IKEv2 DPD is not configured in system view either, the device does not perform dead IKEv2 peer detection.
¡ Specify the local interface or IP address to which the IKEv2 profile can be applied.
match local address { interface-type interface-number | ipv4-address | ipv6 ipv6-address }
By default, an IKEv2 profile can be applied to any local interface or local IP address.
Use this command to specify which address or interface can use the IKEv2 profile for IKEv2 negotiation. Specify the local address configured in IPsec policy or IPsec policy template view (using the local-address command) for this command. If no local address is configured, specify the IP address of the interface that uses the IPsec policy.
¡ Specify a priority for the IKEv2 profile.
priority priority
By default, the priority of an IKEv2 profile is 100.
When the device needs to select an IKEv2 profile for IKEv2 negotiation with a peer, it compares the received peer ID with the peer ID of its local IKEv2 profiles in descending order of their priorities
¡ Set the IKEv2 SA lifetime for the IKEv2 profile.
sa duration seconds
By default, the IKEv2 SA lifetime is 86400 seconds.
The local and remote ends can use different IKEv2 SA lifetimes and they do not negotiate the lifetime. The end with a smaller SA lifetime will initiate an SA negotiation when the lifetime expires.
¡ Set the IKEv2 NAT keepalive interval.
nat-keepalive seconds
By default, the global IKEv2 NAT keepalive setting is used.
Configure this command when the device is behind a NAT gateway. The device sends NAT keepalive packets regularly to its peer to prevent the NAT session from being aged because of no matching traffic.
¡ Enable the configuration exchange feature.
config-exchange { request | set { accept | send } }
By default, all configuration exchange options are disabled.
This feature applies to scenarios where the headquarters and branches communicate through virtual tunnels. It enables exchanges of IP address request and set messages between the IPsec gateway at a branch and the IPsec gateway at the headquarters.
Table 1 Parameter descriptions
|
Parameter |
Description |
|
request |
Enables the IPsec gateway at a branch to submit IP address request messages to the IPsec gateway at the headquarters. |
|
set accept |
Enables the IPsec gateway at a branch to accept the IP addresses pushed by the IPsec gateway at the headquarters. |
|
set send |
Enables the IPsec gateway at the headquarters to push IP addresses to IPsec gateways at branches. |
¡ Enable AAA authorization.
aaa authorization domain domain-name username user-name
By default, AAA authorization is disabled.
The AAA authorization feature enables IKEv2 to request authorization attributes, such as the IKEv2 address pool, from AAA. IKEv2 uses the address pool to assign IP addresses to remote users. For more information about AAA authorization, see AAA in User Access and Authentication Configuration Guide.
Configuring an IKEv2 policy
About this task
During the IKE_SA_INIT exchange, each end tries to find a matching IKEv2 policy, using the IP address of the local security gateway as the matching criterion.
· If IKEv2 policies are configured, IKEv2 searches for an IKEv2 policy that uses the IP address of the local security gateway. If no IKEv2 policy uses the IP address or the policy is using an incomplete proposal, the IKE_SA_INIT exchange fails.
· If no IKEv2 policy is configured, IKEv2 uses the system default IKEv2 policy default.
The device matches IKEv2 policies in the descending order of their priorities. To determine the priority of an IKEv2 policy:
1. First, the device examines the existence of the match local address command. An IKEv2 policy with the match local address command configured has a higher priority.
2. If a tie exists, the device compares the priority numbers. An IKEv2 policy with a smaller priority number has a higher priority.
3. If a tie still exists, the device prefers an IKEv2 policy configured earlier.
Procedure
1. Enter system view.
system-view
2. Create an IKEv2 policy and enter its view.
ikev2 policy policy-name
By default, an IKEv2 policy named default exists.
3. Specify the local interface or address used for IKEv2 policy matching.
match local address { interface-type interface-number | ipv4-address | ipv6 ipv6-address }
By default, no local interface or address is used for IKEv2 policy matching, and the policy matches any local interface or address.
4. Specify a VPN instance for IKEv2 policy matching.
match vrf { name vrf-name | any }
By default, no VPN instance is specified for IKEv2 policy matching. The IKEv2 policy matches all local addresses in the public network.
5. Specify an IKEv2 proposal for the IKEv2 policy.
proposal proposal-name
By default, no IKEv2 proposal is specified for an IKEv2 policy.
6. Specify a priority for the IKEv2 policy.
priority priority
By default, the priority of an IKEv2 policy is 100.
Configuring an IKEv2 proposal
About this task
An IKEv2 proposal contains security parameters used in IKE_SA_INIT exchanges, including the encryption algorithms, integrity protection algorithms, PRF algorithms, and DH groups. An algorithm specified earlier has a higher priority.
Restrictions and guidelines
A complete IKEv2 proposal must have at least one set of security parameters, including one encryption algorithm, one integrity protection algorithm, one PRF algorithm, and one DH group.
You can specify multiple IKEv2 proposals for an IKEv2 policy. A proposal specified earlier has a higher priority.
Procedure
1. Enter system view.
system-view
2. Create an IKEv2 proposal and enter its view.
ikev2 proposal proposal-name
By default, an IKEv2 proposal named default exists.
The default proposal uses the following settings:
¡ Encryption algorithms AES-CBC-128 and 3DES.
¡ Integrity protection algorithms HMAC-SHA1 and HMAC-MD5.
¡ PRF algorithms HMAC-SHA1 and HMAC-MD5.
¡ DH groups 2 and 5.
3. Specify the encryption algorithms.
encryption { 3des-cbc | aes-cbc-128 | aes-cbc-192 | aes-cbc-256 | aes-ctr-128 | aes-ctr-192 | aes-ctr-256 | camellia-cbc-128 | camellia-cbc-192 | camellia-cbc-256 | des-cbc } *
By default, an IKEv2 proposal does not have any encryption algorithms.
4. Specify the integrity protection algorithms.
integrity { aes-xcbc-mac | md5 | sha1 | sha256 | sha384 | sha512 } *
By default, an IKEv2 proposal does not have any integrity protection algorithms.
5. Specify the DH groups.
dh { group1 | group14 | group2 | group24 | group5 | group19 | group20 } *
By default, an IKEv2 proposal does not have any DH groups.
6. Specify the PRF algorithms.
prf { aes-xcbc-mac | md5 | sha1 | sha256 | sha384 | sha512 } *
By default, an IKEv2 proposal uses the integrity protection algorithms as the PRF algorithms.
Configuring an IKEv2 keychain
About this task
An IKEv2 keychain specifies the preshared keys used for IKEv2 negotiation.
An IKEv2 keychain can have multiple IKEv2 peers. Each peer has a symmetric preshared key or an asymmetric preshared key pair, and information for identifying the peer (such as the peer's host name, IP address or address range, or ID).
An IKEv2 negotiation initiator uses the peer host name or IP address/address range as the matching criterion to search for a peer. A responder uses the peer host IP address/address range or ID as the matching criterion to search for a peer.
Procedure
1. Enter system view.
system-view
2. Create an IKEv2 keychain and enter its view.
ikev2 keychain keychain-name
3. Create an IKEv2 peer and enter its view.
peer name
4. Configure a host name for the peer:
hostname name
By default, no host name is configured for an IKEv2 peer.
5. Configure a host IP address or address range for the peer:
address { ipv4-address [ mask | mask-length ] | ipv6 ipv6-address [ prefix-length ] }
By default, no host IP address or address range is configured for an IKEv2 peer.
You must configure different host IP addresses/address ranges for different peers.
6. Configure an ID for the peer:
identity { address { ipv4-address | ipv6 { ipv6-address } } | fqdn fqdn-name | email email-string | key-id key-id-string }
By default, no identity information is configured for an IKEv2 peer.
7. Configure a preshared key for the peer.
pre-shared-key [ local | remote ] { ciphertext | plaintext } string
By default, an IKEv2 peer does not have a preshared key.
Configure global IKEv2 parameters
Enabling the cookie challenging feature
About this task
Enable cookie challenging on responders to protect them against DoS attacks that use a large number of source IP addresses to forge IKE_SA_INIT requests.
Procedure
1. Enter system view.
system-view
2. Enable IKEv2 cookie challenging.
ikev2 cookie-challenge number
By default, IKEv2 cookie challenging is disabled.
Configuring the IKEv2 DPD feature
About this task
IKEv2 DPD detects dead IKEv2 peers in periodic or on-demand mode.
· Periodic IKEv2 DPD—Verifies the liveness of an IKEv2 peer by sending DPD messages at regular intervals.
· On-demand IKEv2 DPD—Verifies the liveness of an IKEv2 peer by sending DPD messages before sending data.
¡ Before the device sends data, it identifies the time interval for which the last IPsec packet has been received from the peer. If the time interval exceeds the DPD interval, it sends a DPD message to the peer to detect its liveliness.
¡ If the device has no data to send, it never sends DPD messages.
Restrictions and guidelines
If you configure IKEv2 DPD in both IKEv2 profile view and system view, the IKEv2 DPD settings in IKEv2 profile view apply. If you do not configure IKEv2 DPD in IKEv2 profile view, the IKEv2 DPD settings in system view apply.
Procedure
1. Enter system view.
system-view
2. Configure global IKEv2 DPD.
ikev2 dpd interval interval [ retry seconds ] { on-demand | periodic }
By default, global DPD is disabled.
Configuring the IKEv2 NAT keepalive feature
About this task
Configure this feature on the IKEv2 gateway behind the NAT device. The gateway then sends NAT keepalive packets regularly to its peer to keep the NAT session alive, so that the peer can access the device.
The NAT keepalive interval must be shorter than the NAT session lifetime.
This feature takes effect after the device detects the NAT device.
Procedure
1. Enter system view.
system-view
2. Set the IKEv2 NAT keepalive interval.
ikev2 nat-keepalive seconds
By default, the IKEv2 NAT keepalive interval is 10 seconds.
Configuring IKEv2 address pools
About this task
To perform centralized management on remote users, an IPsec gateway can use an address pool to assign private IP addresses to remote users.
You must use an IKEv2 address pool together with AAA authorization by specifying the IKEv2 address pool as an AAA authorization attribute. For more information about AAA authorization, see AAA in User Access and Authentication Configuration Guide.
Procedure
1. Enter system view.
system-view
2. Configure an IKEv2 IPv4 address pool.
ikev2 address-group group-name start-ipv4-address end-ipv4-address [ mask | mask-length ]
3. Configure an IKEv2 IPv6 address pool.
ikev2 ipv6-address-group group-name prefix prefix/prefix-len assign-len assign-len
Verifying and maintaining IKEv2
Displaying IKEv2 information
Perform display tasks in in any view.
· Display the IKEv2 policy configuration.
display ikev2 policy [ policy-name | default ]
· Display the IKEv2 profile configuration.
display ikev2 profile [ profile-name ]
· Display the IKEv2 proposal configuration.
display ikev2 proposal [ name | default ]
· Display the IKEv2 SA information.
display ikev2 sa [ count | [ { local | remote } { ipv4-address | ipv6 ipv6-address } [ vpn-instance vpn-instance-name ] ] [ verbose [ tunnel tunnel-id ] ] ]
· Display IKEv2 statistics.
display ikev2 statistics
Clearing IKEv2 information
Perform clear tasks in user view.
· Delete IKEv2 SAs and the child SAs negotiated through the IKEv2 SAs.
reset ikev2 sa [ [ { local | remote } { ipv4-address | ipv6 ipv6-address } [ vpn-instance vpn-instance-name ] ] | tunnel tunnel-id ] [ fast ]
· Clear IKEv2 statistics.
reset ikev2 statistics
IKEv2 configuration examples
Example: Configuring IKEv2 with preshared key authentication
Network configuration
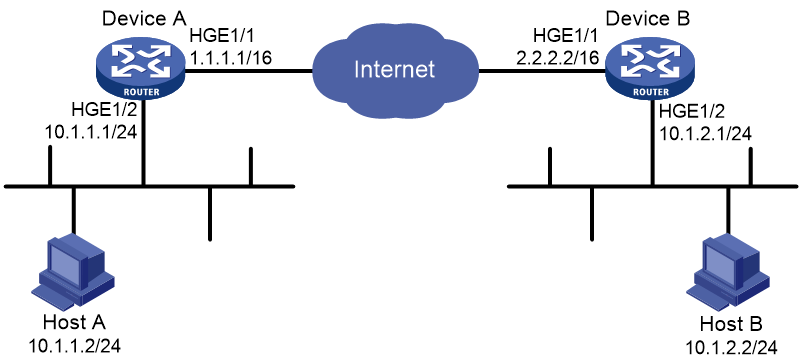
As shown in Figure 2, configure an IKE-based IPsec tunnel between Device A and Device B to secure the communication between subnet 10.1.1.0/24 and subnet 10.1.2.0/24.
· Configure Device A and Device B to use the default IKEv2 proposal and the default IKEv2 policy in IKEv2 negotiation to set up IPsec SAs.
· Configure the two devices to use the preshared key authentication method in IKEv2 negotiation.
Procedure
1. Configure Device A:
# Assign an IP address to each interface. (Details not shown.)
# Configure IPv4 advanced ACL 3101 to identify traffic from subnet 10.1.1.0/24 to subnet 10.1.2.0/24.
<DeviceA> system-view
[DeviceA] acl advanced 3101
[DeviceA-acl-ipv4-adv-3101] rule permit ip source 10.1.1.0 0.0.0.255 destination 10.1.2.0 0.0.0.255
[DeviceA-acl-ipv4-adv-3101] quit
# Create an IPsec transform set named tran1.
[DeviceA] ipsec transform-set tran1
# Set the packet encapsulation mode to tunnel.
[DeviceA-ipsec-transform-set-tran1] encapsulation-mode tunnel
# Use the ESP protocol for the IPsec transform set.
[DeviceA-ipsec-transform-set-tran1] protocol esp
# Specify the encryption and authentication algorithms.
[DeviceA-ipsec-transform-set-tran1] esp encryption-algorithm des-cbc
[DeviceA-ipsec-transform-set-tran1] esp authentication-algorithm sha1
[DeviceA-ipsec-transform-set-tran1] quit
# Create an IKEv2 keychain named keychain1.
[DeviceA] ikev2 keychain keychain1
# Create an IKEv2 peer named peer1.
[DeviceA-ikev2-keychain-keychain1] peer peer1
# Specify peer IP address 2.2.2.2/16.
[DeviceA-ikev2-keychain-keychain1-peer-peer1] address 2.2.2.2 16
# Specify the peer ID, which is IP address 2.2.2.2.
[DeviceA-ikev2-keychain-keychain1-peer-peer1] identity address 2.2.2.2
# Specify abcde in plain text as the preshared key to be used with the peer at 2.2.2.2.
[DeviceA-ikev2-keychain-keychain1-peer-peer1] pre-shared-key plaintext abcde
[DeviceA-ikev2-keychain-keychain1-peer-peer1] quit
[DeviceA-ikev2-keychain-keychain1] quit
# Create an IKEv2 profile named profile1.
[DeviceA] ikev2 profile profile1
# Specify the local authentication method as preshared key.
[DeviceA-ikev2-profile-profile1] authentication-method local pre-share
# Specify the remote authentication method as preshared key.
[DeviceA-ikev2-profile-profile1] authentication-method remote pre-share
# Specify IKEv2 keychain keychain1.
[DeviceA-ikev2-profile-profile1] keychain keychain1
# Specify the peer ID that the IKEv2 profile matches. The peer ID is IP address 2.2.2.2/16.
[DeviceA-ikev2-profile-profile1] match remote identity address 2.2.2.2 255.255.0.0
[DeviceA-ikev2-profile-profile1] quit
# Create an IKE-based IPsec policy entry with name map1 and sequence number 10.
[DeviceA] ipsec policy map1 10 isakmp
# Specify remote IP address 2.2.2.2 for the IPsec tunnel.
[DeviceA-ipsec-policy-isakmp-map1-10] remote-address 2.2.2.2
# Specify ACL 3101 to identify the traffic to be protected.
[DeviceA-ipsec-policy-isakmp-map1-10] security acl 3101
# Specify IPsec transform set tran1 for the IPsec policy.
[DeviceA-ipsec-policy-isakmp-map1-10] transform-set tran1
# Specify IKEv2 profile profile1 for the IPsec policy.
[DeviceA-ipsec-policy-isakmp-map1-10] ikev2-profile profile1
[DeviceA-ipsec-policy-isakmp-map1-10] quit
# Apply IPsec policy map1 to HundredGigE 1/0/1.
[DeviceA] interface hundredgige 1/0/1
[DeviceA-HundredGigE1/0/1] ipsec apply policy map1
[DeviceA-HundredGigE1/0/1] quit
# Configure a static route to the subnet where Host B resides. This example uses 1.1.1.2 as the next hop IP address.
[DeviceA] ip route-static 10.1.2.0 255.255.255.0 1.1.1.2
2. Configure Device B:
# Assign an IP address to each interface. (Details not shown.)
# Configure IPv4 advanced ACL 3101 to identify traffic from subnet 10.1.2.0/24 to subnet 10.1.1.0/24.
<DeviceB> system-view
[DeviceB] acl advanced 3101
[DeviceB-acl-ipv4-adv-3101] rule permit ip source 10.1.2.0 0.0.0.255 destination 10.1.1.0 0.0.0.255
[DeviceB-acl-ipv4-adv-3101] quit
# Create an IPsec transform set named tran1.
[DeviceB] ipsec transform-set tran1
# Set the packet encapsulation mode to tunnel.
[DeviceB-ipsec-transform-set-tran1] encapsulation-mode tunnel
# Use the ESP protocol for the IPsec transform set.
[DeviceB-ipsec-transform-set-tran1] protocol esp
# Specify the encryption and authentication algorithms.
[DeviceB-ipsec-transform-set-tran1] esp encryption-algorithm des-cbc
[DeviceB-ipsec-transform-set-tran1] esp authentication-algorithm sha1
[DeviceB-ipsec-transform-set-tran1] quit
# Create an IKEv2 keychain named keychain1.
[DeviceB] ikev2 keychain keychain1
# Create an IKEv2 peer named peer1.
[DeviceB-ikev2-keychain-keychain1] peer peer1
# Specify peer IP address 1.1.1.1/16.
[DeviceB-ikev2-keychain-keychain1-peer-peer1] address 1.1.1.1 16
# Specify the peer ID, which is IP address 1.1.1.1.
[DeviceB-ikev2-keychain-keychain1-peer-peer1] identity address 1.1.1.1
# Specify abcde in plain text as the preshared key to be used with the peer at 1.1.1.1.
[DeviceB-ikev2-keychain-keychain1-peer-peer1] pre-shared-key plaintext abcde
[DeviceB-ikev2-keychain-keychain1-peer-peer1] quit
[DeviceB-ikev2-keychain-keychain1] quit
# Create an IKEv2 profile named profile1.
[DeviceB] ikev2 profile profile1
# Specify the local authentication method as preshared key.
[DeviceB-ikev2-profile-profile1] authentication-method local pre-share
# Specify the remote authentication method as preshared key.
[DeviceB-ikev2-profile-profile1] authentication-method remote pre-share
# Specify IKEv2 keychain keychain1.
[DeviceB-ikev2-profile-profile1] keychain keychain1
# Specify the peer ID that the IKEv2 profile matches. The peer ID is IP address 1.1.1.1/16.
[DeviceA-ikev2-profile-profile1] match remote identity address 1.1.1.1 255.255.0.0
[DeviceA-ikev2-profile-profile1] quit
# Create an IKE-based IPsec policy entry. Specify use1 as the policy name and set the sequence number to 10.
[DeviceB] ipsec policy use1 10 isakmp
# Specify remote IP address 1.1.1.1 for the IPsec tunnel.
[DeviceB-ipsec-policy-isakmp-use1-10] remote-address 1.1.1.1
# Specify ACL 3101 to identify the traffic to be protected.
[DeviceB-ipsec-policy-isakmp-use1-10] security acl 3101
# Specify IPsec transform set tran1 for the IPsec policy.
[DeviceB-ipsec-policy-isakmp-use1-10] transform-set tran1
# # Specify IKEv2 profile profile1 for the IPsec policy.
[DeviceB-ipsec-policy-isakmp-use1-10] ikev2-profile profile1
[DeviceB-ipsec-policy-isakmp-use1-10] quit
# Apply IPsec policy use1 to HundredGigE 1/0/1.
[DeviceB] interface hundredgige 1/0/1
[DeviceB-HundredGigE1/0/1] ipsec apply policy use1
[DeviceB-HundredGigE1/0/1] quit
# Configure a static route to the subnet where Host A resides. This example uses 2.2.2.1 as the next hop IP address.
[DeviceB] ip route-static 10.1.1.0 255.255.255.0 2.2.2.1
Verifying the configuration
# Initiate a connection from subnet 10.1.1.0/24 to subnet 10.1.2.0/24 to trigger IKEv2 negotiation. After IPsec SAs are successfully negotiated by IKEv2, traffic between the two subnets is IPsec-protected.
# Display the IKEv2 proposal and IKEv2 policy on Device A.
[DeviceA] display ikev2 proposal
IKEv2 proposal : default
Encryption: AES-CBC-128 3DES-CBC
Integrity: SHA1 MD5
PRF: SHA1 MD5
DH Group: MODP1536/Group5 MODP1024/Group2
[DeviceA] display ikev2 policy
IKEv2 policy : default
Match VRF : any
Proposal: default
# Display the IKEv2 SA on Device A.
[DeviceA] display ikev2 sa
Tunnel ID Local Remote Status
---------------------------------------------------------------------------
1 1.1.1.1/500 2.2.2.2/500 EST
Status:
IN-NEGO: Negotiating, EST: Established, DEL:Deleting
# Display the IPsec SAs on Device A.
[DeviceA] display ipsec sa
-------------------------------
Interface: HundredGigE1/0/1
-------------------------------
-----------------------------
IPsec policy: map1
Sequence number: 10
Mode: ISAKMP
-----------------------------
Tunnel id: 0
Encapsulation mode: tunnel
Perfect Forward Secrecy:
Inside VPN:
Extended Sequence Numbers enable: N
Traffic Flow Confidentiality enable: N
Path MTU: 1456
Tunnel:
local address: 1.1.1.1
remote address: 2.2.2.2
Flow:
sour addr: 10.1.1.0/255.255.255.0 port: 0 protocol: ip
dest addr: 10.1.2.0/255.255.255.0 port: 0 protocol: ip
[Inbound ESP SAs]
SPI: 3264152513 (0xc28f03c1)
Connection ID: 141733920771
Transform set: ESP-ENCRYPT-DES-CBC ESP-AUTH-SHA1
SA duration (kilobytes/sec): 1843200/3600
SA remaining duration (kilobytes/sec): 1843200/3484
Max received sequence-number:
Anti-replay check enable: Y
Anti-replay window size: 64
UDP encapsulation used for NAT traversal: N
Status: Active
[Outbound ESP SAs]
SPI: 738451674 (0x2c03e0da)
Connection ID: 64424509441
Transform set: ESP-ENCRYPT-DES-CBC ESP-AUTH-SHA1
SA duration (kilobytes/sec): 1843200/3600
SA remaining duration (kilobytes/sec): 1843200/3484
Max sent sequence-number:
UDP encapsulation used for NAT traversal: N
Status: Active
# Display the IKEv2 proposal, IKEv2 policy, IKEv2 SA and IPsec SAs on Device B.
[DeviceB] display ikev2 proposal
[DeviceB] display ikev2 policy
[DeviceB] display ikev2 sa
[DeviceB] display ipsec sa
Example: Configuring IKEv2 with RSA signature authentication
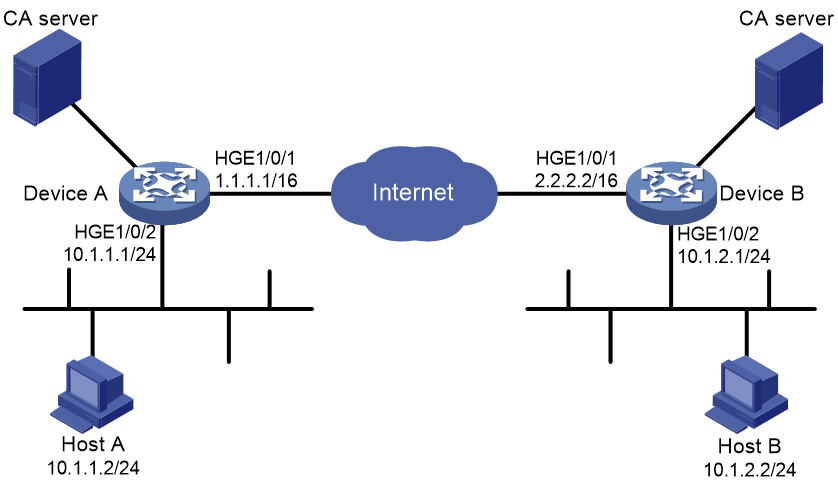
Network configuration
As shown in Figure 3, configure an IKE-based IPsec tunnel between Device A and Device B to secure the communication between subnet 10.1.1.0/24 and subnet 10.1.2.0/24.
Configure Device A and Device B to use IKEv2 negotiation and RSA signature authentication. Device A acts as the initiator, and the subnet where Device A resides uses IP addresses dynamically allocated.
Procedure
1. Configure Device A:
# Assign an IP address to each interface. (Details not shown.)
# Configure IPv4 advanced ACL 3101 to identify traffic from subnet 10.1.1.0/24 to subnet 10.1.2.0/24.
<DeviceA> system-view
[DeviceA] acl advanced 3101
[DeviceA-acl-ipv4-adv-3101] rule permit ip source 10.1.1.0 0.0.0.255 destination 10.1.2.0 0.0.0.255
[DeviceA-acl-ipv4-adv-3101] quit
# Create an IPsec transform set named tran1.
[DeviceA] ipsec transform-set tran1
# Set the packet encapsulation mode to tunnel.
[DeviceA-ipsec-transform-set-tran1] encapsulation-mode tunnel
# Use the ESP protocol for the IPsec transform set.
[DeviceA-ipsec-transform-set-tran1] protocol esp
# Specify the encryption and authentication algorithms.
[DeviceA-ipsec-transform-set-tran1] esp encryption-algorithm des-cbc
[DeviceA-ipsec-transform-set-tran1] esp authentication-algorithm sha1
[DeviceA-ipsec-transform-set-tran1] quit
# Create a PKI entity named entity1.
[DeviceA] pki entity entity1
# Set the common name to devicea for the PKI entity.
[DeviceA-pki-entity-entity1] common-name devicea
[DeviceA-pki-entity-entity1] quit
# Create a PKI domain named domain1.
[DeviceA] pki domain domain1
# Set the certificate request mode to auto and set the password to 123 for certificate revocation.
[DeviceA-pki-domain-domain1] certificate request mode auto password simple 123
# Set an MD5 fingerprint for verifying the validity of the CA root certificate.
[DeviceA-pki-domain-domain1] root-certificate fingerprint md5 50c7a2d282ea710a449eede6c56b102e
# Specify the trusted CA 8088.
[DeviceA-pki-domain-domain1] ca identifier 8088
# Specify the URL of the registration server for certificate request through the SCEP protocol. This example uses http://192.168.222.1:446/eadbf9af4f2c4641e685f7a6021e7b298373feb7.
[DeviceA-pki-domain-domain1] certificate request url http://192.168.222.1:446/eadbf9af4f2c4641e685f7a6021e7b298373feb7
# Specify the CA to accept certificate requests.
[DeviceA-pki-domain-domain1] certificate request from ca
# Specify the PKI entity for certificate request as entity1.
[DeviceA-pki-domain-domain1] certificate request entity entity1
# Specify RSA key pair rsa1 with the general purpose for certificate request.
[DeviceA-pki-domain-domain1] public-key rsa general name rsa1
[DeviceA-pki-domain-domain1] quit
# Create an IKEv2 profile named profile1.
[DeviceA] ikev2 profile profile1
# Specify the local authentication method as RSA signatures.
[DeviceA-ikev2-profile-profile1] authentication-method local rsa-signature
# Specify the remote authentication method as RSA signatures.
[DeviceA-ikev2-profile-profile1] authentication-method remote rsa-signature
# Specify PKI domain domain1 for the IKEv2 profile.
[DeviceA-ikev2-profile-profile1] certificate domain domain1
# Set the local ID to FQDN name www.devicea.com.
[DeviceA-ikev2-profile-profile1] identity local fqdn www.devicea.com
# Specify the peer ID that the IKEv2 profile matches. The peer ID is FQDN name www.deviceb.com.
[DeviceA-ikev2-profile-profile1] match remote identity fqdn www.deviceb.com
[DeviceA-ikev2-profile-profile1] quit
# Create an IKEv2 proposal named 10.
[DeviceA] ikev2 proposal 10
# Specify the integrity protection algorithm as HMAC-MD5.
[DeviceA-ikev2-proposal-10] integrity md5
# Specify the encryption algorithm as 3DES-CBC.
[DeviceA-ikev2-proposal-10] encryption 3des-cbc
# Specify the DH group as Group 1.
[DeviceA-ikev2-proposal-10] dh group1
# Specify the PRF algorithm as HMAC-MD5.
[DeviceA-ikev2-proposal-10] prf md5
[DeviceA-ikev2-proposal-10] quit
# Create an IKEv2 policy named 1.
[DeviceA] ikev2 policy 1
# Specify IKEv2 proposal 10 for the IKEv2 policy.
[DeviceA-ikev2-policy-1] proposal 10
[DeviceA-ikev2-policy-1] quit
# Create an IKE-based IPsec policy entry with name map1 and sequence number 10.
[DeviceA] ipsec policy map1 10 isakmp
# Specify remote IP address 2.2.2.2 for the IPsec tunnel.
[DeviceA-ipsec-policy-isakmp-map1-10] remote-address 2.2.2.2
# Specify IPsec transform set tran1 for the IPsec policy.
[DeviceA-ipsec-policy-isakmp-map1-10] transform-set tran1
# Specify ACL 3101 to identify the traffic to be protected.
[DeviceA-ipsec-policy-isakmp-map1-10] security acl 3101
# Specify IKEv2 profile profile1 for the IPsec policy.
[DeviceA-ipsec-policy-isakmp-map1-10] ikev2-profile profile1
[DeviceA-ipsec-policy-isakmp-map1-10] quit
# Apply IPsec policy map1 to HundredGigE 1/0/1.
[DeviceA] interface hundredgige 1/0/1
[DeviceA-HundredGigE1/0/1] ipsec apply policy map1
[DeviceA-HundredGigE1/0/1] quit
# Configure a static route to the subnet where Host B resides. This example uses 1.1.1.2 as the next hop IP address.
[DeviceA] ip route-static 10.1.2.0 255.255.255.0 1.1.1.2
2. Configure Device B:
# Assign an IP address to each interface. (Details not shown.)
# Configure IPv4 advanced ACL 3101 to identify traffic from subnet 10.1.2.0/24 to subnet 10.1.1.0/24.
<DeviceB> system-view
[DeviceB] acl advanced 3101
[DeviceB-acl-ipv4-adv-3101] rule permit ip source 10.1.2.0 0.0.0.255 destination 10.1.1.0 0.0.0.255
[DeviceB-acl-ipv4-adv-3101] quit
# Create an IPsec transform set named tran1.
[DeviceB] ipsec transform-set tran1
# Set the packet encapsulation mode to tunnel.
[DeviceB-ipsec-transform-set-tran1] encapsulation-mode tunnel
# Use the ESP protocol for the IPsec transform set.
[DeviceB-ipsec-transform-set-tran1] protocol esp
# Specify the encryption and authentication algorithms.
[DeviceB-ipsec-transform-set-tran1] esp encryption-algorithm des-cbc
[DeviceB-ipsec-transform-set-tran1] esp authentication-algorithm sha1
[DeviceB-ipsec-transform-set-tran1] quit
# Create a PKI entity named entity2.
[DeviceB] pki entity entity2
# Set the common name to deviceb for the PKI entity.
[DeviceB-pki-entity-entity2] common-name deviceb
[DeviceB-pki-entity-entity2] quit
# Create a PKI domain named domain2.
[DeviceB] pki domain domain2
# Set the certificate request mode to auto and set the password to 123 for certificate revocation.
[DeviceB-pki-domain-domain2] certificate request mode auto password simple 123
# Set an MD5 fingerprint for verifying the validity of the CA root certificate.
[DeviceB-pki-domain-domain2] root-certificate fingerprint md5 50c7a2d282ea710a449eede6c56b102e
# Specify the trusted CA 8088.
[DeviceB-pki-domain-domain2] ca identifier 8088
# Specify the URL of the registration server for certificate request through the SCEP protocol. This example uses http://192.168.222.1:446/eadbf9af4f2c4641e685f7a6021e7b298373feb7.
[DeviceB-pki-domain-domain2] certificate request url http://192.168.222.1:446/eadbf9af4f2c4641e685f7a6021e7b298373feb7
# Specify the CA to accept certificate requests.
[DeviceB-pki-domain-domain2] certificate request from ca
# Specify the PKI entity for certificate request as entity2.
[DeviceB-pki-domain-domain2] certificate request entity entity2
# Specify RSA key pair rsa1 with the general purpose for certificate request.
[DeviceB-pki-domain-domain2] public-key rsa general name rsa1
[DeviceB-pki-domain-domain2] quit
# Create an IKEv2 profile named profile2.
[DeviceB] ikev2 profile profile2
# Specify the local authentication method as RSA signatures.
[DeviceB-ikev2-profile-profile2] authentication-method local rsa-signature
# Specify the remote authentication method as RSA signatures.
[DeviceB-ikev2-profile-profile2] authentication-method remote rsa-signature
# Set the local identity to FQDN name www.deviceb.com.
[DeviceB-ikev2-profile-profile2] identity local fqdn www.deviceb.com
# Specify the peer ID that the IKEv2 profile matches. The peer ID is FQDN name www.devicea.com.
[DeviceB-ikev2-profile-profile2] match remote identity fqdn www.devicea.com
[DeviceB-ikev2-profile-profile2] quit
# Create an IKEv2 proposal named 10.
[DeviceB] ikev2 proposal 10
# Specify the integrity protection algorithm as HMAC-MD5.
[DeviceB-ikev2-proposal-10] integrity md5
# Specify the encryption algorithm as 3DES-CBC.
[DeviceB-ikev2-proposal-10] encryption 3des-cbc
# Specify the DH group as Group 1.
[DeviceB-ikev2-proposal-10] dh group1
# Specify the PRF algorithm as HMAC-MD5.
[DeviceB-ikev2-proposal-10] prf md5
[DeviceB-ikev2-proposal-10] quit
# Create an IKEv2 policy named 1.
[DeviceB] ikev2 policy 1
# Specify IKEv2 proposal 10 for the IKEv2 policy.
[DeviceB-ikev2-policy-1] proposal 10
[DeviceB-ikev2-policy-1] quit
# Create an IPsec policy template entry. Specify template1 as the template name and set the sequence number to 1.
[DeviceB] ipsec policy-template template1 1
# Specify the remote IP address 1.1.1.1 for the IPsec tunnel.
[DeviceB-ipsec-policy-template-template1-1] remote-address 1.1.1.1
# Specify ACL 3101 to identify the traffic to be protected.
[DeviceB-ipsec-policy-template-template1-1] security acl 3101
# Specify IPsec transform set tran1 for the IPsec policy template.
[DeviceB-ipsec-policy-template-template1-1] transform-set tran1
# Specify IKEv2 profile profile2 for the IPsec policy template.
[DeviceB-ipsec-policy-template-template1-1] ikev2-profile profile2
[DeviceB-ipsec-policy-template-template1-1] quit
# Create an IKE-based IPsec policy entry by using IPsec policy template template1. Specify use1 as the policy name and set the sequence number to 1.
[DeviceB] ipsec policy use1 1 isakmp template template1
# Apply IPsec policy use1 to HundredGigE 1/0/1.
[DeviceB] interface hundredgige 1/0/1
[DeviceB-HundredGigE1/0/1] ipsec apply policy use1
[DeviceB-HundredGigE1/0/1] quit
# Configure a static route to the subnet where Host A resides. This example uses 2.2.2.1 as the next hop IP address.
[DeviceB] ip route-static 10.1.1.0 255.255.255.0 2.2.2.1
Verifying the configuration
# Initiate a connection from subnet 10.1.1.0/24 to subnet 10.1.2.0/24 to trigger IKEv2 negotiation. After IPsec SAs are successfully negotiated by IKEv2, traffic between the two subnets is IPsec-protected.
# Display the IKEv2 proposal configuration on Device A and Device B.
[DeviceA] display ikev2 proposal 10
IKEv2 proposal : 10
Encryption : 3DES-CBC
Integrity : MD5
PRF : MD5
DH Group : MODP768/Group1
[DeviceB] display ikev2 proposal 10
IKEv2 proposal : 10
Encryption : 3DES-CBC
Integrity : MD5
PRF : MD5
DH Group : MODP768/Group1
# Display the IKEv2 policy configuration Device A and Device B.
[DeviceA] display ikev2 policy 1
IKEv2 policy : 1
Priority: 100
Match Local : any
Match VRF : public
Proposal : 10
[DeviceB] display ikev2 policy 1
IKEv2 policy : 1
Priority: 100
Match Local : any
Match VRF : public
Proposal : 10
# Display the IKEv2 SA on Device A.
[DeviceA] display ikev2 sa
Tunnel ID Local Remote Status
---------------------------------------------------------------------------
1 1.1.1.1/500 2.2.2.2/500 EST
Status:
IN-NEGO: Negotiating, EST: Established, DEL:Deleting
# Display information about the CA certificate on Device A.
[DeviceA] display pki certificate domain domain1 ca
Certificate:
Data:
Version: 1 (0x0)
Serial Number:
b9:14:fb:25:c9:08:2c:9d:f6:94:20:30:37:4e:00:00
Signature Algorithm: sha1WithRSAEncryption
Issuer: C=cn, O=rnd, OU=sec, CN=8088
Validity
Not Before: Sep 6 01:53:58 2012 GMT
Not After : Sep 8 01:50:58 2015 GMT
Subject: C=cn, O=rnd, OU=sec, CN=8088
Subject Public Key Info:
Public Key Algorithm: rsaEncryption
Public-Key: (1024 bit)
Modulus:
00:de:81:f4:42:c6:9f:c2:37:7b:21:84:57:d6:42:
00:69:1c:4c:34:a4:5e:bb:30:97:45:2b:5e:52:43:
c0:49:1f:e1:d8:0f:5c:48:c2:39:69:d1:84:e4:14:
70:3d:98:41:28:1c:20:a1:9a:3f:91:67:78:77:27:
d9:08:5f:7a:c4:36:45:8b:f9:7b:e7:7d:6a:98:bb:
4e:a1:cb:2c:3d:92:66:bd:fb:80:35:16:c6:35:f0:
ff:0b:b9:3c:f3:09:94:b7:d3:6f:50:8d:83:f1:66:
2f:91:0b:77:a5:98:22:b4:77:ac:84:1d:03:8e:33:
1b:31:03:78:4f:77:a0:db:af
Exponent: 65537 (0x10001)
Signature Algorithm: sha1WithRSAEncryption
9a:6d:8c:46:d3:18:8a:00:ce:12:ee:2b:b0:aa:39:5d:3f:90:
08:49:b9:a9:8f:0d:6e:7b:e1:00:fb:41:f5:d4:0c:e4:56:d8:
7a:a7:61:1d:2b:b6:72:e3:09:0b:13:9d:fa:c8:fc:c4:65:a7:
f9:45:21:05:75:2c:bf:36:7b:48:b4:4a:b9:fe:87:b9:d8:cf:
55:16:87:ec:07:1d:55:5a:89:74:73:68:5e:f9:1d:30:55:d9:
8a:8f:c5:d4:20:7e:41:a9:37:57:ed:8e:83:a7:80:2f:b8:31:
57:3a:f2:1a:28:32:ea:ea:c5:9a:55:61:6a:bc:e5:6b:59:0d:
82:16
# Display the local certificate on Device A.
[DeviceA]display pki certificate domain domain1 local
Certificate:
Data:
Version: 3 (0x2)
Serial Number:
a1:f4:d4:fd:cc:54:c3:07:c4:9e:15:2d:5f:64:57:77
Signature Algorithm: sha1WithRSAEncryption
Issuer: C=cn, O=rnd, OU=sec, CN=8088
Validity
Not Before: Sep 26 02:06:43 2012 GMT
Not After : Sep 26 02:06:43 2013 GMT
Subject: CN=devicea
Subject Public Key Info:
Public Key Algorithm: rsaEncryption
Public-Key: (1024 bit)
Modulus:
00:b0:a1:cd:24:6e:1a:1d:51:79:f0:2a:3e:9f:e9:
84:07:16:78:49:1b:7d:0b:22:f0:0a:ed:75:91:a4:
17:fd:c7:ef:d0:66:5c:aa:e3:2a:d9:71:12:e4:c6:
25:77:f0:1d:97:bb:92:a8:bd:66:f8:f8:e8:d5:0d:
d2:c8:01:dd:ea:e6:e0:80:ad:db:9d:c8:d9:5f:03:
2d:22:07:e3:ed:cc:88:1e:3f:0c:5e:b3:d8:0e:2d:
ea:d6:c6:47:23:6a:11:ef:3c:0f:6b:61:f0:ca:a1:
79:a0:b1:02:1a:ae:8c:c9:44:e0:cf:d1:30:de:4c:
f0:e5:62:e7:d0:81:5d:de:d3
Exponent: 65537 (0x10001)
X509v3 extensions:
X509v3 CRL Distribution Points:
Full Name:
URI:http://xx.rsa.com:447/8088.crl
Signature Algorithm: sha1WithRSAEncryption
73:ac:66:f9:b8:b5:39:e1:6a:17:e4:d0:72:3e:26:9e:12:61:
9e:c9:7a:86:6f:27:b0:b9:a3:5d:02:d9:5a:cb:79:0a:12:2e:
cb:e7:24:57:e6:d9:77:12:6b:7a:cf:ee:d6:17:c5:5f:d2:98:
30:e0:ef:00:39:4a:da:ff:1c:29:bb:2a:5b:60:e9:33:8f:78:
f9:15:dc:a5:a3:09:66:32:ce:36:cd:f0:fe:2f:67:e5:72:e5:
21:62:85:c4:07:92:c8:f1:d3:13:9c:2e:42:c1:5f:0e:8f:ff:
65:fb:de:7c:ed:53:ab:14:7a:cf:69:f2:42:a4:44:7c:6e:90:
7e:cd
# Display the IPsec SAs on Device A.
[DeviceA] display ipsec sa
-------------------------------
Interface: HundredGigE1/0/1
-------------------------------
-----------------------------
IPsec policy: map1
Sequence number: 10
Mode: ISAKMP
-----------------------------
Tunnel id: 0
Encapsulation mode: tunnel
Perfect Forward Secrecy:
Inside VPN:
Extended Sequence Numbers enable: N
Traffic Flow Confidentiality enable: N
Path MTU: 1456
Tunnel:
local address: 1.1.1.1
remote address: 2.2.2.2
Flow:
sour addr: 10.1.1.0/255.255.255.0 port: 0 protocol: ip
dest addr: 10.1.2.0/255.255.255.0 port: 0 protocol: ip
[Inbound ESP SAs]
SPI: 3264152513 (0xc28f03c1)
Connection ID: 141733920771
Transform set: ESP-ENCRYPT-DES-CBC ESP-AUTH-SHA1
SA duration (kilobytes/sec): 1843200/3600
SA remaining duration (kilobytes/sec): 1843200/3484
Max received sequence-number:
Anti-replay check enable: Y
Anti-replay window size: 64
UDP encapsulation used for NAT traversal: N
Status: Active
[Outbound ESP SAs]
SPI: 738451674 (0x2c03e0da)
Connection ID: 141733920770
Transform set: ESP-ENCRYPT-DES-CBC ESP-AUTH-SHA1
SA duration (kilobytes/sec): 1843200/3600
SA remaining duration (kilobytes/sec): 1843200/3484
Max sent sequence-number:
UDP encapsulation used for NAT traversal: N
Status: Active
# Display the information about the CA certificate, local certificate, IKEv2 SA, and IPsec SA on Device B.
[DeviceB] display ikev2 sa
[DeviceB] display pki certificate domain domain2 ca
[DeviceB] display pki certificate domain domain2 local
[DeviceB] display ipsec sa
Troubleshooting IKEv2
IKEv2 negotiation failed because no matching IKEv2 proposals were found
Symptom
The IKEv2 SA is in IN-NEGO status.
<Sysname> display ikev2 sa
Tunnel ID Local Remote Status
---------------------------------------------------------------------------
5 123.234.234.124/500 123.234.234.123/500 IN-NEGO
Status:
IN-NEGO: Negotiating, EST: Established, DEL:Deleting
Analysis
Certain IKEv2 proposal settings are incorrect.
Solution
1. Examine the IKEv2 proposal configuration to see whether the two ends have matching IKEv2 proposals.
2. Modify the IKEv2 proposal configuration to make sure the two ends have matching IKEv2 proposals.
3. If the problem persists, contact H3C Support.
IPsec SA negotiation failed because no matching IPsec transform sets were found
Symptom
The display ikev2 sa command shows that the IKEv2 SA negotiation succeeded and the IKEv2 SA is in EST status. The display ipsec sa command shows that the expected IPsec SAs have not been negotiated yet.
Analysis
Certain IPsec policy settings are incorrect.
Solution
1. Examine the IPsec configuration to see whether the two ends have matching IPsec transform sets.
2. Modify the IPsec configuration to make sure the two ends have matching IPsec transform sets.
3. If the problem persists, contact H3C Support.
IPsec tunnel establishment failed
Symptom
The ACLs and IKEv2 proposals are correctly configured on both ends. The two ends cannot establish an IPsec tunnel or cannot communicate through the established IPsec tunnel.
Analysis
The IKEv2 SA or IPsec SAs on either end are lost. The reason might be that the network is unstable and the device reboots.
Solution
1. Use the display ikev2 sa command to examine whether an IKEv2 SA exists on both ends. If the IKEv2 SA on one end is lost, delete the IKEv2 SA on the other end by using the reset ikev2 sa command and trigger new negotiation. If an IKEv2 SA exists on both ends, go to the next step.
2. Use the display ipsec sa command to examine whether IPsec SAs exist on both ends. If the IPsec SAs on one end are lost, delete the IPsec SAs on the other end by using the reset ipsec sa command and trigger new negotiation.
3. If the problem persists, contact H3C Support.