- Table of Contents
- Related Documents
-
| Title | Size | Download |
|---|---|---|
| 01-Text | 1.35 MB |
Updating power supply firmware
Updating BPCPLD or PSWCPLD firmware
Updating the PMem 200 firmware
Update the REPO for firmware update
Update the firmware by using HDM out-of-band management
Introduction
This document describes procedures of updating the HDM, BIOS, CPLD, LCD, power supply, GPUFPGA, FANMCU, PMem 200, storage controller firmware, network adapter firmware, and drive firmware from HDM or FIST.
Firmware update methods
The firmware update methods vary by application scenario, as shown in Table 1.
Table 1 Firmware update methods
|
Update method |
Application scenario |
Applicable firmware |
Remarks |
|
HDM |
Firmware update on a single server |
HDM, BIOS, CPLD, BPCPLD, DBCPLD, STBCPLD, PDBCPLD, PDBSCPLD, NDCPLD, AUXCPLD, PFRCPLD, OCPCPLD, GPUCPLD, PSWCPLD, PSU, LCD, GPUFPGA, FANMCU, PMem 200, storage controller firmware, network adapter firmware, and drive firmware |
Supports update with forced configuration restored, factory defaults restored, or user-configured settings retained |
|
FIST |
Firmware update on a single server or multiple servers in bulk |
HDM, BIOS, CPLD, DBCPLD, STBCPLD, PDBCPLD, NDCPLD, AUXCPLD, PFRCPLD, storage controller firmware, network adapter firmware, and drive firmware |
Supports only update with user-configured settings retained |
Restrictions and guidelines
Make sure the updated firmware are compatible with each other.
For G3 servers, the BIOS has multiple version series, including BIOS-1.00.XX and BIOS-2.00.XX. When you update the BIOS to a version of a different series from the current version, follow these restrictions and guidelines:
· To use HDM to update the BIOS, select Forcedly restore. For an R6900 G3 server, you must clear CMOS after a BIOS update. To clear CMOS, perform the following tasks:
a. Power off the server and disconnect power cords.
b. Remove the system battery. Wait for 5 minutes, and then reinstall the system battery.
c. Power on the server.
· Do not use FIST to update the BIOS because FIST retains the user-configured settings by default. To use FIST to update the BIOS to a version of a different series from the current version, contact Technical Support.
The method for the new firmware to take effect varies by firmware type. Follow the methods described in Table 2 to make the new firmware take effect.
Table 2 Method for the new firmware to take effect
|
Firmware type |
Method for the new firmware to take effect |
|
HDM |
Perform a primary/backup switchover and then repeat the update process again. HDM firmware update updates only the backup image. You must perform firmware update twice to update both the primary and backup images to the same version. |
|
· BIOS · GPUFPGA |
Restart the server. |
|
CPLD |
The method varies by device model. For more information, see "Updating CPLD firmware." |
|
PFRCPLD |
Restart CPLD. The system also restarts PFRCPLD when restarting CPLD. For more information, see H3C Servers HDM User Guide. |
|
· DBCPLD · STBCPLD · PDBCPLD · PDBSCPLD · NDCPLD · OCPCPLD · GPUCPLD · PSWCPLD |
Power off the server, reconnect the power cords, and then power on the server. |
|
AUXCPLD |
Re-install the blade server. |
|
BPCPLD |
Restart HDM. |
|
· PSU · LCD · FANMCU |
The firmware takes effect automatically after an update. |
|
· Storage controller firmware · Network adapter firmware · Drive firmware |
Restart the server and enter iFIST. |
|
PMem 200 |
Restart the server. |
Applicable products
This document is applicable to the following products:
· AE100
· H3C UniServer B5700 G3
· H3C UniServer B5800 G3
· H3C UniServer B7800 G3
· H3C UniServer E3200 G3
· H3C UniServer R2700 G3
· H3C UniServer R2900 G3
· H3C UniServer R4100 G3
· H3C UniServer R4300 G3
· H3C UniServer R4400 G3
· H3C UniServer R4700 G3
· H3C UniServer R4900 G3
· H3C UniServer R4930 G5
· H3C UniServer R4950 G3
· H3C UniServer R5300 G3
· H3C UniServer R6700 G3
· H3C UniServer R6900 G3
· H3C UniServer R8900 G3
· H3C UniServer B5700 G5
· H3C UniServer R4300 G5
· H3C UniServer R4330 G5
· H3C UniServer R4700 G5
· H3C UniServer R4900 G5
· H3C UniServer R4950 G5
· H3C UniServer R5300 G5
· H3C UniServer R5500 G5
· H3C UniServer R6900 G5
Updating firmware from HDM
The HDM Web interface is subject to change over time. The figures in this section are for illustration only. You can update the HDM, BIOS, power supply, LCD, GPUFPGA, FANMCU, REPO, and CPLD firmware of a single server from HDM.
Updating HDM
HDM supports one primary firmware image and one backup firmware image, and it always runs the primary image. HDM firmware update updates the backup firmware image.
To minimize the impact on HDM services, HDM uses the following procedure to update HDM firmware:
1. When you update HDM firmware, HDM replaces the backup firmware image with the uploaded update image.
2. At the restart after the update, HDM automatically changes the roles of primary and backup HDM images. Then, HDM restarts with the update image, which is now the primary image.
3. If you do not restart HDM after the update, you must manually perform a primary/backup switchover for HDM to run the updated image. For more information about primary/backup switchover, see H3C Servers HDM User Guide.
Restrictions and guidelines
To avoid update failure, do not power on, power off, or disconnect any power supply during the update.
Only one user can update firmware at a time. If multiple users attempt to update firmware, only the one who first started the update can perform this operation.
Some features on HDM are not available during the update. For more information, see H3C Servers HDM User Guide.
Prerequisites
· Sign in to the HDM Web interface. For more information, see H3C Servers HDM User Guide.
· Obtain the up-to-date HDM firmware image from the H3C website, and store the image file on the local PC. To avoid update failure, make sure the update image file contains a vendor signature and is not corrupt.
· To avoid configuration loss caused by inadvertent mistakes, back up the configuration.
Procedure
1. Enter the firmware update page, as shown in Figure 1.
2. In the work pane, perform the following tasks:
a. Select an image upload method.
- If you select Local, select HDM as the firmware type. Then, browse to the update image file and select it.
- If you select TFTP, enter the IP address of the interface used for file upload and enter the image name. Then, select HDM as the firmware type.
b. Select the HDM restart method after the update is complete. You can have HDM automatically restart when the update is complete or manually restart HDM later.
c. (Optional.) To remove all user-configured settings after you update HDM firmware, select Enabled for Restore factory default.
d. Click Next.
|
|
WARNING! The Restore factory default option removes all user-configured settings when HDM starts up with the new firmware. When you select this option, make sure you understand its impact on the services. If this option is selected, you must use the default user account settings at the first sign-in to HDM after its firmware is updated. For more information, see H3C Servers HDM User Guide. |
Figure 1 Specifying the new HDM firmware image for update

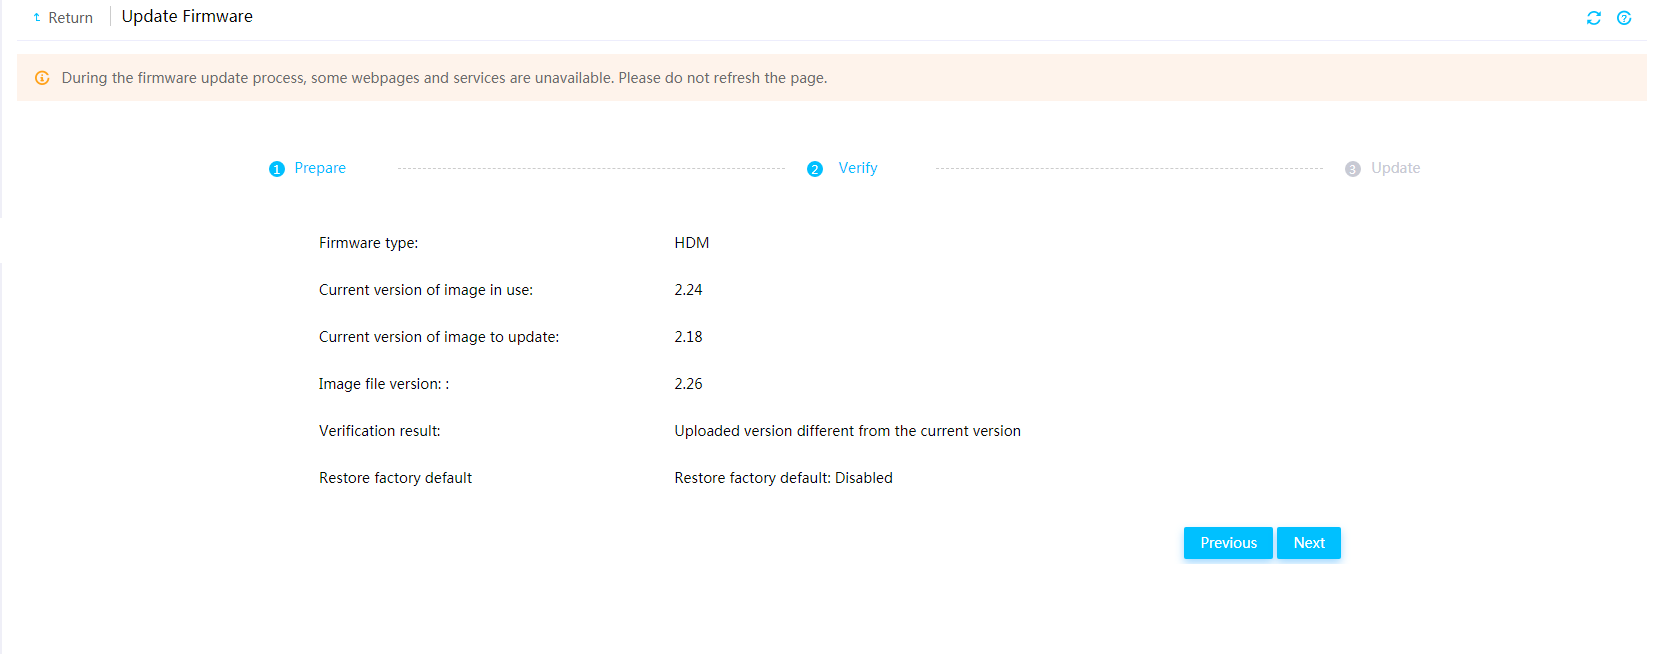
3. Verify that the new firmware image version is correct, and then click Next to start the update process.
Figure 2 Verifying the HDM firmware image version
4. After the update is complete, if you selected manual restart, restart HDM manually. If you selected automatic restart, HDM restarts automatically.
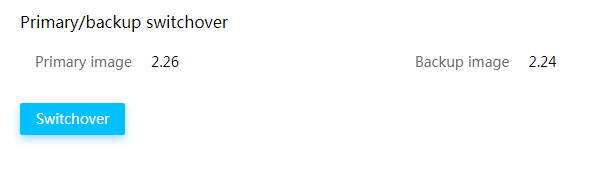
A primary/backup switchover is automatically performed at HDM restart.
5. Re-sign in to HDM. Verify that the primary firmware image has been updated.
As a best practice, perform an HDM update again to update both the primary and backup images to the same version.
|
|
CAUTION: · As a best practice, clear the browser cache, and then re-sign in to HDM. · Clearing the browser cache ensures the correct display of webpage contents after you re-sign in to HDM. |
Figure 3 Verifying that the primary firmware image has been updated
Updating the BIOS
This section describes how to update BIOS or ME firmware for a server from the HDM Web interface. For information about HDM, see HDM online help.
Restrictions and guidelines
· If you select restoring the default BIOS settings during the update, the boot mode in the BIOS will change to UEFI boot mode. If the OS of the server was installed in legacy mode, you must change the BIOS boot mode to legacy for the OS to start up correctly.
· After a BIOS update, set the Configure sSATA As and Configure SATA As fields to RAID if the RSTe embedded RAID controller is used for RAID configuration and the OS has been installed.
· To avoid firmware update errors, make sure the power supplies are operating correctly in redundancy.
· The HDM Web interface displays the updated BIOS version only after the server restarts.
· You can update the BIOS while the server is in power-on or power-off state. If the server is powered on, make sure the OS or UEFI Shell has been accessed before you perform BIOS update.
· The following settings will get lost after a BIOS update even if the Retain option was selected:
¡ mLOM Ethernet adapter settings, which are stored in the BIOS.
¡ Settings on the Front page if the server is an R6900 G3 server.
· All user-configured BIOS settings will get lost if you downgrade the BIOS firmware.
· After an update, you must restart the server for the new firmware to take effect. During the restart, do not perform BIOS update again. If you do so, BIOS errors might occur.
· For a server installed with Intel processors, do not perform graceful power-off from HDM to restart the server after you update the BIOS with the Forcedly restore option specified. If you perform graceful power-off, ME exceptions might occur.
· To select the Retain or Restore option when updating the BIOS firmware of a server installed with Hygon processors through HDM, do not mount any CD/DVD image file to the server. If the server has been mounted with a CD/DVD image file, unmount the image file before the upgrade or do not unmount the image file during the upgrade. Unmounting the image file during the upgrade might interrupt the channel for transmitting the BIOS file, causing upgrade failure.
Prerequisites
· Sign in to the HDM Web interface. For more information, see H3C Servers HDM User Guide.
· Download the most recent version of the BIOS firmware from the H3C website to the configuration terminal. For a successful update, make sure the BIOS firmware image has a vendor signature and has not been tampered with.
· To avoid configuration loss, back up the BIOS configuration file.
· As a best practice, configure HDM to use the Local image upload method to upload the BIOS firmware image.
Procedure
1. Enter the firmware update page, as shown in Figure 4.
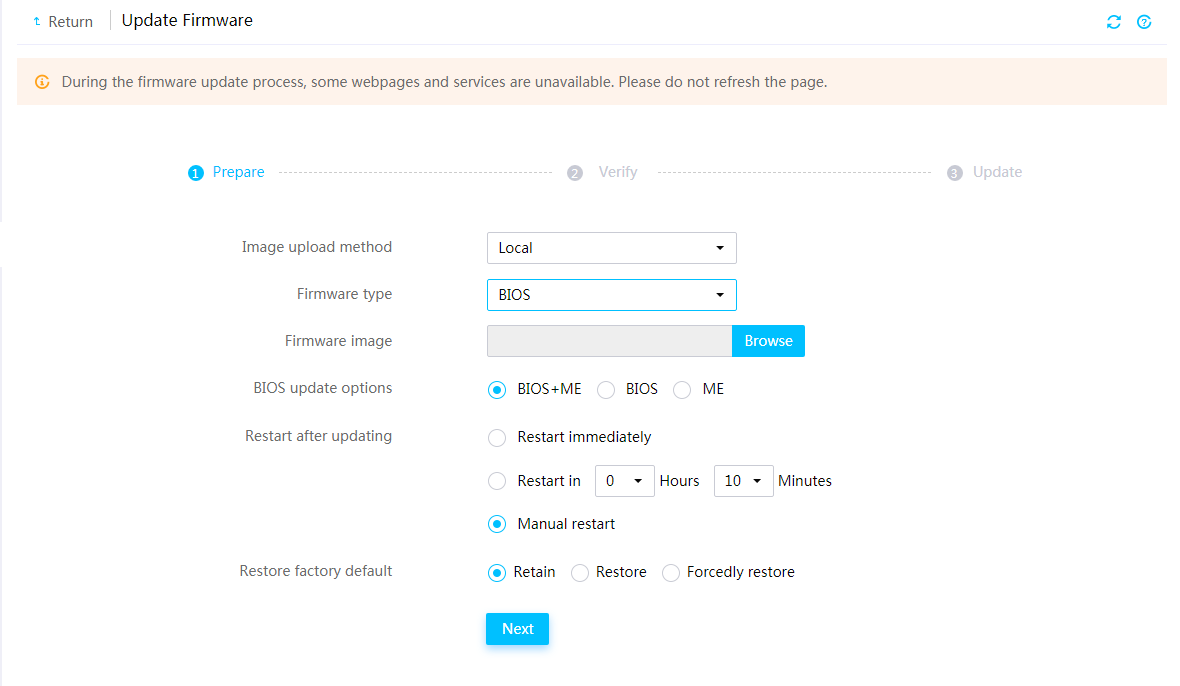
2. In the work pane, perform the following tasks:
a. Select BIOS from the Firmware type list.
b. Click Browse for the Firmware image field, select the locally saved BIOS firmware image, and upload the firmware image.
c. Select the firmware to update. Options include BIOS+ME, BIOS, and ME. The default is BIOS + ME. This step is available only to the servers installed with Intel processors.
d. Select a restart method for the server if the server is in power-on state.
You can have the server automatically reboot immediately or at a scheduled time after the update. Alternatively, you can select Manual restart to manually reboot the server.
e. Select whether to restore default BIOS settings after the update.
- To retain the user-configured BIOS settings, select Retain.
- To remove the user-configured BIOS settings, select Restore or Forcedly restore. The Forcedly restore option enables the BMC to rewrite the BIOS flash and can be used when the BIOS is operating incorrectly and cannot be upgraded in any other ways.
|
|
CAUTION: · The Forcedly restore option removes all user-configured BIOS settings when the server starts up with the new firmware. When you select this option, make sure you understand its impact on the services. · Before you select this option, make sure the server has entered the OS or has been powered off. Otherwise, BIOS exceptions might occur. |
f. Click Next.
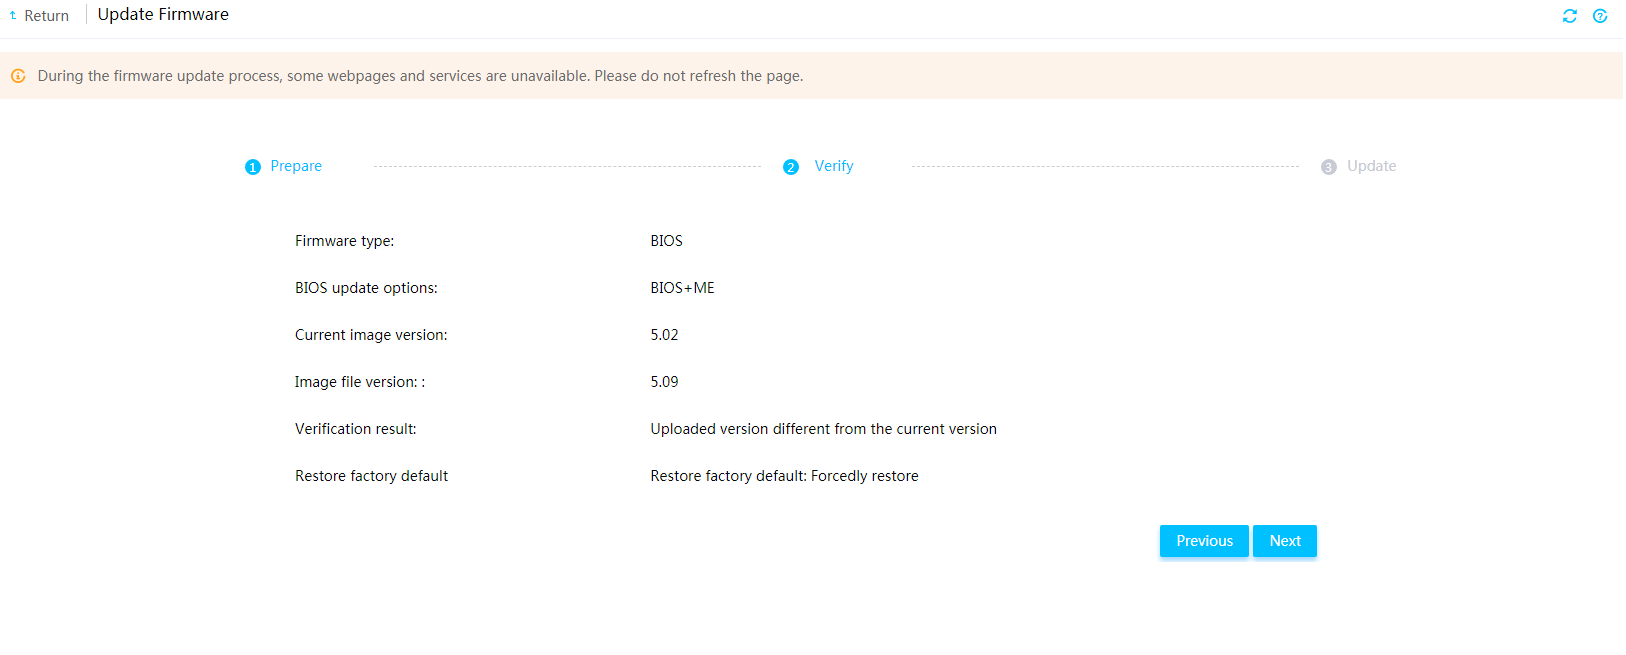
3. Verify that the new BIOS firmware version is correct, and click Next to start the update process.
Figure 5 Verifying the BIOS version
4. Restart the server if you selected Manual restart.
Verifying the configuration
After the server restarts, verify that the BIOS version has been successfully updated on the Dashboard page of the HDM Web interface.
Updating CPLD firmware
Perform this task to update the following types of Complex Programmable Logical Device (CPLD) firmware: CPLD, PFRCPLD, DBCPLD, STBCPLD, PDBCPLD, PDBSCPLD, NDCPLD, OCPCPLD, and AUXCPLD.
For more information about different types of CPLD firmware, see Table 3.
Table 3 Introduction to different types of CPLD firmware
|
Firmware name |
Description |
|
CPLD |
Primary CPLD firmware for the system board of the server. |
|
· PFRCPLD · STBCPLD · AUXCPLD |
Secondary CPLD firmware for the system board of the server. Support for different types of CPLD firmware varies by server model. For more information, see Table 4. |
|
DBCPLD |
CPLD firmware for the processor mezzanine board. |
|
PDBCPLD |
Primary CPLD firmware for the PDB. |
|
PDBSCPLD |
Secondary CPLD firmware for the PDB. |
|
NDCPLD |
CPLD firmware for a compute module. |
|
OCPCPLD |
CLPD firmware for an OCP network adapter. |
Restrictions and guidelines
If CPLD update fails, the server will become unavailable. If the server cannot be accessed, contact Technical Support.
Prerequisites
· Sign in to the HDM Web interface. For more information, see H3C Servers HDM User Guide.
· Download the most recent version of the CPLD firmware from the H3C website to the configuration terminal. For a successful update, make sure the CPLD firmware image has a vendor signature and has not been tampered with.
· As a best practice, configure HDM to use the Local image upload method to upload the CPLD firmware image.
Procedure
The update procedure is the same for different types of CPLD firmware. This section updates the CPLD firmware as an example.
To update the CPLD firmware:
1. Enter the firmware update page, as shown in Figure 6.
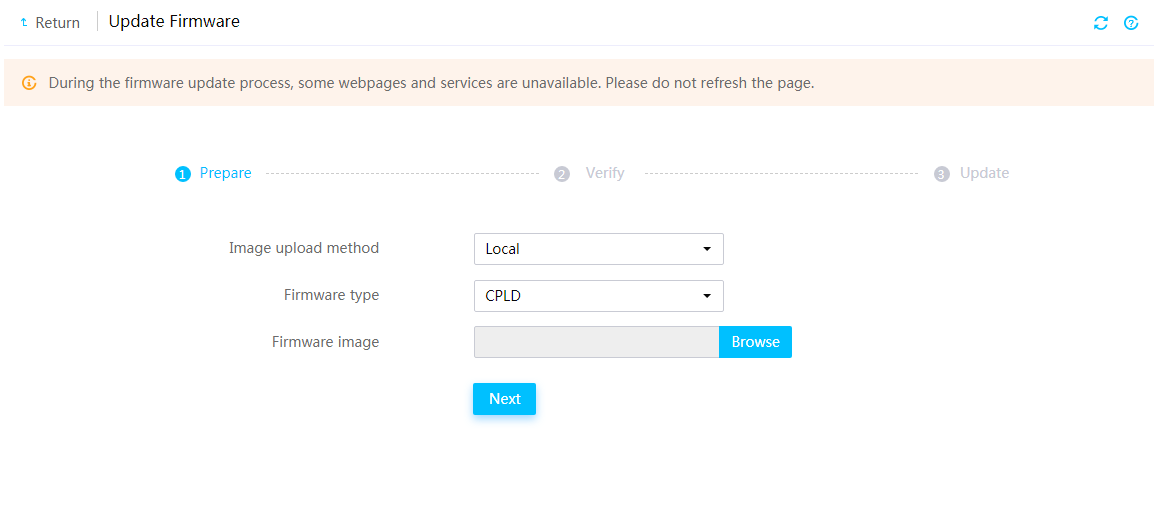
2. In the work pane, perform the following tasks:
a. Select an image upload method.
- If you select Local, select CPLD as the firmware type. Then, browse to the update image file and select it.
- If you select TFTP, enter the IP address of the interface used for image upload and enter the image name. Then, select CPLD as the firmware type. The image name must include the suffix.
b. Click Next.
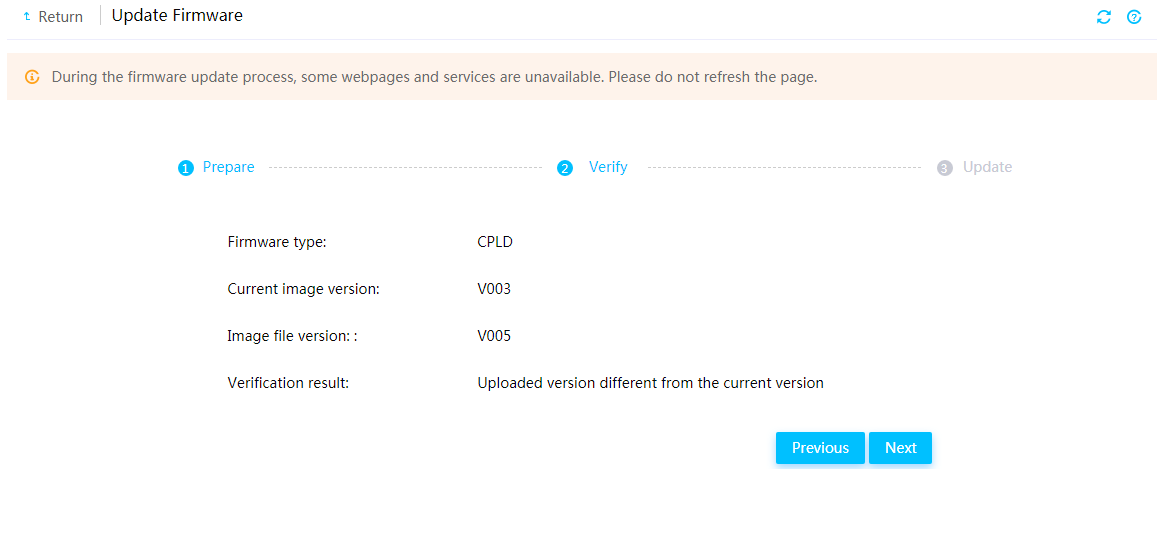
3. Verify that the current image version and image file version are correct, and then click Next.
The firmware update starts and the system displays the update progress.
Figure 7 Verifying firmware information
4. Make the new firmware take effect. Use Table 4 to determine the method.
Table 4 Method for the new CPLD firmware to take effect
|
Firmware type |
Available servers |
Method for the new firmware to take effect |
|
CPLD |
· R2700 G3 · R2900 G3 · R4400 G3 · R4700 G3 · R4900 G3 · R5300 G3 · R4300 G5 · R4330 G5 · R4700 G5 · R4900 G5 · R4930 G5 · R4950 G5 · R5300 G5 · R5500 G5 · R6900 G5 |
Restart CPLD. For more information, see H3C Servers HDM User Guide. |
|
· AE100 · B5700 G3 · B5800 G3 · B7800 G3 · B5700 G5 |
Re-install the blade server or AE module. |
|
|
Other server models |
Power cycle the server with its power cords reconnected. |
|
|
STBCPLD |
R6700 G3 |
Power cycle the server with its power cords reconnected. |
|
DBCPLD |
· R6700 G3 · R6900 G5 |
Power cycle the server with its power cords reconnected. |
|
· PDBCPLD · NDCPLD |
· R6900 G3 · R8900 G3 |
Power cycle the server with its power cords reconnected. |
|
PDBSCPLD |
R8900 G3 |
Power cycle the server with its power cords reconnected. |
|
AUXCPLD |
B7800 G3 |
Re-install the blade server. |
|
OCPCPLD |
R6900 G5 |
Power cycle the server with its power cords reconnected. |
|
PFRCPLD |
· R4300 G5 · R4330 G5 · R4700 G5 · R4900 G5 · R4930 G5 · R4950 G5 · R5300 G5 · R5500 G5 · R6900 G5 |
Restart CPLD. The system also restarts PFRCPLD when restarting CPLD. For more information, see H3C Servers HDM User Guide. |
Updating power supply firmware
This section describes how to update power supply firmware for a server from the HDM Web interface. For information about HDM, see HDM online help.
Power supply firmware update is available only for the R4400 G3, R4900 G3, R5300 G3, R4300 G5, R4330 G5, R4700 G5, R4900 G5, R4930 G5, R4950 G5, R5300 G5, R5500 G5, and R6900 G5.
Prerequisites
· Sign in to the HDM Web interface. For more information, see H3C Servers HDM User Guide.
· Download the most recent version of the power supply firmware from Technical Support to the configuration terminal. For a successful update, make sure the power supply firmware image has a vendor signature and has not been tampered with.
· If the HDM version is 2.XX, identify the available update method (immediate update or update after server power-off) with Technical Support.
Restrictions and guidelines
· Before the update, make sure the present power supplies are operating correctly and the power supply model is consistent with the image file.
· For the R5500 G5, the system board and GPU modules use different sets of power supplies, which must be updated separately.
· The system updates the firmware for power supplies one by one and the power supply that is being updated cannot supply power to the server. Make sure a minimum of one power supply is present and operating correctly except the power supply that is being updated.
· To avoid power supply errors, do not power on or power off the server or disconnect any power supply during the update.
· Power supply firmware supports the following update methods:
¡ Immediate update—Start immediately once the new firmware image is verified.
¡ Update after power-off—Start nine seconds after the server is powered off.
To avoid power supply errors, do not power on the server or disconnect any power supply during the update.
· HDM-1.30.XX supports only the update after power-off method and HDM-2.XX supports both the immediate update and update after power-off methods.
· If the update fails for a power supply, the power supply might fail to operate.
Procedure
1. Enter the firmware update page, as shown in Figure 8.
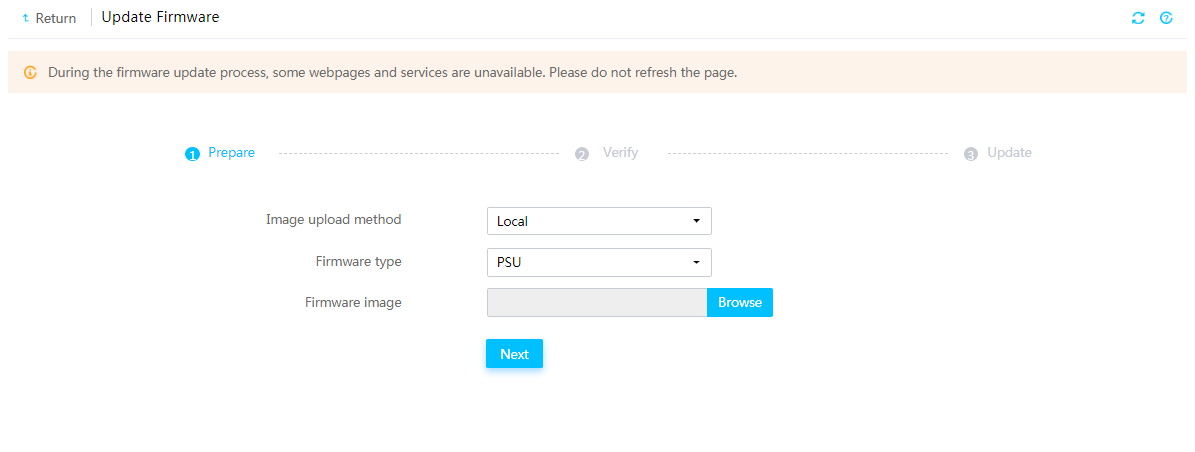
2. In the work pane, perform the following tasks:
a. Select an image upload method.
- If you select Local, select PSU as the firmware type. Then, browse to the update image file and select it.
- If you select TFTP, enter the IP address of the interface used for image upload and enter the image name. Then, select PSU as the firmware type. The image name must include the suffix.
b. Click Next.
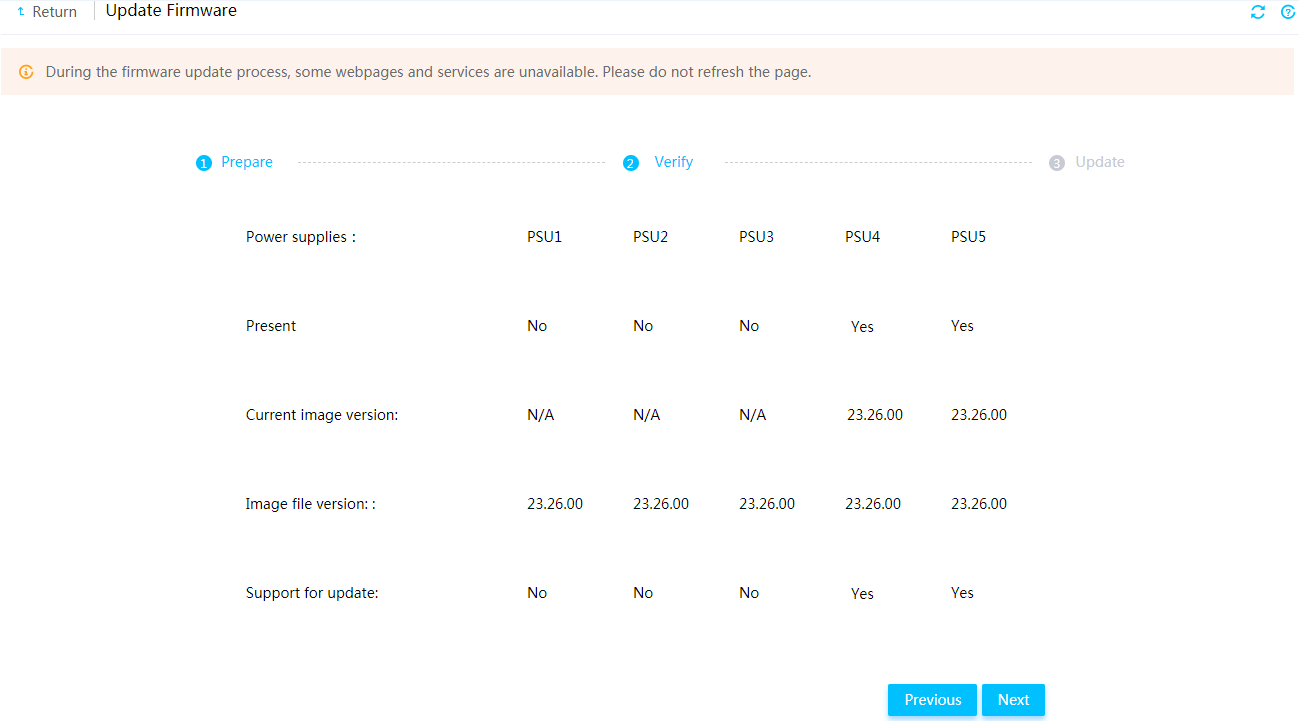
3. Verify that the new firmware image version and power supply information are correct, and then click Next, as shown in Figure 9.
Figure 9 Verifying the firmware version and power supply information
4. The server starts the update immediately or after the server is powered off depending on the update method of the new firmware image.
To view the update result for each power supply, access the operation log page.
The new firmware takes effect automatically for a power supply after the power supply is updated successfully.
Updating BPCPLD or PSWCPLD firmware
Perform this task to update the drive backplane firmware (BPCPLD) and the PCIe switch board firmware (PSWCPLD).
Support for updating BPCPLD firmware and PSWCPLD firmware varies by server model or HDM version as follows:
· BPCPLD firmware update is available only for the following G3 servers and G5 servers:
¡ G3 servers: B5800 G3, R2700 G3, R4300 G3, R4700 G3, R4900 G3, R4950 G3, R5300 G3, R6700 G3, R6900 G3, and R8900 G3.
¡ G5 servers: All G5 servers except the B5700 G5.
· PSWCPLD firmware update is available only in HDM-2.17 or later versions for the R5500 G5.
Restrictions and guidelines
· The system updates the firmware for drive backplanes or PCIe switch boards one by one. For the new firmware to take effect, you must restart HDM after a BPCPLD update, or power cycle the server with the power cords reconnected after a PSWCPLD update.
· An update operation updates only drive backplanes supported by the uploaded BPCPLD image file (backplane firmware image file).
· To update the firmware after a drive backplane or PCIe switch board replacement, first power on the server for the newly installed drive backplane or PCIe switch board to be identified.
· If the update fails, the system retries automatically. A maximum of two retries are allowed for each user-triggered update task.
· If the update fails multiple times, contact Technical Support and try again with another method.
· To avoid update failure, do not power on the server or disconnect any power supply during the update process.
Prerequisites
· Sign in to the HDM Web interface. For more information, see H3C Servers HDM User Guide.
· Download the most recent version of the BPCPLD or PSWCPLD firmware from Technical Support to the configuration terminal. For a successful update, make sure the firmware image has a vendor signature and has not been tampered with.
Procedure
The update procedure is the same for the BPCPLD and PSWCPLD firmware. This section updates the BPCPLD firmware as an example.
To update the BPCPLD firmware:
1. Enter the firmware update page, as shown in Figure 10.
Figure 10 Firmware update page
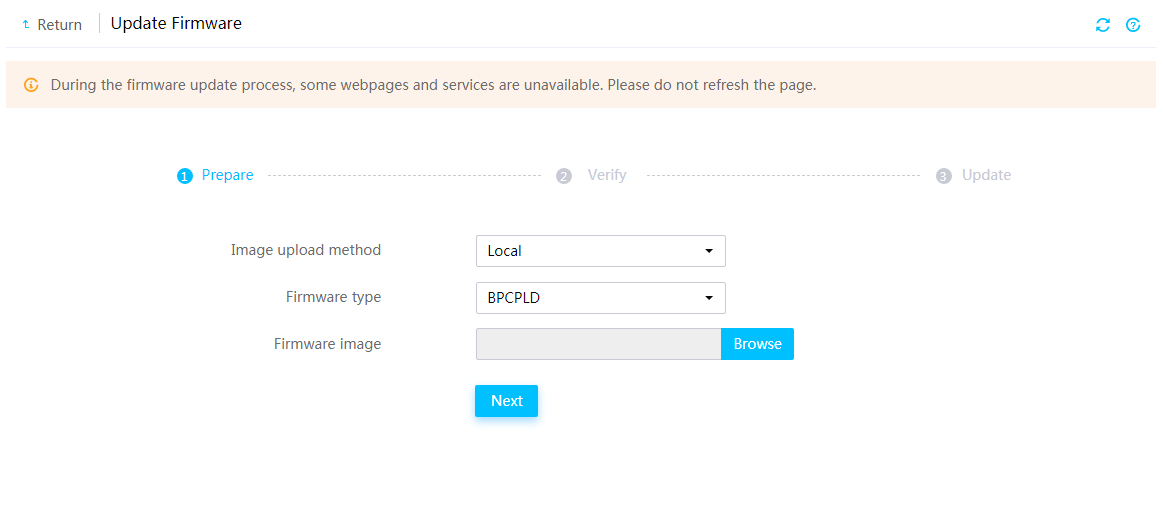
2. In the work pane, perform the following tasks:
a. Select an image upload method.
- If you select Local, select BPCPLD as the firmware type. Then, browse to the update image file and select it.
- If you select TFTP, enter the IP address of the interface used for image upload and enter the image name. Then, select BPCPLD as the firmware type. The image name must include the suffix.
b. Click Next.
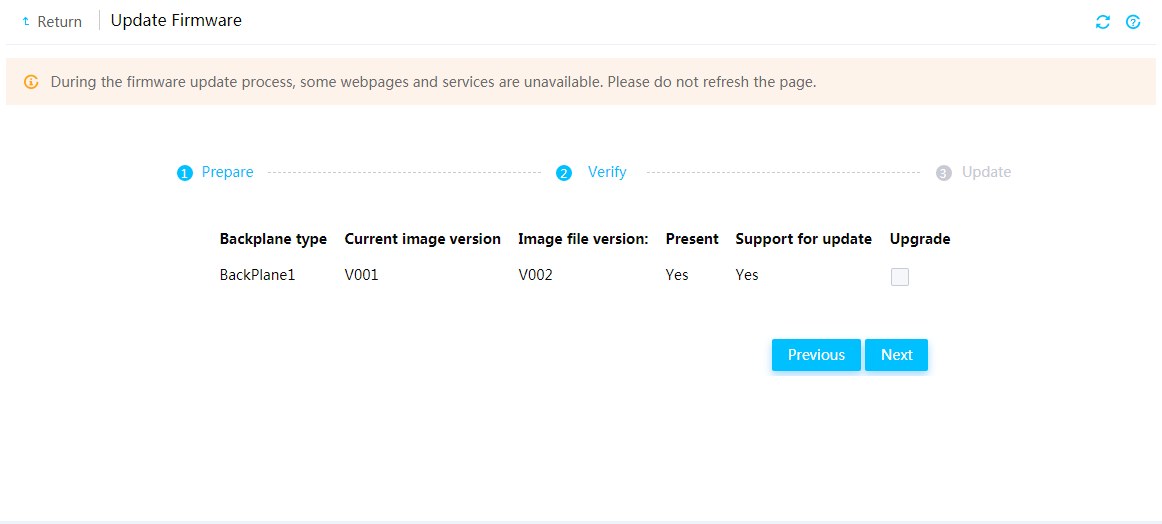
3. Select the drive backplanes to update, verify that the new firmware image version is correct, and then click Next.
Figure 11 Selecting drive backplanes and verifying the firmware version
4. If the server is powered on, power off the server. The firmware update starts nine seconds after the server is powered off.
5. After the update finishes, restart HDM to have the new BPCPLD firmware takes effect.
For the new PSWCPLD firmware to take effect, power cycle the server with its power cords reconnected.
Updating the LCD firmware
LCD firmware update is available only for the R6700 G3, R6900 G3, R8900 G3, R4300 G5, R4330 G5, R4700 G5, R4900 G5, R4930 G5, R4950 G5, and R6900 G5.
Restrictions and guidelines
To avoid LCD display exceptions, do not restart HDM or disconnect the power source from the server during the update.
If the update fails, the LCD might fail to operate. In this case, try to update the LCD firmware again.
The update process might take a long time, and the LCD is not available during the update.
The new LCD firmware automatically takes effect after the update finishes.
You can upload an LCD firmware image and update the LCD firmware only after an LCD is connected to the server.
Prerequisites
· Sign in to the HDM Web interface. For more information, see H3C Servers HDM User Guide.
· Download the most recent version of the LCD firmware from Technical Support to the configuration terminal. For a successful update, make sure the firmware image has a vendor signature and has not been tampered with.
Procedure
1. Enter the firmware update page, as shown in Figure 12.
Figure 12 Firmware update image
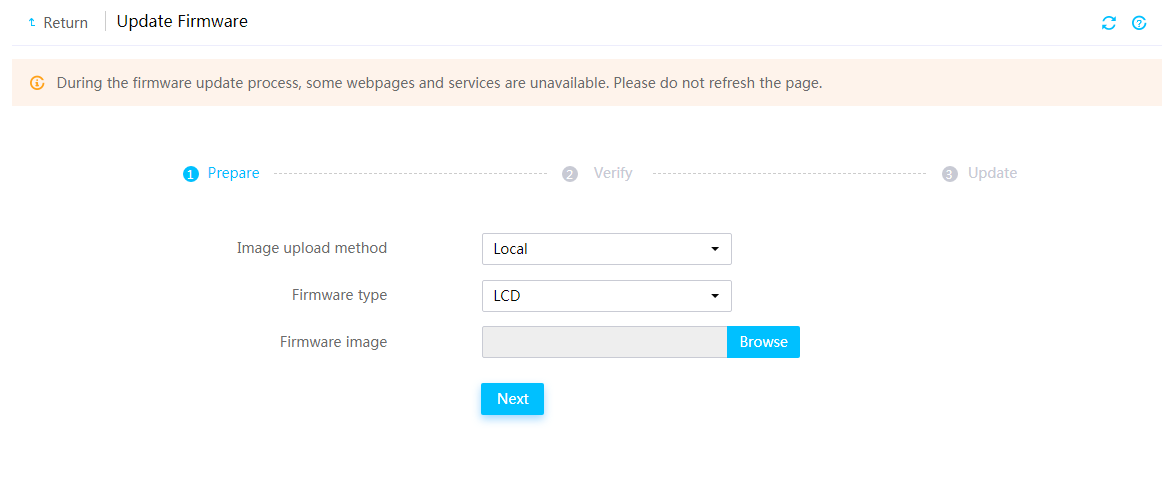
2. In the work pane, perform the following tasks:
a. Select an image upload method.
- If you select Local, select LCD as the firmware type. Then, browse to the update image file and select it.
- If you select TFTP, enter the IP address of the interface used for image upload and enter the image name. Then, select LCD as the firmware type. The image name must include the suffix.
b. Click Next.
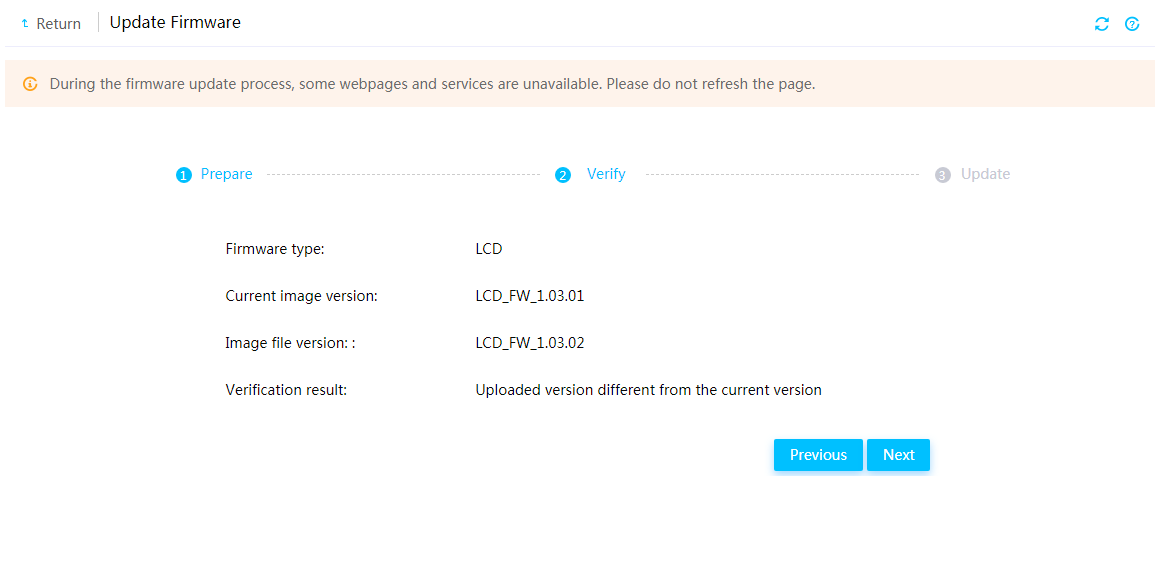
3. Verify that the current image version and image file version are correct, and then click Next.
Figure 13 Verifying firmware information
Updating the GPUCPLD firmware
Perform this task to update the CPLD firmware for GPUs.
Restrictions and guidelines
This feature is available only in HDM-2.16 or later versions for the R5300 G3.
If multiple GPUs are present, the operation updates only GPUs supported by the uploaded GPUCPLD image.
If the update fails for a GPU, the system retries. The system allows a maximum of two retries.
The BIOS will restart multiple times during the update process.
This feature is available only when the server is powered on. During the update process, do not power off or remove power from the server. If you do so, the update might fail or GPUs might fail to be identified.
Prerequisites
· Sign in to the HDM Web interface. For more information, see H3C Servers HDM User Guide.
· Download the most recent version of the GPUCPLD firmware from Technical Support to the configuration terminal. For a successful update, make sure the firmware image has a vendor signature and has not been tampered with.
Procedure
1. Enter the firmware update page, as shown in Figure 14.
Figure 14 Firmware update image

2. In the work pane, perform the following tasks:
a. Select an image upload method.
- If you select Local, select GPUCPLD as the firmware type. Then, browse to the update image file and select it.
- If you select TFTP, enter the IP address of the interface used for image upload and enter the image name. Then, select GPUCPLD as the firmware type. The image name must include the suffix.
b. Click Next.
3. Select the target GPUs, verify that the GPU information, current image version, and image file version are correct, and then click Next.
Figure 15 Verifying firmware information
4. After the update, for the new firmware to take effect, power cycle the server with the power cords reconnected.
Updating the GPUFPGA firmware
Perform this task to update the Field Programmable Gate Array (FPGA) firmware for GPUs.
Restrictions and guidelines
This feature is available only in HDM-2.25 or later versions for the R5300 G5.
This feature is available only for specific GPUs. If multiple GPUs are present, the operation updates only GPUs supported by the uploaded GPUFPGA image.
If the update fails for a GPU, the system retries. The system allows a maximum of two retries.
This feature is available only when the server is powered on. During the update process, do not power off or remove power from the server. If you do so, the update might fail or GPUs might fail to be identified.
Prerequisites
· Sign in to the HDM Web interface. For more information, see H3C Servers HDM User Guide.
· Download the most recent version of the GPUFPGA firmware from Technical Support to the configuration terminal. For a successful update, make sure the firmware image has a vendor signature and has not been tampered with.
Procedure
1. Enter the firmware update page, as shown in Figure 16.
Figure 16 Firmware update image
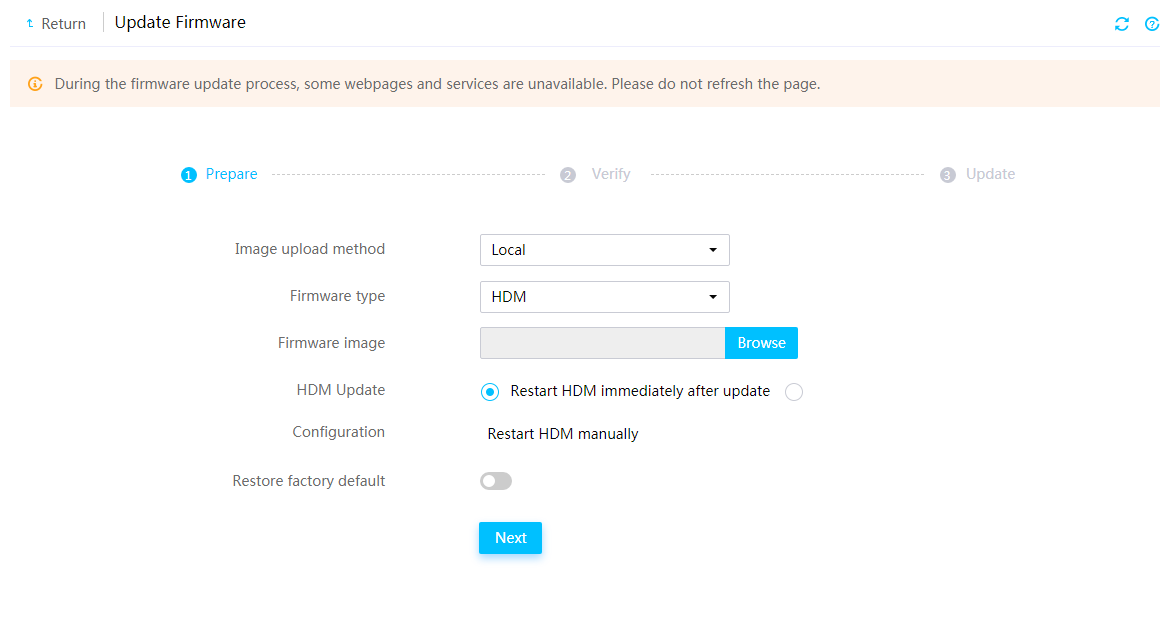
2. In the work pane, perform the following tasks:
a. Select an image upload method.
- If you select Local, select GPUFPGA as the firmware type. Then, browse to the update image file and select it.
- If you select TFTP, enter the IP address of the interface used for image upload and enter the image name. Then, select GPUFPGA as the firmware type. The image name must include the suffix.
b. Click Next.
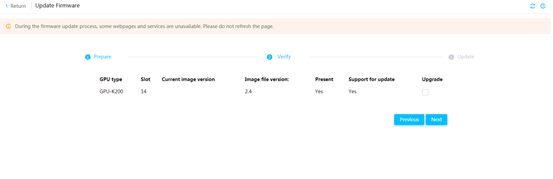
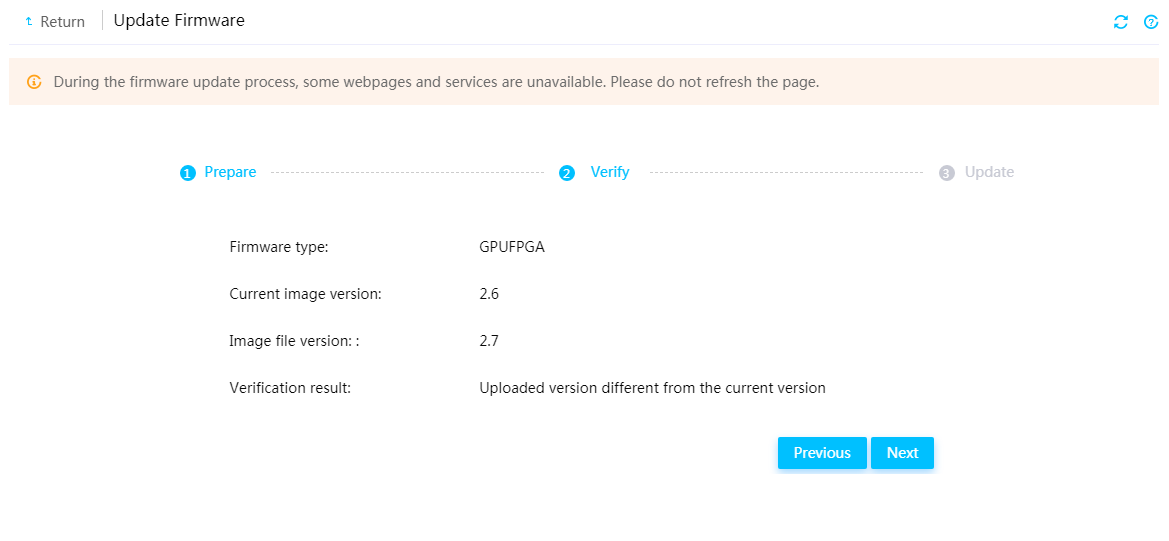
3. Select the target GPUs, verify that the GPU information, current image version, and image file version are correct, and then click Next.
Figure 17 Verifying firmware information
4. After the update, for the new firmware to take effect, power cycle the server.
Updating the FANMCU firmware
Perform this task to update the micro control unit (MCU) firmware of fans.
Restrictions and guidelines
· This feature is available only in HDM-2.25 or later versions for the R5500 G5.
· An update operation updates only fans supported by the FANMCU image file.
· You can update FANMCU firmware only when the server is powered on. To avoid update failure or fan identification failure, do not power off the server or disconnect power cords from the server during the update.
· During the update, the fans rotate at the maximum speed. The fan speed can be adjusted during the update, but the adjustment takes effect only after the update.
· If the update fails for a fan, the system retries. A maximum of two automatic retries are allowed for a user-triggered FANMCU firmware update.
· If the update fails, the MCUs cannot operate correctly and the fans rotate at the maximum speed. You can try again for MCUs to operate correctly.
Prerequisites
· Sign in to the HDM Web interface. For more information, see H3C Servers HDM User Guide.
· Download the most recent version of the FANMCU firmware from Technical Support to the configuration terminal. Verify that the fans to be updated are supported by the FANMCU image file and then save the FANMCU image file locally. For a successful update, make sure the firmware image has a vendor signature and has not been tampered with.
Procedure
1. Enter the firmware update page, as shown in Figure 18.
Figure 18 Firmware update image
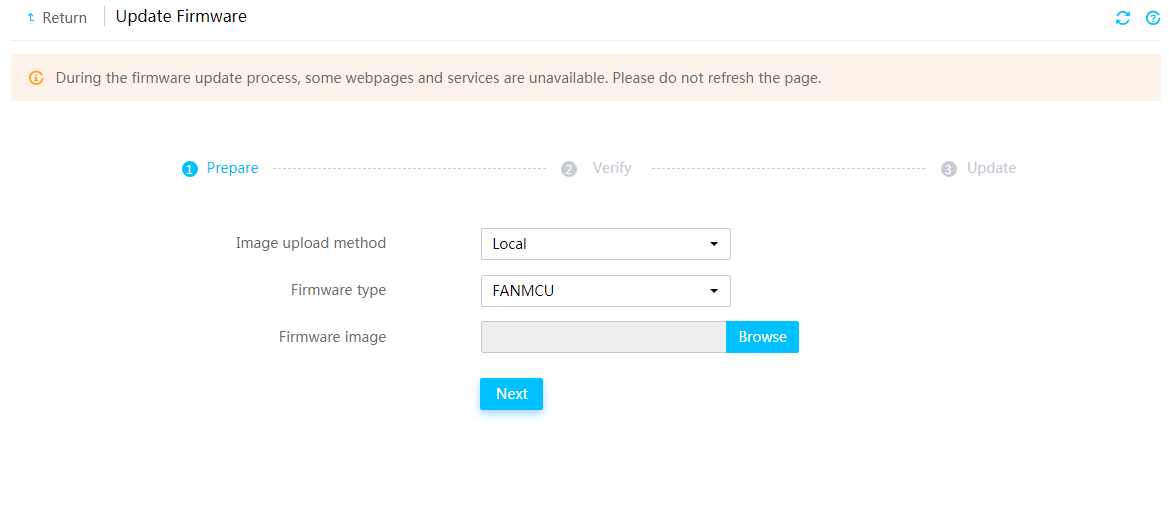
2. In the work pane, perform the following tasks:
a. Select an image upload method.
- If you select Local, select FANMCU as the firmware type. Then, browse to the update image file and select it.
- If you select TFTP, enter the IP address of the interface used for image upload and enter the image name. Then, select FANMCU as the firmware type. The image name must include the suffix.
b. Click Next.
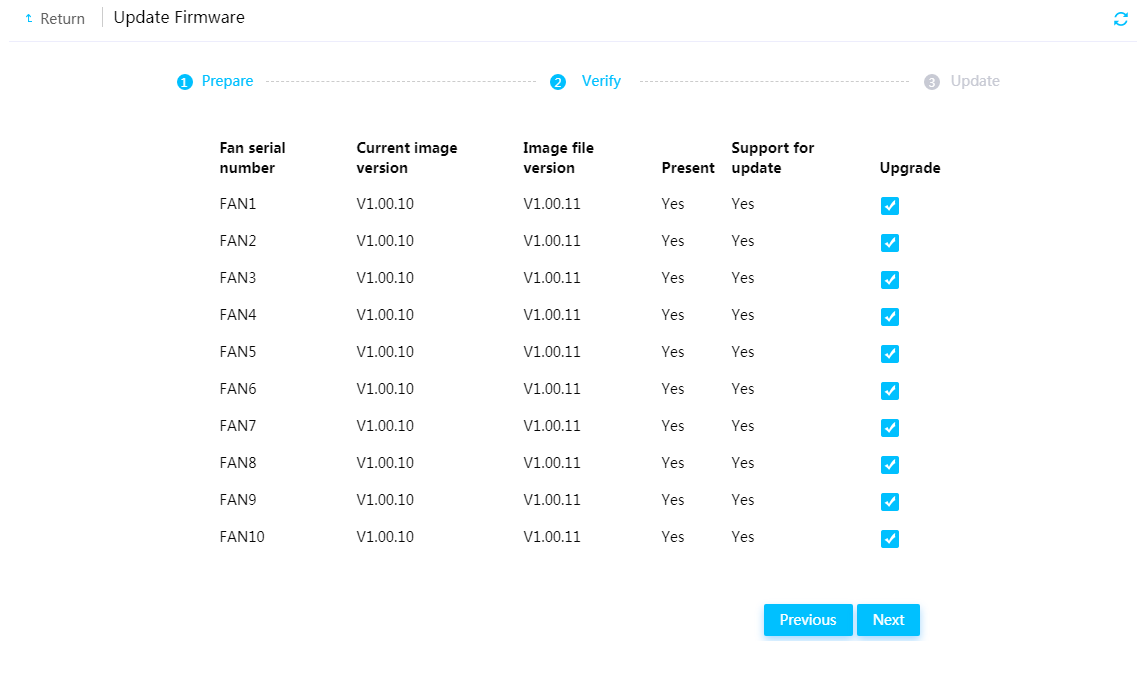
3. Select the fans to update, verify that the current image version and image file version are correct, and then click Next.
Figure 19 Verifying firmware information
4. The firmware takes effect immediately after the firmware update is completed.
Updating the PMem 200 firmware
Perform this task to update the firmware for PMem 200 DIMMs.
Restrictions and guidelines
This feature is available only in HDM-2.96 and later.
This feature is available only for G5 servers.
To ensure successful update, follow these restrictions and guidelines:
· Obtain the most up-to-date PMem 200 firmware image from Technical Support, and make sure the image package contains a signature that is not tampered.
· If PMem 200 DIMMs are disabled, make sure the DIMMs are working correctly before updating the firmware from HDM.
This feature is available only when the BIOS boot mode is UEFI.
Prerequisites
Sign in to the HDM Web interface. For more information, see H3C Servers HDM User Guide.
Procedure
1. Enter the firmware update page, as shown in Figure 20.
Figure 20 Firmware update image
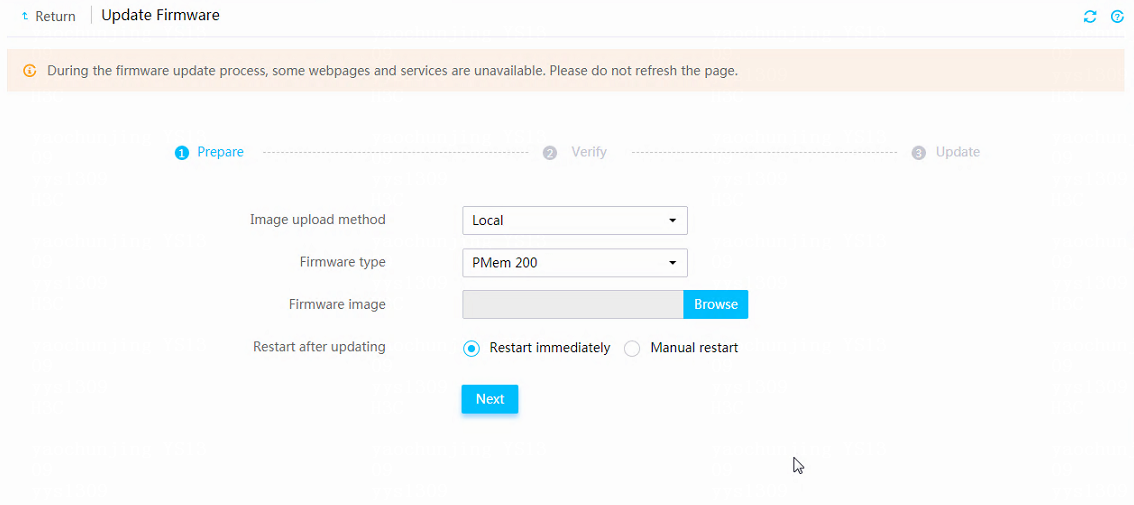
2. In the work pane, perform the following tasks:
a. Select an image upload method.
- If you select Local, select PMem 200 as the firmware type. Then, browse to the update image file and select it.
- If you select TFTP, enter the IP address of the interface used for image upload and enter the image name. Then, select PMem 200 as the firmware type. The image name must include the suffix.
b. Select the method to reboot the server after the update is complete.
You can have the server automatically restart immediately. Alternatively, you can choose Manual restart to manually restart the server.
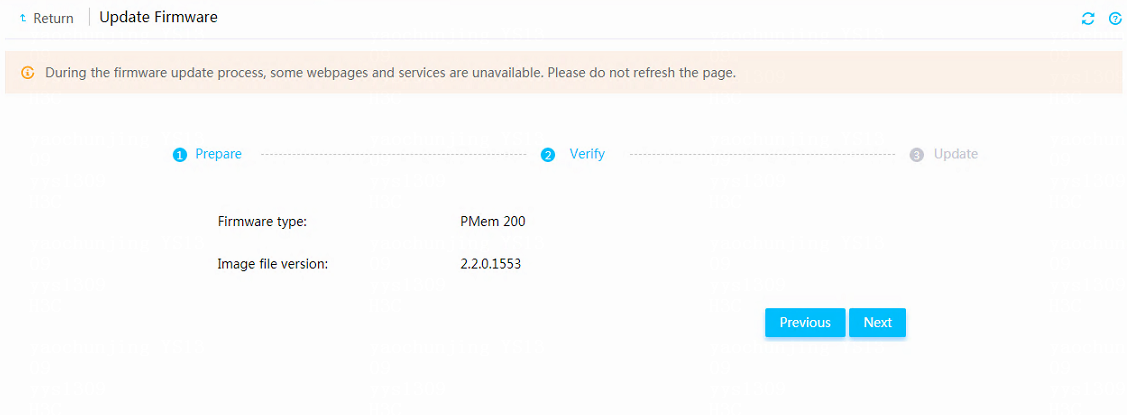
3. Verify that the current firmware type and image file version are correct, and then click Next.
The system starts to update the firmware.
Figure 21 Verifying firmware information
4. If you selected manual restart, manually restart the server. The server automatically enters iFIST to make the new firmware take effect.
If you selected automatic restart, the server automatically restarts and enters iFIST after the update to make the new firmware take effect.
Update the REPO for firmware update
Perform this task to update the REPO for the firmware update. After you upload the REPO image file to the HDM Web interface, you can update the HDM, BIOS, CPLD firmware, storage controller firmware, network adapter firmware, and drive firmware of the server. For information about how to download and use the REPO image file, see the REPO user guide for the server.
Restrictions and guidelines
· This task is supported only when the server is installed with HDM of HDM-2.52 or later versions and is installed with iFIST of iFIST-1.32 or later versions.
· If the server does not support iFIST, you cannot upload the REPO for firmware update in HDM.
· For the new firmware to take effect after REPO update, iFIST of the server is required. Make sure the iFIST version is compatible with the current HDM version. For information about the compatibility between HDM and iFIST, see HDM release notes or iFIST release notes.
· At the first restart after REPO update from HDM, the server will automatically enter iFIST to make the new firmware take effect. During the process for the new firmware to take effect in iFIST, do not restart the server or reconnect its power cords. After the new firmware takes effect, the server automatically restarts again with boot options configured before the update.
· Make sure the REPO image file to be uploaded does not exceed 300 MB, and the MD5 file does not exceed 1024 bytes.
· When you download the REPO image file, the MD5 file and REPO image file will be downloaded in a package.
Prerequisites
Sign in to the HDM Web interface. For more information, see H3C Servers HDM User Guide.
Procedure
1. Enter the firmware update page, as shown in Figure 22.
Figure 22 Firmware update image

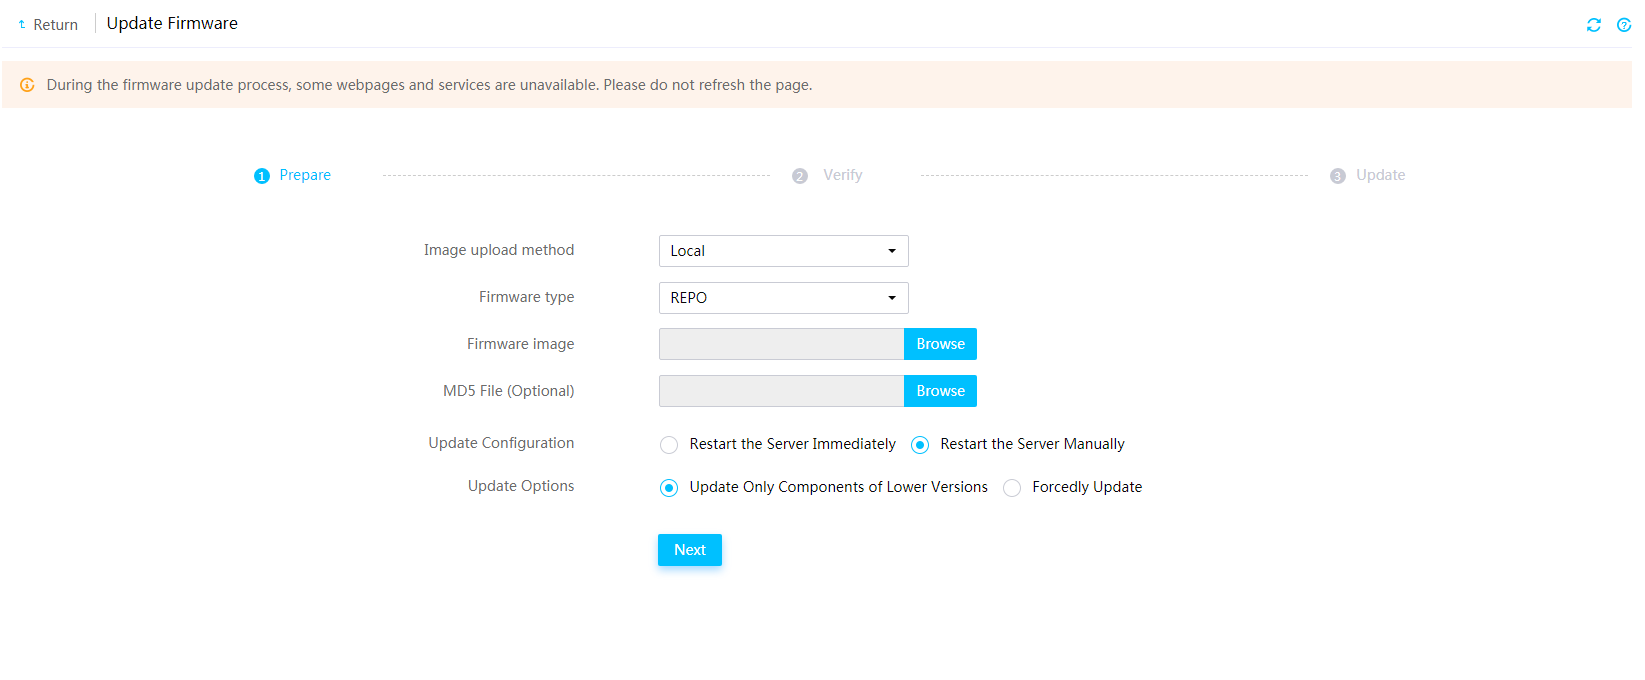
2. In the work pane, perform the following tasks:
a. Select an image upload method.
- If you select Local, select REPO as the firmware type. Browse to the update image file and select it. Then, browse to upload the MD5 file for the REPO as needed. HDM will use the MD5 file to check the integrity of the REPO.
- If you select TFTP, enter the IP address of the interface used for image upload and enter the image name, which must include the suffix. Select REPO as the firmware type. Then, enter the name of the MD5 file for the REPO as needed, which must include the suffix. HDM will use the MD5 file to check the integrity of the REPO.
b. Select the method to reboot the server after the update is complete.
You can have the server automatically restart immediately. Alternatively, you can choose Restart the Server Manually to manually restart the server.
c. Select the components to update in the Update Options field.
- To update only the components of lower versions than the version to be updated, select Update Only Components of Lower Versions.
- To update all the components to the version to be updated, select Forcedly Update.
d. Click Next.
Figure 23 Updating the REPO for firmware update
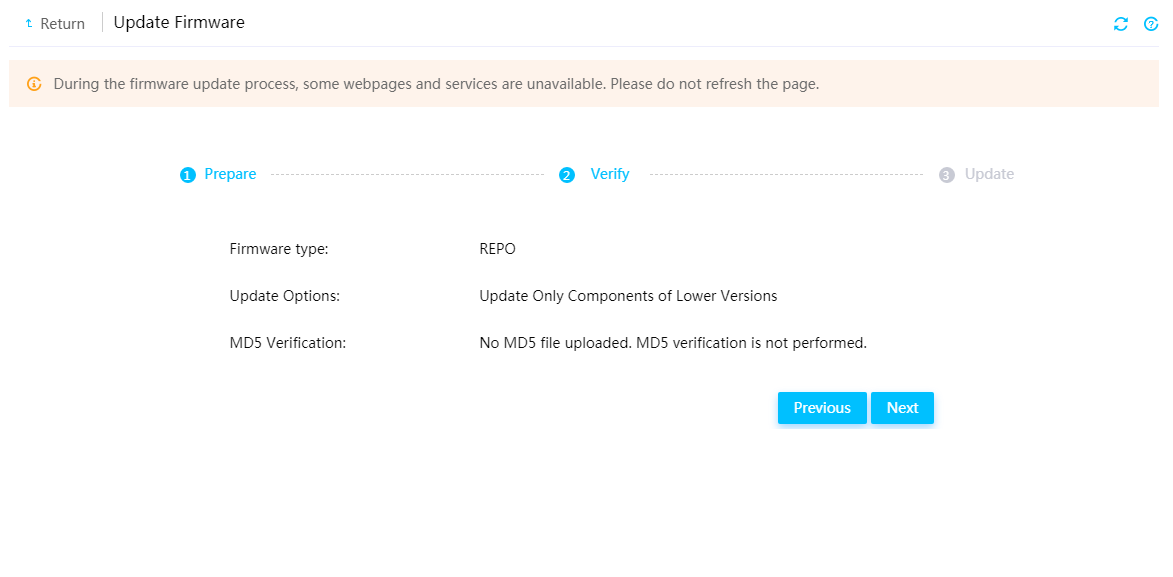
3. Verify that the firmware update configuration is correct, and then click Next.
The firmware update starts and the system displays the update progress.
Figure 24 Verifying the firmware update configuration
4. If you selected automatic restart, the server automatically restarts and enters iFIST after the update to make the new firmware take effect.
If you selected manual restart, manually restart the server. The server automatically enters iFIST to make the new firmware take effect.
5. Access the Operation Log page from HDM to view the firmware update result.
Updating firmware from FIST
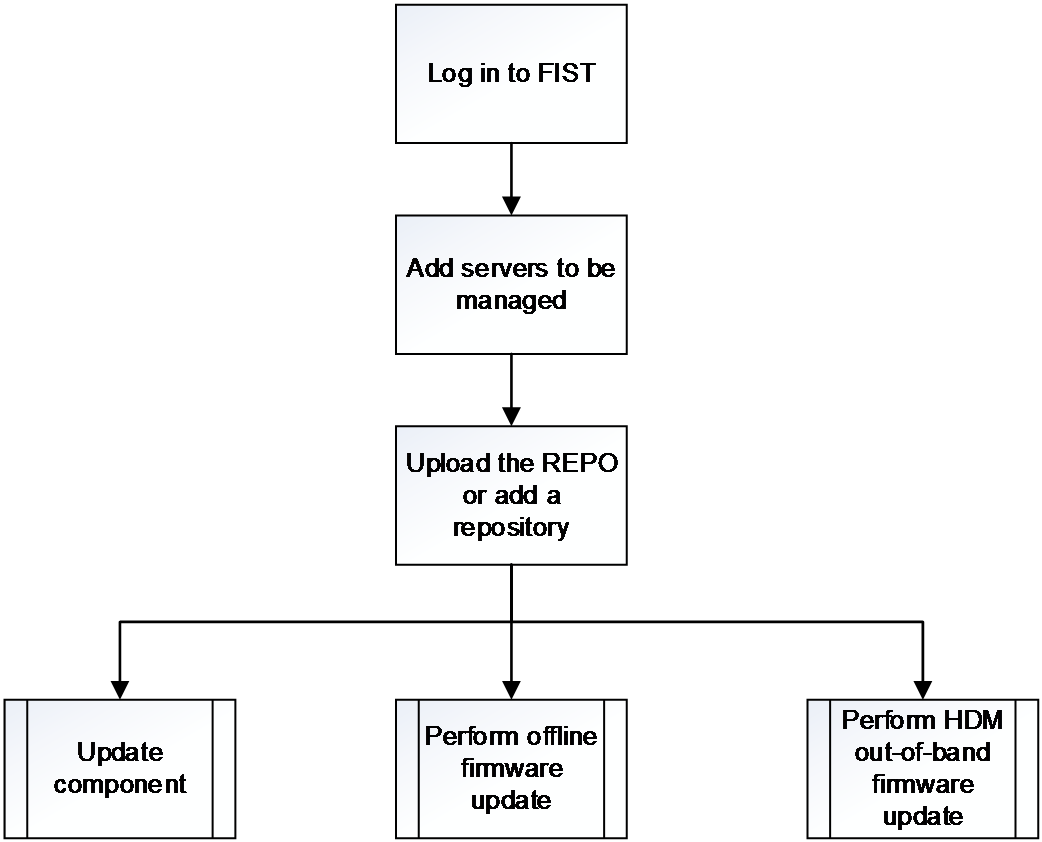
You can update the firmware of one or multiple servers by updating the components, performing offline firmware update, or performing HDM out-of-band firmware update. The REPO is required no matter which method is used to update the firmware.
Table 5 Firmware update methods
|
Items |
Component update |
Offline firmware update |
HDM out-of-band firmware update |
|
Applicable device type |
· HDM · FIST SMS |
HDM |
HDM |
|
Requiring other software or tools |
Yes. If you select FIST SMS as the device type, you must install FIST SMS in the operating system of the server. |
No |
Yes. The server is installed with HDM of HDM-2.52 or later versions and is installed with iFIST of iFIST-1.32 or later versions. |
|
Affecting the operating system |
No |
The server will automatically restart during the update. |
After the update, you must restart the server to make the new firmware take effect. |
|
Requirements on the REPO |
No |
Yes. The REPO version must be REPO-1.11.10 or later and the REPO must contain the LiveCD system. |
No |
|
Requirements on the FIST version |
All versions |
The FIST version must be FIST-2.00.22 and later. |
The FIST version must be FIST-2.32 and later. |
Figure 25 Firmware update workflow
|
|
NOTE: Updating firmware from FIST is not available for some servers if the servers do not support FIST. For servers supporting FIST, see H3C Servers FIST User Guide. |
Add servers
Perform this task to add one or multiple servers.
Prerequisites
· Start FIST and sign in to the FIST Web interface. For more information, see H3C Servers FIST User Guide.
· If you select FIST SMS as the device type, you must install FIST SMS in the operating system of the server. For more information, see H3C Servers FIST SMS User Guide.
Manually add a server to FIST
|
|
IMPORTANT: Disable the firewall of the OS before adding a FIST SMS server node. |
1. In the navigation pane, select Menu > Devices > Server List.
2. Click Add.
3. In the Method dialog box, select Add Manually.
Figure 26 Selecting a method

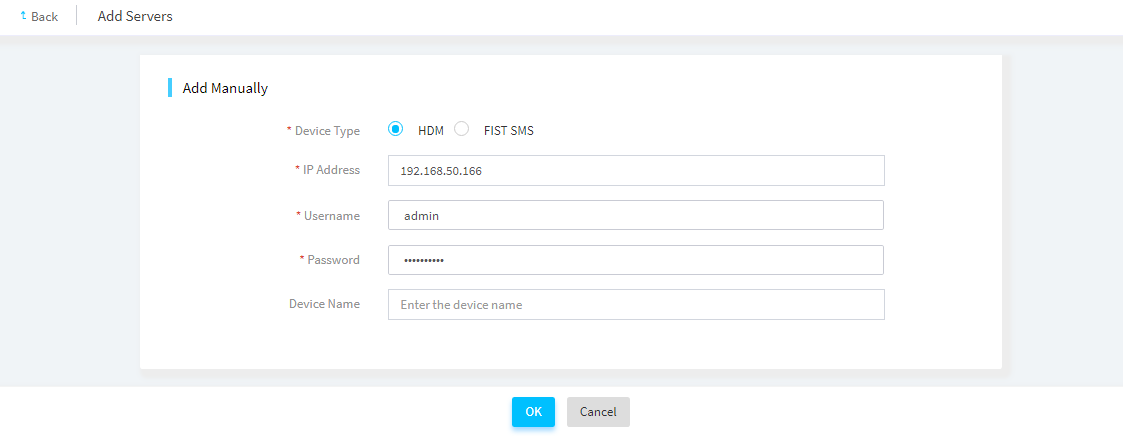
4. Enter the device information and select a label:
¡ To add an HDM server node, select HDM for Device Type.
Specify the HDM IP address and device name.
In the Username and Password fields, specify the username and password of an HDM administrator account in FIST. If a non-administrator account is specified, firmware update is not supported.
Figure 27 Adding an HDM server node
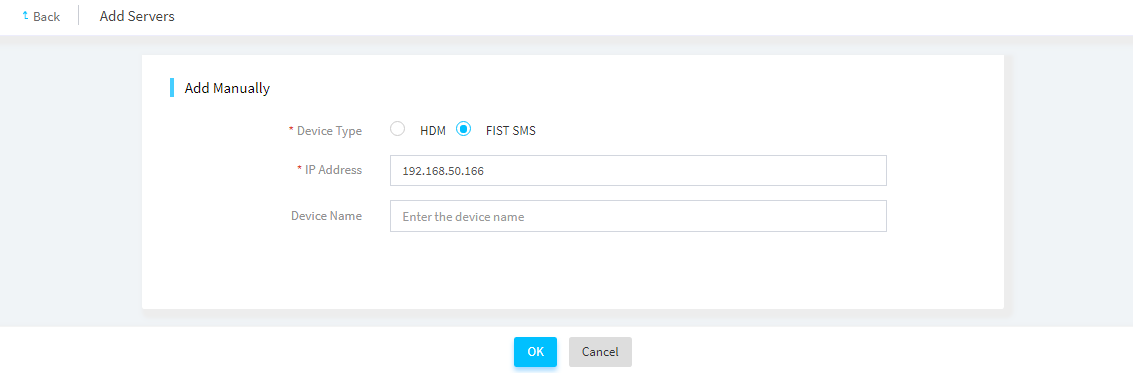
¡ To add a FIST SMS server node, select FIST SMS for Device Type. Specify the FIST SMS IP address and name of the server.
Figure 28 Adding a FIST SMS server node
5. Click OK.
6. Repeat the previous steps to add multiple servers.
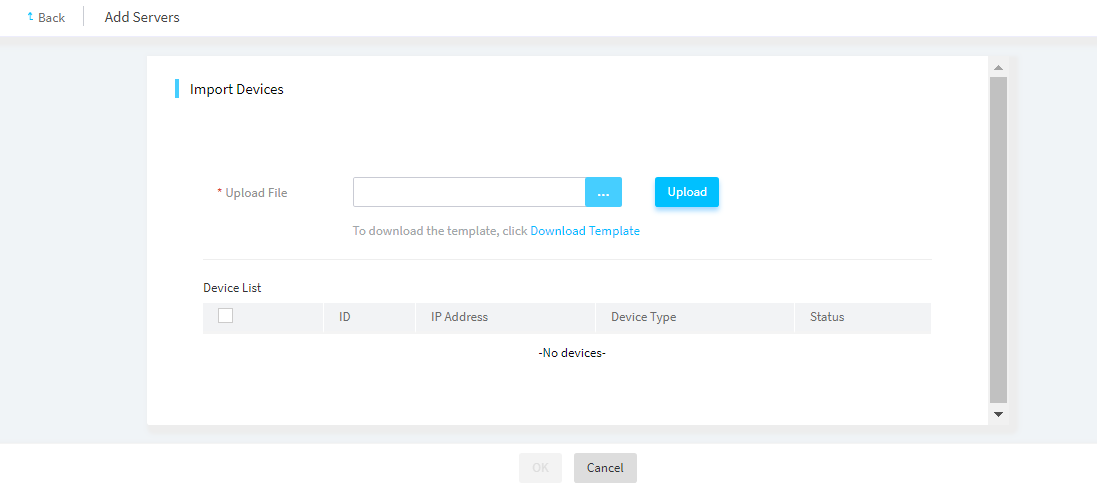
Import servers
Prerequisites
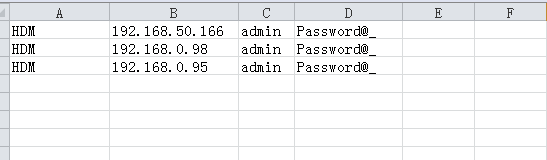
Before you import servers to FIST, first prepare a valid import file that contains the servers you want to import. You can download the import file template on the Import Devices page and then fill in the device information as shown in Figure 29 as needed.
Figure 29 Filling in the device information
Procedure
1. In the navigation pane, select Menu > Devices > Server List.
2. Click Add, and then select Bulk Import.
3. In the Upload File field, click … to select the import file, and then click Upload to upload the file.
FIST displays all devices in the file on the device list.
4. Select a label.
5. Select the servers you want to import to FIST, and then click OK.
The import process might take a while. Clicking Cancel will not interrupt the import process.
Figure 30 Importing servers to FIST
Upload the REPO image file
Perform this task to upload the REPO image file to FIST.
Restrictions and guidelines
· When the free space is about 10 GB, you cannot upload images. In this case, as a best practice, delete the images that are not needed.
· When FIST runs in Windows, for an uploaded image file to be used properly, you must run FIST as an administrator.
· The name of an image file to upload can contain up to 64 characters, including the file extension. The name of an image file cannot contain Chinese characters.
· For the upload to succeed, make sure the name of the image to upload is different from the name of any image on the image list.
· For the upload to succeed, do no refresh the page during the upload process.
Prerequisites
· Start FIST and sign in to the FIST Web interface. For more information, see H3C Servers FIST User Guide.
· Obtain the REPO image file for the update. For more information, see H3C Servers REPO User Guide.
Procedure
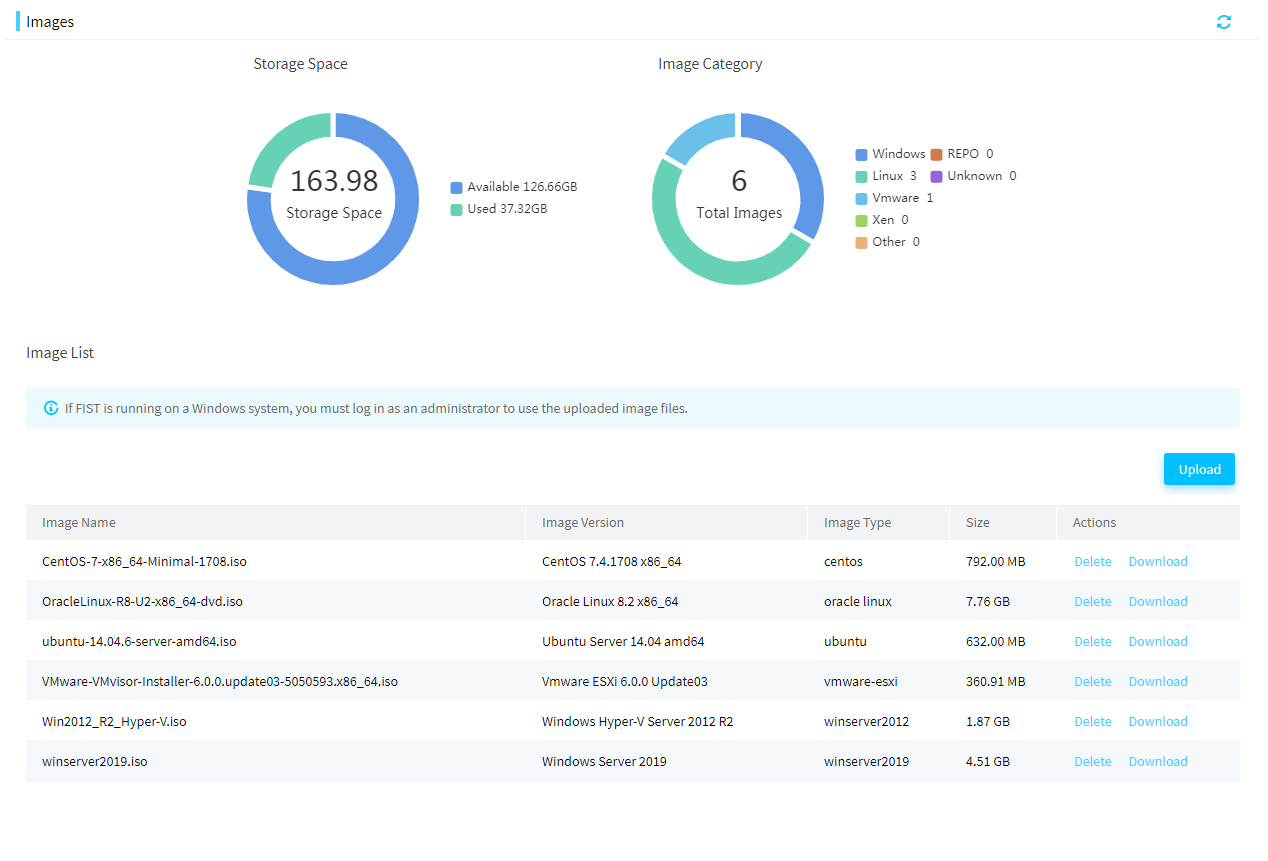
1. In the navigation pane, select Menu > Templates > Images to enter the page as shown in Figure 31.
2. Click Upload in the upper right corner of the image list. The Upload Image dialog box opens, as shown in Figure 32.
Figure 32 Uploading an OS image
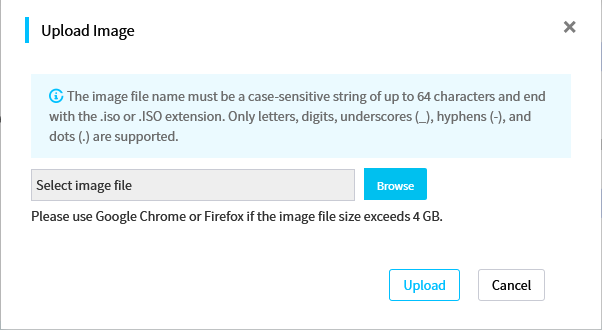
3. Click Browse. In the dialog box that opens, select the image file to upload.
4. Click Upload to upload the REPO image file to the FIST server.
After the upload is completed, the REPO image file is displayed on the image management page.
|
|
NOTE: · If you update the firmware by updating the components, you must click Sync to Repo in the Actions column for the REPO image file to synchronize the file to the Menu > Templates > Repository page. · If you update the firmware by performing offline firmware update, the REPO image file to be uploaded must contain the LiveCD system. |
Update components
Perform this task to update HDM, BIOS, or CPLD firmware of one or multiple servers.
Restrictions and guidelines
· Before you use the component update to bulk update HDM, BIOS, or CPLD firmware of multiple servers from FIST, update the firmware of a single server as a best practice to avoid update errors.
· To update both HDM and the BIOS, update HDM first as a best practice, and then update the BIOS. Make sure you update both the primary and backup images of HDM to the same version.
· After you update the HDM, BIOS, or CPLD firmware from FIST, the firmware configuration is same as the firmware configuration before the update.
· If the system fails to update specific servers during a bulk server update, inventory and then redeploy the servers, or update the servers from HDM. If the issue persists, contact Technical Support.
Prerequisites
· Start FIST and sign in to the FIST Web interface. For more information, see H3C Servers FIST User Guide.
· The servers to be managed have been added to FIST. For more information, see "Add servers."
Procedure
Add a repository
Skip this section if you have uploaded the REPO image file to the image management page and synchronized the file to the Menu > Templates > Repository page.
To add a repository:
1. In the navigation pane, select Menu > Templates > Repositories to enter the page as shown in Figure 33.
Figure 33 Repository management page

2. Click Add Repository. In the dialog box that opens, configure parameters as needed, and then click OK.
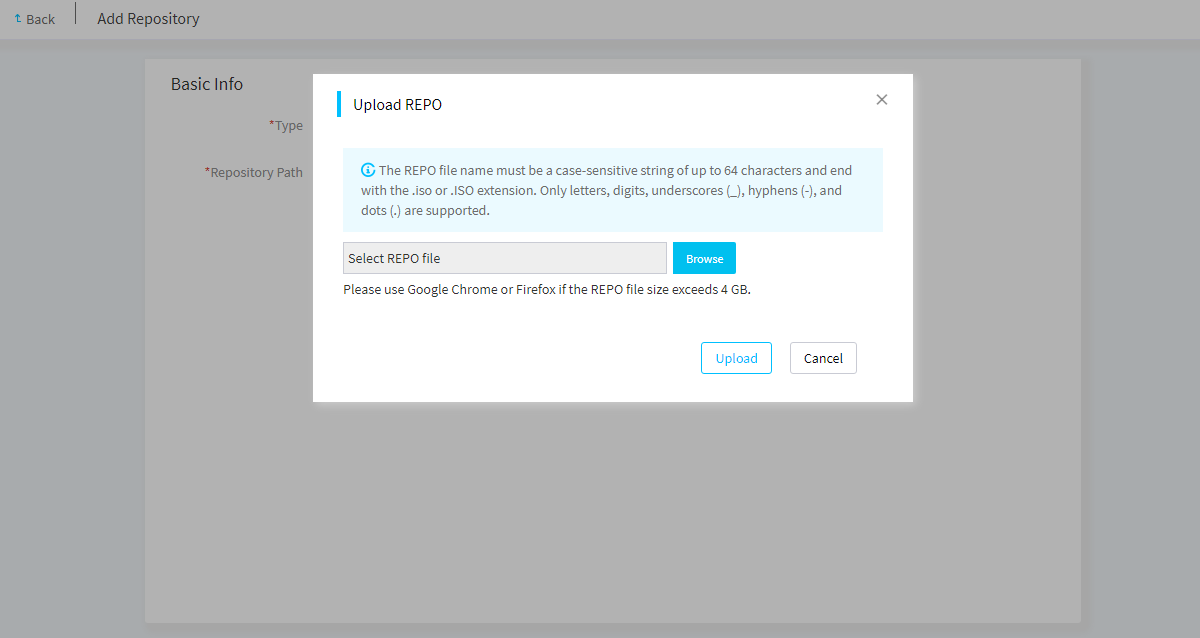
If you select Local Path as shown in Figure 34, perform the following steps:
a. Click Upload.
b. In the dialog box that opens, click Browse, select the repository file, and then click Upload.
|
|
NOTE: For more information about adding a repository, see H3C Servers FIST User Guide. |
Inventory a repository
Skip this section if the FIST version is 2.00.22 or later. FIST of such a version will automatically inventory a repository after the repository is added.
To inventory a repository:
1. As shown in Figure 35, click Inventory in the Actions column for the repository that you want to inventory. Then, FIST will automatically inventory the selected repository.
Figure 35 Inventorying a repository

2. As shown in Figure 35, after inventorying is completed, the Status column for the repository displays Inventoried and the time when inventorying was completed.
3. Click the link in the Repository Name column for the target repository. The repository details page opens to display the repository information.
Add a task
The procedure for updating the HDM, BIOS, or CPLD firmware of a single or multiple servers is the same. The following updating HDM of three servers as an example.
To add a task:
1. In the navigation pane, select Menu > Deployment > Update Components.
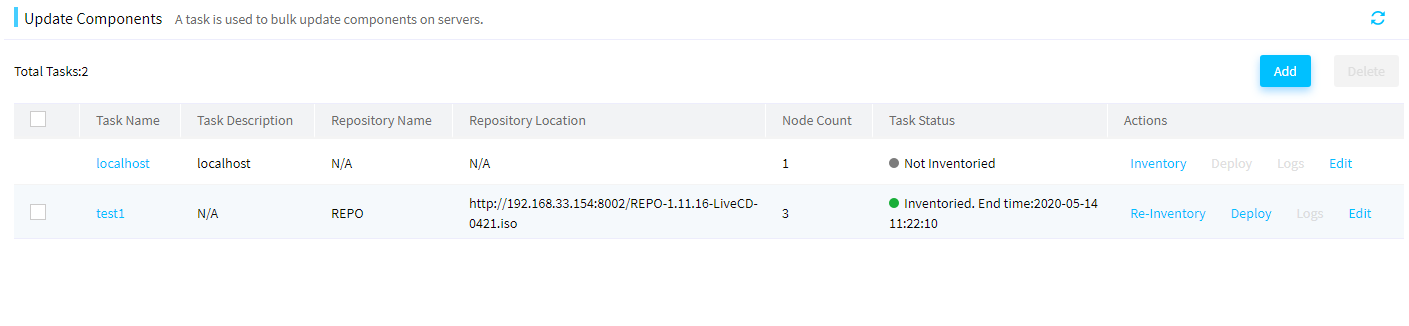
When FIST is being installed on a server, the task named localhost is automatically created. The task named localhost cannot be deleted. Another local task named localhost cannot be added.
Figure 36 Updating components

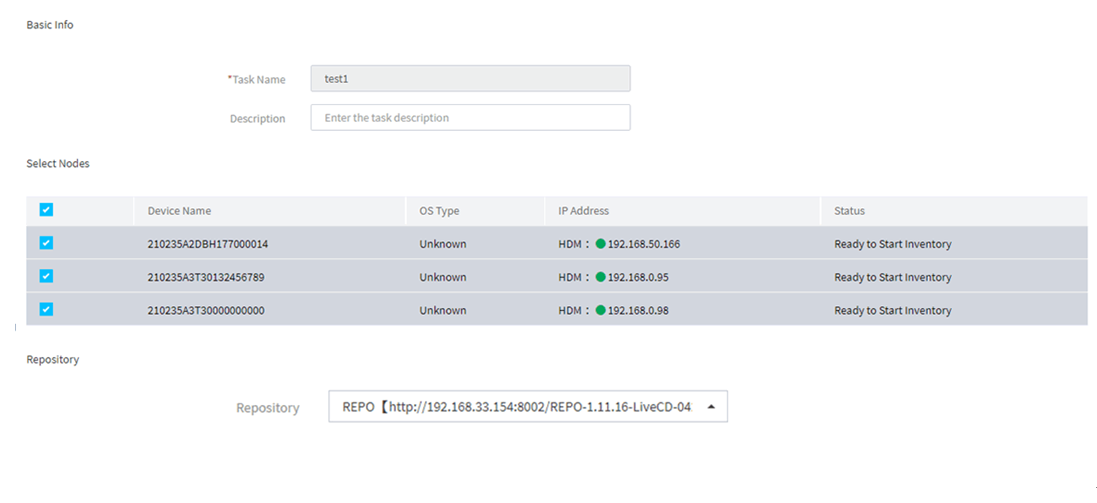
2. Click Add to enter the page as shown in Figure 37. On this page, perform the following steps:
a. (Optional.) Enter the task name and description.
b. Select the target servers.
c. Select the repository to be assigned to the servers from the Repository list.
d. Click OK.
Inventory and deploy a task
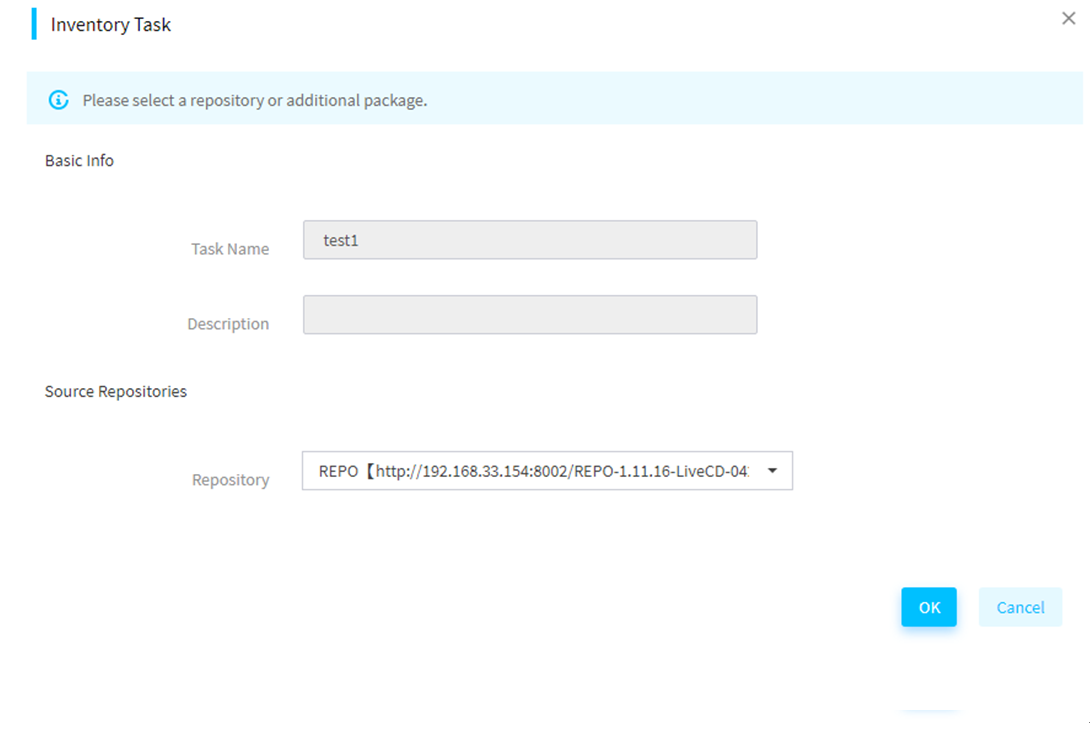
1. Click Inventory in the Actions column for the target task. In the dialog box that opens, select the target repository.
Figure 38 Inventorying a task
2. As shown in Figure 39, after inventorying is completed, the Deploy link appears. The local task named localhost cannot be deployed together with other tasks.
|
|
IMPORTANT: · Failure to inventory or deploy components on some servers in the task does not affect the whole inventorying and deployment process. · When a task is being inventoried or deployed, FIST will automatically skip servers in abnormal state in the task. If all servers in a task are in abnormal state, you cannot inventory or deploy the task. |
Figure 39 Inventoried tasks
3. Click Deploy. The dialog box as shown in Figure 40 opens. Check the HDM firmware version to determine whether to update HDM, and then select the target servers.
By default, all the components that can be used for firmware update are selected.
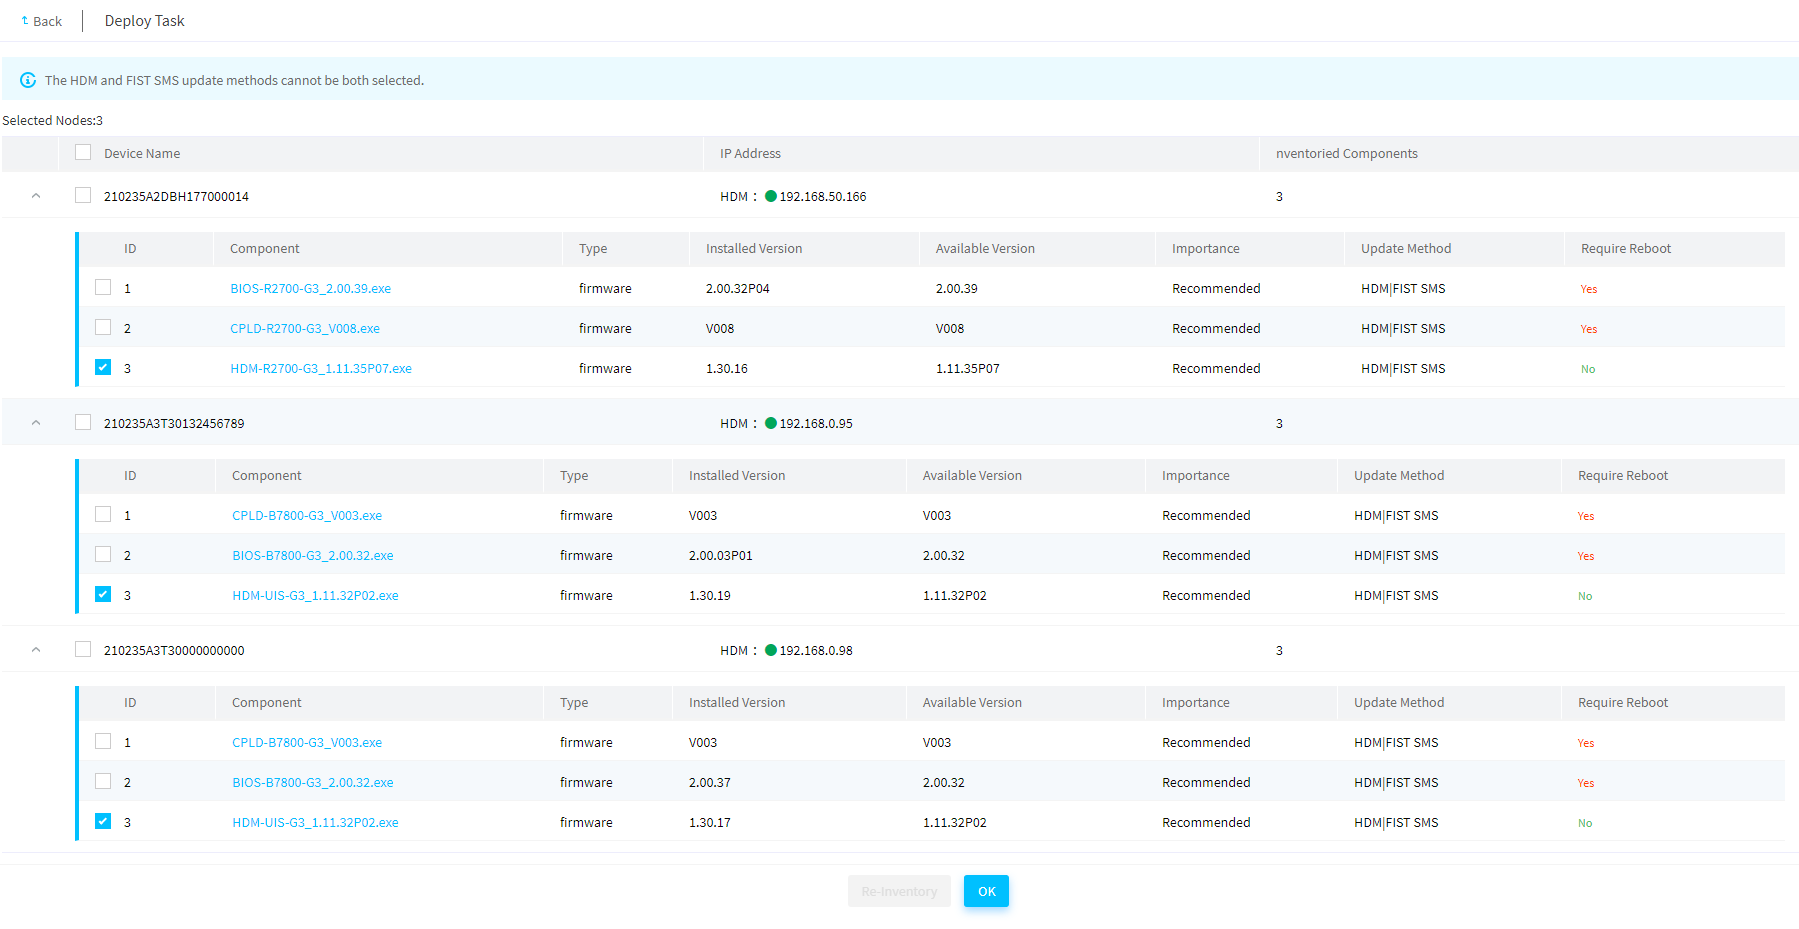
4. Click OK to start the deployment.
5. After the deployment is completed, click Logs to view the deployment logs.
6. Enter the task deployment log page to view the component deployment results. If the deployment fails on some servers, you can click the deployment failure link to view the causes and then inventory and redeploy the task for those servers.
Validating the new firmware
If you update HDM from FIST, HDM will not be restarted after the backup image of HDM has been updated. You must restart HDM, and then repeat the update procedure to update both the primary and backup images to the same version.
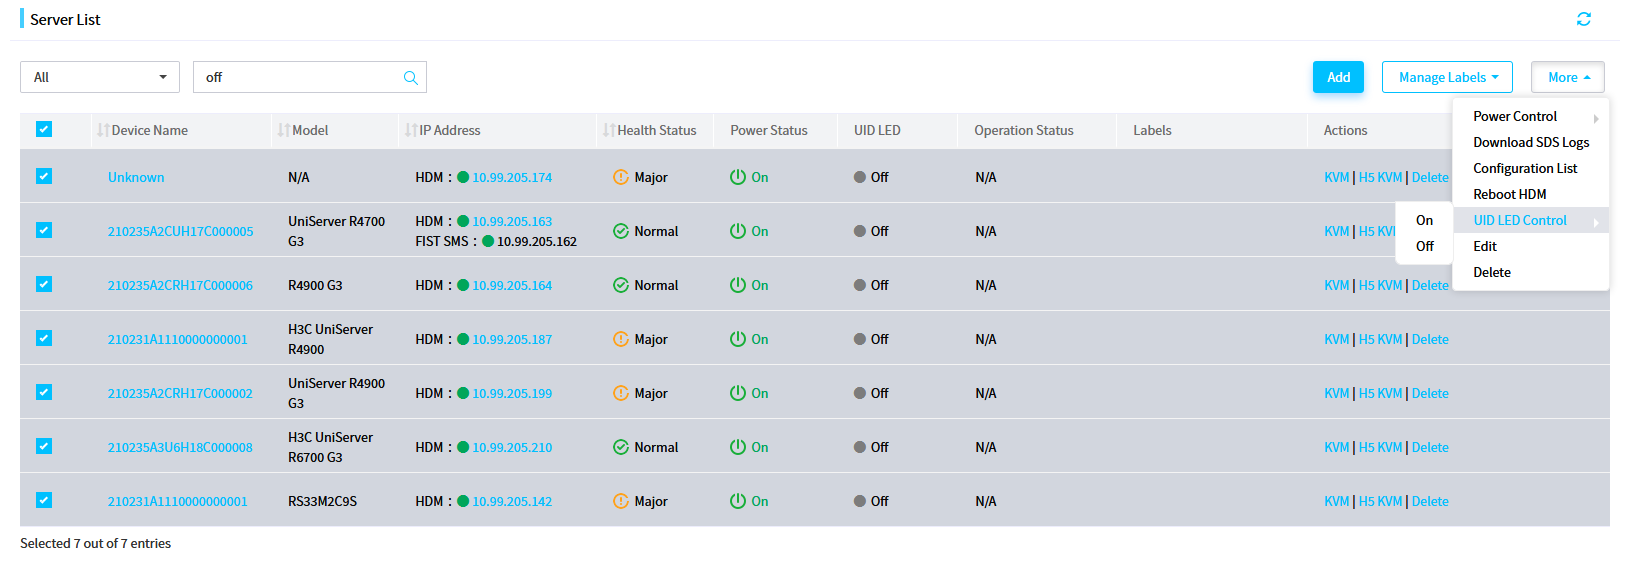
To restart HDM of multiple servers, perform the following tasks:
1. Access the server list and select the target servers.
2. Click More, and then select Reboot HDM.
Rebooting HDM disconnects the servers from FIST for a few minutes. Wait for the session state icons in the IP address column to turn green on the server list page, and then proceed to the next step.
If you need to bulk restart the servers after the update of other firmware, you can click More, select Power Control, and then select Force System Restart to restart the servers in bulk.
Figure 41 Restarting HDM of multiple servers in bulk
3. Log in to the HDM Web interface, access the firmware update page, and verify that both the primary and backup images have been updated successfully. For more information, see H3C Servers HDM User Guide.
Update the firmware offline
You can perform unattended firmware update on one or multiple servers.
Restrictions and guidelines
· During the firmware update, the servers will be restarted automatically.
· To ensure successful update, verify that the target server does not have an image mounted through KVM and its USB port is not connected to the USB drive that contains the boot options.
· As a best practice, use the HDM dedicated port.
· FIST can show the firmware update progress and result for a server only when a repository is used for the update and the server runs FIST-2.32, HDM 2.11, or later.
Prerequisites
· Start FIST and sign in to the FIST Web interface. For more information, see H3C Servers FIST User Guide.
· The servers to be managed have been added to FIST. For information about adding servers, see "Add servers."
· The REPO image file containing the LiveCD system has been uploaded to FIST. For more information, see "Upload the REPO image file."
Procedure
1. In the navigation pane, select Menu > Deployment > Firmware Update > Offline Firmware Update.
2. Select the target servers, and then click Update Firmware.
To quickly filter out the target server, you can use the label or enter a keyword in the search area.
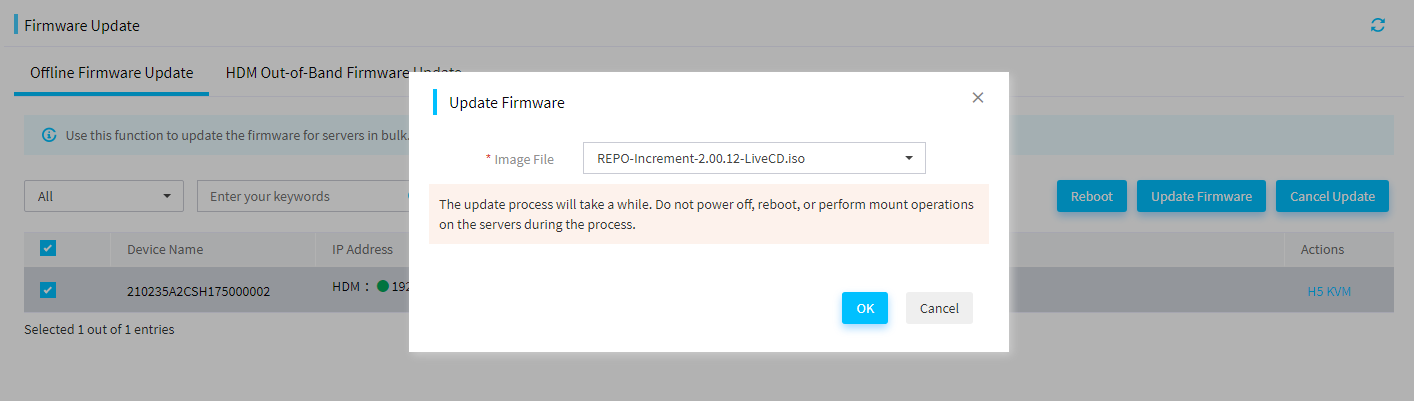
3. In the dialog box that opens, select the image file for the update, and then click OK.
4. (Optional.) To view the firmware update progress of a server, click the H5 KVM link in the Actions column for the sever.
5. (Optional.) After the update is complete for a server, click the Update Finished or Update Failed link in the Update Status column for the server to view the update result.
6. Some firmware products require a reboot to take effect. Select the updated servers and click Reboot to reboot the servers.
Figure 42 Update the firmware offline
Update the firmware by using HDM out-of-band management
Perform this task to update the firmware of one or multiple servers by using HDM out-of-band management.
Restrictions and guidelines
· Make sure the server is installed with HDM of HDM-2.52 or later versions and is installed with iFIST of iFIST-1.32 or later versions.
· This task is not available if the server does not support iFIST.
Prerequisites
· Start FIST and sign in to the FIST Web interface. For more information, see H3C Servers FIST User Guide.
· The servers to be managed have been added to FIST. For information about adding servers, see "Add servers."
· The REPO image file containing the LiveCD system has been uploaded to FIST. For more information, see "Upload the REPO image file."
Procedure
1. In the navigation pane, select Menu > Deployment > Firmware Update > HDM Out-of-Band Firmware Update.
Figure 43 HDM Out-of-Band Firmware Update
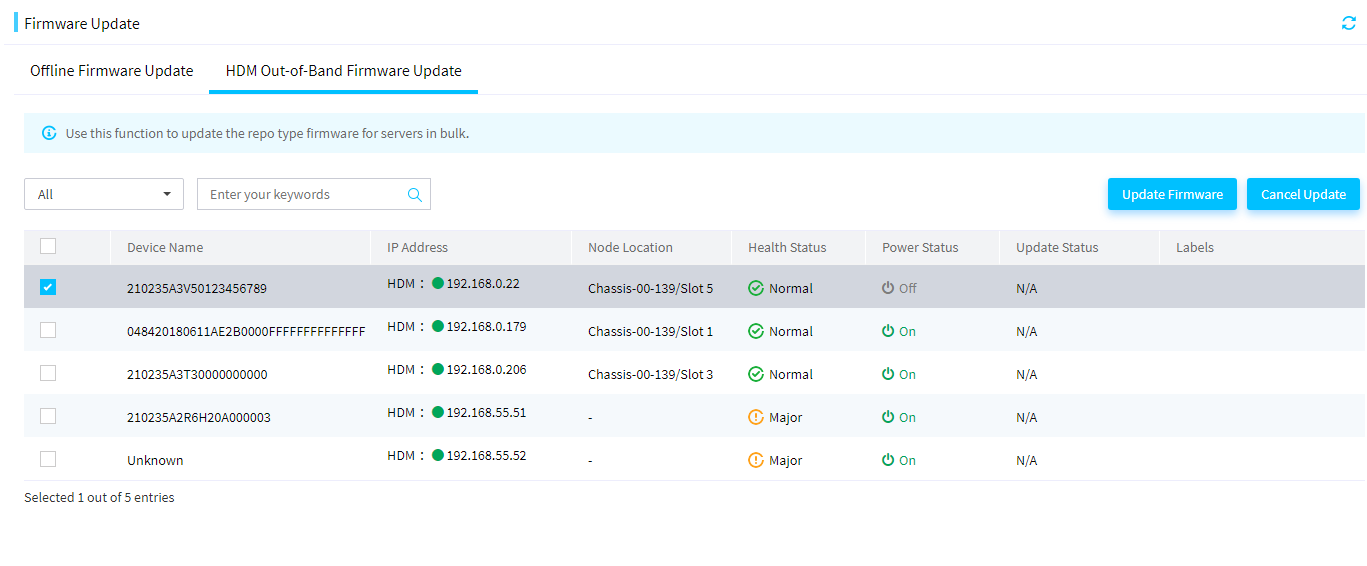
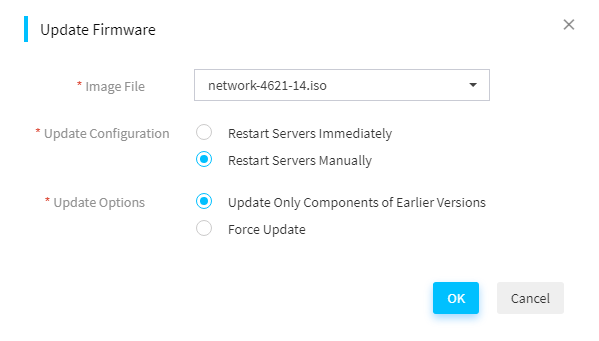
2. Select the target servers and then click Update Firmware. In the dialog box that opens, select the image file for the update, the server restart method after firmware update, an update option, and click OK.
¡ If you select Restart Servers Immediately for Update Configuration, the firmware update is completed if the component update state is Update Finished.
¡ If you select Restart Servers Manually for Update Configuration, you can view the firmware update results on the Operation Log page.
|
|
IMPORTANT: · To search for the target servers, select a label, and enter a keyword in the search box. · Only the REPO image file of a size no larger than 300 MB can be displayed in the image file list. |
Figure 44 Configuring parameters
3. To cancel ongoing firmware update operations on servers, select the target servers and then click Cancel Update. In the confirmation dialog box that opens, click OK.
If a server is verifying the file for update, you cannot cancel the ongoing firmware update operation on the server.
