- Table of Contents
- Related Documents
-
| Title | Size | Download |
|---|---|---|
| 01-Text | 262.30 KB |
Preparing for installation and deployment
Selecting the node configuration
Planning node roles and setting up the nodes
Installing the storage system on the management node
Obtaining the installation package
Installing the storage system on a management node
Logging in to the storage system
Uninstalling the storage system
Uninstalling the storage system from the whole cluster
Uninstalling the storage system from specific nodes
About the storage system
The distributed storage system unifies dispersed commercial servers into a cluster to provide unified storage services on one platform to users. By virtualizing local drives into uniform storage pools, the distributed storage system ensures that users can obtain mass storage services without having to concern about the storage hardware in use.
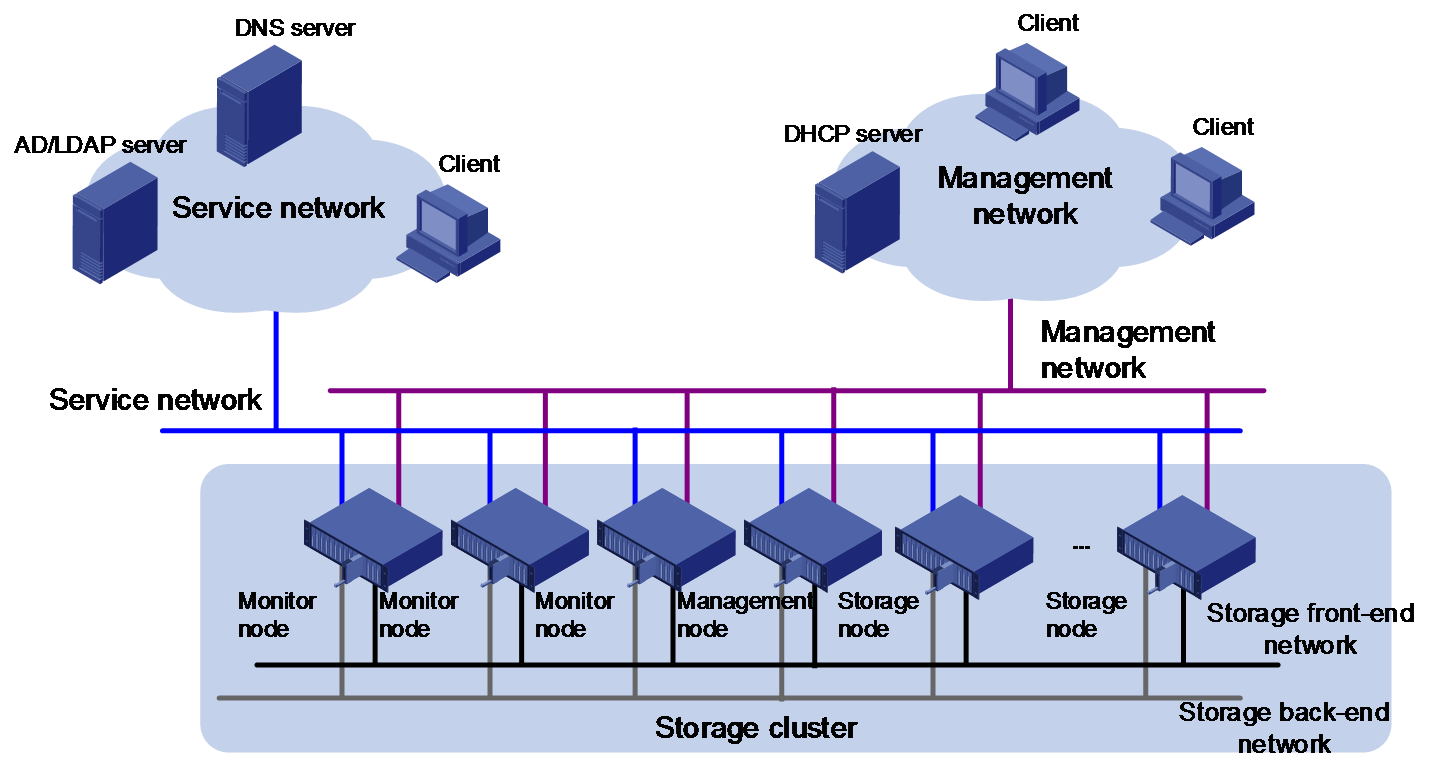
System architecture
A typical distributed storage cluster contains the following networks:
· Management network—Provides connectivity for administrators to access the management node for cluster management.
· Service network—Provides connectivity for application servers to access the storage resources and services on the cluster.
· Storage front-end network—Contains data links in the cluster over which the storage servers distribute I/O requests to storage nodes (also called OSD nodes).
· Storage back-end network—Contains links between nodes in the cluster for OSD heartbeat monitoring and data balancing.
Nodes in a distributed storage cluster can be divided into the following types:
· Management node—A host installed with the distributed storage system to deploy and manage storage resources in the cluster.
· Monitor node—A host on which the monitor process runs to monitor the cluster and maintain and distribute various information vital to cluster operations.
· Storage node—A host that provides storage resources in the cluster.
|
|
NOTE: Unless otherwise stated, a host in this guide refers to a physical server or a VM. |
All nodes in the cluster must be able to reach each other on the management, service, and storage networks.
Figure 1 Distributed storage system networking diagram
Restrictions and guidelines
When you deploy a distributed storage cluster, following these restrictions and guidelines:
· You can deploy physical servers or VMs in a distributed storage cluster, but not both.
· The distributed storage system supports management high availability. You can deploy two management nodes as needed for high availability. For more information, see online help for the distributed storage system.
Preparing for installation and deployment
Before you install the distributed storage system and set up a distributed storage cluster, make sure the software and hardware specifications of the hosts meet the installation and deployment requirements.
Selecting server models
|
|
IMPORTANT: The list of compatible server models is subject to change over time. For the most up-to-date list of compatible server models, contact H3C Support. |
To build a distributed storage cluster of physical servers, use the compatibility matrix for the storage system or contact H3C Support to obtain the available physical server models.
Selecting the node configuration
Make sure the operating system on a management/monitor/storage node is compatible with the storage system. To obtain the image file of a compatible operating system, contact H3C Support.
Selecting a browser
|
|
IMPORTANT: The height dimension must be 900 pixels or higher. |
You can access the storage system from the following browsers without installing client software:
· Google Chrome 50.0 or higher.
· Mozilla Firefox 53.0 or higher.
As a best practice, use an up-to-date version of Google Chrome or Mozilla Firefox browser.
Selecting switches
Make sure the switch has gigabit ports for the management network and 10-gigabit ports for the service network and storage network.
Planning node roles and setting up the nodes
Use Table 1 to prepare node information and configuration required for storage cluster setup.
Table 1 Required node information and configuration for storage cluster setup
|
Item |
Task |
|
Node role |
Determine management nodes, monitor nodes, and storage nodes. |
|
Time zone and clock settings |
Configure each host with the time zone and time settings used in the local region. |
|
Network connectivity |
Configure the IP addresses and subnet masks of each host in the management network, service network, and storage network. Make sure the management, service, and storage networks do not overlap. If network resources are limited, you can use one network for both management and services. |
|
Hostname |
Determine the hostname of each host. Make sure the hostnames of the hosts are unique. NOTE: A hostname must start with a letter and can contain only letters, digits, and hyphens (-). localhost cannot be used as a hostname. |
|
Username and password |
Determine the username and password for accessing the hosts. The default username and password are SDS_Admin and Admin@123stor, respectively. All hosts in the cluster must use the same password. |
Installing the storage system on the management node
Restrictions and guidelines
|
|
CAUTION: · If you cannot execute a command because of lack of permissions, add sudo before the command and try again. If the issue persists, contact H3C Support. · Make sure the free space of the system disk is not less than 100 GB. |
The storage system supports high availability management. If you deploy two management nodes for high availability, follow these restrictions and guidelines:
· The backup node must use the same version of storage system software as the primary node. The installation procedure is the same for backup and primary nodes.
· Make sure the backup node has IP addresses on the management, service, storage front-end, and storage back-end networks.
Screenshots used in this document are for illustration only and might differ from your products.
Obtaining the installation package
Request the storage system installation package from the technical support and put the package to your installation directory.
|
|
IMPORTANT: If FTP is used, you must select binary mode for file transfer. |
Installing the storage system on a management node
Restrictions and guidelines
Do not perform any other operations during the installation.
Prerequisites
Make sure you have finished all preparation tasks in "Preparing for installation and deployment."
Procedure
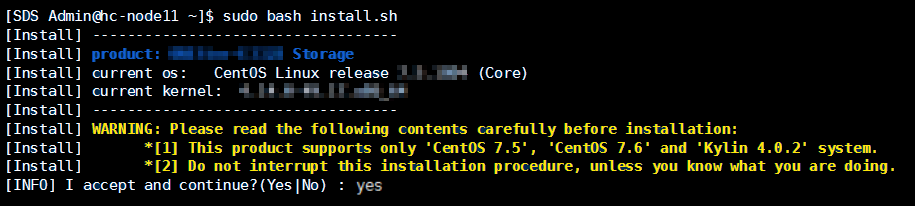
1. Log in to the management node. The default username and password are SDS_Admin and Admin@123stor, respectively. Access the installation directory of the storage system.
2. Execute the tar -vxmf Xxxx-xxxx.tar.gz command to extract the package. The installation package name is Xxxx-xxxx.tar.gz.
3. Access the product directory, and then execute the sudo bash install.sh command.
4. Read the precautions carefully, enter yes.
Figure 2 Installing the storage system
The system starts to install the storage system. After the storage system is installed successfully, the system displays Installation complete!.
Figure 3 Installation success
![]()
|
|
NOTE: · If the installation fails, the system prompts you to roll back configuration. Enter yes to perform a rollback. If you cannot perform a rollback or the rollback fails, contact the technical support. · After the installation, you can execute the vi /var/log/shell_util/install.log command to view the installation log and execute the cat /opt/h3c/packages.info command to view information about installed components. |
Logging in to the storage system
Restrictions and guidelines
As a best practice to prevent cluster exceptions, avoid establishing concurrent management sessions to the storage system.
Your user account will be locked for one minute after three failed password attempts.
Procedure
1. Access http://storage system_ip_address or https://storage system_ip_address.
storage system_ip_address represents the IP address of the management node or the HA VIP of the cluster (only if the cluster is enabled with HA).
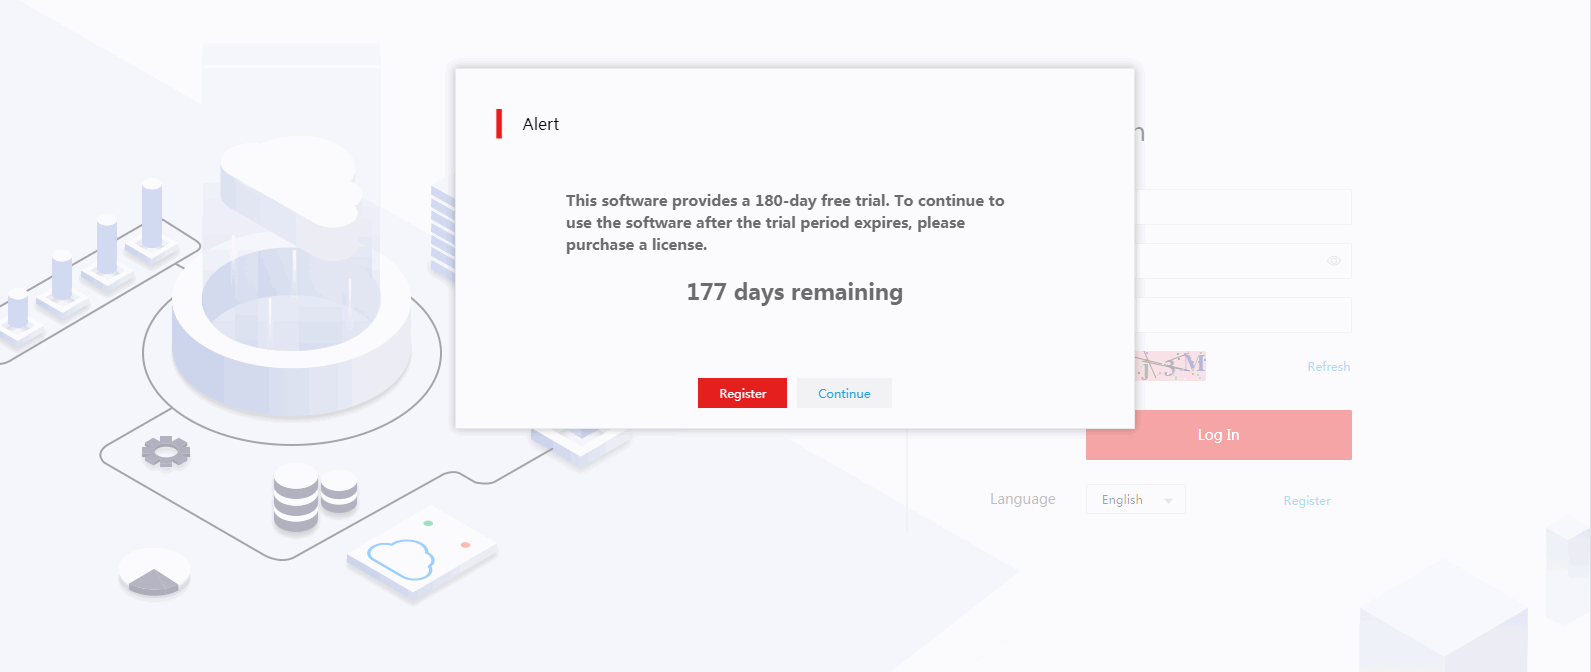
2. If you have not registered a license, select Register to register a license or Continue to use the trial edition, as shown in Figure 4.
For the sake of your business, register a license within 180 days, or the trial edition will expire.
Figure 4 Opening the storage system login page
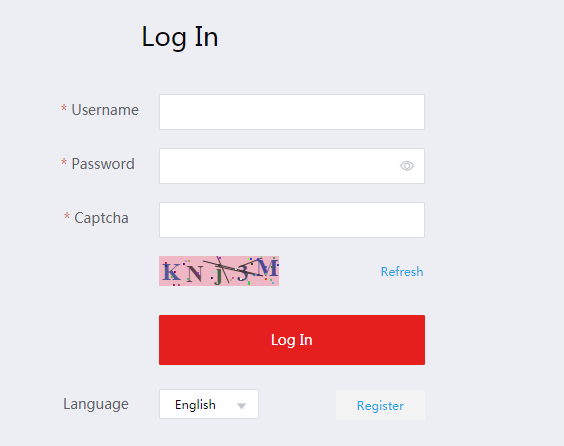
3. Enter the username and password, and then click Log In.
The default username and password are admin and Admin@123, respectively.
Figure 5 Logging in to the storage system
If you log in to the system for the first time, the system will open a setup wizard to help you set up a cluster. For more information about this task, see the online help.
If a cluster has been set up, the system displays the cluster dashboard.
Figure 6 Storage system cluster dashboard

Uninstalling the storage system
Restrictions and guidelines
All configuration and data will be cleared after you uninstall the storage system. Please be cautious.
Stop all storage services before you uninstall the storage system.
If you cannot execute a command because of lack of permissions, add sudo before the command and try again. If the issue persists, contact H3C Support.
Uninstalling the storage system from the whole cluster
1. Log in to the management node. From the CLI of the management node's operating system, execute the onestor-cli probe IP_address command to detect all nodes in the cluster.
The IP_address argument represents the IP address of the management node.
Figure 7 Detecting all nodes in the cluster
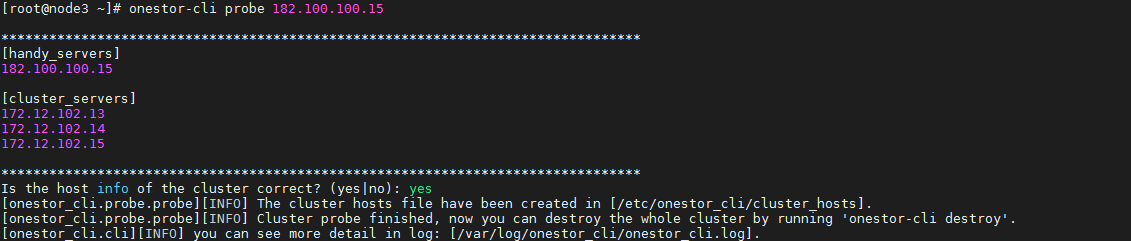
2. Verify that the displayed node information is consistent with the actual node information, enter yes, and then press Enter.
If the displayed node information is inconsistent with the actual information, enter no, press Enter, and then edit the node information in the cluster_hosts file as instructed. Typically, the file is saved in the /etc/onestor_cli/cluster_hosts directory.
3. Execute the onestor-cli destroy command, enter yes at the confirmation prompt, press Enter, enter the password for destroying the storage system, and then press Enter.
The default password for destroying the storage system is Admin@stor.
4. Read the precautions carefully, and then enter yes or no at the prompt to continue the uninstallation.
The uninstallation succeeds when the system displays Finished to destroy Storage cluster..
|
|
IMPORTANT: Some nodes might require a restart before storage system re-installation. If the system prompts you to reboot specific nodes, follow the instructions. |
Figure 8 Uninstallation succeeded

Uninstalling the storage system from specific nodes
1. Log in to the management node. From the CLI of the management node's operating system, execute the onestor-cli destroy --hosts IP_address command.
The IP_address argument represents comma-separated IP addresses of the nodes from which the storage system will be uninstalled.
2. Enter yes at the confirmation prompt, press Enter, enter the password for destroying the storage system, and then press Enter.
The default password for destroying the storage system is Admin@stor.
3. Read the precautions carefully, and then enter yes or no at the prompt to continue the uninstallation.
The uninstallation succeeds when the system displays Finished to destroy Storage cluster..
Figure 9 Uninstallation succeeded

FAQ
|
|
CAUTION: If you cannot execute a command because of lack of permissions, add sudo before the command and try again. If the issue persists, contact H3C Support. |
Installation
What should I do if the installation fails?
1. Verify that the operating system is as required.
2. Verify that the remaining space in the system disk is sufficient.
3. If the issue persists, contact the technical support.
Miscellaneous
What should I do if I fail to set up a storage cluster after I reinstall or upgrade the storage system?
Clear the browser buffer and try again.
