- Table of Contents
- Related Documents
-
| Title | Size | Download |
|---|---|---|
| 02-OAP module configuration | 62.39 KB |
Internal interfaces for OAP modules
Logging in through the console port on the OAP module
Logging in through the management Ethernet port on the OAP module by using SSH
Logging in through the internal Ethernet interface on the OAP module by using SSH
Logging in to the OAP module from the CLI of the device
Configuring the OAP module
The Open Application Architecture provides an open interface for third-party vendors to develop and integrate value-added applications into H3C products. The hardware platforms for these applications can be devices or modules. H3C has developed series of application-specific modules called Open Application Platform (OAP) modules.
OAP modules have their own operating systems. You can log in to the operating system of an OAP module to install features. For example, you can install security features and voice features on the OAP module operating system to provide security and voice services for users.
OAP modules exchange data, status information, and control information with hosting devices through internal interfaces.
Table 1 OAP modules
|
OAP module |
Module type |
Number of internal interfaces |
|
LSUM1FWDEC0 |
Firewall card |
Three 40G Ethernet interfaces |
|
LSUM1NSDEC0 |
NetStream card |
Three 40G Ethernet interfaces |
|
LSUM1WCMX20RT |
High performance access controller module |
Two 10G Ethernet interfaces |
|
LSUM1WCMX40RT |
Four 10G Ethernet interfaces |
|
|
LSUM1ACGDEC0 |
Application control gateway module |
Three 40G Ethernet interfaces |
Internal interfaces for OAP modules
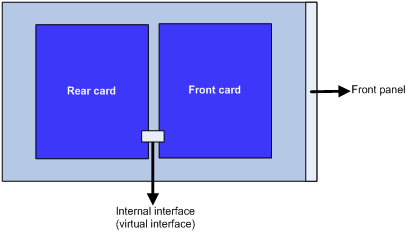
An OAP module integrates a front card and a rear card. The front card provides value-added security services, such as firewall, intrusion prevention, and application control. The rear card is responsible for data exchange between the front card and the switch. The rear card communicates with the front card through the internal interface, as shown in Figure 1.
Figure 1 Internal interface diagram
Logging in to an OAP module
Logging in through the console port on the OAP module
1. Connect one end of the console cable to the serial port of the configuration terminal (for example, a PC).
2. Connect the other end of the console cable to the console port of the OAP module.
3. Start the PC and run a terminal emulation program, such as HyperTerminal.
4. Select the COM connection mode and set the terminal parameters as follows:
? Bits per second—9600.
? Data bits—8.
? Parity check mode—None.
? Stop bits—1.
? Flow control—None.
5. Follow the OAP module user guide to log in to the operating system of the OAP module through the terminal emulation program.
Logging in through the management Ethernet port on the OAP module by using SSH
1. Connect the management Ethernet port of the OAP module to the network by using a network cable.
2. Log in to the OAP module through the console port and enable the SSH server function on the OAP module.
3. Assign an IP address to the management Ethernet port of the OAP module. Make sure the management Ethernet port and the SSH client (an H3C device or a PC with SSH client software) can reach each other.
4. From the SSH client, establish an SSH connection to the IP address of the management Ethernet port on the OAP module.
After the SSH connection is successfully established, you are logged in to the operating system of the OAP module.
Logging in through the internal Ethernet interface on the OAP module by using SSH
When installed in the expansion slot of a device, an OAP module exchanges information with the device through two internal interfaces: one serial port and one fast Ethernet interface. The fast Ethernet interface is used for this login method.
To log in to the operating system of an OAP module through the internal Ethernet interface:
1. Connect the SSH client (for example, a PC) to the Ethernet port of the device by using a network cable.
2. Log in to the OAP module through the console port and enable the SSH server function on the OAP module.
3. Assign an IP address to the internal Ethernet interface on the OAP module. Make sure the PC and the fast Ethernet interface on the OAP module can reach each other.
4. From the SSH client, establish an SSH connection to the IP address of the fast Ethernet interface.
After the SSH connection is successfully established, you are logged in to the operating system of the OAP module.
Logging in to the OAP module from the CLI of the device
|
IMPORTANT: The following modules do not support this login method: · LSUM1ACGDEC0. |
From the CLI of the device, you can log in to the CLI of the OAP module. To return to the CLI of the device, press Ctrl+K.
Perform the following task in user view on the default MDC:
|
Task |
Command |
|
Log in to the CLI of the OAP module from the device. |
In standalone mode: In IRF mode: |
Resetting OAP modules
|
|
CAUTION: Resetting an OAP module might cause a service outage. |
|
|
IMPORTANT: To avoid service data loss, close the operating system of an OAP module before resetting the module. The following modules do not support this operation: · LSQM1WCMX20. · LSQM1WCMX40. |
You can reset an OAP module to restore it to normal operation in the following situations:
· The OAP module fails.
· The OAP module is not operating correctly. For example, the OAP module does not respond to your operation.
Pressing the reset button of the OAP module has the same effect. The device can still identify and control the OAP module after the module starts up again.
Perform the following task in user view:
|
Task |
Command |
|
Reset the OAP module. |
In standalone mode: In IRF mode: |
