- Table of Contents
- Related Documents
-
| Title | Size | Download |
|---|---|---|
| 01-Text | 2.22 MB |
Obtaining the installation package
Installing H3C Matrix on a server
Deploying the super controller
Accessing the super controller
Obtaining the device information file
Registering a license for the first time
Registering an upgrade license
Obtaining licensing information
Upgrading the super controller
Upgrading the super controller
Overview
H3C super controller is designed for Data Center Interconnect (DCI) scenarios. It implements southbound service orchestration and O&M for controllers across DCs and provides a northbound converged network view for the cloud platform. It also provides a unified interface for service deployment.
The super controller implements microservices in cluster mode. Kubernetes-based container deployment of microservices brings flexibility to service deployment, operation, and maintenance. Users can easily upgrade microservices, expand or decrease their capacities, and add services to them.
This document describes the procedure for installing a super controller on H3C Matrix. To install a super controller, you must first install H3C Matrix and set up a Matrix cluster.
Server requirements
Hardware requirements
|
|
IMPORTANT: For correct operation of a super controller, install it on a physical server rather than a virtual machine. |
Table 1 shows the hardware requirements for a server to host a super controller.
|
Item |
CPU |
Memory size |
Drive |
NIC speed |
|
Minimal configuration (support only for basic functions of a super controller) |
X86-64 (Intel 64/AMD 64) Eight cores |
64 GB |
128 GB (64 GB for the partition that contains the root directory and 64 GB for the /var/lib/docker directory) A storage controller with 1G cache memory is required. |
1 Gbps |
|
Recommended configuration |
x86-64 (Intel 64/AMD 64) 24 cores or above 2.4 GHz or above |
128 GB or above |
512 GB or above (256 GB or above for the partition that contains the root directory and 256 GB or above for the /var/lib/docker directory) A storage controller with 1G or more cache memory is required. |
10 Gbps |
Software requirements
The super controller runs on the h3Linux_kernel_3_10 operating system.
Installing H3C Matrix
H3C Matrix is a Kubernetes-based microservice PaaS platform. On this platform, you can set up Kubernetes clusters, deploy microservices, and implement orchestration and O&M for the system, Docker containers, and microservices.
|
|
IMPORTANT: Installing H3C Matrix on a server that already has an operating system installed replaces the existing operating system. To avoid data loss, back up data before H3C Matrix installation. |
This section describes the procedure for installing a super controller on a server without an operating system installed.
Obtaining the installation package
Obtain the H3C Matrix installation ISO image of the required version. This image file contains the operating system installation package, H3C Matrix installation package, H3C Matrix software dependencies, and super controller installation package.
Installing H3C Matrix on a server
1. Use the remote console on the server to load the ISO image through the virtual optical drive. Then restart the sever.
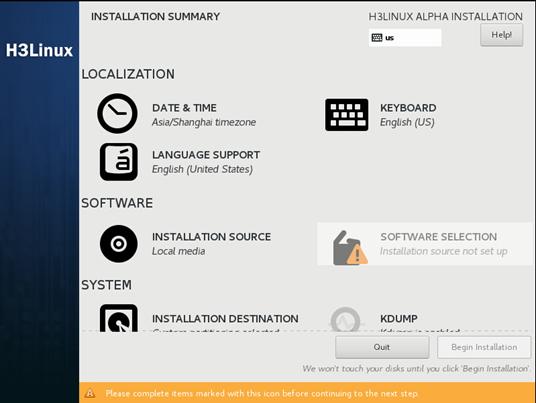
2. On the INSTALLATION SUMMARY page, modify the date, time, and keyboard settings as needed in the LOCALIZATION area.
Figure 1 INSTALLATION SUMMARY page
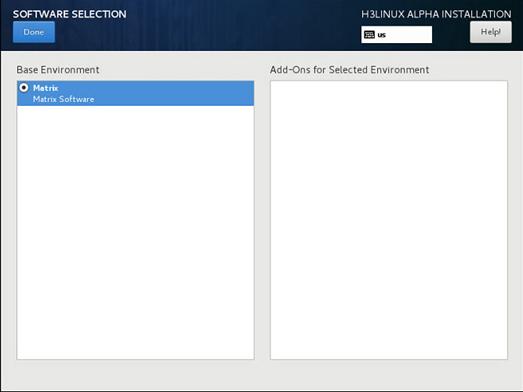
3. In the SOFTWARE area, click SOFTWARE SELECTION. On the SOFTWARE SELECTION page, select the Matrix base environment. Then click Done to return to the INSTALLATION SUMMARY page.
Figure 2 SOFTWARE SELECTION page
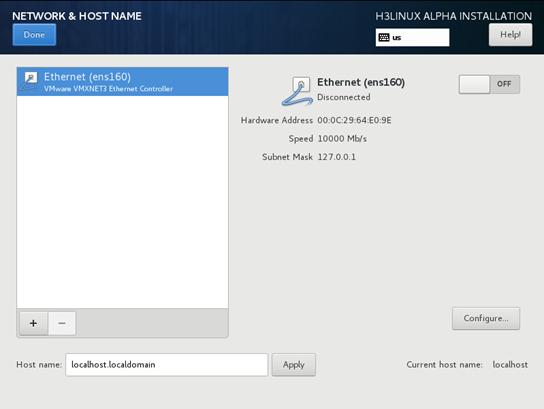
4. Click NETWORK & HOST NAME in the SYSTEM area. On the NETWORK & HOST NAME page, perform the following tasks:
a. Enter a new host name in the Host name field and then click Apply.
|
|
IMPORTANT: · The host names of the nodes in a Matrix cluster must be different. · After H3C Matrix is installed, do not change the host name. If you must change it, contact the after-sales engineer. |
b. Click Configure to enter the network configuration page.
Figure 3 NETWORK & HOST NAME page
5. Configure the network settings as follows:
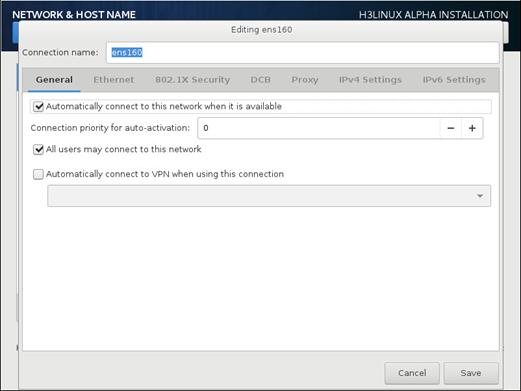
a. Click the General tab and then select Automatically connect to this network when it is available.
Figure 4 General settings
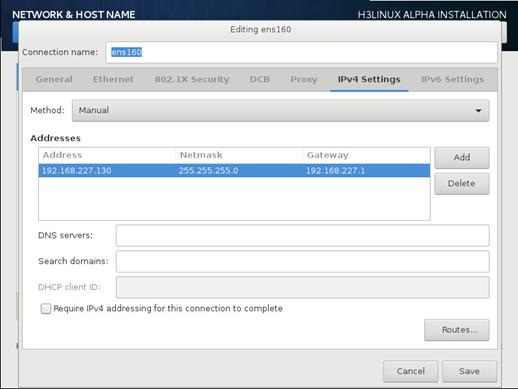
b. Click the IPv4 Settings tab, and then configure an IPv4 address for the server. You must specify a gateway for the server.
Figure 5 Configuring an IPv4 address for the server
c. Click Save to save the configuration.
d. Click Done to return to the INSTALLATION SUMMARY page.
6. Click Begin Installation to start the installation. During the installation process, you will be promoted to configure USER SETTINGS as shown in Figure 6. Set the root password and create a user account for the system.
|
|
IMPORTANT: To avoid an installation failure, do not manually reboot, shut down, or power off the server during the installation process. |
Figure 6 Setting the root password and creating a user account

After the installation is complete, the system automatically reboots to finish the installation of the operating system and H3C Matrix.
Deploying the super controller
You must deploy the super controller on an H3C Matrix cluster. The setup guide (GUIDE on the Matrix platform) will help you set up an H3C Matrix cluster and deploy the super controller.
To deploy the super controller:
1. Enter https://matrix_ip_address:8443/matrix/ui in the address bar of your browser. matrix_ip_address represents the address for logging in to the matrix platform, https://192.168.227.146:8443/matrix/ui for example.
2. On the H3C Matrix login page, select a language, enter the username and password, and then click Log In.
The default username and password are admin and matrix123, respectively
Figure 7 H3C Matrix login page

3. On the top navigation bar, click GUIDE. At the first-time login, the GUIDE page opens automatically.
Figure 8 Cluster configuration guide page
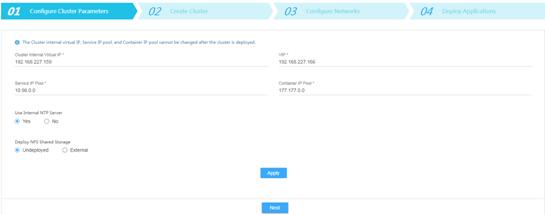
4. Click the Cluster Parameters tab, configure the cluster parameters as described in Table 2, and then click Apply.
Table 2 Cluster parameter descriptions
|
Parameter |
Description |
|
Cluster internal virtual IP |
IP address with a 32-bit subnet mask, used for communication in the cluster. It is not changeable and must be in the same network segment as the master nodes. |
|
VIP |
IP address with a 32-bit subnet mask, used for northbound interface services. You can use this address to log in to the cluster Web interface. This address must be in the same network segment as the master nodes. |
|
Service IP pool |
Address pool used to randomly assign addresses to services in the cluster. This address must not conflict with other network segments in the deployment environment. By default, the address pool is 10.96.0.0/16. |
|
Container IP pool |
Address pool used to randomly assign addresses to containers. This address must not conflict with other network segments in the deployment environment. By default, the address pool is 177.177.0.0/16. |
|
Use Internal NTP Server |
Select whether to use the internal NTP server. · To use the internal NTP server, select Yes. · To not use the internal NTP server, select No and then specify an NTP server by its IP address. |
|
NTP server IP |
IP address of an external NTP server. This address must not conflict with the IP addresses of the nodes in the cluster. |
|
Deploy NFS Shared Storage |
Select whether to deploy NFS shared storage. · To not deploy NFS shared storage, select Undeployed. · To deploy shared storage, click External and then specify an external storage path. |
|
External Storage Path |
Path of the NFS shared storage. |
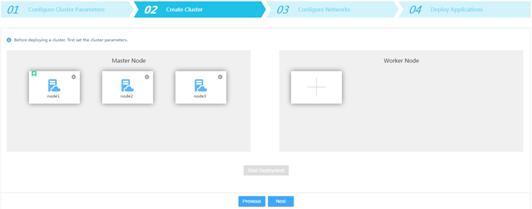
5. Click Next. In the Master
node area, click the ![]() icon. In the dialogue box that opens,
configure the IP address, username, and password for the node, and then click Apply. Add the
other two master nodes in the same way the first master node is added.
icon. In the dialogue box that opens,
configure the IP address, username, and password for the node, and then click Apply. Add the
other two master nodes in the same way the first master node is added.
Figure 9 Adding master nodes
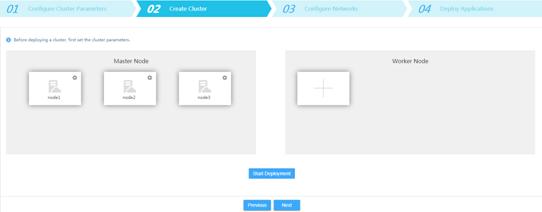
6. In the Worker node area, add the worker nodes as needed in the same way the master nodes are added.
7. Click Start deployment to start deploying the Matrix cluster.
Figure 10 Matrix cluster deployed
8. Click Next. Network configurations are not required for the super controller.
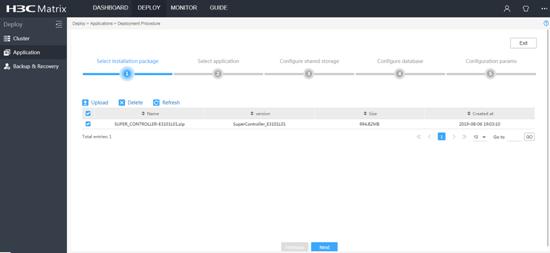
9. Click Next. Select the super controller installation package and then click Next. The system starts resolving the package.
Figure 11 Selecting the super controller installation package

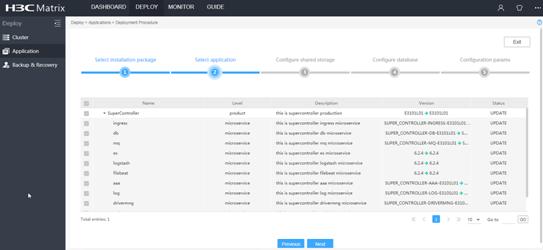
10. After the resolving is complete, click Next. Click Deploy to start deploying the super controller.
Figure 12 Deploying the super controller
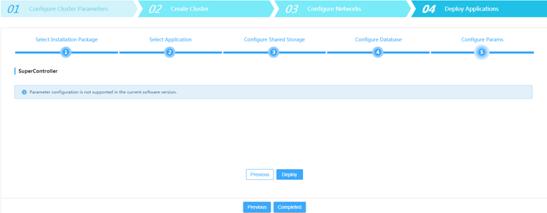
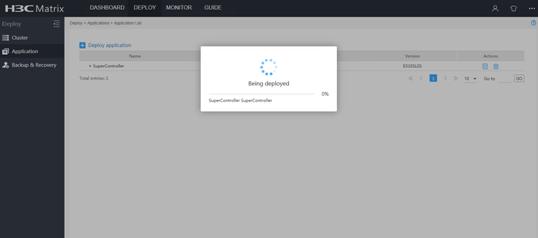
After the deployment is complete, click Application on the left navigation pane to view the super controller information.
Accessing the super controller
You can use a Web browser to access the super controller. The following Web browsers are supported:
· Google Chrome 55 or later
· Internet Explorer 11 or later
· Mozilla Firefox 50 or later
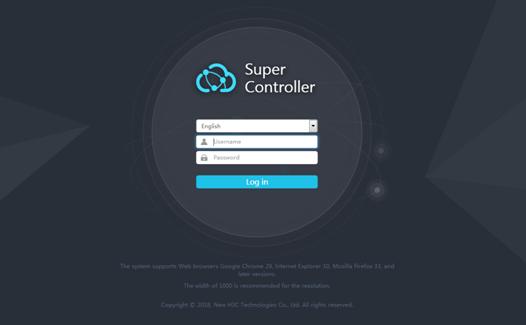
To access the super controller:
1. Select one from the three master nodes for accessing the super controller.
2. Enter https: https://controller_ip_address/suc/ui in the address bar. controller_ip_address represents the IP address of the master node.
3. Select a language from the Language list. Enter the username and password and then click Login.
The default username is admin and the default password is admin123456.
Figure 13 Super Controller login page
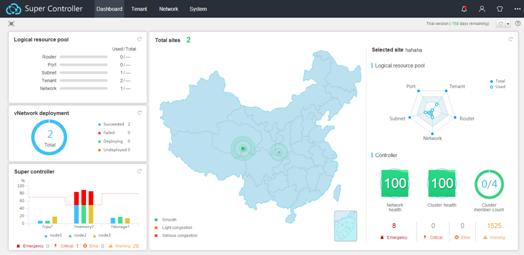
You are placed on the super control Dashboard upon login.
Figure 14 Super controller dashboard page
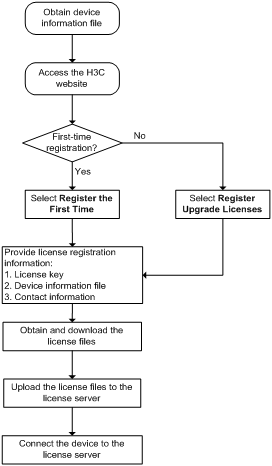
Registering a license
After you install the super controller, you can use complete features and functions of the super controller for a 180-day trial period. After the trial period expires, you must get the super controller licensed.
Figure 15 License registration flowchart
|
|
NOTE: A license file might become invalid when the following hardware changes occur on the license server: · NIC forbidden for use, use of a new NIC, NIC replacement, or NIC damage. · CPU replacement. |
Obtaining the device information file
1. Enter http://license_ip_address:8090/ in the address bar of your browser. license_ip_address represents the IP address of the license server and 8090 is the default port number.
If license server HA has been configured, you can log in to the active license server or access the server by using the virtual IP address of the HA.
2. On the login page, enter the username and password and then click Login.
The default username and password are admin and admin@h3c, respectively.
3. From the left navigation pane, select License Management > License Files.
4. Click Export DID to download the device information file.
Applying for a license file
To apply for a license file for the super controller for the first time, see "Registering a license for the first time."
For any subsequent license file applications, see "Registering an upgrade license."
Registering a license for the first time
1. Access the H3C website at http://www.h3c.com.hk/Technical_Support___Documents/Product_Licensing/ and select Register the First Time.
2. From the Product category list, select New Network_SDN Controller.
3. Provide the license, device, and contact information as described in Table 3.
|
Item |
Description |
|
License information |
Provide the license key. |
|
Device information |
Upload the device information file. |
|
Contact information |
Fill in contact information. The items marked with an asterisk sign (*) are required. |
4. Enter the verification code and then select I accept all terms of H3C Legal Statement.
5. Click Get activation key or file to download the license file.
Registering an upgrade license
1. Access the H3C website at http://www.h3c.com.hk/Technical_Support___Documents/Product_Licensing/ and select Register Upgrade Licenses.
2. From the Product category list, select New Network_SDN Controller.
3. Provide the license, device, and contact information as described in Table 4.
|
Item |
Description |
|
Device information |
Upload the device information file. |
|
License information |
Provide the license key. |
|
Contact information |
Fill in contact information. The items marked with an asterisk sign (*) are required. |
4. Enter the verification code and then select I accept all terms of H3C Legal Statement.
5. Click Get activation key or file to download the license file.
Obtaining licensing information
1. Upload the license files to the license server.
a. Log in to the license server. Select License Management > License Files.
b. On the License Files page, click Install license file.
c. In the dialog box that opens, click Browse… to select the license files saved locally. Then click OK.
After the license files are uploaded, licensing information is displayed on the License Files page.
2. Add a license client on the license server.
a. From the left navigation pane, select Configuration > License Clients.
b. Click the Add
icon ![]() . On the page that
opens, configure settings including username and
password for the clients and then click OK.
. On the page that
opens, configure settings including username and
password for the clients and then click OK.
3. Configure the super controller to obtain licensing information.
a. Log in to the super controller.
b. On the top navigation bar, select Controller > License Manager.
c. In the License Status area, set the required license quantity.
d. In the License server info area, provide the license server IP address, username, password, and port number. Then click Connect to connect the super controller to the license server.
The username and password are those created for the license client on the license server.
The super controller automatically obtains licensing information after connecting to the license server.
Upgrading the super controller
The super controller supports In-Service Software Upgrade (ISSU), which ensures service continuity during the upgrade.
Verifying the cluster status
Before upgrading the super controller, make sure all nodes in the cluster are in normal state.
To verify the status of a node in the cluster:
1. Log in to the H3C Matrix. Click Deploy on the top navigation bar and then select Cluster.
2. Click the ![]() icon for the node and
then select Details. The node status is displayed in the dialogue box that opens.
icon for the node and
then select Details. The node status is displayed in the dialogue box that opens.
Upgrading the Matrix cluster
Before upgrading the super controller, determine whether the current Matrix version matches the new super controller version. (See the release notes for the supper controller to check for the compatible Matrix version.)
· If they match, you do not need to upgrade the Matrix cluster.
· If they do not match, upgrade the Matrix cluster in sequence of worker nodes, standby master nodes, and active master node. After you upgrade each master node, you must verify the database cluster synchronization status of the master node from the CLI. A database cluster is a collection of the databases on the master nodes.
a. Execute the kubectl get po --all-namespaces | grep pxc command to obtain the database names.
[root@node1 ~]# kubectl get po --all-namespaces | grep pxc
vcf-system pxc-node1-95444fdf-hhqnp 1/1 Running 0 30m
vcf-system pxc-node2-6f85c454c7-jz6xm 1/1 Running 0 29m
vcf-system pxc-node3-579c7bf9df-5tm2d 1/1 Running 0 28m
b. Execute the kubectl -n vcf-system exec name -i -- timeout 5 mysql -umysql -pmysql -h name -e "show status like 'wsrep_local_state_comment'" command to verify that the synchronization status of the three databases is Synced.
[root@node1 ~]# kubectl -n vcf-system exec pxc-node1-95444fdf-hhqnp -i -- timeout 5 mysql -umysql -pmysql -h pxc-node1-95444fdf-hhqnp -e "show status like 'wsrep_local_state_comment'"
…
wsrep_local_state_comment Synced
[root@node1 ~]# kubectl -n vcf-system exec pxc-node2-6f85c454c7-jz6xm -i -- timeout 5 mysql -umysql -pmysql -h pxc-node2-6f85c454c7-jz6xm -e "show status like 'wsrep_local_state_comment'"
…
wsrep_local_state_comment Synced
[root@node1 ~]# kubectl -n vcf-system exec pxc-node3-579c7bf9df-5tm2d -i -- timeout 5 mysql -umysql -pmysql -h pxc-node3-579c7bf9df-5tm2d -e "show status like 'wsrep_local_state_comment'"
…
wsrep_local_state_comment Synced
To upgrade the Matrix cluster:
1. Log in to the Matrix cluster. Click Deploy on the
top navigation bar and then select Cluster. Click
the ![]() button of the node to be upgraded and then
select Disable.
button of the node to be upgraded and then
select Disable.
2. Use the new version of the ISO installation image to upgrade the disabled Matrix node. For the upgrade procedure, see "Installing H3C Matrix." Do not change the IP address and user account during the upgrade.
3. Log in to the Matrix cluster. Click Deploy on the
top navigation bar and then select Cluster. Click
the ![]() button of the node and then select Repair. On the
dialogue box that opens, select Use
the existing node deployment file in the system for repairing, and then click Apply.
button of the node and then select Repair. On the
dialogue box that opens, select Use
the existing node deployment file in the system for repairing, and then click Apply.
4. Follow the same procedure to upgrade the other nodes.
Upgrading the super controller
1. Obtain the super controller installation package of the new version and save it locally.
2. Access H3C Matrix. Click Deploy on the top navigation bar and then select Application from the navigation pane.
3. Click Deploy application.
4. In the Deploy application area, click Upload. On the dialogue box that opens, select the local super controller installation package and then click Upload.
5. After the installation page of the new version is uploaded, select it and then click Next. The system starts resolving the installation package.
Figure 16 Selecting the new super controller installation package version
6. Select all components in the list and then click Next.
Figure 17 Selecting the applications
7. Click Next repeatedly to use the default configurations. Click Deploy to start deploying the super controller.
Figure 18 Deploying the super controller
After the deployment is complete, you can view the super controller information on the Application page.
Backing up and restoring the super controller configuration
You can back up and restore the super controller configuration on H3C Matrix. The configuration can be backed up to the local or remote server. Both manual and automatic backup is supported.
Backing up the configuration
1. Log in to H3C Matrix. Click Deploy on the top navigation bar and then select Backup & Recovery.
2. Back up the configurations of H3C Matrix and the applications.
¡ Manual backup
Click Start backup. The system starts backing up the configurations. It saves the backup file to the Linux system and the local directory. If remote backup is configured, the backup file will be simultaneously sent to the remote file server. The backup file name ends with M.zip.
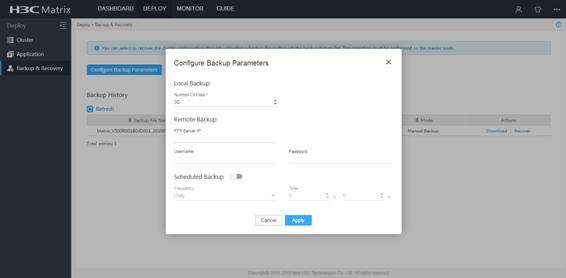
¡ Scheduled backup
Click Configure backup parameters. On the dialogue that opens, enable scheduled backup and set the backup frequency and time. Then click Apply. The system starts backing up the configurations. It saves the backup file to the Linux system at the specified time. If remote backup is configured, the backup file will be simultaneously sent to the remote file server. The backup file name ends with A.zip.
3. To download the backup file, click the download icon in the Operation column.
The system adds an entry in the Backup history area after a backup operation is complete. Each entry describes detailed information about the backup.
Figure 19 Backing up the configuration
Restoring the super controller configuration
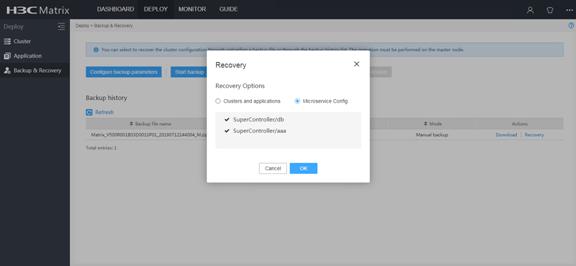
1. Log in to H3C Matrix. Click Deploy on the top navigation bar and then select Backup & Recovery.
2. Use either of the following methods to restore the super controller configuration.
¡ Uploading the backup file
- In the Backup / Recovery area, select the local backup file and then click Upload to upload the backup file.
- Click Recover. On the dialogue box that opens, select Microservice config and then click OK.
¡ Restoring the configurations in the Backup history area
- Click Recover in the Actions column for the entry.
- On the dialogue box that opens, select Microservice config and then click OK.
Figure 20 Restoring the configuration