- Table of Contents
- Related Documents
-
| Title | Size | Download |
|---|---|---|
| 03-FTP and TFTP Configuration | 131.15 KB |
Using the device as an FTP client
Establishing an FTP connection
Managing directories on the FTP server
Working with the files on the FTP server
Switching to another user account
Maintaining and troubleshooting the FTP connection
Terminating the FTP connection
FTP client configuration example
Displaying and maintaining FTP
Using the device as a TFTP client
Displaying and maintaining the TFTP client
TFTP client configuration example
File Transfer Protocol (FTP) is an application layer protocol based on the client/server model. It is used to transfer files from one host to another over a TCP/IP network.
FTP server uses TCP port 20 to transfer data and TCP port 21 to transfer control commands. For more information about FTP, see RFC 959.
FTP supports the following transfer modes:
· Binary mode—Used to transfer image files, such as.bin files.
· ASCII mode—Used to transfer text files, such as .txt, .bat, and .cfg files.
FTP can operate in either of the following modes:
· Active mode (PORT)—The FTP server initiates the TCP connection. This mode is not suitable when the FTP client is behind a firewall, for example, when the FTP client resides in a private network.
· Passive mode (PASV)—The FTP client initiates the TCP connection. This mode is not suitable when the server does not allow the client to use a random unprivileged port greater than 1024.
FTP operation mode varies depending on the FTP client program.
The device can act as the FTP client.
Figure 1 FTP application scenario

Using the device as an FTP client
To connect to an FTP server or enter FTP client view, make sure the following requirements are met:
· You have level-3 (Manage) user privileges on the device. In FTP client view, whether a directory or file management command can be successfully executed depends on the authorization set on the FTP server.
· The device and the FTP server can reach each other.
Establishing an FTP connection
Before you can access the FTP server, use the ftp command in user view or use the open command in FTP client view to establish a connection to the FTP server.
You can use the ftp client source command to specify a source IP address or source interface for the FTP packets sent by the device. If a source interface (typically, a loopback interface) is specified, its primary IP address is used as the source IP address for the FTP packets sent by the device. The source interface and source IP address settings overwrite each other.
The ftp client source command setting applies to all FTP sessions. When you set up an FTP session using the ftp or ftp ipv6 command, you can also specify a different source IP address for the FTP session.
|
|
IMPORTANT: To avoid FTP connection failures, when you specify a source interface for FTP packets, make sure the interface has been assigned a primary IP address. |
To establish an IPv4 FTP connection:
|
Step |
Command |
Remarks |
|
1. Enter system view. |
system-view |
N/A |
|
2. Specify a source IP address for outgoing FTP packets. |
ftp client source { interface interface-type interface-number | ip source-ip-address } |
Optional. By default, the primary IP address of the output interface is used as the source IP address. |
|
3. Return to user view. |
quit |
N/A |
|
4. Log in to the remote FTP server. |
·
(Approach 1) Log in to the
remote FTP server in user view: · (Approach 2) Log in to the remote FTP server in FTP client view: a. ftp b. open server-address [ service-port ] |
Use either approach. |
To establish an IPv6 FTP connection, perform one of the following tasks:
|
Task |
Command |
|
Log in to the remote FTP server from user view. |
ftp ipv6 [ server-address [ service-port ] [ source ipv6 source-ipv6-address ] [ -i interface-type interface-number ] ] |
|
Log in to the remote FTP server from FTP client view. |
1. ftp ipv6 2. open ipv6 server-address [ service-port ] [ -i interface-type interface-number ] |
Managing directories on the FTP server
After the device establishes a connection to an FTP server, you can create or delete folders in the authorized directory on the FTP server.
To manage the directories on the FTP server:
|
Task |
Command |
|
Display detailed information about a directory or file on the FTP server. |
dir [ remotefile [ localfile ] ] |
|
Query a directory or file on the FTP server. |
ls [ remotefile [ localfile ] ] |
|
Change the working directory on the FTP server. |
cd { directory | .. | / } |
|
Return to the upper level directory on the FTP server. |
cdup |
|
Display the working directory being accessed. |
pwd |
|
Create a directory on the remote FTP server. |
mkdir directory |
|
Remove the specified working directory on the FTP server. |
rmdir directory |
Working with the files on the FTP server
After you log in to the server, you can upload a file to or download a file from the authorized directory by following these steps:
1. Use the dir or ls command to display the directory and the location of the file on the FTP server.
2. Delete unused files to get more free storage space.
3. Set the file transfer mode. FTP transmits files in two modes: ASCII and binary. Use ASCII mode to transfer text files. Use binary mode to transfer image files.
4. Use the lcd command to display the local working directory of the FTP client. You can upload the file or save the downloaded file in this directory.
5. Upload or download the file.
To work with files on the FTP server:
|
Task |
Command |
Remarks |
|
Display detailed information about a directory or file on the FTP server. |
dir [ remotefile [ localfile ] ] |
The ls command displays the name of a directory or file only, while the dir command displays detailed information such as the file size and creation time. |
|
Query a directory or file on the FTP server. |
ls [ remotefile [ localfile ] ] |
The ls command displays the name of a directory or file only, while the dir command displays detailed information such as the file size and creation time. |
|
Delete the specified file on the FTP server permanently. |
delete remotefile |
N/A |
|
Set the file transfer mode to ASCII. |
ascii |
By default, ASCII mode is used. |
|
Set the file transfer mode to binary. |
binary |
By default, ASCII mode is used. |
|
Set the FTP operation mode to passive. |
passive |
By default, passive mode is used. |
|
Display the local working directory of the FTP client. |
lcd |
N/A |
|
Upload a file to the FTP server. |
put localfile [ remotefile ] |
N/A |
|
Download a file from the FTP server. |
get remotefile [ localfile ] |
N/A |
Switching to another user account
After you log in to the FTP server with one user account, you can switch to another user account to get a different privilege without reestablishing the FTP connection. You must correctly enter the new username and password. A wrong username or password can cause the FTP connection to disconnect.
To switch to another user account:
|
Task |
Command |
|
Change the username after FTP login. |
user username [ password ] |
Maintaining and troubleshooting the FTP connection
|
Task |
Command |
Remarks |
|
Display the help information of FTP-related commands on the FTP server. |
remotehelp [ protocol-command ] |
N/A |
|
Enable information display in a detailed manner. |
verbose |
By default, the function is enabled. |
|
Enable FTP related debugging when the device acts as the FTP client. |
debugging |
By default, the function is disabled. |
Terminating the FTP connection
To terminate your FTP connection, perform one of the following tasks:
|
Task |
Command |
Remarks |
|
Terminate the FTP connection without exiting FTP client view. |
· disconnect · close |
Use either command in FTP client view. |
|
Terminate the FTP connection and return to user view. |
· bye · quit |
Use either command in FTP client view. |
FTP client configuration example
Network requirements
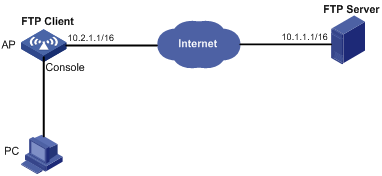
As shown in Figure 2, the AP acts as the FTP client. The AP and the FTP server can reach each other. An account with the username abc and password abc is already configured on the FTP server.
Log in to the FTP server from the FTP client and perform the following tasks:
· Download the system software image file wa2600a_fat.bin from the FTP server to the AP.
· Upload the configuration file startup.cfg from the AP to the FTP server for backup.
Configuration procedure
# Examine the storage space of the AP for insufficiency or impairment. If no sufficient free space is available, use the fixdisk command to fix the storage medium or use the delete/unreserved file-url command to delete unused files. (Details not shown.)
# Log in to the server by using the username abc and password abc.
<Sysname> ftp 10.1.1.1
Trying 10.1.1.1 ...
Connected to 10.1.1.1.
220 WFTPD 2.0 service (by Texas Imperial Software) ready for new user
User(10.1.1.1:(none)):abc
331 Give me your password, please
Password:
230 Logged in successfully
# Set the file transfer mode to binary.
[ftp] binary
200 Type set to I.
# Download the system software image file wa2600a_fat.bin.
[ftp] get wa2600a_fat.bin
227 Entering Passive Mode (10,1,1,1,4,1).
125 BINARY mode data connection already open, transfer starting for / wa2600a_fat.bin.
.....226 Transfer complete.
FTP: 5805100 byte(s) received in 19.898 second(s) 291.74K byte(s)/sec.
# Set the file transfer mode to ASCII, and upload the configuration file startup.cfg from the AP to the FTP server for backup.
[ftp] ascii
[ftp] put startup.cfg back-startup.cfg
227 Entering Passive Mode (10,1,1,1,4,2).
125 ASCII mode data connection already open, transfer starting for /startup.cfg.
226 Transfer complete.
FTP: 3494 byte(s) sent in 5.646 second(s), 618.00 byte(s)/sec.
[ftp] bye
# Specify wa2600a_fat.bin as the main system software image file for the next startup.
<Sysname> boot-loader file wa2600a_fat.bin main
|
|
IMPORTANT: The system software image file used for the next startup must be saved in the root directory of the storage medium. You can copy or move a file to the root directory. |
# Reboot the AP to upgrade the system software image.
<Sysname> reboot
Displaying and maintaining FTP
|
Task |
Command |
Remarks |
|
Display the source IP address configuration of the FTP client. |
display ftp client configuration [ | { begin | exclude | include } regular-expression ] |
Available in any view. |
Trivial File Transfer Protocol (TFTP) is a simplified version of FTP for file transfer over secure reliable networks. TFTP uses UDP port 69 for connection establishment and data transmission. In contrast to TCP-based FTP, TFTP requires no authentication or complex message exchanges, and is easier to deploy.
TFTP supports the following transfer modes:
· Binary mode—Used to transfer image files, such as .bin files.
· ASCII mode—Used to transfer text files, such as .txt, .bat, and .cfg files.
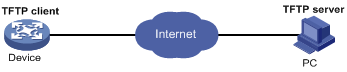
The device can operate only as a TFTP client (see Figure 3) to upload or download files.
Figure 3 TFTP application scenario
Prerequisites
Run a TFTP server program on the file host and set a TFTP working directory.
Configure IP addresses and routes to make sure the device and the TFTP server can reach each other.
Using the device as a TFTP client
The device provides the following modes for downloading a new file from a TFTP server:
· Normal download—The new file is written directly to Flash and overwrites the old file that has the same name as it. If file download is interrupted, both old and new files are lost.
· Secure download—The new file is downloaded to memory and will not be written to Flash until the whole file is obtained. A download failure does not affect the old file that has the same name as the old file.
To avoid undesired file loss, use the secure download mode. If you use the normal download mode because of insufficient memory, assign the new file a file name unique in Flash.
You can use the tftp client source command to specify a source IP address or source interface for the TFTP packets sent by the device. If a source interface (typically, a loopback interface) is specified, its primary IP address is used as the source IP address for the TFTP packets. The source interface and source IP address settings overwrite each other.
The tftp client source command setting applies to all TFTP sessions. When you set up a TFTP session with the tftp command, you can also specify a different source IP address for the TFTP session.
|
|
IMPORTANT: To avoid TFTP connection failures, when you specify a source interface for TFTP packets, make sure the interface has been assigned a primary IP address. |
To use the device as a TFTP client:
|
Step |
Command |
Remarks |
|
1. Enter system view. |
system-view |
N/A |
|
2. Use an ACL to control the client's access to TFTP servers. |
tftp-server [ ipv6 ] acl acl-number |
Optional. By default, no ACL is used for access control. |
|
3. Specify a source IP address for outgoing TFTP packets. |
tftp client source { interface interface-type interface-number | ip source-ip-address } |
Optional. By default, the primary IP address of the output interface is used as the source IP address. |
|
4. Return to user view. |
quit |
N/A |
|
5. Download or upload a file. |
·
For IPv4: ·
For IPv6: |
Optional. |
Displaying and maintaining the TFTP client
|
Task |
Command |
Remarks |
|
Display the source IP address configuration of the TFTP client. |
display tftp client configuration [ | { begin | exclude | include } regular-expression ] |
Available in any view. |
TFTP client configuration example
Network requirements
Configure the PC in Figure 4 as a TFTP server. Use TFTP to download the system software image file wa2600a_fat.bin from the PC to the AP and upload the configuration file startup.cfg from the AP to the PC for backup.

Configuration procedure
This configuration procedure assumes that the PC and the AP can reach each other.
1. Configure the PC (TFTP server):
¡ Enable the TFTP server. (Details not shown.)
¡ Configure a TFTP working directory. (Details not shown.)
2. Configure the AP (TFTP client):
# Examine the storage medium of the AP for insufficiency or impairment. If no sufficient free space is available, use the fixdisk command to fix the storage medium or use the delete/unreserved file-url command to delete unused files. (Details not shown.)
# Download system software image file wa2600a_fat.bin from the PC.
<Sysname> tftp 1.2.1.1 get wa2600a_fat.bin
# Upload a configuration file startup.cfg to the TFTP server.
<Sysname> tftp 1.2.1.1 put startup.cfg startupback.cfg
# Specify wa2600a_fat.bin as the main system software image file for the next startup.
<Sysname> boot-loader file wa2600a_fat.bin main
|
|
IMPORTANT: The system software image file used for the next startup must be saved in the root directory of the storage medium. You can copy or move a file to the root directory. |
# Reboot the AP to upgrade the system software image.
<Sysname> reboot