- Table of Contents
-
- 05-Layer 3 - IP Services Configuration Guide
- 00-Preface
- 01-ARP configuration
- 02-IP addressing configuration
- 03-DHCP configuration
- 04-DNS configuration
- 05-IP forwarding basics configuration
- 06-Fast forwarding configuration
- 07-Adjacency table configuration
- 08-IRDP configuration
- 09-IP performance optimization configuration
- 10-UDP Helper configuration
- 11-IPv6 basics configuration
- 12-DHCPv6 configuration
- 13-IPv6 fast forwarding configuration
- 14-Tunneling configuration
- 15-GRE configuration
- 16-HTTP redirect configuration
- Related Documents
-
| Title | Size | Download |
|---|---|---|
| 12-DHCPv6 configuration | 591.05 KB |
DHCPv6 address/prefix assignment
Rapid assignment involving two messages
Assignment involving four messages
IPv6 address/prefix allocation sequence·
Configuring IPv6 prefix assignment
Configuring IPv6 address assignment
Configuring network parameters assignment
Configuring network parameters in a DHCPv6 address pool
Configuring network parameters in a DHCPv6 option group
Configuring a DHCPv6 policy for IPv6 address and prefix assignment
Configuring the DHCPv6 server on an interface
Setting the DSCP value for DHCPv6 packets sent by the DHCPv6 server
Configuring DHCPv6 binding auto backup·
Advertising subnets assigned to clients·
Applying a DHCPv6 address pool to a VPN instance
Enabling the DHCPv6 server to advertise IPv6 prefixes
Configuring DHCPv6 flood attack protection
Enabling DHCPv6 logging on the DHCPv6 server
Displaying and maintaining the DHCPv6 server
DHCPv6 server configuration examples
Dynamic IPv6 prefix assignment configuration example
Dynamic IPv6 address assignment configuration example
Configuring the DHCPv6 relay agent
DHCPv6 relay agent configuration task list
Enabling the DHCPv6 relay agent on an interface
Specifying DHCPv6 servers on the relay agent
Specifying DHCP servers in a DHCPv6 relay address pool
Specifying a gateway address for DHCPv6 clients
Setting the DSCP value for DHCPv6 packets sent by the DHCPv6 relay agent
Specifying a padding mode for the Interface-ID option
Enabling the DHCPv6 relay agent to support Option 79
Enabling the DHCPv6 relay agent to advertise IPv6 prefixes
Specifying the source IPv6 address for relayed DHCPv6 requests
Enabling the DHCPv6 relay agent to record relay entries
Enabling IPv6 release notification
Enabling client offline detection
Configuring DHCPv6 flood attack protection
Discarding DHCPv6 requests that are delivered from VXLAN tunnels
Displaying and maintaining the DHCPv6 relay agent
DHCPv6 relay agent configuration example
DHCPv6 client configuration task list
Configuring IPv6 address acquisition·
Configuring IPv6 prefix acquisition
Configuring IPv6 address and prefix acquisition
Configuring the DHCPv6 client DUID
Setting the DSCP value for DHCPv6 packets sent by the DHCPv6 client
Displaying and maintaining DHCPv6 client
DHCPv6 client configuration examples
IPv6 address acquisition configuration example
IPv6 prefix acquisition configuration example
IPv6 address and prefix acquisition configuration example
Stateless DHCPv6 configuration example
Application of trusted and untrusted ports·
Implementation of Option 18 and Option 37
DHCPv6 snooping support for Option 37
DHCPv6 snooping configuration task list
Configuring basic DHCPv6 snooping features
Configuring basic DHCPv6 snooping features in a common network
Configuring basic DHCPv6 snooping features in a VXLAN network
Configuring Option 18 and Option 37
Configuring DHCPv6 snooping entry auto backup
Setting the maximum number of DHCPv6 snooping entries
Configuring DHCPv6 packet rate limit
Enabling DHCPv6-REQUEST check·
Configuring a DHCPv6 packet blocking port
Enabling DHCPv6 snooping logging
Displaying and maintaining DHCPv6 snooping
DHCPv6 snooping configuration example
Configuration restrictions and guidelines
DHCPv6 guard configuration task list
Configuring a DHCPv6 guard policy
Applying a DHCPv6 guard policy to an interface
Applying a DHCPv6 guard policy to a VLAN
Displaying and maintaining DHCPv6 guard
DHCPv6 guard configuration example
DHCPv6 overview
DHCPv6 address/prefix assignment
An address/prefix assignment process involves two or four messages.
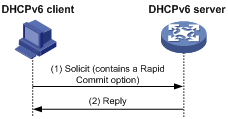
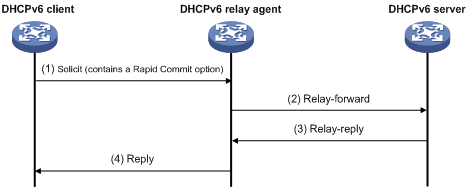
Rapid assignment involving two messages
As shown in Figure 1, rapid assignment operates in the following steps:
1. The DHCPv6 client sends to the DHCPv6 server a Solicit message that contains a Rapid Commit option to prefer rapid assignment.
2. If the DHCPv6 server supports rapid assignment, it responds with a Reply message containing the assigned IPv6 address/prefix and other configuration parameters. If the DHCPv6 server does not support rapid assignment, Assignment involving four messages is performed.
Figure 1 Rapid assignment involving two messages
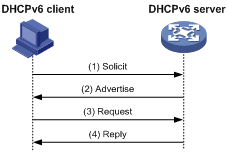
Assignment involving four messages
As shown in Figure 2, four-message assignment operates using the following steps:
1. The DHCPv6 client sends a Solicit message to request an IPv6 address/prefix and other configuration parameters.
2. The DHCPv6 server responds with an Advertise message that contains the assignable address/prefix and other configuration parameters if either of the following conditions exists:
¡ The Solicit message does not contain a Rapid Commit option.
¡ The DHCPv6 server does not support rapid assignment even though the Solicit message contains a Rapid Commit option.
3. The DHCPv6 client might receive multiple Advertise messages offered by different DHCPv6 servers. It selects an offer according to the receiving sequence and server priority, and sends a Request message to the selected server for confirmation.
4. The DHCPv6 server sends a Reply message to the client, confirming that the address/prefix and other configuration parameters are assigned to the client.
Figure 2 Assignment involving four messages
Address/prefix lease renewal
An IPv6 address/prefix assigned by a DHCPv6 server has a valid lifetime. After the valid lifetime expires, the DHCPv6 client cannot use the IPv6 address/prefix. To use the IPv6 address/prefix, the DHCPv6 client must renew the lease time.
Figure 3 Using the Renew message for address/prefix lease renewal
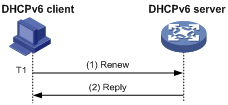
As shown in Figure 3, at T1, the DHCPv6 client sends a Renew message to the DHCPv6 server. The recommended value of T1 is half the preferred lifetime. The DHCPv6 server responds with a Reply message, informing the client whether the lease is renewed.
Figure 4 Using the Rebind message for address/prefix lease renewal
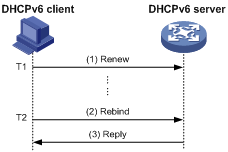
As shown in Figure 4:
· If the DHCPv6 client does not receive a response from the DHCPv6 server after sending a Renew message at T1, it multicasts a Rebind message to all DHCPv6 servers at T2. Typically, the value of T2 is 0.8 times the preferred lifetime.
· The DHCPv6 server responds with a Reply message, informing the client whether the lease is renewed.
· If the DHCPv6 client does not receive a response from any DHCPv6 server before the valid lifetime expires, the client stops using the address/prefix.
For more information about the valid lifetime and the preferred lifetime, see "Configuring basic IPv6 settings."
Stateless DHCPv6
Stateless DHCPv6 enables a device that has obtained an IPv6 address/prefix to get other configuration parameters from a DHCPv6 server.
The device performs stateless DHCPv6 if an RA message with the following flags is received from the router during stateless address autoconfiguration:
· The managed address configuration flag (M flag) is set to 0.
· The other stateful configuration flag (O flag) is set to 1.
For more information about stateless address autoconfiguration, see "Configuring basic IPv6 settings."
Figure 5 Stateless DHCPv6 operation
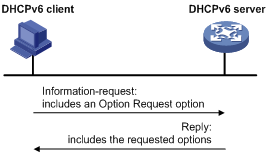
As shown in Figure 5, stateless DHCPv6 operates in the following steps:
1. The DHCPv6 client sends an Information-request message to the multicast address of all DHCPv6 servers and DHCPv6 relay agents. The Information-request message contains an Option Request option that specifies the requested configuration parameters.
2. The DHCPv6 server returns to the client a Reply message containing the requested configuration parameters.
3. The client checks the Reply message. If the obtained configuration parameters match those requested in the Information-request message, the client uses these parameters to complete configuration. If not, the client ignores the configuration parameters. If the client receives multiple replies with configuration parameters matching those requested in the Information-request message, it uses the first received reply.
Protocols and standards
· RFC 3736, Stateless Dynamic Host Configuration Protocol (DHCP) Service for IPv6
· RFC 3315, Dynamic Host Configuration Protocol for IPv6 (DHCPv6)
· RFC 2462, IPv6 Stateless Address Autoconfiguration
· RFC 3633, IPv6 Prefix Options for Dynamic Host Configuration Protocol (DHCP) version 6
· RFC 6939, Client Link-Layer Address Option in DHCPv6
Configuring the DHCPv6 server
Overview
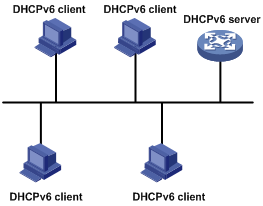
IPv6 address assignment
As shown in Figure 6, the DHCPv6 server assigns IPv6 addresses, domain name suffixes, DNS server addresses, and other configuration parameters to DHCPv6 clients.
The IPv6 addresses assigned to the clients include the following types:
· Temporary IPv6 addresses—Frequently changed without lease renewal.
· Non-temporary IPv6 addresses—Correctly used by DHCP clients, with lease renewal.
Figure 6 IPv6 address assignment
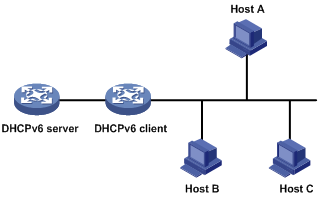
IPv6 prefix assignment
As shown in Figure 7, the DHCPv6 server assigns an IPv6 prefix to the DHCPv6 client. The client advertises the prefix information in a multicast RA message so that hosts on the subnet can automatically configure their IPv6 addresses by using the prefix.
Figure 7 IPv6 prefix assignment
Concepts
Multicast addresses used by DHCPv6
DHCPv6 uses the multicast address FF05::1:3 to identify all site-local DHCPv6 servers. It uses the multicast address FF02::1:2 to identify all link-local DHCPv6 servers and relay agents.
DUID
A DHCP unique identifier (DUID) uniquely identifies a DHCPv6 device (DHCPv6 client, server, or relay agent). A DHCPv6 device adds its DUID in a sent packet.
Figure 8 DUID-LL format
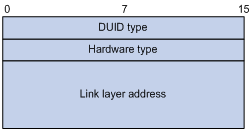
The device supports the DUID format based on link-layer address (DUID-LL) defined in RFC 3315. Figure 8 shows the DUID-LL format, which includes the following fields:
· DUID type—The device supports the DUID type of DUID-LL with the value of 0x0003.
· Hardware type—The device supports the hardware type of Ethernet with the value of 0x0001.
· Link layer address—Takes the value of the bridge MAC address of the device.
IA
Identified by an IAID, an identity association (IA) provides a construct through which a client manages the obtained addresses, prefixes, and other configuration parameters. A client can have multiple IAs, for example, one for each of its interfaces.
IAID
An IAID uniquely identifies an IA. It is chosen by the client and must be unique on the client.
PD
The DHCPv6 server creates a prefix delegation (PD) for each assigned prefix to record the following details:
· IPv6 prefix.
· Client DUID.
· IAID.
· Valid lifetime.
· Preferred lifetime.
· Lease expiration time.
· IPv6 address of the requesting client.
DHCPv6 address pool
The DHCP server selects IPv6 addresses, IPv6 prefixes, and other parameters from an address pool, and assigns them to the DHCP clients.
Address allocation mechanisms
DHCPv6 supports the following address allocation mechanisms:
· Static address allocation—To implement static address allocation for a client, create a DHCPv6 address pool, and manually bind the DUID and IAID of the client to an IPv6 address in the DHCPv6 address pool. When the client requests an IPv6 address, the DHCPv6 server assigns the IPv6 address in the static binding to the client.
· Dynamic address allocation—To implement dynamic address allocation for clients, create a DHCPv6 address pool, specify a subnet for the pool, and divide the subnet into temporary and non-temporary IPv6 address ranges. Upon receiving a DHCP request, the DHCPv6 server selects an IPv6 address from the temporary or non-temporary IPv6 address range based on the address type in the client request.
Prefix allocation mechanisms
DHCPv6 supports the following prefix allocation mechanisms:
· Static prefix allocation—To implement static prefix allocation for a client, create a DHCPv6 address pool, and manually bind the DUID and IAID of the client to an IPv6 prefix in the DHCPv6 address pool. When the client requests an IPv6 prefix, the DHCPv6 server assigns the IPv6 prefix in the static binding to the client.
· Dynamic prefix allocation—To implement dynamic prefix allocation for clients, create a DHCPv6 address pool and a prefix pool, specify a subnet for the address pool, and apply the prefix pool to the address pool. Upon receiving a DHCP request, the DHCPv6 server dynamically selects an IPv6 prefix from the prefix pool in the address pool.
Address pool selection
The DHCPv6 server observes the following principles when selecting an IPv6 address or prefix for a client:
1. If there is an address pool where an IPv6 address is statically bound to the DUID or IAID of the client, the DHCPv6 server selects this address pool. It assigns the statically bound IPv6 address or prefix and other configuration parameters to the client.
2. If the receiving interface has an address pool applied, the DHCP server selects an IPv6 address or prefix and other configuration parameters from this address pool.
3. If no static address pool is configured and no address pool is applied to the receiving interface, the DHCPv6 server selects an address pool depending on the client location.
¡ Client on the same subnet as the server—The DHCPv6 server compares the IPv6 address of the receiving interface with the subnets of all address pools. It selects the address pool with the longest-matching subnet.
¡ Client on a different subnet than the server—The DHCPv6 server compares the IPv6 address of the DHCPv6 relay agent interface closest to the client with the subnets of all address pools. It also selects the address pool with the longest-matching subnet.
To make sure IPv6 address allocation functions correctly, keep the subnet used for dynamic assignment consistent with the subnet where the interface of the DHCPv6 server or DHCPv6 relay agent resides.
IPv6 address/prefix allocation sequence
The DHCPv6 server selects an IPv6 address/prefix for a client in the following sequence:
1. IPv6 address/prefix statically bound to the client's DUID and IAID and expected by the client.
2. IPv6 address/prefix statically bound to the client's DUID and IAID.
3. IPv6 address/prefix statically bound to the client's DUID and expected by the client.
4. IPv6 address/prefix statically bound to the client's DUID.
5. IPv6 address/prefix that was ever assigned to the client.
6. EUI-64 IPv6 address generated based on the client MAC address if EUI-64 address allocation is enabled.
7. Assignable IPv6 address/prefix in the address pool/prefix pool expected by the client.
8. Assignable IPv6 address/prefix in the address pool/prefix pool.
9. IPv6 address/prefix that was a conflict or passed its lease duration. If no IPv6 address/prefix is assignable, the server does not respond.
If a client moves to another subnet, the DHCPv6 server selects an IPv6 address/prefix from the address pool that matches the new subnet.
Conflicted IPv6 addresses can be assigned to other DHCPv6 clients only after the addresses are in conflict for one hour.
Configuration task list
|
Tasks at a glance |
|
(Optional.) Perform the following tasks: · Configuring IPv6 prefix assignment · Configuring IPv6 address assignment · Configuring network parameters assignment · Configuring a DHCPv6 policy for IPv6 address and prefix assignment |
|
(Required.) Configuring the DHCPv6 server on an interface |
|
(Optional.) Setting the DSCP value for DHCPv6 packets sent by the DHCPv6 server |
|
(Optional.) Configuring DHCPv6 binding auto backup |
|
(Optional.) Advertising subnets assigned to clients |
|
(Optional.) Applying a DHCPv6 address pool to a VPN instance |
|
(Optional.) Enabling the DHCPv6 server to advertise IPv6 prefixes |
|
(Optional.) Configuring DHCPv6 flood attack protection |
|
(Optional.) Enabling DHCPv6 logging on the DHCPv6 server |
Configuring IPv6 prefix assignment
Use the following methods to configure IPv6 prefix assignment:
· Configure a static IPv6 prefix binding in an address pool—If you bind a DUID and an IAID to an IPv6 prefix, the DUID and IAID in a request must match those in the binding before the DHCPv6 server can assign the IPv6 prefix to the DHCPv6 client. If you only bind a DUID to an IPv6 prefix, the DUID in the request must match the DUID in the binding before the DHCPv6 server can assign the IPv6 prefix to the DHCPv6 client.
· Apply a prefix pool to an address pool—The DHCPv6 server dynamically assigns an IPv6 prefix from the prefix pool in the address pool to a DHCPv6 client.
Configuration guidelines
· An IPv6 prefix can be bound to only one DHCPv6 client. You cannot modify bindings that have been created. To change the binding for a DHCPv6 client, you must delete the existing binding first.
· Only one prefix pool can be applied to an address pool. You cannot modify prefix pools that have been applied. To change the prefix pool for an address pool, you must remove the prefix pool application first.
· You can apply a prefix pool that has not been created to an address pool. The setting takes effect after the prefix pool is created.
Configuration procedure
To configure IPv6 prefix assignment:
|
Step |
Command |
Remarks |
|
1. Enter system view. |
system-view |
N/A |
|
2. (Optional.) Specify the IPv6 prefixes excluded from dynamic assignment. |
ipv6 dhcp server forbidden-prefix start-prefix/prefix-len [ end-prefix/prefix-len ] [ vpn-instance vpn-instance-name ] |
By default, no IPv6 prefixes in the prefix pool are excluded from dynamic assignment. If the excluded IPv6 prefix is in a static binding, the prefix still can be assigned to the client. To exclude multiple IPv6 prefix ranges, repeat this step. |
|
3. Create a prefix pool. |
ipv6 dhcp prefix-pool prefix-pool-number prefix { prefix-number | prefix/prefix-len } assign-len assign-len [ vpn-instance vpn-instance-name ] |
This step is required for dynamic prefix assignment. By default, no prefix pools exist. If you specify an IPv6 prefix by its ID, make sure the IPv6 prefix is in effect. Otherwise, the configuration does not take effect. |
|
4. Create a DHCPv6 address pool and enter its view. |
ipv6 dhcp pool pool-name |
By default, no DHCPv6 address pools exist. |
|
5. Specify an IPv6 subnet for dynamic assignment. |
network { prefix/prefix-length | prefix prefix-number [ sub-prefix/sub-prefix-length ] } [ preferred-lifetime preferred-lifetime valid-lifetime valid-lifetime ] |
By default, no IPv6 subnet is specified for dynamic assignment. The IPv6 subnets cannot be the same in different address pools. If you specify an IPv6 prefix by its ID, make sure the IPv6 prefix is in effect. Otherwise, the configuration does not take effect. |
|
6. Configure static prefix assignment, dynamic prefix assignment, or both. |
· Configure a static prefix binding: · Apply the prefix pool to the address
pool: |
By default, static or dynamic prefix assignment is not configured for an address pool. To add multiple static IPv6 prefix bindings, use the static-bind prefix command multiple times. |
Configuring IPv6 address assignment
Use one of the following methods to configure IPv6 address assignment:
· Configure a static IPv6 address binding in an address pool.
If you bind a DUID and an IAID to an IPv6 address, the DUID and IAID in a request must match those in the binding before the DHCPv6 server can assign the IPv6 address to the requesting client. If you only bind a DUID to an IPv6 address, the DUID in a request must match the DUID in the binding before the DHCPv6 server can assign the IPv6 address to the requesting client.
· Specify a subnet and address ranges in an address pool.
¡ Non-temporary address assignment—The server selects addresses from the non-temporary address range specified by the address range command. If no non-temporary address range is specified, the server selects addresses on the subnet specified by the network command.
¡ Temporary address assignment—The server selects addresses from the temporary address range specified by the temporary address range command. If no temporary address range is specified in the address pool, the DHCPv6 server cannot assign temporary addresses to clients.
Configuration guidelines
· You can specify only one non-temporary address range and one temporary address range in an address pool.
· The address ranges specified by the address range and temporary address range commands must be on the subnet specified by the network command. Otherwise, the addresses are unassignable.
· An IPv6 address can be bound to only one DHCPv6 client. You cannot modify bindings that have been created. To change the binding for a DHCPv6 client, you must delete the existing binding first.
· Only one subnet can be specified in an address pool. If you use the network command multiple times in a DHCPv6 address pool, the most recent configuration takes effect. If you use this command to specify only new lifetimes, the settings do not affect existing leases. The IPv6 addresses assigned after the modification will use the new lifetimes.
Configuration procedure
To configure IPv6 address assignment:
|
Step |
Command |
Remarks |
|
1. Enter system view. |
system-view |
N/A |
|
2. (Optional.) Specify the IPv6 addresses excluded from dynamic assignment. |
ipv6 dhcp server forbidden-address start-ipv6-address [ end-ipv6-address ] [ vpn-instance vpn-instance-name ] |
By default, all IPv6 addresses except for the DHCPv6 server's IP address in a DHCPv6 address pool are assignable. If the excluded IPv6 address is in a static binding, the address still can be assigned to the client. To exclude multiple IPv6 prefix ranges, repeat this step. |
|
3. Create a DHCPv6 address pool and enter its view. |
ipv6 dhcp pool pool-name |
By default, no DHCPv6 address pools exist. |
|
4. Specify an IPv6 subnet for dynamic assignment. |
network { prefix/prefix-length | prefix prefix-number [ sub-prefix/sub-prefix-length ] } [ preferred-lifetime preferred-lifetime valid-lifetime valid-lifetime ] |
By default, no IPv6 address subnet is specified. The IPv6 subnets cannot be the same in different address pools. If you specify an IPv6 prefix by its ID, make sure the IPv6 prefix is in effect. Otherwise, the configuration does not take effect. |
|
5. (Optional.) Specify a non-temporary IPv6 address range. |
address range start-ipv6-address end-ipv6-address [ preferred-lifetime preferred-lifetime valid-lifetime valid-lifetime ] |
By default, no non-temporary IPv6 address range is specified, and all unicast addresses on the subnet are assignable. |
|
6. (Optional.) Specify a temporary IPv6 address range. |
temporary address range start-ipv6-address end-ipv6-address [ preferred-lifetime preferred-lifetime valid-lifetime valid-lifetime ] |
By default, no temporary IPv6 address range is specified, and the DHCPv6 server cannot assign temporary IPv6 addresses. |
|
7. (Optional.) Enable EUI-64 address allocation mode. |
address-alloc-mode eui-64 |
By default, EUI-64 address allocation mode is disabled. This feature enables the DHCPv6 server to obtain the client MAC address in the DHCP request and generates an EUI-64 IPv6 address to assign to the client. |
|
8. \(Optional.) Create a static binding. |
static-bind address ipv6-address/addr-prefix-length | duid duid [ iaid iaid ] [ preferred-lifetime preferred-lifetime valid-lifetime valid-lifetime ] |
By default, no static binding is configured. To add more static bindings, repeat this step. |
Configuring network parameters assignment
In addition to IPv6 prefixes and IPv6 addresses, you can configure up to eight DNS server addresses, one domain name, eight SIP server addresses, and eight SIP server domain names in an address pool.
You can configure network parameters on a DHCPv6 server by using one of the following methods:
· Configure network parameters in a DHCPv6 address pool.
· Configure network parameters in a DHCPv6 option group, and reference the option group in a DHCPv6 address pool.
Network parameters configured in a DHCPv6 address pool take precedence over those configured in a DHCPv6 option group.
Configuring network parameters in a DHCPv6 address pool
|
Step |
Command |
Remarks |
|
1. Enter system view. |
system-view |
N/A |
|
2. Create a DHCPv6 address pool and enter its view. |
ipv6 dhcp pool pool-name |
By default, no DHCPv6 address pools exist. |
|
3. Specify an IPv6 subnet for dynamic assignment. |
network { prefix/prefix-length | prefix prefix-number [ sub-prefix/sub-prefix-length ] } [ preferred-lifetime preferred-lifetime valid-lifetime valid-lifetime ] |
By default, no IPv6 subnet is specified. The IPv6 subnets cannot be the same in different address pools. If you specify an IPv6 prefix by its ID, make sure the IPv6 prefix is in effect. Otherwise, the configuration does not take effect. |
|
4. (Optional.) Specify a DNS server address. |
dns-server ipv6-address |
By default, no DNS server address is specified. |
|
5. (Optional.) Specify a domain name. |
domain-name domain-name |
By default, no domain name is specified. |
|
6. (Optional.) Specify a SIP server address or domain name. |
sip-server { address ipv6-address | domain-name domain-name } |
By default, no SIP server address or domain name is specified. |
|
7. (Optional.) Configure a self-defined DHCPv6 option. |
option code hex hex-string |
By default, no self-defined DHCPv6 option is configured. |
Configuring network parameters in a DHCPv6 option group
A DHCPv6 option group can be created by using the following methods:
· Create a static DHCPv6 option group by using the ipv6 dhcp option-group command. The static DHCPv6 option group takes precedence over the dynamic DHCPv6 option group.
· When the device acts as a DHCPv6 client, it automatically creates a dynamic DHCPv6 option group for saving the obtained parameters. For more information about creating a dynamic DHCPv6 option group, see "Configuring the DHCPv6 client."
To create a static DHCPv6 option group:
|
Step |
Command |
Remarks |
|
1. Enter system view. |
system-view |
N/A |
|
2. Create a static DHCPv6 option group and enter its view. |
ipv6 dhcp option-group option-group-number |
By default, no static DHCPv6 option groups exist. |
|
3. (Optional.) Specify a DNS server address. |
dns-server ipv6-address |
By default, no DNS server address is specified. |
|
4. (Optional.) Specify a domain name suffix. |
domain-name domain-name |
By default, no domain name suffix is specified. |
|
5. (Optional.) Specify a SIP server address or domain name. |
sip-server { address ipv6-address | domain-name domain-name } |
By default, no SIP server address or domain name is specified. |
|
6. (Optional.) Configure a self-defined DHCPv6 option. |
option code hex hex-string |
By default, no self-defined DHCPv6 option is configured. |
|
7. Return to system view. |
quit |
N/A |
|
8. Create a DHCPv6 address pool and enter its view. |
ipv6 dhcp pool pool-name |
By default, no DHCPv6 address pools exist. |
|
9. Specify a DHCPv6 option group. |
option-group option-group-number |
By default, no DHCPv6 option group is specified. |
Configuring a DHCPv6 policy for IPv6 address and prefix assignment
In a DHCPv6 policy, each DHCPv6 user class has a bound DHCPv6 address pool. Clients matching different user classes obtain IPv6 addresses, IPv6 prefixes, and other parameters from different address pools. The DHCPv6 policy must be applied to the interface that acts as the DHCPv6 server. When receiving a DHCPv6 request, the DHCPv6 server compares the packet against the user classes in the order that they are configured.
If a match is found and the bound address pool has assignable IPv6 addresses or prefixes, the server uses the address pool for assignment. If the bound address pool does not have assignable IPv6 addresses or prefixes, the assignment fails.
If no match is found, the server uses the default DHCPv6 address pool for assignment. If no default address pool is specified or the default address pool does not have assignable IPv6 addresses or prefixes, the assignment fails.
For successful assignment, make sure the applied DHCPv6 policy and the bound address pools exist.
A match rule cannot match an option added by the DHCPv6 relay agent, for example, Option 18 or Option 37.
To configure a DHCPv6 policy for IPv6 address and prefix assignment:
|
Step |
Command |
Remarks |
|
1. Enter system view. |
system-view |
N/A |
|
2. Create a DHCPv6 user class and enter DHCPv6 user class view. |
ipv6 dhcp class class-name |
By default, no DHCPv6 user classes exist. |
|
3. Configure a match rule for the DHCPv6 user class. |
if-match rule rule-number { option option-code [ ascii ascii-string [ offset offset | partial ] | hex hex-string [ mask mask | offset offset length length | partial ] ] | relay-agent gateway-ipv6-address } |
By default, no match rule is configured for a DHCPv6 user class. |
|
4. Return to system view. |
quit |
N/A |
|
5. Create a DHCPv6 policy and enter DHCPv6 policy view. |
ipv6 dhcp policy policy-name |
By default, no DHCPv6 policies exist. |
|
6. Specify a DHCPv6 address pool for a DHCPv6 user class. |
class class-name pool pool-name |
By default, no address pool is specified for a user class. |
|
7. Specify the default DHCPv6 address pool. |
default pool pool-name |
By default, no default address pool is specified. |
|
8. Return to system view. |
quit |
N/A |
|
9. Enter interface view. |
interface interface-type interface-number |
N/A |
|
10. Apply the DHCPv6 policy to the interface. |
ipv6 dhcp apply-policy policy-name |
By default, no DHCPv6 policy is applied to an interface. |
Configuring the DHCPv6 server on an interface
Enable the DHCP server and configure one of the following address/prefix assignment methods on an interface:
· Apply an address pool on the interface—The DHCPv6 server selects an IPv6 address/prefix from the applied address pool for a requesting client. If there is no assignable IPv6 address/prefix in the address pool, the DHCPv6 server cannot to assign an IPv6 address/prefix to a client.
· Configure global address assignment on the interface—The DHCPv6 server selects an IPv6 address/prefix in the global DHCPv6 address pool that matches the server interface address or the DHCPv6 relay agent address for a requesting client.
If you configure both methods on an interface, the DHCPv6 server uses the specified address pool for address assignment without performing global address assignment.
Configuration guidelines
· An interface cannot act as a DHCPv6 server and DHCPv6 relay agent at the same time.
· Do not enable DHCPv6 server and DHCPv6 client on the same interface.
· If you use the ipv6 dhcp server command multiple times, the most recent configuration takes effect.
· You can apply an address pool that has not been created to an interface. The setting takes effect after the address pool is created.
· Only one address pool can be applied to an interface. If you use the ipv6 dhcp server apply pool command multiple times, the most recent configuration takes effect.
Configuration procedure
To configure the DHCPv6 server on an interface:
|
Step |
Command |
Remarks |
|
1. Enter system view. |
system-view |
N/A |
|
2. Enter interface view. |
interface interface-type interface-number |
N/A |
|
3. Enable the DHCPv6 server on the interface. |
ipv6 dhcp select server |
By default, the interface discards DHCPv6 packets from DHCPv6 clients. |
|
4. Configure an address/prefix assignment method. |
· Configure global address assignment: · Apply a DHCPv6 address pool to the
interface: |
By default, desired address/prefix assignment and rapid assignment are disabled, and the default preference is 0. |
Setting the DSCP value for DHCPv6 packets sent by the DHCPv6 server
The DSCP value of a packet specifies the priority level of the packet and affects the transmission priority of the packet.
To set the DSCP value for DHCPv6 packets sent by the DHCPv6 server:
|
Step |
Command |
Remarks |
|
1. Enter system view. |
system-view |
N/A |
|
2. Set the DSCP value for DHCPv6 packets sent by the DHCPv6 server. |
ipv6 dhcp dscp dscp-value |
By default, the DSCP value in DHCPv6 packets sent by the DHCPv6 server is 56. |
Configuring DHCPv6 binding auto backup
The auto backup feature saves DHCPv6 bindings to a backup file, and allows the DHCPv6 server to download the bindings from the backup file at the server reboot. The bindings include the lease bindings and conflicted IPv6 addresses. They cannot survive a reboot on the DHCPv6 server.
The DHCPv6 server does not provide services during the download process. If a connection error occurs during the process and cannot be repaired in a short amount of time, you can terminate the download operation. Manual interruption allows the DHCPv6 server to provide services without waiting for the connection to be repaired.
To configure DHCPv6 binding auto backup:
|
Step |
Command |
Remarks |
|
1. Enter system view. |
system-view |
N/A |
|
2. Configure the DHCPv6 server to back up the bindings to a file. |
ipv6 dhcp server database filename { filename | url url [ username username [ password { cipher | simple } string ] ] } |
By default, the DHCPv6 server does not back up the DHCPv6 bindings. With this command executed, the DHCPv6 server backs up its bindings immediately and runs auto backup. |
|
3. (Optional.) Manually save the DHCPv6 bindings to the backup file. |
ipv6 dhcp server database update now |
N/A |
|
4. (Optional.) Set the waiting time after a DHCPv6 binding change for the DHCPv6 server to update the backup file. |
ipv6 dhcp server database update interval interval |
The default waiting time is 300 seconds. If no DHCPv6 binding changes, the backup file is not updated. |
|
5. (Optional.) Terminate the download of DHCPv6 bindings from the backup file. |
ipv6 dhcp server database update stop |
N/A |
Advertising subnets assigned to clients
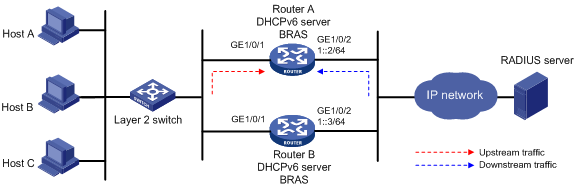
As shown in Figure 9, Router A and Router B act as both the DHCPv6 server and the BRAS device. The BRAS devices send accounting packets to the RADIUS server. To enable the BRAS devices to collect correct accounting information for each RADIUS user, configure the DHCPv6 server to advertise subnets assigned to clients. The upstream and downstream traffic of a RADIUS user will pass through the same BRAS device.
If the DHCPv6 address pool is applied to a VPN instance, the VPN instance must exist.
To configure the subnet advertisement feature:
|
Step |
Command |
Remarks |
|
1. Enter system view. |
system-view |
N/A |
|
2. Create an address pool and enter its view. |
ipv6 dhcp pool pool-name |
By default, no DHCPv6 address pools exist. |
|
3. Advertise the subnet assigned to DHCPv6 clients. |
network { prefix/prefix-length | prefix prefix-number [ sub-prefix/sub-prefix-length ] } [ preferred-lifetime preferred-lifetime valid-lifetime valid-lifetime ] export-route |
By default, the subnet assigned to DHCPv6 clients is not advertised. |
Applying a DHCPv6 address pool to a VPN instance
If a DHCPv6 address pool is applied to a VPN instance, the DHCPv6 server assigns IPv6 addresses in this address pool to clients in the VPN instance. Addresses in this address pool will not be assigned to clients on the public network.
The DHCPv6 server can obtain the VPN instance to which a DHCPv6 client belongs from the following information:
· The client's VPN information stored in authentication modules.
· The VPN information of the DHCPv6 server's interface that receives DHCPv6 packets from the client.
The VPN information from authentication modules takes priority over the VPN information of the receiving interface.
To apply a DHCPv6 address pool to a VPN instance:
|
Step |
Command |
Remarks |
|
1. Enter system view. |
system-view |
N/A |
|
2. Create an address pool and enter its view. |
ipv6 dhcp pool pool-name |
By default, no DHCPv6 address pools exist. |
|
3. Apply the address pool to a VPN instance. |
vpn-instance vpn-instance-name |
By default, the address pool is not applied to any VPN instance. |
Enabling the DHCPv6 server to advertise IPv6 prefixes
A DHCPv6 client can obtain an IPv6 prefix through DHCPv6 and use the IPv6 prefix for IPv6 address assignment in a downstream network. If the IPv6 prefix is in a different subnet than the IPv6 address of the DHCPv6 client's upstream interface, the downstream network cannot access the external network. If the DHCPv6 server is on the same link as the DHCPv6 client, enable the DHCPv6 server to advertise the IPv6 prefix.
To enable the DHCPv6 server to advertise IPv6 prefixes:
|
Step |
Command |
Remarks |
|
1. Enter system view. |
system-view |
N/A |
|
2. Enable the DHCPv6 server to advertise IPv6 prefixes. |
ipv6 dhcp advertise pd-route |
By default, the DHCPv6 server does not advertise IPv6 prefixes. |
Configuring DHCPv6 flood attack protection
The DHCPv6 flood attack protection enables the DHCPv6 server to detect DHCPv6 flood attacks according to the DHCPv6 packet rate threshold on a per-MAC basis.
When the DHCPv6 server receives a DHCPv6 packet from a client (MAC address), it creates a DHCPv6 flood attack entry in check state. If the number of DHCPv6 packets from the same MAC address reaches the upper limit in the detection duration, the server determines that the client is launching a DHCPv6 flood attack. The DHCPv6 flood attack entry changes to the restrain state, and the DHCPv6 server discards the DHCPv6 packets from that client. When the aging time of the entry is reached, the DHCPv6 server deletes the entry. If a DHCPv6 packet from the MAC address arrives later, the DHCPv6 server will create a flood attack entry and count the number of incoming DHCP packets for that client again.
This feature is available only in VXLAN networks. For more information about VXLANs, see VXLAN Configuration Guide.
To configure DHCPv6 flood attack protection:
|
Step |
Command |
Remarks |
|
1. Enter system view. |
system-view |
N/A |
|
2. (Optional.) Set the DHCPv6 packet rate threshold for DHCPv6 flood attack detection. |
ipv6 dhcp flood-protection threshold packet-number milliseconds |
By default, the device allows a maximum of 6 DHCPv6 packets per 5000 milliseconds from each DHCPv6 client. |
|
3. (Optional.) Set the DHCP flood attack entry aging time. |
ipv6 dhcp flood-protection aging-time time |
The default setting is 300 seconds. |
|
4. Enter VSI view. |
vsi vsi-name |
N/A |
|
5. Enable DHCPv6 flood attack protection. |
ipv6 dhcp flood-protection enable |
By default, DHCPv6 flood attack protection is disabled. |
Enabling DHCPv6 logging on the DHCPv6 server
The DHCPv6 logging feature enables the DHCPv6 server to generate DHCPv6 logs and send them to the information center. For information about the log destination and output rule configuration in the information center, see Network Management and Monitoring Configuration Guide.
As a best practice, disable this feature if the log generation affects the device performance or reduces the address and prefix allocation efficiency. For example, this situation might occur when a large number of clients frequently come online or go offline.
To configure DHCPv6 logging on the DHCPv6 server:
|
Step |
Command |
Remarks |
|
1. Enter system view. |
system-view |
N/A |
|
2. Enable DHCPv6 logging. |
ipv6 dhcp log enable |
By default, DHCPv6 logging is disabled. |
Displaying and maintaining the DHCPv6 server
Execute display commands in any view and reset commands in user view.
|
Task |
Command |
|
Display the DUID of the local device. |
display ipv6 dhcp duid |
|
Display information about a DHCPv6 option group. |
display ipv6 dhcp option-group [ option-group-number ] |
|
Display DHCPv6 address pool information. |
display ipv6 dhcp pool [ pool-name | vpn-instance vpn-instance-name ] |
|
Display prefix pool information. |
display ipv6 dhcp prefix-pool [ prefix-pool-number ] [ vpn-instance vpn-instance-name ] |
|
Display DHCPv6 server information on an interface. |
display ipv6 dhcp server [ interface interface-type interface-number ] |
|
Display information about IPv6 address conflicts. |
display ipv6 dhcp server conflict [ address ipv6-address ] [ vpn-instance vpn-instance-name ] |
|
Display information about DHCPv6 binding auto backup |
display ipv6 dhcp server database |
|
Display information about expired IPv6 addresses. |
display ipv6 dhcp server expired [ [ address ipv6-address ] [ vpn-instance vpn-instance-name ] | pool pool-name ] |
|
Display information about IPv6 address bindings. |
display ipv6 dhcp server ip-in-use [ [ address ipv6-address ] [ vpn-instance vpn-instance-name ] | pool pool-name ] |
|
Display information about IPv6 prefix bindings. |
display ipv6 dhcp server pd-in-use [ pool pool-name | [ prefix prefix/prefix-len ] [ vpn-instance vpn-instance-name ] ] |
|
Display packet statistics on the DHCPv6 server. |
display ipv6 dhcp server statistics [ pool pool-name | vpn-instance vpn-instance-name ] |
|
Clear information about IPv6 address conflicts. |
reset ipv6 dhcp server conflict [ address ipv6-address ] [ vpn-instance vpn-instance-name ] |
|
Clear information about expired IPv6 address bindings. |
reset ipv6 dhcp server expired [ [ address ipv6-address ] [ vpn-instance vpn-instance-name ] | pool pool-name ] |
|
Clear information about IPv6 address bindings. |
reset ipv6 dhcp server ip-in-use [ [ address ipv6-address ] [ vpn-instance vpn-instance-name ] | pool pool-name ] |
|
Clear information about IPv6 prefix bindings. |
reset ipv6 dhcp server pd-in-use [ pool pool-name | [ prefix prefix/prefix-len ] [ vpn-instance vpn-instance-name ] ] |
|
Clear packets statistics on the DHCPv6 server. |
reset ipv6 dhcp server statistics [ vpn-instance vpn-instance-name ] |
DHCPv6 server configuration examples
Dynamic IPv6 prefix assignment configuration example
Network requirements
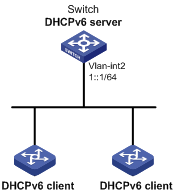
As shown in Figure 10, the switch acts as a DHCPv6 server to assign an IPv6 prefix, a DNS server address, a domain name, a SIP server address, and a SIP server name to each DHCPv6 client.
The switch assigns prefix 2001:0410:0201::/48 to the client whose DUID is 00030001CA0006A40000, and assigns prefixes in the range of 2001:0410::/48 to 2001:0410:FFFF::/48 (excluding 2001:0410:0201::/48) to other clients. The DNS server address is 2::2:3. The DHCPv6 clients reside in the domain aaa.com. The SIP server address is 2:2::4, and the SIP server name is bbb.com.
Configuration procedure
# Specify an IPv6 address for VLAN-interface 2.
<Switch> system-view
[Switch] interface vlan-interface 2
[Switch-Vlan-interface2] ipv6 address 1::1/64
# Disable RA message suppression on VLAN-interface 2.
[Switch-Vlan-interface2] undo ipv6 nd ra halt
# Set the M flag to 1 in RA advertisements to be sent on VLAN-interface 2. Hosts that receive the RA advertisements will obtain IPv6 addresses through DHCPv6.
[Switch-Vlan-interface2] ipv6 nd autoconfig managed-address-flag
# Set the O flag to 1 in RA advertisements to be sent on VLAN-interface 2. Hosts that receive the RA advertisements will obtain information other than IPv6 address through DHCPv6.
[Switch-Vlan-interface2] ipv6 nd autoconfig other-flag
[Switch-Vlan-interface2] quit
# Create prefix pool 1, and specify the prefix 2001:0410::/32 with the assigned prefix length 48.
[Switch] ipv6 dhcp prefix-pool 1 prefix 2001:0410::/32 assign-len 48
# Create address pool 1.
[Switch] ipv6 dhcp pool 1
# In address pool 1, configure subnet 1::/64 where VLAN interface-2 resides.
[Switch-dhcp6-pool-1] network 1::/64
# Apply prefix pool 1 to address pool 1, and set the preferred lifetime to one day, and the valid lifetime to three days.
[Switch-dhcp6-pool-1] prefix-pool 1 preferred-lifetime 86400 valid-lifetime 259200
# In address pool 1, bind prefix 2001:0410:0201::/48 to the client DUID 00030001CA0006A40000, and set the preferred lifetime to one day, and the valid lifetime to three days.
[Switch-dhcp6-pool-1] static-bind prefix 2001:0410:0201::/48 duid 00030001CA0006A40000 preferred-lifetime 86400 valid-lifetime 259200
# Configure the DNS server address 2:2::3.
[Switch-dhcp6-pool-1] dns-server 2:2::3
# Configure the domain name as aaa.com.
[Switch-dhcp6-pool-1] domain-name aaa.com
# Configure the SIP server address as 2:2::4, and the SIP server name as bbb.com.
[Switch-dhcp6-pool-1] sip-server address 2:2::4
[Switch-dhcp6-pool-1] sip-server domain-name bbb.com
[Switch-dhcp6-pool-1] quit
# Enable the DHCPv6 server on VLAN-interface 2, enable desired prefix assignment and rapid prefix assignment, and set the preference to the highest.
[Switch] interface vlan-interface 2
[Switch-Vlan-interface2] ipv6 dhcp select server
[Switch-Vlan-interface2] ipv6 dhcp server allow-hint preference 255 rapid-commit
Verifying the configuration
# Display DHCPv6 server configuration on VLAN-interface 2.
[Switch-Vlan-interface2] display ipv6 dhcp server interface vlan-interface 2
Using pool: global
Preference value: 255
Allow-hint: Enabled
Rapid-commit: Enabled
# Display information about address pool 1.
[Switch-Vlan-interface2] display ipv6 dhcp pool 1
DHCPv6 pool: 1
Network: 1::/64
Preferred lifetime 604800, valid lifetime 2592000
Prefix pool: 1
Preferred lifetime 86400, valid lifetime 259200
Static bindings:
DUID: 00030001ca0006a40000
IAID: Not configured
Prefix: 2001:410:201::/48
Preferred lifetime 86400, valid lifetime 259200
DNS server addresses:
2:2::3
Domain name:
aaa.com
SIP server addresses:
2:2::4
SIP server domain names:
bbb.com
# Display information about prefix pool 1.
[Switch-Vlan-interface2] display ipv6 dhcp prefix-pool 1
Prefix: 2001:410::/32
Assigned length: 48
Total prefix number: 65536
Available: 65535
In-use: 0
Static: 1
# After the client with the DUID 00030001CA0006A40000 obtains an IPv6 prefix, display the binding information on the DHCPv6 server.
[Switch-Vlan-interface2] display ipv6 dhcp server pd-in-use
Pool: 1
IPv6 prefix Type Lease expiration
2001:410:201::/48 Static(C) Jul 10 19:45:01 2009
# After the other client obtains an IPv6 prefix, display binding information on the DHCPv6 server.
[Switch-Vlan-interface2] display ipv6 dhcp server pd-in-use
Pool: 1
IPv6 prefix Type Lease expiration
2001:410:201::/48 Static(C) Jul 10 19:45:01 2009
2001:410::/48 Auto(C) Jul 10 20:44:05 2009
Dynamic IPv6 address assignment configuration example
Network requirements
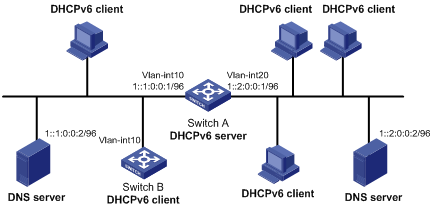
As shown in Figure 11, Switch A acts as a DHCPv6 server to assign IPv6 addresses to the clients on subnets 1::1:0:0:0/96 and 1::2:0:0:0/96.
On Switch A, configure the IPv6 address 1::1:0:0:1/96 for VLAN-interface 10 and 1::2:0:0:1/96 for VLAN-interface 20. The lease duration of the addresses on subnet 1::1:0:0:0/96 is 172800 seconds (two days), the valid time is 345600 seconds (four days), the domain name suffix is aabbcc.com, and the DNS server address is 1::1:0:0:2/96. The lease duration of the addresses on subnet 1::2:0:0:0/96 is 432000 seconds (five days), the valid time is 864000 seconds (ten days), the domain name is aabbcc.com, and the DNS server address is 1::2:0:0:2/96.
Configuration procedure
1. Configure the interfaces on the DHCPv6 server:
# Specify an IPv6 address for VLAN-interface 10.
<SwitchA> system-view
[SwitchA] interface vlan-interface 10
[SwitchA-Vlan-interface10] ipv6 address 1::1:0:0:1/96
# Disable RA message suppression on VLAN-interface 10.
[SwitchA-Vlan-interface10] undo ipv6 nd ra halt
# Set the M flag to 1 in RA advertisements to be sent on VLAN-interface 10. Hosts that receive the RA advertisements will obtain IPv6 addresses through DHCPv6.
[SwitchA-Vlan-interface10] ipv6 nd autoconfig managed-address-flag
# Set the O flag to 1 in RA advertisements to be sent on VLAN-interface 10. Hosts that receive the RA advertisements will obtain information other than IPv6 address through DHCPv6.
[SwitchA-Vlan-interface10] ipv6 nd autoconfig other-flag
[SwitchA-Vlan-interface10] quit
# Specify an IPv6 address for VLAN-interface 20.
[SwitchA] interface vlan-interface 20
[SwitchA-Vlan-interface20] ipv6 address 1::2:0:0:1/96
# Disable RA message suppression on VLAN-interface 20.
[SwitchA-Vlan-interface20] undo ipv6 nd ra halt
# Set the M flag to 1 in RA advertisements to be sent on VLAN-interface 20. Hosts that receive the RA advertisements will obtain IPv6 addresses through DHCPv6.
[SwitchA-Vlan-interface20] ipv6 nd autoconfig managed-address-flag
# Set the O flag to 1 in RA advertisements to be sent on VLAN-interface 20. Hosts that receive the RA advertisements will obtain information other than IPv6 address through DHCPv6.
[SwitchA-Vlan-interface20] ipv6 nd autoconfig other-flag
[SwitchA-Vlan-interface20] quit
2. Enable DHCPv6:
# Enable DHCPv6 server on VLAN-interface 10 and VLAN-interface 20.
[SwitchA] interface vlan-interface 10
[SwitchA-Vlan-interface10] ipv6 dhcp select server
[SwitchA-Vlan-interface10] quit
[SwitchA] interface vlan-interface 20
[SwitchA-Vlan-interface20] ipv6 dhcp select server
[SwitchA-Vlan-interface20] quit
# Exclude the DNS server addresses from dynamic assignment.
[SwitchA] ipv6 dhcp server forbidden-address 1::1:0:0:2
[SwitchA] ipv6 dhcp server forbidden-address 1::2:0:0:2
# Configure the DHCPv6 address pool 1 to assign IPv6 addresses and other configuration parameters to clients on subnet 1::1:0:0:0/96.
[SwitchA] ipv6 dhcp pool 1
[SwitchA-dhcp6-pool-1] network 1::1:0:0:0/96 preferred-lifetime 172800 valid-lifetime 345600
[SwitchA-dhcp6-pool-1] domain-name aabbcc.com
[SwitchA-dhcp6-pool-1] dns-server 1::1:0:0:2
[SwitchA-dhcp6-pool-1] quit
# Configure the DHCPv6 address pool 2 to assign IPv6 addresses and other configuration parameters to clients on subnet 1::2:0:0:0/96.
[SwitchA] ipv6 dhcp pool 2
[SwitchA-dhcp6-pool-2] network 1::2:0:0:0/96 preferred-lifetime 432000 valid-lifetime 864000
[SwitchA-dhcp6-pool-2] domain-name aabbcc.com
[SwitchA-dhcp6-pool-2] dns-server 1::2:0:0:2
[SwitchA-dhcp6-pool-2] quit
Verifying the configuration
# Verify that the clients on subnets 1::1:0:0:0/96 and 1::2:0:0:0/96 can obtain IPv6 addresses and all other configuration parameters from the DHCPv6 server (Switch A). (Details not shown.)
# On the DHCPv6 server, display IPv6 addresses assigned to the DHCPv6 clients.
[SwitchA] display ipv6 dhcp server ip-in-use
Configuring the DHCPv6 relay agent
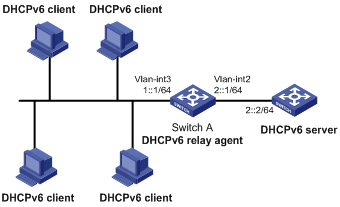
Overview
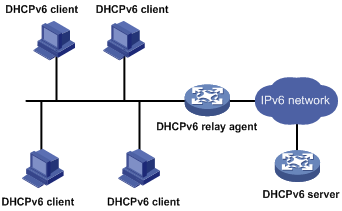
A DHCPv6 client usually uses a multicast address to contact the DHCPv6 server on the local link to obtain an IPv6 address and other configuration parameters. As shown in Figure 12, if the DHCPv6 server resides on another subnet, the DHCPv6 clients need a DHCPv6 relay agent to contact the server. The relay agent feature avoids deploying a DHCP server on each subnet.
Figure 12 Typical DHCPv6 relay agent application
As shown in Figure 13, a DHCPv6 client obtains an IPv6 address and other network configuration parameters from a DHCPv6 server through a DHCPv6 relay agent. The following example uses rapid assignment to describe the process:
· The DHCPv6 client sends a Solicit message containing the Rapid Commit option to the multicast address FF02::1:2 of all the DHCPv6 servers and relay agents.
· After receiving the Solicit message, the DHCPv6 relay agent encapsulates the message into the Relay Message option of a Relay-forward message, and sends the message to the DHCPv6 server.
· After obtaining the Solicit message from the Relay-forward message, the DHCPv6 server performs the following tasks:
¡ Selects an IPv6 address and other required parameters.
¡ Adds them to a reply that is encapsulated within the Relay Message option of a Relay-reply message.
¡ Sends the Relay-reply message to the DHCPv6 relay agent.
· The DHCPv6 relay agent obtains the reply from the Relay-reply message and sends the reply to the DHCPv6 client.
· The DHCPv6 client uses the IPv6 address and other network parameters assigned by the DHCPv6 server to complete network configuration.
Figure 13 Operating process of a DHCPv6 relay agent
DHCPv6 relay agent configuration task list
|
Tasks at a glance |
|
(Required.) Enabling the DHCPv6 relay agent on an interface |
|
(Required.) Specifying DHCPv6 servers |
|
(Optional.) Specifying a gateway address for DHCPv6 clients |
|
(Optional.) Setting the DSCP value for DHCPv6 packets sent by the DHCPv6 relay agent |
|
(Optional.) Specifying a padding mode for the Interface-ID option |
|
(Optional.) Enabling the DHCPv6 relay agent to support Option 79 |
|
(Optional.) Enabling the DHCPv6 relay agent to advertise IPv6 prefixes |
|
(Optional.) Specifying the source IPv6 address for relayed DHCPv6 requests |
|
(Optional.) Enabling the DHCPv6 relay agent to record relay entries |
|
(Optional.) Enabling IPv6 release notification |
|
(Optional.) Enabling client offline detection |
|
(Optional.) Configuring DHCPv6 flood attack protection |
|
(Optional.) Discarding DHCPv6 requests that are delivered from VXLAN tunnels |
Enabling the DHCPv6 relay agent on an interface
|
Step |
Command |
Remarks |
|
1. Enter system view. |
system-view |
N/A |
|
2. Enter interface view. |
interface interface-type interface-number |
N/A |
|
3. Enable DHCPv6 relay agent on the interface. |
ipv6 dhcp select relay |
By default, the DHCPv6 relay agent is disabled on the interface. Do not enable the DHCPv6 relay agent and DHCPv6 client on the same interface. |
Specifying DHCPv6 servers
Specifying DHCPv6 servers on the relay agent
You can use the ipv6 dhcp relay server-address command to specify a maximum of eight DHCPv6 servers on the DHCP relay agent interface. The DHCPv6 relay agent forwards DHCP requests to all the specified DHCPv6 servers.
To specify a DHCPv6 server on a relay agent:
|
Step |
Command |
Remarks |
|
1. Enter system view. |
system-view |
N/A |
|
2. Enter interface view. |
interface interface-type interface-number |
N/A |
|
3. Specify a DHCPv6 server. |
ipv6 dhcp relay server-address ipv6-address [ interface interface-type interface-number ] |
By default, no DHCPv6 server is specified. If a DHCPv6 server address is a link-local address or multicast address, you must specify an outgoing interface by using the interface keyword in this command. Otherwise, DHCPv6 packets might fail to reach the DHCPv6 server. |
Specifying DHCP servers in a DHCPv6 relay address pool
DHCPv6 address pools created on a DHCPv6 relay agent are called DHCPv6 relay address pools. You can create a relay address pool and specify DHCPv6 servers in this address pool. This feature allows DHCPv6 clients of the same type to obtain IPv6 addresses, IPv6 prefixes, and other configuration parameters from the DHCPv6 servers specified in the matching DHCPv6 relay address pool.
It applies to scenarios where the DHCPv6 relay agent connects to clients of the same access type but classified into different types by their locations. In this case, the relay interface typically has no IPv6 address configured. You can use the gateway-list command to specify the gateway addresses for clients matching the same DHCPv6 relay address pool.
Upon receiving a DHCPv6 Solicit or Request from a client that matches a DHCPv6 relay address pool, the relay agent processes the packet as follows:
· Fills the link-address field of the packet with a specified gateway address.
· Forwards the packet to all DHCPv6 servers in the matching DHCPv6 relay address pool.
The DHCPv6 servers select a DHCPv6 relay address pool according to the gateway address.
To configure a DHCPv6 relay address pool on the DHCPv6 relay agent:
|
Step |
Command |
Remarks |
|
1. Enter system view. |
system-view |
N/A |
|
2. Create a DHCPv6 relay address pool and enter its view. |
ipv6 dhcp pool pool-name |
By default, no DHCPv6 relay address pools exist. |
|
3. Specify gateway addresses for the clients matching the DHCPv6 relay address pool. |
gateway-list ipv6-address&<1-8> |
By default, no gateway address is specified. |
|
4. Specify DHCPv6 servers for the DHCPv6 relay address pool. |
remote-server ipv6-address [ interface interface-type interface-number ] |
By default, no DHCPv6 server is specified for the DHCPv6 relay address pool. You can specify a maximum of eight DHCPv6 servers for one DHCPv6 relay address pool for high availability. The relay agent forwards DHCPv6 Solicit and Request packets to all DHCPv6 servers in the DHCPv6 relay address pool. |
Specifying a gateway address for DHCPv6 clients
By default, the DHCPv6 relay agent fills the link-address field of DHCPv6 Solicit and Request packets with the first IPv6 address of the relay interface. You can specify a gateway address on the relay agent for DHCPv6 clients. The DHCPv6 relay agent uses the specified gateway address to fill the link-address field of DHCPv6 Solicit and Request packets.
To specify a gateway address for DHCPv6 clients:
|
Step |
Command |
Remarks |
|
1. Enter system view. |
system-view |
N/A |
|
2. Enter interface view. |
interface interface-type interface-number |
N/A |
|
3. Specify a gateway address for DHCPv6 clients. |
ipv6 dhcp relay gateway ipv6-address |
By default, the DHCPv6 relay agent uses the first IPv6 address of the relay interface as the clients' gateway address. |
Setting the DSCP value for DHCPv6 packets sent by the DHCPv6 relay agent
The DSCP value of a packet specifies the priority level of the packet and affects the transmission priority of the packet.
To set the DSCP value for DHCPv6 packets sent by the DHCPv6 relay agent:
|
Step |
Command |
Remarks |
|
1. Enter system view. |
system-view |
N/A |
|
2. Set the DSCP value for DHCPv6 packets sent by the DHCPv6 relay agent. |
ipv6 dhcp dscp dscp-value |
The default DSCP value is 56. |
Specifying a padding mode for the Interface-ID option
This feature enables the relay agent to fill the Interface-ID option in the specified mode. When receiving a DHCPv6 packet from a client, the relay agent fills the Interface-ID option in the mode and then forwards the packet to the DHCPv6 server.
To specify a padding mode for the Interface-ID option:
|
Step |
Command |
Remarks |
|
1. Enter system view. |
system-view |
N/A |
|
2. Enter interface view. |
interface interface-type interface-number |
N/A |
|
3. Specify a padding mode for the Interface-ID option. |
ipv6 dhcp relay interface-id { bas | interface } |
By default, the relay agent fills the Interface-ID option with the interface index of the interface. |
Enabling the DHCPv6 relay agent to support Option 79
Option 79, also called the client link layer address option, is used to record the MAC address of the DHCPv6 client. The first relay agent that a DHCPv6 request passes learns the MAC address of the client and encapsulates this address into Option 79 in the Relay-Forward packet for the request. The DHCPv6 server verifies the client or assigns IPv6 address/prefix to the client based on the MAC address of the client.
As shown in Figure 14, Option 79 includes the following fields:
· Option code—Option code. The value is 79.
· Option length—Size of the option data.
· Link-layer type—Link-layer address type of the client.
· Link-layer address—Link-layer address of the client.
Figure 14 Option 79 format

If DHCPv6 relay agents exist in the network, the DHCPv6 server needs the MAC address of the DHCPv6 client for authentication or for IPv6 address or prefix assignment. To meet the requirement, enable the DHCPv6 relay agent that the client first passes to support Option 79.
To enable the DHCPv6 relay agent to support Option 79:
|
Step |
Command |
Remarks |
|
1. Enter system view. |
system-view |
N/A |
|
2. Enter interface view. |
interface interface-type interface-number |
N/A |
|
3. Enable the DHCPv6 relay agent to support Option 79. |
ipv6 dhcp relay client-link-address enable |
By default, the DHCPv6 relay agent does not support Option 79. |
Enabling the DHCPv6 relay agent to advertise IPv6 prefixes
A DHCPv6 client can obtain an IPv6 prefix through DHCPv6 and use the IPv6 prefix for IPv6 address assignment in a downstream network. If the IPv6 prefix is in a different subnet than the IPv6 address of the DHCPv6 client's upstream interface, the downstream network cannot access the external network. You can enable the DHCPv6 relay agent that is on the same link as the DHCPv6 client to advertise the IPv6 prefix.
To enable the DHCPv6 relay agent to advertise IPv6 prefixes:
|
Step |
Command |
Remarks |
|
1. Enter system view. |
system-view |
N/A |
|
2. Enable the DHCPv6 relay agent to advertise IPv6 prefixes. |
ipv6 dhcp advertise pd-route |
By default, the DHCPv6 relay agent does not advertise IPv6 prefixes. Before using this command, make sure the DHCPv6 relay agent is enabled to record DHCPv6 relay entries. |
Specifying the source IPv6 address for relayed DHCPv6 requests
About specifying the source IPv6 address for relayed DHCPv6 requests
This task is required if a relay interface does not have routes to DHCPv6 servers. You can specify a global unicast address or the IPv6 address of another interface (typically the loopback interface) as the source IPv6 address for DHCPv6 requests. The relay interface inserts the source IPv6 address in the source IPv6 address field.
Procedure
To specify the source IPv6 address for relayed DHCPv6 requests:
|
Step |
Command |
Remarks |
|
1. Enter system view. |
system-view |
N/A |
|
2. Enter interface view. |
interface interface-type interface-number |
N/A |
|
3. Specify the source IPv6 address for relayed DHCPv6 requests. |
ipv6 dhcp relay source-address { ipv6-address | interface interface-type interface-number } |
By default, the DHCPv6 relay agent uses the IPv6 global unicast address of the interface that connects to the DHCPv6 server as the source IPv6 address for relayed DHCPv6 requests. If the specified interface does not have an IPv6 global unicast address, the IPv6 address of the output interface is used as the source address for relayed DHCPv6 requests. |
Enabling the DHCPv6 relay agent to record relay entries
This feature enables the DHCPv6 relay agent to automatically record DHCPv6 relay entries after DHCPv6 clients obtain IPv6 addresses or prefixes through DHCPv6. A DHCPv6 relay entry contains the binding between a client's hardware address and IPv6 address or prefix.
Some security features, such as IP source guard, use DHCPv6 relay entries to check incoming packets and block packets that do not match any entry. Hosts using manually configured IPv6 addresses are denied to access external networks through the relay agent. For more information about IP source guard, see Security Configuration Guide.
To enable the DHCPv6 relay agent to record relay entries:
|
Step |
Command |
Remarks |
|
1. Enter system view. |
system-view |
N/A |
|
2. Enter interface view. |
interface interface-type interface-number |
N/A |
|
3. Enable the recording of DHCPv6 relay entries. |
ipv6 dhcp relay client-information record |
By default, the DHCPv6 relay agent does not record relay entries. |
Enabling IPv6 release notification
This feature enables the DHCPv6 relay agent to send a Release message to the DHCPv6 server after it deletes a DHCPv6 relay entry. After the DHCPv6 server receives the message, it reclaims the IPv6 address or prefix and marks the lease as expired.
If you do not enable this feature, the DHCPv6 relay agent will not send a Release message after it deletes a relay entry.
To enable IPv6 release notification:
|
Step |
Command |
Remarks |
|
1. Enter system view. |
system-view |
N/A |
|
2. Enter interface view. |
interface interface-type interface-number |
N/A |
|
3. Enable IPv6 release notification. |
ipv6 dhcp relay release-agent |
By default, IPv6 release notification is disabled. |
Enabling client offline detection
This feature enables the DHCPv6 relay agent to detect the status of ND entries. After an ND entry ages out, the DHCPv6 relay agent considers the client offline and deletes the relay entry for the client. For more information about ND, see "Configuring basic IPv6 settings."
To enable client offline detection:
|
Step |
Command |
Remarks |
|
1. Enter system view. |
system-view |
N/A |
|
2. Enter interface view. |
interface interface-type interface-number |
N/A |
|
3. Enable client offline detection. |
ipv6 dhcp client-detect |
By default, client offline detection is disabled. |
Configuring DHCPv6 flood attack protection
The DHCPv6 flood attack protection enables the DHCPv6 relay agent to detect DHCPv6 flood attacks according to the DHCPv6 packet rate threshold on a per-MAC basis.
When the DHCPv6 relay agent receives a DHCPv6 packet from a client (MAC address), it creates a DHCPv6 flood attack entry in check state. If the number of DHCPv6 packets from the same MAC address reaches the upper limit in the detection duration, the relay agent determines that the client is launching a DHCPv6 flood attack. The DHCPv6 flood attack entry changes to the restrain state, and the DHCPv6 relay agent discards the DHCPv6 packets from that client. When the aging time of the entry is reached, the DHCPv6 relay agent deletes the entry. If a DHCPv6 packet from the MAC address arrives later, the DHCPv6 relay agent will create a flood attack entry and count the number of incoming DHCP packets for that client again.
This feature is available only in VXLAN networks. For more information about VXLANs, see VXLAN Configuration Guide.
Configure this feature on the downlink interface of the DHCPv6 relay agent if the relay agent uses its MAC address as the source MAC address in the packets relayed to the server.
To configure DHCPv6 flood attack protection:
|
Step |
Command |
Remarks |
|
1. Enter system view. |
system-view |
N/A |
|
2. (Optional.) Set the DHCPv6 packet rate threshold for DHCPv6 flood attack detection. |
ipv6 dhcp flood-protection threshold packet-number milliseconds |
By default, the device allows a maximum of 6 DHCPv6 packets per 5000 milliseconds from each DHCPv6 client. |
|
3. (Optional.) Set the DHCP flood attack entry aging time. |
ipv6 dhcp flood-protection aging-time time |
The default setting is 300 seconds. |
|
4. Enter VSI view. |
vsi vsi-name |
N/A |
|
5. Enable DHCPv6 flood attack protection. |
ipv6 dhcp flood-protection enable |
By default, DHCPv6 flood attack protection is disabled. |
Discarding DHCPv6 requests that are delivered from VXLAN tunnels
About discarding DHCPv6 requests that are delivered from VXLAN tunnels
In a VXLAN network, the DHCPv6 relay agent feature can be configured on the VSI interface of a VTEP.
When the DHCPv6 relay agent receives a DHCPv6 request from an AC mapped to the VSI interface, the relay agent forwards this request to the DHCPv6 servers and broadcasts this request to other VTEPs. If those VTEPs also function as the DHCPv6 relay agents, each will forward the DHCPv6 request to the DHCPv6 servers they are connecting to. To prevent a DHCPv6 server from receiving the same DHCPv6 request from different VTEPs, you can configure this command on the VSI interface of the VTEPs that are not directly connecting to DHCPv6 clients.
Procedure
|
Step |
Command |
Remarks |
|
1. Enter system view. |
system-view |
N/A |
|
2. Enter interface view. |
interface vsi-interface vsi-number |
N/A |
|
3. Configure the DHCP relay agent to discard the DHCP requests that are delivered from VXLAN tunnels. |
ipv6 dhcp relay request-from-tunnel discard |
By default, the DHCPv6 relay agent can forward the DHCPv6 requests that are delivered from VXLAN tunnels. If you configure this command on a device that acts as both the distributed and centralized VXLAN IP gateways, make sure the gateways do not use the same VSI interface to provide the gateway services. |
Displaying and maintaining the DHCPv6 relay agent
Execute display commands in any view and reset commands in user view.
|
Task |
Command |
|
Display the DUID of the local device. |
display ipv6 dhcp duid |
|
Display DHCPv6 relay entries that record clients' IPv6 address information. |
display ipv6 dhcp relay client-information address [ interface interface-type interface-number | ipv6 ipv6-address ] [ vpn-instance vpn-instance-name ] |
|
Display DHCPv6 relay entries that record clients' IPv6 prefix information. |
display ipv6 dhcp relay client-information pd [ interface interface-type interface-number | prefix prefix/prefix-len ] [ vpn-instance vpn-instance-name ] |
|
Display DHCPv6 server addresses specified on the DHCPv6 relay agent. |
display ipv6 dhcp relay server-address [ interface interface-type interface-number ] |
|
Display packet statistics on the DHCPv6 relay agent. |
display ipv6 dhcp relay statistics [ interface interface-type interface-number ] |
|
Clear DHCPv6 relay entries that record clients' IPv6 address information. |
reset ipv6 dhcp relay client-information address [ interface interface-type interface-number | ipv6 ipv6-address ] [ vpn-instance vpn-instance-name ] |
|
Clear DHCPv6 relay entries that record clients' IPv6 prefix information. |
reset ipv6 dhcp relay client-information pd [ interface interface-type interface-number | prefix prefix/prefix-len ] [ vpn-instance vpn-instance-name ] |
|
Clear packets statistics on the DHCPv6 relay agent. |
reset ipv6 dhcp relay statistics [ interface interface-type interface-number ] |
DHCPv6 relay agent configuration example
Network requirements
As shown in Figure 15, configure the DHCPv6 relay agent on Switch A to relay DHCPv6 packets between DHCPv6 clients and the DHCPv6 server.
Switch A acts as the gateway of network 1::/64. It sends RA messages to notify the hosts to obtain IPv6 addresses and other configuration parameters through DHCPv6. For more information about RA messages, see "Configuring basic IPv6 settings."
Configuration procedure
# Specify IPv6 addresses for VLAN-interface 2 and VLAN-interface 3.
<SwitchA> system-view
[SwitchA] interface vlan-interface 2
[SwitchA-Vlan-interface2] ipv6 address 2::1 64
[SwitchA-Vlan-interface2] quit
[SwitchA] interface vlan-interface 3
[SwitchA-Vlan-interface3] ipv6 address 1::1 64
# Disable RA message suppression on VLAN-interface 3.
[SwitchA-Vlan-interface3] undo ipv6 nd ra halt
# Set the M flag to 1 in RA advertisements to be sent on VLAN-interface 3. Hosts that receive the RA advertisements will obtain IPv6 addresses through DHCPv6.
[SwitchA-Vlan-interface3] ipv6 nd autoconfig managed-address-flag
# Set the O flag to 1 in RA advertisements to be sent on VLAN-interface 3. Hosts that receive the RA advertisements will obtain information other than IPv6 address through DHCPv6.
[SwitchA-Vlan-interface3] ipv6 nd autoconfig other-flag
# Enable the DHCPv6 relay agent on VLAN-interface 3 and specify the DHCPv6 server on the relay agent.
[SwitchA-Vlan-interface3] ipv6 dhcp select relay
[SwitchA-Vlan-interface3] ipv6 dhcp relay server-address 2::2
Verifying the configuration
# Display DHCPv6 server address information on Switch A.
[SwitchA-Vlan-interface3] display ipv6 dhcp relay server-address
Interface: Vlan-interface3
Server address Outgoing Interface Public/VRF name
2::2 --/--
# Display packet statistics on the DHCPv6 relay agent.
[SwitchA-Vlan-interface3] display ipv6 dhcp relay statistics
Packets dropped : 0
Packets received : 14
Solicit : 0
Request : 0
Confirm : 0
Renew : 0
Rebind : 0
Release : 0
Decline : 0
Information-request : 7
Relay-forward : 0
Relay-reply : 7
Packets sent : 14
Advertise : 0
Reconfigure : 0
Reply : 7
Relay-forward : 7
Relay-reply : 0
Configuring the DHCPv6 client
Overview
With DHCPv6 client configured, an interface can obtain configuration parameters from the DHCPv6 server.
A DHCPv6 client can use DHCPv6 to complete the following functions:
· Obtain an IPv6 address, an IPv6 prefix, or both, and obtain other configuration parameters. The client automatically creates a DHCPv6 option group for the obtained parameters. With the obtained IPv6 prefix, the client can generate its global unicast address.
· Support stateless DHCPv6 to obtain configuration parameters except IPv6 address and IPv6 prefix. The client obtains an IPv6 address through stateless IPv6 address autoconfiguration. If the client receives an RA message with the M flag set to 0 and the O flag set to 1 during address acquisition, stateless DHCPv6 starts.
Do not configure the DHCPv6 client on the same interface as the DHCPv6 server or the DHCPv6 relay agent.
DHCPv6 client configuration task list
|
Tasks at a glance |
|
(Required.) Perform one of the following tasks: · Configuring IPv6 address acquisition · Configuring IPv6 prefix acquisition |
|
(Optional.) Configuring the DHCPv6 client DUID |
|
(Optional.) Setting the DSCP value for DHCPv6 packets sent by the DHCPv6 client |
Configuring IPv6 address acquisition
|
Step |
Command |
Remarks |
|
1. Enter system view. |
system-view |
N/A |
|
2. Enter interface view. |
interface interface-type interface-number |
Supported interfaces include Layer 3 Ethernet interface, Layer 3 Ethernet subinterface, Layer 3 aggregate interface, Layer 3 aggregate subinterface, and VLAN interface. |
|
3. Configure the interface to use DHCPv6 to obtain an IPv6 address and other configuration parameters. |
ipv6 address dhcp-alloc [ option-group group-number | rapid-commit ] * |
By default, the interface does not use DHCPv6 for IPv6 address acquisition. |
Configuring IPv6 prefix acquisition
|
Step |
Command |
Remarks |
|
1. Enter system view. |
system-view |
N/A |
|
2. Enter interface view. |
interface interface-type interface-number |
Supported interfaces include Layer 3 Ethernet interface, Layer 3 Ethernet subinterface, Layer 3 aggregate interface, Layer 3 aggregate subinterface, and VLAN interface. |
|
3. Configure the interface to use DHCPv6 to obtain an IPv6 prefix and other configuration parameters. |
ipv6 dhcp client pd prefix-number [ option-group group-number | rapid-commit ] * |
By default, the interface does not use DHCPv6 for IPv6 prefix acquisition. |
Configuring IPv6 address and prefix acquisition
|
Step |
Command |
Remarks |
|
1. Enter system view. |
system-view |
N/A |
|
2. Enter interface view. |
interface interface-type interface-number |
Supported interfaces include Layer 3 Ethernet interface, Layer 3 Ethernet subinterface, Layer 3 aggregate interface, Layer 3 aggregate subinterface, and VLAN interface. |
|
3. Configure the interface to use DHCPv6 to obtain an IPv6 address, an IPv6 prefix, and other configuration parameters. |
ipv6 dhcp client stateful prefix prefix-number [ option-group option-group-number | rapid-commit ] * |
By default, the interface does not use DHCPv6 for IPv6 address and prefix acquisition. |
Configuring stateless DHCPv6
|
Step |
Command |
Remarks |
|
1. Enter system view. |
system-view |
N/A |
|
2. Enter interface view. |
interface interface-type interface-number |
Supported interfaces include Layer 3 Ethernet interface, Layer 3 Ethernet subinterface, Layer 3 aggregate interface, Layer 3 aggregate subinterface, and VLAN interface. |
|
3. Configure the interface to support stateless DHCPv6. |
· Enable stateless IPv6 address
autoconfiguration: · Enable stateless DHCPv6: |
By default, the interface does not support stateless DHCPv6. You can perform both tasks. If you use only the ipv6 address auto command, make sure the M flag is set to 0 and the O flag is set to 1 in the RA message. Otherwise, stateless DHCPv6 cannot be triggered. |
Configuring the DHCPv6 client DUID
The DUID of a DHCPv6 client is the globally unique identifier of the client. The client pads its DUID into Option 1 of the DHCPv6 packet that it sends to the DHCPv6 server. The DHCPv6 server can assign specific IPv6 addresses or prefixes to DHCPv6 clients with specific DUIDs.
To configure the DHCPv6 client DUID:
|
Step |
Command |
Remarks |
|
1. Enter system view. |
system-view |
N/A |
|
2. Enter interface view. |
interface interface-type interface-number |
Supported interfaces include Layer 3 Ethernet interface, Layer 3 Ethernet subinterface, Layer 3 aggregate interface, Layer 3 aggregate subinterface, and VLAN interface. |
|
3. Configure the DHCPv6 client DUID. |
ipv6 dhcp client duid { ascii string | hex string | mac interface-type interface-number } |
By default, the interface uses the device bridge MAC address to generate its DHCPv6 client DUID. Make sure the DUID that you configure is unique. |
Setting the DSCP value for DHCPv6 packets sent by the DHCPv6 client
The DSCP value of a packet specifies the priority level of the packet and affects the transmission priority of the packet.
To set the DSCP value for DHCPv6 packets sent by the DHCPv6 client:
|
Step |
Command |
Remarks |
|
1. Enter system view. |
system-view |
N/A |
|
2. Set the DSCP value for DHCPv6 packets sent by the DHCPv6 client. |
ipv6 dhcp client dscp dscp-value |
By default, the DSCP value in DHCPv6 packets sent by the DHCPv6 client is 56. |
Displaying and maintaining DHCPv6 client
Execute the display commands in any view, and execute the reset command in user view.
|
Task |
Command |
|
Display the DHCPv6 client information. |
display ipv6 dhcp client [ interface interface-type interface-number ] |
|
Display the DHCPv6 client statistics. |
display ipv6 dhcp client statistics [ interface interface-type interface-number ] |
|
Clear the DHCPv6 client statistics. |
reset ipv6 dhcp client statistics [ interface interface-type interface-number ] |
DHCPv6 client configuration examples
IPv6 address acquisition configuration example
Network requirements
As shown in Figure 16, configure the switch to use DHCPv6 to obtain configuration parameters from the DHCPv6 server. The parameters include IPv6 address, DNS server address, domain name suffix, SIP server address, and SIP server domain name.
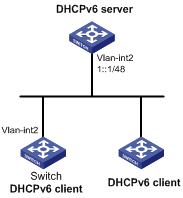
Configuration procedure
You must configure the DHCPv6 server first before configuring the DHCPv6 client. For information about configuring DHCPv6 server, see "Configuring the DHCPv6 server."
# Configure VLAN-interface 2 as a DHCPv6 client for IPv6 address acquisition. Configure the DHCPv6 client to support DHCPv6 rapid address assignment. Configure the DHCPv6 client to create a dynamic DHCPv6 option group for saving configuration parameters.
<Switch> system-view
[Switch] interface vlan-interface 2
[Switch-Vlan-interface2] ipv6 address dhcp-alloc rapid-commit option-group 1
[Switch-Vlan-interface2] quit
Verifying the configuration
# Verify that the client has obtained an IPv6 address and other configuration parameters from the server.
[Switch] display ipv6 dhcp client
Vlan-interface2:
Type: Stateful client requesting address
State: OPEN
Client DUID: 0003000100e002000000
Preferred server:
Reachable via address: FE80::2E0:1FF:FE00:18
Server DUID: 0003000100e001000000
IA_NA: IAID 0x00000642, T1 50 sec, T2 80 sec
Address: 1:1::2/128
Preferred lifetime 100 sec, valid lifetime 200 sec
Will expire on Mar 27 2014 at 08:06:57 (198 seconds left)
DNS server addresses:
2000::FF
Domain name:
example.com
SIP server addresses:
2:2::4
SIP server domain names:
bbb.com
# Verify that the client has created a dynamic DHCPv6 option group for saving configuration parameters.
[Switch] display ipv6 dhcp option-group 1
DHCPv6 option group: 1
DNS server addresses:
Type: Dynamic (DHCPv6 address allocation)
Interface: Vlan-interface2
2000::FF
Domain name:
Type: Dynamic (DHCPv6 address allocation)
Interface: Vlan-interface2
example.com
SIP server addresses:
Type: Dynamic (DHCPv6 address allocation)
Interface: Vlan-interface2
2:2::4
SIP server domain names:
Type: Dynamic (DHCPv6 address allocation)
Interface: Vlan-interface2
bbb.com
# Verify that the DHCPv6 client has obtained an IPv6 address..
[Switch] display ipv6 interface brief
*down: administratively down
(s): spoofing
Interface Physical Protocol IPv6 Address
Vlan-interface2 up up 1:1::2
IPv6 prefix acquisition configuration example
Network requirements
As shown in Figure 17, configure the switch to use DHCPv6 to obtain configuration parameters from the DHCPv6 server. The parameters include IPv6 prefix, DNS server address, domain name suffix, SIP server address, and SIP server domain name.
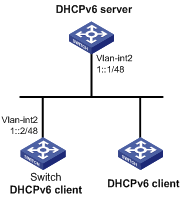
Configuration procedure
You must configure the DHCPv6 server first before configuring the DHCPv6 client. For information about configuring DHCPv6 server, see "Configuring the DHCPv6 server."
# Configure an IPv6 address for VLAN-interface 2 that is connected to the DHCPv6 server.
<Switch> system-view
[Switch] interface vlan-interface 2
[Switch-Vlan-interface2] ipv6 address 1::2/48
# Configure VLAN-interface 2 as a DHCPv6 client for IPv6 prefix acquisition. Configure the DHCPv6 client to support DHCPv6 rapid prefix assignment. Configure the DHCPv6 client to assign an ID to the obtained IPv6 prefix and create a dynamic DHCPv6 option group for saving configuration parameters.
[Switch-Vlan-interface2] ipv6 dhcp client pd 1 rapid-commit option-group 1
[Switch-Vlan-interface2] quit
Verifying the configuration
# Verify that the DHCPv6 client has obtained an IPv6 prefix and other configuration parameters from the DHCPv6 server.
[Switch] display ipv6 dhcp client
Vlan-interface2:
Type: Stateful client requesting prefix
State: OPEN
Client DUID: 0003000100e002000000
Preferred server:
Reachable via address: FE80::2E0:1FF:FE00:18
Server DUID: 0003000100e001000000
IA_PD: IAID 0x00000642, T1 50 sec, T2 80 sec
Prefix: 12:34::/48
Preferred lifetime 100 sec, valid lifetime 200 sec
Will expire on Feb 4 2014 at 15:37:20(80 seconds left)
DNS server addresses:
2000::FF
Domain name:
example.com
SIP server addresses:
2:2::4
SIP server domain names:
bbb.com
# Verify that the client has obtained an IPv6 prefix.
[Switch] display ipv6 prefix 1
Number: 1
Type : Dynamic
Prefix: 12:34::/48
Preferred lifetime 100 sec, valid lifetime 200 sec
# Verify that the client has created a dynamic DHCPv6 option group for saving configuration parameters.
[Switch] display ipv6 dhcp option-group 1
DHCPv6 option group: 1
DNS server addresses:
Type: Dynamic (DHCPv6 prefix allocation)
Interface: Vlan-interface2
2000::FF
Domain name:
Type: Dynamic (DHCPv6 prefix allocation)
Interface: Vlan-interface2
example.com
SIP server addresses:
Type: Dynamic (DHCPv6 prefix allocation)
Interface: Vlan-interface2
2:2::4
SIP server domain names:
Type: Dynamic (DHCPv6 prefix allocation)
Interface: Vlan-interface2
bbb.com
IPv6 address and prefix acquisition configuration example
Network requirements
As shown in Figure 18, configure the switch to use DHCPv6 to obtain configuration parameters from the DHCPv6 server. The parameters include IPv6 address, IPv6 prefix, DNS server address, domain name suffix, SIP server address, and SIP server domain name.

Configuration procedure
You must configure the DHCPv6 server before configuring the DHCPv6 client. For information about configuring the DHCPv6 server, see "Configuring the DHCPv6 server."
# Configure an IPv6 address for VLAN-interface 2 that is connected to the DHCPv6 server.
<Switch> system-view
[Switch] interface vlan-interface 2
[Switch-Vlan-interface2] ipv6 address 1::2/48
# Configure VLAN-interface 2 as a DHCPv6 client for IPv6 address and prefix acquisition. Specify IDs for the dynamic IPv6 prefix and dynamic DHCPv6 option group, and configure the client to support rapid address and prefix assignment.
[Switch-Vlan-interface2] ipv6 dhcp client stateful prefix 1 rapid-commit option-group 1
[Switch-Vlan-interface2] quit
Verifying the configuration
# Verify that the DHCPv6 client has obtained an IPv6 address, an IPv6 prefix, and other configuration parameters from the DHCPv6 server.
[Switch] display ipv6 dhcp client
Vlan-interface2:
Type: Stateful client requesting address and prefix
State: OPEN
Client DUID: 0003000100e002000000
Preferred server:
Reachable via address: FE80::2E0:1FF:FE00:18
Server DUID: 0003000100e001000000
IA_NA: IAID 0x00000642, T1 50 sec, T2 80 sec
Address: 1:1::2/128
Preferred lifetime 100 sec, valid lifetime 200 sec
Will expire on Mar 27 2014 at 08:02:00 (199 seconds left)
IA_PD: IAID 0x00000642, T1 50 sec, T2 80 sec
Prefix: 12:34::/48
Preferred lifetime 100 sec, valid lifetime 200 sec
Will expire on Mar 27 2014 at 08:02:00 (199 seconds left)
DNS server addresses:
2000::FF
Domain name:
example.com
SIP server addresses:
2:2::4
SIP server domain names:
bbb.com
# Verify that the DHCPv6 client has obtained an IPv6 address.
[Switch] display ipv6 interface brief
*down: administratively down
(s): spoofing
Interface Physical Protocol IPv6 Address
Vlan-interface2 up up 1:1::2
# Verify that the client has obtained an IPv6 prefix.
[Switch] display ipv6 prefix 1
Number: 1
Type : Dynamic
Prefix: 12:34::/48
Preferred lifetime 100 sec, valid lifetime 200 sec
# Verify that the client has created a dynamic DHCPv6 option group for saving configuration parameters.
[Switch] display ipv6 dhcp option-group 1
DNS server addresses:
Type: Dynamic (DHCPv6 address and prefix allocation)
Interface: Vlan-interface2
2000::FF
Domain name:
Type: Dynamic (DHCPv6 address and prefix allocation)
Interface: Vlan-interface2
example.com
SIP server addresses:
Type: Dynamic (DHCPv6 address and prefix allocation)
Interface: Vlan-interface2
2:2::4
SIP server domain names:
Type: Dynamic (DHCPv6 address and prefix allocation)
Interface: Vlan-interface2
bbb.com
Stateless DHCPv6 configuration example
Network requirements
As shown in Figure 19, configure Switch A to use stateless DHCPv6 to obtain configuration parameters except IPv6 address and IPv6 prefix. Switch B acts as the gateway and advertises RA messages periodically.
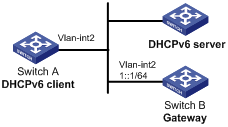
Configuration procedure
You must configure the DHCPv6 server first before configuring the DHCPv6 client. For information about configuring DHCPv6 server, see "Configuring the DHCPv6 server."
1. Configure the gateway Switch B.
# Configure an IPv6 address for VLAN-interface 2.
<SwitchB> system-view
[SwitchB] interface vlan-interface 2
[SwitchB-Vlan-interface2] ipv6 address 1::1 64
# Set the O flag to 1 in RA advertisements to be sent on VLAN-interface 2. Hosts that receive the RA advertisements will obtain information other than IPv6 address through DHCPv6.
[SwitchB-Vlan-interface2] ipv6 nd autoconfig other-flag
# Disable RA message suppression on VLAN-interface 2.
[SwitchB-Vlan-interface2] undo ipv6 nd ra halt
2. Configure the DHCPv6 client Switch A.
# Enable stateless IPv6 address autoconfiguration on VLAN-interface 2.
<SwitchA> system-view
[SwitchA] interface vlan-interface 2
[SwitchA-Vlan-interface2] ipv6 address auto
With stateless IPv6 address autoconfiguration enabled, but no IPv6 address configured for VLAN-interface 2, Switch A automatically generates a link local address. It sends an RS message to Switch B to request configuration information for IPv6 address generation. Upon receiving the RS message, Switch B sends back an RA message. After receiving an RA message with the M flag set to 0 and the O flag set to 1, Switch A performs stateless DHCPv6 to get other configuration parameters.
Verifying the configuration
# Display the DHCPv6 client information.
[SwitchA-Vlan-interface2] display ipv6 dhcp client interface vlan-interface 2
Vlan-interface2:
Type: Stateless client
State: OPEN
Client DUID: 00030001000fe2ff0000
Preferred server:
Reachable via address: FE80::213:7FFF:FEF6:C818
Server DUID: 0003000100137ff6c818
DNS server addresses:
1:2:4::5
1:2:4::7
Domain name:
abc.com
# Display the DHCPv6 client statistics.
[SwitchA-Vlan-interface2] display ipv6 dhcp client statistics
Interface : Vlan-interface2
Packets received : 1
Reply : 1
Advertise : 0
Reconfigure : 0
Invalid : 0
Packets sent : 5
Solicit : 0
Request : 0
Renew : 0
Rebind : 0
Information-request : 5
Release : 0
Decline : 0
Configuring DHCPv6 snooping
Overview
DHCPv6 snooping works between the DHCPv6 client and server, or between the DHCPv6 client and DHCPv6 relay agent. It guarantees that DHCPv6 clients obtain IPv6 addresses or prefixes from authorized DHCPv6 servers. Also, it records IP-to-MAC bindings of DHCPv6 clients (called DHCPv6 snooping address entries) and prefix-to-port bindings of DHCPv6 clients (called DHCPv6 snooping prefix entries) for security purposes.
DHCPv6 snooping does not work between the DHCPv6 server and DHCPv6 relay agent.
DHCPv6 snooping defines trusted and untrusted ports to make sure that clients obtain IPv6 addresses only from authorized DHCPv6 servers.
· Trusted—A trusted port can forward DHCPv6 messages correctly to make sure the clients get IPv6 addresses from authorized DHCPv6 servers.
· Untrusted—An untrusted port discards received messages sent by DHCPv6 servers to prevent unauthorized servers from assigning IPv6 addresses.
DHCPv6 snooping reads DHCP-ACK messages received from trusted ports and DHCP-REQUEST messages to create DHCPv6 snooping entries. A DHCPv6 snooping entry can be an address entry or a prefix entry.
· A DHCPv6 address entry includes the MAC and IP addresses of a client, the port that connects to the DHCPv6 client, and the VLAN. You can use the display ipv6 dhcp snooping binding command to display the IP addresses of users for management.
· A DHCPv6 prefix entry includes the prefix and lease information assigned to the client, the port that connects to the DHCPv6 client, and the VLAN. You can use the command to display display ipv6 dhcp snooping pd binding command to display the prefixes of the users for management.
Application of trusted and untrusted ports
Configure ports facing the DHCPv6 server as trusted ports, and configure other ports as untrusted ports.
As shown in Figure 20, configure the DHCPv6 snooping device's port that is connected to the DHCPv6 server as a trusted port. The trusted port forwards response messages from the DHCPv6 server to the client. The untrusted port connected to the unauthorized DHCPv6 server discards incoming DHCPv6 response messages.
Figure 20 Trusted and untrusted ports

Implementation of Option 18 and Option 37
Option 18 for DHCPv6 snooping
Option 18, also called the interface-ID option, is used by the DHCPv6 relay agent to determine the interface to use to forward RELAY-REPLY message.
The DHCPv6 snooping device adds Option 18 to the received DHCPv6 request message before forwarding it to the DHCPv6 server. The server then assigns IP address to the client based on the client information in Option 18.
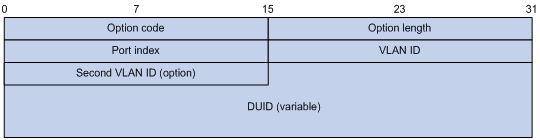
Figure 21 shows the Option 18 format, which includes the following fields:
· Option code—Option code.
· Option length—Size of the option data.
· Port index—Port that receives the DHCPv6 request from the client.
· VLAN ID—ID of the outer VLAN.
· Second VLAN ID—ID of the inner VLAN.
· DUID—DUID of the DHCPv6 client.
|
|
NOTE: The Second VLAN ID field is optional. If the received DHCPv6 request does not contain a second VLAN, Option 18 also does not contain it. |
DHCPv6 snooping support for Option 37
Option 37, also called the remote-ID option, is used to identify the client.
The DHCPv6 snooping device adds Option 37 to the received DHCPv6 request message before forwarding it to the DHCPv6 server. This option provides client information about address allocation.
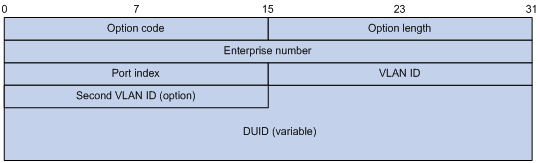
Figure 22 shows the Option 37 format, which includes the following fields:
· Option code—Option code.
· Option length—Size of the option data.
· Enterprise number—Enterprise number.
· Port index—Port that receives the DHCPv6 request from the client.
· VLAN ID—ID of the outer VLAN.
· Second VLAN ID—ID of the inner VLAN.
· DUID—DUID of the DHCPv6 client.
|
|
NOTE: The Second VLAN ID field is optional. If the received DHCPv6 request does not contain a second VLAN, Option 37 also does not contain it. |
DHCPv6 snooping configuration task list
|
Tasks at a glance |
|
(Required.) Configuring basic DHCPv6 snooping features |
|
(Optional.) Configuring Option 18 and Option 37 |
|
(Optional.) Configuring DHCPv6 snooping entry auto backup |
|
(Optional.) Setting the maximum number of DHCPv6 snooping entries |
|
(Optional.) Configuring DHCPv6 packet rate limit |
|
(Optional.) Enabling DHCPv6-REQUEST check |
|
(Optional.) Configuring a DHCPv6 packet blocking port |
|
(Optional.) Enabling DHCPv6 snooping logging |
Configuring basic DHCPv6 snooping features
Configuring basic DHCPv6 snooping features in a common network
Follow these guidelines when you configure basic DHCPv6 snooping:
· To make sure DHCPv6 clients can obtain valid IPv6 addresses, specify the ports connected to authorized DHCPv6 servers as trusted ports. The trusted ports and the ports connected to DHCPv6 clients must be in the same VLAN.
· If you configure DHCPv6 snooping settings on a Layer 2 Ethernet interface that is a member port of a Layer 2 aggregate interface, the settings do not take effect unless the interface is removed from the aggregation group.
To configure basic DHCPv6 snooping:
|
Step |
Command |
Remarks |
|
1. Enter system view. |
system-view |
N/A |
|
2. Enable DHCPv6 snooping. |
ipv6 dhcp snooping enable |
By default, DHCPv6 snooping is disabled. |
|
3. Enter interface view. |
interface interface-type interface-number |
This interface must connect to the DHCPv6 server. |
|
4. Specify the port as a trusted port. |
ipv6 dhcp snooping trust |
By default, all ports are untrusted ports after DHCPv6 snooping is enabled. |
|
5. Return to system view. |
quit |
N/A |
|
6. Enter interface view. |
interface interface-type interface-number |
This interface must connect to the DHCPv6 client. |
|
7. (Optional.) Enable recording DHCPv6 snooping entries. |
· Enable recording DHCPv6 snooping
address entries: · Enable recording DHCPv6 snooping prefix
entries: |
By default, recording of DHCPv6 snooping address entries is disabled. By default, recording of DHCPv6 snooping prefix entries is disabled. |
Configuring basic DHCPv6 snooping features in a VXLAN network
About basic DHCPv6 snooping features in a VXLAN network
In a VXLAN network, you can configure the following interfaces as DHCPv6 snooping trusted interfaces:
· ACs that are mapped to a VSI.
· VXLAN tunnel interfaces that are assigned to a VSI.
When the VTEP with DHCPv6 snooping configured receives a DHCPv6 request, the VTEP forwards this request through the trusted ACs or VXLAN tunnel interfaces.
Restrictions and guidelines
If the DHCPv6 server is in the local site, configure the AC that connects to the DHCPv6 server as trusted. If the DHCPv6 server is in a remote site, configure the VXLAN tunnel interface as trusted.
Configuring basic DHCPv6 snooping features in a VXLAN network (DHCPv6 server at the local site)
|
Step |
Command |
Remarks |
|
1. Enter system view. |
system-view |
N/A |
|
2. Enable DHCPv6 snooping globally. |
ipv6 dhcp snooping enable |
By default, DHCPv6 snooping is disabled globally. |
|
3. Enter interface view. |
interface interface-type interface-number |
N/A |
|
4. Enter Ethernet service instance view. |
service-instance instance-id |
N/A |
|
5. Configure the AC as the DHCPv6 snooping trusted interface. |
ipv6 dhcp snooping trust |
By default, all ports are untrusted after DHCPv6 snooping is enabled. |
|
6. Exit to interface view |
quit |
N/A |
|
7. Exit to the system view. |
quit |
N/A |
|
8. Enter VSI view. |
vsi vsi-name |
N/A |
|
9. (Optional.) Enable recording of client information in DHCPv6 snooping entries on the ACs mapped to the VSI and VXLAN tunnel interfaces assigned to the VSI. |
ipv6 dhcp snooping binding record |
By default, the recording of DHCP snooping entries is disabled. |
Configuring basic DHCPv6 snooping features in a VXLAN network (DHCPv6 server at a remote site)
|
Step |
Command |
Remarks |
|
1. Enter system view. |
system-view |
N/A |
|
2. Enable DHCPv6 snooping globally. |
ipv6 dhcp snooping enable |
By default, DHCP snooping is disabled globally. |
|
3. Enter VSI view. |
vsi vsi-name |
N/A |
|
4. Configure the VXLAN tunnel interfaces as the DHCP snooping trusted interface. |
ipv6 dhcp snooping trust tunnel |
By default, all ports are untrusted after DHCPv6 snooping is enabled. This command sets all VXLAN tunnel interfaces in the VSI as DHCPv6 snooping trusted interfaces. |
|
5. (Optional.) Enable recording of client information in DHCP snooping entries on the ACs mapped to the VSI and VXLAN tunnel interfaces assigned to the VSI. |
ipv6 dhcp snooping binding record |
By default, the recording of DHCP snooping entries is disabled. |
Configuring Option 18 and Option 37
|
Step |
Command |
Remarks |
|
1. Enter system view. |
system-view |
N/A |
|
2. Enter interface view. |
interface interface-type interface-number |
N/A |
|
3. Enable support for Option 18. |
ipv6 dhcp snooping option interface-id enable |
By default, Option 18 is not supported. |
|
4. (Optional.) Specify the content as the interface ID. |
ipv6 dhcp snooping option interface-id [ vlan vlan-id ] string interface-id |
By default, the DHCPv6 snooping device uses its DUID as the content for Option 18. |
|
5. Enable support for Option 37. |
ipv6 dhcp snooping option remote-id enable |
By default, Option 37 is not supported. |
|
· (Optional.) Specify the content as the remote ID. |
ipv6 dhcp snooping option remote-id [ vlan vlan-id ] string remote-id |
By default, the DHCPv6 snooping device uses its DUID as the content for Option 37. |
Configuring DHCPv6 snooping entry auto backup
The auto backup feature saves DHCPv6 snooping entries to a backup file, and allows the DHCPv6 snooping device to download the entries from the backup file at reboot. The entries on the DHCPv6 snooping device cannot survive a reboot. The auto backup helps the security features provide services if these features (such as IP source guard) must use DHCPv6 snooping entries for user authentication.
|
|
IMPORTANT: If you disable DHCPv6 snooping with the undo ipv6 dhcp snooping enable command, the device deletes all DHCPv6 snooping entries, including those stored in the backup file. |
To configure DHCPv6 snooping entry auto backup:
|
Step |
Command |
Remarks |
|
1. Enter system view. |
system-view |
N/A |
|
2. Configure the DHCPv6 snooping device to back up DHCPv6 snooping entries to a file. |
ipv6 dhcp snooping binding database filename { filename | url url [ username username [ password { cipher | simple } string ] ] } |
By default, the DHCPv6 snooping device does not back up the DHCPv6 snooping entries. With this command executed, the DHCPv6 snooping device backs up DHCPv6 snooping entries immediately and runs auto backup. This command automatically creates the file if you specify a non-existent file. |
|
3. (Optional.) Manually save DHCPv6 snooping entries to the backup file. |
ipv6 dhcp snooping binding database update now |
N/A |
|
4. (Optional.) Set the waiting time after a DHCPv6 snooping entry change for the DHCPv6 snooping device to update the backup file. |
ipv6 dhcp snooping binding database update interval interval |
The default waiting time is 300 seconds. The waiting period starts when a DHCPv6 snooping entry is learned, updated, or removed. The DHCPv6 snooping device updates the backup file when the specified waiting period is reached. All changed entries during the period will be saved to the backup file. If no DHCPv6 snooping entry changes, the backup file is not updated. |
Setting the maximum number of DHCPv6 snooping entries
Perform this task to prevent the system resources from being overused.
To set the maximum number of DHCPv6 snooping entries:
|
Step |
Command |
Remarks |
|
1. Enter system view. |
system-view |
N/A |
|
2. Enter interface view. |
interface interface-type interface-number |
N/A |
|
3. Set the maximum number of DHCPv6 snooping entries for the interface to learn. |
ipv6 dhcp snooping max-learning-num max-number |
By default, the number of DHCPv6 snooping entries for an interface to learn is not limited. |
Configuring DHCPv6 packet rate limit
This DHCPv6 packet rate limit feature discards exceeding DHCPv6 packets to prevent attacks that send large numbers of DHCPv6 packets.
To configure DHCPv6 packet rate limit:
|
Step |
Command |
Remarks |
|
1. Enter system view. |
system-view |
N/A |
|
2. Enter interface view. |
interface interface-type interface-number |
N/A |
|
3. Set the maximum rate at which an interface can receive DHCPv6 packets. |
ipv6 dhcp snooping rate-limit rate |
By default, incoming DHCPv6 packets on an interface are not rate limited. The rate configured on a Layer 2 aggregate interface applies to all members of the aggregate interface. If a member interface leaves the aggregation group, it uses the rate configured in its Ethernet interface view. |
Enabling DHCPv6-REQUEST check
Perform this task to use the DHCPv6-REQUEST check feature to protect the DHCPv6 server against DHCPv6 client spoofing attacks. Attackers can forge DHCPv6-RENEW messages to renew leases for legitimate DHCPv6 clients that no longer need the IP addresses. The forged messages disable the victim DHCPv6 server from releasing the IP addresses. Attackers can also forge DHCPv6-DECLINE or DHCPv6-RELEASE messages to terminate leases for legitimate DHCPv6 clients that still need the IP addresses.
The DHCPv6-REQUEST check feature enables the DHCPv6 snooping device to check every received DHCPv6-RENEW, DHCPv6-DECLINE, or DHCPv6-RELEASE message against DHCPv6 snooping entries.
· If any criterion in an entry is matched, the device compares the entry with the message information.
¡ If they are consistent, the device considers the message valid and forwards it to the DHCPv6 server.
¡ If they are different, the device considers the message forged and discards it.
· If no matching entry is found, the device forwards the message to the DHCPv6 server.
To enable DHCPv6-REQUEST check:
|
Step |
Command |
Remarks |
|
1. Enter system view. |
system-view |
N/A |
|
2. Enter interface view. |
interface interface-type interface-number |
N/A |
|
ipv6 dhcp snooping check request-message |
By default, DHCPv6-REQUEST check is disabled. |
Configuring a DHCPv6 packet blocking port
Perform this task to configure a port as a DHCPv6 packet blocking port. The DHCPv6 packet blocking port drops all incoming DHCP requests.
To configure a DHCPv6 packet blocking port:
|
Step |
Command |
Remarks |
|
1. Enter system view. |
system-view |
N/A |
|
2. Enter interface view. |
interface interface-type interface-number |
N/A |
|
3. Configure the port to block DHCPv6 requests. |
ipv6 dhcp snooping deny |
By default, the port does not block DHCPv6 requests. |
Enabling DHCPv6 snooping logging
The DHCPv6 snooping logging feature enables the DHCPv6 snooping device to generate DHCPv6 snooping logs and send them to the information center. For information about the log destination and output rule configuration in the information center, see Network Management and Monitoring Configuration Guide.
As a best practice, disable this feature if the log generation affects the device performance.
To enable DHCPv6 snooping logging:
|
Step |
Command |
Remarks |
|
1. Enter system view. |
system-view |
N/A |
|
2. Enable DHCPv6 snooping logging. |
ipv6 dhcp snooping log enable |
By default, DHCPv6 snooping logging is disabled. |
Displaying and maintaining DHCPv6 snooping
Execute display commands in any view, and reset commands in user view.
|
Task |
Command |
|
Display information about trusted ports. |
display ipv6 dhcp snooping trust |
|
Display DHCPv6 snooping address entries. |
display ipv6 dhcp snooping binding [ address ipv6-address [ vlan vlan-id ] ] |
|
Display information about the file that stores DHCPv6 snooping entries. |
display ipv6 dhcp snooping binding database |
|
(In standalone mode.) Display DHCPv6 packet statistics for DHCPv6 snooping. |
display ipv6 dhcp snooping packet statistics [ slot slot-number ] |
|
(In IRF mode.) Display DHCPv6 packet statistics for DHCPv6 snooping. |
display ipv6 dhcp snooping packet statistics [ chassis chassis-number slot slot-number ] |
|
Display DHCPv6 snooping prefix entries. |
display ipv6 dhcp snooping pd binding [ prefix prefix/prefix-length [ vlan vlan-id ] ] |
|
Clear DHCPv6 snooping address entries. |
reset ipv6 dhcp snooping binding { all | address ipv6-address [ vlan vlan-id ] } |
|
(In standalone mode.) Clear DHCPv6 packet statistics for DHCPv6 snooping. |
reset ipv6 dhcp snooping packet statistics [ slot slot-number ] |
|
(In IRF mode.) Clear DHCPv6 packet statistics for DHCPv6 snooping. |
reset ipv6 dhcp snooping packet statistics [ chassis chassis-number slot slot-number ] |
|
Clear DHCPv6 snooping prefix entries. |
reset ipv6 dhcp snooping pd binding { all | prefix prefix/prefix-length [ vlan vlan-id ] } |
DHCPv6 snooping configuration example
Network requirements
As shown in Figure 23, Switch B is connected to the authorized DHCPv6 server through GigabitEthernet 1/0/1, to the unauthorized DHCPv6 server through GigabitEthernet 1/0/3, and to the DHCPv6 client through GigabitEthernet 1/0/2.
Configure only the port connected to the authorized DHCPv6 server to forward the responses from the DHCPv6 server. Enable the DHCPv6 snooping device to record DHCPv6 snooping address entries.
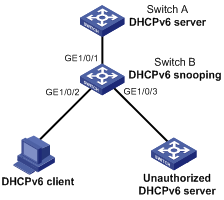
Configuration procedure
# Enable DHCPv6 snooping.
<SwitchB> system-view
[SwitchB] ipv6 dhcp snooping enable
# Specify GigabitEthernet 1/0/1 as a trusted port.
[SwitchB] interface gigabitethernet 1/0/1
[SwitchB-GigabitEthernet1/0/1] ipv6 dhcp snooping trust
[SwitchB-GigabitEthernet1/0/1] quit
# Enable recording DHCPv6 snooping address entries on GigabitEthernet 1/0/2.
[SwitchB]interface gigabitethernet 1/0/2
[SwitchB-GigabitEthernet1/0/2] ipv6 dhcp snooping binding record
[SwitchB-GigabitEthernet1/0/2] quit
Verifying the configuration
# Verify that the DHCPv6 client obtains an IPv6 address and all other configuration parameters only from the authorized DHCPv6 server. (Details not shown.)
# Display DHCPv6 snooping address entries on the DHCPv6 snooping device.
[SwitchB] display ipv6 dhcp snooping binding
Configuring DHCPv6 guard
About DHCPv6 guard
The DHCPv6 guard feature filters DHCPv6 Advertise and Reply messages by using DHCPv6 guard policies to make sure DHCPv6 clients obtain addresses/prefixes from authorized DHCPv6 servers. To provide finer level of filtering granularity, you can specify the following parameters for a DHCPv6 guard policy:
· Device role of the device that attached to the target interface or VLAN. The interface or VLAN to which the DHCPv6 guard policy is applied is called the target interface or VLAN.
· DHCPv6 server match criterion.
· Match criterion for IPv6 addresses/prefixes assigned by DHCPv6 servers.
· Allowed DHCPv6 server preference range.
To meet requirements of DHCPv6 clients in different locations, apply DHCPv6 guard policies to different interfaces or VLANs on the same device. This feature enables the device to take different actions when receiving different types DHCPv6 messages on the target interfaces or VLANs:
|
Received messages |
Actions |
|
DHCPv6 Solicit and Request messages. |
Forwards them without filtering. |
|
Advertise messages if the device role of DHCPv6 server is set. |
Forwards only Advertise messages in which the source IP address is permitted by the ACL and the server preference is in the match range. |
|
Reply messages if the device role of DHCPv6 server is set. |
Forwards only Reply messages in which the assigned IPv6 addresses/prefixes are permitted by the ACL. |
|
Advertise or Reply messages if the device role of DHCPv6 client is set. |
Drops them. |
|
Advertise or Reply messages received on the trusted ports. |
Forwards them without filtering. |
Configuration restrictions and guidelines
The DHCPv6 guard feature operates correctly only when the device is located between the DHCPv6 client and the DHCPv6 server or between the DHCPv6 client and the DHCPv6 relay agent. If the device is located between the DHCPv6 server and the DHCPv6 relay agent, the DHCPv6 guard feature cannot operate correctly.
When the DHCPv6 guard feature is configured on a DHCPv6 snooping device, both features can take effect. The device forwards DHCPv6 reply packets received on a DHCPv6 snooping trusted port only if they pass the DHCPv6 guard check. These packets are dropped if they fail the DHCPv6 guard check.
DHCPv6 guard configuration task list
|
Tasks at a glance |
Remarks |
|
(Required.) Configuring a DHCPv6 guard policy |
N/A |
|
(Required.) Perform one of the following tasks: |
If DHCPv6 guard polices are applied to both an interface and the VLAN of the interface, the interface-specific policy is used on the interface. |
Configuring a DHCPv6 guard policy
|
Step |
Command |
Remarks |
|
1. Enter system view. |
system-view |
N/A |
|
2. Create a DHCPv6 guard policy and enter its view. |
ipv6 dhcp guard policy policy-name |
N/A |
|
3. Specify the role of the device attached to the target interface or VLAN. |
device-role { client | server } |
By default, the device role is DHCPv6 client for the device attached to the target interface or VLAN. |
|
4. Configure a DHCPv6 server match criterion. |
if-match server acl { acl-number | name acl-name } |
By default, no DHCPv6 server match criterion is configured, and all DHCPv6 servers are authorized. |
|
5. Configure a match criterion for the assigned IPv6 addresses/prefixes. |
if-match reply acl { acl-number | name acl-name } |
By default, no match criterion is configured for the assigned IPv6 addresses/prefixes, and all assigned IPv6 addresses/prefixes can pass the address/prefix check. |
|
6. Configure an allowed DHCPv6 server preference range. |
preference { max max-value | min min-value } * |
By default, no DHCPv6 server preference range is configured, and DHCPv6 servers with preferences 1 to 255 can pass the preference check. |
|
7. Configure the port to which the policy applies as a trusted port for the policy. |
trust port |
By default, no trusted port is configured for a DHCPv6 guard policy. |
Applying a DHCPv6 guard policy to an interface
|
Step |
Command |
Remarks |
|
1. Enter system view. |
system-view |
N/A |
|
2. Enter interface view. |
interface interface-type interface-number |
N/A |
|
3. Apply a DHCPv6 guard policy to the interface. |
ipv6 dhcp guard apply policy policy-name |
By default, no DHCP guard policy is applied to the interface. |
Applying a DHCPv6 guard policy to a VLAN
|
Step |
Command |
Remarks |
|
1. Enter system view. |
system-view |
N/A |
|
2. Create a VLAN and enter its view. |
vlan vlan-number |
N/A |
|
3. Apply a DHCPv6 guard policy to the VLAN. |
ipv6 dhcp guard apply policy policy-name |
By default, no DHCP guard policy is applied to the VLAN. |
Displaying and maintaining DHCPv6 guard
Execute display commands in any view.
|
Task |
Command |
|
Display information about DHCPv6 guard policies. |
display ipv6 dhcp guard policy [ policy-name ] |
DHCPv6 guard configuration example
Network requirements
As shown in Figure 24, all DHCPv6 servers and clients are in VLAN 100. The assignable IPv6 address ranges on the DHCPv6 server 1, server 2, and server 3 are 2001::/64, 2001::/64, and 2002::/64, respectively.
Configure DHCPv6 guard on the switch, so that the switch forwards only DHCPv6 replies with the source IPv6 address in the range of FE80::/12 and assigned prefixes in the range of 2001::/16.

Configuration procedure
Before you configure DHCPv6 guard, complete the configuration on DHCPv6 servers.
# Create VLAN 100, and assign GigabitEthernet 1/0/1, GigabitEthernet 1/0/2, GigabitEthernet 1/0/3, and GigabitEthernet 1/0/4 to VLAN 100.
<Switch> system-view
[Switch] vlan 100
[Switch-vlan100] port gigabitethernet 1/0/1 to gigabitethernet 1/0/4
[Switch-vlan100] quit
# Create an IPv6 basic ACL numbered 2001.
[Switch] acl ipv6 number 2001
# Create rule 1 to permit only packets with source IPv6 addresses in the range of FE80::/12.
[Switch-acl-ipv6-basic-2001] rule 1 permit source fe80:: 12
[Switch-acl-ipv6-basic-2001] quit
# Create an IPv6 basic ACL numbered 2002.
[Switch] acl ipv6 number 2002
# Create rule 1 to permit only packets with source IPv6 addresses in the range of 2001::/16.
[Switch-acl-ipv6-basic-2002] rule 1 permit source 2001:: 16
[Switch-acl-ipv6-basic-2002] quit
# Create DHCPv6 guard policy named p1.
[Switch] ipv6 dhcp guard policy p1
# Set the device role to the DHCPv6 server for the device attached to the target VLAN.
[Switch-dhcp6-guard-policy-p1] device-role server
# Specify ACL 2001 to match DHCPv6 servers.
[Switch-dhcp6-guard-policy-p1] if-match server acl 2001
# Specify ACL 2002 to match addresses/prefixes assigned by DHCPv6 servers.
[Switch-dhcp6-guard-policy-p1] if-match reply acl 2002
[Switch-dhcp6-guard-policy-p1] quit
# Create DHCPv6 guard policy named p2.
[Switch] ipv6 dhcp guard policy p2
# Set the device role to the DHCPv6 client for the device attached to the target interface.
[Switch-dhcp6-guard-policy-p2] device-role client
[Switch-dhcp6-guard-policy-p2] quit
# Apply DHCPv6 guard policy p1 to VLAN 100.
[Switch] vlan 100
[Switch-vlan100] ipv6 dhcp guard apply policy p1
[Switch-vlan100] quit
# Apply DHCPv6 guard policy p2 to GigabitEthernet 1/0/4.
[Switch]interface gigabitethernet 1/0/4
[Switch-GigabitEthernet1/0/4] ipv6 dhcp guard apply policy p2
[Switch-GigabitEthernet1/0/4] quit
Verifying the configuration
Verify that the switch forwards DHCPv6 replies with the source IPv6 address in the range of FE80::/12 and the assigned prefix in the range of 2001::/16. The switch forwards DHCP replies from the DHCPv6 server 1 and drops replies from DHCPv6 server 2 and server 3.