- Table of Contents
-
- 04-Layer 2 - LAN Switching Configuration Guide
- 00-Preface
- 01-MAC address table configuration
- 02-Ethernet link aggregation configuration
- 03-Port isolation configuration
- 04-Spanning tree configuration
- 05-Loop detection configuration
- 06-VLAN configuration
- 07-MVRP configuration
- 08-QinQ configuration
- 09-VLAN mapping configuration
- 10-LLDP configuration
- 11-Service loopback group configuration
- 12-EPON configuration
- Related Documents
-
| Title | Size | Download |
|---|---|---|
| 01-MAC address table configuration | 197.21 KB |
Contents
Configuring the MAC address table
How a MAC address entry is created
MAC address table configuration task list
Configuring MAC address entries
Adding or modifying a static or dynamic MAC address entry globally
Adding or modifying a static or dynamic MAC address entry on an interface
Adding or modifying a blackhole MAC address entry
Adding or modifying a multiport unicast MAC address entry
Disabling MAC address learning
Disabling global MAC address learning
Disabling MAC address learning on interfaces
Disabling MAC address learning on a VLAN
Setting the aging timer for dynamic MAC address entries
Setting the MAC learning limit on an interface
Assigning MAC learning priority to interfaces
Enabling MAC address synchronization
Configuring MAC address move notifications and suppression
Configuring MAC address move notifications
Configuring MAC address move suppression
Enabling ARP fast update for MAC address moves
Enabling SNMP notifications for the MAC address table
Displaying and maintaining the MAC address table
MAC address table configuration example
Setting the MAC Information mode
Setting the MAC change notification interval
Setting the MAC Information queue length
MAC Information configuration example
Configuration restrictions and guidelines
Configuring the MAC address table
Overview
An Ethernet device uses a MAC address table to forward frames. A MAC address entry includes a destination MAC address, an outgoing interface, and a VLAN ID. When the device receives a frame, it uses the destination MAC address of the frame to look for a match in the MAC address table.
· The device forwards the frame out of the outgoing interface in the matching entry if a match is found.
· The device floods the frame in the VLAN of the frame if no match is found.
How a MAC address entry is created
The entries in the MAC address table include entries automatically learned by the device and entries manually added.
MAC address learning
The device can automatically populate its MAC address table by learning the source MAC addresses of incoming frames on each interface.
When a frame arrives at an interface (for example, port A), the device performs the following tasks:
1. Checks the source MAC address (for example, MAC-SOURCE) of the frame.
2. Looks up the source MAC address in the MAC address table.
¡ The device updates the entry if an entry is found.
¡ The device adds an entry for MAC-SOURCE and port A if no entry is found.
3. When the device receives a frame destined for MAC-SOURCE after learning this source MAC address, the device performs the following tasks:
a. Finds the MAC-SOURCE entry in the MAC address table.
b. Forwards the frame out of port A.
The device performs the learning process each time it receives a frame with an unknown source MAC address until the table is fully populated.
Manually configuring MAC address entries
Dynamic MAC address learning does not distinguish between illegitimate and legitimate frames, which can invite security hazards. When Host A is connected to port A, a MAC address entry will be learned for the MAC address of Host A (for example, MAC A). When an illegal user sends frames with MAC A as the source MAC address to port B, the device performs the following tasks:
1. Learns a new MAC address entry with port B as the outgoing interface and overwrites the old entry for MAC A.
2. Forwards frames destined for MAC A out of port B to the illegal user.
As a result, the illegal user obtains the data of Host A. To improve the security for Host A, manually configure a static entry to bind Host A to port A. Then, the frames destined for Host A are always sent out of port A. Other hosts using the forged MAC address of Host A cannot obtain the frames destined for Host A.
Types of MAC address entries
A MAC address table can contain the following types of entries:
· Static entries—A static entry is manually added to forward frames with a specific destination MAC address out of the associated interface, and it never ages out. A static entry has higher priority than a dynamically learned one.
· Dynamic entries—A dynamic entry can be manually configured or dynamically learned to forward frames with a specific destination MAC address out of the associated interface. A dynamic entry might age out. A manually configured dynamic entry has the same priority as a dynamically learned one.
· Blackhole entries—A blackhole entry is manually configured and never ages out. A blackhole entry is configured for filtering out frames with a specific source or destination MAC address. For example, to block all frames destined for or sourced from a user, you can configure the MAC address of the user as a blackhole MAC address entry. A blackhole entry has higher priority than a dynamically learned one.
· Multiport unicast entries—A multiport unicast entry is manually added to send frames with a specific unicast destination MAC address out of multiple ports, and it never ages out. A multiport unicast entry has higher priority than a dynamically learned one.
A static, blackhole, or multiport unicast MAC address entry can overwrite a dynamic MAC address entry, but not vice versa. A static entry, a blackhole entry, and a multiport unicast entry cannot overwrite one another.
MAC address table configuration task list
The configuration tasks discussed in the following sections can be performed in any order.
This document covers only the configuration of unicast MAC address entries, including static, dynamic, blackhole, and multiport unicast MAC address entries. For information about configuring static multicast MAC address entries, see IP Multicast Configuration Guide. For information about MAC address table configuration in VPLS, see MPLS Configuration Guide.
To configure the MAC address table, perform the following tasks:
Configuring MAC address entries
Configuration guidelines
· You cannot add a dynamic MAC address entry if a learned entry already exists with a different outgoing interface for the MAC address.
· The manually configured static, blackhole, and multiport unicast MAC address entries cannot survive a reboot if you do not save the configuration. The manually configured dynamic MAC address entries are lost upon reboot whether or not you save the configuration.
A frame whose source MAC address matches different types of MAC address entries is processed differently.
|
Type |
Description |
|
Static MAC address entry |
Forwards the frame according to the destination MAC address regardless of whether the frame's ingress interface is the same as that in the entry. |
|
Multiport unicast MAC address entry |
· Learns the MAC address (MAC A) of the frame and generates a dynamic MAC address entry, but the entry does not take effect. · Forwards frames destined for MAC A based on the multiport unicast MAC address entry. |
|
Dynamic MAC address entry |
· Learns the MAC address of the frames received on a different interface from that in the entry and overwrites the original entry. · Forwards the frame received on the same interface as that in the entry and updates the aging timer for the entry. |
|
Blackhole MAC address entry |
Discards the frame. |
Adding or modifying a static or dynamic MAC address entry globally
|
Step |
Command |
Remarks |
|
1. Enter system view. |
system-view |
N/A |
|
2. Add or modify a static or dynamic MAC address entry. |
mac-address { dynamic | static } mac-address interface interface-type interface-number vlan vlan-id |
By default, no MAC address entry is configured globally. Make sure you have created the VLAN and assigned the interface to the VLAN. |
Adding or modifying a static or dynamic MAC address entry on an interface
|
Step |
Command |
Remarks |
|
1. Enter system view. |
system-view |
N/A |
|
2. Enter interface view. |
· Enter Layer 2 Ethernet interface view: · Enter Layer 2 aggregate interface view: |
N/A |
|
3. Add or modify a static or dynamic MAC address entry. |
mac-address { dynamic | static } mac-address vlan vlan-id |
By default, no MAC address entry is configured on the interface. Make sure you have created the VLAN and assigned the interface to the VLAN. |
Adding or modifying a blackhole MAC address entry
|
Step |
Command |
Remarks |
|
1. Enter system view. |
system-view |
N/A |
|
2. Add or modify a blackhole MAC address entry. |
mac-address blackhole mac-address vlan vlan-id |
By default, no blackhole MAC address entry is configured. Make sure you have created the VLAN. |
Adding or modifying a multiport unicast MAC address entry
You can configure a multiport unicast MAC address entry to associate a unicast destination MAC address with multiple ports. The frame with a destination MAC address matching the entry is sent out of multiple ports.
For example, when a group of servers are processing a request from a client, the client does not need to know that more than one server is responding. In this case, you can configure a multiport unicast MAC address entry on the device connected to the server group. Then, the device forwards the frame destined for the server group to every server in the group.
You can configure a multiport unicast MAC address entry globally or on an interface.
The configuration of multiport unicast MAC address entries is not supported on ports of the LSQM1SRP8X2QE0 MPU.
Configuring a multiport unicast MAC address entry globally
|
Step |
Command |
Remarks |
|
1. Enter system view. |
system-view |
N/A |
|
2. Add or modify a multiport unicast MAC address entry. |
mac-address multiport mac-address interface interface-list vlan vlan-id |
By default, no multiport unicast MAC address entry is configured globally. Make sure you have created the VLAN and assigned the interface to the VLAN. |
Configuring a multiport unicast MAC address entry on an interface
|
Step |
Command |
Remarks |
|
1. Enter system view. |
system-view |
N/A |
|
2. Enter interface view. |
· Enter Layer 2 Ethernet interface view: · Enter Layer 2 aggregate interface view: |
N/A |
|
3. Add the interface to a multiport unicast MAC address entry. |
mac-address multiport mac-address vlan vlan-id |
By default, no multiport unicast MAC address entry is configured on the interface. Make sure you have created the VLAN and assigned the interface to the VLAN. |
Disabling MAC address learning
MAC address learning is enabled by default. To prevent the MAC address table from being saturated when the device is experiencing attacks, disable MAC address learning. For example, you can disable MAC address learning to prevent the device from being attacked by a large amount of frames with different source MAC addresses.
After MAC address learning is disabled, existing dynamic MAC address entries age out when the aging timer expires.
Disabling global MAC address learning
After you disable global MAC address learning, the device stops learning MAC addresses on all interfaces.
The global MAC address learning configuration does not take effect on a VPLS VSI. For information about VSIs, see MPLS Configuration Guide.
To disable global MAC address learning:
|
Step |
Command |
Remarks |
|
1. Enter system view. |
system-view |
N/A |
|
2. Disable global MAC address learning. |
undo mac-address mac-learning enable |
By default, global MAC address learning is enabled. |
Disabling MAC address learning on interfaces
When global MAC address learning is enabled, you can disable MAC address learning on a single interface.
To disable MAC address learning on an interface:
|
Step |
Command |
Remarks |
|
1. Enter system view. |
system-view |
N/A |
|
2. Enter interface view. |
· Enter Layer 2 Ethernet interface view: · Enter Layer 2 aggregate interface view: |
N/A |
|
3. Disable MAC address learning on the interface. |
undo mac-address mac-learning enable |
By default, MAC address learning on the interface is enabled. |
Disabling MAC address learning on a VLAN
When global MAC address learning is enabled, you can disable MAC address learning on a per-VLAN basis.
To disable MAC address learning on a VLAN:
|
Step |
Command |
Remarks |
|
1. Enter system view. |
system-view |
N/A |
|
2. Enable global MAC address learning. |
mac-address mac-learning enable |
By default, global MAC address learning is enabled. |
|
3. Enter VLAN view. |
vlan vlan-id |
N/A |
|
4. Disable MAC address learning on the VLAN. |
undo mac-address mac-learning enable |
By default, MAC address learning on the VLAN is enabled. |
Setting the aging timer for dynamic MAC address entries
For security and efficient use of table space, the MAC address table uses an aging timer for each dynamic MAC address entry. If a dynamic MAC address entry is not updated before the aging timer expires, the device deletes the entry. This aging mechanism ensures that the MAC address table can promptly update to accommodate latest network topology changes.
A stable network requires a longer aging interval, and an unstable network requires a shorter aging interval.
An aging interval that is too long might cause the MAC address table to retain outdated entries. As a result, the MAC address table resources might be exhausted, and the MAC address table might fail to update its entries to accommodate the latest network changes.
An interval that is too short might result in removal of valid entries, which would cause unnecessary floods and possibly affect the device performance.
To reduce floods on a stable network, set a long aging timer or disable the timer to prevent dynamic entries from unnecessarily aging out. Reducing floods improves the network performance. Reducing flooding also improves the security because it reduces the chances for a data frame to reach unintended destinations.
To set the aging timer for dynamic MAC address entries:
|
Step |
Command |
Remarks |
|
1. Enter system view. |
system-view |
N/A |
|
2. Set the aging timer for dynamic MAC address entries. |
mac-address timer { aging seconds | no-aging } |
The default setting is 300 seconds. The no-aging keyword disables the aging timer. |
Setting the MAC learning limit on an interface
This feature limits the MAC address table size. A large MAC address table will degrade forwarding performance.
The MAC learning limit does not take effect on TRILL ports.
To set the MAC learning limit on an interface:
|
Step |
Command |
Remarks |
|
1. Enter system view. |
system-view |
N/A |
|
2. Enter Layer 2 Ethernet interface view. |
interface interface-type interface-number |
N/A |
|
3. Set the MAC learning limit on the interface. |
mac-address max-mac-count count |
By default, the number of learned MAC addresses is not limited. |
Configuring the unknown frame forwarding rule after the MAC learning limit on an interface is reached
You can enable or disable forwarding of unknown frames after the MAC learning limit is reached.
In this document, unknown frames refer to frames whose source MAC addresses are not in the MAC address table.
To configure the device to forward unknown frames received on the interface after the MAC learning limit on the interface is reached:
|
Step |
Command |
Remarks |
|
1. Enter system view. |
system-view |
N/A |
|
2. Enter interface view. |
· Enter Layer 2 Ethernet interface view. · Enter Layer 2 aggregate interface view. |
N/A |
|
3. Configure the device to forward unknown frames received on the interface after the MAC learning limit on the interface is reached. |
mac-address max-mac-count enable-forwarding |
By default, the device can forward unknown frames received on an interface after the MAC learning limit on the interface is reached. You can use the undo mac-address max-mac-count enable-forwarding command in Layer 2 aggregate interfaces. |
Assigning MAC learning priority to interfaces
The MAC learning priority mechanism assigns either low priority or high priority to an interface. An interface with high priority can learn MAC addresses as usual. However, an interface with low priority is not allowed to learn MAC addresses already learned on a high-priority interface.
The MAC learning priority mechanism can help defend your network against MAC address spoofing attacks. In a network that performs MAC-based forwarding, an upper layer device MAC address might be learned by a downlink interface because of a loop or attack to the downlink interface. To avoid this problem, perform the following tasks:
· Assign high MAC learning priority to an uplink interface.
· Assign low MAC learning priority to a downlink interface.
To assign MAC learning priority to an interface:
|
Step |
Command |
Remarks |
|
1. Enter system view. |
system-view |
N/A |
|
2. Enter interface view. |
· Enter Layer 2 Ethernet interface view: · Enter Layer 2 aggregate interface view: |
N/A |
|
3. Assign MAC learning priority to the interface. |
mac-address mac-learning priority { high | low } |
By default, low MAC learning priority is used. |
Enabling MAC address synchronization
To avoid unnecessary floods and improve forwarding speed, make sure all cards have the same MAC address table. After you enable MAC address synchronization, each card advertises learned MAC address entries to other cards. (In standalone mode.)
To avoid unnecessary floods and improve forwarding speed, make sure all cards have the same MAC address table. After you enable MAC address synchronization, each card advertises learned MAC address entries to other cards of all member devices. (In IRF mode.)
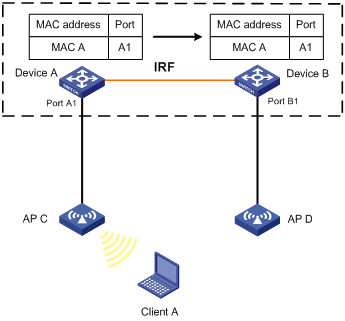
As shown in Figure 1:
· Device A and Device B form an IRF fabric enabled with MAC address synchronization.
· Device A and Device B connect to AP C and AP D, respectively.
When Client A associates with AP C, Device A learns a MAC address entry for Client A and advertises it to Device B.
Figure 1 MAC address tables of devices when Client A accesses AP C
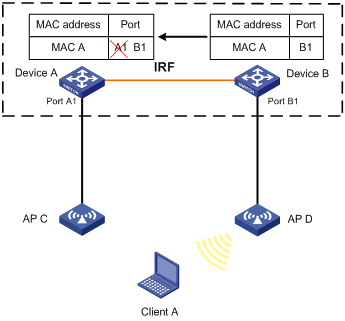
When Client A roams to AP D, Device B learns a MAC address entry for Client A. Device B advertises it to Device A to ensure service continuity for Client A, as shown in Figure 2.
Figure 2 MAC address tables of devices when Client A roams to AP D
To enable MAC address synchronization:
|
Step |
Command |
Remarks |
|
1. Enter system view. |
system-view |
N/A |
|
2. Enable MAC address synchronization. |
mac-address mac-roaming enable |
By default, MAC address synchronization is disabled. |
Configuring MAC address move notifications and suppression
The outgoing interface for a MAC address entry learned on interface A is changed to interface B when the following conditions exist:
· Interface B receives a packet with the MAC address as the source MAC address.
· Interface B belongs to the same VLAN as interface A.
In this case, the MAC address is moved from interface A to interface B, and a MAC address move occurs.
If a MAC address is continuously moved between the two interfaces, Layer 2 loops might occur. To detect and locate loops, you can configure MAC address move notifications and MAC address move suppression.
Configuring MAC address move notifications
This feature enables the device to output MAC address move logs when MAC address moves are detected.
To display the MAC address move records after the device is started, use the display mac-address mac-move command.
To configure MAC address move notifications:
|
Step |
Command |
Remarks |
|
3. Enter system view. |
system-view |
N/A |
|
4. Enable MAC address move notifications, and optionally specify a MAC move detection interval. |
mac-address notification mac-move [ interval interval-value ] |
By default, MAC address move notifications are disabled. If you do not specify a MAC move detection interval, the default setting of 1 minute is used. To enable the system to display MAC address move logs, you must execute the snmp-agent trap enable mac-address command after executing the mac-address notification mac-move command. |
Configuring MAC address move suppression
When the system detects that a MAC address frequently moves to or from an interface, you can configure MAC address move suppression on the interface to shut it down. The interface automatically comes up after waiting for a suppression interval. Also, you can use the shutdown command and then the undo shutdown command to bring up the interface.
To configure MAC address move suppression:
|
Step |
Command |
Remarks |
|
1. Enter system view. |
system-view |
N/A |
|
2. (Optional.) Set a suppression interval for MAC address moves. |
mac-address notification mac-move suppression interval interval-value |
The default setting is 30 seconds. |
|
3. (Optional.) Set a suppression threshold for MAC address moves. |
mac-address notification mac-move suppression threshold threshold-value |
The default setting is 3. |
|
4. Enter interface view. |
· Enter Layer 2 Ethernet interface view: · Enter Layer 2 aggregate interface view: |
N/A |
|
5. Enable MAC address move suppression. |
mac-address notification mac-move suppression |
By default, MAC address move suppression is disabled. |
Enabling ARP fast update for MAC address moves
ARP fast update for MAC address moves allows the device to update an ARP entry immediately after the outgoing interface for a MAC address changes. This feature ensures data connection without interruption.
This feature takes effect only on intra-card MAC address moves.
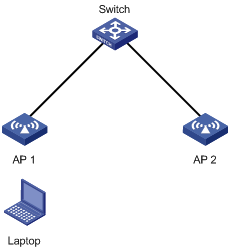
As shown in Figure 3, a mobile user Laptop accesses the network by connecting to AP 1 or AP 2. When the AP to which the user connects changes, the switch updates the ARP entry for the user immediately after it detects a MAC address move.
Figure 3 ARP fast update application scenario
To enable ARP fast update for MAC address moves:
|
Step |
Command |
Remarks |
|
1. Enter system view. |
system-view |
N/A |
|
2. Enable ARP fast update for MAC address moves. |
By default, ARP fast update for MAC address moves is disabled. |
Disabling static source check
By default, the static source check feature is enabled on an interface. The check identifies whether a received frame meets the following conditions:
· The source MAC address of the frame matches a static MAC address entry.
· The incoming interface of the frame is different from the outgoing interface in the entry.
If the frame meets both conditions, the switch drops the frame.
When this feature is disabled, the switch does not perform the check for a received frame. It can forward the frame whether or not the frame meets the conditions.
To disable the static source check feature:
|
Step |
Command |
Remarks |
|
1. Enter system view. |
system-view |
N/A |
|
2. Enter interface view. |
· Enter Layer 2 Ethernet interface view: · Enter Layer 3 Ethernet interface view: |
N/A |
|
3. Disable the static source check feature. |
By default, the static source check feature is enabled. |
Enabling SNMP notifications for the MAC address table
After you enable SNMP notifications for the MAC address table, the device will send SNMP notifications to the SNMP module to notify the NMS of important events. You can set the notification sending parameters in SNMP to determine the attributes of sending notifications.
After you disable SNMP notifications for the MAC address table, the device will send log messages to the information center module. You can set the output rules and destinations to examine the log messages of the MAC address table module.
For more information about SNMP notifications and information center, see Network Management and Monitoring Configuration Guide.
To enable SNMP notifications for the MAC address table:
|
Step |
Command |
|
|
system-view |
N/A |
|
|
2. Enable SNMP notifications for the MAC address table. |
snmp-agent trap enable mac-address [ mac-move ] |
By default, SNMP notifications are enabled for the MAC address table. When SNMP notifications are disabled for the MAC address table, syslog messages are sent to notify important events on the MAC address table module. |
Displaying and maintaining the MAC address table
Execute display commands in any view.
|
Task |
Command |
|
Display MAC address table information. |
display mac-address [ mac-address [ vlan vlan-id ] | [ [ dynamic | static ] [ interface interface-type interface-number ] | blackhole | multiport ] [ vlan vlan-id ] [ count ] ] |
|
Display the aging timer for dynamic MAC address entries. |
display mac-address aging-time |
|
Display the system or interface MAC address learning state. |
display mac-address mac-learning [ interface interface-type interface-number ] |
|
Display MAC address statistics. |
display mac-address statistics |
|
Display the MAC address move records (in standalone mode). |
|
|
Display the MAC address move records (in IRF mode). |
display mac-address mac-move [ chassis chassis-number slot slot-number ] |
MAC address table configuration example
Network requirements
On a network:
· Host A at MAC address 000f-e235-dc71 is connected to interface GigabitEthernet 1/0/1 of Device and belongs to VLAN 1.
· Host B at MAC address 000f-e235-abcd, which behaved suspiciously on the network, also belongs to VLAN 1.
Configure the MAC address table as follows:
· To prevent MAC address spoofing, add a static entry for Host A in the MAC address table of Device.
· To drop all frames destined for Host B, add a blackhole MAC address entry for Host B.
· Set the aging timer to 500 seconds for dynamic MAC address entries.
Configuration procedure
# Add a static MAC address entry for MAC address 000f-e235-dc71 on GigabitEthernet 1/0/1 that belongs to VLAN 1.
<Device> system-view
[Device] mac-address static 000f-e235-dc71 interface gigabitethernet 1/0/1 vlan 1
# Add a blackhole MAC address entry for MAC address 000f-e235-abcd that belongs to VLAN 1.
[Device] mac-address blackhole 000f-e235-abcd vlan 1
# Set the aging timer to 500 seconds for dynamic MAC address entries.
[Device] mac-address timer aging 500
Verifying the configuration
# Display the static MAC address entries for interface GigabitEthernet 1/0/1.
[Device] display mac-address static interface gigabitethernet 1/0/1
MAC Address VLAN ID State Port/NickName Aging
000f-e235-dc71 1 Static GE1/0/1 N
# Display the blackhole MAC address entries.
[Device] display mac-address blackhole
MAC Address VLAN ID State Port/NickName Aging
000f-e235-abcd 1 Blackhole N/A N
# Display the aging time of dynamic MAC address entries.
[Device] display mac-address aging-time
MAC address aging time: 500s.
Configuring MAC Information
The MAC Information feature can generate syslog messages or SNMP notifications when MAC address entries are learned or deleted. You can use these messages to monitor user's leaving or joining the network and analyze network traffic.
The MAC Information feature buffers the MAC change syslog messages or SNMP notifications in a queue. The device overwrites the oldest MAC address change written into the queue with the most recent MAC address change when the following conditions exist:
· The MAC change notification interval does not expire.
· The queue has been exhausted.
To send a syslog message or SNMP notification immediately after it is created, set the queue length to zero.
Enabling MAC Information
|
Step |
Command |
Remarks |
|
1. Enter system view. |
system-view |
N/A |
|
2. Enable MAC Information globally. |
mac-address information enable |
By default, MAC Information is globally disabled. |
|
3. Enter interface view. |
Enter Layer 2 Ethernet interface view: |
N/A |
|
4. Enable MAC Information on the interface. |
mac-address information enable { added | deleted } |
By default, MAC Information is disabled on the interface. Make sure you have enabled MAC Information globally before you enable it on the interface. |
Setting the MAC Information mode
The following MAC Information modes are available for sending MAC address changes:
· Syslog—The device sends syslog messages to notify MAC address changes. The device sends syslog messages to the information center, which then outputs them to the monitoring terminal. For more information about information center, see Network Management and Monitoring Configuration Guide.
· Trap—The device sends SNMP notifications to notify MAC address changes. The device sends SNMP notifications to the NMS. For more information about SNMP, see Network Management and Monitoring Configuration Guide.
To set the MAC Information mode:
|
Step |
Command |
Remarks |
|
1. Enter system view. |
system-view |
N/A |
|
2. Set the MAC Information mode. |
mac-address information mode { syslog | trap } |
The default setting is trap. |
Setting the MAC change notification interval
To prevent syslog messages or SNMP notifications from being sent too frequently, you can set the MAC change notification interval to a larger value.
To set the MAC change notification interval:
|
Step |
Command |
Remarks |
|
1. Enter system view. |
system-view |
N/A |
|
2. Set the MAC change notification interval. |
mac-address information interval interval-time |
The default setting is 1 second. |
Setting the MAC Information queue length
|
Step |
Command |
Remarks |
|
1. Enter system view. |
system-view |
N/A |
|
2. Set the MAC Information queue length. |
mac-address information queue-length value |
The default setting is 50. |
MAC Information configuration example
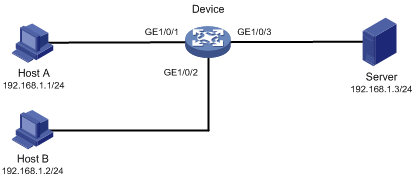
Network requirements
Enable MAC Information on interface GigabitEthernet 1/0/1 on Device in Figure 4 to send MAC address changes in syslog messages to the log host, Host B, through interface GigabitEthernet 1/0/2.
Configuration restrictions and guidelines
When you edit the file /etc/syslog.conf, follow these restrictions and guidelines:
· Comments must be on a separate line and must begin with a pound sign (#).
· No redundant spaces are allowed after the file name.
· The logging facility name and the severity level specified in the /etc/syslog.conf file must be the same as those configured on the device. Otherwise, the log information might not be output correctly to the log host. The logging facility name and the severity level are configured by using the info-center loghost and info-center source commands, respectively.
Configuration procedure
1. Configure Device to send syslog messages to Host B:
# Enable the information center.
<Device> system-view
[Device] info-center enable
# Specify the log host 192.168.1.2/24 and specify local4 as the logging facility.
[Device] info-center loghost 192.168.1.2 facility local4
# Disable log output to the log host.
[Device] info-center source default loghost deny
To avoid output of unnecessary information, disable all modules from outputting logs to the specified destination (loghost, in this example) before you configure an output rule.
# Configure an output rule to output to the log host MAC address logs that have a severity level of at least informational.
[Device] info-center source mac loghost level informational
2. Configure the log host, Host B:
Configure Solaris as follows. Configure other UNIX operating systems in the same way Solaris is configured.
a. Log in to the log host as a root user.
b. Create a subdirectory named Device in directory /var/log/.
# mkdir /var/log/Device
c. Create file info.log in the Device directory to save logs from Device.
# touch /var/log/Device/info.log
d. Edit the file syslog.conf in directory /etc/ and add the following contents:
# Device configuration messages
local4.info /var/log/Device/info.log
In this configuration, local4 is the name of the logging facility that the log host uses to receive logs, and info is the informational level. The UNIX system records the log information that has a severity level of at least informational to the file /var/log/Device/info.log.
e. Display the process ID of syslogd, end the syslogd process, and then restart syslogd using the –r option to make the new configuration take effect.
# ps -ae | grep syslogd
147
# kill -HUP 147
# syslogd -r &
The device can output MAC address logs to the log host, which stores the logs to the specified file.
3. Enable MAC Information on Device:
# Enable MAC Information globally.
[Device] mac-address information enable
# Configure the MAC Information mode as syslog.
[Device] mac-address information mode syslog
# Enable MAC Information on interface GigabitEthernet 1/0/1 to enable GigabitEthernet 1/0/1 to record MAC address change information when the interface performs either of the following tasks:
¡ Learns a new MAC address.
¡ Deletes an existing MAC address.
[Device] interface gigabitethernet 1/0/1
[Device-GigabitEthernet1/0/1] mac-address information enable added
[Device-GigabitEthernet1/0/1] mac-address information enable deleted
[Device-GigabitEthernet1/0/1] quit
# Set the MAC Information queue length to 100.
[Device] mac-address information queue-length 100
# Set the MAC change notification interval to 20 seconds.
[Device] mac-address information interval 20