- Table of Contents
-
- 01-Fundamentals Configuration Guide
- 00-Preface
- 01-CLI Configuration
- 02-Login Management Configuration
- 03-FTP and TFTP Configuration
- 04-File System Management
- 05-Configuration File Management Configuration
- 06-Software Upgrade Configuration
- 07-ISSU Configuration
- 08-Device Management Configuration
- 09-Automatic Configuration
- 10-Management with BootWare
- Related Documents
-
| Title | Size | Download |
|---|---|---|
| 10-Management with BootWare | 266.62 KB |
Managing the system with BootWare
Using the BASIC-BOOTWARE menu·
Modifying serial port parameters
Updating the extended BootWare segment
Running the primary extended BootWare segment
Running the backup extended BootWare segment
Using the EXTEND-BOOTWARE menu
Upgrading system software through the console port
Upgrading system software through the management Ethernet port
Restoring the factory-default configuration
Clearing the console login password
Using the product-specific submenu
Using the EXTEND-ASSISTANT menu
Disabling password recovery capability·
System software upgrade examples
Using XMODEM to upgrade software through the console port
Using TFTP to upgrade system software through the Ethernet interface
Using FTP to upgrade system software through the Ethernet interface
BootWare provides a menu method for you to perform basic file operations, software upgrade, and system management when you cannot access the Comware CLI, for example, because of software image corruption.
|
|
NOTE: Output in this document is for illustration only. |
Overview
The BootWare program comprises one basic segment and one extended segment. The basic segment enables the system to complete basic initialization, and the extended segment bootstraps the system software image.
Table 1 lists the menus that each segment provides and the major tasks you can perform from these menus. You can access these menus only during system startup.
|
BootWare segment |
Menu |
Tasks |
Reference |
|
Basic |
BASIC-BOOTWARE |
· Modify serial port parameters. · Upgrade BootWare. · Start the primary or backup BootWare extended segment. |
|
|
Extended |
EXTEND-BOOTWARE |
· Upgrade system software. · Manage files. · Set the system operating mode to IRF or standalone. |
|
|
Extended |
EXTEND-ASSISTANT |
· Examine system memory. · Search system memory. · Display CF card information. |
Restrictions and guidelines
If you are upgrading software on an MPU from its BootWare menus, make sure you have one connection to its console port and one connection to its management port.
While you are using the BootWare menus of an MPU, do not remove or insert the CF card on the MPU.
Availability of some menu options vary with the password recovery capability setting.
Using the BASIC-BOOTWARE menu
To access the BASIC-BOOTWARE menu:
1. Power on the device.
DDR2 SDRAM test successful.
Press Ctrl+T to start five-step full RAM test...
Press Ctrl+Y to start nine-step full RAM test...
System is starting...
Press Ctrl+D to access BASIC-BOOTWARE MENU
2. Press Ctrl + D within 3 seconds after the "Press Ctrl+D to access BASIC-BOOTWARE MENU" prompt message appears. If you fail to do this within the time limit, the system starts to run the extended BootWare segment.
======================<BASIC-BOOTWARE MENU(Ver 1.20)>=======================
|<1> Modify Serial Interface Parameter |
|<2> Update Extend BootWare |
|<3> Update Full BootWare |
|<4> Boot Extend BootWare |
|<5> Boot Backup Extend BootWare |
|<0> Reboot |
============================================================================
Enter your choice(0-5):
Table 2 BASIC-BOOTWARE menu options
|
Option |
Task |
|
<1> Modify Serial Interface Parameter |
Change the baud rate of the console port. |
|
<2> Update Extend BootWare |
Update the extended BootWare segment. If the extended segment has corrupted, choose this option to repair it. |
|
<3> Update Full BootWare |
Update the entire BootWare, including the basic segment and the extended segment. |
|
<4> Boot Extend BootWare |
Run the primary extended BootWare segment. |
|
<5> Boot Backup Extend BootWare |
Run the backup extended BootWare segment. |
|
<0> Reboot |
Reboot the device. |
Modifying serial port parameters
When using the console port to access the system, make sure the port parameters are consistent with the serial port settings on the configuration terminal, including the baud rate, data bits, parity check, stop bits, flow control, and emulation. If the settings are inconsistent, communication will fail. For more information, see login management configuration in Fundamentals Configuration Guide.
With BootWare, you can change the baud rate. H3C recommends that you change the default baud rate (9600 bps) to a higher baud rate for faster file transfer before downloading a software image file with XMODEM through the console port.
To change the baud rate of the console port:
1. Enter 1 in the BASIC-BOOTWARE menu.
Enter your choice(0-5): 1
===============================<BAUDRATE SET>===============================
|Note:'*'indicates the current baudrate |
| Change The HyperTerminal's Baudrate Accordingly |
|---------------------------<Baudrate Available>---------------------------|
|<1> 9600(Default)* |
|<2> 19200 |
|<3> 38400 |
|<4> 57600 |
|<5> 115200 |
|<0> Exit |
============================================================================
Enter your choice(0-5):
2. Enter the number that represents the baud rate you want to choose. For example, enter 5 to set the baud rate to 115200 bps.
|
|
NOTE: The baud rate change is a one-time operation. The baud rate will restore to the default (9600 bps) at reboot. To set up a console session with the device after a reboot, you must change the baud rate setting on the configuration terminal to 9600 bps. |
Updating the extended BootWare segment
If the extended BootWare segment has been corrupted, enter 2 in the BASIC-BOOTWARE menu to update it.
Enter your choice(0-5): 2
Please Start To Transfer File, Press <Ctrl+C> To Exit.
Waiting ...CCCCC
Download successfully!
329344 bytes downloaded!
Updating Extend BootWare? [Y/N]Y
Updating Extend BootWare...............Done!
Updating the entire BootWare
To update the entire BootWare, enter 3 in the BASIC-BOOTWARE menu.
Enter your choice(0-5): 3
Please Start To Transfer File, Press <Ctrl+C> To Exit.
Waiting ...CCCCC
Download successfully!
329344 bytes downloaded!
Updating Basic BootWare? [Y/N]Y
Updating Basic BootWare...............Done!
Updating Extend BootWare? [Y/N]Y
Updating Extend BootWare...............Done!
Running the primary extended BootWare segment
To bootstrap the system software image with the primary extended BootWare segment, enter 4 in the BASIC-BOOTWARE menu.
Enter your choice(0-5): 4
Booting Normal Extend BootWare
The Extend BootWare is self-decompressing................
Done!
****************************************************************************
* *
* H3C S12500 BootWare, Version 1.22 *
* *
****************************************************************************
Copyright (c) 2004-2012 Hangzhou H3C Technologies Co., Ltd.
Compiled Date : Dec 3 2012
CPU Type : MPC8548E
CPU L1 Cache : 32KB
CPU L2 Cache : 512KB
CPU Clock Speed : 1000MHz
Memory Type : DDR2 SDRAM
Memory Size : 1024MB
Memory Speed : 400MHz
BootWare Size : 4MB
Flash Size : 128MB
cfa0 Size : 247MB
NVRAM Size : 1024KB
BASIC CPLD Version : 003
EXTEND CPLD Version : 003
PCB Version : Ver.B
Board self testing...........................
Board steady testing... [ PASS ]
Board SlotNo... [ 1 ]
Subcard exist testing... [ PASS ]
DX246 testing... [ PASS ]
PHY88E1111 testing... [ PASS ]
CPLD1 testing... [ PASS ]
CPLD2 testing... [ PASS ]
NS16550 register testing... [ PASS ]
The default switch's Mac address... [00:e0:fc:00:95:12]
CF Card testing... [ PASS ]
BootWare Validating...
Press Ctrl+B to enter extended boot menu...
BootWare password: Not required. Please press Enter to continue.
Running the backup extended BootWare segment
To bootstrap the system software image with the backup extended BootWare segment, enter 5 in the BASIC-BOOTWARE menu. For information about backing up the extended BootWare segment, see "Managing the BootWare image."
Enter your choice(0-5): 5
Booting Backup Extend BootWare
The Extend BootWare is self-decompressing................
Done!
****************************************************************************
* *
* H3C S12500 BootWare, Version 1.22 *
* *
****************************************************************************
Copyright (c) 2004-2012 Hangzhou H3C Technologies Co., Ltd.
Compiled Date : Dec 3 2012
CPU Type : MPC8548E
CPU L1 Cache : 32KB
CPU L2 Cache : 512KB
CPU Clock Speed : 1000MHz
Memory Type : DDR2 SDRAM
Memory Size : 1024MB
Memory Speed : 400MHz
BootWare Size : 4MB
Flash Size : 128MB
cfa0 Size : 247MB
NVRAM Size : 1024KB
BASIC CPLD Version : 003
EXTEND CPLD Version : 003
PCB Version : Ver.B
Board self testing...........................
Board steady testing... [ PASS ]
Board SlotNo... [ 1 ]
Subcard exist testing... [ PASS ]
DX246 testing... [ PASS ]
PHY88E1111 testing... [ PASS ]
CPLD1 testing... [ PASS ]
CPLD2 testing... [ PASS ]
NS16550 register testing... [ PASS ]
The default switch's Mac address... [00:e0:fc:00:95:12]
CF Card testing... [ PASS ]
BootWare Validating...
Press Ctrl+B to enter extended boot menu...
BootWare password: Not required. Please press Enter to continue.
Using the EXTEND-BOOTWARE menu
To access the EXTEND-BOOTWARE menu, press Ctrl + B within 3 seconds after the " Press Ctrl+B to enter extended boot menu..." prompt message appears. If you fail to do this, the system starts decompressing the system software.
DDR2 SDRAM test successful.
Press Ctrl+T to start five-step full RAM test...
Press Ctrl+Y to start nine-step full RAM test...
System is starting...
Press Ctrl+D to access BASIC-BOOTWARE MENU
Booting Normal Extend BootWare
The Extend BootWare is self-decompressing................
Done!
****************************************************************************
* *
* H3C S12500 BootWare, Version 1.22 *
* *
****************************************************************************
Copyright (c) 2004-2012 Hangzhou H3C Technologies Co., Ltd.
Compiled Date : Dec 3 2012
CPU Type : MPC8548E
CPU L1 Cache : 32KB
CPU L2 Cache : 512KB
CPU Clock Speed : 1000MHz
Memory Type : DDR2 SDRAM
Memory Size : 1024MB
Memory Speed : 400MHz
BootWare Size : 4MB
Flash Size : 128MB
cfa0 Size : 247MB
NVRAM Size : 1024KB
BASIC CPLD Version : 003
EXTEND CPLD Version : 003
PCB Version : Ver.B
Board self testing...........................
Board steady testing... [ PASS ]
Board SlotNo... [ 1 ]
Subcard exist testing... [ PASS ]
DX246 testing... [ PASS ]
PHY88E1111 testing... [ PASS ]
CPLD1 testing... [ PASS ]
CPLD2 testing... [ PASS ]
NS16550 register testing... [ PASS ]
The default switch's Mac address... [00:e0:fc:00:95:12]
CF Card testing... [ PASS ]
BootWare Validating...
Press Ctrl+B to enter extended boot menu...
BootWare password: Not required. Please press Enter to continue.
The following is the EXTEND-BOOTWARE menu:
Password recovery capability is enabled.
Note: The current operating device is cfa0
Enter < Storage Device Operation > to select device.
===========================<EXTEND-BOOTWARE MENU>===========================
|<1> Boot System |
|<2> Enter Serial SubMenu |
|<3> Enter Ethernet SubMenu |
|<4> File Control |
|<5> Restore to Factory Default Configuration |
|<6> BootWare Operation Menu |
|<7> Clear Super Password |
|<8> Storage Device Operation |
|<9> Product Special Operation |
|<0> Reboot |
============================================================================
Ctrl+Z: Access EXTEND-ASSISTANT MENU
Ctrl+F: Format File System
Enter your choice(0-9):
Table 3 EXTEND-BOOTWARE menu options
|
Option |
Tasks |
Reference |
|
<1> Boot System |
Run the system software without rebooting the device. Choose this option after completing operations in the EXTEND-BOOTWARE menu. |
N/A |
|
<2> Enter Serial SubMenu |
Download files with XMODEM and upgrade system software through the console port. |
|
|
<3> Enter Ethernet SubMenu |
Download files with FTP or TFTP and upgrade system software through the management Ethernet port. |
Upgrading system software through the management Ethernet port |
|
<4> File Control |
· Display files on the current storage medium. · Set a software image file as the primary or backup startup system software image file. · Delete file to free storage space. |
|
|
<5> Restore to Factory Default Configuration |
Restore the factory-default configuration. |
|
|
<6> BootWare Operation Menu |
Back up, recover, and upgrade the BootWare image. |
|
|
<7> Clear Super Password |
Clear the console login password to allow console login without authentication. This is a one-time operation and takes effect only for the first system boot or reboot after you choose this option. If password recovery capability is disabled, this option is not available. |
|
|
<8> Storage Device Operation |
Set the storage medium from which the MPU will start up. Set the storage medium where file operations are performed. This storage medium is referred to as the current storage medium" in this chapter. |
|
|
<9> Product Special Operation |
Change the system operating mode. Start the device with the factory-default configuration, ignoring all startup configuration files. For more information, see "Using the product-specific submenu." |
|
|
<0> Reboot |
Reboot the device. |
N/A |
|
|
NOTE: System software images are in .bin format (for example, main.bin) and run at startup. You can set one system software image as a main (M) or backup (B) image. For more information, see "Changing the file attribute of a system software image." At startup, the device always attempts to boot first with the main system software image. If the attempt fails, for example, because the image file is corrupted, the device tries to boot with the backup system software image. If the attempt still fails, the device displays a failure message. |
Running the system software
To run the system software after completing all operations, enter 1 in the EXTEND-BOOTWARE menu.
Enter your choice(0-9): 1
Starting to get the main application file--cfa0:/s12500-test.bin!.......
..........................................................
The main application file is self-decompressing.............................
............................................................................
............................................................................
............................................................................
............................................................................
............................................................................
............................................................................
............................................................................
............................................................................
............................................................................
............................................................................
..............................................................
Done!
System application is starting...
Upgrading system software through the console port
You can upgrade the system software through the console port or modify the baud rate of the console port from the Serial submenu.
To upgrade system software through the console port from the Serial submenu:
1. Enter 2 in the EXTEND-BOOTWARE menu to access the Serial submenu.
===========================<Enter Serial SubMenu>==========================
|Note:the operating device is cfa0 |
|<1> Download Application Program To SDRAM And Run |
|<2> Update Main Application File |
|<3> Update Backup Application File |
|<4> Update Secure Application File |
|<5> Update User Private File |
|<6> Modify Serial Interface Parameter |
|<0> Exit To Main Menu |
==========================================================================
Enter your choice(0-6):
Table 4 Serial submenu options
|
Option |
Tasks |
|
<1> Download Application Program To SDRAM And Run |
Load and run a system software image in SDRAM. If password recovery capability is disabled, this option is not available. |
|
<2> Update Main Application File |
Download a system software image to the current storage medium as the main image (the file attribute is set to M). If a main system image already exists on the storage medium, the M file attribute of the original image is removed. |
|
<3> Update Backup Application File |
Download a system software image to the current storage medium as the backup image (the file attribute is set to B). If a backup system image already exists on the storage medium, the B file attribute of the original image is removed. |
|
<4> Update Secure Application File |
Download a system software image to the current storage medium as the secure image (the file attribute is set to S). This option is not supported in the current release. |
|
<5> Update User Private File |
Download a file to the current storage medium. This option is not available when password recovery capability is disabled. |
|
<6> Modify Serial Interface Parameter |
Change the baud rate of the console port. |
|
<0> Exit To Main Menu |
Return to the EXTEND-BOOTWARE menu. |
|
|
NOTE: To set the current storage medium, see "Managing storage media." |
2. Enter 6 in the serial submenu to change the baud rate.
===============================<BAUDRATE SET>=============================
|Note:'*'indicates the current baudrate |
| Change The HyperTerminal's Baudrate Accordingly |
|---------------------------<Baudrate Available>---------------------------|
|<1> 9600(Default)* |
|<2> 19200 |
|<3> 38400 |
|<4> 57600 |
|<5> 115200 |
|<0> Exit |
==========================================================================
Enter your choice(0-5):5
3. Enter an appropriate baud rate option. For example, enter 5 to set the baud rate to 115200 bps.
H3C recommends that you change the default baud rate (9600 bps) to a higher baud rate for faster file transfer before downloading a system software image with XMODEM through the console port.
4. Enter 0 to return to the Serial submenu.
5. Choose an option from 1 to 5. For example, to upgrade the main system software image, enter 2.
===========================<Enter Serial SubMenu>==========================
|Note:the operating device is cfa0 |
|<1> Download Application Program To SDRAM And Run |
|<2> Update Main Application File |
|<3> Update Backup Application File |
|<4> Update Secure Application File |
|<5> Update User Private File |
|<6> Modify Serial Interface Parameter |
|<0> Exit To Main Menu |
==========================================================================
Enter your choice(0-6): 2
6. On the configuration terminal, configure the communication settings and transfer the upgrade file. For more information, see "Using XMODEM to upgrade software through the console port."
In this example, when the file transfer is complete, the system sets the file as the main system software image. The following is the sample output:
Loading...................................................................
..........................................................................
..........................................................................
..................................Done!
47979456 bytes downloaded!
Updating File cfa0:/test.bin..............................................
..........................................................................
..........................................................................
...............................................
..Done!
7. Enter 0 in the Serial submenu to return to the EXTEND-BOOTWARE menu.
8. Enter 1 in the EXTEND-BOOTWARE menu to run the new system software.
Upgrading system software through the management Ethernet port
You can upgrade the system software through the management Ethernet port from the Ethernet submenu.
To update system software through the management Ethernet port from the Ethernet submenu:
1. Enter 3 in the EXTEND-BOOTWARE menu to access the Ethernet submenu.
==========================<Enter Ethernet SubMenu>=========================
|Note:the operating device is cfa0 |
|<1> Download Application Program To SDRAM And Run |
|<2> Update Main Application File |
|<3> Update Backup Application File |
|<4> Update Secure Application File |
|<5> Update User Private File |
|<6> Modify Ethernet Parameter |
|<0> Exit To Main Menu |
|<Ensure The Parameter Be Modified Before Downloading!> |
==========================================================================
Enter your choice(0-6):
Table 5 Ethernet submenu options
|
Option |
Tasks |
|
<1> Download Application Program To SDRAM And Run |
Load and run a system software image in SDRAM. This option is only available when password recovery capability is enabled. |
|
<2> Update Main Application File |
Download a system software image to the current storage medium as the main image (the file attribute is set to M). If a main system image already exists on the storage medium, the M file attribute of the original image is removed. |
|
<3> Update Backup Application File |
Download a system software image to the current storage medium as the backup image (the file attribute is set to B). If a backup system image already exists on the storage medium, the B file attribute of the original image is removed. |
|
<4> Update Secure Application File |
Download a system software image to the current storage medium as the secure image (the file attribute is set to S). This option is not supported in the current release. |
|
<5> Update User Private File |
Download a file to the current storage medium. This option is only available when password recovery capability is enabled. |
|
<6> Modify Ethernet Parameter |
Configure FTP or TFTP file transfer settings. |
|
<0> Exit To Main Menu |
Return to the EXTEND-BOOTWARE menu. |
2. Enter 6 in the Ethernet submenu to configure file transfer settings.
Enter your choice(0-6):6
==========================<ETHERNET PARAMETER SET>=========================
|Note: '.' = Clear field. |
| '-' = Go to previous field. |
| Ctrl+D = Quit. |
==========================================================================
Protocol (FTP or TFTP) :TFTP
Load File Name :
:test.bin
Target File Name :
:test.bin
Server IP Address :192.168.2.26
Local IP Address :192.168.2.1
Gateway IP Address :0.0.0.0
Table 6 Setting Ethernet parameters for file transfer
|
Field |
Description |
|
'.' = Clear field |
Press the dot (.), and then press Enter to clear the setting for a field. |
|
'-' = Go to previous field |
Press the hyphen (-), and then press Enter to return to the previous field. |
|
Ctrl+D = Quit |
Press Ctrl + D to exit the Ethernet parameter settings menu. |
|
Protocol (FTP or TFTP) |
Set the file transfer protocol to FTP or TFTP. |
|
Load File Name |
Set the name of the file to be downloaded. |
|
Target File Name |
Set a file name for saving the file in the current storage medium on the device. By default, the target file name is the same as the source file name. |
|
Server IP Address |
Set the IP address of the FTP or TFTP server. If a mask must be set, use a colon (:) to separate the mask length from the IP address. For example, 192.168.2.26:24. |
|
Local IP Address |
Set the IP address of the device. |
|
Gateway IP Address |
Set a gateway IP address if the device is on a different network than the server. |
|
FTP User Name |
Set the username for accessing the FTP server. This username must be the same as configured on the FTP server. This field is not available for TFTP. |
|
FTP User Password |
Set the password for accessing the FTP server. This password must be the same as configured on the FTP server. This field is not available for TFTP. |
3. Choose an option from 1 to 5. For example, to upgrade the main system software image, enter 2.
==========================<Enter Ethernet SubMenu>=========================
|Note:the operating device is cfa0 |
|<1> Download Application Program To SDRAM And Run |
|<2> Update Main Application File |
|<3> Update Backup Application File |
|<4> Update Secure Application File |
|<5> Update User Private File |
|<6> Modify Ethernet Parameter |
|<0> Exit To Main Menu |
|<Ensure The Parameter Be Modified Before Downloading!> |
==========================================================================
Enter your choice(0-6):2
Waiting ...CCC
Download successfully!
47979456 bytes downloaded!
Updating File cfa0:/test.bin..............................................
..........................................................................
..........................................................................
...............................................
..Done!
4. Enter 0 in the Serial submenu to return to the EXTEND-BOOTWARE menu.
5. Enter 1 in the EXTEND-BOOTWARE menu to run the new system software.
Managing files
|
|
CAUTION: The private-data.txt file is automatically created by the system in the built-in flash for recording configuration file information. If password recovery capability is disabled, you cannot delete or replace the file. If the capability is enabled, |
To change the type of a system software image, retrieve files, or delete files, enter 4 in the EXTEND-BOOTWARE menu.
===========================<EXTEND-BOOTWARE MENU>===========================
|<1> Boot System |
|<2> Enter Serial SubMenu |
|<3> Enter Ethernet SubMenu |
|<4> File Control |
|<5> Restore to Factory Default Configuration |
|<6> BootWare Operation Menu |
|<7> Clear Super Password |
|<8> Storage Device Operation |
|<9> Product Special Operation |
|<0> Reboot |
============================================================================
Ctrl+Z: Access EXTEND-ASSISTANT MENU
Ctrl+F: Format File System
Enter your choice(0-9): 4
The following File Control submenu appears:
===============================<File CONTROL>=============================
|Note:the operating device is cfa0 |
|<1> Display All File(s) |
|<2> Set Application File type |
|<3> Delete File |
|<0> Exit To Main Menu |
==========================================================================
Enter your choice(0-3):
Displaying all files
To display all files on the current storage medium, enter 1 in the FILE CONTROL submenu:
Enter your choice(0-3): 1
Display all file(s) in cfa0:
'M' = MAIN 'B' = BACKUP 'S' = SECURE 'N/A' = NOT ASSIGNED
============================================================================
|NO. Size(B) Time Type Name |
|1 5602 Jun/03/2012 22:06:02 N/A cfa0:/test.cfg |
|2 4714356 Jun/03/2012 19:11:10 N/A cfa0:/logfile/logfile1.log |
|3 936158 Jun/03/2012 19:26:00 N/A cfa0:/diaglog/diagfile1.log |
|4 4196112 Jun/03/2012 14:59:16 N/A cfa0:/info.txt |
|5 53538808 Jun/03/2012 14:36:12 M cfa0:/s12500-test.bin |
|6 57979456 Oct/04/2012 02:14:54 N/A cfa0:/test.bin |
|7 3 Jun/03/2012 14:57:04 N/A cfa0:/a.txt |
|8 6425 Jun/03/2012 16:15:22 N/A cfa0:/startup.cfg |
|9 717220 Jun/03/2012 19:10:14 N/A cfa0:/12500_mr.btw |
============================================================================
Changing the file attribute of a system software image
System software image file attributes include main (M), backup (B), and secure (S). The S attribute is not supported in the current release.
A system software image can have any combination of the M and B attributes. An image with neither the M attribute nor the B attribute is marked as N/A.
On an MPU, you can specify only one main image and one backup image. If you assign the same attribute to two images that are the same type, the most recent assignment causes the previously assigned attribute to be removed.
For example, the boot image file main.bin has the M attribute and the boot image file update.bin has the B attribute. If you assign the M attribute to update.bin, update.bin will have both the M and B attributes (M+B), and the file attribute of main.bin will change to N/A.
To change the type of a system software image:
1. Enter 2 in the File Control submenu.
Enter your choice(0-3): 2
'M' = MAIN 'B' = BACKUP 'S' = SECURE 'N/A' = NOT ASSIGNED
==========================================================================
|NO. Size(B) Time Type Name |
|1 53538808 Jun/03/2012 14:36:12 M cfa0:/s12500-test.bin |
|2 57979456 Oct/04/2012 02:14:54 N/A cfa0:/test.bin |
|0 Exit |
==========================================================================
Enter file No:2
2. Enter the number of the file you are working with.
Modify the file attribute:
==========================================================================
|<1> +Main |
|<2> -Main |
|<3> +Backup |
|<4> -Backup |
|<0> Exit |
==========================================================================
Enter your choice(0-4):
3. Enter a number in the range of 1 to 4 to add or delete a file attribute for the file. For example, enter 3 to set the file as the backup image.
Enter your choice(0-4):3
Set the file attribute success!
Deleting a file
When a storage medium is insufficient, you can delete unused files to free up the storage space.
1. Enter 3 in the FILE CONTROL menu.
Enter your choice(0-3): 3
Deleting the file in cfa0:
'M' = MAIN 'B' = BACKUP 'S' = SECURE 'N/A' = NOT ASSIGNED
============================================================================
|NO. Size(B) Time Type Name |
|1 5602 Jun/03/2012 22:06:02 N/A cfa0:/test.cfg |
|2 4714356 Jun/03/2012 19:11:10 N/A cfa0:/logfile/logfile1.log |
|3 936158 Jun/03/2012 19:26:00 N/A cfa0:/diaglog/diagfile1.log |
|4 4196112 Jun/03/2012 14:59:16 N/A cfa0:/info.txt |
|5 53538808 Jun/03/2012 14:36:12 M cfa0:/s12500-test.bin |
|6 57979456 Oct/04/2012 02:14:54 N/A cfa0:/test.bin |
|7 3 Jun/03/2012 14:57:04 N/A cfa0:/a.txt |
|8 6425 Jun/03/2012 16:15:22 N/A cfa0:/startup.cfg |
|9 717220 Jun/03/2012 19:10:14 N/A cfa0:/12500_mr.btw |
============================================================================
Enter file No: 4
2. Enter the number of the file to delete. For example, enter 4 to delete cfa0:/info.txt.
Enter file No: 4
3. When the following prompt appears, enter Y.
The file you selected is cfa0:/info.txt,Delete it? [Y/N]Y
Deleting...Done!
Restoring the factory-default configuration
|
|
CAUTION: Performing this task can cause all next-startup configuration files in the current storage medium to be permanently deleted. |
To restore the factory-default configuration from the EXTEND-BOOTWARE menu, make sure password recovery capability is disabled. If the capability is enabled, you cannot perform the task.
To enable the system to start up with the factory-default configuration instead of a next-startup configuration file:
1. Enter 5 in the EXTEND-BOOTWARE menu.
===========================<EXTEND-BOOTWARE MENU>===========================
|<1> Boot System |
|<2> Enter Serial SubMenu |
|<3> Enter Ethernet SubMenu |
|<4> File Control |
|<5> Restore to Factory Default Configuration |
|<6> BootWare Operation Menu |
|<7> Clear Super Password |
|<8> Storage Device Operation |
|<9> Product Special Operation |
|<0> Reboot |
============================================================================
Ctrl+Z: Access EXTEND-ASSISTANT MENU
Ctrl+F: Format File System
Enter your choice(0-9): 5
2. Follow the system instruction to complete the task.
¡ If password recovery capability is enabled, first disable the capability from the CLI, and then reboot the device to access the EXTEND-BOOTWARE menu.
Password recovery capability is enabled. To perform this operation, first
disable the password recovery capability using the undo password-recovery
enable command in CLI.
¡ If password recovery capability is disabled, enter Y at the prompt to complete the task.
Because the password recovery capability is disabled, this operation can
cause the configuration files to be deleted, and the system will start up
with factory defaults. Are you sure to continue?[Y/N]Y
Setting...Done.
Managing the BootWare image
You can use BootWare Operation menu to back up, recover, and upgrade the BootWare image.
To access the BootWare Operation menu, enter 6 in the EXTEND-BOOTWARE menu.
Enter your choice(0-9): 6
=========================<BootWare Operation Menu>==========================
|Note:the operating device is cfa0 |
|<1> Backup Full BootWare |
|<2> Restore Full BootWare |
|<3> Update BootWare By Serial |
|<4> Update BootWare By Ethernet |
|<0> Exit To Main Menu |
============================================================================
Enter your choice(0-4):
Table 7 BootWare Operation menu options
|
Option |
Tasks |
|
<1> Backup Full BootWare |
Back up the BootWare image. |
|
<2> Restore Full BootWare |
Recover the BootWare image. |
|
<3> Update BootWare By Serial |
Update the BootWare from the console port. |
|
<4> Update BootWare By Ethernet |
Update the BootWare from an Ethernet port. |
|
<0> Exit To Main Menu |
Return to the EXTEND-BOOTWARE menu. |
Backing up the BootWare image
You can back up the entire BootWare image, its basic segment, or extended segment. When the BootWare image is corrupted, you could use the backup image for recovery.
Enter 1 in the BootWare Operation menu to perform a BootWare image backup.
Enter your choice(0-4): 1
Will you backup the Basic BootWare? [Y/N]Y
Begin to backup the Basic BootWare..Done!
Will you backup the Extend BootWare? [Y/N]Y
Begin to backup the Extend BootWare.Done!
Recovering the BootWare image
If the BootWare image has been corrupted, you can use a backup BootWare image to recover it.
Enter 2 in the BootWare Operation menu to recover the BootWare image. You may choose to recovery the entire image, its basic segment, or extended segment.
Enter your choice(0-4): 2
Will you restore the Basic BootWare? [Y/N]Y
Begin to restore Normal Basic BootWare..Done!
Will you restore the Extend BootWare? [Y/N]Y
Begin to restore Normal Extend BootWare.Done!
Upgrading the BootWare image
You can upgrade the BootWare image through the console port or an Ethernet port.
To upgrade the BootWare image through the console port, entre 3 in the BootWare Operation menu.
Enter your choice(0-4): 3
====================<BOOTWARE OPERATION SERIAL SUB-MENU>====================
|<1> Update Full BootWare |
|<2> Update Extend BootWare |
|<3> Update Basic BootWare |
|<4> Modify Serial Interface Parameter |
|<0> Exit To Main Menu |
============================================================================
Enter your choice(0-4):4
Table 8 BOOTWARE OPERATION SERIAL submenu options
|
Option |
Task |
|
<1> Update Full BootWare |
Upgrade the entire BootWare image. |
|
<2> Update Extend BootWare |
Upgrade the extended segment. |
|
<3> Update Basic BootWare |
Upgrade the basic segment. |
|
<4> Modify Serial Interface Parameter |
Modify the baud rate of the console port. Perform this task before you perform any upgrade task. |
|
<0> Exit To Main Menu |
Return to the BootWare Operation menu. |
To upgrade the BootWare image through the management Ethernet port, enter 4 in the BootWare Operation menu.
Enter your choice(0-4):4
===================<BOOTWARE OPERATION ETHERNET SUB-MENU>===================
|<1> Update Full BootWare |
|<2> Update Extend BootWare |
|<3> Update Basic BootWare |
|<4> Modify Ethernet Parameter |
|<0> Exit To Main Menu |
============================================================================
Enter your choice(0-4):
Table 9 BOOTWARE OPERATION ETHERNET submenu options
|
Option |
Task |
|
<1> Update Full BootWare |
Upgrade the entire BootWare image. |
|
<2> Update Extend BootWare |
Upgrade the extended segment. |
|
<3> Update Basic BootWare |
Upgrade the basic segment. |
|
<4> Modify Ethernet Parameter |
Configure the FTP or TFTP file transfer settings. |
|
<0> Exit To Main Menu |
Return to the BootWare Operation menu. |
Clearing the console login password
|
|
IMPORTANT: · To perform this task, make sure password recovery capability is enabled. If the capability is disabled, you cannot perform this task. · This is a one-time operation. The configuration takes effect only for the first system boot or reboot (option 1 and option 0 in the EXTEND-BOOTWARE menu) after you perform the operation. If you do not save the running configuration, the original settings continue to take effect for the subsequent reboot. |
If you cannot remember the console login password, enter 7 in the EXTEND-BOOTWARE menu to clear the password, and then configure a new password and save the running configuration.
Enter your choice(0-9): 7
Clear Application Password Success!
For more information about the console login password, see "Logging in to the CLI."
Managing storage media
To get information about the storage media on the MPU you are working with, and set the storage medium you want to use for file operations, enter 8 in the EXTEND-BOOTWARE menu.
Enter your choice(0-9): 8
The following DEVICE CONTROL menu appears:
==============================<DEVICE CONTROL>==============================
|<1> Display All Available Nonvolatile Storage Device(s) |
|<2> Set The Operating Device |
|<3> Set The Default Boot Device |
|<0> Exit To Main Menu |
============================================================================
Enter your choice(0-3):
Table 10 DEVICE CONTROL menu options
|
Option |
Task |
|
<1> Display All Available Nonvolatile Storage Device(s) |
Display all storage media on the MPU you are working with. |
|
<2> Set The Operating Device |
Set the current storage medium. All file operations performed using BootWare menus are performed on the current storage medium. |
|
<3> Set The Default Boot Device |
Set the default storage medium from which the system will start up. |
|
<0> Exit To Main Menu |
Return to the EXTEND-BOOTWARE menu. |
Using the product-specific submenu
In the EXTEND-BOOTWARE menu, enter 9 to enter the product-specific submenu:
Enter your choice(0-9): 9
========================<PRODUCT SPECIAL OPERATION>=========================
|<1> Modify Chassis ID Operation |
|<2> Modify Working Mode |
|<3> Modify PCL Key |
|<4> Skip Current System Configuration |
|<0> Exit To Main Menu |
============================================================================
Table 11 Product-specific submenu options
|
Option |
Task |
|
<1> Modify Chassis ID Operation |
Change the IRF member ID of the device. This function is not available when password recovery capability is disabled. |
|
<2> Modify Working Mode |
Change the system operating mode. |
|
<3> Modify PCL Key |
Change the PCL key to adjust the ACL rule length setting. |
|
<4> Skip Current System Configuration |
Start the device with the factory-default configuration at the next reboot. This is a one-time operation and takes effect only at the next reboot. This function is not available when password recovery capability is disabled. |
|
<0> Exit To Main Menu |
Return to the EXTEND-BOOTWARE menu. |
Changing the member ID of the device
1. Enter 1 in the product-specific submenu.
Enter your choice(0-4): 1
==============================<CHASSIS ID SET>==============================
| Note:'*'indicates the current chassis ID |
| Change The Chassis ID Accordingly |
|-------------------------<Chassis ID Available>---------------------------|
|<1> 0* |
|<2> 1 |
|<3> 2 |
|<4> 3 |
|<5> 4 |
|<0> Exit |
============================================================================
2. To place the device in standalone mode, enter 1 to set the chassis ID to 0. To place the device in IRF mode, select 1, 2, 3, or 4 as its member ID.
The asterisk sign (*) indicates the current setting. For more information about the standalone and IRF mode and member ID, see IRF Configuration Guide.
Enter your choice(0-5): 3
Chassis ID has been changed to 2.
The current chassis ID is 2.
Changing the system operating mode
1. Enter 2 in the product-specific submenu.
Enter your choice(0-4):2
=============================<WORKING MODE SET>=============================
|Note:'*'indicates the current working mode |
| Change The Working Mode Accordingly |
|-------------------------<Working Modes Available>------------------------|
|<1> Standard Mode* |
|<2> BridgeE Mode |
|<3> RouteE Mode |
|<4> Advance Mode |
|<5> Configurable Mode |
|<0> Exit |
Enter your choice(0-5):
2. Select an operating mode for the device.
The asterisk sign (*) indicates the current setting. For more information about system operating modes, see "Managing the device."
Enter your choice(0-5): 1
================================<HYBRID SET>================================
|Note:the current working mode is Standard Mode, Hybrid |
| Change The Hybrid state Accordingly |
|----------------------------<Hybrid Avaliable>----------------------------|
|<1> None Hybrid(Default)* |
|<2> Hybrid |
|<0> Exit |
============================================================================
Enter your choice(0-2):
Changing the PCL key
1. Enter 3 in the product-specific submenu.
Enter your choice(0-4): 3
===============================<PCL KEY SET>================================
|Note:'*'indicates the current PCL Key |
| Change The PCL Key Accordingly |
|---------------------------<PCL Key Available>----------------------------|
|<1> IPv6 disable and advanced mode* |
|<2> IPv6 disable and standard mode |
|<3> IPv6 enable and advanced mode |
|<4> IPv6 enable and standard mode |
|<0> Exit |
============================================================================
Enter your choice(0-4):
2. Select an option for the device.
The asterisk sign (*) indicates the current setting.
Table 12 Configuration made by the options
|
Item |
Equivalent configuration at the CLI |
|
<1> IPv6 disable and advanced mode |
acl ipv6 disable + acl mode advanced |
|
<2> IPv6 disable and standard mode |
acl ipv6 disable + acl mode standard |
|
<3> IPv6 enable and advanced mode |
acl ipv6 enable + acl mode advanced |
|
<4> IPv6 enable and standard mode |
acl ipv6 enable + acl mode standard |
The default mode is IPv6 disable and advanced mode. Different modes specify different ACL rule length settings. For more information, see the acl ipv6 { enable | disable } and acl mode { advanced | standard } commands in ACL and QoS Command Reference.
Using the EXTEND-ASSISTANT menu
1. In the EXTEND-BOOTWARE menu, press Ctrl+Z to enter the EXTEND-ASSISTANT menu.
==========================<EXTEND-ASSISTANT MENU>===========================
|<1> Display Memory |
|<2> Search Memory |
|<3> Display CF card info |
|<0> Exit To Main Menu |
============================================================================
Enter your choice(0-3):
2. To view memory information, enter 1 and provide the memory address and length as prompted.
Enter your choice(0-3): 1
Info: Press Ctrl+C to abort or return to EXTEND-ASSISTANT MENU.
Info: only support hexadecimal input.
Enter memory address:80
Enter memory length:2
00000080: 55555555 55555555 UUUUUUUU
3. To search for certain memory information, enter 2 and provide the start and end addresses and the value of interest as prompted.
Enter your choice(0-3): 2
Info: Press Ctrl+C to abort or return to EXTEND-ASSISTANT MENU.
Info: only support hexadecimal input.
Enter start address:80
Enter end address:90
Enter the value to search for:55555555
00000080: 55555555 55555555 55555555 55555555 UUUUUUUUUUUUUUUU
4. To view CF card information, enter 3.
Enter your choice(0-3): 3
CF card 0:
Model: CactusFlashCard
Firm: 23-11-06
Ser#: KC203 00144608
Capacity: 247.5 MB
Current CF Card 0:
|
|
NOTE: The device displays and searches for memory information in 4-byte mode. If a memory address that you enter is not a multiple of 4 bytes, the device automatically adjusts it. |
Table 13 describes the error messages that might appear when you use the EXTEND-ASSISTANT menu.
|
Error message |
Description |
|
Invalid address. |
The entered start or end address is beyond the memory space or the end address is lower than the start address. |
|
Invalid length |
The entered memory length is so great that the calculated end address is beyond the memory space. |
|
Invalid value. |
No value is provided at the prompt Enter the value to search for: before Enter is pressed. |
|
The value not fount. |
The specified value is not found in the specified memory space, or the length of the specified value is not valid because it is not a multiple of 4 bytes. |
BootWare shortcut keys
BootWare provides the shortcut keys in Table 14.
Table 14 BootWare shortcut keys
|
Shortcut keys |
Prompt message |
Function |
|
Ctrl+B |
Press Ctrl+B to enter extended boot menu… |
Accesses the EXTEND-BOOTWARE menu while the device is starting up. |
|
Ctrl+C |
Please Start To Transfer File, Press <Ctrl+C> To Exit |
Stops the ongoing file transfer and exits the current operation interface. |
|
Info: Press Ctrl+C to abort or return to EXTEND-ASSISTANT MENU |
Returns to the EXTEND-ASSISTANT menu. If the system is outputting the result of an operation, this shortcut key combination aborts the display first. |
|
|
Ctrl+D |
Press Ctrl+D to access BASIC-BOOTWARE MENU |
Accesses the BASIC-BOOTWARE menu. |
|
Ctrl+D = Quit |
Exits the parameter settings menu. |
|
|
Ctrl+F |
Ctrl+F: Format File System |
Formats the current storage medium. NOTE: If password recovery capability is disabled, you cannot format the flash. |
|
Ctrl+T |
Press Ctrl+T to start five-step full RAM test… |
Starts a five-step RAM test.
This RAM test is intended for memory troubleshooting. H3C recommends not performing this test. |
|
Ctrl+Y |
Press Ctrl+Y to start nine-step full RAM test… |
Starts a nine-step RAM test.
This RAM test is intended for memory troubleshooting. H3C recommends not performing this test. |
|
Ctrl+Z |
Ctrl+Z: Access EXTEND-ASSISTANT MENU |
Accesses the EXTEND-ASSISTANT menu from the EXTEND-BOOTWARE menu. |
Disabling password recovery capability
Password recovery capability controls console user access to the device configuration and SDRAM from BootWare menus. This feature also determines the method for dealing with console login password loss (see Figure 1).
If password recovery capability is enabled, a console user can access the device configuration without authentication to configure new passwords.
If password recovery capability is disabled, console users must restore the factory-default configuration before they can configure new passwords. Restoring the factory-default configuration deletes the next-startup configuration files.
To enhance system security, disable password recovery capability.
Figure 1 Dealing with console login password loss
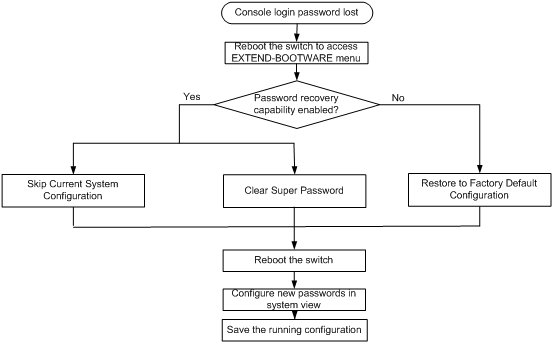
Table 15 summarizes options whose availability varies with the password recovery capability setting.
Table 15 BootWare options and password recovery capability compatibility matrix
|
BootWare menu option |
Password recovery enabled |
Password recovery disabled |
Tasks that can be performed |
|
Download Application Program To SDRAM And Run |
Yes |
No |
Load and run the system software image in SDRAM. |
|
Update User Private File |
Yes |
No |
Download a file to the current storage medium. |
|
Clear Super Password |
Yes |
No |
Clear the console login password to allow console login without authentication. This is a one-time operation and takes effect only for the first system boot or reboot after you choose this option. |
|
Modify Chassis ID Operation |
Yes |
No |
Switch between IRF mode and standalone mode and change the member ID of the device. For more information about IRF, see IRF Configuration Guide. |
|
Skip Current System Configuration |
Yes |
No |
Load the factory-default configuration without deleting the next-startup configuration file. This is a one-time operation and takes effect only for the first system boot or reboot after you perform the operation. |
|
Restore to Factory Default Configuration |
No |
Yes |
Delete the next-startup configuration file and load the factory-default configuration. |
To disable password recovery capability:
|
Step |
Command |
Remarks |
|
1. Enter system view. |
system-view |
N/A |
|
2. Disable password recovery capability. |
undo password-recovery enable |
Enabled by default. |
When password recovery capability is disabled, you cannot downgrade the software configuration of the device to a version that does not support the capability through the BootWare menus. You can do so at the CLI, but the BootWare menu password configured becomes effective again.
BootWare upgrade example
You can use one of the following methods to upgrade the BootWare:
· Use the Serial submenu to load and run a system software image and upgrade the BootWare.
· Use the Ethernet submenu to load and run a system software image and upgrade the BootWare.
· Use the BootWare Operation menu to upgrade the BootWare from the console port.
· Use the BootWare Operation menu to upgrade the BootWare from the Ethernet port.
· At the CLI, use the boot-loader file command to load and run a system software image and upgrade the BootWare.
· At the CLI, use the bootrom update file command to directly upgrade the BootWare.
Among these methods, only the two methods using the BootWare Operation menu upgrade the entire BootWare. All other methods upgrade only the extended BootWare segment. This example describes how to use the BootWare Operation menu to upgrade the BootWare from the Ethernet port.
1. In the EXTEND-BOOTWARE menu, enter 6.
===========================<EXTEND-BOOTWARE MENU>===========================
|<1> Boot System |
|<2> Enter Serial SubMenu |
|<3> Enter Ethernet SubMenu |
|<4> File Control |
|<5> Restore to Factory Default Configuration |
|<6> BootWare Operation Menu |
|<7> Clear Super Password |
|<8> Storage Device Operation |
|<9> Product Special Operation |
|<0> Reboot |
============================================================================
Ctrl+Z: Enter EXTEND-ASSISTANT MENU
Ctrl+F: Format File System
Enter your choice(0-9): 6
2. In the BootWare Operation menu, enter 4.
=========================<BootWare Operation Menu>==========================
|Note:the operating device is cfa0 |
|<1> Backup Full BootWare |
|<2> Restore Full BootWare |
|<3> Update BootWare By Serial |
|<4> Update BootWare By Ethernet |
|<0> Exit To Main Menu |
============================================================================
Enter your choice(0-4): 4
3. In the BootWare Operation Ethernet submenu, enter 4 to modify the Ethernet parameters.
===================<BOOTWARE OPERATION ETHERNET SUB-MENU>===================
|<1> Update Full BootWare |
|<2> Update Extend BootWare |
|<3> Update Basic BootWare |
|<4> Modify Ethernet Parameter |
|<0> Exit To Main Menu |
============================================================================
Enter your choice(0-4): 4
==========================<ETHERNET PARAMETER SET>==========================
|Note: '.' = Clear field. |
| '-' = Go to previous field. |
| Ctrl+D = Quit. |
============================================================================
Protocol (FTP or TFTP) :tftp
Load File Name :host
:12500_mr.btw
Target File Name :target
:12500_mr.btw
Server IP Address :192.168.1.1 192.168.2.26
Local IP Address :192.168.1.253 192.168.2.1
Gateway IP Address :0.0.0.0
4. In the BootWare Operation Ethernet submenu, enter 1 to upgrade the BootWare.
===================<BOOTWARE OPERATION ETHERNET SUB-MENU>===================
|<1> Update Full BootWare |
|<2> Update Extend BootWare |
|<3> Update Basic BootWare |
|<4> Modify Ethernet Parameter |
|<0> Exit To Main Menu |
============================================================================
Enter your choice(0-4): 1
Loading.................Done!
717196 bytes downloaded!
Updating Basic BootWare? [Y/N]Y
Updating Basic BootWare....Done!
Updating Extend BootWare? [Y/N]Y
Updating Extend BootWare...Done!
5. Return to the BootWare Operation menu.
===================<BOOTWARE OPERATION ETHERNET SUB-MENU>===================
|<1> Update Full BootWare |
|<2> Update Extend BootWare |
|<3> Update Basic BootWare |
|<4> Modify Ethernet Parameter |
|<0> Exit To Main Menu |
============================================================================
Enter your choice(0-4): 0
=========================<BootWare Operation Menu>==========================
|Note:the operating device is cfa0 |
|<1> Backup Full BootWare |
|<2> Restore Full BootWare |
|<3> Update BootWare By Serial |
|<4> Update BootWare By Ethernet |
|<0> Exit To Main Menu |
============================================================================
Enter your choice(0-4): 0
===========================<EXTEND-BOOTWARE MENU>===========================
|<1> Boot System |
|<2> Enter Serial SubMenu |
|<3> Enter Ethernet SubMenu |
|<4> File Control |
|<5> Restore to Factory Default Configuration |
|<6> BootWare Operation Menu |
|<7> Clear Super Password |
|<8> Storage Device Operation |
|<9> Product Special Operation |
|<0> Reboot |
============================================================================
Ctrl+Z: Enter EXTEND-ASSISTANT MENU
Ctrl+F: Format File System
Enter your choice(0-9):
6. Enter 0 to reboot the device with the new BootWare.
Enter your choice(0-9): 0
DDR2 SDRAM test successful.
Press Ctrl+T to start five-step full RAM test...
Press Ctrl+Y to start nine-step full RAM test...
System is starting...
Press Ctrl+D to access BASIC-BOOTWARE MENU
Booting Normal Extend BootWare
The Extend BootWare is self-decompressing................
Done!
****************************************************************************
* *
* H3C S12500 BootWare, Version 1.22 *
* *
****************************************************************************
Copyright (c) 2004-2012 Hangzhou H3C Technologies Co., Ltd.
Compiled Date : Dec 3 2012
CPU Type : MPC8548E
CPU L1 Cache : 32KB
CPU L2 Cache : 512KB
CPU Clock Speed : 1000MHz
Memory Type : DDR2 SDRAM
Memory Size : 1024MB
Memory Speed : 400MHz
BootWare Size : 4MB
Flash Size : 128MB
cfa0 Size : 247MB
NVRAM Size : 1024KB
BASIC CPLD Version : 003
EXTEND CPLD Version : 003
PCB Version : Ver.B
Board self testing...........................
Board steady testing... [ PASS ]
Board SlotNo... [ 1 ]
Subcard exist testing... [ PASS ]
DX246 testing... [ PASS ]
PHY88E1111 testing... [ PASS ]
CPLD1 testing... [ PASS ]
CPLD2 testing... [ PASS ]
NS16550 register testing... [ PASS ]
The default switch's Mac address... [00:e0:fc:00:95:12]
CF Card testing... [ PASS ]
BootWare Validating...
Backup Extend BootWare is newer than Normal Extend BootWare,Update? [Y/N]N
Press Ctrl+B to enter extended boot menu...
BootWare password: Not required. Please press Enter to continue.
Password recovery capability is enabled.
Note: The current operating device is cfa0
Enter < Storage Device Operation > to select device.
===========================<EXTEND-BOOTWARE MENU>===========================
|<1> Boot System |
|<2> Enter Serial SubMenu |
|<3> Enter Ethernet SubMenu |
|<4> File Control |
|<5> Restore to Factory Default Configuration |
|<6> BootWare Operation Menu |
|<7> Clear Super Password |
|<8> Storage Device Operation |
|<9> Product Special Operation |
|<0> Reboot |
============================================================================
Ctrl+Z: Access EXTEND-ASSISTANT MENU
Ctrl+F: Format File System
Enter your choice(0-9):
The BootWare upgrade is completed.
System software upgrade examples
You can upgrade the system software by using the BootWare menus, the ISSU feature (see "Performing ISSU"), or the methods described in "Upgrading software." This section describes how to upgrade the system software using the BootWare menus.
Using XMODEM to upgrade software through the console port
1. In the EXTEND-BOOTWARE menu, enter 2.
The Serial submenu appears:
===========================<Enter Serial SubMenu>==========================
|Note:the operating device is cfa0 |
|<1> Download Application Program To SDRAM And Run |
|<2> Update Main Application File |
|<3> Update Backup Application File |
|<4> Update Secure Application File |
|<5> Update User Private File |
|<6> Modify Serial Interface Parameter |
|<0> Exit To Main Menu |
==========================================================================
Enter your choice(0-6):
2. In the Serial submenu, enter 6.
===============================<BAUDRATE SET>=============================
|Note:'*'indicates the current baudrate |
| Change The HyperTerminal's Baudrate Accordingly |
|---------------------------<Baudrate Available>---------------------------|
|<1> 9600(Default)* |
|<2> 19200 |
|<3> 38400 |
|<4> 57600 |
|<5> 115200 |
|<0> Exit |
==========================================================================
Enter your choice(0-5):1
3. Select the correct download baud rate.
In this example, enter 1 to select 9600 bps.
4. Change the baud rate of your terminal to match that set on the Serial submenu, close your connection to the device and then reestablish the connection to make the terminal's baud rate change take effect, and press Enter.
The Serial submenu appears again:
===========================<Enter Serial SubMenu>==========================
|Note:the operating device is cfa0 |
|<1> Download Application Program To SDRAM And Run |
|<2> Update Main Application File |
|<3> Update Backup Application File |
|<4> Update Secure Application File |
|<5> Update User Private File |
|<6> Modify Serial Interface Parameter |
|<0> Exit To Main Menu |
==========================================================================
Enter your choice(0-6):2
If your terminal is running Windows 98, change the baud rate before closing the connection. If your terminal is running Windows 2000, you must close the connection before you can change the setting.
5. Select an option as required.
In this example, enter 2 to download a system software image to the current storage medium as the main image:
Please Select File .
XMODEM downloading ...CCC
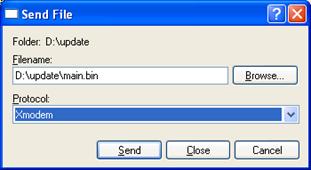
6. Select Transfer > Send File in the HyperTerminal window. In the dialog box that appears, click Browse to select the source file, and select Xmodem from the Protocol list.
Figure 2 File transmission dialog box
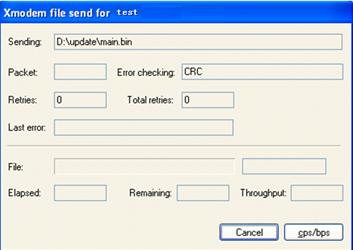
7. Click Send.
The following dialog box appears:
Figure 3 File transfer progress
After the file transfer is complete, the Serial submenu appears again. You can choose other options as required.
Using TFTP to upgrade system software through the Ethernet interface
In this example, the device acts as the TFTP client.
1. Connect the device to the intended TFTP server through the device's management Ethernet interface and obtain the IP address of the intended TFTP server. Connect your terminal to the device's console port.
You can use the same PC for the two purposes.
2. On the intended TFTP server, run TFTP server and specify the working path for software upgrade.
3. Run the terminal emulation program on the terminal, reboot the device, and enter the EXTEND-BOOTWARE menu.
4. In the EXTEND-BOOTWARE menu, enter 3.
==========================<Enter Ethernet SubMenu>=========================
|Note:the operating device is cfa0 |
|<1> Download Application Program To SDRAM And Run |
|<2> Update Main Application File |
|<3> Update Backup Application File |
|<4> Update Secure Application File |
|<5> Update User Private File |
|<6> Modify Ethernet Parameter |
|<0> Exit To Main Menu |
|<Ensure The Parameter Be Modified Before Downloading!> |
==========================================================================
Enter your choice(0-6):6
5. To download a file, enter 6 to modify Ethernet port settings.
==========================<ETHERNET PARAMETER SET>=========================
|Note: '.' = Clear field. |
| '-' = Go to previous field. |
| Ctrl+D = Quit. |
==========================================================================
Protocol (FTP or TFTP) :TFTP
Load File Name :bootware
:test.bin
Target File Name :bootware
:test.bin
Server IP Address :192.168.1.1
Local IP Address :192.168.1.253
Gateway IP Address :0.0.0.0
After you complete the modification, the Ethernet submenu appears again.
==========================<Enter Ethernet SubMenu>=========================
|Note:the operating device is cfa0 |
|<1> Download Application Program To SDRAM And Run |
|<2> Update Main Application File |
|<3> Update Backup Application File |
|<4> Update Secure Application File |
|<5> Update User Private File |
|<6> Modify Ethernet Parameter |
|<0> Exit To Main Menu |
|<Ensure The Parameter Be Modified Before Downloading!> |
==========================================================================
Enter your choice(0-6):2
6. In the Ethernet submenu, enter 2 to download the specified image file to the device.
Loading...................................................................
..........................................................................
..........................................................................
..........................................................................
..................................Done!
47979456 bytes downloaded!
Updating File cfa0:/test.bin..............................................
..........................................................................
..........................................................................
..........................................................................
...............................................
..Done!
After the file transfer is complete, the Ethernet submenu appears again. You can choose other options as required.
Using FTP to upgrade system software through the Ethernet interface
In this example, the device acts as the FTP client.
1. Connect the device to the intended FTP server through the device's management Ethernet interface and obtain the IP address of the intended TFTP server. Connect your terminal to the device's console port.
You can use the same PC for the two purposes.
2. On the intended FTP server, run FTP server, specify the working path for software upgrade, and configure an FTP user account.
3. Run the terminal emulation program on the terminal, reboot the device, and enter the EXTEND-BOOTWARE menu.
4. Perform steps 4 to 6 in the procedure described in "Using TFTP to upgrade system software through the Ethernet interface."