- Table of Contents
- Related Documents
-
| Title | Size | Download |
|---|---|---|
| 04-Data buffer configuration | 86.09 KB |
Contents
Configuring the shared-area size
Applying data buffer configuration
Displaying and maintaining data buffers
The switch operates in IRF or standalone (the default) mode. For information about the IRF mode, see IRF Configuration Guide.
Overview
Data buffers temporarily store packets to avoid packet loss.
An interface card has an ingress buffer and an egress buffer. An interface stores outgoing packets in the egress buffer when congestion occurs, and stores incoming packets in the ingress buffer when the CPU is busy.
Buffer resource
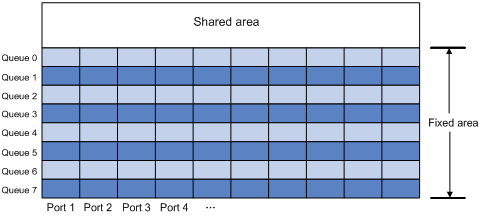
Shared area and fixed area
Both an ingress buffer and an egress buffer have a shared area and a fixed area. The shared area is partitioned into queues, as shown in Figure 1.
· The shared area is shared by the queues of all interfaces. When an interface or a queue receives traffic bursts, it can temporarily preempt buffer resources of the shared area. After sending out the traffic bursts, the interface releases the preempted resources for use by other interfaces or queues. You can manually configure the number of buffer resources for the shared area, and the rest is automatically assigned to the fixed area.
· The fixed area is allocated to interfaces and then to queues of each interface. The switch allocates the buffer resources of the fixed area equally among all interfaces on an interface card and then allocates the buffer resources of each interface equally among all its queues. In this manner, all queues of all interfaces have an equal number of dedicated buffer resources.
Figure 1 Shared area and fixed area
When congestion occurs:
1. An interface first uses the buffer resources of the shared area to store packets.
2. When no buffer resources are available in the shared area, the interface uses the buffer resources of the corresponding queue in the fixed area.
3. When no buffer resources of the queue in the fixed area are available, the interface discards subsequent packets.
When an interface uses the egress buffer, packets with drop precedence 0 can use buffer resources in both the shared area and fixed area, but packets with drop precedence 1 or 2 can use only buffer resources in the fixed area.
|
|
NOTE: · Only cards with silk screen LST1XP16LEB1 or LST1XP16LEC1 support configuring the ingress buffer. · The configuration of the ingress buffer takes effect only on the default MDC. For information about MDC, see Fundamentals Configuration Guide. |
Configuring a data buffer
|
|
CAUTION: Inappropriate data buffer changes can cause system problems. Before manually changing data buffer settings, make sure you understand its impact on your device. |
Configuring the shared-area size
The data buffer on an interface card has a fixed size. After you set the shared-area size for a data buffer, the rest is automatically assigned to the fixed area.
To configure the shared area size:
|
Step |
Command |
Remarks |
|
system-view |
N/A |
|
|
2. Configure the shared-area size. |
· In standalone mode: · In IRF mode: |
The default setting is 1024 buffer resources for the ingress buffer and 4096 buffer resources for the egress buffer.
|
Applying data buffer configuration
Perform this task to apply the data buffer configuration.
You cannot directly modify the applied configuration. To modify the configuration, you must cancel the application, re-configure data buffers, and re-apply the configuration.
To apply data buffer configuration:
|
Step |
Command |
|
1. Enter system view. |
system-view |
|
2. Apply data buffer configuration. |
buffer apply |
Displaying and maintaining data buffers
Execute display commands in any view.
|
Task |
Command |
|
Display data buffer configuration (in standalone mode). |
display buffer [ slot slot-number ] |
|
Display data buffer configuration (in IRF mode). |
display buffer [ chassis chassis-number slot slot-number ] |
applying data buffer configuration, 3
buffer resource
applying data buffer configuration, 3
data buffer configuration, 1
data buffer shared-area size configuration, 2
configuring
data buffer shared-area size, 2
data buffers, 1
data buffer
applying configuration, 3
configuration, 1
displaying, 3
maintaining, 3
shared-area size configuration, 2
displaying data buffers, 3
drop precedence
shared area, 1
fixed area
drop precedence, 1
maintaining data buffers, 3
network
data buffer shared-area size configuration, 2
network management
applying data buffer configuration, 3
data buffer configuration, 1
overview
buffer resource, 1
congestion, 1
drop precedence, 1
fixed area, 1
shared area, 1
procedure
applying data buffer configuration, 3
configuring data buffer shared-area size, 2
displaying data buffer, 3
maintaining data buffer, 3
shared area
drop precedence, 1
size configuration, 2