| Title | Size | Downloads |
|---|---|---|
| H3C UIS Manager vGPU Configuration Guide-5W101-book.pdf | 1.60 MB |
- Table of Contents
- Related Documents
-
vGPU Configuration Guide
Document version: 5W101-20210103
Copyright © 2021 New H3C Technologies Co., Ltd. All rights reserved.
No part of this manual may be reproduced or transmitted in any form or by any means without prior written consent of New H3C Technologies Co., Ltd.
Except for the trademarks of New H3C Technologies Co., Ltd., any trademarks that may be mentioned in this document are the property of their respective owners.
The information in this document is subject to change without notice.
Contents
Intelligent vGPU resource scheduling
Installing an NVIDIA graphics driver on a VM
(Optional) Requesting a license for a VM
(Optional) Editing the vGPU type for a VM
(Optional) Creating a service template
Deploying NVIDIA License Server
Platform hardware requirements
Platform software requirements
Platform configuration requirements
Network ports and management interface
Installing and configuring NVIDIA License Server
About vGPUs
Overview
GPU virtualization enables multiple VMs to have simultaneous direct access to a single physical GPU by virtualizing the physical GPU into logical ones called virtual GPUs (vGPUs).
NVIDIA GRID vGPU runs on a host installed with NVIDIA GRID GPUs to provide vGPU resources for VMs that deliver high-performance graphics services such as complex 2D graphics processing and 3D graphics rendering.
H3C UIS Manager uses the NVIDIA GRID vGPU technology together with intelligent resource scheduling (iRS) to provide schedulable vGPU resources. To maximize usage, UIS Manager pools vGPUs and allocates them dynamically to VM groups based on the usage status of vGPUs and priorities of the VMs.
Mechanisms
GPU virtualization
GPU virtualization operates as follows:
1. A physical GPU uses DMA to directly obtain the instructions that graphics applications issue to an NVIDIA driver and processes the instructions.
2. The physical GPU puts rendered data in the frame buffers of vGPUs.
3. The NVIDIA driver pulls the rendered data from the physical frame buffers.
Figure 1 GPU virtualization mechanism

UIS Manager integrates NVIDIA vGPU Manager, which is the core component of GPU virtualization. NVIDIA vGPU Manager divides a physical GPU into multiple independent vGPUs. Each vGPU has exclusive access to a fixed amount of frame buffer. All vGPUs resident on a physical GPU monopolize the GPU’s engines in turn through time-division multiplexing, including the graphics (3D), video decode, and video encode engines.
Intelligent vGPU resource scheduling
Intelligent vGPU resource scheduling assigns the vGPU resources of the hosts in a cluster to a GPU resource pool for a group of VMs that provide the same service. Each VM in the VM group is assigned a service template. A service template defines the priority of VMs that use the service template to use physical resources and the total ratio of resources that all VMs using the service template can use. When a VM starts or restarts, UIS Manager allocates resources to the VM based on its service template priority, resource usage of the resource pool, and the total ratio of resources that all VMs configured with the same service template use.
UIS Manager uses the following rules to allocate vGPU resources:
· Allocates vGPU resources in the VM boot sequence if VMs use service templates with the same priority.
· Allocates vGPU resources in descending order of priority if idle vGPUs are fewer than the VMs to boot.
For example, a resource pool contains 10 vGPUs, and a VM group contains 12 VMs. VMs 1 through 4 use service template A, which has a low priority and allows its VMs to use 20% of the vGPUs in the resource pool. VMs 5 through 12 use service template B, which has a high priority and allows its VMs to use 80% of the vGPUs in the resource pool. When all VMs boot simultaneously, UIS Manager first assigns vGPU resources to VMs 5 through 12. Among VMs 1 through 4, the two VMs that boot first are assigned the remaining two vGPUs.
· Reclaims vGPU resources from some low-priority VMs and assigns the vGPU resources to high-priority VMs when the following conditions are met:
¡ Idle vGPUs are fewer than the high-priority VMs to boot.
¡ The VMs that use the same low-priority service template use more resources than the resource ratio specified in the service template.
For example, a resource pool contains 10 vGPUs, and a VM group contains 12 VMs. VMs 1 through 4 use service template A, which has a low priority and allows its VMs to use 20% of the vGPUs in the resource pool. VMs 5 through 12 use service template B, which has a high priority and allows its VMs to use 80% of the vGPUs in the resource pool. VMs 1 through 10 are running, and VMs 1 through 4 use four vGPUs. When VM 11 and VM 12 boot, UIS Manager reclaims two vGPUs from VMs 1 through 4 and assigns them to VM 11 and VM 12.
Restrictions and guidelines
To provide vGPUs, physical GPUs must support NVIDIA GRID vGPU solutions.
Configuring vGPUs
This chapter describes how to attach a vGPU to a VM in UIS Manager.
Prerequisites
· Install NVIDIA GRID vGPU-compatible GPUs on the server to provide vGPUs. For more information about GPU installation, see the hardware installation guide for the server.
· Download the Virtual GPU License Manager installer, gpumodeswitch tool, and GPU drivers from the NVIDIA website.
· Deploy NVIDIA License Server and request NVIDIA vGPU licenses as described in "Deploying NVIDIA License Server" and "(Optional) Requesting a license for a VM."
Restrictions and guidelines
· Each VM can be attached to one vGPU.
· A physical GPU can provide vGPUs of the same type. The physical GPUs of a graphics card can provide different types of vGPUs.
· A physical GPU with vGPUs resident cannot be used for GPU passthrough. A passed through physical GPU cannot provide vGPUs.
· Make sure GPUs operate in graphics mode. If a GPU operates in compute mode, set its mode to graphics as described in gpumodeswitch User Guide.
Procedure
This section uses a VM running 64-bit Windows 7 as an example to describe how to attach a vGPU to a VM.
Creating vGPUs
1. On the top navigation bar, click Hosts.
2. Select a host to enter the host summary page.
3. Click the Hardware Configuration tab.
4. Click the GPU Device tab.
Figure 2 GPU list

5. Click the ![]() icon for a GPU.
icon for a GPU.
6. Select a vGPU type, and then click OK.

Attaching vGPUs to VMs
1. On the top navigation bar, click Services, and then select iRS from the navigation pane.

2. Click Add iRS Service.
3. Configure the name and description of the iRS service, select vGPU as the resource type, and then click Next.
Figure 5 Adding an iRS service

4. Select the target vGPU pool name, select the vGPUs to be assigned to the vGPU pool, and then click Next.
Figure 6 Assigning vGPUs to a vGPU pool

5. Click Add to add service VMs.
6. Click the ![]() icon for the VM field.
icon for the VM field.

7. Select service VMs and then click OK.
The selected VMs must be in shutdown state. If you select multiple service VMs, they will be assigned the same service template and priority. You can perform the add operation again to assign a different service template to another group of service VMs.
Figure 8 Selecting service VMs

8. Click the ![]() icon for the Service Template
field.
icon for the Service Template
field.
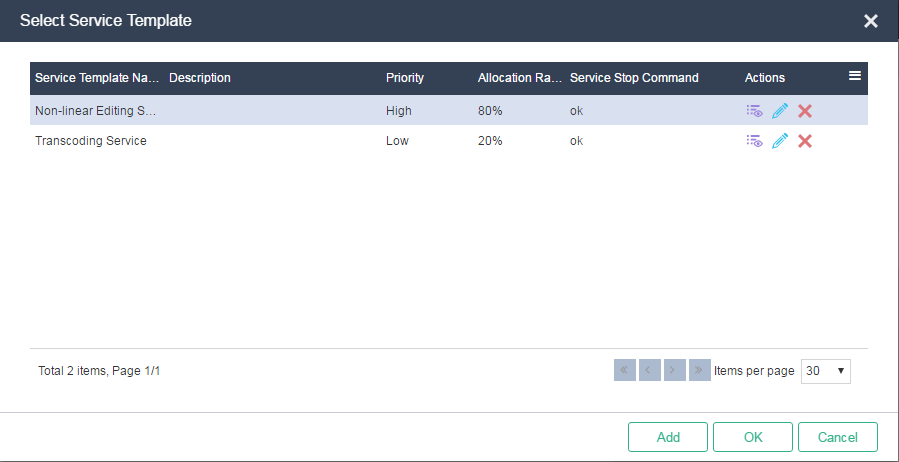
9. Select a service template and click OK.
For more information about service templates, see "Intelligent vGPU resource scheduling" and "(Optional) Creating a service template."
Figure 9 Selecting a service template
10. Click Finish.
The added iRS service appears in the iRS service list.
Figure 10 iRS service list

11. From the left navigation pane, select the added vGPU pool.
12. On the VMs tab, select the VMs to boot, right-click on the VM list, and then select Start.
Figure 11 Starting service VMs

13. In the dialog box that opens, click OK.
14. Right-click a VM and select Console from the shortcut menu, and then wait for the VM to start up.
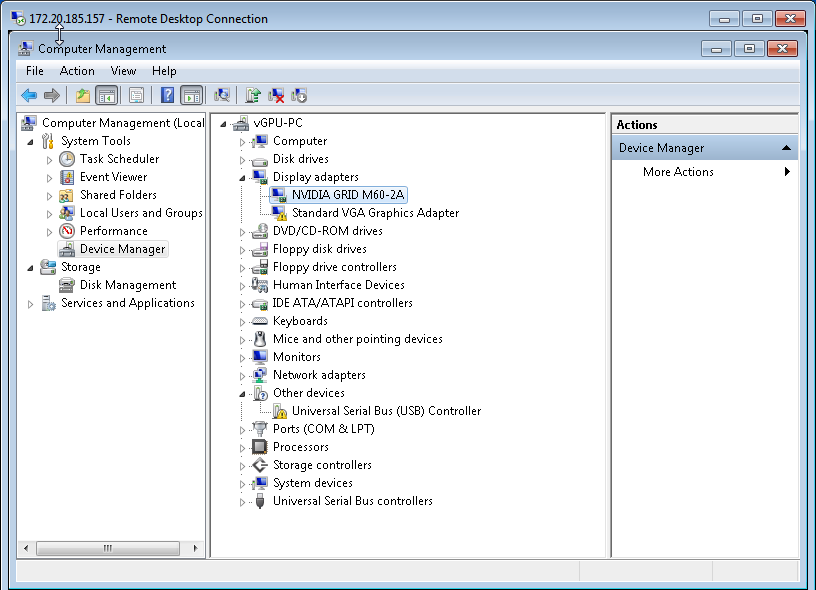
15. On the VM, open Device Manager, and then select Display adapters to verify that a vGPU has been attached to the VM.
To use the vGPU, you must install an NVIDIA graphics driver on the VM.
Figure 12 Device Manager

Installing an NVIDIA graphics driver on a VM
1. Download a matching NVIDIA graphics driver and upload it to a VM.
2. Double-click the driver installer and install the driver following the setup wizard.
Figure 13 Installing an NVIDIA graphics driver

3. Restart the VM.
The VNC console is unavailable after you install an NVIDIA graphics driver. Please access the VM through remote desktop software such as RGS or Mstsc.
4. Log in to the VM through remote desktop software.
5. Open Device Manager, and then select Display adapters to verify that the model of the attached vGPU is correct.
Figure 14 Displaying vGPU information
(Optional) Requesting a license for a VM
1. Log in to a VM.
2. Right-click on the desktop, and then select NVIDIA Control Panel.
Figure 15 NVIDIA Control Panel

3. From the left navigation pane, select Licensing > Manage License. Enter the IP address and port number of an NVIDIA license server, and then click Apply.
For more information about deploying an NVIDIA license server, see "Deploying NVIDIA License Server."
Figure 16 Specifying an NVIDIA license server

(Optional) Editing the vGPU type for a VM
1. Create an iRS vGPU pool of the target type.
Figure 17 vGPU pool list

2. On the top navigation bar, click VMs.
3. Click the name of a VM in shutdown state.
4. On the VM summary page, click Edit.
Figure 18 VM summary page

5. Select More > GPU Device from the menu.

6. Click the ![]() icon for the Resource Pool field.
icon for the Resource Pool field.
7. Select the target vGPU pool, and then click OK.
Figure 20 Selecting a vGPU pool

8. Click Apply.
(Optional) Creating a service template
Before you create a service template, modify the resource allocation ratios of the system-defined service templates. Make sure the sum of the resource allocation ratios of all service templates does not exceed 100%.
To create a service template:
1. On the top navigation bar, click Services, and then select iRS from the navigation pane.
Figure 21 iRS service list

2. Click Service Templates.
Figure 22 Service template list

3. Click Add.
Figure 23 Adding a service template
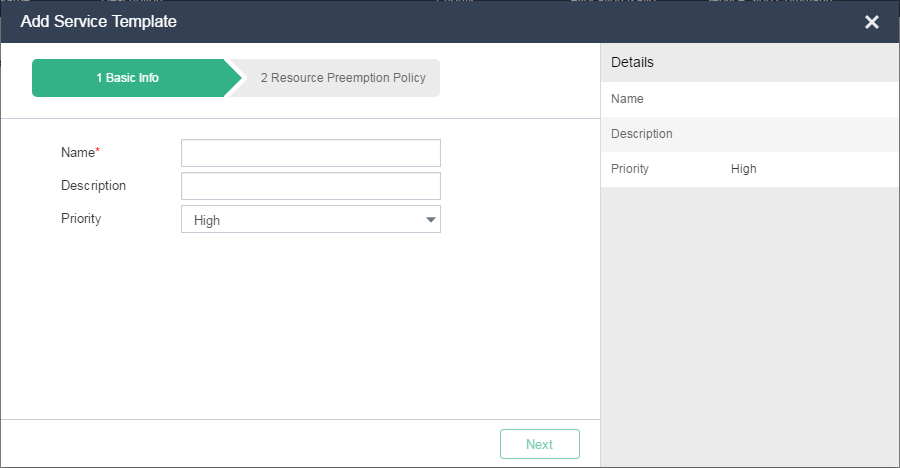
4. Enter a name and a description for the service template, select a priority, and then click Next.
5. Configure the following parameters:
|
Parameter |
Description |
|
Priority |
Specifies the priority of VMs that use the service template to use physical resources. When the resource usage of VMs using a service template with low priority exceeds the assigned resource ratio, the system reclaims the resources of these VMs to ensure that VMs using a service template with high priority have enough resources to use. If the resource usage of VMs using a service template with low priority does not exceed the assigned resource ratio, the system does not reclaim the resources of these VMs. |
|
Allocation Ratio |
Specifies the ratio of resources in an iRS service to be assigned to a service template. For example, if 10 GPUs participate in iRS and the allocation ratio of a service template is 20%, 2 GPUs will be assigned to the service template. The total allocation ratio of all service templates cannot exceed 100%. |
|
Service Stop Command |
Specifies the command that can be executed by the OS of a VM to release the resources occupied by the VM so that other VMs can use the resources. For example, you can enter a shutdown command. |
|
Result to Return |
Specifies the result used by the UIS Manager to determine whether a command used for stopping services has been executed successfully by matching the returned result against this parameter. |
|
Action Upon Failure |
Specifies an action to take upon stopping service failure. · Find Next—The system tries to stop services of other VMs to release resources. · Shut Down VM—The system shuts down the current VM to release resources. |
Figure 24 Configuring resource allocation for the service template

6. Click Finish.
Appendix A NVIDIA vGPU solution
NVIDIA vGPU overview
NVIDIA vGPUs are classified into the following types:
· Q-series—For designers and advanced users.
· B-series—For advanced users.
· A-series—For virtual application users.
Each vGPU series has a fixed amount of frame buffer, number of supported display heads, and maximum resolution.
A physical GPU is virtualized based on the following rules:
· vGPUs are created on a physical GPU based on a certain frame buffer size.
· All vGPUs resident on a physical GPU have the same frame buffer size. A physical GPU cannot provide vGPUs with different frame buffer sizes.
· The physical GPUs of a graphics card can provide different types of vGPUs.
For example, a Tesla M60 graphics card has two physical GPUs, and each GPU has an 8 GB frame buffer. The GPUs can provide vGPUs with a frame buffer of 0.5 GB, 1 GB, 2 GB, 4 GB, or 8 GB.
The following table shows the vGPU types supported by Tesla M60:
|
vGPU type |
Frame buffer in MB |
Max. display heads |
Max. resolution per display head |
Max. vGPUs per GPU |
Max. vGPUs per graphics card |
|
M60-8Q |
8192 |
4 |
4096 × 2160 |
1 |
2 |
|
M60-4Q |
4096 |
4 |
4096 × 2160 |
2 |
4 |
|
M60-2Q |
2048 |
4 |
4096 × 2160 |
4 |
8 |
|
M60-1Q |
1024 |
2 |
4096 × 2160 |
8 |
16 |
|
M60-0Q |
512 |
2 |
2560 × 1600 |
16 |
32 |
|
M60-2B |
2048 |
2 |
4096 × 2160 |
4 |
8 |
|
M60-1B |
1024 |
4 |
2560 × 1600 |
8 |
16 |
|
M60-0B |
512 |
2 |
2560 × 1600 |
16 |
32 |
|
M60-8A |
8192 |
1 |
1280 × 1024 |
1 |
2 |
|
M60-4A |
4096 |
1 |
1280 × 1024 |
2 |
4 |
|
M60-2A |
2048 |
1 |
1280 × 1024 |
4 |
8 |
|
M60-1A |
1024 |
1 |
1280 × 1024 |
8 |
16 |
UIS Manager does not support vGPUs with a 512 MB frame buffer, such as M60-0Q and M60-0B.
For more information about NVIDIA GPUs and vGPUs, see Virtual GPU Software User Guide of NVIDIA.
vGPU licensing
NVIDIA GRID vGPU is a licensed product. A VM obtains a license from an NVIDIA vGPU license server to enable all vGPU features at bootup and returns the license at shutdown.
Figure 25 NVIDIA GRID vGPU licensing
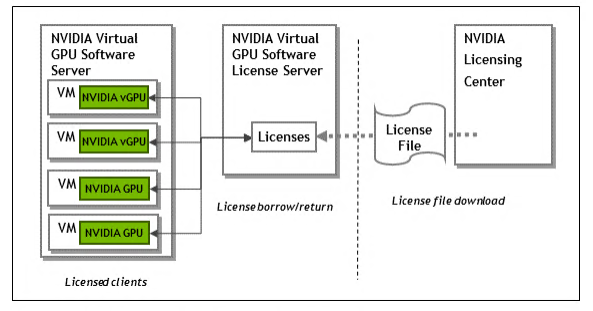
The following NVIDIA GRID products are available as licensed products on NVIDIA Tesla GPUs:
· Virtual Workstation.
· Virtual PC.
· Virtual Application.
The following table shows GRID license editions:
|
GRID license edition |
GRID features |
Supported vGPUs |
|
GRID Virtual Application |
PC-level application. |
A-series vGPUs |
|
GRID Virtual PC |
Business virtual desktop for users who require a great user experience with PC applications for Windows, Web browsers, and high-definition video. |
B-series vGPUs |
|
GRID Virtual Workstation |
Workstation for users of mid-range and high-end workstations who require access to remote professional graphics applications. |
Q-series and B-series vGPUs |
Deploying NVIDIA License Server
Platform hardware requirements
The VM or physical host to be installed with NVIDIA License Server must have a minimum of two CPUs and 4 GB of memory.
NVIDIA License Server supports a maximum of 150000 licensed clients when running on a VM or physical host with four or more CPUs and 16 GB of memory.
Platform software requirements
· JRE—32-bit, JRE1.8 or later. Make sure a JRE has been installed on the platform before you install NVIDIA License Server.
· NET Framework—.NET Framework 4.5 or later on Windows.
· Apache Tomcat—Apache Tomcat 7.x or 8.x. The installer package of NVIDIA License Server for Windows contains an Apache Tomcat package. For Linux, you must install Apache Tomcat before you install NVIDIA License Server.
· Web browser—Later than Firefox 17, Chrome 27, or Internet Explorer 9.
Platform configuration requirements
· The platform must have a fixed IP address.
· The platform must have a minimum of one unchanging Ethernet MAC address, to be used as a unique identifier when registering the server and generating licenses in the NVIDIA Software Licensing Center.
· The platform’s date and time must be set accurately.
Network ports and management interface
The license server requires TCP port 7070 to be open in the platform’s firewall, to serve licenses to clients. By default, the installer will automatically open this port.
The license server’s management interface is web-based, and uses TCP port 8080. To access the management interface from the platform hosting the license server, access http://localhost:8080/licserver. To access the management interface from a remote PC, access http://<license server ip>:8080/licserver.
For more information about hardware and software requirements for NVIDIA License Server deployment, see Virtual GPU Software License Server User Guide.
Installing and configuring NVIDIA License Server
7. On H3C UIS Manager, create a VM that meets the platform requirements for NVIDIA License Server deployment.
8. Install NVIDIA License Manager as described in the Installing the NVIDIA vGPU Software License Server chapter of Virtual GPU Software License Server User Guide. That chapter provides the installation prerequisites and procedures for both Windows and Linux.
9. Configure NVIDIA License Server as described in the Manager Licenses on the NVIDIA vGPU Software License Server chapter of Virtual GPU Software License Server User Guide.
