| Title | Size | Downloads |
|---|---|---|
| H3C UIS Manager Heterogeneous Migration Guide-5W101-book.pdf | 761.40 KB |
- Table of Contents
- Related Documents
-
|
|
|
H3C UIS Manager |
|
Heterogeneous Migration Configuration Guide |
|
|
|
|
Document version: 5W101-20220330
Copyright © 2022 New H3C Technologies Co., Ltd. All rights reserved.
No part of this manual may be reproduced or transmitted in any form or by any means without prior written consent of New H3C Technologies Co., Ltd.
Except for the trademarks of New H3C Technologies Co., Ltd., any trademarks that may be mentioned in this document are the property of their respective owners.
The information in this document is subject to change without notice.
Contents
1 About heterogeneous migration
Installing the heterogeneous migration component
Downloading an installation package
Installing the migration client
5 Appendix A Migration client compatibility
6 Appendix B Installing a migration client on a Linux OS
1 About heterogeneous migration
Heterogeneous migration allows migration of disk data on physical x86 servers, VMs managed by UIS Manager, and VMs managed by another platform to destination VMs on the UIS Manager platform. It requires client installation on the source device.
This document uses an environment shown in Figure 1-1 as an example.
Figure 1-1 Migration environment

To perform a heterogeneous migration, you must perform the following tasks:
1. Download a migration client from UIS Manager to a source device (physical server or VM).
2. Install the migration client and connect the source device to UIS Manager. Then, the migration client reports the status of the source device to UIS Manager.
3. Mount the PE image to the destination VM, configure the TargetClient, and connect TargetClient to the UIS Manager. Then, the TargetClient reports the status of the destination VM to UIS Manager.
4. Create and start a migration task. The migration client receives the migration command and starts migrating the system disk and data disk.
Figure 1-2 Heterogeneous migration

2 Preparing a source device
Installing the heterogeneous migration component
1. Upgrade the movesure.tar.gz package to any folder on the target host.
2. Execute the tar –zxvf movesure.tar.gz command to uncompress the package to the current folder.
3. Execute the sh install_en.sh command in the movesure folder to install the heterogeneous migration component.
|
|
IMPORTANT: To uninstall the heterogeneous migration component, execute the sh uninstall.sh command. |
Downloading an installation package
1. Log in to UIS Manager.
2. On the top navigation bar, click Services.
3. From the left navigation pane, select Heterogeneous Migration.
4. Click the Download Client tab.
5. Verify that the client proxy IP address is correct. By default, the client proxy IP address is the management IP address of UIS Manager.
If the IP address is different from the actual address, click Update Client Proxy IP, which is available only after the migration license is activated.
6. Use the following methods to download the target installation package:
¡ Click the target OS name. The system downloads the installation package in a .zip file named Clone_Client_xxx.zip, for example, Clone_Client_Redhat5x86_64.zip. Then, you must decompress the file and upload the decompressed installation package to the source device through FTP.
¡ Click
the ![]() icon for the target client edition to obtain the URL for
downloading. Then, access the remote console of the source device and use the URL
to download the installation package.
icon for the target client edition to obtain the URL for
downloading. Then, access the remote console of the source device and use the URL
to download the installation package.
Figure 2-1 Downloading a migration client

Installing the migration client
|
|
IMPORTANT: To avoid installation failure, disable firewall and security policy settings for the source device. If the source device is a VM, make sure the port for migration tools has been enabled on the source device. |
This section describes installing the migration client on a Windows OS. For more information about installation on a Linux OS, see "Appendix B Installing a migration client on a Linux OS."
To install the migration client:
1. Access the remote console of the source device.
Figure 2-2 Accessing the remote console of the source device

2. Double-click Clone_Client_Win.exe.
3. In the window that opens, select the installation language and then click OK.
4. Accept the installation agreement, select the installation directory, and start the installation process.
5. Click Y at the prompt to install the CDP driver program.
6. After the installation, restart the source device for the installed client to take effect.
|
|
CAUTION: The restart operation will interrupt services if the source device uses a Windows operating system. Restart the source device when it is not busy to minimize the impact. |
Figure 2-3 Restarting the source device

After the restart, you can access the Services > Heterogeneous Migration > Source Device page to verify that the source device has been added to the source list. By default, the system names source devices by their computer names in the operating system.
Figure 2-4 Source device list

3 Preparing a destination VM
Obtaining the PE image
UIS provides Win10PE and Centos7PE images for migration in Windows OS and Linux OS, respectively. The PE images are released with the UIS version image.
Creating a destination VM
|
|
CAUTION: If the source device uses the Suse10 OS, set the bus type to IDE when creating a destination VM. |
Create the destination VM on UIS Manager as shown in Figure 3-1. Make sure both the available disk size and total disk size of the destination VM are equal to or larger than the disk sizes of the source device.
Figure 3-1 Creating the destination VM

Configuring TargetClient
1. Mount the PE image to the destination VM.
Figure 3-2 Mounting the PE image to the destination VM

2. Start the destination VM and access the VM's console. The VM boots from the PE image and runs TargetClient to access the H3C Converter Platform.
Figure 3-3 H3C Converter Platform

3. Click Tools and configure network settings for the VM to communicate with UIS Manager.
|
|
CAUTION: The network settings configured in this step get lost after the VM restarts. After the migration, you can reconfigure network settings for the VM as needed. |
Figure 3-4 Configuring network settings

4. Enter the IP address of UIS Manager, specify a host name for the VM, and then click the chevron.
The local IP address field is optional. By default, the default IP address used by the destination VM to access the migration platform is used. If UIS Manager uses a public IP address, or if two hosts provide stateful failover, you must specify a local IP address. If you do not do so, the source device cannot connect to the destination VM.
Figure 3-5 Configuring TargetClient parameters

The page that opens indicates that TargetClient and the destination VM have been connected to UIS Manager.
Figure 3-6 TargetClient connection

5. Access the Services > Heterogeneous Migration > Destination VM page to verify that the destination VM has been added to the destination VM page, and the VM status is online.
|
|
IMPORTANT: Only online destination VMs support migration tasks. If the migration operation fails for an online destination VM, verify that no network address conflict exists. |
Figure 3-7 Destination VM list

4 Performing a migration
Restrictions and guidelines
The migration process will occupy the network bandwidth and affect the computing performance of the source device, and services will be interrupted during migration. As a best practice, perform data migration during off-peak periods, and properly arrange the service switchover time.
To avoid migration failures or other compatibility issues, verify that the platform is compatible with the operating system of the source device and the destination device has sufficient hardware resources.
You might need to reload or update the drivers for some hardware after migration. Some hardware settings such as the MAC address of the NIC and hard drive letter might change. If there are applications bound to hardware, you must edit the applications accordingly.
Creating a migration task
1. On the top navigation bar, click Services.
2. From the left navigation pane, select Heterogeneous Migration.
3. Click Create Migration Task.
4. Select I have read the restrictions and guidelines, and then click Next.
5. Specify the source device and destination VM.
Figure 4-1 Specifying the source device and destination VM

6. Select source and destination disks.
By default, the system maps each source device disk to a target device disk. If you manually map a source disk to a target disk, make sure the target disk has a same or larger size than the source disk. For dynamic source disks, the destination disks and source disks must have the same size.
|
|
IMPORTANT: · Only system disks and data disks can be migrated. · You do not need to select a destination disk for an LVM disk because it is a logical volume, but the system also migrates LVM data. · The data on the destination disk, including the partition table will be erased. After migration, all the data on the source disk will be migrated to the target disk. |
Figure 4-2 Selecting disks

7. Configure task parameters as needed.
Figure 4-3 Configuring task parameters

8. To start the migration task immediately, click Start. To save the migration task, click Save. You can access the migration task list later to start a saved task.
|
|
CAUTION: · Before you configure a migration task, you must license the source devices to be specified in the task. You can execute a migration task multiple times and specify the same source device in multiple migration tasks. · When a migration task is saved or executed, a migration license is issued to a source device immediately. An issued license cannot be reclaimed, even if the system fails to create the migration task. In such a case, locate the cause of failure and create another migration task. |
9. To view the migration task list, click the Migration Tasks tab. The system names migration tasks by source device names and updates the list every 30 seconds.
Figure 4-4 Migration task list

10. To view detailed information about a migration task, click the source device name. The detailed information page displays the migration process, device information, and logs.
|
|
NOTE: The system calculates the execution progress of a migration task by periodically sampling data. The system might not refresh the execution progress in real time when migrating a large number of disks, which does not affect migration. You can check the migration progress for the migration state of each disk. |
Figure 4-5 Viewing detailed information about a migration task

11. The system executes a migration task periodically at the incremental migration interval if you do not finish it manually. To manually finish a migration task, click Finish.
Before manually finishing a task, you must stop the services on the source device to prevent the device from generating new data.
|
|
CAUTION: You can manually perform incremental data migration for a migration task that is not finished after its first execution. Incremental migration copies only the changed or new data since the previous migration. You can verify data integrity and restore data for a migration task that is not finished after its first execution. |
Figure 4-6 Finishing a migration task

After you finish the task, the task enters Finished state.
Figure 4-7 Migration completion

Configuring a driver
|
|
IMPORTANT: As a best practice, for Linux OSs, use Virtio drivers if the kernel version is 2.6.25 or higher (for example, redhat 5.2), and use IDE drivers if the kernel version is not. |
The system can detect disk driver incompatibility risks for a migration task. You can export information about the hardware that might have driver incompatibility issues and import drivers for the hardware to the destination VM.
To configure a driver:
1. On the top navigation bar, click Services.
2. From the left navigation pane, select Heterogeneous Migration.
3. Select the Migration Tasks tab.
4. Click the source device name of a migration task.
5. Click Set Driver.
Figure 4-8 Configuring a driver
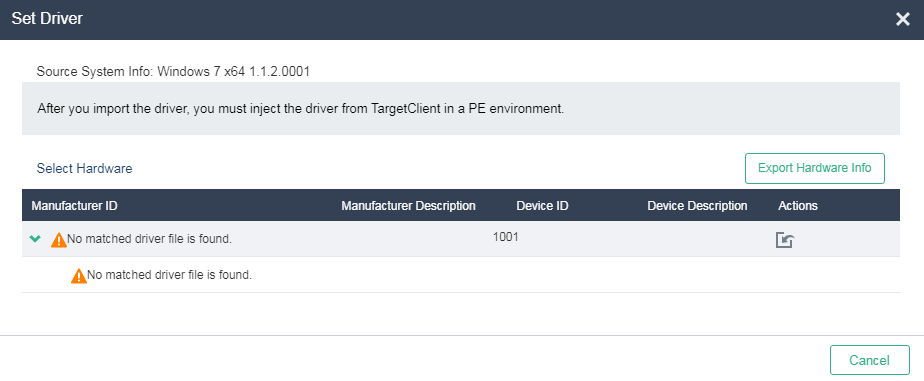
6. Click Export Hardware Info. The system exports hardware information about disks of the destination VM in TXT format.
7. Open the downloaded file to view information about the required drivers. The file name is Destination_VM_name Driver Hardware Info.txt.
8. Compress driver files to be uploaded into a .zip file and name the compressed file mptspi.zip.
Typically, driver files are .sys or .inf files and .ko files for Windows and Linux, respectively.
Make sure the compressed file does not contain multi-layered folders.
9. On the detailed task information page, click the import button to import the compressed file to UIS Manager.
Figure 4-9 Importing the compressed file to UIS Manager

10. Click InDrv in TargetClient to install drivers to the destination VM.
Figure 4-10 Installing drivers

Accessing the destination VM
1. Access the console of the destination VM and exit the H3C Converter Platform.
2. At the prompt, click OK to restart the destination VM.
If you cannot access the VM's operating system or the system prompts partition or disk not found, power off the VM, restart the VM, and select boot from CAS.
Figure 4-11 Restarting the destination VM

3. Enter the username and password and access the destination VM. Verify that all data in the source device has been migrated to the destination VM.
By default, the destination VM uses the same username and password as the source device.
Figure 4-12 Verifying data on the destination VM

5 Appendix A Migration client compatibility
Table 5-1 displays OSs, file systems, disk types, and drivers compatible with the migration client.
Table 5-1 Migration client compatibility
|
Item |
Windows |
Linux |
|
OS |
Windows 2003 x32 Windows 2003 x64 Windows 2003 R2 Windows 2008 x32 Windows 2008 x64 Windows 2k8 R2 x64 Windows 2k8 R2 SP1 Windows 2012 Windows 2012 R2 Windows 2016 Windows 2016 R2 |
Redhat 4/5/6 32-bit Redhat 4/5/6/7 64-bit Centos 6 32-bit Centos 6/7 64-bit Suse 10/11 32-bit Suse 10/11/12 64-bit NeoKylin 5.0/6.0/6.5/6.7/7 64-bit Kylin 3.2/6.7 64-bit Ubuntu 12/14 64-bit |
|
File system |
ntfs |
ext2 ext3 ext4 xfs fat32 ntfs |
|
Disk type |
ISCSI/FC Mutipath disk Other identifiable disks |
ISCSI/FC Mutipath disk LVM/LVM2 Other identifiable disks |
6 Appendix B Installing a migration client on a Linux OS
1. Log in to the migration client through FTP and access the /root/Clone_Client_Linux_64 directory.
2. Execute the ./install.sh command to run the installation script
3. Select the matching driver package at the prompt and enter y.
4. If multiple driver packages exist, select the one that has a similar version as the system kernel.
Figure 6-2 Installing the migration client

The system prompts install/start CAS succeeded! after the installation finishes.
Figure 6-3 Installation completion

