- Table of Contents
-
- 01-Fundamentals Configuration Guide
- 00-Preface
- 01-CLI Configuration
- 02-Login Management Configuration
- 03-FTP and TFTP Configuration
- 04-File System Management Configuration
- 05-Configuration File Management Configuration
- 06-Software Upgrade Configuration
- 07-License Management
- 08-Device Management Configuration
- 09-Automatic Configuration
- Related Documents
-
| Title | Size | Download |
|---|---|---|
| 03-FTP and TFTP Configuration | 140.86 KB |
Using the device as an FTP client
Establishing an FTP connection
Managing directories on the FTP server
Working with the files on the FTP server
Switching to another user account
Maintaining and troubleshooting the FTP connection
Terminating the FTP connection
FTP client configuration example
Using the device as an FTP server
Configuring authentication and authorization
FTP server configuration example
Displaying and maintaining FTP·
Using the device as a TFTP client
Displaying and maintaining the TFTP client
TFTP client configuration example
Configuring FTP
File Transfer Protocol (FTP) is an application layer protocol based on the client/server model. It is used to transfer files from one host to another over a TCP/IP network.
FTP server uses TCP port 20 to transfer data and TCP port 21 to transfer control commands. For more information about FTP, see RFC 959.
FTP supports the following transfer modes:
· Binary mode—Used to transfer image files, such as .app, .bin, and .btm files.
· ASCII mode—Used to transfer text files, such as .txt, .bat, and .cfg files.
FTP can operate in either of the following modes:
· Active mode (PORT)—The FTP server initiates the TCP connection. This mode is not suitable when the FTP client is behind a firewall, for example, when the FTP client resides in a private network.
· Passive mode (PASV)—The FTP client initiates the TCP connection. This mode is not suitable when the server does not allow the client to use a random unprivileged port greater than 1024.
FTP operation mode varies depending on the FTP client program.
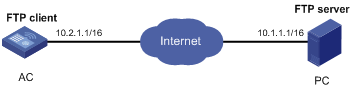
The device can act as the FTP client or FTP server.
Figure 1 FTP application scenario

FIPS compliance
The device supports the FIPS mode that complies with NIST FIPS 140-2 requirements. Support for features, commands, and parameters might differ in FIPS mode and non-FIPS mode. For more information about FIPS mode, see Security Configuration Guide.
FTP is not supported in FIPS mode.
Using the device as an FTP client
To connect to an FTP server or enter FTP client view, make sure the following requirements are met:
· You have level-3 (Manage) user privileges on the device. In FTP client view, whether a directory or file management command can be successfully executed depends on the authorization set on the FTP server.
· The device and the FTP server can reach each other.
Establishing an FTP connection
Before you can access the FTP server, use the ftp command in user view or use the open command in FTP client view to establish a connection to the FTP server.
You can use the ftp client source command to specify a source IP address or source interface for the FTP packets sent by the device. If a source interface (typically, a loopback interface) is specified, its primary IP address is used as the source IP address for the FTP packets sent by the device. The source interface and source IP address settings overwrite each other.
The ftp client source command setting applies to all FTP sessions. When you set up an FTP session using the ftp or ftp ipv6 command, you can also specify a different source IP address for the FTP session.
|
|
IMPORTANT: If you specify a source interface for FTP packets, make sure the interface has been assigned a primary IP address. Otherwise, the FTP connection cannot be established. |
To establish an IPv4 FTP connection:
|
Step |
Command |
Remarks |
|
1. Enter system view. |
system-view |
N/A |
|
2. Specify a source IP address for outgoing FTP packets. |
ftp client source { interface interface-type interface-number | ip source-ip-address } |
Optional. By default, the primary IP address of the output interface is used as the source IP address. |
|
3. Return to user view. |
quit |
N/A |
|
4. Log in to the remote FTP server. |
·
(Method 1) Log in to the remote FTP server in user view:
· (Method 2) Log in to the remote FTP server in FTP client view: a. ftp b. open server-address [ service-port ] |
Use either method. |
To establish an IPv6 FTP connection, perform one of the following tasks:
|
Task |
Command |
|
Log in to the remote FTP server from user view. |
ftp ipv6 [ server-address [ service-port ] [ source ipv6 source-ipv6-address ] [ -i interface-type interface-number ] ] |
|
Log in to the remote FTP server from FTP client view. |
1. ftp ipv6 2. open ipv6 server-address [ service-port ] [ -i interface-type interface-number ] |
Managing directories on the FTP server
After the device establishes a connection to an FTP server, you can create or delete folders in the authorized directory on the FTP server.
To manage the directories on the FTP server:
|
Task |
Command |
|
Display detailed information about a directory or file on the FTP server. |
dir [ remotefile [ localfile ] ] |
|
Query a directory or file on the FTP server. |
ls [ remotefile [ localfile ] ] |
|
Change the working directory on the FTP server. |
cd { directory | .. | / } |
|
Return to the upper level directory on the FTP server. |
cdup |
|
Display the working directory being accessed. |
pwd |
|
Create a directory on the remote FTP server. |
mkdir directory |
|
Remove the specified working directory on the FTP server. |
rmdir directory |
Working with the files on the FTP server
After you log in to the server, you can upload or download a file from the authorized directory by following these steps:
1. Use the dir or ls command to display the directory and the location of the file on the FTP server.
2. Delete unused files to get more free storage space.
3. Set the file transfer mode. FTP transmits files in two modes: ASCII and binary. Use ASCII mode to transfer text files. Use binary mode to transfer image files.
4. Use the lcd command to display the local working directory of the FTP client. You can upload the file or save the downloaded file in this directory.
5. Upload or download the file.
To work with files on the FTP server:
|
Task |
Command |
Remarks |
|
Display detailed information about a directory or file on the FTP server. |
dir [ remotefile [ localfile ] ] |
The ls command displays the name of a directory or file only, while the dir command displays detailed information such as the file size and creation time. |
|
Query a directory or file on the FTP server. |
ls [ remotefile [ localfile ] ] |
The ls command displays the name of a directory or file only, while the dir command displays detailed information such as the file size and creation time. |
|
Delete the specified file on the FTP server permanently. |
delete remotefile |
N/A |
|
Set the file transfer mode to ASCII. |
ascii |
By default, ASCII mode is used. |
|
Set the file transfer mode to binary. |
binary |
By default, ASCII mode is used. |
|
Set the FTP operation mode to passive. |
passive |
By default, passive mode is used. |
|
Display the local working directory of the FTP client. |
lcd |
N/A |
|
Upload a file to the FTP server. |
put localfile [ remotefile ] |
N/A |
|
Download a file from the FTP server. |
get remotefile [ localfile ] |
N/A |
Switching to another user account
After you log in to the FTP server with one user account, you can switch to another user account to obtain a different privilege without reestablishing the FTP connection. You must correctly enter the new username and password. A wrong username or password can cause the FTP connection to disconnect.
To switch to another user account:
|
Task |
Command |
|
Change the username after FTP login. |
user username [ password ] |
Maintaining and troubleshooting the FTP connection
|
Task |
Command |
Remarks |
|
Display the help information of FTP-related commands on the FTP server. |
remotehelp [ protocol-command ] |
N/A |
|
Enable information display in a detailed manner. |
verbose |
By default, the function is enabled. |
|
Enable FTP related debugging when the device acts as the FTP client. |
debugging |
By default, the function is disabled. |
Terminating the FTP connection
To terminate your FTP connection, perform one of the following tasks:
|
Task |
Command |
Remarks |
|
Terminate the FTP connection without exiting FTP client view. |
· disconnect · close |
Use either command in FTP client view. |
|
Terminate the FTP connection and return to user view. |
· bye · quit |
Use either command in FTP client view. |
FTP client configuration example
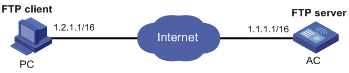
Network requirements
As shown in Figure 2, the AC acts as the FTP client and the PC acts as the FTP server. The AC and the PC can reach each other. An account with the username abc and password abc is already configured on the FTP server.
Log in to the FTP server from the FTP client, download the system software image file newest.bin from the PC to the AC, and upload the configuration file config.cfg from the AC to the PC for backup.
Configuration procedure
# Examine the storage space of the AC. If the free space is insufficient, use the delete/unreserved file-url command to delete unused files. (Details not shown.)
# Log in to the server at 10.1.1.1 using the username abc and password abc.
<AC> ftp 10.1.1.1
Trying 10.1.1.1
Press CTRL+K to abort
Connected to 10.1.1.1
220 WFTPD 2.0 service (by Texas Imperial Software) ready for new user
User(10.1.1.1:(none)):abc
331 Give me your password, please
Password:
230 Logged in successfully
# Set the file transfer mode to binary.
[ftp] binary
200 Type set to I.
# Download the system software image file newest.bin from the PC to the AC.
[ftp] get newest.bin
227 Entering Passive Mode (10,1,1,1,10,68).
125 BINARY mode data connection already open, transfer starting for /newest.bin.
226 Transfer complete.
FTP: 23951480 byte(s) received in 95.399 second(s), 251.00K byte(s)/sec.
# Set the file transfer mode to ASCII, and upload the configuration file config.cfg from the AC to the PC for backup.
[ftp] ascii
[ftp] put config.cfg back-config.cfg
227 Entering Passive Mode (10,1,1,1,4,2).
125 ASCII mode data connection already open, transfer starting for /config.cfg.
226 Transfer complete.
FTP: 3494 byte(s) sent in 5.646 second(s), 618.00 byte(s)/sec.
[ftp] bye
221 Server closing.
# Specify newest.bin as the main system software image file for the next startup.
<AC> boot-loader file newest.bin main
|
|
IMPORTANT: The system software image file used for the next startup must be saved in the root directory of the storage medium. You can copy or move a file to the root directory. |
# Reboot the AC, and the system software image file is updated at the system reboot.
<AC> reboot
Using the device as an FTP server
If the device is operating as an FTP server, make sure the following requirements are met to ensure successful FTP operations:
· The device and the FTP server can reach each other.
· Configure a user account (including the username, password, and authorization) on the device or a remote authentication server for an FTP user. This task is required, because for security reasons the device does not support anonymous FTP. By default, authenticated users can access the root directory of the device.
· The FTP user provides the correct username and password.
|
|
NOTE: When you use the Internet Explorer browser to log in to the device operating as an FTP server, some FTP functions are not available. This is because multiple connections are required during the login process but the device supports only one connection at a time. |
Configuring basic parameters
When you upload a file to the FTP server, the FTP server first checks whether it already has a file with the same name. If yes, the FTP server uses one of the following modes to update the file:
· Fast mode—Receives the entire file to its memory before starting to write data to the local file. If a problem, such as a power failure, occurs during the file transfer, the existing file on the FTP server is not affected.
· Normal mode—Writes data to the local file while receiving data. If a problem, such as a power failure, occurs during file transfer, the existing file on the FTP server is corrupted. However, this mode consumes less memory space than fast mode.
To configure basic parameters for the FTP server:
|
Step |
Command |
Remarks |
|
1. Enter system view. |
system-view |
N/A |
|
2. Enable the FTP server. |
ftp server enable |
By default, the FTP server is disabled. |
|
3. Use an ACL to control FTP access to the server. |
ftp server acl acl-number |
Optional. By default, no ACL is used for access control. |
|
4. Configure the idle-timeout timer. |
ftp timeout minutes |
Optional. The default idle-timeout timer is 30 minutes. If no data is transferred within the idle-timeout time, the connection is terminated. |
|
5. Set the file update mode for the FTP server. |
ftp update { fast | normal } |
Optional. By default, normal update is used. |
|
6. Return to user view. |
quit |
N/A |
|
7. Manually release the FTP connection established with the specified username. |
free ftp user username |
Optional. |
Configuring authentication and authorization
Perform this task on the FTP server to authenticate FTP clients and specify the directories that authenticated clients can access.
The following authentication modes are available:
· Local authentication—The device looks up the client's username and password in the local user account database. If a match is found, authentication succeeds.
· Remote authentication—The device sends the client's username and password to a remote authentication server for authentication. The user account is configured on the remote authentication server rather than the device.
To assign an FTP user write access (including upload, delete, and create) to the device, assign level-3 (Manage) user privileges to the user. For read-only access to the file system, any user privilege level is acceptable.
For more information, see the chapter on AAA configuration in Security Configuration Guide.
To configure authentication and authorization for the FTP server:
|
Step |
Command |
Remarks |
|
1. Enter system view. |
system-view |
N/A |
|
2. Create a local user account and enter its view. |
local-user user-name |
By default, no authorized local user account exists, and the system does not support FTP anonymous user access. |
|
3. Set a password for the user account. |
password [ [ hash ] { cipher | simple } password ] |
N/A |
|
4. Assign FTP service to the user account. |
service-type ftp |
By default, no service type is specified. If the FTP service is specified, the root directory of the device is by default used. |
|
5. Configure authorization attributes. |
authorization-attribute { acl acl-number | callback-number callback-number | idle-cut minute | level level | user-profile profile-name | user-role { guest | guest-manager | security-audit } | vlan vlan-id | work-directory directory-name } * |
Optional. By default, the FTP users can access the root directory of the device, and the user level is 0. You can change the default configuration using this command. |
For more information about the local-user, password, service-type ftp, and authorization-attribute commands, see Security Command Reference.
FTP server configuration example
Network requirements
Create a local user account with the username abc and password abc and enable FTP server on the AC in Figure 3. Use the user account to log in to the FTP server from the FTP client, upload the file newest.bin from the FTP client to the FTP server, and download the configuration file config.cfg from the FTP server to the FTP client for backup.
Configuration procedure
1. Configure the AC (FTP server):
# Create a local user account abc, set its password to abc and the user privilege level to level 3 (the manage level), specify the root directory of the Flash as the authorized directory, and specify the service type as FTP.
<AC> system-view
[AC] local-user abc
[AC-luser-abc] password simple abc
[AC-luser-abc] authorization-attribute level 3
[AC-luser-abc] authorization-attribute work-directory flash:/
[AC-luser-abc] service-type ftp
[AC-luser-abc] quit
# Enable the FTP server.
[AC] ftp server enable
[AC] quit
# Examine the storage space and delete unused files for more free space.
<AC> dir
Directory of cfa0:/
0 -rw- 54047744 Oct 15 2012 15:38:40 main.bin
1 -rw- 349 Oct 22 2012 11:10:32 system.xml
2 -rw- 1914 Oct 22 2012 11:10:34 startup.cfg
3 -rw- 1914 Oct 22 2012 11:10:34 test.cfg
1020068 KB total (831136 KB free)
File system type of cfa0: FAT32
<AC> delete /unreserved cfa0:/test.cfg
2. Perform FTP operations from the PC (FTP client):
# Log in to the FTP server at 1.1.1.1 using the username abc and password abc.
c:\> ftp 1.1.1.1
Connected to 1.1.1.1.
220 FTP service ready.
User(1.1.1.1:(none)): abc
331 Password required for abc.
Password:
230 User logged in.
# Download the configuration file config.cfg from the AC to the PC for backup.
ftp> get config.cfg back-config.cfg
# Upload the file newest.bin to the AC.
ftp> put newest.bin
200 Port command okay.
150 Opening ASCII mode data connection for /newest.bin.
226 Transfer complete.
ftp> bye
221 Server closing.
c:\>
This FTP procedure also applies to upgrading configuration files.
|
|
NOTE: After you finish transferring the Boot ROM image through FTP, execute the bootrom update command to upgrade Boot ROM. |
3. Upgrade the AC:
# If the system software image file used for the next startup or the startup configuration file is not saved in the Flash root directory, copy or move the file to the Flash root directory. (Details not shown.)
# Specify newest.bin as the main system software image file for the next startup.
<AC> boot-loader file newest.bin main
# Reboot the AC and the system software image file is updated at the system reboot.
<AC> reboot
Displaying and maintaining FTP
|
Task |
Command |
Remarks |
|
Display the source IP address configuration of the FTP client. |
display ftp client configuration [ | { begin | exclude | include } regular-expression ] |
Available in any view. |
|
Display the FTP server configuration. |
display ftp-server |
Available in any view. |
|
Display detailed information about logged-in FTP users. |
display ftp-user |
Available in any view. |
Configuring TFTP
Trivial File Transfer Protocol (TFTP) is a simplified version of FTP for file transfer over secure reliable networks. TFTP uses UDP port 69 for connection establishment and data transmission. In contrast to TCP-based FTP, TFTP does not require authentication or complex message exchanges, and is easier to deploy.
TFTP supports the following transfer modes:
· Binary mode—Used to transfer image files, such as .app, .bin, and .btm files.
· ASCII mode—Used to transfer text files, such as .txt, .bat, and .cfg files.
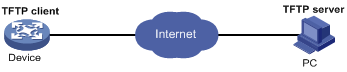
The device can operate only as a TFTP client (see Figure 4) to upload or download files.
Figure 4 TFTP application scenario
FIPS compliance
The device supports the FIPS mode that complies with NIST FIPS 140-2 requirements. Support for features, commands, and parameters might differ in FIPS mode and non-FIPS mode. For more information about FIPS mode, see Security Configuration Guide.
TFTP is not supported in FIPS mode.
Prerequisites
Run a TFTP server program on the file host and set a TFTP working directory.
Configure IP addresses and routes to make sure the device and the TFTP server can reach each other.
Using the device as a TFTP client
The device provides the following modes for downloading a new file from a TFTP server:
· Normal download—The new file is written directly to the storage medium and overwrites the old file that has the same name. If file download is interrupted, both old and new files are lost.
· Secure download—The new file is downloaded to memory and will not be written to the storage medium until the entire file is obtained. A download failure does not affect the old file that has the same name as the old file.
To avoid file loss, use the secure download mode or assign the new file a file name unique in the storage medium.
You can use the tftp client source command to specify a source IP address or source interface for the TFTP packets sent by the device. If a source interface (typically, a loopback interface) is specified, its primary IP address is used as the source IP address for the TFTP packets. The source interface and source IP address settings overwrite each other.
The tftp client source command setting applies to all TFTP sessions. When you set up a TFTP session with the tftp command, you can also specify a different source IP address for the TFTP session.
|
|
IMPORTANT: If you specify a source interface for TFTP packets, make sure the interface has been assigned a primary IP address. Otherwise, the TFTP connection cannot be established. |
To use the device as a TFTP client:
|
Step |
Command |
Remarks |
|
1. Enter system view. |
system-view |
N/A |
|
2. Use an ACL to control the client's access to TFTP servers. |
tftp-server [ ipv6 ] acl acl-number |
Optional. By default, no ACL is used for access control. |
|
3. Specify a source IP address for outgoing TFTP packets. |
tftp client source { interface interface-type interface-number | ip source-ip-address } |
Optional. By default, the primary IP address of the output interface is used as the source IP address. |
|
4. Return to user view. |
quit |
N/A |
|
5. Download or upload a file. |
·
For IPv4: ·
For IPv6: |
Optional. |
Displaying and maintaining the TFTP client
|
Task |
Command |
Remarks |
|
Display the source IP address configuration of the TFTP client. |
display tftp client configuration [ | { begin | exclude | include } regular-expression ] |
Available in any view. |
TFTP client configuration example
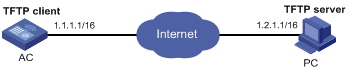
Network requirements
Configure the PC in Figure 5 as a TFTP server, and use TFTP to download the system software image file newest.bin from the PC to the AC and upload the configuration file config.cfg from the AC to the PC for backup.
Configuration procedure
This configuration procedure assumes that the PC and the AC can reach each other.
1. Configure the PC (TFTP server):
¡ Enable the TFTP server. (Details not shown.)
¡ Configure a TFTP working directory. (Details not shown.)
2. Configure the AC (TFTP client):
# Examine the storage medium of the AC. If the free space is insufficient, use the delete/unreserved file-url command to delete unused files. (Details not shown.)
# Download system software image file newest.bin from the PC.
<AC> tftp 1.2.1.1 get newest.bin
# Upload a configuration file config.cfg to the TFTP server.
<AC> tftp 1.2.1.1 put config.cfg configback.cfg
# If the system software image file used for the next startup is not saved in the Flash root directory, copy or move the file to the Flash root directory. (Details not shown.)
# Specify newest.bin as the main system software image file for the next startup.
<AC> boot-loader file newest.bin main
# Reboot the AC and the software is upgraded.
<AC> reboot