- Table of Contents
- Related Documents
-
| Title | Size | Download |
|---|---|---|
| 03-NSM Device Automation Configuration Examples | 4.70 MB |
NSM
Device Automation Configuration Examples
Document version: 5W100-20250415
Copyright © 2025 New H3C Technologies Co., Ltd. All rights reserved.
No part of this manual may be reproduced or transmitted in any form or by any means without prior written consent of New H3C Technologies Co., Ltd.
Except for the trademarks of New H3C Technologies Co., Ltd., any trademarks that may be mentioned in this document are the property of their respective owners.
The information in this document is subject to change without notice.
Contents
Example: Configuring device automation
Back up the device configuration
Create a new configuration template
Deploy device configuration tasks
Introduction
Automated device configuration allows NSM to perform automatic backups and deployments for incorporated devices. You can perform backup immediately or scheduled backup as follows:
· Backup device configuration—You can create backup plans as needed to back up the device's current running and startup files. Manual and automatic backups are supported.
· Deploy device configuration—You can bulk deploy a configuration template from the configuration library as the startup configuration or running configuration to one or multiple devices as needed. You can also restore the current device configuration to a previous configuration on the device configuration page.
Usage guidelines
Application scenarios
Back up and deploy device configurations in the NSM system.
Prerequisites
· Use an account with the automation management permissions to log in to the global interface.
· Make sure the system uses the correct SNMP read and write parameters to manage devices.
Example: Configuring device automation
The system administrator of a company wants to deploy a configuration to a managed device. To avoid impacting other services, the administrator plans to back up the device's original configuration before applying the new one. To achieve this purpose, perform the following operations:
1. Back up the device configuration file.
2. Issue the deployment task for this device. (Configuration segments are used in this example.)
3. Compare the configuration files before and after deploying the device.
4. Restore the device configuration to a history configuration.
|
|
NOTE: This document describes the configuration process by using NSM E0722 as an example. |
Back up the device configuration
Manual backup
You can perform a manual backup as follows.
1. On the top navigation bar, click Management. From the navigation pane, select General Device Configuration > Configuration Center to access the device configuration page, as shown in Figure 1.
Figure 1 Device configuration page

2. Select one or multiple devices, and click Backup Configuration to access the Add Backup Task page, as shown in Figure 2.
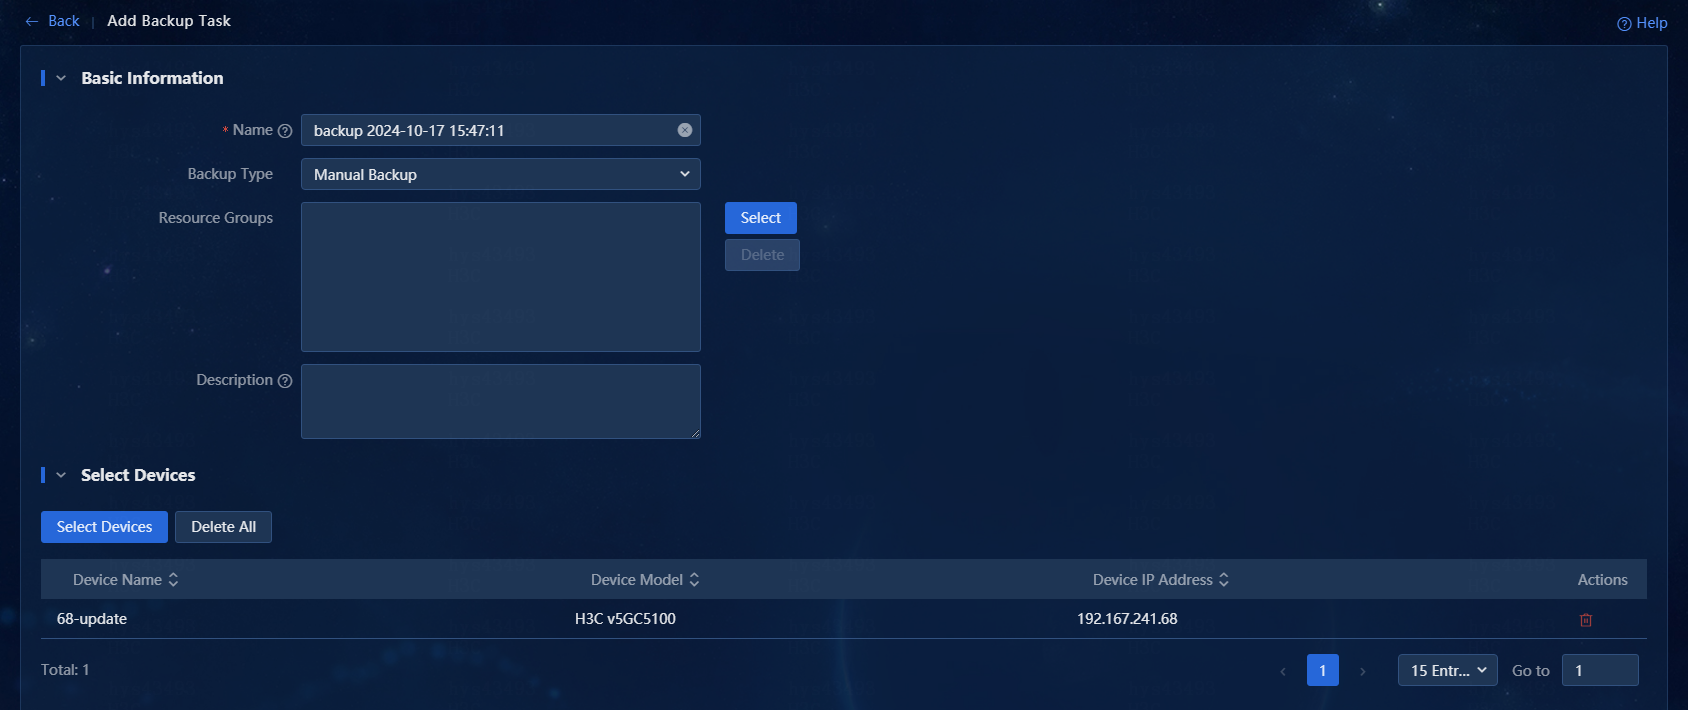
3. In the Basic Information area, configure the following parameters as needed:
¡ Name: Configure the backup task name. The default is backup plus the current date current time, which can be edited as needed. The valid length is 1 to 32 characters.
¡ Backup Type: Select Manual Backup. After the backup task is added, the system immediately executes the backup operation.
¡ Resource Groups: Click Select to choose resource groups.
¡ Description: Enter a description of the backup task. The valid length is 0 to 128 characters.
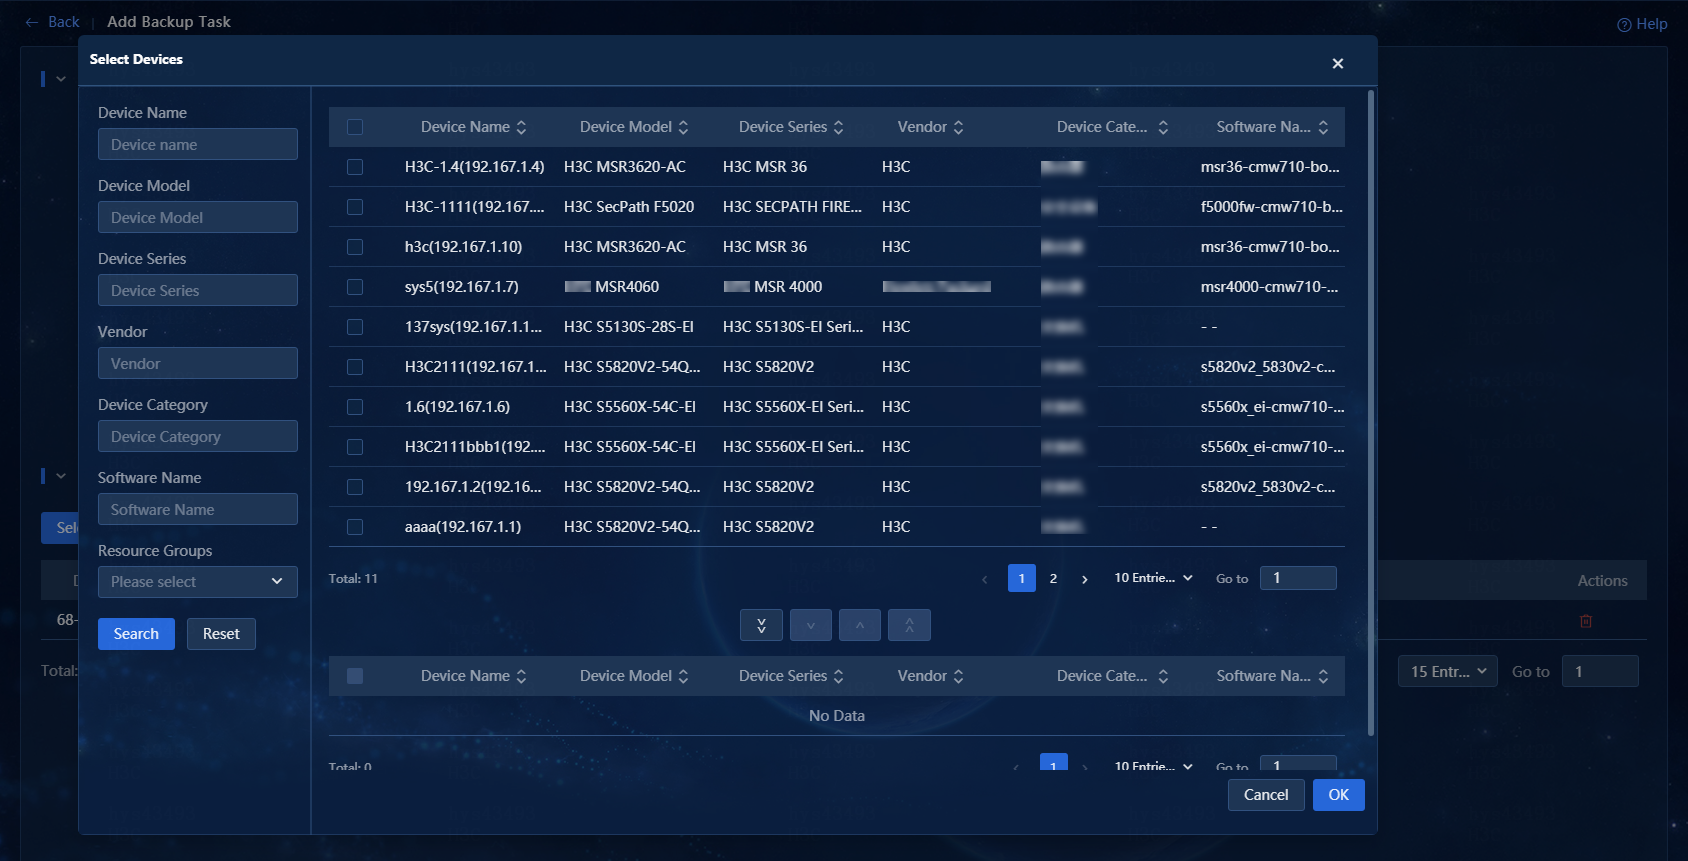
4. In the Select Devices area, click Select Devices. In the window that opens, query and select devices based on the parameters such as device name, as shown in Figure 3. Add the selected devices to the device list. You can delete devices selected in the device list through the Actions column of the list or the Delete All button.
5. After completing the configuration, click OK. If the request to create a manual backup task is successfully deployed, the page will display a success message. After the backup task is added, you can view the manual backup results on the General Device Configuration > Configuration Backup > Backup Tasks page, as shown in Figure 4.

Automatic backup
You can create scheduled backup plans as needed.
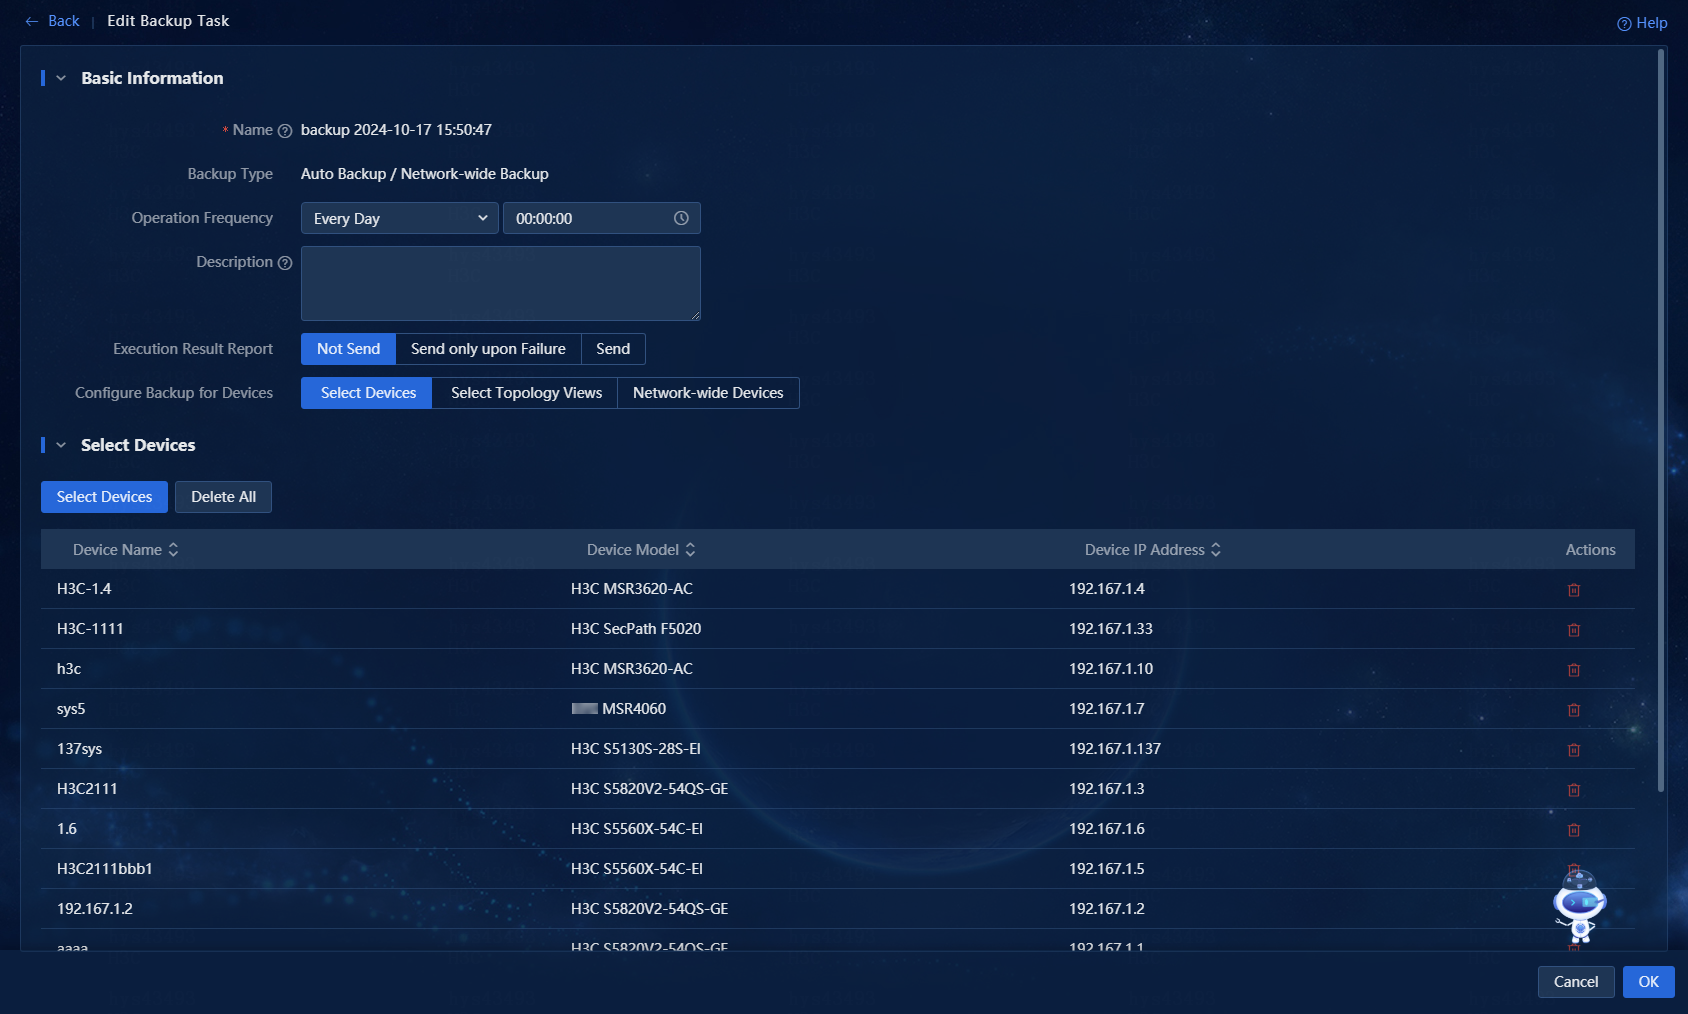
1. Access the page for adding a backup task. For more information, see "Manual backup." Select Automatic Backup / Network-wide backup for the Backup Type, as shown in Figure 5.
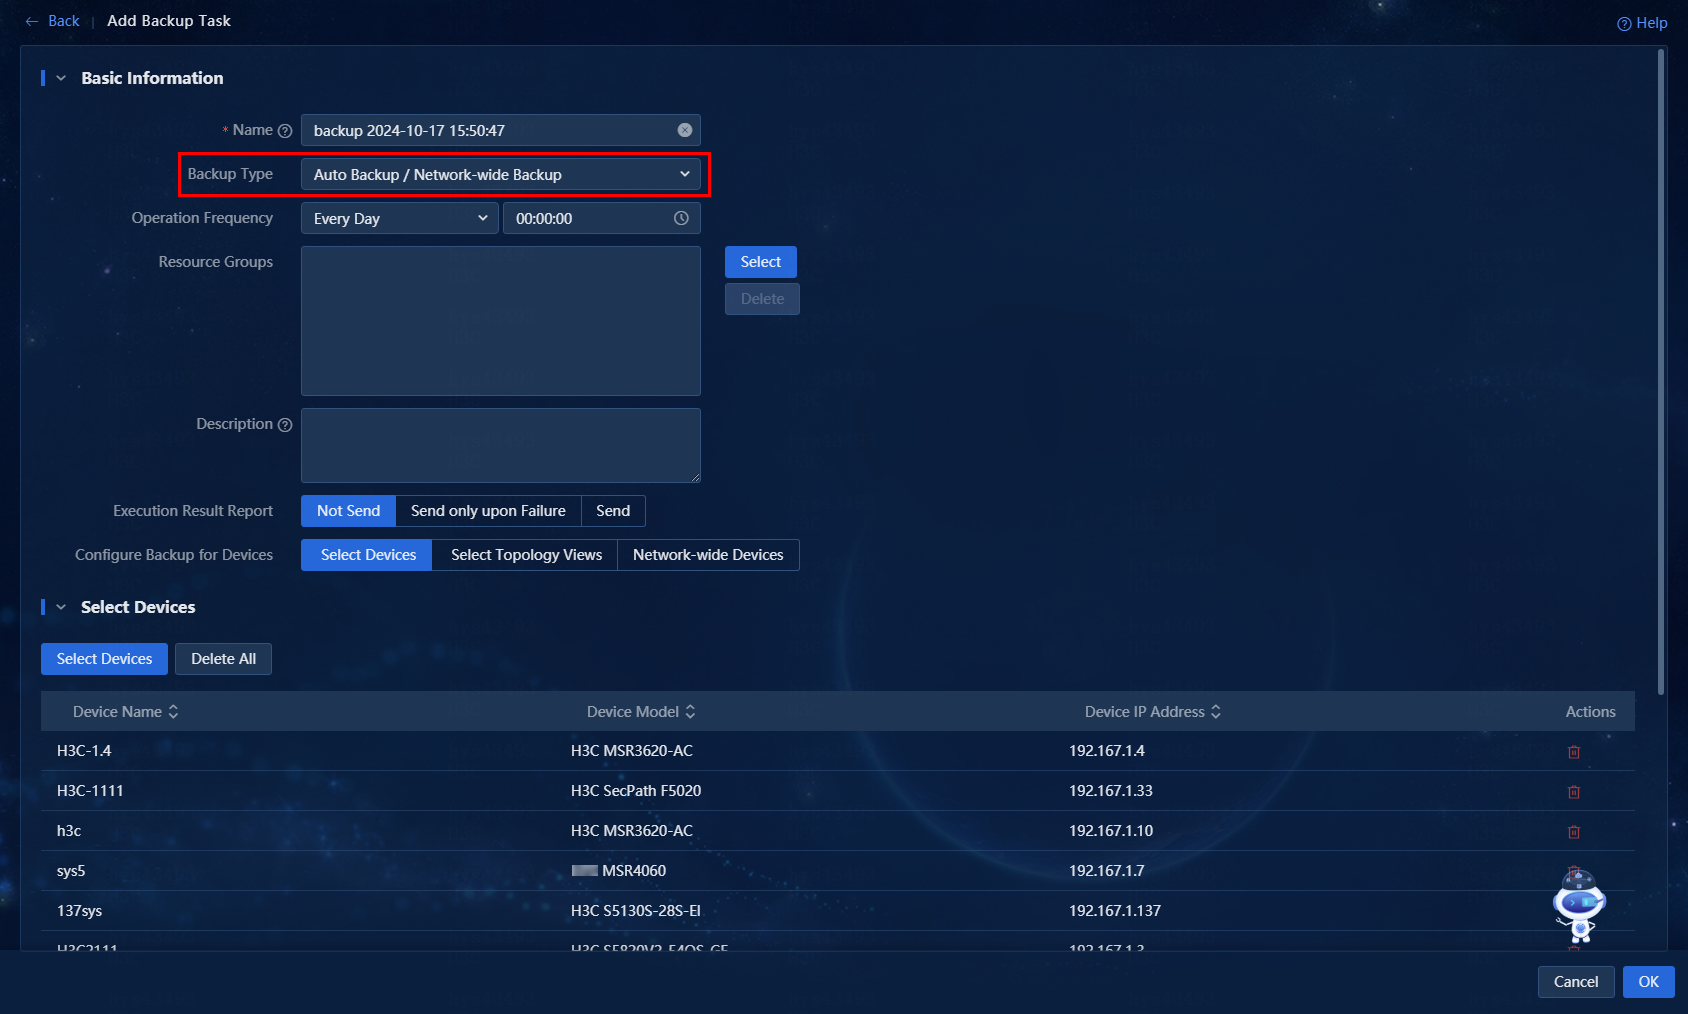
2. In the Basic Information area, configure the following parameters as needed:
¡ Name: Configure the backup task name. The default is backup plus the current date current time, which can be edited as needed. The valid length is 1 to 32 characters.
¡ Backup Type: Select Automatic Backup / Network-wide backup.
¡ Operation Frequency: Set the frequency to for backup task execution. The system will execute backup operations according to the specified frequency. Configure the operation frequency.
- Click the first drop-down field to select the frequency. Options include every day, every week, and every month.
- Click the second drop-down field to select the start time for executing the backup task.
¡ Resource Groups: Click Select to choose resource groups.
¡ Description: Enter a description of the backup task. The valid length is 0 to 128 characters.
¡ Execution Result Report: This parameter is required when you select Automatic Backup / Network-wide backup for Backup Type. Select whether to send the backup task execution result report via mailbox. Options include Not Send, Send only upon Failure, and Send. If you click Send only upon Failure or Send, you must configure the recipient's mailbox address.
¡ Configure Backup for Devices: This parameter is required when you select Automatic Backup / Network-wide backup for Backup Type. Options include Select Devices, Select Topology Views, and Network-wide Devices.
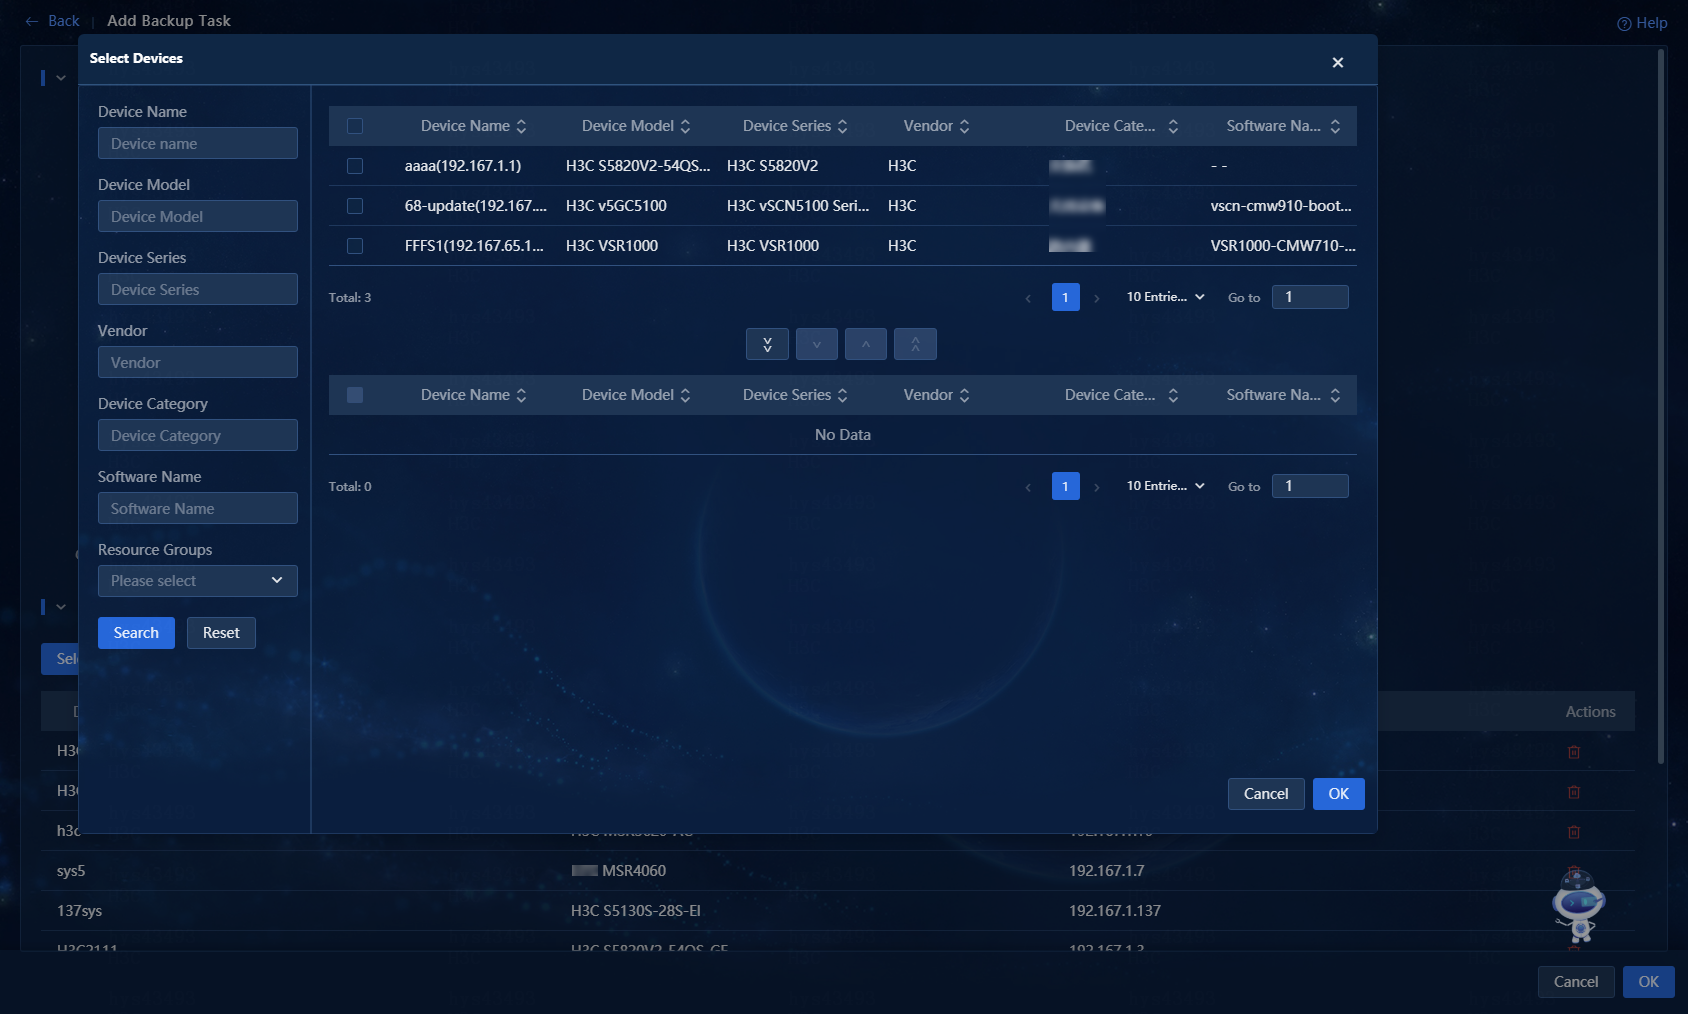
3. In the Select Devices area, click Select Devices. In the window that opens, query and select devices based on the parameters such as device name, as shown in Figure 6. Add the selected devices to the device list. You can delete devices selected in the device list through the Actions column of the list or the Delete All button.
4. After completing the configuration, click OK. If the request to create an auto backup task is successfully deployed, the page will display a success message. After the backup task is added, you can view the manual backup results on the General Device Configuration > Configuration Backup > Backup Tasks page, as shown in Figure 7.

5. You can edit a created automatic backup task, as shown in Figure 8.
View backup history
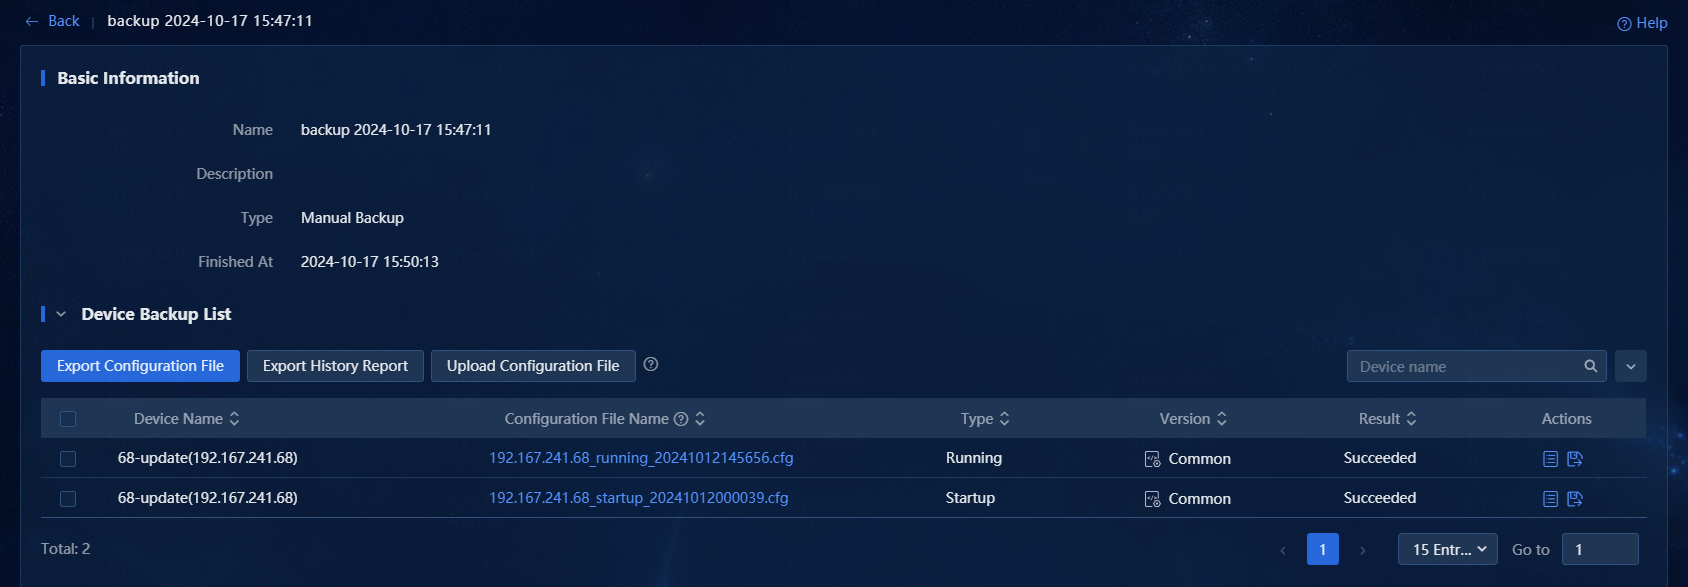
1. On the top navigation bar, click Management. From the navigation pane, select General Device Configuration > Backup History Records to access the backup history page, as shown in Figure 9.

2. Click the name link in the list to access the details page of a specific history backup task, as shown in Figure 10.
¡ Export the configuration files.
- Click Export Configuration File to save the configuration files of all successfully backed up devices to your local system.
- Select one or more history records, and then click Export Configuration File to save the configuration files of successfully backed up devices to your local machine.
¡ Export history records
- Click Export History Report to save all device backup records to your local storage.
- Select one or more history records, and then click Export History Report to save the selected records to your local device.
¡ Upload configuration files
- Select one or more history records, click Upload Configuration File, configure the remote host parameters in the window that opens, and then click OK to upload the configuration files of successfully backed up devices to the remote address.
|
|
NOTE: · You can export only the configuration files that have been successfully backed up. · The naming convention for the exported or uploaded configuration files is defined in the deployment parameters. · When you export or upload a configuration file, unsupported special characters in the file name will be replaced with an underscore (_). |
Figure 10 Backup history details
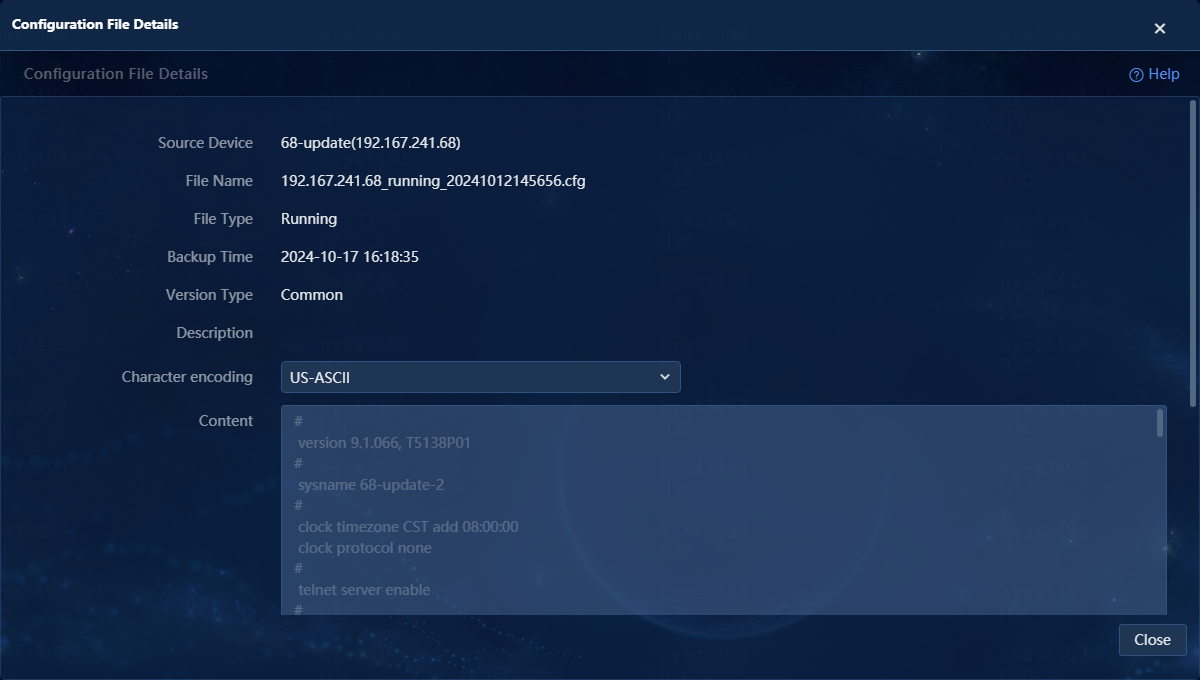
3. Click a configuration file name link in the device backup execution list to view detailed information about the configuration file in the window that opens.
Figure 11 Configuration file details
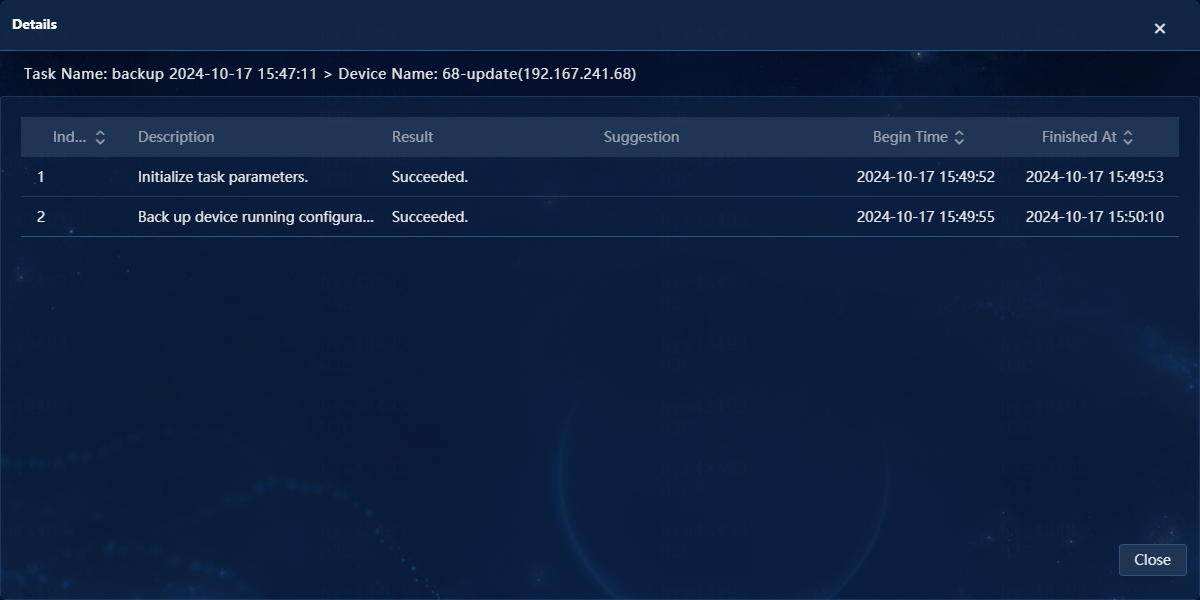
4. On the backup history details page, click ![]() in the Actions column of the device backup execution list to
view detailed steps of the backup operation in the window that opens, as shown
in Figure 12.
in the Actions column of the device backup execution list to
view detailed steps of the backup operation in the window that opens, as shown
in Figure 12.
5. On the backup history details page, click ![]() in the Actions column of the device backup execution list to
save the selected configuration as a template in the window that opens, as
shown in Figure 13.
in the Actions column of the device backup execution list to
save the selected configuration as a template in the window that opens, as
shown in Figure 13.
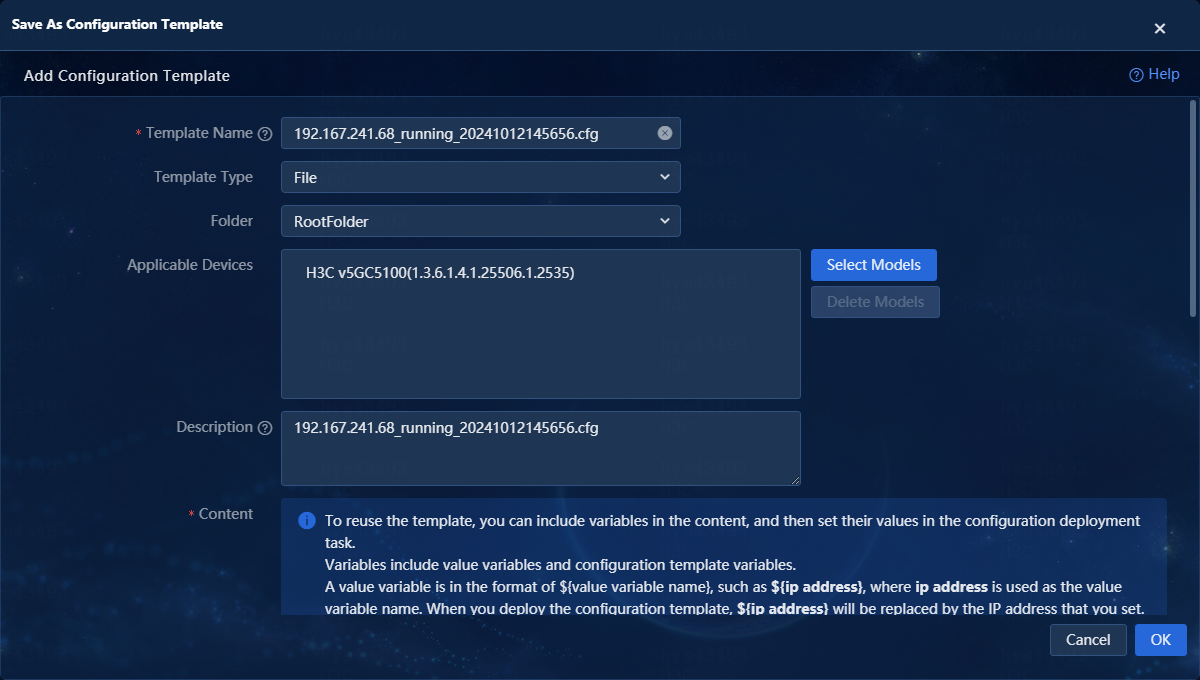
6. Configure the relevant parameters as needed on the page for adding a configuration template. After configuration, click OK, and a success message will be displayed. After the configuration template is added, view the new configuration templates on the General Device Configuration > Deployment Tasks > Configuration Templates page, as shown in Figure 14. You can use this template to perform configuration deployment for the device.
Figure 14 Add a new configuration template to the configuration library

Deploy device configuration
The system deploys device configurations through various configuration templates. The existing template types include configuration segment, configuration file, and CLI script. You can deploy device configurations by creating a new configuration template or selecting an existing template from the configuration library.
The following steps deploy device configuration by creating a configuration template with the template type set to configuration segment.
Create a new configuration template
1. On the top navigation bar, click Management. From the navigation pane, select General Device Configuration > Deployment Tasks > Configuration Templates to access the configuration library page.
2. As shown in Figure 15, click Add, and select Manually Add to access the Add Configuration Template page.
Figure 15 Configuration template list

3. On the Add Configuration Template page, click the Template Type field to select a template type. Options include configuration segment, configuration file, CLI script, and TCL script. This document uses the configuration segment template type as an example for illustration.
¡A configuration segment can be deployed to only the device's running configuration. For information about the devices supported by configuration segments, see the online help.
¡A configuration file supports deployment only for startup configuration.
¡A CLI script supports deployment only to the device's running configuration. After you select the CLI script template type, the configuration content supports both simple mode and advanced mode.
- Simple mode—The command and output do not support the input of separators ^|^, ^|, or |^.
- Advanced mode—Uses character string ^|^ as a separator. The string to the left represents the command, while the string to the right represents the output. Each line can contain no more than one separator, and the character strings ^| and |^ are not allowed.
¡A TCL script supports configuring only as running configuration.
4. Select the target folder and applicable devices as needed. In this document, the system default folder is used as the target folder, and no applicable devices are selected.
¡Folder: Select the directory to store the configuration template.
¡Applicable Devices: Click Select Models and choose the device models compatible with configuration template in the window that opens.
Figure 16 Add a configuration template

5. Enter the configuration segment to deploy in the Content field.
6. Click OK to complete adding the configuration template. The newly added configuration segment is displayed in the corresponding folder, as shown in Figure 17.
Figure 17 Configuration library

Deploy device configuration tasks
You can access the device configuration deployment page by using the following methods to deploy device configuration tasks.
Method 1
1. On the top navigation bar, click Management.
From the navigation pane, select General Device Configuration > Deployment
Tasks > Configuration Templates to access the configuration
library page. From the configuration template list, select a configuration template
and click ![]() in the Actions column to access the device configuration deployment
page, as shown in Figure 1.
in the Actions column to access the device configuration deployment
page, as shown in Figure 1.
Figure 18 Device configuration deployment page

2. Click Select Devices, select the devices you need to deploy in the window that opens, and then click OK, as shown Figure 19.

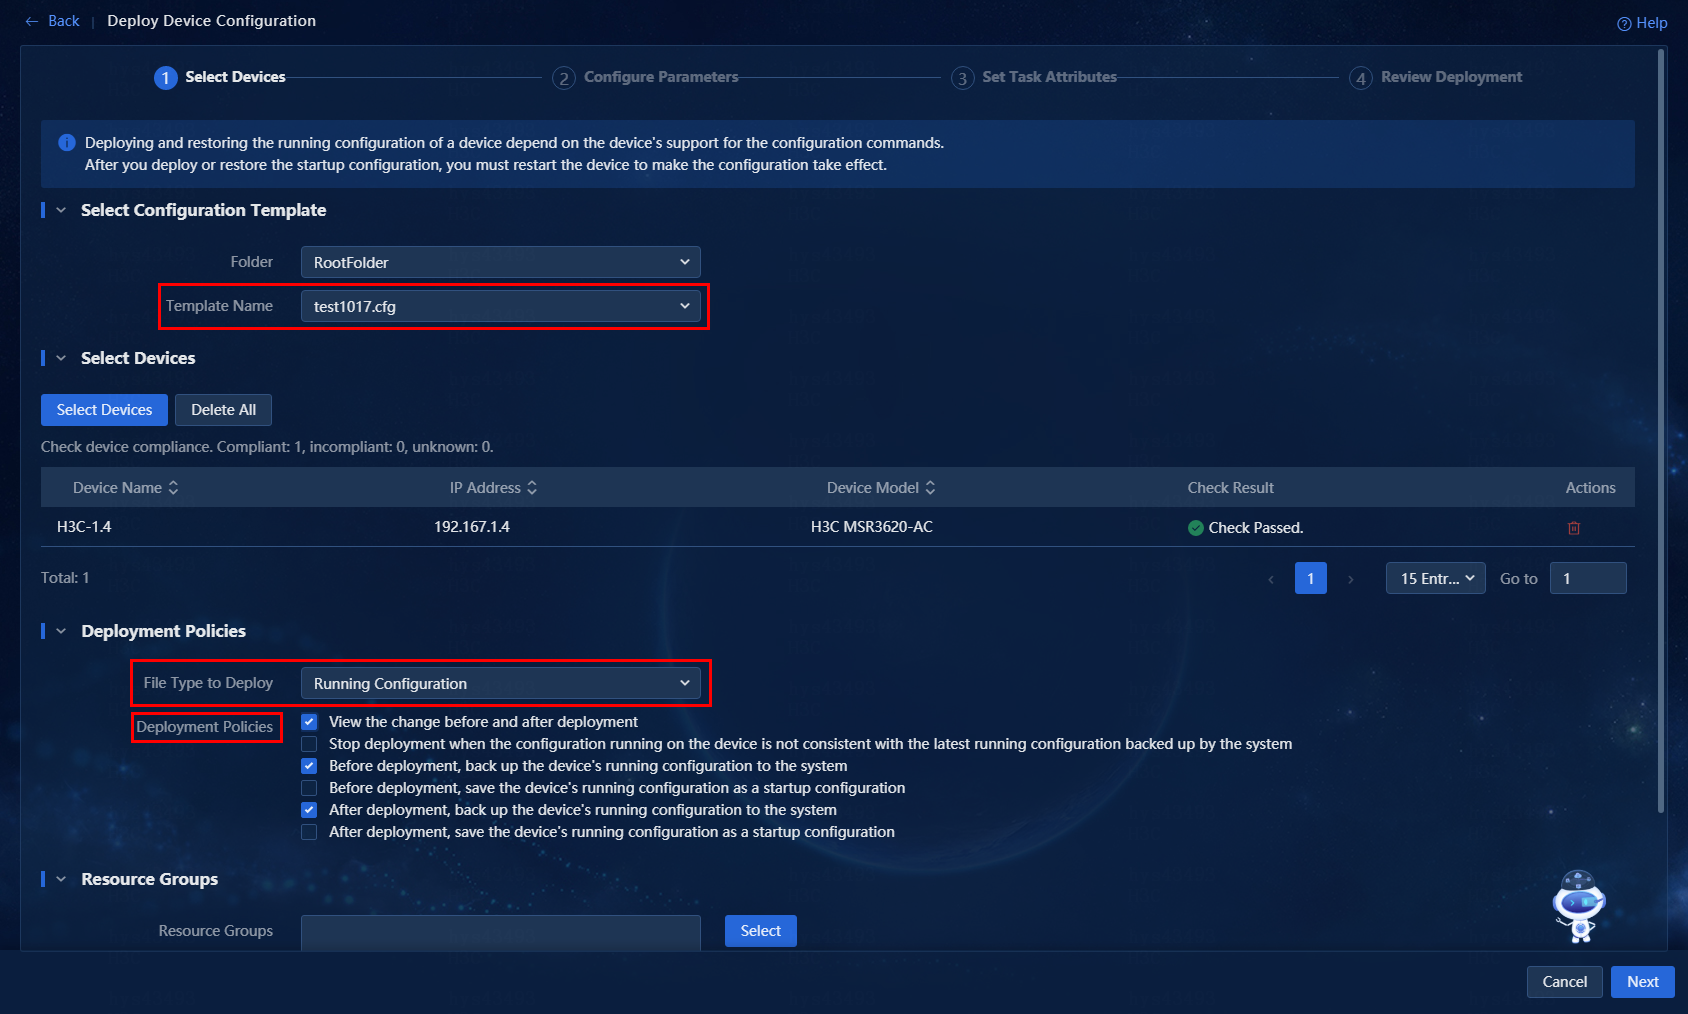
3. On the device configuration deployment page, you can select one or multiple deployment policies as needed, as shown in Figure 20. After selection, click Next.
Table 1 Description of deployment policies
|
Deployment policy |
Description |
|
View the change before and after deployment |
If you select this option, the Before deployment, back up the device's running configuration to the system and After deployment, back up the device's running configuration to the system options are automatically selected. This setting allows you to view the changes in the device's running configuration before and after issuing the commands. |
|
Stop deployment when the configuration running on the device is not consistent with the latest running configuration backed up by the system |
Do not issue the commands if the device's current running configuration does not match the latest backup configuration. |
|
Before deployment, back up the device's running configuration to the system |
Back up the device's running configuration to the network management server before issuing the commands. |
|
Before deployment, save the device's running configuration as a startup configuration |
Save the device's running configuration as its startup configuration before issuing commands to the device. Upon restart, the device will boot by using the saved configuration to maintain the previous configuration status. |
|
After deployment, back up the device's running configuration to the system |
Back up the device's running configuration to the network management server after issuing the commands. |
|
After deployment, save the device's running configuration as a startup configuration |
Save the device's running configuration as the startup configuration after issuing the commands to the device. Upon restart, the device will boot by using the saved configuration to maintain the previous configuration status. |
Figure 20 Deploy device configuration
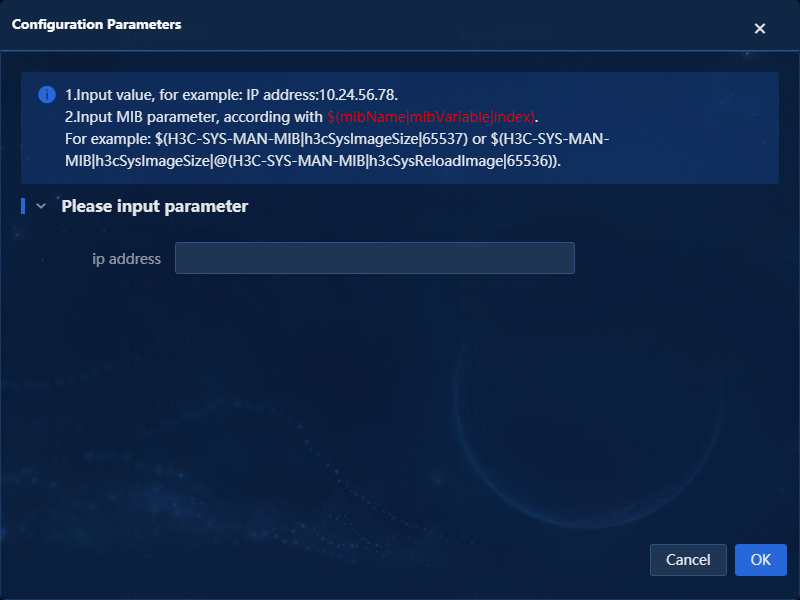
4. If the selected template contains variables,
configure the parameters as shown in Figure 21. On
the parameter configuration page, click ![]() in the Edit column for the device, or select one or multiple
devices and click Configuration Parameters. You can configure parameters
as needed in the window that opens. The parameter configuration method varies
by the selected template. See the prompt on the page for detailed parameter
configuration description. Table 2 shows
the specific types.
in the Edit column for the device, or select one or multiple
devices and click Configuration Parameters. You can configure parameters
as needed in the window that opens. The parameter configuration method varies
by the selected template. See the prompt on the page for detailed parameter
configuration description. Table 2 shows
the specific types.
Table 2 Configuration parameter description
|
Wildcard |
Description |
|
${} |
Indicates the parameter definition in the configuration segment. For example, "${solution name}" represents a parameter named "solution name." |
|
"|" |
Indicate possible value options, for example, "v1|v2c" means the value can be v1 or v2c. |
|
"-" |
Indicates that the value range contains consecutive digits. For example, "0-3" indicates an integer range from 0 to 3. |
|
"()" |
Indicates the input range of parameters. You can use enumeration input values or specify an input range. To specify the input range, use an open interval. For example, "${SNMP version (v1|v2c)}" indicates the parameter name is "SNMP version," with value v1 or v2c. "${Level (0-3)}" indicates the parameter name is "level," with value 1 or 2. |
|
"[]". |
Indicates the input range of the parameter, which is a closed interval. For example, "${level[0-3]}" indicates that the parameter name is "level", with value 0, 1, 2, or 3. |
|
"?" |
Indicates that a value can appear once or not at all. For example, "n[0-4]?" allows you to set data between 0 and 4, or leave it unspecified. |
|
"*". |
Indicates the value supports selecting multiple options. For example, "SNMP version (v1|v2c)*" allows you to configure v1, v2c, or both v1 and v2c. |
|
":" |
Indicates the type of the value range, typically used with parameter settings for enumeration types. For example, “(aux:[0] | vty:[0-4])” indicates that the value range is 0 for the aux parameter and 0 to 4 for the vty parameter. Variables aux and vty represent the enumerated values defined in another parameter. |
|
"m" and "n" |
Indicates the start value and end value for the parameter, where the end value must be greater than the start value. For example, "m[0-4] n[0-4]" indicates that the input range for the start value is 0-4, and the input range for the end value is also 0-4, separated by a space. |
|
"$()" |
Indicates a dynamic MIB type. It includes at least two "|" symbols, in the format of $(mibName|mibVariable|index). It supports nested values for MIB parameters. Symbol "@" indicates nesting. The syntax format @(mib|mibVariable|conditionValue) retrieves the index value when mibVariable is conditionValue. Use the first return value if the condition expression might return multiple index values. |
Figure 21 Parameter configuration page
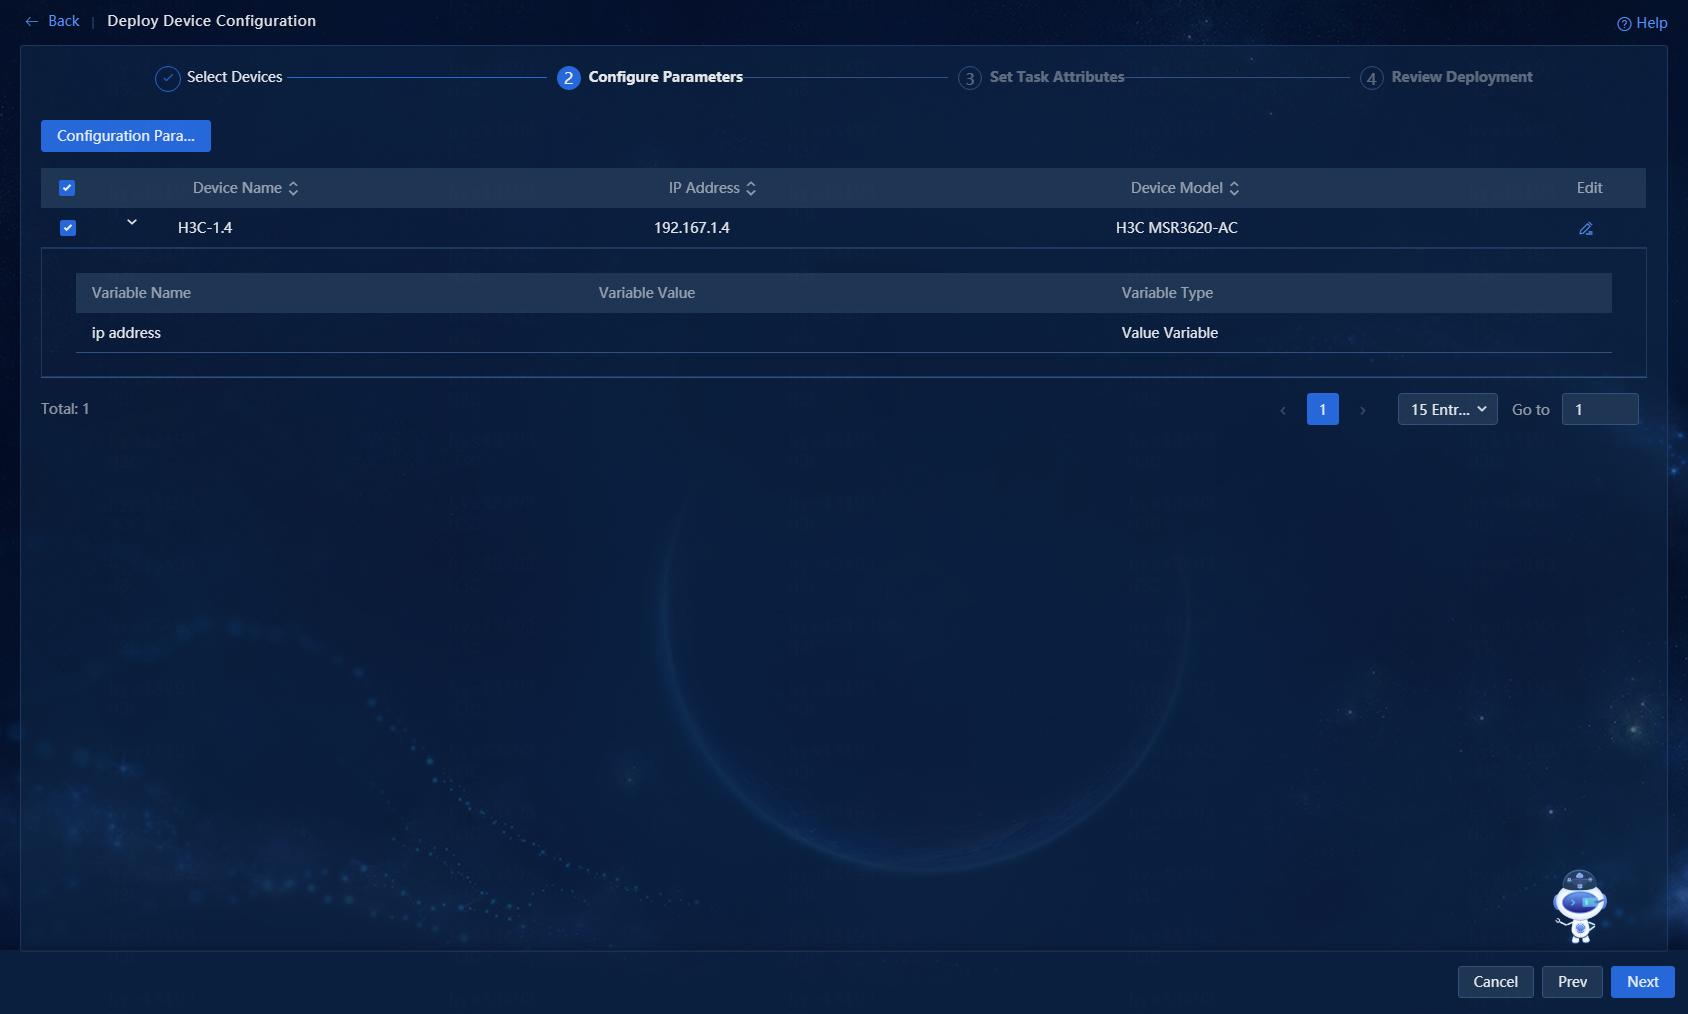
Figure 22 Parameter configuration window
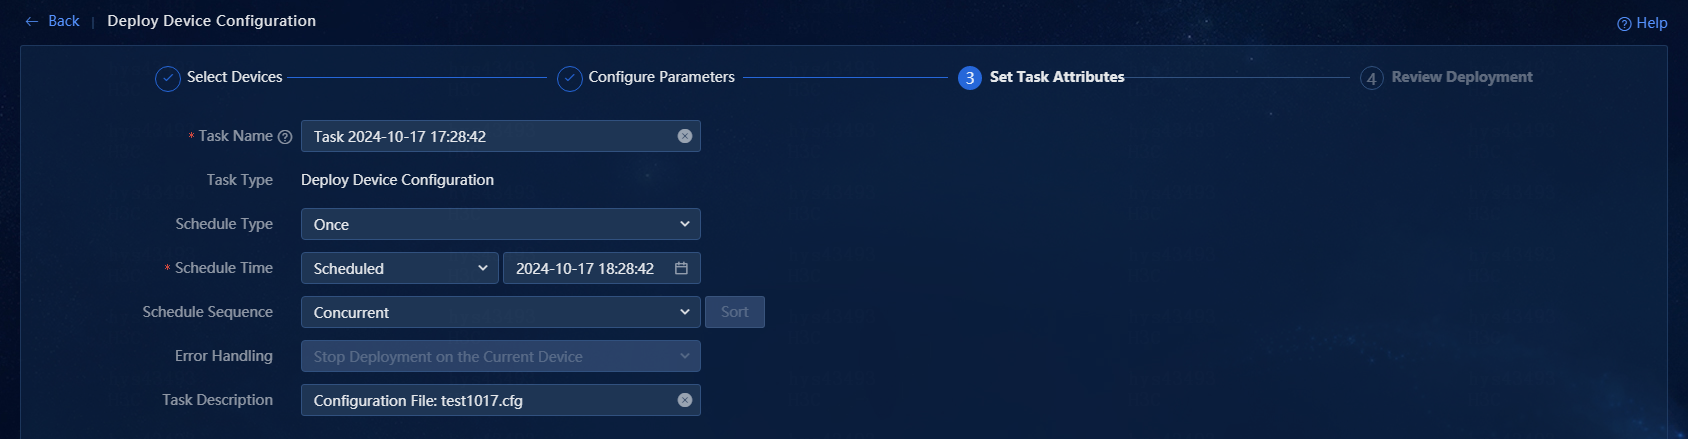
5. If the selected template configuration does not contain variables, proceed directly to the task attribute settings page. On the task attribute settings page, configure parameters such as device deployment task name, schedule type, schedule time, and schedule sequence, as shown in Figure 23. After configuration is complete, click Next.
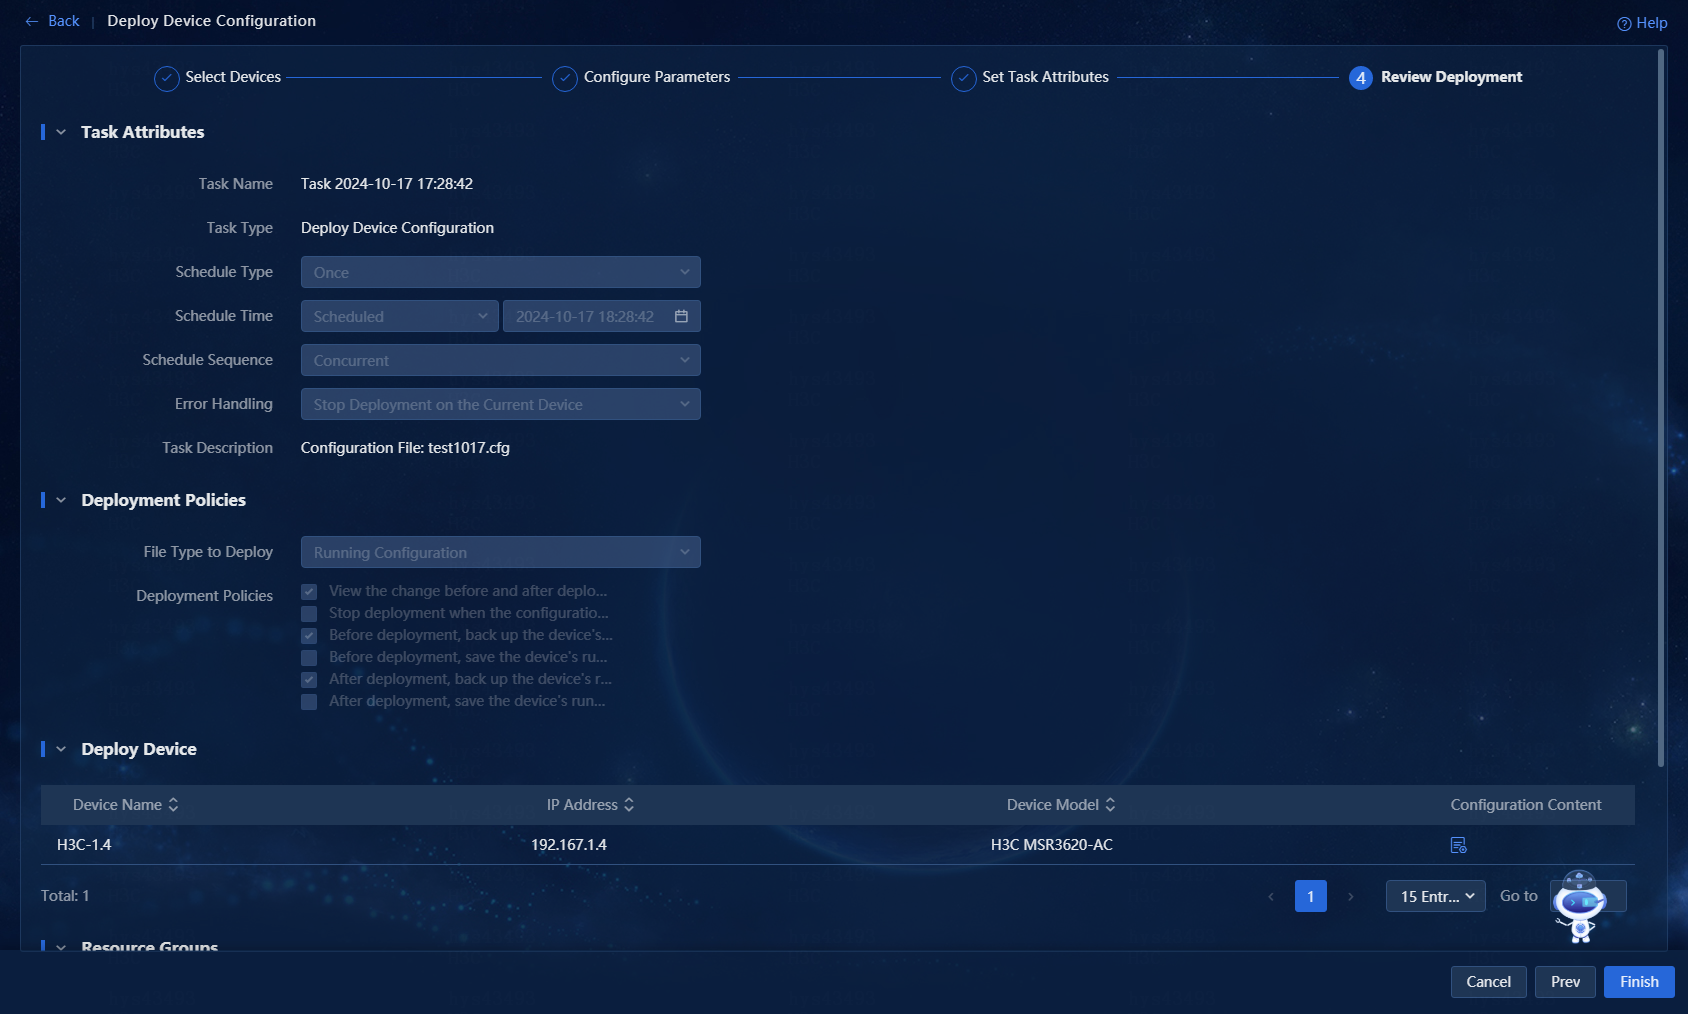
6. The deployment review page displays the task summary, as shown in Figure 24. After verifying the configuration, click Finish to submit the device configuration creation task request.
Figure 24 Configuration review page
7. If the system successfully processes the request for the new task, it will automatically navigate to the device deployment task page. The deployment task list will include a new record for this task, and a success message will be displayed, as shown in Figure 25.
Figure 25 Task management page

Method 2
1. On the top navigation bar, click Management. From the navigation pane, select General Device Configuration > Configuration Center to access the device configuration page, as shown in Figure 26.
Figure 26 Device configuration page

2. Select one or multiple devices for deployment, and click Deploy Configuration to access the device configuration page. For more information about the specific operations, see method 1 in "Deploy device configuration."
Method 3
1. On the top navigation bar, click Management. From the navigation pane, select General Device Configuration > Deployment Tasks > Deployment Guides to access the deployment guides page.
2. Click Deploy Configuration to access the device configuration page. For more information about the specific operations, see method 1 in "Deploy device configuration."
Baseline device configuration
The system performs baseline configuration operations on specific devices according to the baseline policy as follows:
1. On the top navigation bar, click Management. From the navigation pane, select General Device Configuration > Configuration Center to access the device configuration page, as shown in Figure 27.
Figure 27 Device configuration page

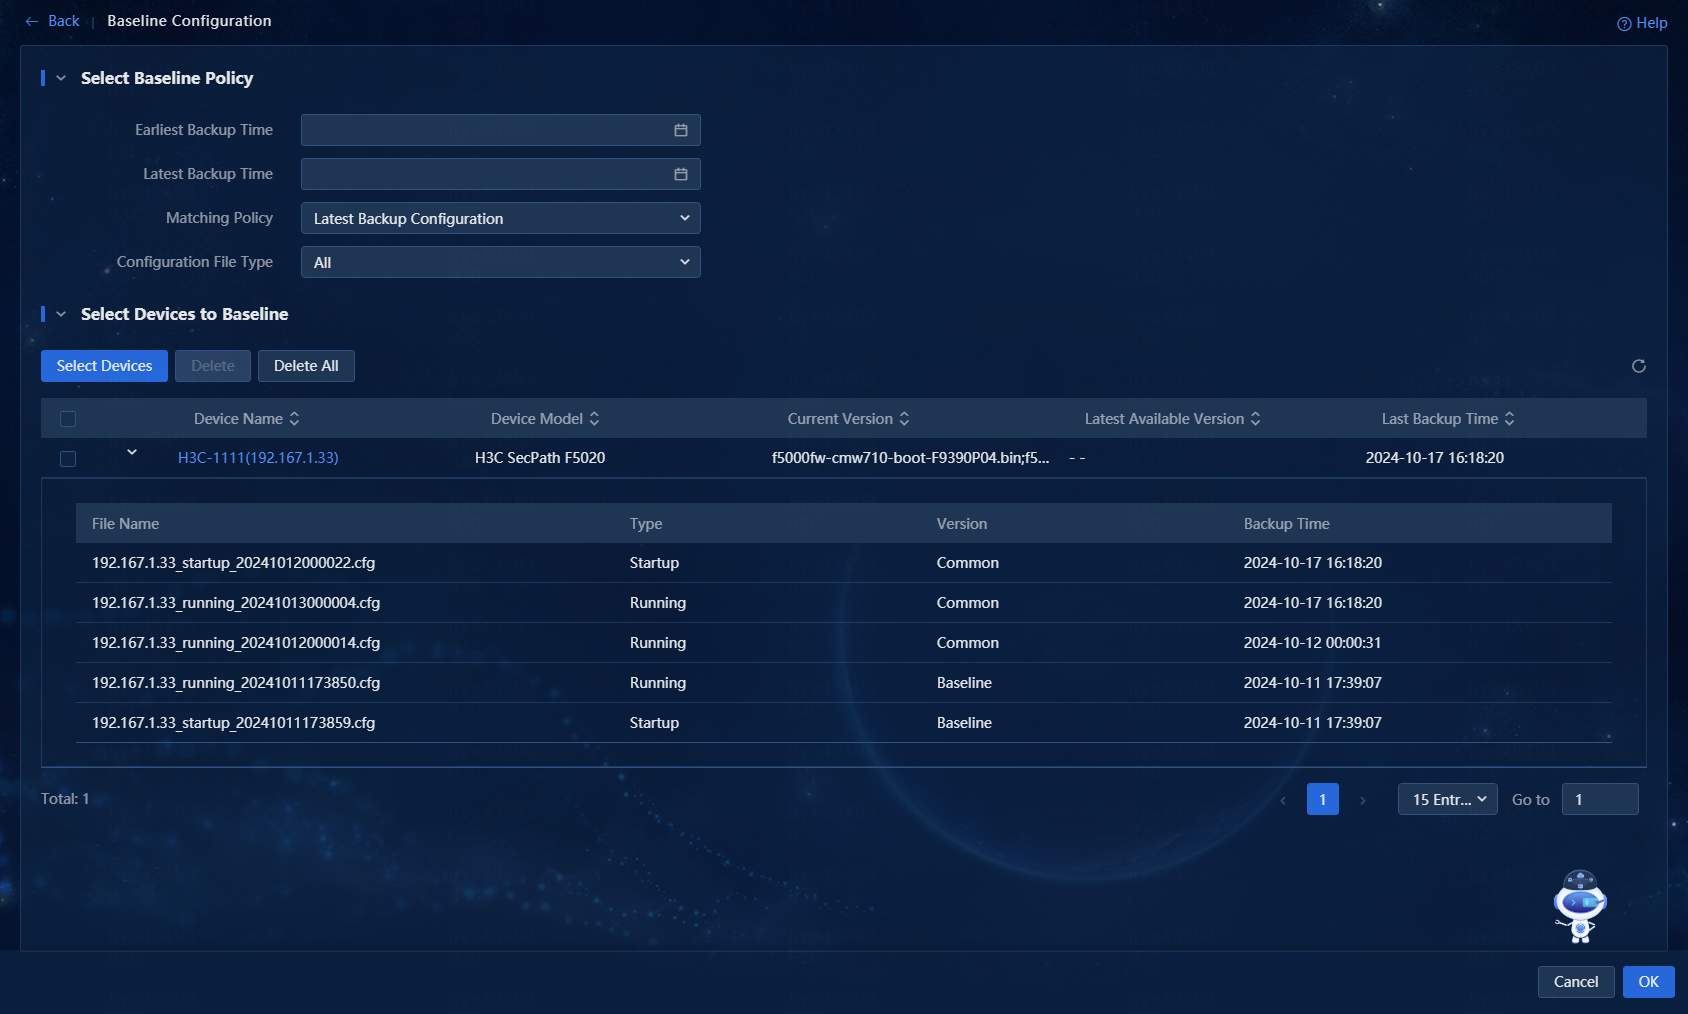
2. Select one or multiple devices and click Baseline Configuration to access the baseline configuration page. You can perform the following operations:
a. Configure the baseline policy.
- Earliest/Latest Backup Time: Specify the time range within which backup operations are performed for the devices.
- Matching Policy: Select the most recent backup time or the earliest backup time.
- Configuration File Type: Select the configuration type to baseline. Options include all, running configuration, and startup configuration.
b. Click Select Devices and select the devices to be baselined in the window that opens.
c. After configuration, click OK to complete the device's baseline configuration.
Figure 28 Baseline configuration
Compare configuration files
You can compare two specified configuration files in either simple mode or advanced mode.
· Use simple mode to compare the configurations of two devices on the page.
· Use the advanced mode to compare the configurations of multiple devices on the page.
Simple mode
1. On the top navigation bar, click Management. From the navigation pane, select General Device Configuration > Configuration Audit > Config File Comparison to access the configuration file compare comparison page.
2. Click the Simple Mode tab, as shown in Figure 29.
Figure 29 Configuration file comparison in simple mode
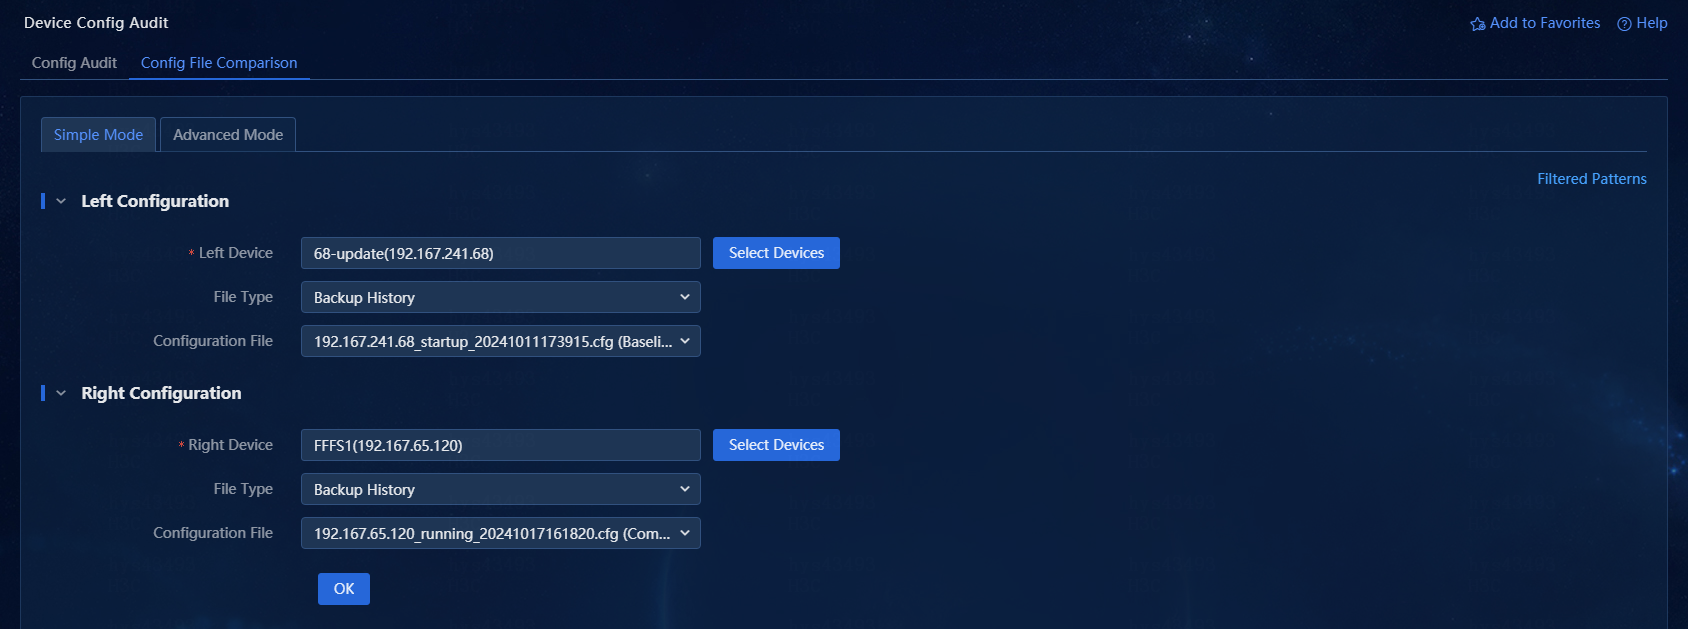
3. Set the parameters for the left and right configurations. The operation methods for both areas are the same.
a. Click Select Devices and select the devices as needed in the dialog box that opens.
b. Click the File Type field and select the file type to compare. Options include startup configuration, running configuration, and backup history.
c. Click the Configuration File field and select the file to compare.
4. After completing the configuration, click OK. The comparison results will be displayed in the configuration comparison window that opens, as shown in Figure 30.
Figure 30 Configuration comparison

a. Click the Filtered Patterns link in the upper right corner of the page, as shown in Figure 31.
b. Select the configured filtered patterns in the dialog box or click Add to add new filtered patterns, as shown in Figure 32. This document takes the adding of filtered patterns for illustration.
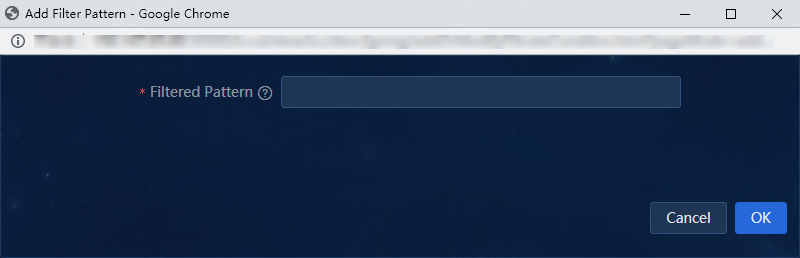
c. As shown in Figure 33, click Add. In the dialog box that opens, enter the filtered pattern and click OK.
Figure 31 Filtered patterns link
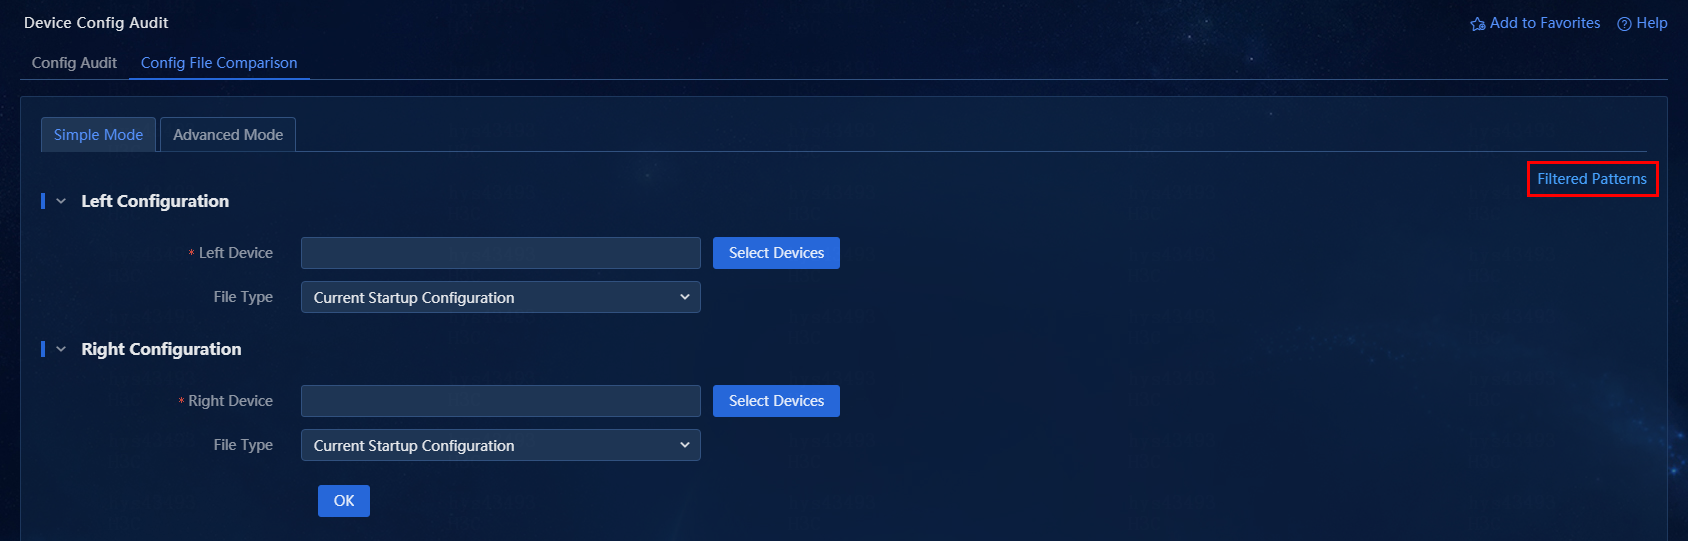
Figure 32 Filtered patterns dialog box
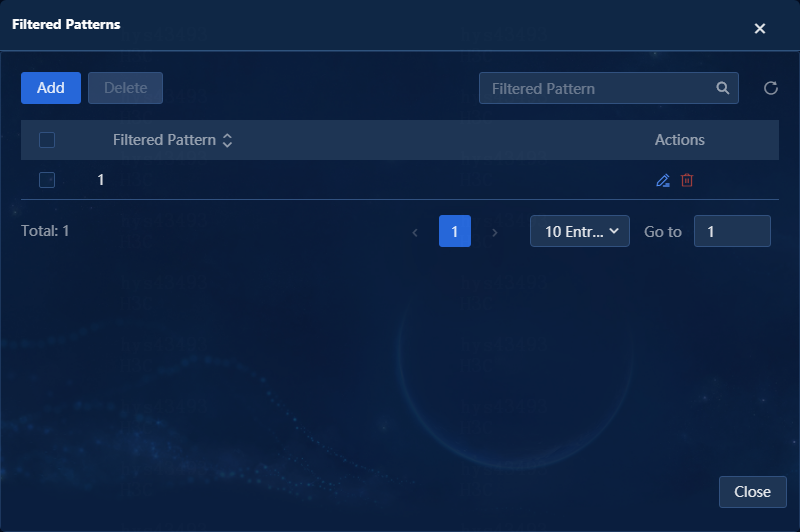
Figure 33 Add a filtered pattern
Advanced mode
Use advanced mode to compare configurations of multiple devices on the page.
1. On the top navigation bar, click Management. From the navigation pane, select General Device Configuration > Configuration Audit > Config File Comparison to access the configuration file compare comparison page.
2. Click the Advanced Mode tab, as shown in Figure 34.
Figure 34 Configuration file comparison in advanced mode
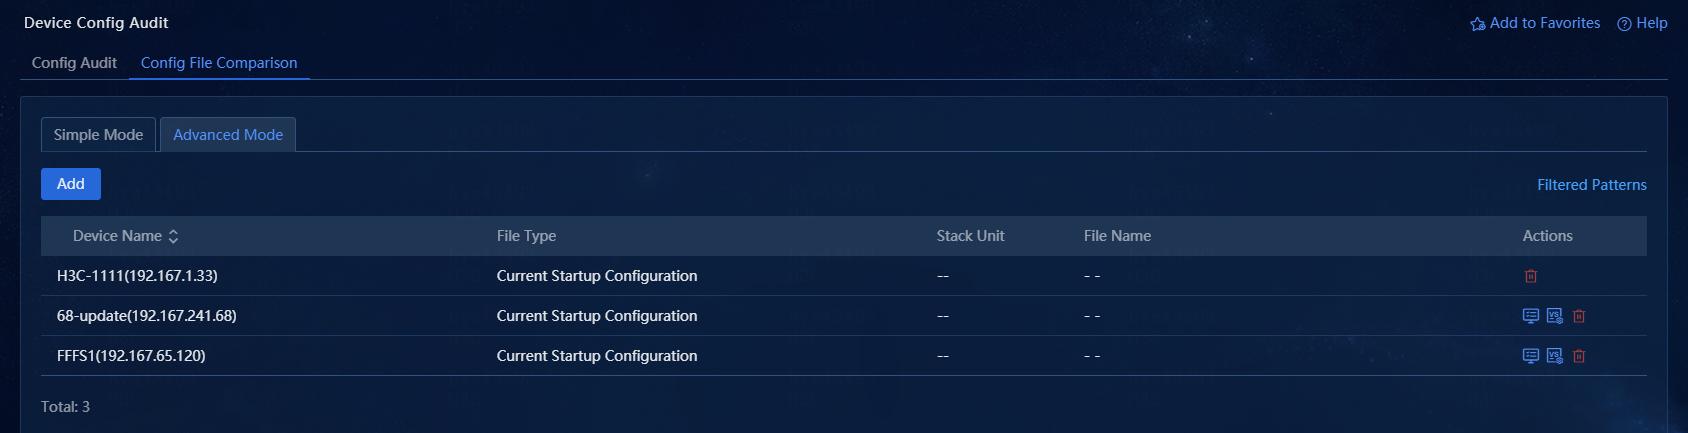
3. Click Add, and select the devices and file type for configuration file comparison in the dialog box that opens, as shown in Figure 35.
Figure 35 Select device configuration
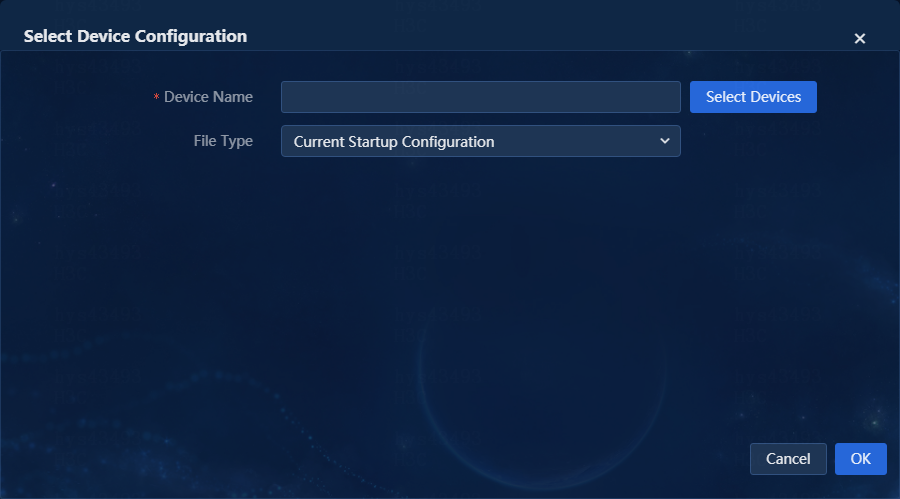
a. Click Select Devices in the dialog box. In the window that opens, select devices as needed, and then OK.
b. Click the File Type field and select the file type you want to compare.
4. After completing the configuration, click OK. The selected devices will be displayed in the device list on the general configuration file comparison page. Repeat step 3 to add multiple configuration files, as shown in Figure 36.
Figure 36 Configuration file comparison in advanced mode
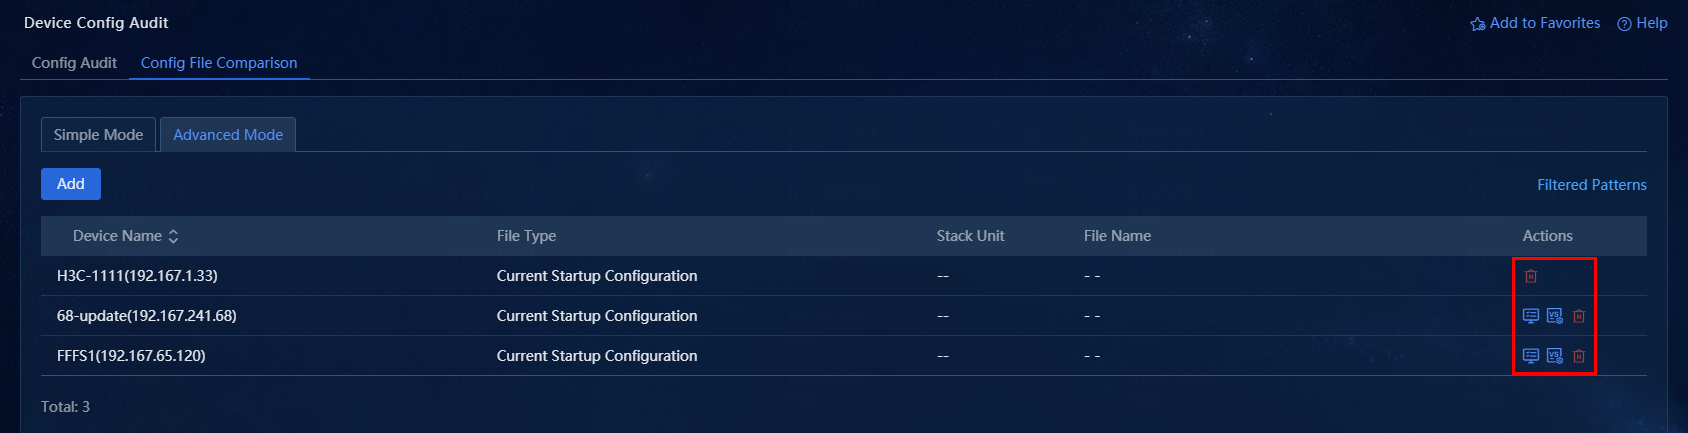
5. Select a record from the device list on the
configuration file comparison page, and click ![]() in the Actions column to set the device configuration as the
default baseline configuration.
in the Actions column to set the device configuration as the
default baseline configuration.
6. Click ![]() in the Actions column for other records in the device list
to display the comparison results between the current configuration file and
the baseline configuration file in the window that opens.
in the Actions column for other records in the device list
to display the comparison results between the current configuration file and
the baseline configuration file in the window that opens.
7. To delete a record from the device list,
click ![]() in the Actions column for that record.
in the Actions column for that record.
8. The advanced mode also supports filtered pattern configuration to filter out unnecessary configuration information. For more information, see step 5 in "Simple mode."
Restore device configuration
You can access the device configuration restoration page by using the following methods to perform device configuration restoration operations.
Method 1
1. On the top navigation bar, click Management. From the navigation pane, select General Device Configuration > Configuration Center to access the device configuration page.
2. Select one or multiple devices that require
configuration restoration. Click the ![]()
![]() field at the top of the page, select a restoration method, and
access the device configuration restoration page. Restoration methods include Restore
Device Configuration and Restore Device Configuration to Baseline.
field at the top of the page, select a restoration method, and
access the device configuration restoration page. Restoration methods include Restore
Device Configuration and Restore Device Configuration to Baseline.
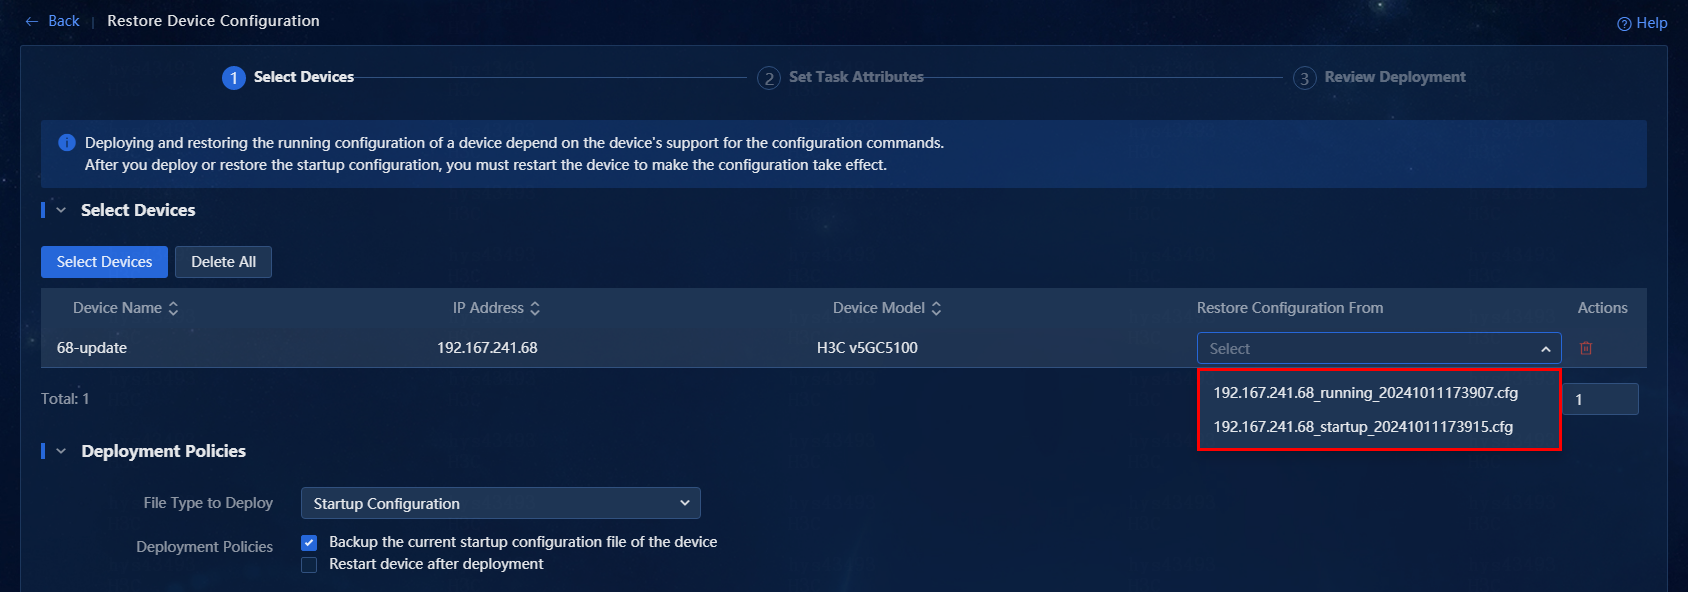
¡ Restore Device Configuration: Select this option to access the device configuration restoration page, where you can select the configuration file to restore the device.
¡ Restore Device Configuration to Baseline: Select this option to enable the system to automatically select the baseline configuration file as the configuration file on the device configuration restoration page.
3. Click the Restore Configuration From field, and select the configuration file to restore the device, as shown in Figure 37 and Figure 38.
Figure 37 Select a file to restore device configuration
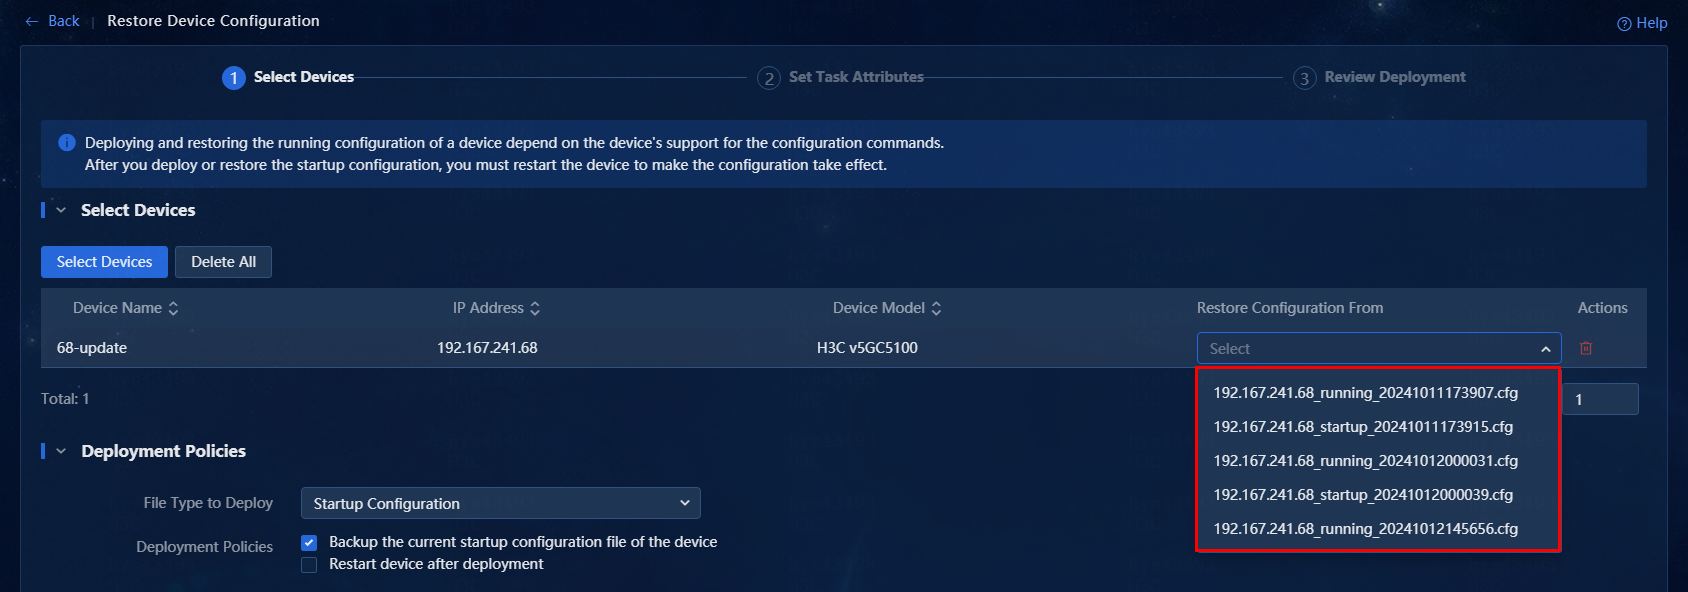
Figure 38 Select a file to restore the device configuration to the baseline
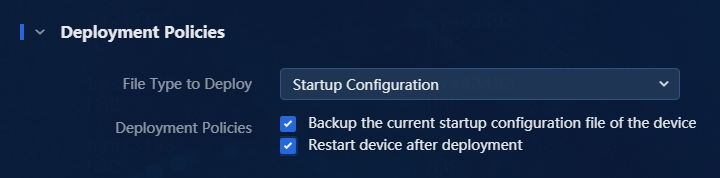
4. Select deployment polices as needed, as shown in Figure 39.
|
|
CAUTION: If you select Restart device after deployment as the deployment policy, the device will be rebooted immediately after deployment. Make sure you understand the impact before selecting this option. |
Figure 39 Select deployment policies
5. After completing the configuration, click Next to access the task attribute settings page, as shown in Figure 40.
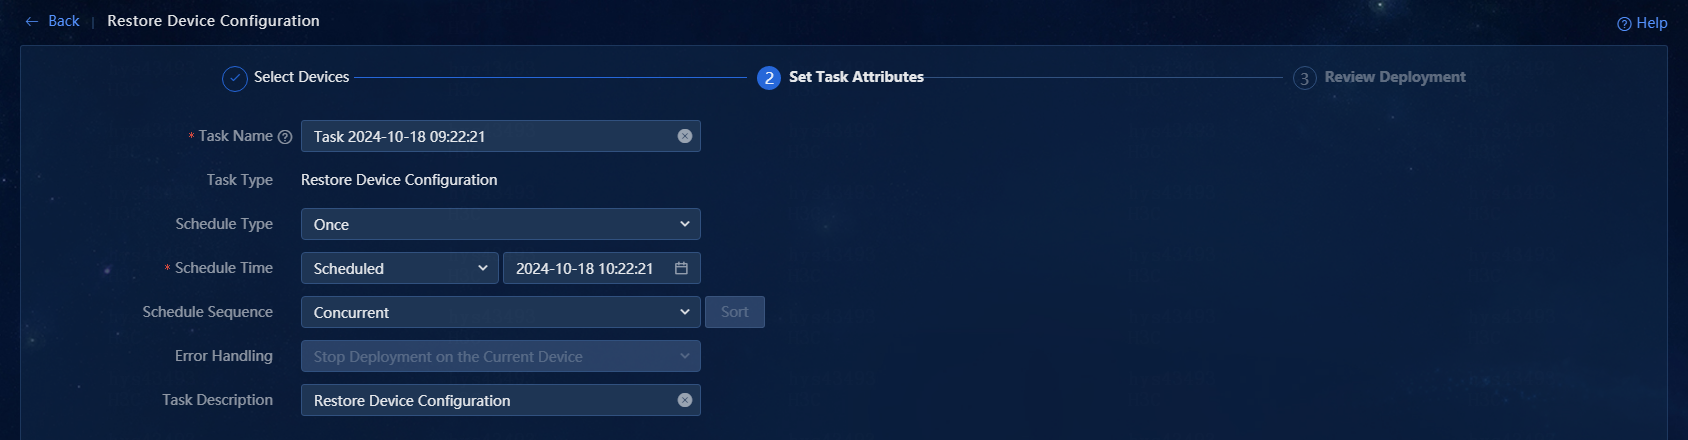
6. Click Next to display the summary information of the current configuration restoration task. After verifying the configuration, click Finish to submit the configuration restoration request. If the system successfully processes the request for the new task, it will automatically navigate to the deployment task page, where the new task is added to the deployment task list and a success message is displayed, as shown in Figure 41.
Figure 41 Deployment task list

Method 2
1. On the top navigation bar, click Automation. From the navigation pane, select Configuration Deployment > Deployment Guides to access the deployment guides page.
2. Click Restore Device Configuration to access the device configuration restoration page.
3. For information about operations on the device configuration restoration page, see "Restore device configuration."
Figure 42 Restore device configuration

