- Table of Contents
- Related Documents
-
| Title | Size | Download |
|---|---|---|
| 08-Anti-virus configuration | 206.54 KB |
Virus signature library management
Restrictions and guidelines: Anti-virus
Configuring an anti-virus policy
Specifying a parameter profile for an anti-virus action
Applying an anti-virus policy to a DPI application profile
Activating anti-virus policy and rule settings
Applying a DPI application profile to a security policy rule
Managing the virus signature library
Scheduling automatic virus signature library update
Triggering an immediate automatic virus signature library update
Manually updating the virus signature library
Rolling back the virus signature library
Display and maintenance commands for anti-virus
Anti-virus configuration examples
Example: Using an anti-virus policy in a security policy
Configuring anti-virus
About anti-virus
Anti-virus identifies viruses in the application layer of packets based on an up-to-date virus signature library and takes actions to prevent a network from being infected. This feature is typically deployed on a gateway to insulate the internal network from viruses and protect the internal data.
Application scenario
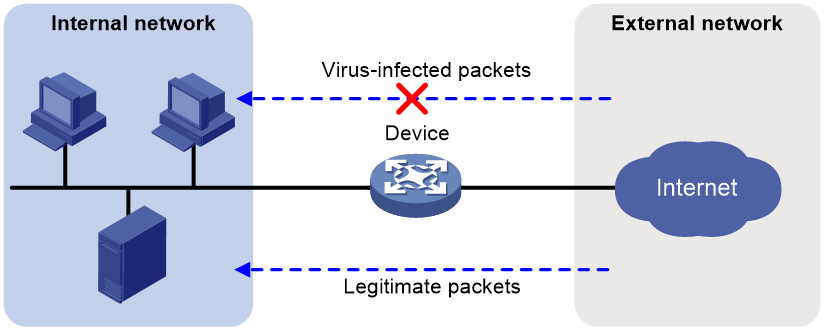
As shown in Figure 1, the device is the gateway of an internal network. Internal users access the external network and download data from the external network. The internal server accepts data uploaded by external users.
In this scenario, you can configure anti-virus on the gateway to protect the internal network. Anti-virus inspects incoming packets, permits legitimate packets to pass, and takes actions, such as alert, block, or redirect, on packets containing viruses.
Figure 1 Anti-virus application scenario
Terminology
Virus signature
A virus signature is a character string that uniquely identifies a specific virus. The virus signature library contains the predefined virus signatures.
MD5 rules
An MD5 rule is generated by the system based on the virus signatures in the virus signature library to identify virus-infected files.
Signature exception
Typically, anti-virus takes anti-virus actions on packets matching virus signatures. If a virus proves to be a false alarm, you can set the virus signature as a signature exception. Packets matching the signature exception are permitted to pass.
Application exception
Typically, anti-virus action is protocol specific and applies to all applications carried by the protocol. To take a different action on an application, you can set the application as an exception and specify a different anti-virus action for the application. Application exceptions use application-specific actions and the other applications use protocol-specific actions. For example, the anti-virus action for HTTP is alert. To block the games carried by HTTP, you can set the games as application exceptions and specify the block action for them.
Anti-virus action
Anti-virus actions apply to the packets that match virus signatures. The actions include the following types:
· alert—Permits matching packets and generates logs.
· block—Blocks matching packets and generates logs.
· redirect—Redirects matching HTTP connections to a URL and generates logs. The redirection is applicable to only uploading connections.
The generated anti-virus logs can be sent to the device information center.
Virus detection methods
The device supports the following virus detection methods:
· Virus signature-based detection—The device matches packets against virus signatures in the virus signature library, and determines that a packet contains viruses if a match is found.
· MD5 rule-based detection—The device generates an MD5 hash value for a file to be inspected and compares the value with the system-defined MD5 rules. If a match is found, the file is identified to be virus-infected. The device supports inspecting only the header of a file. If the MD5 value of the file header calculated matches an MD5 rule (i.e., a virus is detected), the device will no longer inspect the remaining file content. This can reduce the impact on system performance and reduce the memory usage of the device.
Anti-virus mechanism
Anti-virus takes effect after you apply an anti-virus policy to a DPI application profile and use the DPI application profile in a security policy rule.
As shown in Figure 2, upon receiving a packet, the anti-virus device performs the following operations:
1.
2.
3. The device identifies whether the anti-virus supports the application layer protocol of the packet.
¡ If not, the device permits the packet to pass without anti-virus inspection.
¡ If yes, the device compares the packet with the virus signatures and MD5 rules.
4. If a matching signature or MD5 rule is found, the device determines if the matching signature is an exception.
¡ If yes, the device permits the packet to pass.
¡ If not, the device examines whether the application is an exception.
- If the application is an exception, the device takes the application-specific action (alert, block, or permit).
- If the application is not an exception, the device takes the protocol-specific action (alert, block, or redirect).
5. If no matching signature or MD5 rule is found, the device permits the packet to pass.

Virus signature library management
The device inspects packets for viruses based on the virus signature library. You can update the virus signature library to the latest version or roll it back to the previous version or the factory default version.
Updating the virus signature library
The following methods are available for updating the virus signature library:
· Automatic update.
The device automatically and periodically downloads the most up-to-date virus signature file to update the signature library.
· Triggered update.
The device downloads the most up-to-date virus signature file to update the signature library immediately after you trigger the operation.
· Manual update.
Use this method when the device cannot obtain the virus signature file automatically.
You must manually download the most up-to-date virus signature file and then use the downloaded file to update the signature library.
Rolling back the virus signature library
If the false alarm rate is high or abnormal situations frequently occur, you can roll back the virus signature library to the factory default version.
Licensing requirements
Before using the anti-virus feature on WSG1800X and WX2800X series, purchase and correctly install a license. If the license expires, the anti-virus feature is still available but you can no longer update the virus signature library. For more information about licenses, see License Management Configuration Guide.
Restrictions and guidelines: Anti-virus
Anti-virus supports inspecting packets transported through FTP, HTTP, HTTPS, IMAP, IMAPS, NFS, POP3, POP3S, SMB, SMTP, and SMTPS.
Anti-virus tasks at a glance
To configure anti-virus, perform the following tasks:
1. Configuring an anti-virus policy
2. Specifying a parameter profile for an anti-virus action
3. Applying an anti-virus policy to a DPI application profile
4. (Optional.) Activating anti-virus policy and rule settings
5. Applying a DPI application profile to a security policy rule
6. Managing the virus signature library
Configuring an anti-virus policy
About this task
An anti-virus policy defines the virus detection criteria, anti-virus actions, virus signature exceptions, and application exceptions.
The virus signatures in the virus signature library are available to all anti-virus policies on the device.
The device supports sending the alarm message defined in the warning parameter profile applied to the policy. If an endpoint user visits a virus-infected website, the device will display the alarm message on the user's browser. For more information about configuring a warning parameter profile, see "Configuring DPI engine."
Restrictions and guidelines
Anti-virus supports only NFSv3 of the NFS protocol, and SMBv1 and SMBv2 of the SMB protocol.
The anti-virus module supports the following log output methods:
· Fast log output—You must specify a log host to receive the log messages. Log messages are sent to the specified log host.
· Syslog output—Log messages are sent to the information center. With the information center, you can set log message filtering and output rules, including output destinations. The information center can output anti-virus syslogs to any destinations except the console and the monitor terminal. If you configure the console or monitor terminal as an output destination, the output destination setting will not take effect. To view anti-virus syslogs stored on the device, use the display logbuffer command. Make sure you do not disable log output to the log buffer, which is enabled by default. For more information about configuring the information center, see System Management Configuration Guide.
Syslog output might affect device performance. As a best practice, use fast log output. For more information about fast log output, see Network Management and Monitoring Configuration Guide.
With the warning parameter-profile command configured, the device will proxy HTTP traffic matching the anti-virus policies, which will greatly affect device performance. Determine whether to configure this command based on the actual situation.
Procedure
1. Enter system view.
system-view
2. Create an anti-virus policy and enter its view.
anti-virus policy policy-name
A default anti-virus policy named default exists. The default anti-virus policy cannot be modified or deleted.
3. (Optional.) Configure a description for the anti-virus policy.
description text
4. Configure anti-virus for an application layer protocol.
inspect { ftp | http | imap | nfs | pop3 | smb | smtp } direction { both | download | upload } [ cache-file-size file-size ] action { alert | block | redirect }
By default, the device performs virus detection on upload and download packets for FTP, HTTP, IMAP, NFS, and SMB, on download packets for POP3, and on upload packets for SMTP. The anti-virus action for FTP, HTTP, NFS, and SMB is block and for IMAP, SMTP, and POP3 is alert. The maximum size for the file that can be cached for inspection is 1 MB. The direction keyword is not available for the POP3 and SMTP protocols because the POP3 protocol supports only the download direction and the SMTP protocol supports only the upload direction.
5. (Optional.) Apply a warning parameter profile to an anti-virus policy and enable sending the alarm message defined in the profile.
warning parameter-profile profile-name
By default, no warning parameter profile is applied and the device does not support the sending of alarm messages.
The alarm message sending takes effect only when the HTTP protocol and the block action are configured for virus detection.
6. (Optional.) Set a signature as a signature exception.
exception signature signature-id
7. (Optional.) Set an application as an application exception and specify an anti-virus action for the application exception.
exception application application-name action { alert | block | permit }
8. Enable the virus signatures at and above a severity level.
signature severity { critical | high | medium } enable
By default, virus signatures of all severity levels are enabled.
Specifying a parameter profile for an anti-virus action
About this task
Before you can specify a parameter profile for an anti-virus action, configure the parameter profile in the DPI engine. For more information, see "Configuring DPI engine."
A parameter profile defines the parameters for executing an action. For example, you can configure parameters such as the email server address and email recipients in the email parameter profile, and then apply the profile to the email action.
If no parameter profile is specified for an anti-virus action, or if the specified parameter profile does not exist, the default parameter settings of the action are used.
Procedure
1. Enter system view.
system-view
2. Specify a parameter profile for an anti-virus action.
anti-virus { logging | redirect } parameter-profile profile-name
By default, no parameter profile is specified for an anti-virus action.
Applying an anti-virus policy to a DPI application profile
About this task
The DPI application profile is a template for configuring DPI security services. For an anti-virus policy to take effect, you must apply it to a DPI application profile.
A DPI application profile can use only one anti-virus policy. If you apply different anti-virus policies to the same DPI application profile, only the most recent configuration takes effect.
Procedure
1. Enter system view.
system-view
2. Enter DPI application profile view.
app-profile profile-name
For more information about this command, see DPI engine commands in DPI Command Reference.
3. Apply an anti-virus policy to the DPI application profile.
anti-virus apply policy policy-name mode { alert | protect }
By default, no anti-virus policy is applied to a DPI application profile.
Activating anti-virus policy and rule settings
About this task
By default, the system will detect whether another configuration change (such as creation, modification, or deletion) occurs within a 20-second interval after a change to the anti-virus policy and rule settings:
· If no configuration change occurs within the interval, the system performs an activation operation at the end of the next interval to make the configuration take effect.
· If a configuration change occurs within the interval, the system continues to periodically check whether a configuration change occurs within the interval.
To activate the policy and rule configurations immediately, you can execute the inspect activate command.
Restrictions and guidelines
This task can cause temporary outage for all DPI services. As a best practice, perform the task after all DPI service policy and rule settings are complete.
For information about activating DPI service module configuration, see "Configuring DPI engine."
Procedure
1. Enter system view.
system-view
2. Activate anti-virus policy and rule settings.
inspect activate
By default, anti-virus policy and rule settings will be activated automatically.
|
|
CAUTION: This command can cause temporary outage for the DPI service and other services based on DPI. For example, security policies cannot perform application access control. |
Applying a DPI application profile to a security policy rule
1. Enter system view.
system-view
2. Enter security policy view.
security-policy { ip | ipv6 }
3. Enter security policy rule view.
rule { rule-id | [ rule-id ] name rule-name }
4. Set the rule action to pass.
action pass
The default rule action is drop.
5. Use a DPI application profile in the rule.
profile app-profile-name
By default, no DPI application profile is used in a security policy rule.
Managing the virus signature library
As viruses constantly increase and change, you must update the virus signature library in time. You can also roll back the virus signature library.
Restrictions and guidelines
· Do not delete the /dpi/ folder in the root directory of the storage medium.
· Do not perform virus signature update and rollback when the device's free memory is below the normal state threshold. For more information about device memory thresholds, see device management in Device Management Configuration Guide.
· For successful automatic and immediate signature update, make sure the device can resolve the domain name of the H3C website into an IP address through DNS. For more information about DNS, see DNS configuration in Network Connectivity Configuration Guide.
Scheduling automatic virus signature library update
About this task
You can schedule automatic virus signature library update if the device can access the signature database services on the H3C website. The device periodically obtains the latest signature file from the H3C website to update its local signature library according to the update schedule.
Procedure
1. Enter system view.
system-view
2. Enable automatic virus signature library update and enter automatic virus signature library update configuration view.
anti-virus signature auto-update
By default, automatic virus signature library update is disabled.
3. Schedule the update time.
update schedule { daily | weekly { fri | mon | sat | sun | thu | tue | wed } } start-time time tingle minutes
By default, the device updates the virus signature library at a random time between 02:01:00 and 04:01:00 every day.
Triggering an immediate automatic virus signature library update
About this task
Anytime you find a new release of virus signature file on the H3C website, you can trigger the device to immediately and automatically update the virus signature library.
Procedure
1. Enter system view.
system-view
2. Trigger an immediate virus signature library update.
anti-virus signature auto-update-now
Manually updating the virus signature library
About this task
If the device cannot access the signature database services on the H3C website, use one of the following methods to manually update the virus signature library:
· Local update—Updates the virus signature library by using the locally stored virus signature file.
· FTP/TFTP update—Updates the virus signature library by using the virus signature file stored on an FTP or TFTP server.
In manual update of the virus signature library, you can configure the source keyword to specify the source IP address for packets sent to the TFTP or FTP server. For example, if the device-sent packets destined for the TFTP or FTP server must be translated by NAT, you must configure a source IP address that satisfies the NAT translation rules. If a separate NAT device is used in the network, make sure the IP address specified by this command can reach the NAT device at Layer 3.
Procedure
1. Enter system view.
system-view
2. Manually update the virus signature library.
anti-virus signature update file-path [ source { ip | ipv6 } { ip-address | interface interface-type interface-number } ]
|
|
CAUTION: The H3C website provides different signature libraries for devices with different memory sizes and software versions. You must obtain the signature library that is suitable for your device. If your device has a small memory (8 GB or less) but you choose a signature library that is for a large memory (more than 8 GB), the signature update might result in device anomaly. |
Rolling back the virus signature library
1. Enter system view.
system-view
2. Roll back the virus signature library.
anti-virus signature rollback factory
Display and maintenance commands for anti-virus
Execute the display commands in any view.
|
Task |
Command |
|
Display virus signature information. |
display anti-virus signature [ [ signature-id ] | [ severity { critical | high | low | medium } ] ] |
|
Display virus signature family information. |
display anti-virus signature family-info |
|
Display virus signature library information. |
display anti-virus signature library |
|
Display anti-virus statistics. |
display anti-virus statistics [ policy policy-name ] |
Anti-virus configuration examples
Example: Using an anti-virus policy in a security policy
Network configuration
As shown in Figure 3, the AC connects the LAN and the Internet. The client uses a Web server and a mail server on the Internet to transport files and emails.
Configure the AC to use an anti-virus policy to detect and prevent viruses in the files and emails downloaded by the client.

Procedure
1. Configure interfaces on the AC:
# Create VLAN 100. Create VLAN-interface 100 and assign an IP address to the VLAN interface. The AP will obtain this IP address to establish a CAPWAP tunnel with the AC.
<AC> system-view
[AC] vlan 100
[AC-vlan100] quit
[AC] interface vlan-interface 100
[AC-Vlan-interface100] ip address 192.1.1.1 24
[AC-Vlan-interface100] quit
# Create VLAN 200. Create VLAN-interface 200 and assign an IP address to the VLAN interface. The client will access the wireless network through this VLAN.
[AC] vlan 200
[AC-vlan200] quit
[AC] interface vlan-interface 200
[AC-Vlan-interface200] ip address 192.2.1.1 24
[AC-Vlan-interface200] quit
# Configure the interface connected to the switch as a trunk port that permits VLAN 100 and VLAN 200.
[AC] interface gigabitethernet 1/0/1
[AC-GigabitEthernet1/0/1] port link-type trunk
[AC-GigabitEthernet1/0/1] port trunk permit vlan 100 200
[AC-GigabitEthernet1/0/1] quit
2. Configure the wireless service:
# Create service template 1 and enter its view.
[AC] wlan service-template 1
# Configure the SSID as service.
[AC-wlan-st-1] ssid service
# Configure the AC to forward client data traffic.
[AC-wlan-st-1] client forwarding-location ac
# Assign clients coming online to VLAN 200.
[AC-wlan-st-1] vlan 200
# Enable the service template.
[AC-wlan-st-1] service-template enable
[AC-wlan-st-1] quit
3. Configure the AP:
# Create an AP named ap1 with model WA6320.
[AC] wlan ap ap1 model WA6320
# Set the serial ID of AP ap1 to 219801A28N819CE0002T.
[AC-wlan-ap-ap1] serial-id 219801A28N819CE0002T
# Enter radio 1 view for AP ap1, and bind service template 1 to radio 1.
[AC-wlan-ap-ap1] radio 1
[AC-wlan-ap-ap1-radio-1] service-template 1
# Enable radio 1 for AP ap1.
[AC-wlan-ap-ap1-radio-1] radio enable
[AC-wlan-ap-ap1-radio-1] quit
# Enter radio 2 view for AP ap1, and bind service template 1 to radio 2.
[AC-wlan-ap-ap1] radio 2
[AC-wlan-ap-ap1-radio-2] service-template 1
# Enable radio 2 for AP ap1.
[AC-wlan-ap-ap1-radio-2] radio enable
[AC-wlan-ap-ap1-radio-2] quit
[AC-wlan-ap-ap1] quit
4. Configure an object group:
# Create an IP address object group named antivirus, and specify its subnet as 192.2.1.0/24.
[AC] object-group ip address antivirus
[AC-obj-grp-ip-antivirus] network subnet 192.2.1.0 24
[AC-obj-grp-ip-antivirus] quit
5. Configure an anti-virus policy:
# Create an anti-virus policy named down_av and enter its view.
[AC] anti-virus policy down_av
# Configure anti-virus for FTP and SMB in download direction and specify the anti-virus action as block.
[AC-anti-virus-policy-down_av] inspect ftp direction download action block
[AC-anti-virus-policy-down_av] inspect smb direction download action block
# Configure anti-virus for IMAP in download direction and specify the anti-virus action as alert.
[AC-anti-virus-policy-down_av] inspect imap direction download action alert
# Set the Alibaba application as an application exception. Specify alert as the anti-virus action for the application exception.
[AC-anti-virus-policy-down_av] exception application Alibaba action alert
[AC-anti-virus-policy-down_av] quit
6. Configure a DPI application profile and activate the anti-virus policy settings:
# Create a DPI application profile named sec, and enter its view.
[AC] app-profile sec
# Apply anti-virus policy down_av to DPI application profile sec. Set the anti-virus policy mode to protect.
[AC-app-profile-sec] anti-virus apply policy down_av mode protect
[AC-app-profile-sec] quit
# Activate the anti-virus policy settings.
[AC] inspect activate
7. Configure an anti-virus security policy:
# Enter IPv4 security policy view.
[AC] security-policy ip
# Create a security policy rule named av. Configure the matching conditions as the source IP address object group antivirus, FTP service, SMB service, IMAP service, AP ap1, AP group default-group, and SSID service.
[AC-security-policy-ip] rule name av
[AC-security-policy-ip-10-av] source-ip antivirus
[AC-security-policy-ip-10-av] service ftp
[AC-security-policy-ip-10-av] service smb
[AC-security-policy-ip-10-av] service imap
[AC-security-policy-ip-10-av] ap ap1
[AC-security-policy-ip-10-av] ap-group default-group
[AC-security-policy-ip-10-av] ssid service
# Configure the security action as pass and specify DPI application profile sec.
[AC-security-policy-ip-10-av] action pass
[AC-security-policy-ip-10-av] profile sec
[AC-security-policy-ip-10-av] quit
# Activate rule matching acceleration.
[AC-security-policy-ip] accelerate enhanced enable
[AC-security-policy-ip] quit
Verifying the configuration
# View anti-virus statistics by using the display anti-virus statistics command on the AC.
[AC] display anti-virus statistics
Slot 1:
Total Block: 2
Total Redirect: 0
Total Alert: 1
Type http ftp smtp pop3 imap smb nfs
Block 0 1 0 0 0 1 0
Redirect 0 0 0 0 0 0 0
Alert+Permit 0 0 0 0 1 0 0
