- Table of Contents
- Related Documents
-
| Title | Size | Download |
|---|---|---|
| 04-HQoS configuration | 223.65 KB |
Restrictions and guidelines: HQoS configuration
Mapping traffic to predefined forwarding classes
About predefined forwarding classes
Marking a forwarding class for packets
Configuring a forwarding profile
Configuring a forwarding group
Restrictions and guidelines for forwarding group configuration
Configuring a forwarding group at a child branch node
Configuring a forwarding group at the parent branch node
Configuring a scheduler policy
Applying a scheduler policy to an interface
Configuring per-queue traffic accounting for HQoS
Display and maintenance commands for HQoS
Example: Configuring local QoS ID mode
Configuring HQoS
About HQoS
Hierarchical QoS (HQoS) can hierarchically classify and schedule traffic, for example, by both user and application. HQoS provides more granular and flexible traffic control and quality assurance services than traditional QoS.
As shown in Figure 1, HQoS uses a tree structure and has the following nodes:
· Leaf node—Corresponds to a predefined forwarding class (FC), which is a scheduling queue, for example, BE, AF, and NC in Figure 1. After receiving a packet, an interface assigns the packet to the corresponding forwarding class.
· Branch node—Corresponds to a forwarding group (FG). A forwarding group (parent branch node) can have multiple nested forwarding groups (child branch nodes) or predefined forwarding classes.
· Root node—Corresponds to a scheduler policy (SP). A scheduler policy can have multiple nested forwarding groups. After a scheduler policy is applied to an interface, the interface can perform hierarchical traffic scheduling from the leaf nodes to the root node.
A child branch node can specify a forwarding profile for lead nodes. Then, the child branch node can schedule the traffic of leaf nodes according to the scheduling priority, scheduling weight, shaping parameters, and bandwidth setting in the forwarding profile.
Similarly, the root node and parent branch node can specify match criteria and forwarding profiles for their lower-level nodes.
The VLAN range next to a node is the match criteria specified by its higher-level node. The forwarding profile in the arrow pointing to a higher-level node is the control action to take on the traffic traversing the node.
Figure 1 HQoS scheduling model

Restrictions and guidelines: HQoS configuration
This feature is available only for the following cards:
|
Card category |
Cards |
|
CEPC |
CEPC-XP4LX, CEPC-XP24LX, CEPC-XP48RX, CEPC-CP4RX, CEPC-CP4RXA, CEPC-CP4RX-L, CEPC-CQ8L, CEPC-CQ8LA, CEPC-CQ8L1A, CEPC-CQ16L1 |
|
CSPEX |
CSPEX-1304X, CSPEX-1404X, CSPEX-1502X, CSPEX-1504X, CSPEX-1504XA, CSPEX-1602X, CSPEX-1602XA, CSPEX-1804X, CSPEX-1512X, CSPEX-1612X, CSPEX-1812X, CSPEX-1802X, CSPEX-1802XA, CSPEX-2612XA, CSPEX-1812X-E, CSPEX-2304X-G, CSPEX-1502XA |
|
SPE |
RX-SPE200, RX-SPE200-E |
HQoS tasks at a glance
To configure HQoS, perform the following tasks:
1. (Optional.) Mapping traffic to predefined forwarding classes
2. (Optional.) Configuring a drop profile
A drop profile must be nested in a forwarding profile to take effect.
3. Configuring a forwarding profile
4. Configuring a forwarding group
¡ Configuring a forwarding group at a child branch node
Perform this task to associate the predefined forwarding classes with forwarding profiles for leaf nodes.
¡ Configuring a forwarding group at the parent branch node
Perform this task to associate child branch nodes with forwarding profiles.
5. Configuring a scheduler policy
Perform this task to associate forwarding groups with forwarding profiles.
6. Applying a scheduler policy to an interface
7. (Optional.) Configuring per-queue traffic accounting for HQoS
Mapping traffic to predefined forwarding classes
About predefined forwarding classes
Predefined forwarding classes
The system has eight predefined forwarding classes, as shown in Table 1.
Table 1 Predefined forwarding classes
|
Forwarding class name |
Service type |
Forwarding class type |
|
Network Control (NC) |
Highest-priority services, including network control packets. |
High-priority services. |
|
High-1 (H1) |
The service types are not explicitly defined. |
|
|
Expedited (EF) |
Delay/jitter-sensitive services, such as voice and video. |
|
|
High-2 (H2) |
The service types are not explicitly defined. |
|
|
Low-1 (L1) |
The service types are not explicitly defined. |
Services guaranteeing transmission quality. |
|
Assured (AF) |
Services guaranteeing transmission quality, including VPN and data packet transmission. |
|
|
Low-2 (L2) |
The service types are not explicitly defined. |
Best-effort services. |
|
Best Effort (BE) |
Best-effort services, such as webpage browsing. |
Traffic mapping to predefined forwarding classes
In HQoS, a packet arriving at a port is classified and mapped to a forwarding class before it is assigned to a scheduling queue.
You can map traffic to forwarding classes by using a QoS policy. A QoS policy allows you to perform the following tasks:
· Classifies traffic into multiple classes.
· Configures the action of marking forwarding classes in a traffic behavior.
· Associates each traffic class with a traffic behavior in a QoS policy.
After you apply the QoS policy to an interface, traffic classes are mapped to forwarding classes. With this method, you can classify packets based on the following attributes:
· Packet priority.
· IP address.
· MAC address.
· VLAN.
· Protocol type.
For more information about QoS policies, see "Configuring a QoS policy."
Restrictions and guidelines
Packets are not classified before entering scheduling queues. Instead, they are classified according to the match criteria of the forwarding group in which they are scheduled.
Marking a forwarding class for packets
1. Enter system view.
system-view
2. Create a traffic class and enter traffic behavior view.
traffic classifier classifier-name [ operator { and | or } ]
3. Configure a match criterion.
if-match match-criteria
By default, no match criterion is configured.
For more information about the if-match command, see ACL and QoS Command Reference.
4. Return to system view.
quit
5. Create a traffic behavior and enter traffic behavior view.
traffic behavior behavior-name
6. Configure the action of marking a forwarding class.
remark forwarding-class { id fc-id | name fc-name }
By default, no action of marking forwarding classes is configured.
7. Return to system view.
quit
8. Create a QoS policy and enter QoS policy view.
qos policy policy-name
9. Associate the traffic class with the traffic behavior in the QoS policy.
classifier classifier-name behavior behavior-name
By default, a traffic class is not associated with a traffic behavior.
10. Return to system view.
quit
11. Apply the QoS policy.
For more information, see " Applying the QoS policy."
By default, no QoS policy is applied.
Configuring a drop profile
About this task
Packet dropping can be used for congestion avoidance. A device can assign drop levels to received packets and color the received packets. Packets of different colors can be assigned to different queues. You can configure drop parameters (for example, queue length threshold) for packets of different colors. When the queue length reaches a certain threshold, the drop action is performed.
An HQoS drop profile supports the following drop algorithms:
· Tail drop—Packet drop is determined by the specified drop threshold. When the queue length reaches the upper threshold, all newly arriving packets are dropped.
· WRED—Drop levels are taken into account for packet dropping in each queue.
¡ A lower threshold and an upper threshold are defined for each color, including red, yellow, and green. When the queue length of packets in a color is between the lower threshold and upper threshold, the system drop packets at a drop probability.
¡ When the queue length exceeds the upper threshold, the system drops all newly arriving packets.
The system automatically creates a predefined drop profile when you create the first drop profile. The predefined drop profile is named default and numbered 0. The contents of the predefined drop profile cannot be modified.
Procedure
1. Enter system view.
system-view
2. Create a drop profile and enter drop profile view.
qos drop-profile dp-name
3. Perform at least one of the following tasks to configure the drop profile:
¡ Configure drop parameters for red packets.
red low-limit low-limit high-limit high-limit discard-probability discard-prob
By default, the low-limit is 0, the high-limit is 512, and the discard-prob is 10.
¡ Configure drop parameters for yellow packets.
yellow low-limit low-limit high-limit high-limit discard-probability discard-prob
By default, the low-limit is 0, the high-limit is 512, and the discard-prob is 10.
¡ Configure drop parameters for green packets.
green low-limit low-limit high-limit high-limit discard-probability discard-prob
By default, the low-limit is 0, the high-limit is 512, and the discard-prob is 10.
¡ Set the exponent for average queue length calculation.
weighting-constant exponent
The default setting is 8.
Configuring a forwarding profile
About this task
A forwarding profile sets the policing or control actions to take on the traffic passing through a node. In a scheduler policy tree, each node (forwarding group or forwarding class) must have a forwarding profile.
The system automatically creates a predefined forwarding profile when you create the first forwarding profile. A predefined forwarding profile cannot be modified. Table 2 shows the predefined forwarding profiles.
Table 2 Predefined forwarding profiles
|
Forwarding profile name |
Forwarding profile ID |
Scheduling priority and weight |
Drop profile |
|
default |
0 |
WFQ priority 1, weight 1 |
N/A |
Restrictions and guidelines
A forwarding profile might be associated with different scheduling entities (including forwarding groups or forwarding classes) in a scheduler policy tree. Scheduling entities at different layers have different requirements for their associated forwarding profiles. When you modify a forwarding profile associated with a scheduling entity, the system checks the conformance of the modification with the requirement of the scheduling entity. Even if the CLI allows you to modify a forwarding profile parameter setting, your modification attempt might fail due to nonconformity.
In addition, modifying a forwarding profile already applied to an interface might fail due to insufficient hardware resources.
Procedure
1. Enter system view.
system-view
2. Create a forwarding profile and enter forwarding profile view.
qos forwarding-profile fp-name
3. (Optional.) Perform at least one of the following tasks to configure the queuing mode:
¡ Enable SP queuing:
sp
¡ Configure WFQ queuing:
wfq [ weight weight-value ]
By default, no queuing mode is configured for a forwarding profile.
These commands overwrite one another, and whichever is configured last takes effect.
4. (Optional.) Configure the GTS parameters.
gts cir cir-value [ cbs cbs-value ] [ pir pir-value ]
By default, no GTS parameter is configured for a forwarding profile, and the traffic rate is not limited.
5. (Optional.) Set the minimum guaranteed bandwidth.
bandwidth bandwidth-value
By default, no minimum guaranteed bandwidth is set in a forwarding profile.
6. (Optional.) Use a drop profile.
drop-profile dp-name
By default, a forwarding profile does not use any drop profile and uses tail drop.
Configuring a forwarding group
About forwarding groups
Forwarding groups include forwarding groups at child branch nodes and forwarding groups at parent branch nodes. Because forwarding groups are basic scheduling entities in a scheduler policy tree, creating forwarding groups is required in scheduler policy configuration.
A parent branch node specifies match criteria and forwarding profiles for child branch nodes. A child branch node nests a predefined forwarding class in the forwarding group and associates the forwarding class with a forwarding profile.
The system automatically creates a predefined forwarding group when you create the first forwarding group. The predefined forwarding group is named default and numbered 0. The predefined forwarding group nests the predefined forwarding classes and associates each nested forwarding class with a forwarding profile. The predefined forwarding group cannot be modified.
Restrictions and guidelines for forwarding group configuration
You can nest multiple predefined forwarding classes in a forwarding group. However, you cannot nest both predefined forwarding classes and forwarding groups in a forwarding group.
A predefined forwarding class can be nested in multiple forwarding groups and associated with a different forwarding profile in each forwarding group.
If you associate different forwarding profiles when nesting the same predefined forwarding class or forwarding group in a forwarding group, the most recent nesting takes effect.
If you associate different forwarding profiles with one predefined forwarding class or forwarding group nested in a forwarding group, the most recent configuration takes effect.
Each time you associate a predefined forwarding class or a forwarding group with a forwarding profile, the system checks the contents of the forwarding profile for conflict. If the forwarding profile conflicts with the predefined forwarding class or the forwarding group, your association attempt will fail.
The system limits both the number of nesting layers and the number of forwarding groups nested at a layer in a scheduler policy tree. When either limit is exceeded, your nesting attempt will fail.
When you execute the display current-configuration command after configuring a forwarding group, the following rules apply:
· If the forwarding group is nested with a forwarding group or forwarding class, this command displays both forwarding group configuration and forwarding group nesting information.
· If the forwarding group is not nested with a forwarding group or forwarding class, this command displays only forwarding group configuration.
Configuring a forwarding group at a child branch node
Prerequisites
Make sure the forwarding profile to be associated with the predefined forwarding class already exists.
Restrictions and guidelines
The PIR parameter is not supported for GTS if you configure GTS in a forwarding profile associated with the predefined forwarding class.
Procedure
1. Enter system view.
system-view
2. Create a forwarding group and enter forwarding group view.
qos forwarding-group fg-name
3. Nest a predefined forwarding class in the forwarding group and associate the forwarding class with a forwarding profile.
forwarding-class fc-name profile fp-name
By default, a user-defined forwarding group does not have nested forwarding classes.
Configuring a forwarding group at the parent branch node
Prerequisites
Make sure the forwarding group to be nested and the forwarding profile to be associated with forwarding group already exist.
Restrictions and guidelines
The match criteria for nested forwarding groups of a forwarding group cannot overlap.
Removing match criteria in forwarding group view also removes the nested forwarding groups.
If the PIR is configured for GTS in the forwarding profile associated with a forwarding group at the parent branch node, the CIR in GTS does not take effect.
Procedure
1. Enter system view.
system-view
2. Enter forwarding group view.
qos forwarding-group fg-name
3. Configure a match criterion and enter forwarding group match criterion view.
match match-criteria
By default, no match criterion is configured.
For more information about the match command, see ACL and QoS Command Reference.
4. Nest a child forwarding group in the match criterion of the forwarding group and associate the child forwarding group with a forwarding profile.
forwarding-group sub-fg-name profile fp-name
By default, a user-defined forwarding group does not have child forwarding groups.
Configuring a scheduler policy
Restrictions and guidelines
Configuration conflicts with QoS features
The scheduler policy configuration conflicts with the following QoS features:
· Queue-based GTS (see "Configuring traffic policing, traffic shaping, and rate limit").
· Interface WRED (see "Configuring congestion avoidance").
· Hardware queue scheduling (see "Configuring hardware congestion management").
Scheduler policy configuration
The system does not automatically nest the predefined forwarding group or associate the predefined forwarding group with a predefined forwarding profile in a scheduler policy on creation of the scheduler policy.
You can nest multiple forwarding groups in a scheduler policy.
A forwarding group can be nested in multiple scheduler policies and associated with a different forwarding profile in each scheduler policy.
If you associate different forwarding profiles with one forwarding group in a scheduler policy, the most recent configuration takes effect.
Each time you associate a forwarding group with a forwarding profile, the system checks the contents of the forwarding profile. If the forwarding profile conflicts with the forwarding group, your association attempt will fail.
The system has a limit on the number of forwarding groups that can be nested at a layer in the scheduler policy tree. When the limit is exceeded, your nesting attempt will fail.
Match criteria configuration
The match criteria for nested forwarding groups of a scheduler policy cannot overlap.
In group mode, the match criteria of a forwarding group are the union of the match criteria of all its child forwarding groups.
You cannot configure the group mode for a forwarding group with forwarding classes nested.
Removing match criteria in scheduler policy view also removes the nested forwarding groups.
The predefined forwarding group nested in a scheduler policy has used the group mode. You cannot modify or remove the match criteria of the predefined forwarding group.
Procedure
1. Enter system view.
system-view
2. Create a scheduler policy and enter scheduler policy view.
qos scheduler-policy sp-name
3. (Optional.) Set the scheduling unit for the scheduler policy.
scheduler-unit { byte-count | weight }
The default setting is byte-count.
4. Configure a match criterion and enter scheduler policy match criterion view.
match { match-criteria | group }
By default, no match criterion is configured.
For more information about the match command, see ACL and QoS Command Reference.
5. Nest a forwarding group in the match criterion of the scheduler policy, and associate the forwarding group with a forwarding profile.
forwarding-group fg-name profile fp-name
By default, the predefined forwarding group is nested in a scheduler policy in group mode.
Applying a scheduler policy to an interface
About this task
After you apply a scheduler policy to an interface, the scheduler policy takes effect only on complete branch nodes. Table 3 shows the conditions for complete branch nodes.
Table 3 Conditions for complete branch nodes
|
Branch node |
Conditions to be met |
|
Forwarding group node with nested forwarding classes |
All predefined forwarding classes are nested. |
|
Forwarding group node with child forwarding groups |
· All predefined forwarding classes are nested in each child forwarding group. · The match criteria of the forwarding group node are the union of the match criteria of all child forwarding groups. |
Restrictions and guidelines
Only one scheduler policy can be applied to an interface.
You can modify a scheduler policy that has been applied to an interface. The modification takes effect immediately.
Procedure
1. Enter system view.
system-view
2. Enter interface view.
interface interface-type interface-number
3. Apply a scheduler policy to the interface.
qos apply scheduler-policy sp-name outbound
By default, a scheduler policy is not applied to an interface.
Configuring per-queue traffic accounting for HQoS
About this task
Per-queue traffic accounting collects the following statistics:
· The total queue length.
· The current queue length.
· The total number of packets forwarded.
· The number of per-color packets forwarded.
· The number of per-color packets dropped.
Restrictions and guidelines
Disabling per-queue traffic accounting clears the traffic statistics that have been collected.
Dynamically refreshing a scheduler policy does not clear the original statistics. To view accurate statistics, use the reset counter interface command to clear the original statistics after you dynamically refresh a scheduler policy.
Procedure
1. Enter system view.
system-view
2. Enable per-queue traffic accounting.
qos queue-statistics { inbound | outbound }
By default, per-queue traffic accounting is enabled.
Display and maintenance commands for HQoS
Execute the display commands in any view.
|
Task |
Command |
|
Display predefined forwarding class information. |
display qos forwarding-class [ name fc-name ] |
|
Display forwarding group information. |
display qos forwarding-group [ name fg-name ] |
|
Display drop profile information. |
display qos drop-profile [ name dp-name ] |
|
Display forwarding profile information. |
display qos forwarding-profile [ name fp-name ] |
|
Display scheduler policy information. |
display qos scheduler-policy name [ name sp-name ] |
|
Display the scheduler policy information and traffic statistics for interfaces. |
display qos scheduler-policy interface [ interface-type interface-number ] [ outbound ] |
|
Display diagnostic information about interfaces. |
In standalone mode: display qos scheduler-policy diagnosis interface [ interface-type interface-number ] [ inbound ] |
HQoS configuration examples
Example: Configuring local QoS ID mode
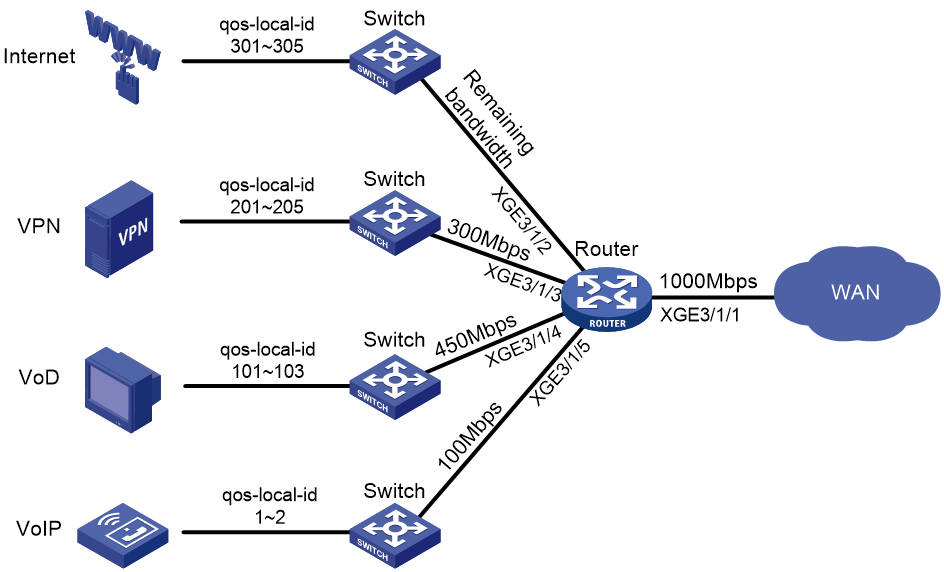
The local QoS ID mode is a WAN networking method that identifies services by local QoS ID. Traffic accessing a backbone router includes VoIP, VoD, VPN, and Internet. Because each service is carried by a different IP address segment, you can perform per-IP-address-segment rate limiting and bandwidth management.
Network configuration
As shown in Figure 2, configure the router to meet the following requirements:
· Rate limit for the outgoing interface is 1000 Mbps.
· VoIP service—Uses IP precedence values 6 and 7, SP scheduling, and rate limit of 100 Mbps. Two user groups share the bandwidth.
· VoD service—Uses IP precedence values 4 and 5, high scheduling priority, and rate limit of 450 Mbps. Three user groups share the bandwidth at the ratio of 2:2:1.
· VPN service—Uses IP precedence values 2 and 3, medium scheduling priority, and rate limit of 300 Mbps. User groups each have an equal share of the bandwidth. When the number of user groups is less than 3, the rate limit for each user group is 100 Mbps.
· Internet service—Uses IP precedence values 0 and 1, low scheduling priority, and the surplus bandwidth in the network. Five user groups each have an equal share of the bandwidth. Because all the other services are rate limited, the guaranteed bandwidth for Internet traffic is 150 Mbps, providing 30 Mbps bandwidth for each user group. The total bandwidth for Internet traffic is not restricted but the maximum bandwidth for each user group is set to 36 Mbps.
· Source IP address assignment:
¡ VoIP—10.1.1.X and 10.1.2.X carry two user groups.
¡ VoD—20.1.1.X, 20.1.2.X, and 20.1.3.X carry three user groups.
¡ VPN—30.1.1.X, 30.1.2.X, 30.1.3.X, 30.1.4.X, and 30.1.5.X carry five user groups.
¡ Internet—40.1.1.X, 40.1.2.X, 40.1.3.X, 40.1.4.X, and 40.1.5.X carry five user groups.
Configuration considerations
To meet the network requirements, you must perform the following tasks:
· Map traffic to predefined forwarding classes as follows:
¡ Map VoIP traffic with IP precedence values 6 and 7 to the predefined forwarding class NC.
¡ Map VoD traffic with IP precedence values 4 and 5 to the predefined forwarding class EF.
¡ Map VPN traffic with IP precedence values 2 and 3 to the predefined forwarding class AF.
¡ Map Internet traffic with IP precedence values 0 and 1 to the predefined forwarding class BE.
· Mark each type of traffic with a local QoS ID by source IP address. Then, map each type of traffic to a forwarding group by local QoS ID.
· Assign the user groups of each type of traffic to different forwarding groups by different match criteria.
Restrictions and guidelines
Because all traffic is differentiated by IP precedence, you can map different classes of traffic to the predefined forwarding classes through up-fc mapping. For this purpose, configure the incoming ports to select the trusted priority type automatically.
Procedure
# Create forwarding profiles for Layer 1 forwarding groups.
[Router] qos forwarding-profile vpn-fg2
[Router-fp-vpn-fg2] gts cir 100000
[Router-fp-vpn-fg2] quit
[Router] qos forwarding-profile internet-fg2
[Router-fp-internet-fg2] gts cir 36000
[Router-fp-internet-fg2] quit
[Router] qos forwarding-profile vod-fg2-1
[Router-hqos-fp-vod-fg2-1] wfq weight 2
[Router-hqos-fp-vod-fg2-1] quit
[Router] qos forwarding-profile vod-fg2-2
[Router-hqos-fp-vod-fg2-1] wfq weight 2
[Router-hqos-fp-vod-fg2-1] quit
[Router] qos forwarding-profile vod-fg2-3
[Router-hqos-fp-vod-fg2-1] wfq weight 1
[Router-hqos-fp-vod-fg2-1] quit
[Router] qos forwarding-profile empty
[Router-hqos-fp-empty] quit
# Create forwarding profiles for forwarding classes.
[Router] qos forwarding-profile fc
[Router-hqos-fp-fc] sp
[Router-hqos-fp-fc] quit
# Nest forwarding classes in Layer 2 forwarding groups.
[Router] qos forwarding-group internet-fg2
[Router-internet-fg2] forwarding-class NC profile fc
[Router-internet-fg2] forwarding-class H1 profile fc
[Router-internet-fg2] forwarding-class EF profile fc
[Router-internet-fg2] forwarding-class H2 profile fc
[Router-internet-fg2] forwarding-class L1 profile fc
[Router-internet-fg2] forwarding-class AF profile fc
[Router-internet-fg2] forwarding-class L2 profile fc
[Router-internet-fg2] forwarding-class BE profile fc
[Router-internet-fg2] quit
[Router] qos forwarding-group voip-fg2
[Router-voip-fg2] forwarding-class NC profile fc
[Router-voip-fg2] forwarding-class H1 profile fc
[Router-voip-fg2] forwarding-class EF profile fc
[Router-voip-fg2] forwarding-class H2 profile fc
[Router-voip-fg2] forwarding-class L1 profile fc
[Router-voip-fg2] forwarding-class AF profile fc
[Router-voip-fg2] forwarding-class L2 profile fc
[Router-voip-fg2] forwarding-class BE profile fc
[Router-voip-fg2] quit
[Router] qos forwarding-group vod-fg2-1
[Router-fg-vod-fg2-1] forwarding-class NC profile fc
[Router-fg-vod-fg2-1] forwarding-class H1 profile fc
[Router-fg-vod-fg2-1] forwarding-class EF profile fc
[Router-fg-vod-fg2-1] forwarding-class H2 profile fc
[Router-fg-vod-fg2-1] forwarding-class L1 profile fc
[Router-fg-vod-fg2-1] forwarding-class AF profile fc
[Router-fg-vod-fg2-1] forwarding-class L2 profile fc
[Router-fg-vod-fg2-1] forwarding-class BE profile fc
[Router-fg-vod-fg2-1] quit
[Router] qos forwarding-group vod-fg2-2
[Router-fg-vod-fg2-2] forwarding-class NC profile fc
[Router-fg-vod-fg2-2] forwarding-class H1 profile fc
[Router-fg-vod-fg2-2] forwarding-class EF profile fc
[Router-fg-vod-fg2-2] forwarding-class H2 profile fc
[Router-fg-vod-fg2-2] forwarding-class L1 profile fc
[Router-fg-vod-fg2-2] forwarding-class AF profile fc
[Router-fg-vod-fg2-2] forwarding-class L2 profile fc
[Router-fg-vod-fg2-2] forwarding-class BE profile fc
[Router-fg-vod-fg2-2] quit
[Router] qos forwarding-group vod-fg2-3
[Router-fg-vod-fg2-3] forwarding-class NC profile fc
[Router-fg-vod-fg2-3] forwarding-class H1 profile fc
[Router-fg-vod-fg2-3] forwarding-class EF profile fc
[Router-fg-vod-fg2-3] forwarding-class H2 profile fc
[Router-fg-vod-fg2-3] forwarding-class L1 profile fc
[Router-fg-vod-fg2-3] forwarding-class AF profile fc
[Router-fg-vod-fg2-3] forwarding-class L2 profile fc
[Router-fg-vod-fg2-3] forwarding-class BE profile fc
[Router-fg-vod-fg2-3] quit
[Router] qos forwarding-group vpn-fg2
[Router-vpn-fg2] forwarding-class NC profile fc
[Router-vpn-fg2] forwarding-class H1 profile fc
[Router-vpn-fg2] forwarding-class EF profile fc
[Router-vpn-fg2] forwarding-class H2 profile fc
[Router-vpn-fg2] forwarding-class L1 profile fc
[Router-vpn-fg2] forwarding-class AF profile fc
[Router-vpn-fg2] forwarding-class L2 profile fc
[Router-vpn-fg2] forwarding-class BE profile fc
[Router-vpn-fg2] quit
# Nest forwarding groups in Layer 1 forwarding groups.
[Router] qos forwarding-group voip
[Router-fg-voip] match qos-local-id 1
[Router-fg-voip-match] forwarding-group voip-fg2 profile empty
[Router-fg-voip-match] quit
[Router-fg-voip] match qos-local-id 2
[Router-fg-voip-match] forwarding-group voip-fg2 profile empty
[Router-fg-voip-match] quit
[Router-fg-voip] quit
[Router] qos forwarding-group vod
[Router-fg-vod] match qos-local-id 101
[Router-fg-vod-match] forwarding-group vod-fg2-1 profile vod-fg2-1
[Router-fg-vod-match] quit
[Router-fg-vod] match qos-local-id 102
[Router-fg-vod-match] forwarding-group vod-fg2-2 profile vod-fg2-2
[Router-fg-vod-match] quit
[Router-fg-vod] match qos-local-id 103
[Router-fg-vod-match] forwarding-group vod-fg2-3 profile vod-fg2-3
[Router-fg-vod-match] quit
[Router-fg-vod] quit
[Router] qos forwarding-group vpn
[Router-fg-vpn] match qos-local-id 201
[Router-fg-vpn-match] forwarding-group vpn-fg2 profile vpn-fg2
[Router-fg-vpn-match] quit
[Router-fg-vpn] match qos-local-id 202
[Router-fg-vpn-match] forwarding-group vpn-fg2 profile vpn-fg2
[Router-fg-vpn-match] quit
[Router-fg-vpn] match qos-local-id 203
[Router-fg-vpn-match] forwarding-group vpn-fg2 profile vpn-fg2
[Router-fg-vpn-match] quit
[Router-fg-vpn] match qos-local-id 204
[Router-fg-vpn-match] forwarding-group vpn-fg2 profile vpn-fg2
[Router-fg-vpn-match] quit
[Router-fg-vpn] match qos-local-id 205
[Router-fg-vpn-match] forwarding-group vpn-fg2 profile vpn-fg2
[Router-fg-vpn-match] quit
[Router-fg-vpn] quit
[Router] qos forwarding-group internet
[Router-fg-internet] match qos-local-id 301
[Router-fg-internet-match] forwarding-group internet-fg2 profile internet-fg2
[Router-fg-internet-match] quit
[Router-fg-internet] match qos-local-id 302
[Router-fg-internet-match] forwarding-group internet-fg2 profile internet-fg2
[Router-fg-internet-match] quit
[Router-fg-internet] match qos-local-id 303
[Router-fg-internet-match] forwarding-group internet-fg2 profile internet-fg2
[Router-fg-internet-match] quit
[Router-fg-internet] match qos-local-id 304
[Router-fg-internet-match] forwarding-group internet-fg2 profile internet-fg2
[Router-fg-internet-match] quit
[Router-fg-internet] match qos-local-id 305
[Router-fg-internet-match] forwarding-group internet-fg2 profile internet-fg2
[Router-fg-internet-match] quit
[Router-fg-internet] quit
# Mark traffic with a local QoS ID based on the source IP address.
[Router] acl basic 2001
[Router-acl-ipv4-basic-2001] rule permit source 10.1.1.0 0.0.0.255
[Router-acl-ipv4-basic-2001] quit
[Router] acl basic 2002
[Router-acl-ipv4-basic-2002] rule permit source 10.1.2.0 0.0.0.255
[Router-acl-ipv4-basic-2002] quit
[Router] acl basic 2101
[Router-acl-ipv4-basic-2101] rule permit source 20.1.1.0 0.0.0.255
[Router-acl-ipv4-basic-2101] quit
[Router] acl basic 2102
[Router-acl-ipv4-basic-2102] rule permit source 20.1.2.0 0.0.0.255
[Router-acl-ipv4-basic-2102] quit
[Router] acl basic 2103
[Router-acl-ipv4-basic-2103] rule permit source 20.1.3.0 0.0.0.255
[Router-acl-ipv4-basic-2103] quit
[Router] acl basic 2201
[Router-acl-ipv4-basic-2201] rule permit source 30.1.1.0 0.0.0.255
[Router-acl-ipv4-basic-2201] quit
[Router] acl basic 2202
[Router-acl-ipv4-basic-2202] rule permit source 30.1.2.0 0.0.0.255
[Router-acl-ipv4-basic-2202] quit
[Router] acl basic 2203
[Router-acl-ipv4-basic-2203] rule permit source 30.1.3.0 0.0.0.255
[Router-acl-ipv4-basic-2203] quit
[Router] acl basic 2204
[Router-acl-ipv4-basic-2204] rule permit source 30.1.4.0 0.0.0.255
[Router-acl-ipv4-basic-2204] quit
[Router] acl basic 2205
[Router-acl-ipv4-basic-2205] rule permit source 30.1.5.0 0.0.0.255
[Router-acl-ipv4-basic-2205] quit
[Router] acl basic 2301
[Router-acl-ipv4-basic-2301] rule permit source 40.1.1.0 0.0.0.255
[Router-acl-ipv4-basic-2301] quit
[Router] acl basic 2302
[Router-acl-ipv4-basic-2302] rule permit source 40.1.2.0 0.0.0.255
[Router-acl-ipv4-basic-2302] quit
[Router] acl basic 2303
[Router-acl-ipv4-basic-2303] rule permit source 40.1.3.0 0.0.0.255
[Router-acl-ipv4-basic-2303] quit
[Router] acl basic 2304
[Router-acl-ipv4-basic-2304] rule permit source 40.1.4.0 0.0.0.255
[Router-acl-ipv4-basic-2304] quit
[Router] acl basic 2305
[Router-acl-ipv4-basic-2305] rule permit source 40.1.5.0 0.0.0.255
[Router-acl-ipv4-basic-2305] quit
[Router] traffic classifier 1
[Router-classifier-1] if-match acl 2001
[Router-classifier-1] quit
[Router] traffic classifier 2
[Router-classifier-2] if-match acl 2002
[Router-classifier-2] quit
[Router] traffic classifier 101
[Router-classifier-101] if-match acl 2101
[Router-classifier-101] quit
[Router] traffic classifier 102
[Router-classifier-102] if-match acl 2102
[Router-classifier-102] quit
[Router] traffic classifier 103
[Router-classifier-103] if-match acl 2103
[Router-classifier-103] quit
[Router] traffic classifier 201
[Router-classifier-201] if-match acl 2201
[Router-classifier-201] quit
[Router] traffic classifier 202
[Router-classifier-202] if-match acl 2202
[Router-classifier-202] quit
[Router] traffic classifier 203
[Router-classifier-203] if-match acl 2203
[Router-classifier-203] quit
[Router] traffic classifier 204
[Router-classifier-204] if-match acl 2204
[Router-classifier-204] quit
[Router] traffic classifier 205
[Router-classifier-205] if-match acl 2205
[Router-classifier-205] quit
[Router] traffic classifier 301
[Router-classifier-301] if-match acl 2301
[Router-classifier-301] quit
[Router] traffic classifier 302
[Router-classifier-302] if-match acl 2302
[Router-classifier-302] quit
[Router] traffic classifier 303
[Router-classifier-303] if-match acl 2303
[Router-classifier-303] quit
[Router] traffic classifier 304
[Router-classifier-304] if-match acl 2304
[Router-classifier-304] quit
[Router] traffic classifier 305
[Router-classifier-305] if-match acl 2305
[Router-classifier-305] quit
[Router] traffic behavior 1
[Router-behavior-1] remark qos-local-id 1
[Router-behavior-1] remark forwarding-class name NC
[Router-behavior-1] quit
[Router] traffic behavior 2
[Router-behavior-2] remark qos-local-id 2
[Router-behavior-2] remark forwarding-class name NC
[Router-behavior-2] quit
[Router] traffic behavior 101
[Router-behavior-101] remark qos-local-id 101
[Router-behavior-101] remark forwarding-class name EF
[Router-behavior-101] quit
[Router] traffic behavior 102
[Router-behavior-102] remark qos-local-id 102
[Router-behavior-102] remark forwarding-class name EF
[Router-behavior-102] quit
[Router] traffic behavior 103
[Router-behavior-103] remark qos-local-id 103
[Router-behavior-103] remark forwarding-class name EF
[Router-behavior-103] quit
[Router] traffic behavior 201
[Router-behavior-201] remark qos-local-id 201
[Router-behavior-201] remark forwarding-class name AF
[Router-behavior-201] quit
[Router] traffic behavior 202
[Router-behavior-202] remark qos-local-id 202
[Router-behavior-202] remark forwarding-class name AF
[Router-behavior-202] quit
[Router] traffic behavior 203
[Router-behavior-203] remark qos-local-id 203
[Router-behavior-203] remark forwarding-class name AF
[Router-behavior-203] quit
[Router] traffic behavior 204
[Router-behavior-204] remark qos-local-id 204
[Router-behavior-204] remark forwarding-class name AF
[Router-behavior-204] quit
[Router] traffic behavior 205
[Router-behavior-205] remark qos-local-id 205
[Router-behavior-205] remark forwarding-class name AF
[Router-behavior-205] quit
[Router] traffic behavior 301
[Router-behavior-301] remark qos-local-id 301
[Router-behavior-301] remark forwarding-class name BE
[Router-behavior-301] quit
[Router] traffic behavior 302
[Router-behavior-302] remark qos-local-id 302
[Router-behavior-302] remark forwarding-class name BE
[Router-behavior-302] quit
[Router] traffic behavior 303
[Router-behavior-303] remark qos-local-id 303
[Router-behavior-303] remark forwarding-class name BE
[Router-behavior-303] quit
[Router] traffic behavior 304
[Router-behavior-304] remark qos-local-id 304
[Router-behavior-304] remark forwarding-class name BE
[Router-behavior-304] quit
[Router] traffic behavior 305
[Router-behavior-305] remark qos-local-id 305
[Router-behavior-305] remark forwarding-class name BE
[Router-behavior-305] quit
[Router] qos policy localid
[Router-qospolicy-localid] classifier 1 behavior 1
[Router-qospolicy-localid] classifier 2 behavior 2
[Router-qospolicy-localid] classifier 101 behavior 101
[Router-qospolicy-localid] classifier 102 behavior 102
[Router-qospolicy-localid] classifier 103 behavior 103
[Router-qospolicy-localid] classifier 201 behavior 201
[Router-qospolicy-localid] classifier 202 behavior 202
[Router-qospolicy-localid] classifier 203 behavior 203
[Router-qospolicy-localid] classifier 204 behavior 204
[Router-qospolicy-localid] classifier 205 behavior 205
[Router-qospolicy-localid] classifier 301 behavior 301
[Router-qospolicy-localid] classifier 302 behavior 302
[Router-qospolicy-localid] classifier 303 behavior 303
[Router-qospolicy-localid] classifier 304 behavior 304
[Router-qospolicy-localid] classifier 305 behavior 305
[Router-qospolicy-localid] quit
# Create a scheduler policy, and nest Layer 1 forwarding groups.
[Router] qos scheduler-policy SP
[Router-sp-SP] match group
[Router-sp-SP-match] forwarding-group voip profile voip
[Router-sp-SP-match] forwarding-group vod profile vod
[Router-sp-SP-match] forwarding-group vpn profile vpn
[Router-sp-SP-match] forwarding-group internet profile empty
[Router-sp-SP-match] quit
[Router-sp-SP] quit
# Configure GTS on Ten-GigabitEthernet 3/1/1.
[Router] interface ten-gigabitethernet 3/1/1
[Router-Ten-GigabitEthernet3/1/1] qos lr outbound cir 1000000
# Apply scheduler policy SP and QoS policy localid to the outbound direction of Ten-GigabitEthernet 3/1/1.
[Router-Ten-GigabitEthernet3/1/1] qos apply scheduler-policy SP outbound
[Router-Ten-GigabitEthernet3/1/1] qos apply policy localid outbound
