| Title | Size | Downloads |
|---|---|---|
| MSR26E-CMW910-R9119P16.zip | 163.80 MB | |
| H3C_MSR1000_MSR26E_MSR36E-CMW910-R9119P16_Release_Notes.pdf | 706.03 KB | |
| H3C_MSR1000_MSR26E_MSR36E-CMW910-R9119P16_Release_Notes_(Software_Feature_Changes).pdf | 1.83 MB |
H3C MSR1000_MSR26E_MSR36E-CMW910-R9119P16 Release Notes
Contents
Hardware and software compatibility matrix· 1
Upgrading restrictions and guidelines· 3
Software feature and command updates· 4
Open problems and workarounds· 4
Resolved problems in CMW910-R9119P16· 7
Resolved problems in CMW910-R9119P15· 8
Resolved problems in CMW910-R9119P12· 10
Appendix B Upgrading software· 17
Saving the running configuration and verifying the storage space· 19
Downloading the image file to the router· 20
Specifying the startup image file· 21
Rebooting and completing the upgrade· 21
Upgrading from the BootWare menu·· 23
Accessing the BootWare menu·· 23
Using TFTP/FTP to upgrade software through an Ethernet port 24
Using XMODEM to upgrade software through the console port 27
Managing files from the BootWare menu·· 32
Changing the type of a system software image· 34
Handling software upgrade failures· 35
Appendix C Handling console login password loss· 35
Disabling password recovery capability· 35
Handling console login password loss· 36
Examining the password recovery capability setting·· 37
Using the Skip Current System Configuration option·· 38
Using the Skip Authentication for Console Login option·· 39
Using the Restore to Factory Default Configuration option·· 40
Table 2 Hardware and software compatibility matrix. 1
Table 3 MSR1008 routers Technical specifications. 13
Table 4 MSR2630E-X1 routerTechnical specifications. 13
Table 5 MSR3610E-X1[-DP] routerTechnical specifications. 14
Table 6 Interface modules available for the MSR1008/MSR2630E-X1/MSR3610E-X1/MSR3610E-X1-DP router 15
Table 7 MSR1008 / MSR2630E-X1/ MSR3610E-X1[-DP] routers software features. 15
Table 9 BootWare menu options. 24
Table 10 Ethernet submenu options. 25
Table 11 Network parameter fields and shortcut keys. 25
Table 12 Serial submenu options. 27
Table 13 File Control submenu options. 33
Table 14 BootWare options and password recovery capability compatibility matrix. 36
This document describes the features, restrictions and guidelines, open problems, and workarounds for version R9119P16. Before you use this version in a live network, back up the configuration and test the version to avoid software upgrade affecting your live network. Use this document in conjunction with H3C MSR1000_MSR26E_MSR36E-CMW910-R9119P16 Release Notes (Software Feature Changes) and the documents listed in "Related documentation."
Version information
Version number
H3C Comware Software, Version 9.1.041, Release 9119P16
Note: You can see the version number with the command display version in any view. Please see Note①.
Version history
Version number | Last version | Release date | Release type | Remarks | ||
CMW710-R9119P16 | CMW710-R9119P15 | 2023-05-23 | Release version | · Fixes bugs | ||
CMW710-R9119P15 | CMW710-R9119P12 | 2023-02-23 | Release version | · Fixes bugs | ||
CMW710-R9119P12 | First release | 2022-06-28 | aRelease version | · First release
| ||
Hardware and software compatibility matrix
| CAUTION: To avoid an upgrade failure, use Table 2 to verify the hardware and software compatibility before performing an upgrade. |
Table 2 Hardware and software compatibility matrix
Item | Specifications | |||
Product family | MSR1008/MSR2630E-X1/MSR3610E-X1/MSR3610E-X1-DP | |||
Boot ROM version | MSR1008: 104 or higher MSR2630E-X1/MSR3610E-X1/MSR3610E-X1-DP 1:105 or higher (Note: Perform the command display version command in any view to view the version information. Please see Note②) | |||
Host software | Hardware | software | MD5 Check Sum | |
MSR2630E-X1 | MSR26E-CMW910-R9119P16.ipe | 8ea7519a6bdc9a62a2db2c6320d28756 | ||
MSR3610E-X1/ MSR3610E-X1-DP | MSR36E-CMW910-R9119P16.ipe | dc7f58482849c4acaf66e08acc320976 | ||
MSR1008 | MSR1000-CMW910-R9119P16.ipe | 1028edc4615867e435a43a428a976c0a | ||
MC version | iMC FCAPS(E0711) iMC AOM(E0706P01) iMC ACLM (E0706P12) iMC BIMS 7.3 (E0509) iMC DM 7.3(E0706P12) iMC EAD 7.3 (E0627) iMC EIA 7.3 (E0627) iMC EIA 7.3 (E0627) iMC iCC 7.3(E0706P12) iMC IVM 7.3 (E0508) iMC MVM 7.3 (E0511) iMC NTA 7.3 (E0507) iMC PLAT 7.3 (E0706P12) iMC QoSM 7.3 (E0506P01) iMC SHM 7.3 (E0511) UCenter E0709 iMC VLAN 7.3 (E0706P12) | |||
iNode version | iNode PC 7.3 (E0585) | |||
Please see the example below generated by the display version command:
H3C Comware Software, Version 9.1.041, Release 9119P16 ------- 注①
Copyright (c) 2004-2022 New H3C Technologies Co., Ltd. All rights reserved.
H3C MSR1000 uptime is 0 weeks, 2 days, 17 hours, 53 minutes
Last reboot reason : User reboot
Boot image: flash:/msr1000-cmw910-boot-r9119p16.bin
Boot image version: 9.1.041, Release 9119P16
Compiled Aug 22 2022 14:00:00
System image: flash:/msr1000-cmw910-system-r9119p16.bin
System image version: 9.1.041, Release 9119P16
Compiled Aug 22 2022 14:00:00
Slot 0: RT-MSR1008 uptime is 0 week, 2 days, 17 hours, 53 minutes
Last reboot reason : User reboot
CPU ID: 5
2G bytes DDR4 SDRAM Memory
2560M bytes Flash Memory
PCB Version: Ver.B
CPLD Version: 0.0
Basic BootWare Version: 1.04 ------- 注②
Extend BootWare Version: 1.04
[FIXED PORTS] CON (Hardware)Ver.B, (Driver)1.0, (CPLD)0.0
[FIXED PORTS] GE0/0/0 (Hardware)Ver.B, (Driver)1.0, (CPLD)0.0
[FIXED PORTS] GE0/0/1 (Hardware)Ver.B, (Driver)1.0, (CPLD)0.0
[FIXED PORTS] 10GSW (Hardware)Ver.B, (Driver)1.0, (CPLD)0.0
[FIXED PORTS] XSFP0/0/10 (Hardware)Ver.B, (Driver)1.0, (CPLD)0.0
[FIXED PORTS] XSFP0/0/11 (Hardware)Ver.B, (Driver)1.0, (CPLD)0.0
Upgrading restrictions and guidelines
Hardware feature updates
CMW910-R9119P16
None
CMW910-R9119P15
None
CMW910-R9119P12
None
Software feature and command updates
For more information about the software feature and command update history, see H3C MSR1000_MSR26E_MSR36E-CMW910-R9119P16 Release Notes (Software Feature Changes).
MIB updates
None.
Operation changes
None
Restrictions and cautions
R9119P14 and earlier versions do not support Web configuration. Do not configure features through Web. To use Web UI, upgrade the software version to R9135P04 or later as a best practice.
Open problems and workarounds
202303151408
· Symptom: If peer switching ports of devices of the same model are connected over a single optical fiber, the Rx end comes up and goes down repeatedly. If peer switching ports of devices of different models are connected over a single optical fiber, the Rx end stays up.
· Condition: This symptom occurs if peer switching ports of devices of the same model are connected over a single optical fiber.
· Workaround: Shut down the interface that comes up and goes down repeatedly.
202305251947
· Symptom: A fiber combo port activated on an MSR3610E/MSR2630E router cannot come up after a 100 Mbps transceiver module is inserted into it.
· Condition: This symptom occurs if the following conditions exist:
¡ The fiber port of a combo interface on an MSR3610E/MSR2630E router is activated.
¡ A 100 Mbps transceiver module is inserted into the fiber combo port.
· Workaround: Before inserting a 100 Mbps transceiver module into an activated fiber combo port, first execute the speed 100 command.
202304131322
· Symptom: For the MSR device, if you configure Track to monitor collaboration between static route and NQA, packet loss might occur in the NQA ICMP-echo operation.
· Condition: This symptom might occur with a certain probability if you configure Track to monitor collaboration between static route and NQA for the MSR device.
· Workaround: This issue is planned to be resolved in subsequent versions. Link detection can be replaced with BFD.
202304270197
· Symptom: If you apply a security policy that uses an IPS policy and then inject traffic that matches the IPS characteristics, the system fails to take the action defined in the IPS policy on some traffic.
· Condition: This symptom might occur if you apply a security policy that uses an IPS policy.
· Workaround: Apply security policies and IPS policies separately.
202305191517
· Symptom: The Output(Total) field value, which displays the number of outgoing packets on an interface, is displayed abnormally. The PPS value in the Last 30 seconds outputs field for an interface is abnormal. As a result, the interface bandwidth is exceeded and the bandwidth usage reaches 100%, and alarms are generated.
· Condition: This symptom might occur if interface data reading actions are performed concurrently for many times, which will cause the driver to collect statistics incorrectly with a low probability.
· Workaround: Execute the flow-interval command to increase the statistics polling interval on the device. Reduce the frequency of concurrently reading interface data on the network management system.
202305230264
· Symptom: The device's CPU is fully occupied and its interfaces do not send or receive packets.
· Condition: This symptom occurs at a very low probability if the following conditions are satisfied:
¡ The device is installed with both the old and new SIC-CNDE-SJK network data encryption modules.
¡ You have configured IPsec with SM algorithms, BGP and BFD features on the device, and the device runs under high load for a long period after the IPsec tunnel, BGP, and BFD services are up.
· Workaround: This problem will be fixed in later versions.
202305221038
· Symptom: On the Network > Port Management page of the Web interface, configure an interface to operate in half duplex mode and then configure it to operate in full duplex mode, and configure the interface to operate at 1 Gbps. In this case, the system prompts that the configuration fails to be deployed.
· Condition: This symptom occurs if the following operations are performed on the Network > Port Management page of the Web interface:
a. Configure an interface to operate in half duplex mode and then configure it to operate in full duplex mode.
b. Configure the interface to operate at 1 Gbps.
· Workaround: This problem will be fixed in later versions. Avoid configuring an interface in this sequence.
202304251195
· Symptom: Packets can be exchanged between interfaces in the same security zone before the security-zone intra-zone default permit command is executed in system view. Normally, the system should drop such packets.
· Condition: This symptom might occur if you add different interfaces to the same security zone but do not execute the security-zone intra-zone default permit command in system view.
· Workaround: This problem will be fixed in later versions.
202303241306
· Symptom: When the MSR device uses VLAN interfaces to forward MPLS traffic, its forwarding performance is only about 30% of that of the SR6602I.
· Condition: This symptom occurs if the MSR device uses VLAN interfaces to forward MPLS traffic and the MSR device's CPU MAC cannot recognize MPLS packets.
· Workaround: Do not use VLAN interfaces to forward a large amount of MPLS traffic. Use normal Layer 3 interfaces instead.
202304230323
· Symptom: On the Web interface, the per-IP TCP connection upper limit does not take effect.
· Condition: This symptom occurs if you perform the following operations:
a. On the Add Connection Limit Rule page, configure the per-IP connection upper limit and per-IP UDP connection upper limit, and click Apply.
b. Click the edit icon for the rule, configure the per-IP TCP connection upper limit on the Modify Connection Limit Rule page, and click Apply.
c. Click the edit icon for the rule, delete the per-IP UDP connection upper limit on the Modify Connection Limit Rule page, and click Apply.
· Workaround: None. This problem is scheduled to be fixed in the next version.
202305300744
· Symptom: Interface XGE 0/0/10 on an MSR3610E/MSR2630E router fails to come up after it is connected to a peer interface.
· Condition: This symptom occurs with a low probability if you perform the following steps sequentially when connecting XGE 0/0/10 to a peer interface:
a. Connect optical fibers to a transceiver module.
b. Insert the transceiver module with optical fibers to XGE 0/0/10.
· Workaround: If the issue has occurred, remove and reinsert the optical fibers to the transceiver module. This issue is expected to be removed in later versions.
202305310821
· Symptom: After all fast forwarding entries are aged out, 30% of the occupied memory is not released.
· Condition: This symptom occurs if more than 10 million fast forwarding entries are generated, the amount of free memory space reaches the minor alarm threshold, and then all fast forwarding entries are aged out.
· Workaround: None. This problem is scheduled to be fixed in the next version.
List of resolved problems
Resolved problems in CMW910-R9119P16
202302211003
· Symptom: A device cannot ping a destination because the actual length of the ICMP echo requests is not the same as the length specified in the ping –s -r command.
· Condition: This symptom occurs if the echo request length specified in the ping –s -r command is 200 with a fluctuation around 20.
202302201459
· Symptom: On the Network > LAN Settings page of the Web interface for the MSR device, no prompt message appears when you switch an interface from a GE interface to a LAN interface.
· Condition: This symptom might occur if you switch an interface from a GE interface to a LAN interface on the Network > LAN Settings page of the Web interface for the MSR device.
202302040295
· Symptom: On the System Information page of the Web interface for the MSR device, the interface rate statistics graph does not display traffic statistics on interfaces.
· Condition: This symptom might occur if you view traffic statistics on an interface on the corresponding rate statistics graph on the System Information page of the Web interface for the MSR device.
202212130756
· Symptom: When you create an application group, and then upgrade the APR signature library, you cannot edit the application group after the upgrade. However, the system still displays that the application group is user-defined.
· Condition: This symptom might occur if you create an application group, upgrade the APR signature library, and then edit the application group after the upgrade.
202211030757
· Symptom: If you enable DHCP snooping both globally and for VLANs in different configuration orders, the effective rules issued to the driver are different. As a result, DHCP snooping malfunction occurs.
· Condition: This symptom might occur if DHCP snooping is enabled both globally and for VLANs.
202304030297
· Symptom: When BGP uses a peer address range (non-unicast addresses) to establish peer relationships, it cannot correctly establish peer relationships with some of the addresses in the address range.
· Condition: This symptom occurs if BGP uses a peer address range (non-unicast addresses) to establish peer relationships.
202304240520
· Symptom: The overall forwarding efficiency degrades after the device receives a large number of packets to unknown destinations.
· Condition: This symptom might occur after the device receives a large number of packets to unknown destinations.
Resolved problems in CMW910-R9119P15
202212280307
· Symptom: PPPoE dialup is performed on a WAN interface. After an L2TP user comes online and pings the VT interface address, the LNS crashes and becomes unavailable.
· Condition: This symptom occurs if the following operations are performed:
a. PPPoE dialup is performed on a WAN interface.
b. After an L2TP user comes online, the user pings the VT interface address.
202209030481
· Symptom: The device prints Deadloop detected on cpu 0 core 1 repeatedly and fails to forward NAT traffic of the NAT session last established.
· Condition: This symptom occurs if have configured a large number of NAT server mappings that meet the following conditions:
¡ Each NAT server mapping has the same public IP address and different public port numbers.
202206200185
· Symptom: Fragmented SCTP data packets cannot be forwarded because the first fragmented SCTP data packet is dropped by ASPF.
· Condition: This symptom occurs if fragmented SCTP data packets cannot be forwarded.
202206230754
· Symptom: After a USB drive is removed, .the device mistakenly prompts the message The device does not exist when you save a .cfg file to the previous path for the removed USB drive.
· Condition: This symptom might occur when you save a .cfg file to the previous path for a removed USB drive.
202206021368
· Symptom: After an amount of traffic triggers MAC authentication, some MAC addresses are mistakenly added to the MAC address table as dynamically learned MAC addresses.
· Condition: This symptom might occur when you view the MAC address table after an amount of traffic triggers MAC authentication.
202207040549
· Symptom: The device is installed with a SIC-5G interface module and two SIM cards are present. When the primary SIM card has no signal or the dialup fails, the device fails to switch to the secondary SIM card.
· Condition: This symptom might occur when two SIM cards are present and the primary SIM card has no signal or the dialup fails.
202206291452
· Symptom: When the IPv6 single-stack automatic dialup mode is configured on a 5G interface, the 5G interface cannot automatically dial up to obtain an IPv6 address after the modem is rebooted. You must delete and then execute the ipv6 address cellular-alloc command again.
· Condition: This symptom occurs if the IPv6 single-stack automatic dialup mode is configured on a 5G interface and the modem is rebooted.
202206291094
· Symptom: IMC cannot sample flows based on the BGP AS number by using the NetStream component.
· Condition: This symptom occurs if IMC samples flows based on the BGP AS number by using the NetStream component.
202206231138
· Symptom: If the display interface brief command is executed when a large number of subinterfaces are configured, the command output is displayed slowly.
· Condition: This symptom occurs if the display interface brief command is executed when a large number of subinterfaces are configured and you view the command output.
202206171668
· Symptom: Delete the segment-routing ipv6 configuration, and then deploy the locator configuration. Additional anycast enable configuration is generated.
· Condition: This symptom occurs when you delete the segment-routing ipv6 configuration, and then deploy the locator configuration.
202205231309
· Symptom: When the device run OSPFv3 in some scenarios, the OSPFv3 process might failed to be deployed. After you use the follow command to display stack information for the process, the process will recover.
· Condition: This symptom occurs if the following conditions exist:
a. You use the vpn-instance command to create a VPN instance, and no OSPFv3 instances run on the VPN instance.
b. You use the ip binding vpn-instance command associate an interface with the VPN instance.
You configure an IPv6 address for the interface by using the ipv6 address command.
You execute a minimum of one OSPFv3 pre-configuration command on the interface, but do not enable OSPFv3 on the interface.
c. You perform one of the following tasks:
- You use the undo ip binding vpn-instance command to unbind the VPN instance from the interfaces on the device.
When the device has only one interface associated with the VPN instance and you continue to unbind the interface from the VPN instance, this symptom might occur.
- You delete the VPN instance directly.
202204131807
· Symptom: The device has two ECMP routes to reach an IP address. The output interface of one route is a main interface and the output interface of the other route is a subinterface of the main interface. When you ping the IP address, the device sends the ICMP echo requests through the subinterface, but the source IP address of the requests is the IP address of the main interface.
· Condition: This symptom occurs if the following conditions exist:
¡ The device has two ECMP routes to reach the pinged IP address.
¡ The output interface of one route is a main interface and the output interface of the other route is a subinterface of the main interface.
202206110680
· Symptom: The ping communication over an IPsec tunnel fails on the SR6602-I/IE device.
· Condition: This symptom occurs when the interface applied with an IPsec policy has a MTU greater than 2000, the IPsec uses the built-in hardware encryption card and GM encryption card, and the packet length is between 1931 to 1946 bytes.
Resolved problems in CMW910-R9119P12
202205190948
· Symptom: In an EVPN L3VPN over SRv6 network, the device takes about half an hour before it can advertise EVPN private network routes to peers after L2VPN is enabled and then disabled on it.
· Condition: This symptom occurs if the following operations are performed on the device in an EVPN L3VPN over SRv6 network:
a. Enable L2VPN and then disable it.
b. Re-advertise EVPN private network routes.
202205171465
· Symptom: The console is stuck after the docker start -i comware command is executed in system view.
· Condition: This symptom occurs if you execute the docker start -i comware command in system view.
202205131400
· Symptom: The console is stuck after the packet-capture interface xx port x command is executed in user view.
· Condition: This symptom occurs if you execute the packet-capture interface xx port x command in user view.
202205230921
· Symptom: Enable webcache (with listening port 179), configure BGP, and then delete the webcache configuration. The BGP neighbor relationship cannot be established. This issue cannot be resolved by executing the reset bgp command. You must reconfigure BGP to resolve this issue.
· Condition: This symptom occurs when you enable webcache (with listening port 179), configure BGP, and then delete the webcache configuration.
202205231503
· Symptom: After you issue PBR settings on the Web interface, the PBR page gets stuck, and the system cannot display the issued PBR settings. You can restore the page by deleting all PBR settings at the back end.
· Condition: This symptom occurs when you issue PBR settings on the Web interface.
202205191658
· Symptom: When the device is low on memory, the OS kills the BGP process and the COMSH process. After the device memory restores to normal condition, the device does not restart those processes.
· Condition: The device is low on memory.
202205240918
· Symptom: In a multihomed EVPN VPWS site, a PE encapsulates incorrect private labels into packets, and traffic forwarding fails as a result.
· Condition: This symptom occurs if IS-IS is reset and a PE sends traffic to remote PEs at a dualhomed site.
202204280573
· Symptom: The nat server command does not take effect.
· Condition: This symptom occurs if you specify the private port as dns when executing the nat server command.
202204140101
· Symptom: In an EVPN VPWS over SRv6 network, the entries in user mode and kernel mode are inconsistent when multiple SRv6 TE ECMP tunnels exist.
· Condition: This symptom occurs in an EVPN VPWS over SRv6 network if multiple SRv6 TE ECMP tunnels exist..
Related documentation
Documentation set
· H3C MSR1000 Router Series Installation Quick Start
· H3C MSR2630E-X1 Router Installation Quick Start
· H3C MSR3610E-X1[-X1-DP] Router Installation Quick Start
· H3C MSR3610E-X1[-X1-DP] Routers Installation Guide
· H3C MSR3610E-X1[-X1-DP] Routers Hardware Information and Specifications
· H3C MSR2630E-X1 Router Installation Guide
· H3C MSR2630E-X1 Router Hardware Information and Specifications
· H3C MSR1000 Router Series Installation Guide
· H3C MSR1000 Router Series Hardware Information and Specifications
· H3C MSR Router Series Interface Module Guide
· H3C MSR1000[2600][3610] Routers Configuration Guides(V9)-R9119
· H3C MSR1000[2600][3610] Routers Command Reference(V9)-R9119
Obtaining documentation
Take the following steps to get related documents from the H3C website at www.h3c.com.
1. Go to https://www.h3c.com/
2. Choose the desired product category and model.
Technical support
To obtain technical assistance, contact H3C by using one of the following methods:
· Email:
h3cts@h3c.com (countries and regions except Hong Kong, China)
service_hk@h3c.com (Hong Kong, China)
· Technical support hotline number. To obtain your local technical support hotline number, go to the H3C Service Hotlines website: https://www.h3c.com/en/Support/Online_Help/Service_Hotlines/
To access documentation, go to the H3C website at http://www.h3c.com/en/.
Table 3 MSR1008 routers Technical specifications
Item | Specifications |
Console port | 1 |
USB port | 1 |
GE copper port | 10, including two combo ports |
GE fiber ports | 2, combo ports |
10 GE fiber port | 2 |
Built-in 5G module | N/A |
5G ANT ports | N/A |
GNSS antenna port | N/A |
Memory | 2 GB DDR4 |
Flash | 4 GB |
Dimensions (H × W × D) (excluding rubber feet and mounting brackets) | 43.6 × 266 × 161 mm (1.72 × 10.47 × 6.34 in) |
Input voltage | 100 to 240 VAC @ 50 to 60 Hz |
Max power consumption | 14.7 W |
Operating temperature | 0°C to 45°C (32°F to 113°F) |
Operating humidity | 5% RH to 95% RH, noncondensing |
Table 4 MSR2630E-X1 routerTechnical specifications
Item | Specifications |
Console port | 1 |
GE copper ports | 2 (combo interfaces) + 8 |
GE fiber ports | 2 (combo interfaces) |
10GE fiber ports | 3 |
USB port | 1 |
SIC slots | 2 |
AC power receptacles | 1 |
Memory | 4 GB DDR4 |
Flash | 4 GB EMMC |
Dimensions (H × W × D) (excluding mounting brackets and rubber feet) | 44.2 × 360 × 300 mm (1.74 × 14.17 × 11.81 in) |
Rated AC voltage | 100 VAC to 240 VAC @ 50 or 60 Hz |
Maximum power consumption | 39 W |
Operating temperature | · Operating: 0°C to 45°C (32°F to 113°F) · Storage: –40°C to +70°C (–40°F to +158°F) |
Relative humidity (non-condensing) | 5% RH to 95% RH, noncondensing |
Table 5 MSR3610E-X1[-DP] routerTechnical specifications
Item | MSR3610E-X1 | MSR3610E-X1-DP |
Console port | 1 | 1 |
GE copper ports | 2 (combo interfaces) + 8 | 2 (combo interfaces) + 8 |
GE fiber ports | 2 (combo interfaces) | 2 (combo interfaces) |
10GE fiber ports | 3 | 3 |
USB port | 1 | 1 |
SIC slots | 4 | 4 |
AC power receptacles | 1 | 2 |
Memory | 4 GB DDR4 | 4 GB DDR4 |
Flash | 4 GB EMMC | 4 GB EMMC |
Dimensions (H × W × D) (excluding mounting brackets and rubber feet) | 44.2 × 440 × 320 mm (1.74 × 17.32 × 12.60 in) | 44.2 × 440 × 320 mm (1.74 × 17.32 × 12.60 in) |
Rated AC voltage | 100 VAC to 240 VAC @ 50 or 60 Hz | 100 VAC to 240 VAC @ 50 or 60 Hz |
Maximum power consumption | 45 W | 45 W |
Operating temperature | · Operating: 0°C to 45°C (32°F to 113°F) · Storage: –40°C to +70°C (–40°F to +158°F) | · Operating: 0°C to 45°C (32°F to 113°F) · Storage: –40°C to +70°C (–40°F to +158°F) |
Relative humidity (non-condensing) | 5% RH to 95% RH, noncondensing | 5% RH to 95% RH, noncondensing |
Table 6 Interface modules available for the MSR1008/MSR2630E-X1/MSR3610E-X1/MSR3610E-X1-DP router
For compatibility between the router and interface modules, see the interface module guide for the router.
Item | Description |
SIC | WAN interface modules: · SIC-1E1-F-V3-H3: 1-port fractional E1 interface SIC module · SIC-2E1-F-H3: 2-port fractional E1 interface SIC module · SIC-CNDE-SJK: China OSCCA data encryption SIC module(SM1/2/3/4 supported) · SIC-5G: 5G NR (NSA/SA/4G FDD/TDD LTE-A/3G WCDMA,Sub6,GNSS) SIC module |
Table 7 MSR1008 / MSR2630E-X1/ MSR3610E-X1[-DP] routers software features
Item | Specification |
Layer 2 protocol | Ethernet, Ethernet II, VLAN, 802.1p, 802.1Q, 802.1X, STP (802.1D), RSTP (802.1w), MSTP (802.1s), PPP, PPPoE client, PPPoE server |
IP services | Unicast/multicast, TCP, UDP, IP option, IP unnumbered, policy-based routing, NetStream ECMP UCMP |
IP application | Ping, Tracert, ICMP, DHCP server, DHCP relay, DHCP client, DNS client, DNS proxy, DDNS, NTP, SNTP |
IPv4 routing | Static routing Dynamic routing: RIPv1/v2, OSPFv2, BGP, IS-IS Routing policy Multicast routing: IGMPv1/v2/v3, PIM-DM, PIM-SM, MBGP, MSDP |
IPv6 | IPv6 ND, IPv6 PMTU, IPv6 FIB, IPv6 ACL, NAT-PT, IPv6 tunnel, 6PE IPv6 tunneling technologies: manual tunneling, automatic tunneling, GRE tunnel, 6to4, ISATAP Static routing Dynamic routing: RIPng, OSPFv3, IS-ISv6, BGP4+ IPv6 multicast: MLDv1/v2, PIM-DM, PIM-SM |
QoS | LR Committed access rate (CAR) FIFO, WFQ, CBQ Generic Traffic Shaping (GTS) Traffic classification Support network slicing on routing subinterfaces and aggregate subinterfaces |
Security | Portal, 802.1X, IP source guard Local authentication, RBAC, RADIUS, TACACS ACL, filter, connection limit IKE/IKEv2, IPsec ADVPN L2TP, NATPKI, RSA, SSHv1.5/2.0, URPF, and GRE ARP attack prevention Endpoint Admission Defense (EAD) |
MPLS | LDP, Static LSP L3VPN: MCE/multirole host L2VPN: Martini, Kompella, CCC, SVC |
High availability | VRRP, VRRPv3 Bandwidth-based load balancing and backup IP address-based load balancing and backup NQA collaboration with routing, VRRP or interface backup |
Management and maintenance | SNMPv1/v2c/v3, MIB, Syslog, RMON Branch Intelligent Management System (BIMS), deployment from a USB drive CLI, file system, and dual image DHCP, FTP, HTTP, ICMP, UDP public, UDP private, TCP public, TCP private, and SNMP NQA tests Console port login, Telnet (VTY) login, SSH login, FTP login EAA |
Virtualization | Integration of a highly available and high-performance open virtualization platform that supports third-party operating systems, such as Windows, CentOS, Ubuntu, and RedHat Complete lifecycle management of virtual machines, including VM creation, modification, startup, suspend, recovery, hibernation, reboot, shutdown, and power-off Monitoring of critical VM resources, such as vCPU, memory, disk I/O, and network I/O Support of high-performance virtualization Ethernet adapter and SR-IOV Support of fast app deployment, app deployment to VMs through a USB drive, and unified app deployment across the network Complete troubleshooting and recovery mechanism Scheduled backup and manual backup Real-time monitoring of VM state VM anomaly detection and auto reboot Integration of Docker and Kubelet functions, allowing deployment of third-party applications on the device as containers through Docker or Kubernetes |
SRv6 | · Support L2VPN over SRv6 in TE or BE mode · Support L3VPN over SRv6 in TE or BE mode · Support EVPN L2VPN over SRv6 in TE or BE mode · Support EVPN L3VPN over SRv6 in TE or BE mode · Support public network IP over SRv6 in TE or BE mode · Support SRv6 OAM · Support SRv6 TI-LFA FRR · Support SRv6 TE policy and SBFD collaboration · Support BGP-LS for SRv6 · Support CBTS based on the five tuples for SRv6 Support color-, tunnel policy-, and DSCP-based traffic steering in an SRv6 TE policy scenario |
iFIT | · Support iFIT in an L3VPN over SRv6 scenario in TE or BE mode · Support iFIT in an EVPN L3VPN over SRv6 scenario in TE or BE mode · Support iFIT in a public network IP over SRv6 scenario in TE or BE mode |
This section describes how to upgrade system software while the router is operating normally or when the router cannot correctly start up.
The following software types are available:
· Boot ROM image—A .bin file that comprises a basic section and an extended section. The basic section is the minimum code that bootstraps the system. The extended section enables hardware initialization and provides system management menus. You can use these menus to load application software and the startup configuration file or manage files when the device cannot correctly start up.
· Comware image—Includes the following image subcategories:
¡ Boot image—A .bin file that contains the Linux operating system kernel. It provides process management, memory management, file system management, and the emergency shell.
¡ System image—A .bin file that contains the minimum feature modules required for device operation and some basic features, including device management, interface management, configuration management, and routing. To have advanced features, you must purchase feature packages.
¡ Feature package—Includes a set of advanced software features. Users purchase feature packages as needed.
¡ Patch packages—Irregularly released packages for fixing bugs without rebooting the device. A patch package does not add new features or functions.
Comware software images that have been loaded are called "current software images." Comware images specified to load at the next startup are called "startup software images."
Boot ROM image, boot image, and system image are required for the system to work. These images might be released separately or as a whole in one .ipe package file. If an .ipe file is used, the system automatically decompresses the file, loads the .bin boot and system images and sets them as startup software images.
You can upgrade system software by using one of the following methods:
Upgrade method | Remarks |
Upgrading from the CLI | You must reboot the router to complete the upgrade. This method can interrupt ongoing network services. |
Upgrading from the BootWare menu | Use this method when the router cannot correctly start up. |
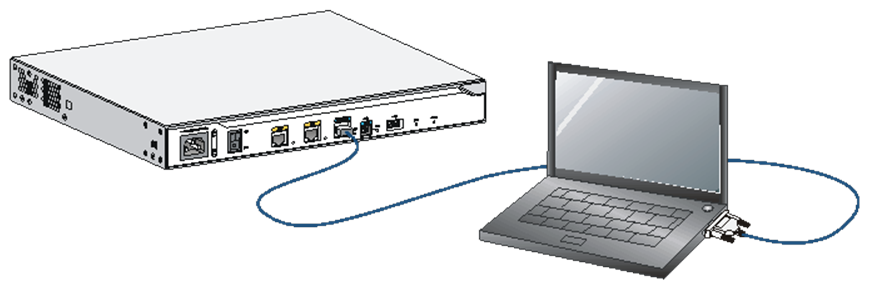
Before you upgrade system software, complete the following tasks:
· Set up the upgrade environment as shown in Table 9.
· Configure routes to make sure that the router and the file server can reach each other.
· Run a TFTP or FTP server on the file server.
· Log in to the CLI of the router through the console port.
· Copy the upgrade file to the file server and correctly set the working directory on the TFTP or FTP server.
· Make sure the upgrade has minimal impact on the network services. During the upgrade, the router cannot provide any services.
| IMPORTANT: In the BootWare menu, if you choose to download files over Ethernet, the Ethernet port must be M-GE0 on an SR6602-I or SR6602-IE router. |
Model | Storage medium | Path | Router Types |
MSR1008 | Flash | flash:/ | Centralized devices |
MSR2630E-X1 | Flash | flash:/ | Centralized devices |
MSR3610E-X1 | Flash | flash:/ | Centralized devices |
MSR3610E-X1-DP | Flash | flash:/ | Centralized devices |
Figure 1 Set up the upgrade environment
You can use the TFTP or FTP commands on the router to access the TFTP or FTP server to back up or download files.
Saving the running configuration and verifying the storage space
1. Save the running configuration.
<Sysname> save
The current configuration will be written to the device. Are you sure? [Y/N]:y
Please input the file name(*.cfg)[flash:/startup.cfg]
(To leave the existing filename unchanged, press the enter key):
Validating file. Please wait...
Saved the current configuration to mainboard device successfully.
<Sysname>
2. Identify the system software image and configuration file names and verify that the sda0 has sufficient space for the new system software image.
<Sysname> dir
Directory of sda0: (VFAT)
0 -rw- 0 Sep 18 2020 15:35:36 1
1 drw- - Aug 06 2020 17:37:32 core
2 -rw- 60 Aug 03 2020 17:53:42 database.dhcp
3 -rw- 5815756 Aug 21 2020 16:19:12 diag.tar.gz
4 -rw- 5814047 Aug 18 2020 17:36:20 diag_SR6602-I_20200818-173359.tar.g
z
5 -rw- 5814117 Aug 18 2020 17:42:30 diag_SR6602-I_20200818-174021.tar.g
z
6 drw- - Jul 15 2020 15:14:12 diagfile
7 -rw- 2429 Sep 21 2020 16:48:35 ifindex.dat
8 drw- - Sep 07 2020 10:50:04 license
9 drw- - Jul 15 2020 16:30:00 logfile
10 drw- - Jul 15 2020 16:37:20 pki
11 drw- - Jul 15 2020 15:14:12 seclog
12 -rw- 208731136 Sep 07 2020 10:50:10 msr1000-cmw910-boot-r9112p12.bin
13 -rw- 175310848 Sep 07 2020 10:50:10 msr1000-cmw910-system-r9112p12.bin
14 -rw- 47334400 Sep 07 2020 10:50:10 msr1000-cmw910-virtualization-r9112p12
.bin
15 -rw- 431384576 Sep 04 2020 16:21:54 msr1000.ipe
16 -rw- 20373 Sep 21 2020 16:48:36 startup.cfg
17 -rw- 447126 Sep 21 2020 16:48:36 startup.mdb
18 drw- - Jul 15 2020 15:15:52 third-party
19 drw- - Sep 07 2020 10:50:16 versionInfo
3139576 KB total (2266716 KB free) <Sysname>
Downloading the image file to the router
Using TFTP
Download the system software image file to the sda0 on the router.
<Sysname> tftp 172.32.108.50 get msr1000.ipe
Press CTRL+C to abort.
% Total % Received % Xferd Average Speed Time Time Time Current
Dload Upload Total Spent Left Speed
100 127M 100 127M 0 0 719k 0 0:03:02 0:03:02 --:--:-- 638k
Writing file...Done.
<Sysname>
Using FTP
1. From FTP client view, download the system software image file to the CF card on the router.
<Sysname> ftp 172.32.108.50
Press CTRL+C to abort.
Connected to 172.32.108.50 (172.32.108.50).
220 3Com 3CDaemon FTP Server Version 2.0
User (172.32.108.50:(none)): 1
331 User name ok, need password
Password:
230 User logged in
Remote system type is UNIX.
Using binary mode to transfer files.
ftp> get msr1000.ipe
msr1000.ipe already exists. Overwrite it? [Y/N]:y
local: /mnt/slot1#flash:/msr1000.ipe remote: msr1000.ipe
227 Entering passive mode (172,32,108,50,196,58)
125 Using existing data connection
....................................................................................................................................
226 Closing data connection; File transfer successful.
139764736 bytes received in 14.655 seconds (9.10 Mbytes/s)
ftp>
2. Return to user view.
[ftp] quit
221 Service closing control connection
<Sysname>
Specifying the startup image file
1. Specify the msr1000.ipe file as the main image file at the next reboot.
<Sysname> boot-loader file flash:/msr1000.ipe all main
Verifying the file flash:/msr1000.ipe on slot 0....Done.
H3C MSR1000 images in IPE:
msr1000-cmw910-boot-r9112p12.bin
msr1000-cmw910-system-r9112p12.bin
This command will set the main startup software images. Continue? [Y/N]:y
Add images to slot 1.
File flash:/msr1000-cmw910-boot-r9112p12.bin already exists on slot 0.
File flash:/msr1000-cmw910-system-r9112p12.bin already exists on slot 0.
Overwrite the existing files? [Y/N]:y
Decompressing file flash:/msr1000-cmw910-boot-r9112p12.bin to flash:/flash:/msr1000-cmw910-boot-r9112p12.bin...Done.
Decompressing file msr1000-cmw910-system-r9112p12.bin to flash:/msr1000-cmw910-system-r9112p12.bin...Done.
Verifying the file flash:/msr1000-cmw910-boot-r9112p12.bin on slot 0...Done.
Verifying the file msr1000-cmw910-system-r9112p12.bin on slot 0....Done.
The images that have passed all examinations will be used as the main startup software images at the next reboot on slot 0.
Decompression completed.
Do you want to delete flash:/msr1000.ipe now? [Y/N]:y
<Sysname>
2. Verify that the file has been loaded.
<Sysname> display boot-loader
Software images on slot 0:
Current software images:
flash:/msr1000-cmw910-boot-r9112p12.bin
flash:/msr1000-cmw910-system-r9112p12.bin
flash:/msr1000-cmw910-virtualization-r9112p12.bin
Main startup software images:
flash:/msr1000-cmw910-boot-r9112p12.bin
flash:/msr1000-cmw910-system-r9112p12.bin
flash:/msr1000-cmw910-virtualization-r9112p12.bin
Backup startup software images:
None
<Sysname>
Rebooting and completing the upgrade
1. Reboot the router.
<Sysname> reboot
Start to check configuration with next startup configuration file, please wait.........DONE!
This command will reboot the device. Continue? [Y/N]:y
Now rebooting, please wait...
<Sysname>
System is starting...
2. After the reboot is complete, verify that the system software image is correct.
<Sysname> display version
H3C Comware Software, Version 9.0.001, Release 9112P06
Copyright (c) 2004-2021 New H3C Technologies Co., Ltd. All rights reserved.
H3C SR6602 uptime is 0 weeks, 0 days, 0 hours, 0 minutes
Last reboot reason : User reboot
Boot image: flash:/msr1000-cmw910-boot-r9112p12.bin
Boot image version: 9.0.001, Release 9112P06
Compiled Sep 21 2020 14:00:00
System image: flash:/msr1000-cmw910-system-r9112p12.bin
System image version: 9.0.001, Release 9112P06
Compiled Sep 21 2020 14:00:00
Feature image(s) list:
flash:/msr1000-cmw910-virtualization-r9112p12.bin, version: 9.0.001
Compiled Sep 21 2020 14:00:00
Slot 0: RT-SR6602-IE uptime is 0 week, 0 day, 0 hour, 0 minute
Last reboot reason : User reboot
CPU ID: 2
128G bytes DDR4 SDRAM Memory
32M bytes Flash Memory
PCB Version: B
FPGA Version: 2.12
Basic CPLD Version: 1.0
Extend CPLD Version: 1.0
Basic BootWare Version: 1.14
Extend BootWare Version: 1.14
[FIXED PORTS] CON (Hardware)Ver.B, (Driver)1.0, (CPLD)1.0
[FIXED PORTS] MGE (Hardware)Ver.B, (Driver)1.0, (CPLD)1.0
[FIXED PORTS] 6XGE (Hardware)Ver.B, (Driver)1.0, (CPLD)1.0
[FIXED PORTS] 14XGSW (Hardware)Ver.B, (Driver)1.0, (CPLD)1.0
[FIXED PORTS] 12GSW (Hardware)Ver.B, (Driver)1.0, (CPLD)1.0
Slot 1: RT-FIP-30 uptime is 0 week, 0 day, 0 hour, 0 minute
Last reboot reason : User reboot
PCB Version: A
FPGA Version: 3.12
CPLD Version: 1.0
[FIXED PORTS] 4XGE (Hardware)Ver.A, (Driver)1.0, (CPLD)1.0
[FIXED PORTS] 16XGE (Hardware)Ver.A, (Driver)1.0, (CPLD)1.0
Upgrading from the BootWare menu
You can use the following methods to upgrade software from the BootWare menu:
· Using TFTP/FTP to upgrade software through an Ethernet port
· Using XMODEM to upgrade software through the console port
Accessing the BootWare menu
1. Power on the router , and you can see the following information:
System is starting...
Booting Normal Extend BootWare
The Extend BootWare is self-decompressing....Done.
****************************************************************************
* *
* H3C MSR1000 BootWare, Version 1.03 *
* *
**************************************************************************** Copyright (c) 2004-2021 New H3C Technologies Co., Ltd.
Compiled Date : Apr 22 2021
CPU ID : 0x1
Memory Type : DDR3 SDRAM
Memory Size : 1024MB
Flash Size : 2MB
Nand Flash size : 256MB
CPLD Version : 2.0
PCB Version : 3.0
BootWare Validating...
Press Ctrl+B to access EXTENDED-BOOTWARE MENU...
2. Press Ctrl + B to access the BootWare menu.
Password recovery capability is enabled.
Note: The current operating device is sda0
Enter < Storage Device Operation > to select device.
===========================<EXTEND-BOOTWARE MENU>===========================
|<1> Boot System |
|<2> Enter Serial SubMenu |
|<3> Enter Ethernet SubMenu |
|<4> File Control |
|<5> Restore to Factory Default Configuration |
|<6> Skip Current System Configuration |
|<7> BootWare Operation Menu |
|<8> Skip authentication for console login |
|<9> Storage Device Operation |
|<0> Reboot |
============================================================================
Ctrl+Z: Access EXTENDED ASSISTANT MENU
Ctrl+F: Format File System
Enter your choice(0-9):
Item | Description |
<1> Boot System | Boot the system software image. |
<2> Enter Serial SubMenu | Access the Serial submenu (see Table 12 ) for upgrading system software through the console port or changing the serial port settings. |
<3> Enter Ethernet SubMenu | Access the Ethernet submenu (see Table 10) for upgrading system software through an Ethernet port or changing Ethernet settings. |
<4> File Control | Access the File Control submenu (see Table 13) to retrieve and manage the files stored on the router. |
<5> Restore to Factory Default Configuration | Delete the next-startup configuration files and load the factory-default configuration. |
<6> Skip Current System Configuration | Start the router with the factory default configuration. This is a one-time operation and does not take effect at the next reboot. You use this option when you forget the console login password. |
<7> BootWare Operation Menu | Access the BootWare Operation menu for backing up, restoring, or upgrading BootWare. When you upgrade the system software image, BootWare is automatically upgraded. H3C does not recommend upgrading BootWare separately. This document does not cover using the BootWare Operation menu. |
<8> Skip authentication for console login | Clear all the authentication schemes on the console port. |
<9> Storage Device Operation | Access the Storage Device Operation menu to manage storage devices. Using this option is beyond this chapter. |
<0> Reboot | Restart the router. |
Using TFTP/FTP to upgrade software through an Ethernet port
1. Enter 3 in the BootWare menu to access the Ethernet submenu.
===============================<File CONTROL>===============================
|Note:the operating device is flash |
|<1> Download Image Program To SDRAM And Run |
|<2> Update Main Image File |
|<3> Update Backup Image File |
|<4> Download Files(*.*) |
|<5> Modify Ethernet Parameter |
|<0> Exit To Main Menu |
============================================================================
Enter your choice(0-4):
Table 10 Ethernet submenu options
Item | |
<1> Download Application Program To SDRAM And Run | Download a system software image to the SDRAM and run the image. |
<2> Update Main Image File | Upgrade the main system software image. |
<3> Update Backup Image File | Upgrade the backup system software image. |
<4> Download Files(*.*) | Download a system software image to the Flash or CF card. |
<5> Modify Ethernet Parameter | Modify network settings. |
<0> Exit To Main Menu | Return to the BootWare menu. |
2. Enter 5 to configure the network settings.
=========================<ETHERNET PARAMETER SET>=========================
|Note: '.' = Clear field. |
| '-' = Go to previous field. |
| Ctrl+D = Quit. |
==========================================================================
Protocol (FTP or TFTP) :ftp
Load File Name :msr1000.ipe
:
Target File Name :msr1000.ipe
:
Server IP Address :192.168.1.1
Local IP Address :192.168.1.100
Subnet Mask :255.255.255.0
Gateway IP Address :0.0.0.0
FTP User Name :user001
FTP User Password :********
Table 11 Network parameter fields and shortcut keys
Field | Description |
'.' = Clear field | Press a dot (.) and then Enter to clear the setting for a field. |
'-' = Go to previous field | Press a hyphen (-) and then Enter to return to the previous field. |
Ctrl+D = Quit | Press Ctrl + D to exit the Ethernet Parameter Set menu. |
Protocol (FTP or TFTP) | Set the file transfer protocol to FTP or TFTP. |
Load File Name | Set the name of the file to be downloaded. |
Target File Name | Set a file name for saving the file on the router. By default, the target file name is the same as the source file name. |
Server IP Address | Set the IP address of the FTP or TFTP server. If a mask must be set, use a colon (:) to separate the mask length from the IP address. For example, 192.168.80.10:24. |
Local IP Address | Set the IP address of the router. |
Subnet Mask | Subnet Mask of the local IP address. |
Gateway IP Address | Set a gateway IP address if the router is on a different network than the server. |
FTP User Name | Set the username for accessing the FTP server. This username must be the same as configured on the FTP server. This field is not available for TFTP. |
FTP User Password | Set the password for accessing the FTP server. This password must be the same as configured on the FTP server. This field is not available for TFTP. |
3. Select an option in the Ethernet submenu to upgrade a system software image. For example, enter 2 to upgrade the main system software image.
Loading.....................................................................
............................................................................
............................................................................
.........................................Done.
37691392 bytes downloaded!
The file already exists,will you overwrite it? [Y/N]Y
Image file msr1000-cmw910-boot-r9112p12.bin is self-decompressing...
Saving file flash:/msr1000-cmw910-boot-r9112p12.bin.bin .................
Done.
Image file msr1000-cmw910-system-r9112p12.bin is self-decompressing...
Saving file flash:/msr1000-cmw910-system-r9112p12.bin.bin .................
............................................................................
...........................Done.
==========================<Enter Ethernet SubMenu>==========================
|Note:the operating device is sda0 |
|<1> Download Image Program To SDRAM And Run |
|<2> Update Main Image File |
|<3> Update Backup Image File |
|<4> Download Files(*.*) |
|<5> Modify Ethernet Parameter |
|<0> Exit To Main Menu |
|<Ensure The Parameter Be Modified Before Downloading!> |
============================================================================
Enter your choice(0-5):
4. Enter 0 to return to the BootWare menu
===========================<EXTEND-BOOTWARE MENU>===========================
|<1> Boot System |
|<2> Enter Serial SubMenu |
|<3> Enter Ethernet SubMenu |
|<4> File Control |
|<5> Modify BootWare Password |
|<6> Skip Current System Configuration |
|<7> BootWare Operation Menu |
|<8> Skip authentication for console login |
|<9> Storage Device Operation |
|<0> Reboot |
============================================================================
Enter your choice(0-9):
5. 1 to boot the system.
Loading the main image files...
Loading file flash:/msr1000-cmw910-system-e0901p01.bin..........................
Done.
Loading file flash:/msr1000-cmw910-boot-e0901p01.bin..............Done.
Image file flash:/msr1000-cmw910-boot-e0901p01.bin is self-decompressing.........
.....Done.
System image is starting...
Line aux0 is available.
Press ENTER to get started.
Using XMODEM to upgrade software through the console port
1. Enter 2 in the BootWare menu to access the Serial submenu.
===========================<Enter Serial SubMenu>===========================
|Note:the operating device is sda0 |
|<1> Download Image Program To SDRAM And Run |
|<2> Update Main Image File |
|<3> Update Backup Image File |
|<4> Download Files(*.*) |
|<5> Modify Serial Interface Parameter |
|<0> Exit To Main Menu |
============================================================================
Enter your choice(0-4):
Table 12 Serial submenu options
Item | Description |
<1> Download Application Program To SDRAM And Run | Download an application to SDRAM through the serial port and run the program. |
<2> Update Main Image File | Upgrade the main system software image. |
<3> Update Backup Image File | Upgrade the backup system software image. |
<4>Download Files(*.*) | Download a system software image to the Flash or CF card. |
<5> Modify Serial Interface Parameter | Modify serial port parameters |
<0> Exit To Main Menu | Return to the BootWare menu. |
2. Enter 5 Select an appropriate baud rate for the console port. For example, enter 5 to select 115200 bps.
===============================<BAUDRATE SET>===============================
|Note:'*'indicates the current baudrate |
| Change The HyperTerminal's Baudrate Accordingly |
|---------------------------<Baudrate Available>---------------------------|
|<1> 9600(Default)* |
|<2> 19200 |
|<3> 38400 |
|<4> 57600 |
|<5> 115200 |
|<0> Exit |
============================================================================
Enter your choice(0-5):
The following messages appear:
Baudrate has been changed to 115200 bps.
Please change the terminal's baudrate to 115200 bps, press ENTER when ready.
| NOTE: Typically the size of a .bin file is over 10 MB. Even at 115200 bps, the download takes about 30 minutes. |
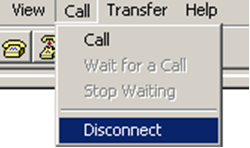
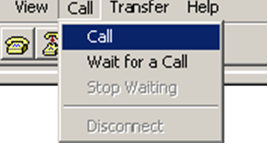
3. Select Call > Disconnect in the HyperTerminal window to disconnect the terminal from the router.
Figure 2 Disconnect the terminal connection
| NOTE: If the baud rate of the console port is 9600 bps, jump to step 9. |
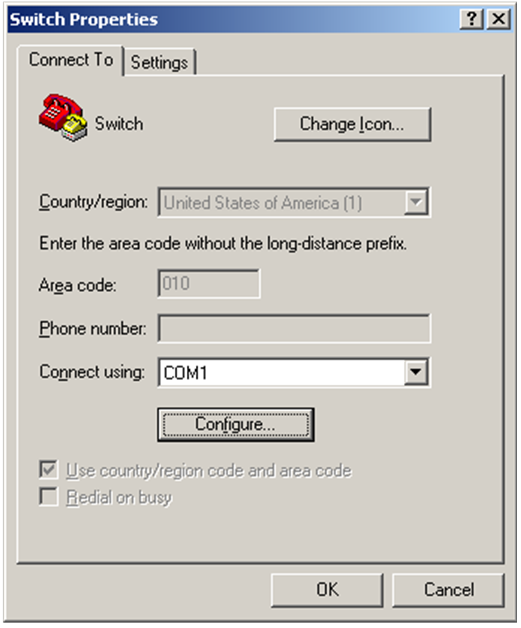
4. Select File > Properties, and in the Properties dialog box, click Configure.
Figure 3 Properties dialog box
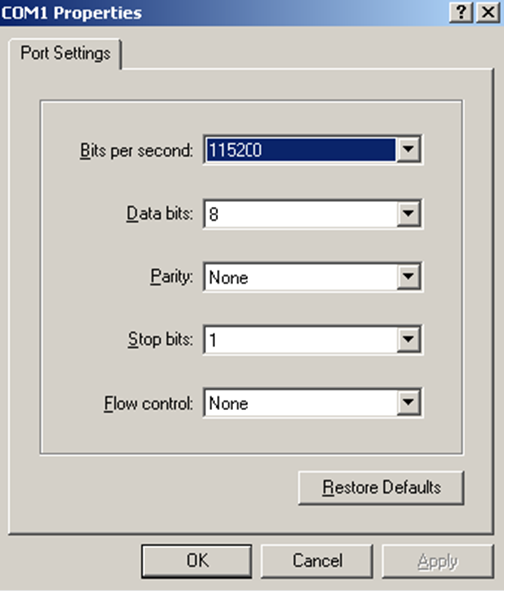
5. Select 115200 from the Bits per second list and click OK.
Figure 4 Modify the baud rate
6. Select Call > Call to reestablish the connection.
Figure 5 Reestablish the connection
7. Press Enter.
The following menu appears:
The current baudrate is 115200 bps
===============================<BAUDRATE SET>===============================
|Note:'*'indicates the current baudrate |
| Change The HyperTerminal's Baudrate Accordingly |
|---------------------------<Baudrate Available>---------------------------|
|<1> 9600(Default) |
|<2> 19200 |
|<3> 38400 |
|<4> 57600 |
|<5> 115200* |
|<0> Exit |
============================================================================
Enter your choice(0-5):
8. Enter 0 to return to the Serial submenu.
===========================<Enter Serial SubMenu>===========================
|Note:the operating device is sda0 |
|<1> Download Image Program To SDRAM And Run |
|<2> Update Main Image File |
|<3> Update Backup Image File | |<4> Download Files(*.*) |
|<5> Modify Serial Interface Parameter |
|<0> Exit To Main Menu |
============================================================================
Enter your choice(0-4):
9. Select an option from options 2 to 3 to upgrade a system software image. For example, enter 2 to upgrade the main system software image.
Please Start To Transfer File, Press <Ctrl+C> To Exit.
Waiting ...CCCCC
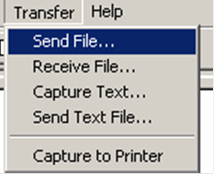
10. Select Transfer > Send File in the HyperTerminal window.
Figure 6 Transfer menu
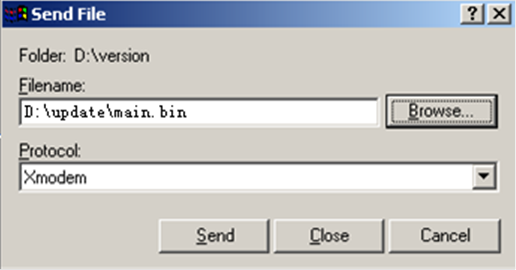
11. In the dialog box that appears, click Browse to select the source file, and select Xmodem from the Protocol list.
Figure 7 File transmission dialog box
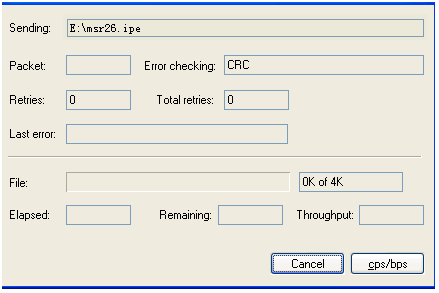
12. Click Send. The following dialog box appears:
Figure 8 File transfer progress
13. When the Serial submenu appears after the file transfer is complete, enter 0 at the prompt to return to the BootWare menu.
Download successfully!
37691392 bytes downloaded!
Input the File Name:main.bin
Updating File flash:/main.bin..............................................
.....................................................Done!
===========================<Enter Serial SubMenu>===========================
|Note:the operating device is sda0 |
|<1> Download Image Program To SDRAM And Run |
|<2> Update Main Image File |
|<3> Update Backup Image File | |<4> Download Files(*.*) |
|<5> Modify Serial Interface Parameter |
|<0> Exit To Main Menu |
============================================================================
Enter your choice(0-4):
14. Enter 1 in the BootWare menu to boot the system.
15. If you are using a download rate other than 9600 bps, change the baud rate of the terminal to 9600 bps. If the baud rate has been set to 9600 bps, skip this step.
Managing files from the BootWare menu
To change the type of a system software image, retrieve files, or delete files, enter 4 in the BootWare menu.
The File Control submenu appears:
==============================<File CONTROL>==============================
|Note:the operating device is sda0 |
|<1> Display All File(s) |
|<2> Set Image File type |
|<3> Set Bin File type |
|<4> Set Configuration File type |
|<5> Delete File |
|<6> Copy File |
|<0> Exit To Main Menu |
==========================================================================
Enter your choice(0-6):
Table 13 File Control submenu options
Item | Description |
<1> Display All File | Display all files. |
<2> Set Image File type | Change the type of a system software image (.ipe). |
<3> Set Bin File type | Change the type of a system software image (.bin). |
<4> Set Configuration File type | Change the type of a configuration file. |
<5> Delete File | Delete files. |
<6> Copy File | Copy File |
<0> Exit To Main Menu | Return to the BootWare menu. |
Displaying all files
To display all files, enter 1 in the File Control submenu:
Display all file(s) in sda0:
'M' = MAIN 'B' = BACKUP 'N/A' = NOT ASSIGNED
============================================================================
|NO. Size(B) Time Type Name |
|1 37691392 May/16/2021 07:09:16 N/A flash:/msr1000.ipe |
|2 25992 May/16/2021 12:18:00 N/A flash:/startup.mdb |
|3 1632 May/16/2021 12:18:00 M flash:/startup.cfg |
|4 84 May/16/2021 12:17:59 N/A flash:/ifindex.dat |
|5 11029 May/16/2021 13:31:16 N/A flash:/logfile/logfile1.log |
|6 17 May/16/2021 07:47:24 N/A flash:/.pathfile |
|7 1006592 May/16/2021 07:44:16 M flash:/msr1000-cmw910-data-r9112p12.bin|
|8 815 May/16/2021 12:03:14 N/A flash:/license/DeviceID.did |
|9 1180672 May/16/2021 07:44:15 M flash:/msr1000-cmw910-voice-r9112p12. bin|
|10 10240 May/16/2021 07:44:15 M flash:/msr1000-cmw910-security-r9112p12.bin|
|11 24067072 May/16/2021 07:44:10 M flash:/msr1000-cmw910-system-r9112p12.bin |
|12 11418624 May/16/2021 07:44:05 M flash:/msr1000-cmw910-boot-r9112p12.bin |
============================================================================
Changing the type of a system software image
System software image file attributes include main (M), and backup (B). You can store only one main image, and one backup image on the router. A system software image can have any combination of the M, and B attributes. If the file attribute you are assigning has been assigned to an image, the assignment removes the attribute from that image. The image is marked as N/A if it has only that attribute.
To change the type of a system software image:
1. Enter 2 in the File Control submenu.
'M' = MAIN 'B' = BACKUP 'N/A' = NOT ASSIGNED
============================================================================
|NO. Size(B) Time Type Name |
|1 37691392 May/16/2021 07:09:16 N/A flash:/msr1000.ipe |
|0 Exit |
============================================================================
Enter file No:1
2. Enter the number of the file you are working with, and press Enter.
Modify the file attribute:
==========================================================================
|<1> +Main |
|<2> +Backup |
|<0> Exit |
==========================================================================
Enter your choice(0-2):
3. Enter a number in the range of 1 to 4 to add or delete a file attribute for the file.
Set the file attribute success!
Deleting files
When storage space is insufficient, you can delete obsolete files to free up storage space.
To delete files:
1. Enter 5 in the File Control submenu.
Deleting the file in sda0:
'M' = MAIN 'B' = BACKUP 'N/A' = NOT ASSIGNED
============================================================================
|NO. Size(B) Time Type Name |
|NO. Size(B) Time Type Name |
|1 37691392 May/16/2021 07:09:16 N/A flash:/msr1000.ipe |
|2 25992 May/16/2021 12:18:00 N/A flash:/startup.mdb |
|3 1632 May/16/2021 12:18:00 M flash:/startup.cfg |
|4 84 May/16/2021 12:17:59 N/A flash:/ifindex.dat |
|5 11029 May/16/2021 13:31:16 N/A flash:/logfile/logfile1.log |
|6 17 May/16/2021 07:47:24 N/A flash:/.pathfile |
|7 1006592 May/16/2021 07:44:16 M flash:/msr1000-cmw910-data-r9112p12.bin|
|8 815 May/16/2021 12:03:14 N/A flash:/license/DeviceID.did |
|9 1180672 May/16/2021 07:44:15 M flash:/msr1000-cmw910-voice-r9112p12. bin|
|10 10240 May/16/2021 07:44:15 M flash:/msr1000-cmw910-security-r9112p12.bin|
|11 24067072 May/16/2021 07:44:10 M flash:/msr1000-cmw910-system-r9112p12.bin|
|12 11418624 May/16/2021 07:44:05 M flash:/msr1000-cmw910-boot-r9112p12.bin|
0 Exit
Enter file No.:
2. Enter the number of the file to delete.
3. When the following prompt appears, enter Y.
The file you selected is flash:/msr1000-cmw910-security-r9112p12.bin,Delete it?
[Y/N]Y
Deleting...Done.
Handling software upgrade failures
If a software upgrade fails, the system runs the old software version. To handle a software failure:
1. Check the physical ports for a loose or incorrect connection.
2. If you are using the console port for file transfer, check the HyperTerminal settings (including the baud rate and data bits) for any wrong setting.
3. Check the file transfer settings:
¡ If XMODEM is used, you must set the same baud rate for the terminal as for the console port.
¡ If TFTP is used, you must enter the same server IP addresses, file name, and working directory as set on the TFTP server.
¡ If FTP is used, you must enter the same FTP server IP address, source file name, working directory, and FTP username and password as set on the FTP server.
4. Check the FTP or TFTP server for any incorrect setting.
5. Check that the storage device has sufficient space for the upgrade file.
6. If the message “Something is wrong with the file” appears, check the file for file corruption.
Appendix C Handling console login password loss
Disabling password recovery capability
Password recovery capability controls console user access to the device configuration and SDRAM from BootWare menus.
If password recovery capability is enabled, a console user can access the device configuration without authentication to configure new passwords.
If password recovery capability is disabled, console users must restore the factory-default configuration before they can configure new passwords. Restoring the factory-default configuration deletes the next-startup configuration files.
To enhance system security, disable password recovery capability.
错误!未找到引用源。 summarizes options whose availability varies with the password recovery capability setting.
Table 14 BootWare options and password recovery capability compatibility matrix
BootWare menu option | Password recovery enabled | Password recovery disabled | Tasks that can be performed |
Download Image Program To SDRAM And Run | Yes | No | Load and run Comware software images in SDRAM. |
Skip Authentication for Console Login | Yes | No | Enable console login without authentication. |
Skip Current System Configuration | Yes | No | Load the factory-default configuration without deleting the next-startup configuration files. |
Restore to Factory Default Configuration | No | Yes | Delete the next-startup configuration files and load the factory-default configuration. |
To disable password recovery capability:
Step | Command | Remarks |
1. Enter system view. | system-view | N/A |
2. Disable password recovery capability. | undo password-recovery enable | By default, password recovery capability is enabled. |
When password recovery capability is disabled, you cannot downgrade the device software to a version that does not support the capability through the BootWare menus. You can do so at the CLI, but the BootWare menu password configured becomes effective again.
Handling console login password loss
| CAUTION: Handling console login password loss causes service outage. |
The method for handling console login password loss depends on the password recovery capability setting (see 错误!未找到引用源。).
Figure 9 Handling console login password loss
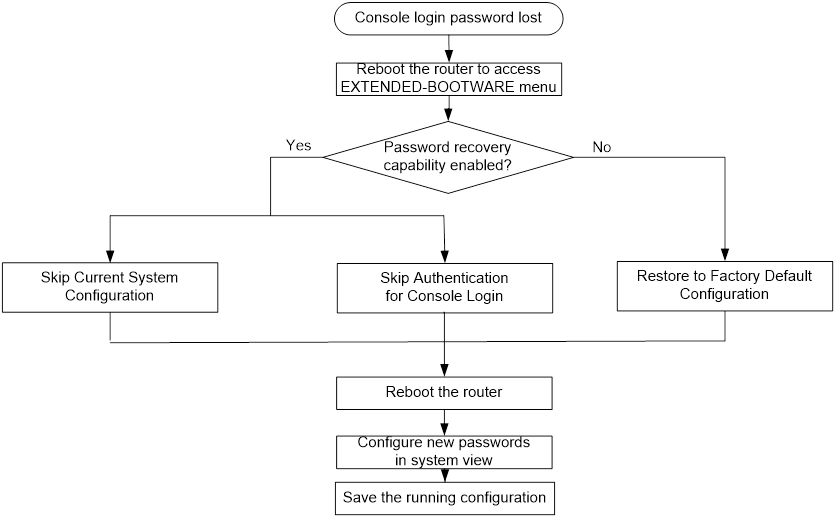
Examining the password recovery capability setting
7. Reboot the router.
System is starting...
Press Ctrl+D to access BASIC-BOOTWARE MENU...
Press Ctrl+T to start heavy memory test
Booting Normal Extended BootWare........
The Extended BootWare is self-decompressing....Done.
****************************************************************************
* *
* H3C MSR1000 BootWare, Version 1.03 *
* *
****************************************************************************
Copyright (c) 2004-2021 New H3C Technologies Co., Ltd.
Compiled Date : May 13 2021
CPU ID : 0x2
Memory Type : DDR3 SDRAM
Memory Size : 2048MB
BootWare Size : 1024KB
Flash Size : 8MB
cfa0 Size : 247MB
CPLD Version : 2.0
PCB Version : 2.0
BootWare Validating...
Press Ctrl+B to access EXTENDED-BOOTWARE MENU...
8. Press Ctrl + B within three seconds after the "Press Ctrl+B to access EXTENDED-BOOTWARE MENU..." prompt message appears.
9. Read the password recovery capability setting information displayed before the EXTEND-BOOTWARE menu.
Password recovery capability is enabled.
Note: The current operating device is sda0
Enter < Storage Device Operation > to select device.
===========================<EXTEND-BOOTWARE MENU>===========================
|<1> Boot System |
|<2> Enter Serial SubMenu |
|<3> Enter Ethernet SubMenu |
|<4> File Control |
|<5> Restore to Factory Default Configuration |
|<6> Skip Current System Configuration |
|<7> BootWare Operation Menu |
|<8> Skip Authentication for Console Login |
|<9> Storage Device Operation |
|<0> Reboot |
============================================================================
Ctrl+Z: Access EXTEND ASSISTANT MENU
Ctrl+F: Format File System
Enter your choice(0-9):
Using the Skip Current System Configuration option
10. Reboot the router to access the EXTEND-BOOTWARE menu, and then enter 6.
The current mode is password recovery.
Note: The current operating device is sda0
Enter < Storage Device Operation > to select device.
===========================<EXTEND-BOOTWARE MENU>===========================
|<1> Boot System |
|<2> Enter Serial SubMenu |
|<3> Enter Ethernet SubMenu |
|<4> File Control |
|<5> Restore to Factory Default Configuration |
|<6> Skip Current System Configuration |
|<7> BootWare Operation Menu |
|<8> Skip Authentication for Console Login |
|<9> Storage Device Operation |
|<0> Reboot |
============================================================================
Ctrl+Z: Access EXTEND ASSISTANT MENU
Ctrl+F: Format File System
Enter your choice(0-9): 6
After the configuration skipping flag is set successfully, the following message appears:
Flag Set Success.
11. When the EXTEND-BOOTWARE menu appears again, enter 1 to reboot the router.
The router starts up with the factory-default configuration without deleting the next-startup configuration files.
12. To use the configuration in a next-startup configuration file, load the file in system view.
<H3C> system-view
[H3C] configuration replace file flash:/startup.cfg
Current configuration will be lost, save current configuration? [Y/N]:n
Info: Now replacing the current configuration. Please wait...
Info: Succeeded in replacing current configuration with the file startup.cfg.
13. Configure a new console login authentication mode and a new console login password.
In the following example, the console login authentication mode is password and the authentication password is 123456. For security purposes, the password is always saved in ciphertext, whether you specify the simple or cipher keyword for the set authentication password command.
<H3C> system-view
[H3C] line console 0
[H3C-line-console0] authentication-mode password
[H3C-line-console0] set authentication password simple 123456
Use the line console 0 command on an Msr1000 router. The console port and the Console port are the same physical port.
14. To make the settings take effect after a reboot, save the running configuration to the next-startup configuration file.
[H3C-line-console0] save
Using the Skip Authentication for Console Login option
15. Reboot the router to access the EXTEND-BOOTWARE menu, and then enter 8.
The current mode is password recovery.
Note: The current operating device is sda0
Enter < Storage Device Operation > to select device.
===========================<EXTEND-BOOTWARE MENU>===========================
|<1> Boot System |
|<2> Enter Serial SubMenu |
|<3> Enter Ethernet SubMenu |
|<4> File Control |
|<5> Restore to Factory Default Configuration |
|<6> Skip Current System Configuration |
|<7> BootWare Operation Menu |
|<8> Skip Authentication for Console Login |
|<9> Storage Device Operation |
|<0> Reboot |
============================================================================
Ctrl+Z: Access EXTEND ASSISTANT MENU
Ctrl+F: Format File System
Enter your choice(0-9): 8
The router deletes the console login authentication configuration commands from the main next-startup configuration file. After the operation is completed, the following message appears:
Clear Image Password Success!
16. When the EXTEND-BOOTWARE menu appears again, enter 1 to reboot the router.
The router starts up with the main next-startup configuration file.
17. Configure a console login authentication mode and a new console login password. See
"Configure a new console login authentication mode and a new console login password.."
18. To make the setting take effect after a reboot, save the running configuration to the next-startup configuration file.
[H3C-line-console0] save
Using the Restore to Factory Default Configuration option
| CAUTION: Using the Restore to Factory Default Configuration option deletes both the main and backup next-configuration files. |
19. Reboot the router to access the EXTEND-BOOTWARE menu, and enter 5.
The current mode is no password recovery.
Note: The current operating device is sda0
Enter < Storage Device Operation > to select device.
===========================<EXTEND-BOOTWARE MENU>===========================
|<1> Boot System |
|<2> Enter Serial SubMenu |
|<3> Enter Ethernet SubMenu |
|<4> File Control |
|<5> Restore to Factory Default Configuration |
|<6> Skip Current System Configuration |
|<7> BootWare Operation Menu |
|<8> Skip Authentication for Console Login |
|<9> Storage Device Operation |
|<0> Reboot |
============================================================================
Ctrl+Z: Access EXTEND ASSISTANT MENU
Ctrl+F: Format File System
Enter your choice(0-9): 5
20. At the prompt for confirmation, enter Y.
The router deletes its main and backup next-startup configuration files and restores the factory-default configuration.
The current mode is no password recovery. The configuration files will be
deleted, and the system will start up with factory defaults, Are you sure to
continue?[Y/N]Y
Setting...Done.
21. When the EXTEND-BOOTWARE menu appears again, enter 1 to reboot the router.
The router starts up with the factory-default configuration.
22. Configure a new console login authentication mode and a new console login password. See
"Configure a new console login authentication mode and a new console login password.."
23. To make the settings take effect after a reboot, save the running configuration to the next-startup configuration file.
[H3C] save
