| Title | Size | Downloads |
|---|---|---|
| C35-BIOS-2.00.66-signed.bin.zip | 11.35 MB | |
| BIOS 2.00.XXC BIOS-2.00.66 Release Notes.pdf | 863.86 KB |
|
H3C BIOS-2.00.66 Release Notes |
|
|
Copyright © 2023 New H3C Technologies Co., Ltd. All rights reserved.
No part of this manual may be reproduced or transmitted in any form or by any means without prior written consent of New H3C Technologies Co., Ltd.
Except for the trademarks of New H3C Technologies Co., Ltd., any trademarks that may be mentioned in this document are the property of their respective owners.
The information in this document is subject to change without notice.
Contents
BIOS built-in software version
Hardware and software compatibility matrixes
Update restrictions and guidelines
Software feature and command updates
Resolved problems in BIOS-2.00.66
Resolved problems in BIOS-2.00.65
Resolved problems in BIOS-2.00.63P10
Resolved problems in BIOS-2.00.63
Resolved problems in BIOS-2.00.62
Resolved problems in BIOS-2.00.60
Resolved problems in BIOS-2.00.58P21
Resolved problems in BIOS-2.00.58
Resolved problems in BIOS-2.00.57
Resolved problems in BIOS-2.00.56
Resolved problems in BIOS-2.00.55
Resolved problems in BIOS-2.00.53
Resolved problems in BIOS-2.00.52
Resolved problems in BIOS-2.00.51
Resolved problems in BIOS-2.00.50
Resolved problems in BIOS-2.00.48
Resolved problems in BIOS-2.00.47
Resolved problems in BIOS-2.00.46
Resolved problems in BIOS-2.00.45
Resolved problems in BIOS-2.00.44
Resolved problems in BIOS-2.00.43
Resolved problems in BIOS-2.00.41
Resolved problems in BIOS-2.00.39
Resolved problems in BIOS-2.00.37P06
Resolved problems in BIOS-2.00.37
Resolved problems in BIOS-2.00.36
Resolved problems in BIOS-2.00.35P01
Resolved problems in BIOS-2.00.32P07
Resolved problems in BIOS-2.00.32P03
Resolved problems in BIOS-2.00.31P03
Resolved problems in BIOS-2.00.31P01
Resolved problems in BIOS-2.00.28
Resolved problems in BIOS-2.00.26
Resolved problems in BIOS-2.00.25
Resolved problems in BIOS-2.00.14P02
Resolved problems in BIOS-2.00.14P01
Resolved problems in BIOS-2.00.12
Resolved problems in BIOS-2.00.09
Appendix A Software feature list
Appendix B Updating software for rack servers
(Optional) Backing up the current configuration
Handling firmware update failures
Appendix C Updating DCPMM for rack servers
Appendix D Updating software for blade servers and compute modules
List of tables
Table 1 Target file name and MD5 checksum
Table 2 Hardware and software compatibility matrix for the H3C UniServer R4300 G3
Table 4 Software features of the H3C UniServer BIOS
Introduction
This document describes the features, restrictions and guidelines, open problems, and workarounds for version BIOS-2.00.66.
Use this document in conjunction with the documents listed in "Related documentation."
Screenshots in this document are for illustration only.
Version information
Version number
Version 2.00.66
Table 1 Target file name and MD5 checksum
Model | File name and MD5 checksum |
H3C UniServer R4900 G3/ R4700 G3/R2900 G3/R2700 G3 | C35-BIOS-2.00.66-signed.bin: 87461387066144cd6ffe86f766585a0f UN-AEP_01.02.00.5446_Linux.rpm: 1f0232b7ea592910727a0fbe236ef254 |
H3C UniServer R4300 G3 | S85-BIOS-2.00.66-signed.bin:41f9cb250c1d7d71911381a4e5ef272f UN-AEP_01.02.00.5446_Linux.rpm:76eb8a0adaf143c6b7b02e61dccd619b |
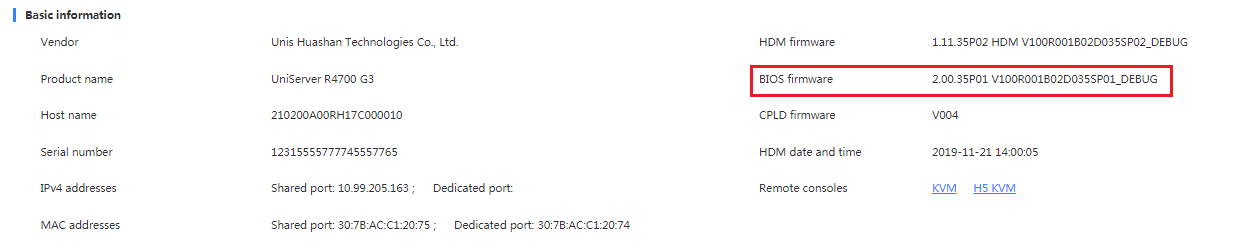
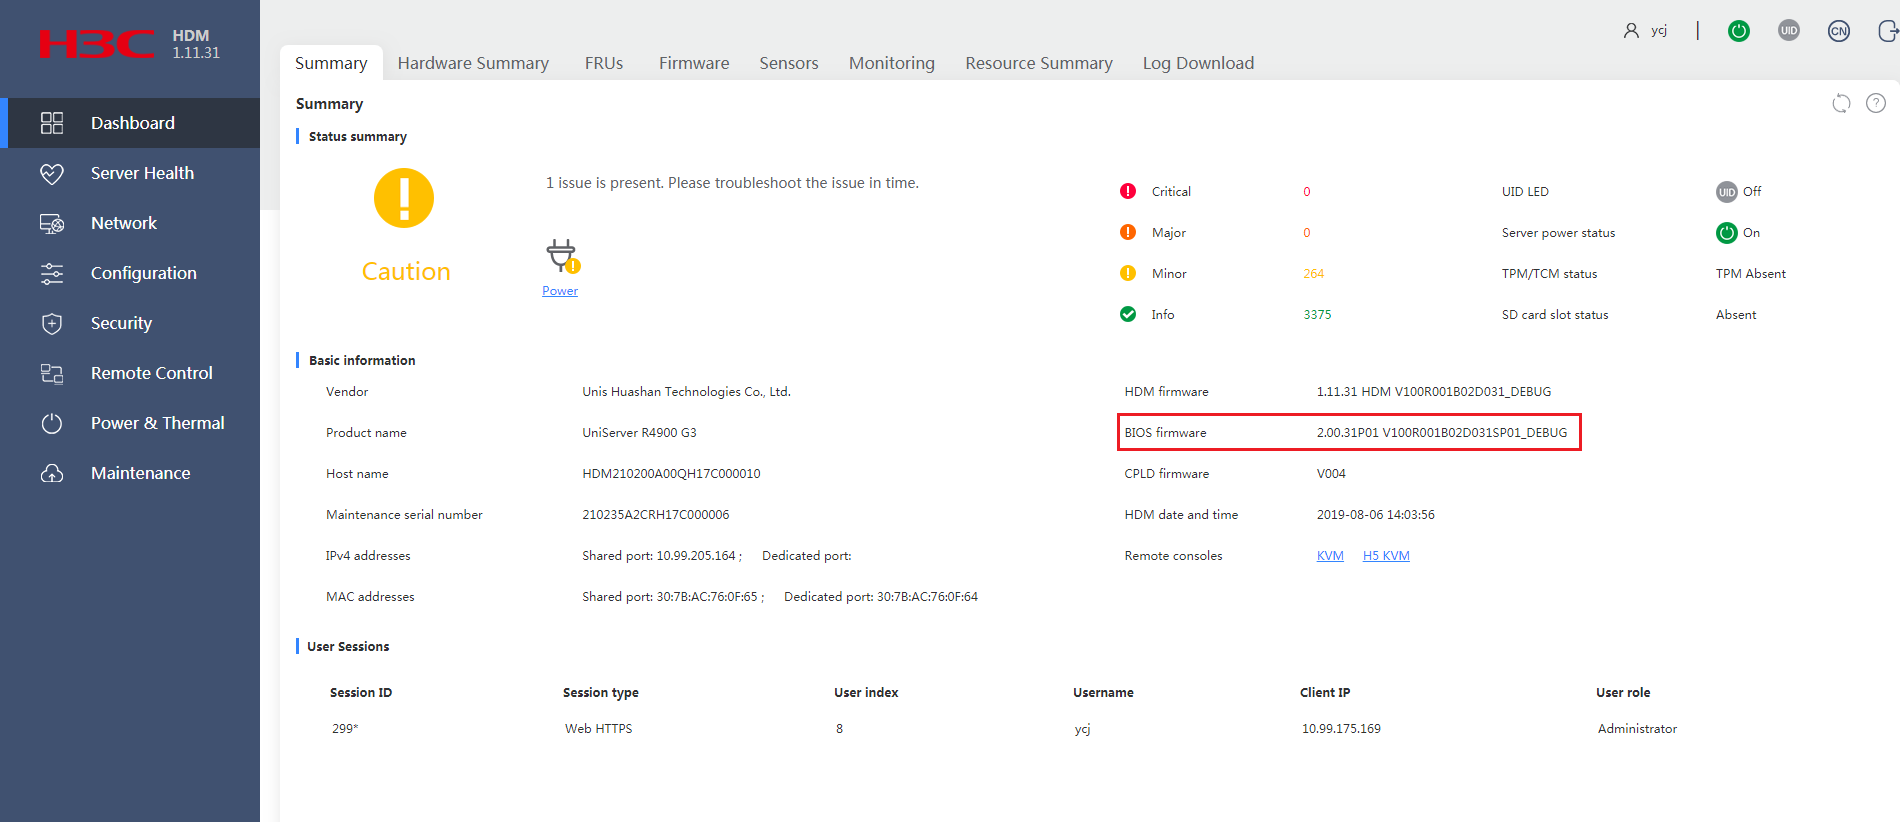
You can access the HDM Web interface of the server to identify the BIOS firmware version in the Basic information section of the Dashboard > Summary page, as shown in Figure 1.
Figure 1 Viewing the BIOS version number from HDM
BIOS built-in software version
Item | Version | Remarks |
Microcode | SKX-H0 : MB750654_02007006.pdb CLX-B1 : MBF50657_05003604.pdb | N/A |
Intel BKC Version | IPU 2022.3 | N/A |
RC Code | RC0623.D09 | N/A |
ME Firmware | SPS_E5_04_01_04_804_0 | N/A |
RSTe PreOS Components | v6.2.0.1034 | N/A |
VMDVROC_1.efi | v6.3.0.1005 | N/A |
VMDVROC_2.efi | v6.3.0.1005 | N/A |
10GBE FW | v4.10 | This item is available only for the mLOM network adapters on R2700 G3, R2900 G3, R4700 G3, R4900 G3, and R6900 G3 |
DCPMM Module Firmware | 1.2.0.5446 | N/A |
DCPMM UEFI and HII Driver | v01.00.00.3536 | N/A |
BIOS ACM | v1.7.54 | N/A |
Hardware and software compatibility matrixes
CAUTION: To avoid an update failure, use the following table to verify the hardware and software compatibility before performing an update. |
Table 2 Hardware and software compatibility matrix for the H3C UniServer R4300 G3
Item | Specifications |
HDM | Version 1.11.35P03 or later Version 1.30.14 or later Version 2.70 or later |
CPLD | Version 007 or later |
IMC | N/A |
DCPMM firmware version | UN-AEP_01.02.00.5446 |
Remarks | When updating the BIOS version, replacing or installing the DCPMM, or upgrading the DCPMM firmware, make sure the BIOS version is compatible with the DCPMM firmware version. |
Table 3 Hardware and software compatibility matrix for the H3C UniServer R4900 G3/R4700 G3/R2900 G3/R2700 G3
Item | Specifications |
HDM | Version 1.11.35P03 or later Version 1.30.14 or later Version 2.70 or later |
CPLD | Version 004 or later |
IMC | N/A |
DCPMM firmware version | UN-AEP_01.02.00.5446 |
Remarks | When updating the BIOS version, replacing or installing the DCPMM, or upgrading the DCPMM firmware, make sure the BIOS version is compatible with the DCPMM firmware version. |
Update restrictions and guidelines
Version upgrade is recommended because this release resolves some non-critical issues.
Make sure the software versions are compatible with each other.
To update both HDM and the BIOS, update HDM first.
Make sure the server is running in stable state before the update. That is, the server is powered off or has entered the operating system.
If the server enters the OS before the update, you must power cycle the server for the new firmware to take effect.
If you select the Retain or Restore method to update the BIOS, the update occurs during POST after the server is powered on again. During the update, do not disconnect the power source from the server, or forcedly power off or restart the server.
If you select the Force Restore method to update the BIOS, do not disconnect the power source from the server, or power off or restart the server.
Selecting the Restore or Force Restore method will restore the default BIOS settings, including restoring the boot mode in the BIOS to the default (UEFI).
If you update the BIOS from version 2.00.10 or earlier to version to 2.00.11 or later, you must select the Force Restore method. Update from version 2.00.11 or later supports the Retain, Restore, and Force Restore methods.
As a best practice of bulk update from FIST, make sure you can update one server successfully before you update the remaining servers.
For BIOS update on blade servers and storage modules, only one user can update the BIOS at a time.
If the R8900 is configured with many PCIe modules, for example, seven Ethernet adapters and four storage controllers, and the boot mode is UEFI, choose the update methods as follows:
If the current software version is BIOS 2.00.32P07 or earlier, select the Restore or Force Restore method.
If the current software version is BIOS 2.00.35P01 or later, select the Retain, Restore or Force Restore method.
Hardware feature updates
BIOS-2.00.65
BIOS-2.00.65 added the support for the following hardware:
NVIDIA A100 80G GPU module on H3C UniServer R8900 G3.
BIOS-2.00.62
BIOS-2.00.62 added the support for the following hardware:
32GB 2Rx4 DDR4-3200 CXMT RDIMM.
BIOS-2.00.60
BIOS-2.00.60 added the support for the following hardware:
NVIDIA A100 40G GPU.
BIOS-2.00.58
BIOS-2.00.58 added the support for the following hardware:
Mellanox 25G BF2-MBF2H512C-AESOT smart network adapter.
BIOS-2.00.56
BIOS-2.00.56 added the support for the following hardware:
Alibaba X-Dragon modules on the R4300 G3.
BIOS-2.00.50
BIOS-2.00.50 added the support for the following hardware:
BIOS SPI flash memories GD25B256E.
BIOS-2.00.36
BIOS-2.00.36 added the support for the following hardware:
Redriver modules on the R4900 G3.
BIOS-2.00.25
BIOS-2.00.25 added the support for the following hardware:
NIC-iETH562FT mLOM Ethernet adapter with two copper ports and two fiber ports.
Software feature and command updates
Software feature updates
This version introduced the following features:
Upgraded Intel SKX-H0 Microcode to MB750654_02007006.
Upgraded Intel CLX-B1 Microcode to MBF50657_05003604.
Mitigated Intel CPU vulnerability CVE-2022-40982.
BIOS-2.00.63
This version introduced the following features:
Upgraded the Intel BKC version to IPU 2022.3.
BIOS-2.00.62
This version introduced the following features:
Upgraded the Intel BKC version to IPU 2022.2.
Upgraded the Intel SKX-H0 Microcode to MB750654_02006E05 and the Intel CLX-B1 Microcode to MBF50657_05003302.
BIOS-2.00.58
This version introduced the following features:
Added the Workload Profile Configuration item to the Advanced Power Management Configuration screen for users to configure workload profiles for the R2700 G3, R2900 G3, R4700 G3, and R4900 G3.
BIOS-2.00.55
This version introduced the following changes:
Changed the default state of ADDDC Sparing to Enabled for the R6900 G3 server.
BIOS-2.00.50
This version introduced the following new features:
Added the G3 blade server configuration templates for different scenarios. For more information, see H3C Servers Purley Platform BIOS User Guide.
Upgraded the Intel BKC version to IPU 2021.1.
Upgraded the Intel SKX-H0 Microcode version to MB750654_02006B06 and upgraded the Intel CLX-B1 Microcode version to MBF50657_05003103 to solve the following faults:
High levels of posted interrupt traffic on the PCIe port may result in a machine check with a TOR timeout.
Vulnerabilities (CVE-2020-12357, CVE-2020-8670, CVE-2020-8700, CVE-2020-12359, CVE-2020-12358, CVE-2021-0095, CVE-2020-12360, CVE-2020-24486, CVE-2021-0133, CVE-2021-0132, CVE-2021-0131, CVE-2021-0134) on 2021 Q1 Intel processors.
BIOS-2.00.47
This version introduced the following new features:
Upgraded the following Microcode versions to mitigate vulnerabilities (CVE-2020-0587, CVE-2020-0588, CVE-2020-0590, CVE-2020-0591, CVE-2020-0592, CVE-2020-0593, CVE-2020-8696, CVE-2020-8738, CVE-2020-8739, CVE-2020-8740, CVE-2020-8755, and CVE-2020-8764) on 2020 Q4 Intel processors:
Upgraded the Intel SKX-H0 Microcode version to MB750654_02006A08.
Upgraded the Intel CLX-B1 Microcode version to MBF50657_05003003.
BIOS-2.00.43
This version introduced the following new features:
Upgraded the SmartTest code to perform fault testing on DIMMs for 2-processor and 4-processor server configurations.
Upgraded the following Microcode versions to mitigate vulnerability CVE-2020-0543 on Intel processors:
Upgraded the Intel SKX-H0 Microcode version to MB750654_02006906.
Upgraded the Intel CLX-B1 Microcode version to MBF50657_05002F01.
BIOS-2.00.41
This version introduced the following new features:
Upgraded the UEFI Driver of mLOM Ethernet adapters to version 1.2585.0 for the system to identify mLOM Ethernet adapters when 64-bit VMware ESXi 6.5 U2 (or a lower version) is used.
BIOS-2.00.39 is embedded with the Intel X722 V4.10 firmware package, which uses UEFI Driver V1.2177.0. The UEFI Driver is incompatible with VMware ESXi 6.5 U2 (64-bit) and lower versions, preventing the system from loading the driver and identifying X722 Ethernet adapters.
BIOS-2.00.39
This version introduced the following new features:
Upgraded the Intel SKX-H0 Microcode version to MB750654_02000069.
Upgraded the Intel CLX-B0 Microcode version to MBF50656_04002F00.
Upgraded the Intel CLX-B1 Microcode version to MBF50657_05002F00.
Upgraded the firmware version of 10GBE mLOM Ethernet adapters to 4.10.
BIOS-2.00.37
This version introduced the following new features:
SPD recording of memory fault information, including fault type, number of faults, rank, bank, row, and column.
BIOS-2.00.32P07
This version introduced the following new features:
Upgraded the Intel SKX-H0 Microcode version to MB750654_02000065.
Upgraded the Intel CLX-B0 Microcode version to MBF50656_0400002.
Upgraded the Intel CLX-B1 Microcode version to MBF50657_0500002C.
Fixed bugs on Intel processors:
CRC error reporting occurred because Intel SKX/CLX processors experienced high-speed signal errors during the POST phase or OS operation phase.
Core 3-Strike timeout events occurred because of unstable internal FIVR caused by fluctuating processor core power load.
BIOS-2.00.28
This version introduced the following new feature:
Upgraded the AMI Codebase version to 5.14_PurleyCrb_0ACLA046 & Purley-R Release Purley-R Release RC0584.D01 (2019_WW16).
BIOS-2.00.26
This version introduced the following new feature:
Upgraded the AMI Codebase version to 5.14_PurleyCrb_0ACLA045 & Purley-R Release Purley-R Release RC0580.D04(2019_WW12).
BIOS-2.00.25
This version introduced the following new feature:
Added support of obtaining the firmware version of Ethernet adapters and reporting the information to HDM for displaying.
BIOS-2.00.14P01
This version introduced the following new features:
Added support of setting permanent boot options for the BIOS from HDM.
Added support of enabling BIOS logging without enabling the debug mode.
BIOS-2.00.12
This version introduced the following new feature:
Added support of BIOS configuration import and export.
Restrictions and cautions
When you upgrade the BIOS from HDM, only BIOS 2.00.11 and later versions support retaining user-configured BIOS settings. For an earlier version, select Forcedly restore to remove the user-configured BIOS settings. If you do not do so, BIOS startup errors might occur.
For an R8900 G3 server installed with multiple PCIe modules, such as seven network adapters and four storage controllers, if you specify the UEFI boot mode and upgrade the BIOS from BIOS-2.00.32P07 or an earlier version with the user-configured settings retained, the upgrade operation fails.
In UEFI mode, If you downgrade the BIOS from BIOS-2.00.53 or a later version to BIOS-2.00.52 or an earlier version with the BIOS configurations retained, the Preboot execute environment (PXE) item might fail to be displayed. To resolve the issue, first export the BIOS configurations from HDM to the local device, downgrade the BIOS, and then import the exported BIOS configurations.
In Legacy mode, If you downgrade the BIOS from BIOS-2.00.53 or a later version to BIOS-2.00.52 or an earlier version with the BIOS configurations retained, the BIOS boot options might fail to take effect. To resolve the issue, first export the BIOS configurations from HDM to the local device, delete configurations in the lower-version file that do not exist in the higher-version file, and then import the edited lower-version file to the server.
With memory rank sparing, the server restarts upon an uncorrectable error, but it does not copy data to the spare ranks. This is normal because rank sparing is designed to reduce the accumulation of correctable errors instead of uncorrectable errors.
For the BIOS to start up successfully, do not update or reset HDM while the BIOS is starting up.
Open problems and workarounds
List of resolved problems
Resolved problems in BIOS-2.00.66
202303201533
Symptom: When the server is installed with NIC-MCX566A-CDAB-3S-2P Ethernet adapter, HDM cannot display the related network adapter information in Legacy mode.
Condition: This symptom might occur if the server is installed with NIC-MCX566A-CDAB-3S-2P Ethernet adapter, and you attempt to view the related network adapter information from HDM in Legacy mode.
Resolved problems in BIOS-2.00.65
202303161239
Symptom: You cannot enter the network port configuration page through a shortcut key in Legacy mode when the server is installed with the UN-NIC-ETH-MCX631102AN-ADAT Ethernet adapter.
Condition: This symptom might occur if you change to Legacy mode to view short keys when the server is installed with the UN-NIC-ETH-MCX631102AN-ADAT Ethernet adapter.
Resolved problems in BIOS-2.00.63P10
202212220317
Symptom: If a faulty DIMM of the line error type exists in the server, BIOS startup might fail during memory initialization at the BIOS self-test phase. The system might restart repeatedly.
Condition: This symptom might occur if a faulty DIMM of the line error type exists in the server.
Resolved problems in BIOS-2.00.63
202211151772
Symptom: In Legacy mode, the Boot Override field on the Save&Exit screen displays only one network port boot option for the Intel-I350-Gb-BackPlane onboard network adapter.
Condition: This symptom might occur if you view the Boot Override field on the Save&Exit screen in Legacy mode.
202209191581
Symptom: After you upgrade or downgrade the BIOS firmware on a server installed with an H3C-proprietary network adapter H3C NIC 530F B2, the Boot&Exit screen does not display PXE boot options for the network adapter in Legacy mode.
Condition: This symptom might occur after you upgrade or downgrade the BIOS firmware on a server installed with an H3C-proprietary network adapter H3C NIC 530F B2.
202208041560
Symptom: After you switch a server installed with an UN-NIC-ETH531F-LP-2P network adapter to Legacy mode, the port rate of the network adapter is displayed as 0*GE on HDM. The HDM Web interface displays that no match is found for the port information.
Condition: This symptom might occur if you view network adapter information from the HDM Web interface after switching the server installed with an UN-NIC-ETH531F-LP-2P network adapter to Legacy mode.
Resolved problems in BIOS-2.00.62
202206150265
Symptom: The default state of policy control for server power capping is changed from enabled to disabled.
Condition: None.
202112081918
Symptom: With 8 × 16G DIMMs and 4 ×128G AEPs installed, if you set the AEP mode to AD, the actual bandwidth can only reach 10% of the expected value in bandwidth tests.
Condition: This symptom might occur if you perform bandwidth tests on a server installed with 8 × 16G DIMMs and 4 ×128G AEPs and configured with the AD AEP mode.
Resolved problems in BIOS-2.00.60
202202180546
Symptom: HDM does not display port information for the NIC-10GE-2P-530F-L2 network adapter and displays incorrect interface information after you change the boot mode to Legacy.
Condition: This symptom might occur after you change the boot mode to Legacy for a server installed with a NIC-10GE-2P-530F-L2 network adapter.
202201200320
Symptom: The rate and bandwidth information displayed in the OS is inconsistent from the display from HDM after a LinkView UA3160 8G GPU is installed.
Condition: This symptom might occur if a LinkView UA3160 8G GPU is installed.
Resolved problems in BIOS-2.00.58P21
202204170016
Symptom: The OCP network adapter cannot be detected during the cold restart of the R4500 server.
Condition: This symptom might occur if the R4500 server is cold restarted multiple times.
Resolved problems in BIOS-2.00.58
202201100778
Symptom: Added support for the Mellanox 25G BF2-MBF2H512C-AESOT smart network adapter.
Condition: None.
202202160451
Symptom: Added support for the Mellanox 25G BF2-MBF2H512C-AESOT smart network adapter.
Condition: None.
Resolved problems in BIOS-2.00.57
202201080371
Symptom: For an R5300 G3 server installed with multiple LinkView UA3160 8G GPUs, BIOS prompts that the system does not have sufficient IO resources to assign to the GPUs, causing GPU identification failure.
Condition: This symptom might occur if multiple LinkView UA3160 8G GPUs are installed on an R5300 G3 server.
Resolved problems in BIOS-2.00.56
202112151361
Symptom: Added support for Alibaba X-Dragon modules on the R4300 G3.
Condition: None.
Resolved problems in BIOS-2.00.55
202107270933
Symptom: If you update the driver for the NIC-BCM957416-T-B-10Gb-2P NIC, change the boot mode to legacy, and then log in to HDM, the NIC information page cannot display information about the NIC correctly.
Condition: This symptom might occur if you update the driver for the NIC-BCM957416-T-B-10Gb-2P NIC and then change the boot mode to legacy.
Resolved problems in BIOS-2.00.53
202109090617
Symptom: Added BIOS options and changed the default value of some BIOS options for the R4300 G3 server.
Condition: None.
Resolved problems in BIOS-2.00.52
202012141546
Symptom: The HDM network adapter page does not display information about the UN-IB-MCX653105A-ECAT-100Gb-1P or UN-IB-MCX653106A-ECAT-100Gb-2P network adapter installed on an R4900 G3 server in Legacy mode.
Condition: This symptom might occur when an R4900 G3 server in Legacy mode is installed with a UN-IB-MCX653105A-ECAT-100Gb-1P or UN-IB-MCX653106A-ECAT-100Gb-2P network adapter.
Resolved problems in BIOS-2.00.51
202107010626
Symptom: After you power on an X10000 G3 server installed with 12PCS 16G DDR4 RDIMM and 1PCS/2PCS/4PCS 128G AEP memory modules, HDM displays a minor alarm during the hardware initialization phase.
Condition: This symptom might occur when you power on an X10000 G3 server installed with 12PCS 16G DDR4 RDIMM and 1PCS/2PCS/4PCS 128G AEP memory modules.
Resolved problems in BIOS-2.00.50
202104190326
Symptom: The rate and bandwidth of the UN-NIC-ETH-X722DA2 NIC are displayed on the BIOS IIO link page but are not displayed on the HDM PCIe page.
Condition: This symptom might occur if you view the rate and bandwidth of the UN-NIC-ETH-X722DA2 NIC on the BIOS IIO link page and HDM PCIe page.
Resolved problems in BIOS-2.00.48
202103110545
Symptom: A prompt opens to indicate that PCI resources are insufficient on the BIOS setup screen when a UN-GPU-A100-40G GPU module is installed in the R4900 G3 server.
Condition: This symptom might occur if a UN-GPU-A100-40G GPU module is installed in the R4900 G3 server.
Resolved problems in BIOS-2.00.47
202011070536
Symptom: When a Retimer or Redriver module is installed on an R4300 G3 server, HDM mistakenly displays two Retimer or Redriver modules.
Condition: None.
Resolved problems in BIOS-2.00.46
202011040555
Symptom: When a memory error occurs, HDM mistakenly identifies the faulty memory of the previously reported memory error as the faulty memory for the new error.
Condition: This symptom might occur if memory errors occur on the server.
202011091261
Symptom: If memory modules with 16Gb DRAM chips are used with other memory modules, the BIOS Early VGA screen and POST screen do not display alarms for 16Gb component disabling events.
Condition: This symptom might occur if memory modules with 16Gb DRAM chips are used with other memory modules.
Resolved problems in BIOS-2.00.45
202008311085
Symptom: If the localboot field in PXE configuration file pxelinux.cfg points to invalid address 0xffff, the server cannot start up from the invalid address and cannot automatically start from the local OS.
Condition: This symptom might occur if the localboot field in PXE configuration file pxelinux.cfg points to invalid address 0xffff.
Resolved problems in BIOS-2.00.44
202008311076
Symptom: IOMCA is disabled in the BIOS after a BIOS update and PCIe errors are reported through AER.
Condition: This symptom might occur after a BIOS update. The system disables IOMCA for BIOS update and then uses AER to report PCIe errors to reduce system crashes caused by PCIe uncorrectable errors.
202008110726
Symptom: Added support for the BIOS to issue NIC-ETH682i-Mb CLP commands. This feature is required because the NIC-ETH682i-Mb NIC is incompatible with the QINQ\MCTP\CLP feature on HDM and the feature cannot be used if the BIOS does not support issuing CLP commands.
Condition: None.
202009040724
Symptom: For an R5300 G3 server, if you install eight A100 GPUs and configure the server to operate in AI cabling mode, the server gets stuck at the POST phase and cannot start up.
Condition: This symptom might occur on an R5300 G3 server if you install eight A100 GPUs and configure the server to operate in AI cabling mode.
202009041310
Symptom: Added support for SmartTest of SK Hynix DIMMs on the R8900 G3 server.
Condition: None.
202008111633
Symptom: The default state of MCTP proxy was changed to enabled for G3 blade servers.
Condition: None.
Resolved problems in BIOS-2.00.43
202006300792
Symptom: The system cannot start up when 64GB 2Rx4 DDR4-2933 DIMMs are used together with Skylake processors, and a log message is generated, indicating memory unavailability.
Condition: This symptom might occur when 64GB 2Rx4 DDR4-2933 DIMMs are used together with Skylake processors.
202007020757
Symptom: Changed the default state of ADDDC Sparing from Disabled to Enabled in the BIOS setup utility for the R4300 G3 and R6700 G3 servers.
Condition: None.
Resolved problems in BIOS-2.00.41
202003260837
Symptom: HDM displays Intel DCPMMs with SPD information written in as not verified.
Condition: None.
202006031359
Symptom: Upgraded the SmartTest code in the BIOS to the same version as the Samsung SmartTest code.
Condition: None.
202006031371
Symptom: Added support of importing or exporting single-port PXE configuration for the BIOS from HDM.
Condition: None.
Resolved problems in BIOS-2.00.39
202001200572
Symptom: BIOS setup does not display OS as an available boot option in UEFI mode if the Sangfor-custom Linux OS is installed.
Condition: This symptom might occur if the Sangfor-custom Linux OS is installed.
Resolved problems in BIOS-2.00.37P06
202003120884
Symptom: Memory errors occurred in the OS cannot be recorded to SPD.
Condition: This symptom might occur if a memory hardware error occurs in the OS.
Resolved problems in BIOS-2.00.37
201912200865
Symptom: Install the Kylin operating system in UEFI mode. After the installation, restart the server, enter the BIOS setup utility to set Boot mode select to Legacy, reboot the server, and then enter the BIOS setup utility again to set Boot mode select to UEFI. After the server restarts, no boot option for the Kylin operating system is present in the BIOS setup utility.
Condition: This symptom might occur if the Kylin operating system is installed in UEFI mode, and you set the boot mode to legacy and then back to UEFI.
Resolved problems in BIOS-2.00.36
201912050624
Symptom: Use an IPMI command to edit the Monitor/MWAIT item and then restart the BIOS for the configuration to take effect. Then, update the BIOS by entering the Maintenance > Update Firmware page from HDM and selecting the Retain method. After the server is powered on, the BIOS setup utility displays that the Monitor/MWAIT configuration is not saved successfully.
Condition: This symptom might occur if you use an IPMI command to edit the Monitor/MWAIT item, and then restart the BIOS from HDM with BIOS configuration retained.
Resolved problems in BIOS-2.00.35P01
201908130892
Symptom: In the default BIOS configuration file, the Refresh Options item does not have an asterisk (*) for identifying the item's default value.
Condition: This symptom might occur when the BIOS configuration file is exported by using the SCE tool in the Linux OS.
201908260280
Symptom: After the SOL mode is enabled, the server does not prompt users to press ESC, F4, or other keys in the POST phase during BIOS boot.
Condition: This symptom might occur during the POST phase if the SOL mode is enabled.
201908290809
Symptom: For an R4900 server, the slot number of a faulty DIMM in the HDM SEL log is inconsistent with the actual slot number of the DIMM that has injected the error.
Condition: This symptom might occur if the R4900 uses 4114 or 3106 processors and an uncorrectable memory error is present.
Resolved problems in BIOS-2.00.32P07
201910280302
Symptom: The system board product SN cannot be modified from the BIOS setup utility.
Condition: None.
Resolved problems in BIOS-2.00.32P03
201908130988
Symptom: The server stays at the hardware initialization phase during server startup.
Condition: This symptom occurs when hardware initialization failure occurs for some reasons and FRB-2 Timer Policy is set to the default Do Nothing.
Resolved problems in BIOS-2.00.31P03
201908090159
Symptom: Changed the default setting of the Package C State item in the BIOS setup utility from Auto to C0/C1.
Condition: None.
Resolved problems in BIOS-2.00.31P01
201905310601
Symptom: The BIOS displays an incorrect PCIe slot number for the LSI 9361-8i RAID storage controller during the OptionROM loading phase in legacy boot mode.
Condition: This symptom might occur during the OptionROM loading phase in legacy boot mode.
201905280631
Symptom: Physical slots of the installed 12 LFF SATA drives correspond to incorrect logic PCH SATA ports.
Condition: This symptom might occur when the server is installed with SATA drives.
Resolved problems in BIOS-2.00.28
201905100428
Symptom: After HDM reset, the SOL redirection does not display the BIOS setup interface.
Condition: This symptom might occur after HDM is reset.
201905210737
Symptom: The one-time and permanent boot options configured from the HDM Web interface or through MIB cannot be synchronized to the BIOS.
Condition: This symptom might occur if you configure one-time or permanent boot options from HDM or through MIB and the boot mode and boot option on the BIOS stays UEFI and HDD, respectively.
Resolved problems in BIOS-2.00.26
201904090528
Symptom: Added support for configuring LLDP state from the BIOS.
Condition: None.
Resolved problems in BIOS-2.00.25
201903050427
Symptom: After the BIOS reboots, the permanent boot option configuration from HDM is removed.
Condition: This symptom might occur after the BIOS reboots.
201903130867
Symptom: Set both the debug mode and OS watchdog timer to Enabled in the BIOS, and update the BIOS to version 2.00.24 with BIOS configuration retained. The server got stuck at the early POST phase and cannot enter the BIOS.
Condition: This symptom might occur if the both debug mode and OS watchdog timer are set to Enabled.
Resolved problems in BIOS-2.00.14P02
201902270466
Symptom: The add-in options on the server cannot be identified in the BIOS setup utility after the server is power cycled.
Condition: This symptom might occur only for version 2.00.14P01 after the following tasks are performed in sequence:
Update the BIOS version to 2.00.14P01, and then restart the system.
Update HDM version to 2.00.014P01 with the default settings restored.
Power cycle the server and enter the BIOS setup utility.
Resolved problems in BIOS-2.00.14P01
201811280071
Symptom: Red POST screen might occur when KVM is launched because the update of the Redfish channel fails.
Condition: This symptom might occur after the following tasks are performed in sequence:
Update HDM version to 2.00.18.
Update BIOS version to 2.00.10 with the Force Restore method selected.
Launch a KVM remote console from HDM after HDM rewrites the BIOS and restarts.
201811090096
Symptom: In legacy mode, two PXE prompts appear during POST after F12 is pressed.
Condition: This symptom might occur when F12 is pressed during POST.
Resolved problems in BIOS-2.00.12
201812140203
Symptom: After two rounds of DMI margin tests on the PCH end, five times each round, the average value of lane2/lane3 at Up/Down are lower than the claimed value in specifications.
Condition: This symptom might occur when DMI register settings in the BIOS need to be adjusted.
Resolved problems in BIOS-2.00.09
First release.
Troubleshooting
To obtain troubleshooting information, access the H3C official website at http://www.h3c.com/en/Technical_Documents, select the device category and model, and then click Diagnose & Maintain.
Related documentation
Documentation set
H3C Servers Purley Platform BIOS User Guide
Technical support
To obtain support services, contact H3C Support at [email protected].
Appendix A Software feature list
Table 4 Software features of the H3C UniServer BIOS
Category | Features |
IIO/Uncore | VT-d virtualization PCIe 2.0 or PCIe 3.0 SR-IOV |
Processor | Intel Xeon Platinum, Xeon Gold, Xeon Silver, Xeon Bronze series Hyper-threading Turbo boost P-State and C-State |
Memory | Maximum memory size: 24 × 16GB RDIMMs 24 × 32GB RDIMMs Maximum data transfer rate: DDR4 RDIMM/LRDIMM at 2666 MT/s ECC check (MBE and SBE) and correction (SBE) |
SATA controller | 8 × SATA ports AHCI and RAID modes |
UEFI secure boot | UEFI secure boot UEFI secure boot (Setup/User Mode) |
RAS memory | ECC error detection and reporting Intel MCA PCIe AER Correctable, non-fatal, and fatal error detection and reporting |
USB | USB XHCI mode USB 3.0 or 2.0 USB legacy boot |
Appendix B Updating software for rack servers
The following information describes how to upgrade the BIOS firmware from the HDM Web interface for the R2700, R2900, R4300, R4700, R4900, R5300, R6700, R6900, and R8900 G3.
Screenshots in this section are for illustration only. They might vary as the software version changes.
1.Open a browser, and enter the HDM management IP address in the https://hdm_ip_address format in the address bar. In this example, the HDM management IP address is 192.168.50.132.
2.On the sign-in page, enter the username and password, and then click Sign in.
The default username is admin and the default password is Password@_.
Figure 2 HDM sign-in page

(Optional) Backing up the current configuration
As a best practice, back up the current configuration in case the update causes a configuration loss.
To back up the current configuration:
1.In the navigation pane, select Maintenance > Import/Export Config.
Figure 3 Backing up the current configuration
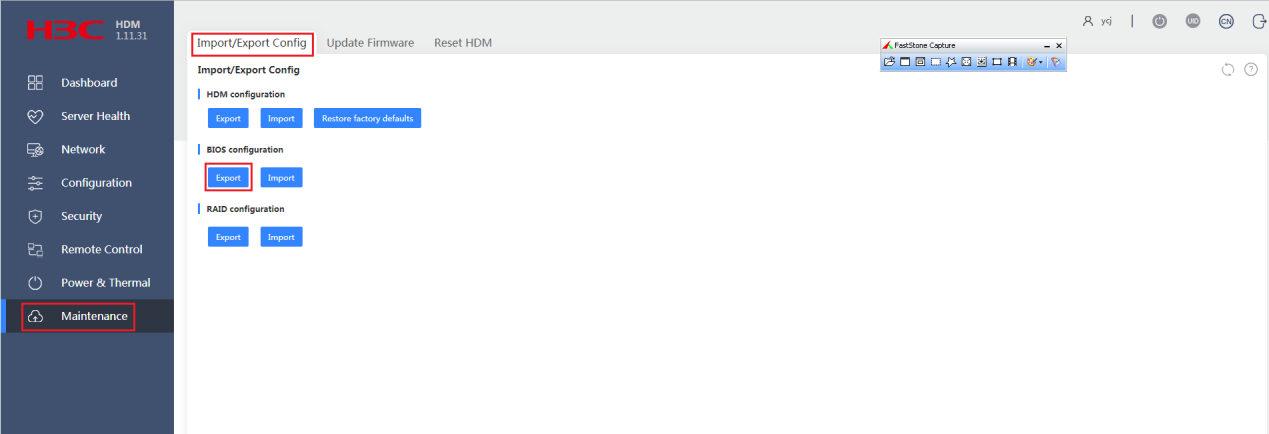
2.Click Export in the BIOS configuration section to save BIOS configuration locally.
CAUTION: Do not power off the server during the update. |
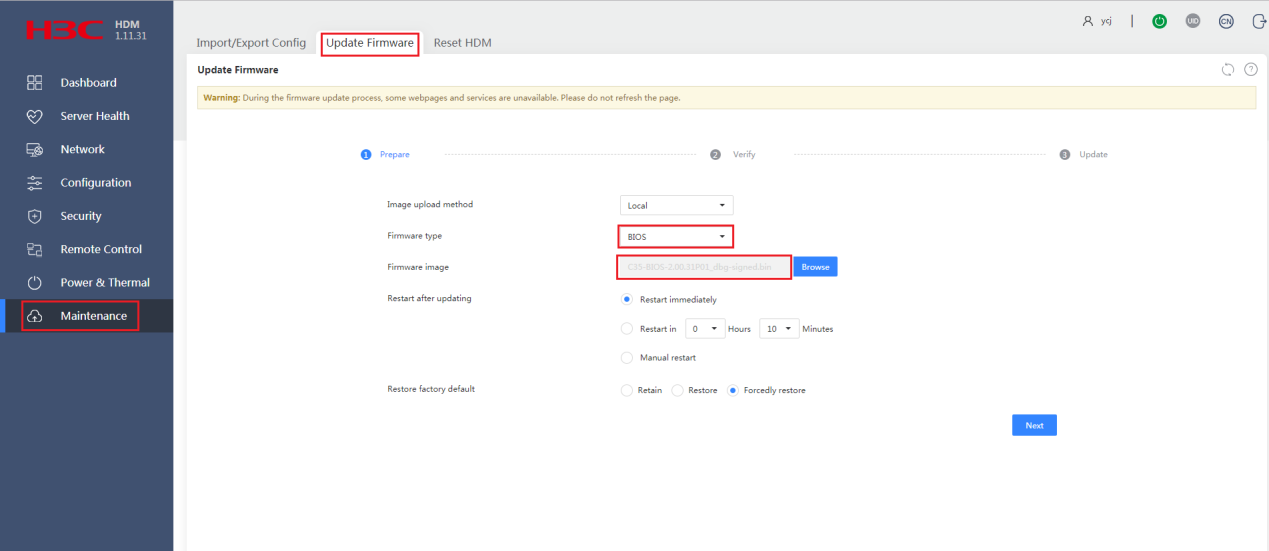
To update the BIOS firmware:
1.In the navigation pane, select Maintenance > Update Firmware.
2.In the work pane, specify the update firmware image file:
a.Select BIOS as the firmware type.
b.Upload the new firmware image file. This example uses C35-BIOS-2.00.31P01_dbg-signed.bin.
c.Select the method to reboot the server after the update is complete.
You can have the server automatically reboot immediately when the update finishes or at a scheduled time, or choose Manual restart to manually reboot the server.
d.Select whether to restore default BIOS settings after the update.
To retain the user-configured BIOS settings, select Retain.
To remove the user-configured BIOS settings, select Restore or Forcedly restore. The Forcedly restore option enables the HDM to rewrite the BIOS flash and can be used when the BIOS is operating incorrectly and cannot be updated in any other ways.
e.Click Next.
CAUTION: Do not restore default BIOS settings, unless otherwise required by the new version. The Restore factory default option removes all user-configured BIOS settings when the server starts up with the new firmware. When you select this option, make sure you understand its impact on the services. |
Figure 4 Specifying the new BIOS firmware image
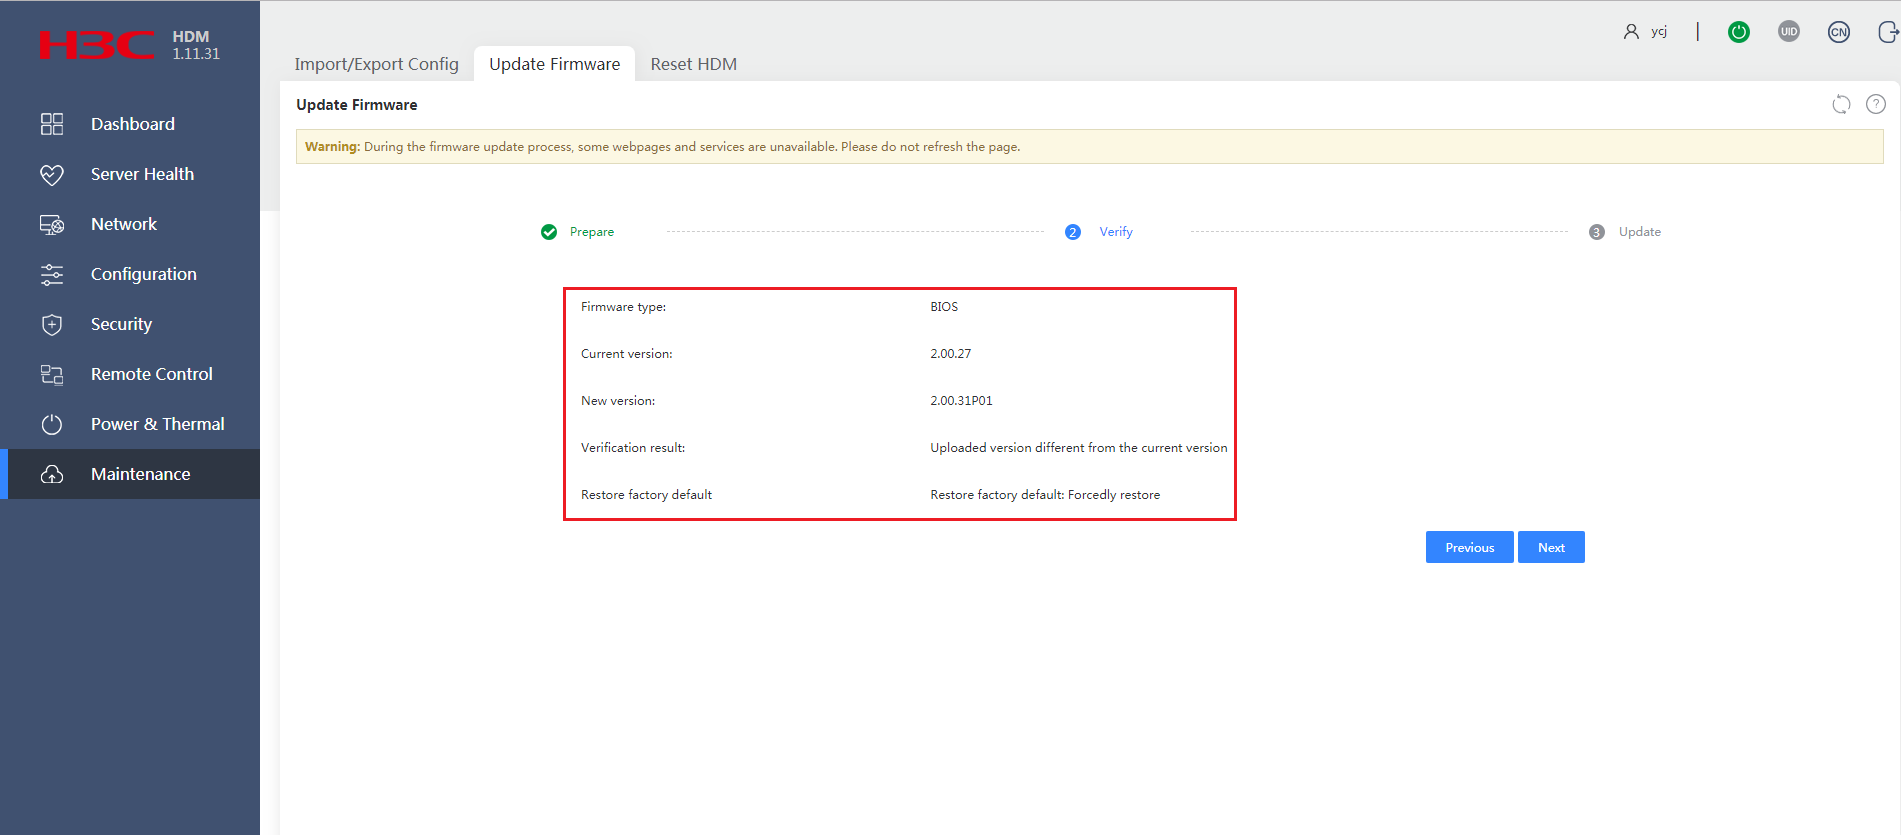
3.Verify that the new firmware image version is correct, and then click Next.
Figure 5 Verifying the BIOS firmware image version
4.Follow the system instructions to complete the update.
Figure 6 Update start confirmation

Figure 7 Update completed

5.Restart the server if you selected Manual restart.
a.Select Power & Thermal > Power Control.
b.Click Force system reset.
Figure 8 Restarting the server

6.After the server restarts and the POST phase finishes, re-sign in to HDM to verify the update on the Dashboard > Summary page.
Figure 9 Verifying that the BIOS firmware image has been updated
Handling firmware update failures
If a firmware update fails, the system starts up with the previous firmware version.
To resolve the issue:
1.Verify that BIOS is selected as the firmware type.
2.Verify that the firmware image file is compatible with your server model and is not corrupt. Download the desired image file again if the image file is not incompatible with the server or is corrupt.
3.Verify that the HDM client and the HDM server have a stable network connection.
Appendix C Updating DCPMM for rack servers
DCPMM is the memory module on a G3 server. In this document, it is called AEP.
IMPORTANT: Do not power off the server during the upgrade. |
This upgrade procedure is applicable to only G3 servers with a Red Hat Enterprise Linux 7.3 or CentOS7.3 operating system. For G3 servers with other operating systems, use the REPO LiveCD for upgrade.
The DCPMM firmware package name is in the UN-AAA_xx.xx.xx.xxxx_Linux.rpm format, where AAA represents the memory model (AEP for G3 servers), and xx.xx.xx.xxxx represents the specific memory firmware version number. In this example, the DCPMM firmware package name is UN-AEP_01.02.00.5444_Linux.rpm.
The version number displayed in the figures in this procedure might differ from the actual version number.
To upgrade DCPMM for a rack server:
1.Log in to the system as the administrator.
2.Copy the UN-AEP_01.02.00.5444_Linux.rpm component package to any path (such as /home) in the system.
Figure 10 Copying the AEP component package

3.Access the component package path, and then execute the chmod 777 UN-AEP_01.02.00.5444_Linux.rpm command to make the component package readable, writable, and executable by everyone.
4.Execute the echo -e 'y\nn\n' | ./UN-AEP_01.02.00.5444_Linux.rpm command to start the upgrade.
The system displays a prompt when the upgrade succeeded.

5.Perform a cold restart.
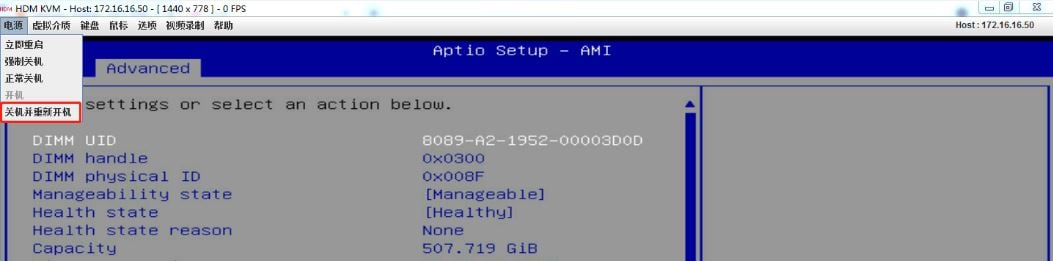
6.From HDM KVM, shut down and then start the server.
Figure 12 Shutting down and then starting the server from HDM KVM
7.Power off and then power on the server.
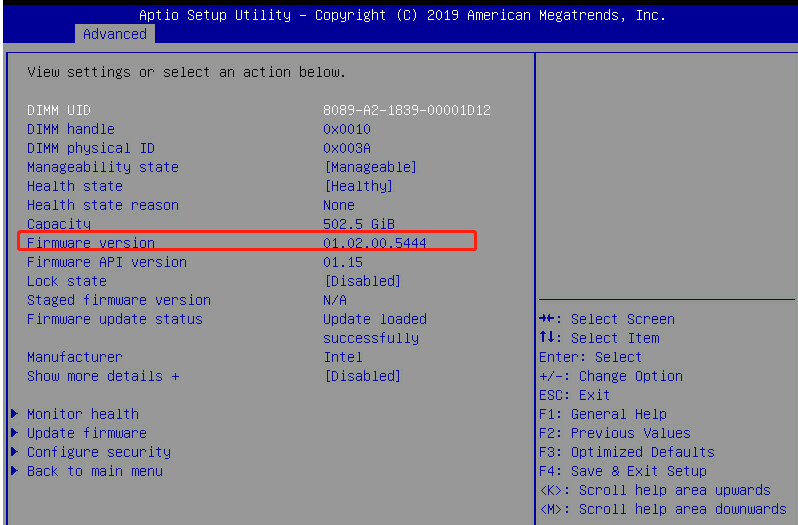
8.Verify the new AEP memory version.
Figure 13 New AEP memory version
If the DCPMM firmware upgrade fails, the system starts up with the previous firmware version.
To resolve the issue, verify that the upgrade package is compatible with G3 servers and is not corrupt. Download the desired upgrade package if the current package is incompatible with the server or is corrupt.
Appendix D Updating software for blade servers and compute modules
The following information describes how to upgrade the BIOS firmware from the OM Web interface for the B5700 G3, B5800 G3, and B7800 G3.
The BIOS update procedure is the same for blade servers and compute modules. This section uses the procedure for compute modules as an example.
Software update flowchart
Preparing for BIOS update
Preparing update tools
Table 5 lists the required tools for BIOS update.
Item | Description |
PC | For logging in to the OM Web interface. |
cables | For connecting the PC to the OM modules. |
BIOS firmware image | Download the most recent version of the BIOS firmware from the H3C website. |
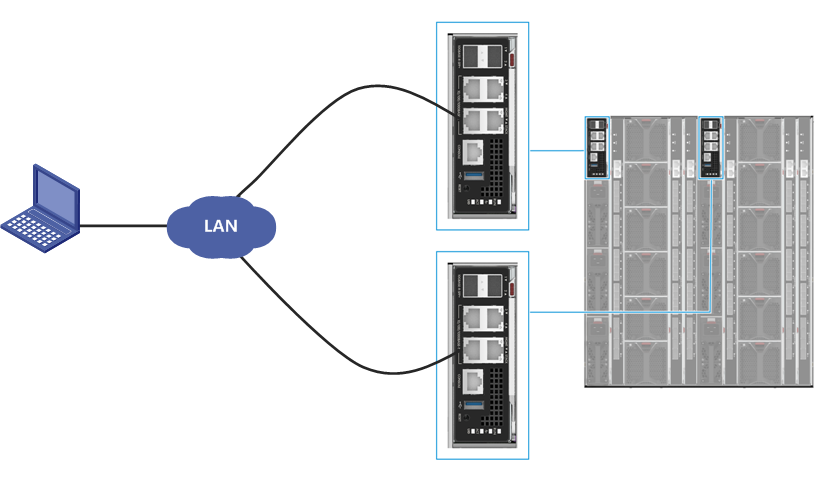
Setting up the configuration environment
As shown in Figure 14, use a local PC as the OM client and connect the PC to the management (MGMT) ports on the active and standby OM modules. Make sure the IP address of the OM client is in the same network segment with the management IP addresses of OM modules.
Figure 14 Setting up the configuration environment
Obtaining OM sign-in settings
To sign in to OM Web interface, you must obtain OM management IP address and user account information. The management IP address is assigned by a DHCP server by default. This section uses the settings in Table 6 as an example.
Item | Description |
IP address | 172.17.0.143 |
Subnet mask | 255.255.255.0 |
Gateway | 172.17.0.1 |
Username | admin |
Password (case-sensitive) | Password@_ |
Updating the BIOS
Prerequisites
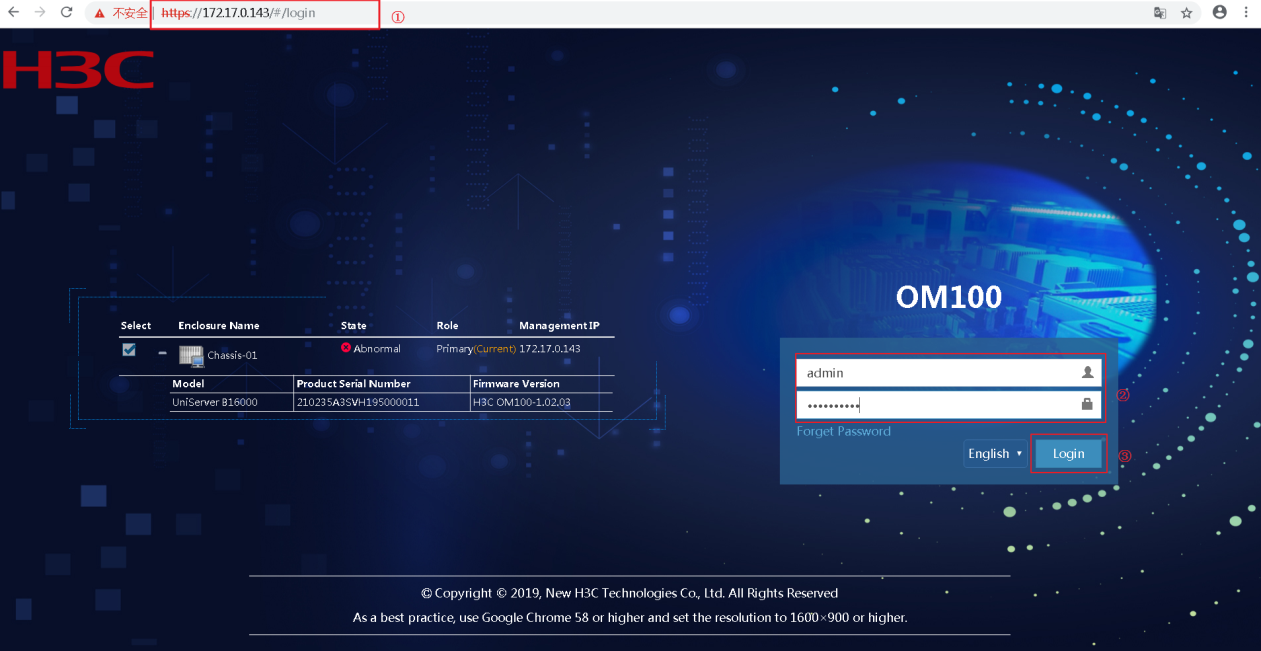
1.Open the browser, and enter the OM management IP address in the format of https://OM_ip_address.
2.On the sign-in page, enter the username and password, and then click Login.
Figure 15 Signing in to OM
3.In the navigation pane, select Blade Servers > target_node > State Diagnosis to check the running state and the diagnostic information of the target node.
Figure 16 Checking the running state and diagnostic information
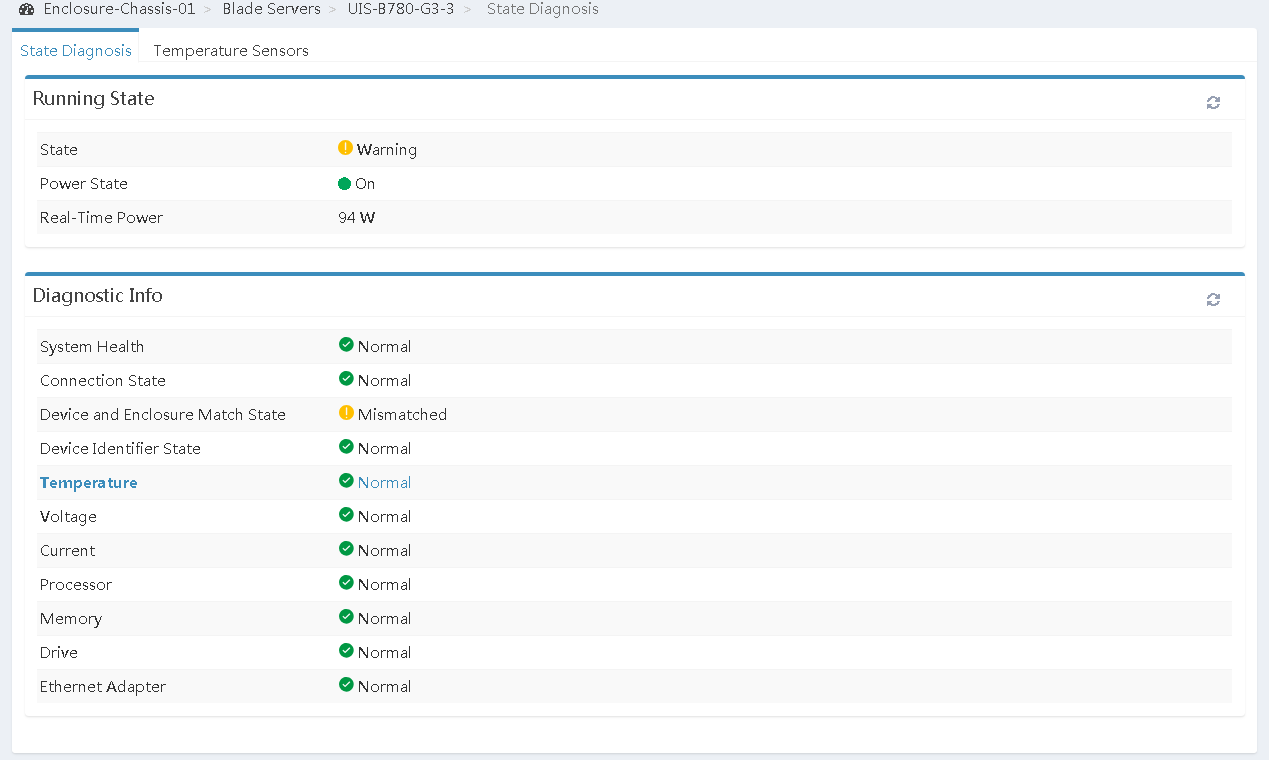
4.If the running state and the diagnostic information of the target node are all normal, go to step 6. If the running state or the diagnostic information is abnormal, go to step 5.
Make sure the target node is powered on.
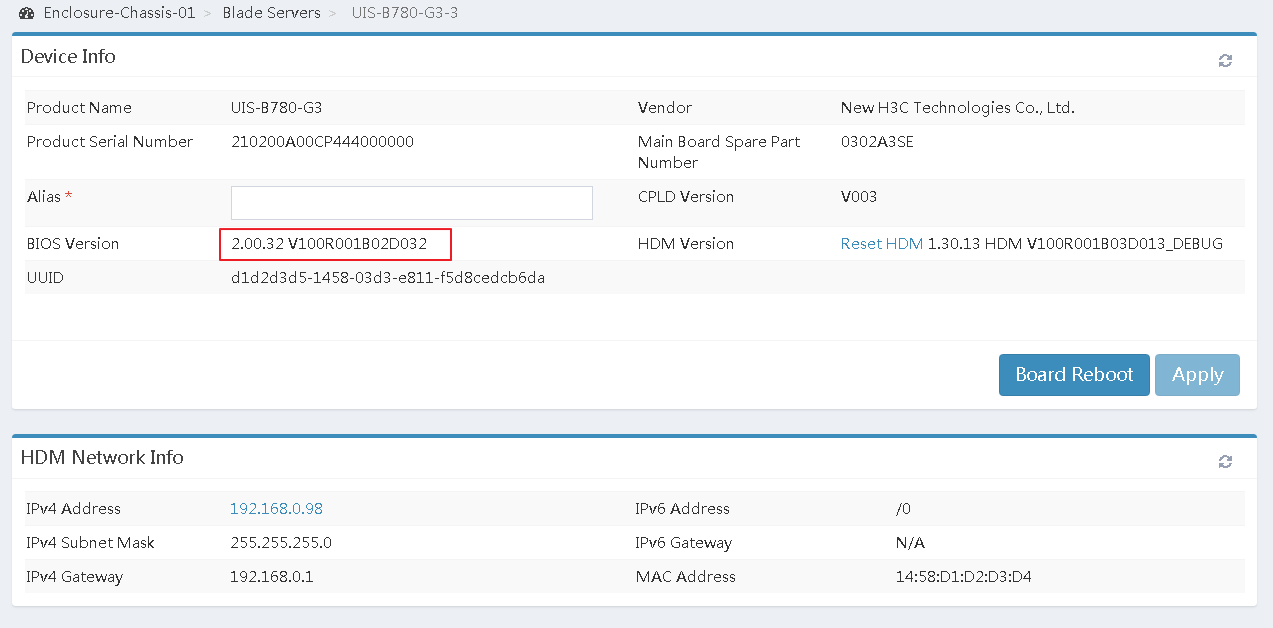
6.In the navigation pane, select Blade Servers > target_node to view and record the current BIOS firmware version.
Figure 17 Viewing BIOS firmware version
Procedure
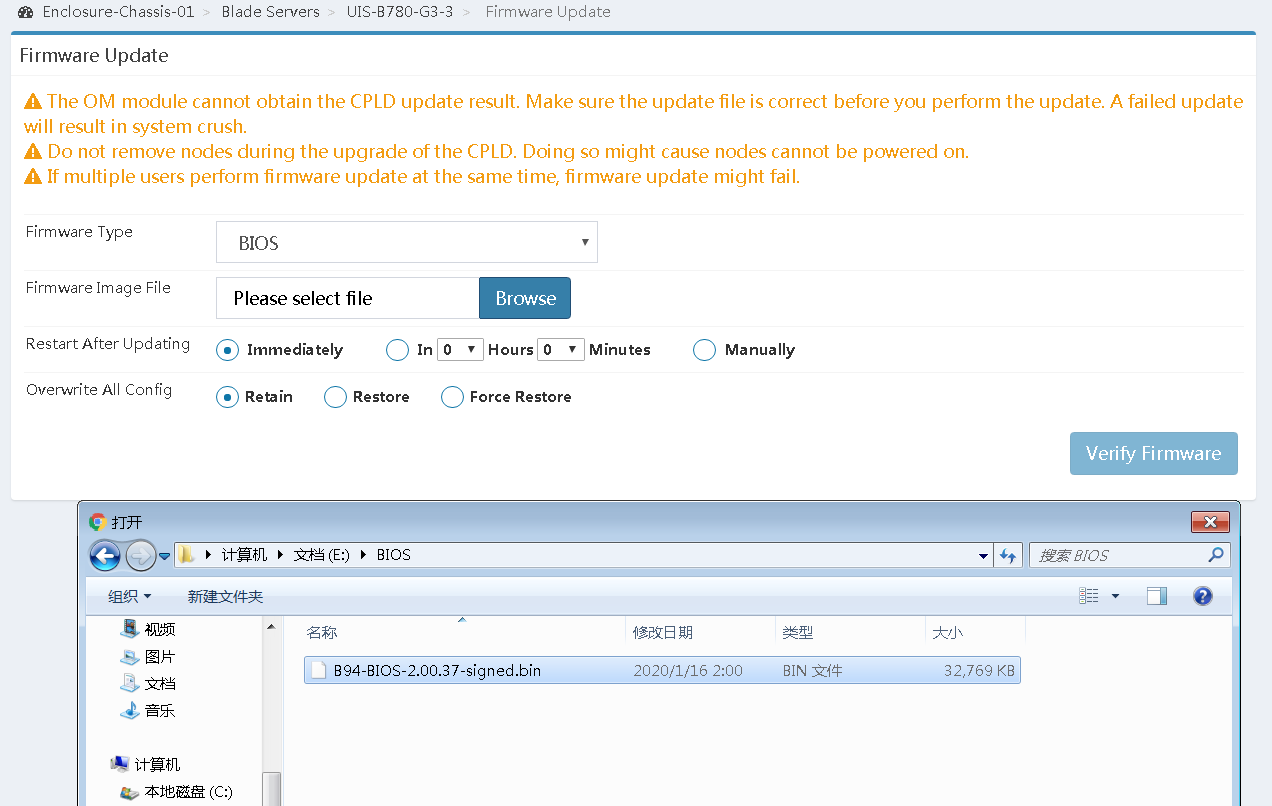
1.In the navigation pane, select Blade Servers > target_node > Firmware Update.
Figure 18 Firmware update page
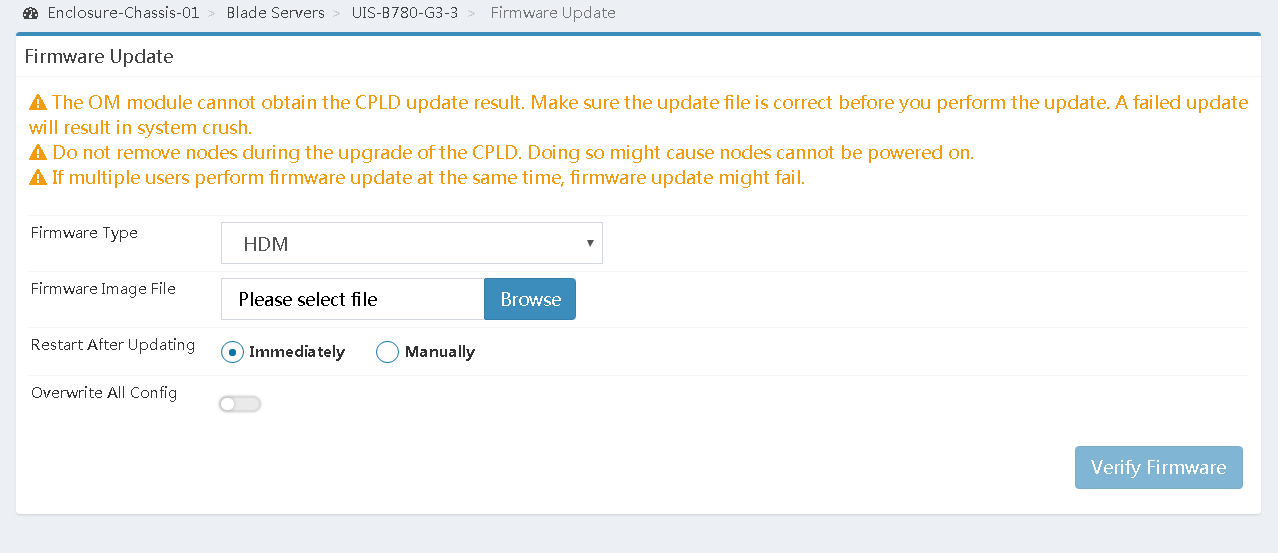
a.Select BIOS from the Firmware Type list.
b.Click Browse for the Firmware Image File field, select the locally saved BIOS firmware image, and upload the firmware image.
c.Select a restart method for the server if the server is in power-on state.
You can have the server automatically reboot immediately or at a scheduled time after the update. Alternatively, you can select Manually to manually reboot the server.
This section selects Immediately to automatically reboot the server immediately as an example.
d.Select whether to restore default BIOS settings after the update.
To retain the user-configured BIOS settings, select Retain.
To remove the user-configured BIOS settings, select Restore or Force Restore. The Force Restore option enables the HDM to rewrite the BIOS flash and can be used when the BIOS is operating incorrectly and cannot be upgraded in any other ways.
e.Click Next.
Figure 19 Configuring firmware update
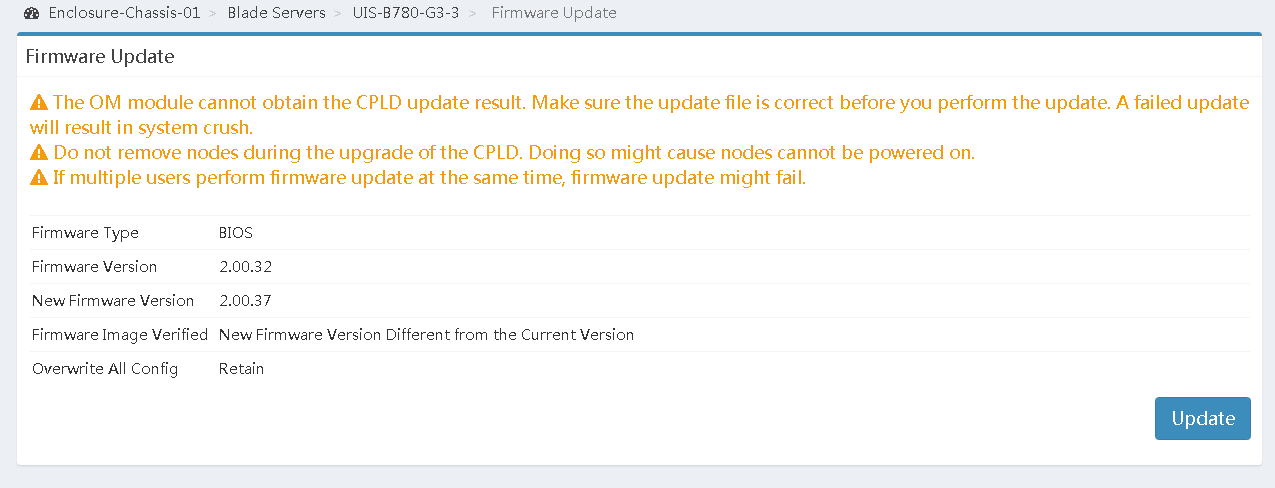
3.Click Verify Firmware to verify that the new BIOS firmware version is correct.
Figure 20 Verifying the BIOS version

4.Click Update to start the firmware update, as shown in Figure 21.
Figure 21 Starting firmware update
As shown in Figure 22, the system displays the update progress, and a prompt opens to indicate the update result.

Verifying the configuration
After the server restarts, log in to OM and select Blade Servers > target_node from the navigation pane to verify that the BIOS version has been successfully updated.
Figure 23 Verifying BIOS firmware update

IMPORTANT: If the BIOS version fails to be updated, perform the update again. If the issue persists, contact H3C Support. |
Acronym | Full name |
BIOS | Basic Input and Output System |
FIST | Fast Intelligent Scalable Toolkits |
HDM | H3C Device Management |
MCA | Machine Check Architecture |
RAID | Redundant Arrays of Independent Disks |
REPO | Repository |
SDS | Secure Diagnosis System |
SMASH CLP | Systems Management Architecture for Server Hardware Command-Line Protocol |
