- Table of Contents
- Related Documents
-
| Title | Size | Download |
|---|---|---|
| 01-Text | 3.95 MB |
REPO-based software updating methods and application scenarios· 3
Exporting the configuration list 7
Obtaining a complete REPO·· 10
Out-of-band firmware update· 23
About out-of-band firmware update· 23
Updating a single server out of band from HDM·· 23
Updating servers in bulk out of band from FIST· 25
Driver update through a FIST server template· 32
Firmware update from iFIST· 37
About REPO
This document provides information about updating repositories (REPOs).
Introduction
A repository (REPO) is a collection of firmware and driver installation packages, through which you can install or update a component as needed. In this document, the term "component" refers to both firmware and drivers.
| NOTE: Figures in this document are for illustration only. |
Applicable products
This document is applicable to the following products:
· AE modules
· H3C UniServer B5700 G5
· H3C UniServer R4300 G5
· H3C UniServer R4330 G5
· H3C UniServer R4330 G5 H3
· H3C UniServer R4700 G5
· H3C UniServer R4900 G5
· H3C UniServer R4930 G5
· H3C UniServer R4930 G5 H3
· H3C UniServer R4950 G5
· H3C UniServer R5300 G5
· H3C UniServer R5500 G5
· H3C UniServer R6900 G5
· H3C UniServer R4950 G3
· H3C UniServer B5700 G3
· H3C UniServer B5800 G3
· H3C UniServer B7800 G3
· H3C UniServer R2700 G3
· H3C UniServer R2900 G3
· H3C UniServer R4300 G3
· H3C UniServer R4700 G3
· H3C UniServer R4900 G3
· H3C UniServer R5300 G3
· H3C UniServer R6700 G3
· H3C UniServer R6900 G3
· H3C UniServer R8900 G3
REPO-based software updating methods and application scenarios
REPO supports the following update methods:
· One-key update.
· Single component update.
· Offline firmware update.
· Out-of-band firmware update.
· Update through FIST or iFIST.
Table 1 displays the OS requirements for each REPO update method and their application scenarios.
Table 1 OS requirements and application scenarios
Update method | Supported component type | Dependent software | OS required or not | Application scenarios |
One-key update | Firmware+driver | N/A | Yes | Update the components on a single server in bulk. |
Single component update | Firmware+driver | N/A | Yes | Update a specific component on a single server. |
Offline firmware update | Firmware | HDM/FIST | No, but LiveCD is required | Update firmware for components on one server or multiple servers in bulk, from the virtual media mounted through HDM KVM or from FIST, respectively. This method is interruptive. It requires a reboot to access the LiveCD system included in the REPO for an update. |
Out-of-band firmware update | Firmware | HDM/FIST | No | Update firmware for components on one server or multiple servers in bulk, from HDM or FIST, respectively. With this method, you can have the system execute the update at the next startup to avoid interrupting the running operating system. |
Update from FIST | Firmware+driver | FIST | · Server firmware update: No · Component firmware and driver update: Yes (FIST SMS also required) | Update components on multiple servers in bulk. |
Update through a server template from FIST | Driver | FIST | No | Install drivers during OS installation. A server template on FIST can be used to update firmware for servers in bulk repeatedly. |
Update from iFIST | Firmware | iFIST | No | Update firmware for multiple components on one server in bulk. |
Driver | iFIST | No | Install drivers during OS installation. |
Obtaining a REPO
Customizing a REPO
About customizing a REPO
Perform this task to customize your REPO for specific components based on the server model and OS. A custom REPO integrates the one-key update script and can contain the LiveCD system. You can use the REPO Manager Tool to create REPOs for HDM, the BIOS, and CPLD online.
Building a custom REPO
1. Access the REPO customization page at http://supportrepo.h3c.com/repo-en.htm.
Figure 1 Customizing a REPO
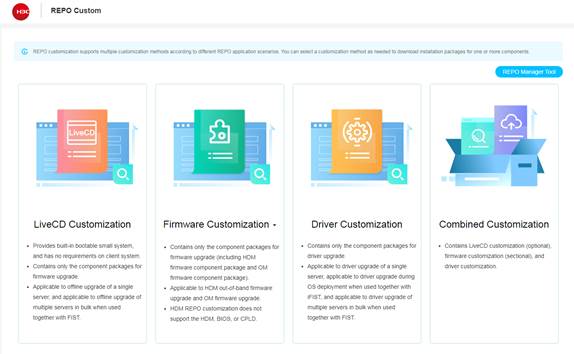
2. Select a customization method as needed:
¡ LiveCD Customization—To customize a LiveCD REPO image that contains only firmware for offline firmware update, select this option. This option is applicable to offline update for one server from the virtual media device mounted through HDM KVM or for multiple servers from FIST.
¡ Firmware Customization—To customize a REPO image that contains only firmware for out-of-band firmware update from HDM or from FIST, select HDM REPO Customization for firmware customization.
| IMPORTANT: The REPO image file size for out-of-band firmware update from HDM or from FIST cannot exceed 300 MB. |
¡ Driver Customization—To customize a REPO image that contains only drivers for the following scenarios, select this option:
- Driver update during OS installation from iFIST.
- Bulk driver update from FIST.
¡ Combined Customization—To customize a REPO image that contains both firmware and drivers for update from FIST, iFIST, or LiveCD, select this option.
3. Identify the components of interest by using keyword filters or by importing a server configuration list.
| NOTE: File import is available only for combined customization. |
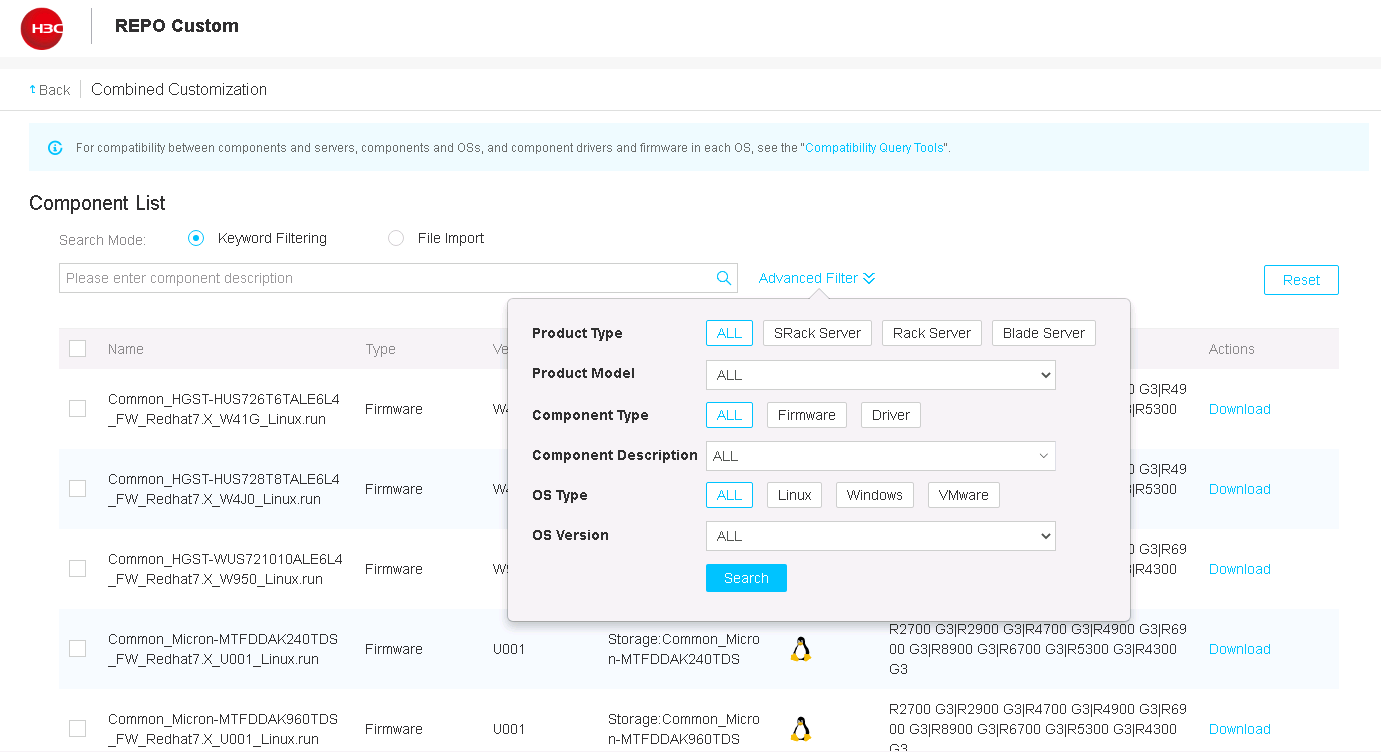
¡ If you select Keyword Filtering, enter a component description keyword or select settings for advanced filters, and then click Search.
| NOTE: The supported filters differ depending on REPO customization method. |
Figure 2 Filtering components
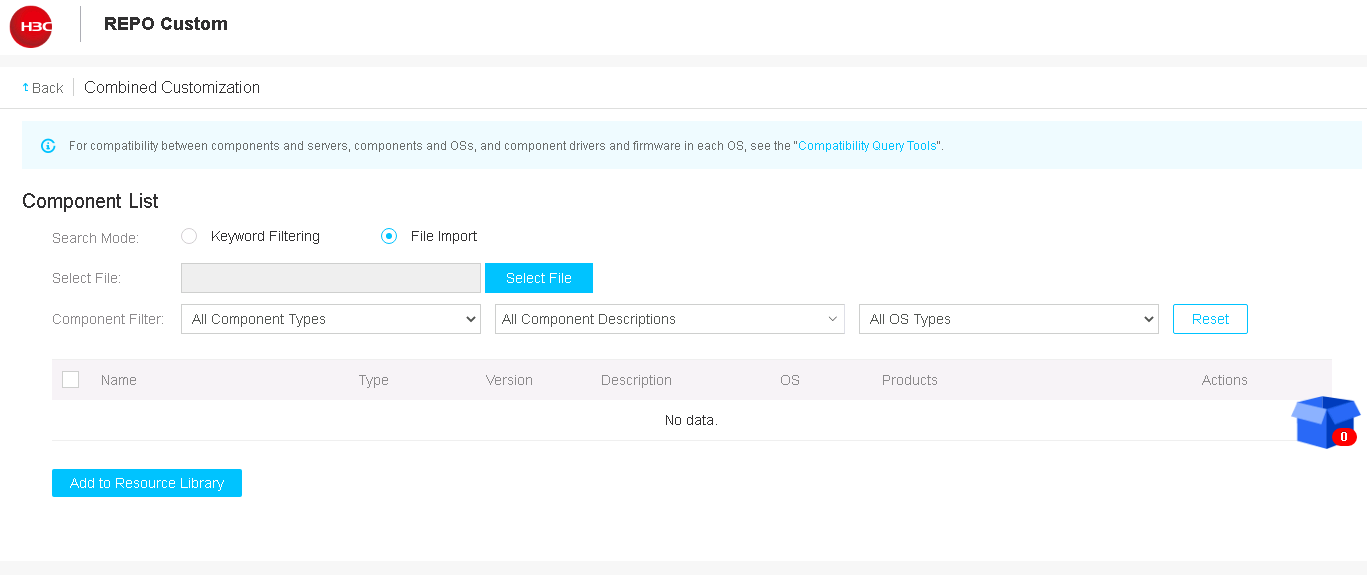
¡ If you select File Import, click Select File, and then upload the server configuration list from a .json file. The system will automatically display the available component update files.
For more information about exporting the server configuration list, see "Exporting the configuration list."
Figure 3 Importing a service configuration list
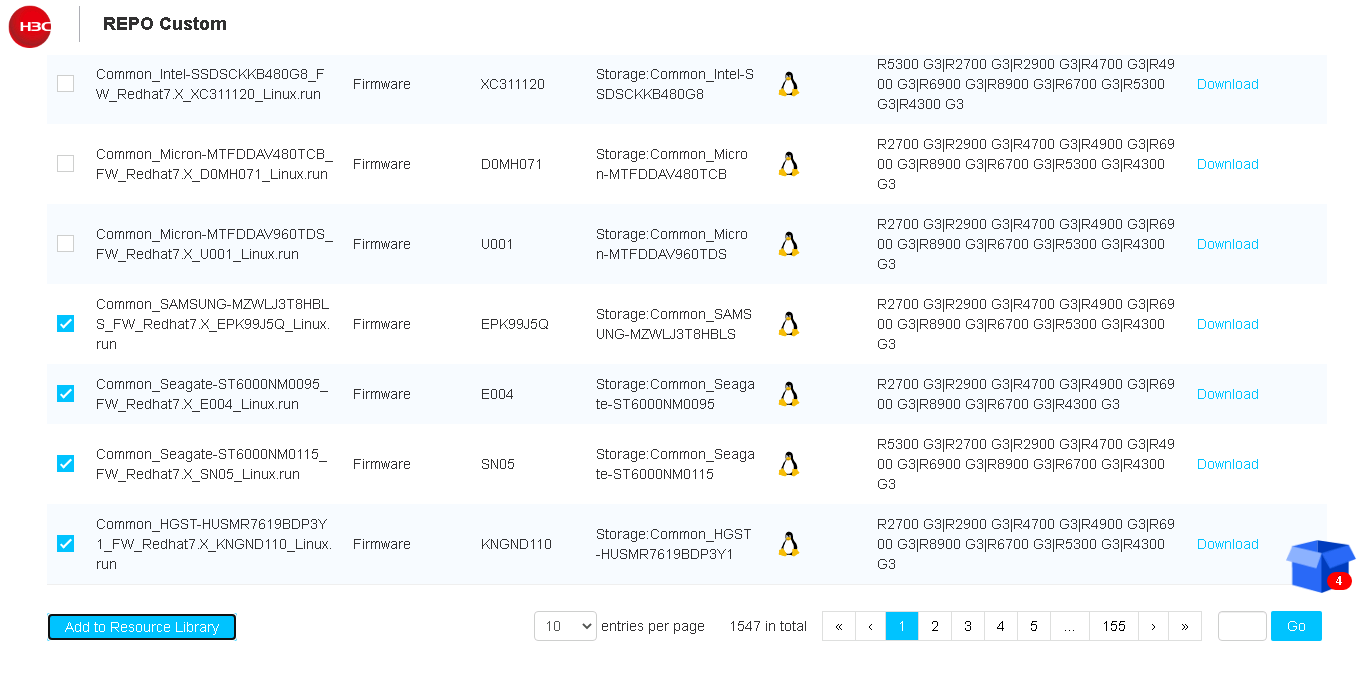
4. Select the target components, and then click Add to Resource Library.
The number of selected component update files is displayed over the box at the bottom right of the page.
Figure 4 Adding components to the resource library
5. Click the box icon at the bottom right of the page.
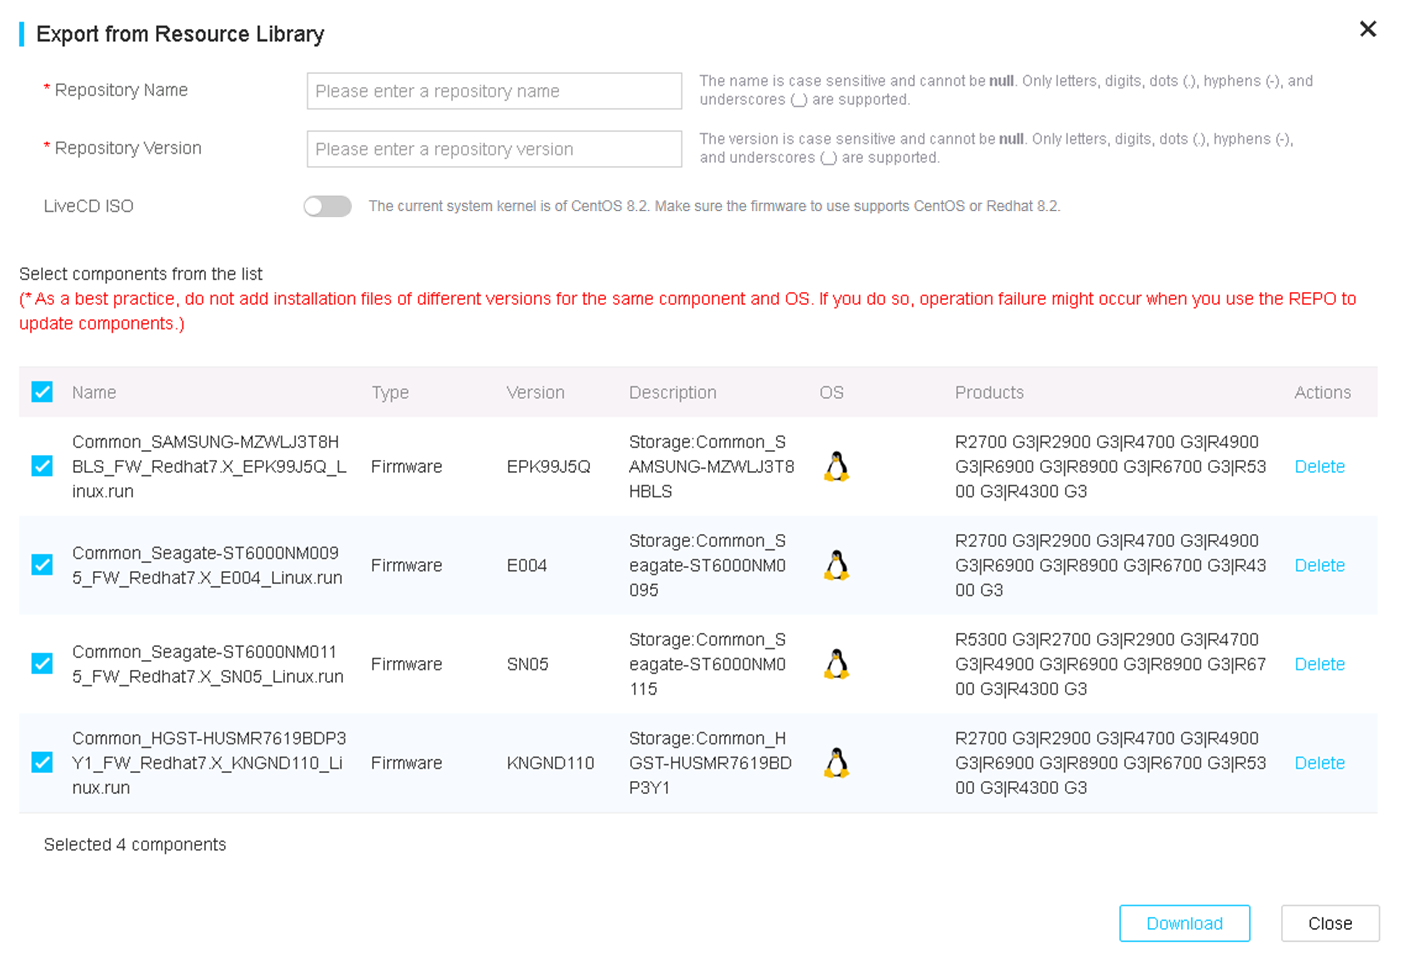
6. In the dialog box that opens, perform the following steps:
a. Enter the repository name and version, and then select the component files to be exported as a REPO.
b. To do combined customization for an offline firmware update, select the LiveCD ISO option.
c. To download the MD5 checksum file when you do a firmware customization for out-of-band update from HDM, select the option that enables MD5 checksum file downloading.
d. Click Download.
Figure 5 Specifying the repository name and version
Exporting the configuration list
1. Log in to FIST, and access Menu > Devices > Server List.
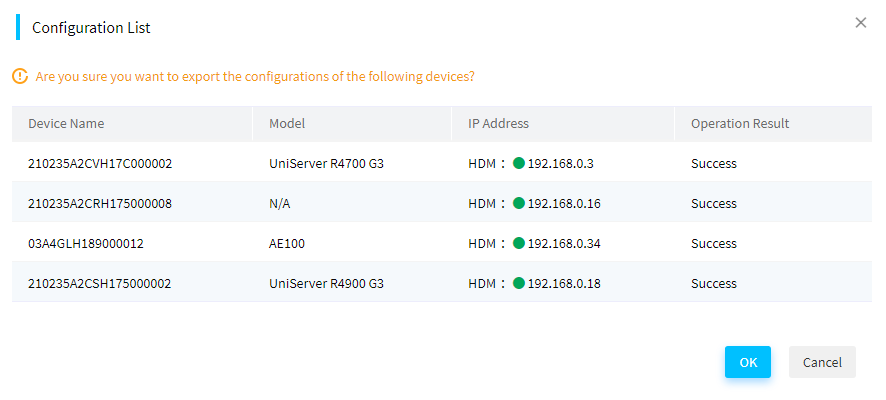
2. Select the servers whose configuration information you want to export, click More, and then select Configuration List.
3. In the confirmation box that opens, click OK.
Figure 6 Confirming the operation
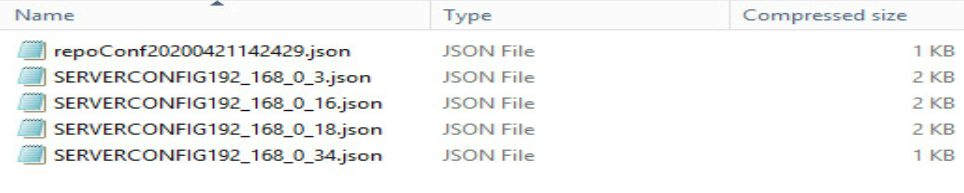
4. Decompress the downloaded file. Then, you can import the .json repoConf file for multiple servers or .json SERVERSONFIG file for a single server when you do combined customization.
Figure 7 Decompressed configuration list files
Using REPO Manager Tool
Restrictions and guidelines
· If you select .bin as the upload type, REPO Manager Tool supports only signed firmware for HDM, the BIOS, and CPLD, and does not support DBCPLD, STBCPLD, AUXCPLD, PDBCPLD, NDCPLD, and PDBSCPLD.
· You can upload a file of up to 1 GB. If the system prompts insufficient drive space, contact the administrator to release the space before uploading the file again.
· The file name cannot exceed 128 characters. To avoid a downloading failure, do not modify the name of a single component package in .run/exe format during uploading.
· The resource library supports selecting a maximum of 16 components for downloading.
Procedure
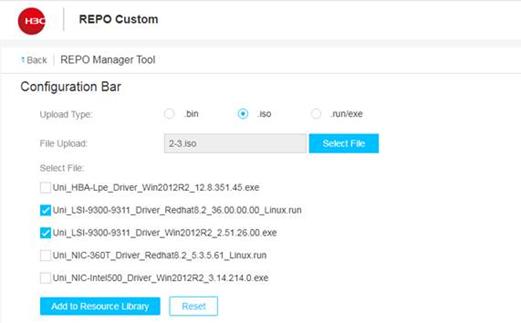
1. Access the REPO Custom page, and click REPO Manager Tool in the upper right corner.
Figure 8 REPO Custom
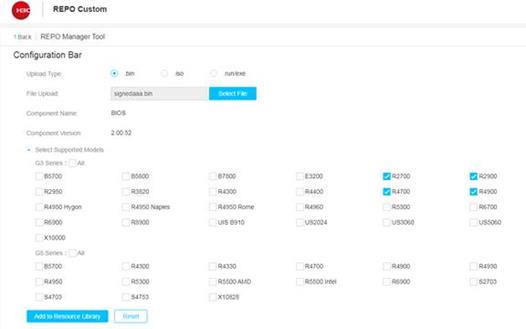
2. Select the upload type. Options include .bin, .iso, and .run/exe.
¡ If you select the .bin upload type, click Select File and select local signed firmware for HDM, the BIOS, or CPLD. The page will display the component name and version for the uploaded file. Then, select supported models. You can select multiple models of the same series. After selecting models, click Add to the Resource Library.
Figure 9 Selecting the .bin upload type
¡ If you select the .iso upload type, click Select File and select a local .iso file. After uploading, select single component packages to be created, and then click Add to Resource Library.
Figure 10 Selecting the .iso upload type
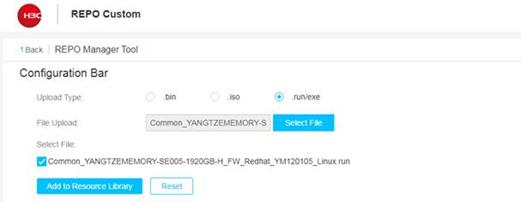
¡ If you select the .run/exe upload type, click Select File and select a single component file in .run/exe format. After uploading, the page will select the file automatically. Then, click Add to Resource Library.
Figure 11 Selecting the .run/exe upload type
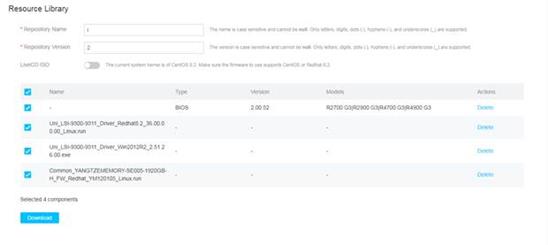
3. Enter the repository name and version, enable LiveCD ISO as needed, select components, and click Download.
Figure 12 Creating and downloading a REPO
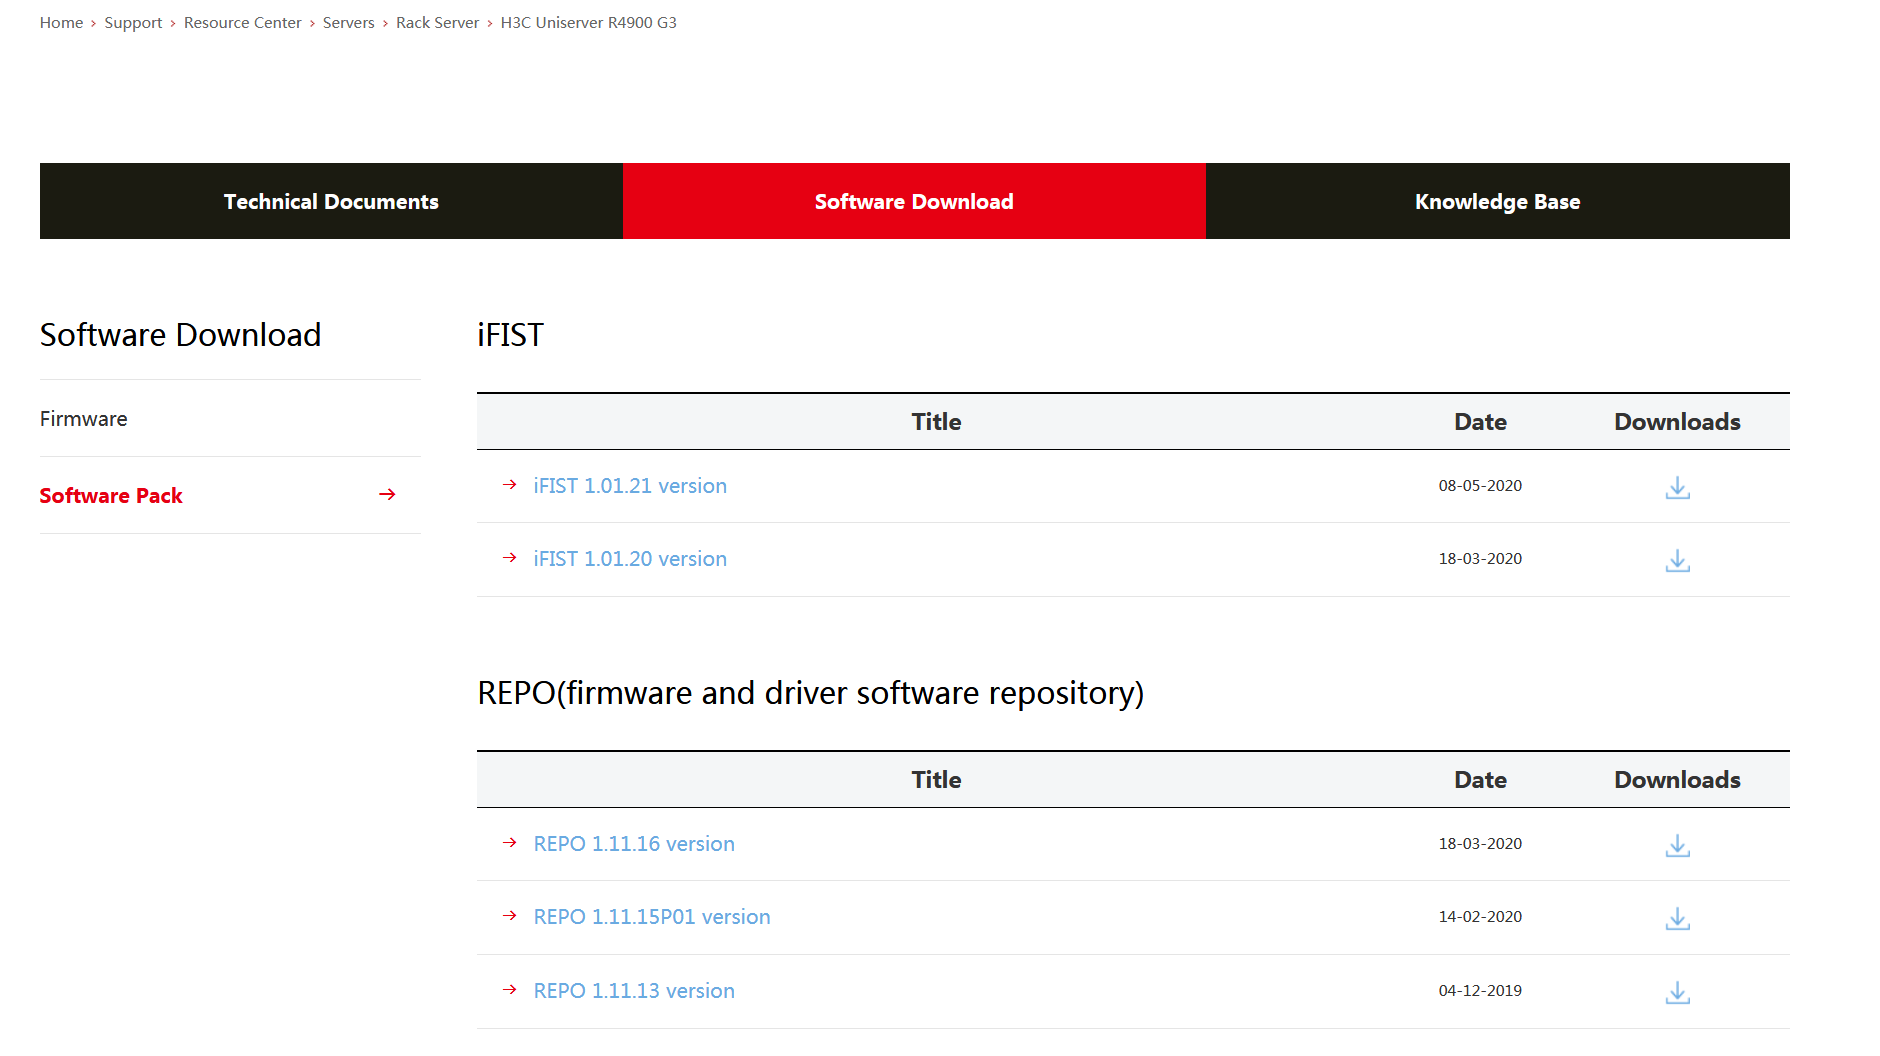
Obtaining a complete REPO
As shown in Figure 13, access the H3C website to obtain a REPO that contains the installation packages for all components. This figure uses REPO-1.11.11 as an example.
A complete REPO has a large size and takes a long time to download or upload. If you are not to update all components of a server, use a custom REPO as a best practice.
Figure 13 Obtaining a complete REPO
Using a REPO
If the HDM firmware version is between HDM-1.11.08 (included) and HDM-1.30.18 (included), updating the BIOS from the OS by using a REPO or through FIST SMS cannot retain user-configured BIOS settings.
One-key update
Restrictions and guidelines
One-key update requires a Windows, CentOS, Red Hat, or VMware ESXi OS on the server.
Only REPO-1.11.11 and later versions support one-key update for VMware OSs.
Procedure
1. Upload the REPO to the OS of the server, or use HDM KVM to mount the REPO to the server.
2. Access the REPO from the server.
Figure 15 Processor Configuration screen
3. Run the update script. The script updates the component automatically.
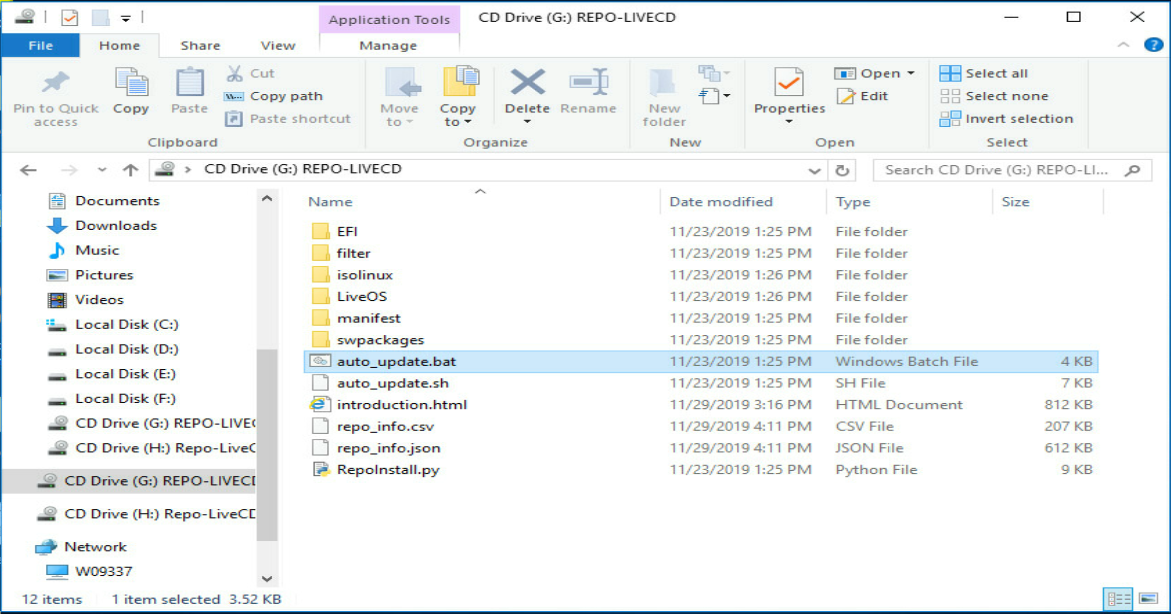
¡ For a Windows OS, double-click the auto_update.bat file.
Figure 16 Running the update script in a Windows OS
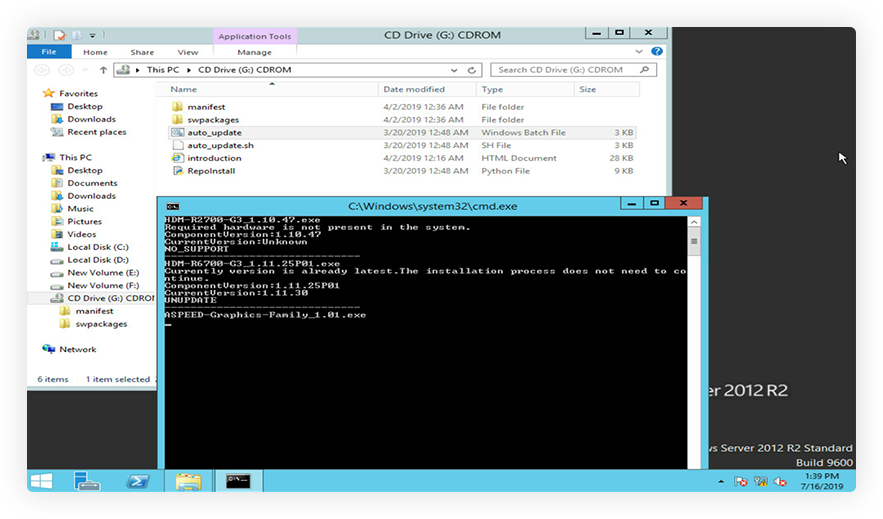
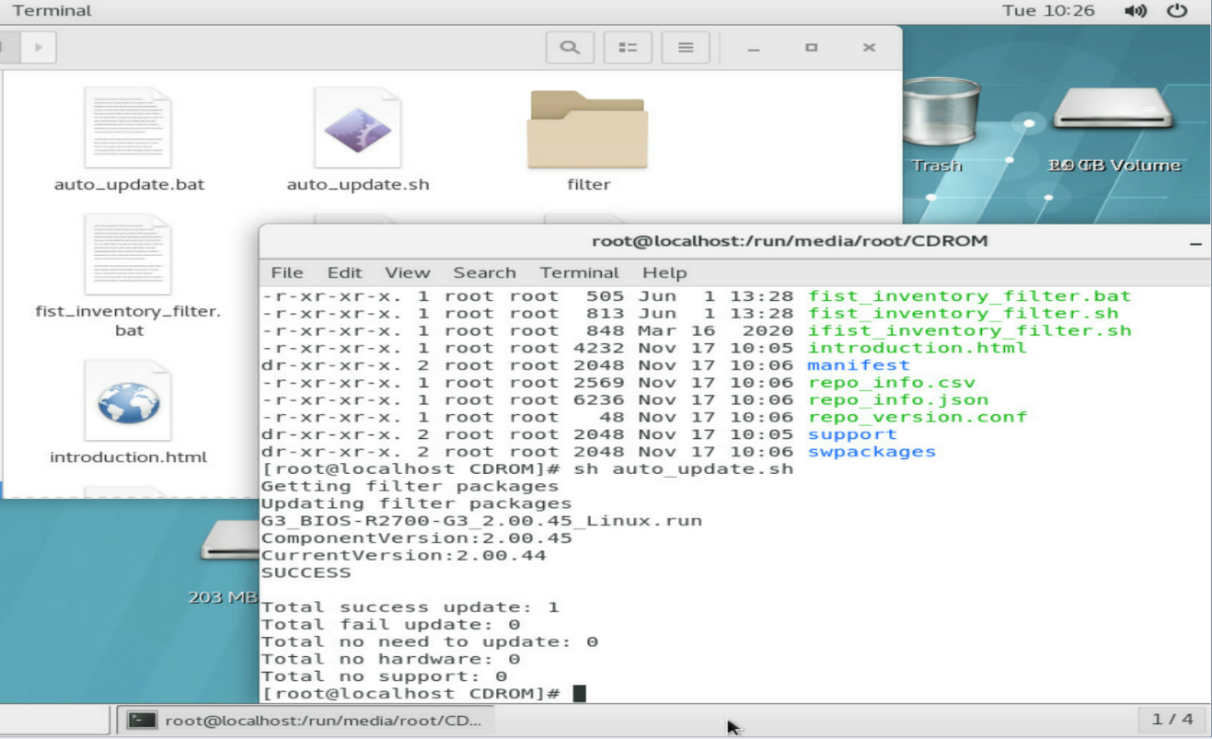
¡ For a Linux or VMware OS, execute the sh auto_update.sh command.
Figure 17 Running the update script in a Linux or VMware OS
Obtaining logs
The directory for storing log files varies depending on the operating system.
Operating system | Log directory |
Linux | /home/update.log |
VMware | /tmp/update.log |
Windows | C:\Users\login username\AppData\Local\Temp\manager\baseFilename.log. NOTE: The log file is hidden. To access the file, unhide it first. |
Single component update
About this task
Perform this task to update a single component. When you perform this task, you must manually select the installation file for the target component.
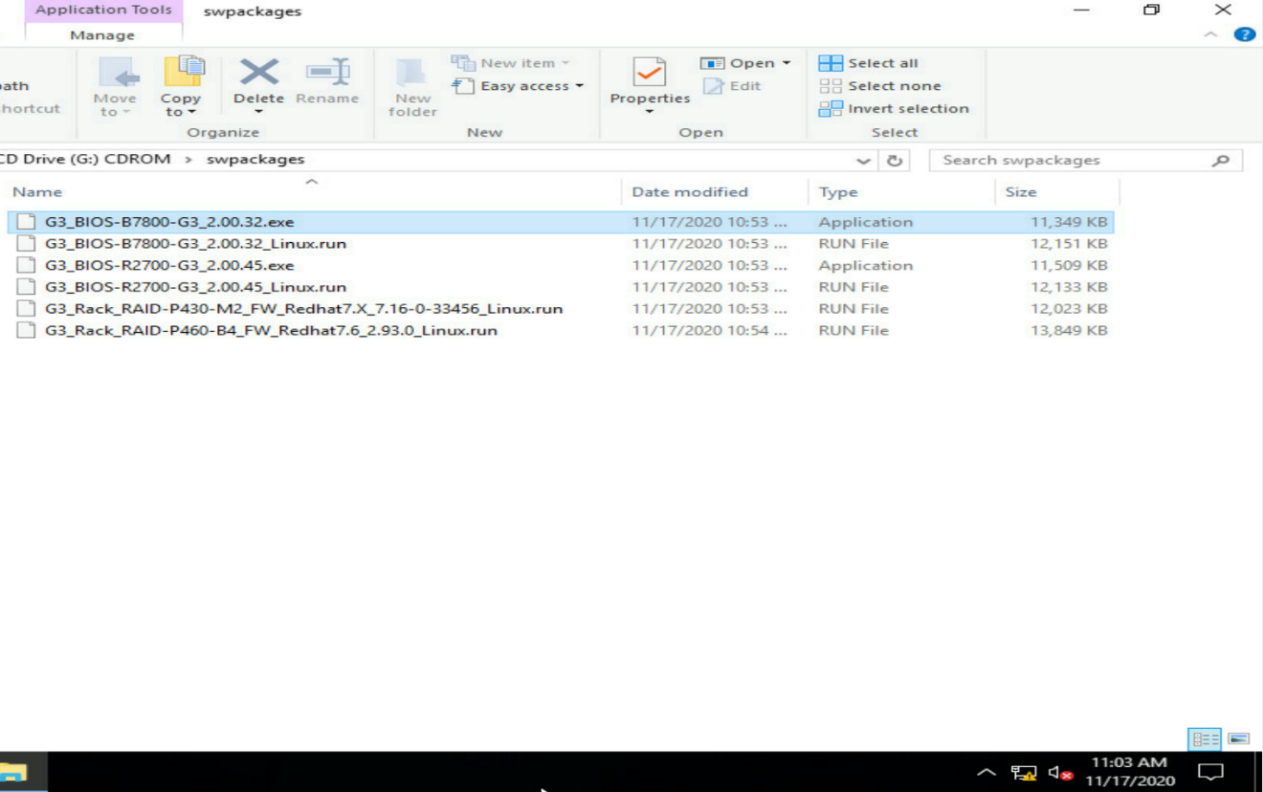
The installation files in a REPO are stored in the /swpackages directory.
Restrictions and guidelines
When you select an installation file, make sure it is compatible with the server model and OS of the server. Typically, you can determine the file and server compatibility by using the file name. For example, The BIOS-B7800-G3_2.00.32.exe file can update the BIOS to version 2.00.32 for a B7800 G3 server using a Windows OS.
For the drivers of drives, the system can perform a single component update only when the drives are in pass-through mode.
Procedure in a Windows OS
| IMPORTANT: The component installation files for Windows OS are .exe files. |
1. Upload the REPO to the OS of the server, or use HDM KVM to mount the REPO to the server.
2. Access the /swpackages directory of the REPO from the server, and then double-click the target .exe installation file, for example, BIOS-B7800-G3_2.00.32.exe.
Figure 18 Running the installation file
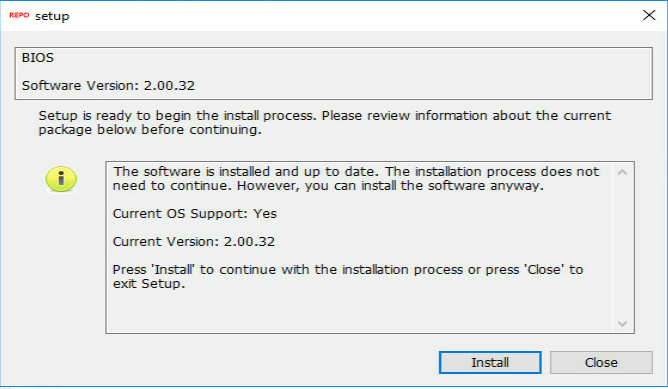
3. In the setup dialog box that opens, click Install.
Figure 19 Confirming the installation
4. After the installation finishes, restart the server for the update to take effect.
Figure 20 Installation completion

Procedure in a Linux or VMware OS
| IMPORTANT: · The installation files for Linux (CentOS or Redhat) or VMware are .run files. · In REPO-1.11.16 (or earlier), the installation files for Linux and VMware are .rpm files and .vib files, respectively. · You can run the .rpm or .vib files in a REPO by using a sh or ./ command. You cannot execute them by using the rpm or vib command. |
This section uses installing HDM 1.30.21 on an R2700 G3 server running a Linux OS as an example.
To perform a single component update:
1. Upload the REPO to the OS of the server, or use HDM KVM to mount the REPO to the server.
2. Access the OS of the server, and then execute the chmod +x file_name command to make the file executable. The file_name argument represents the file name, for example, HDM-R2700-G3_1.30.21_Linux.run.
3. Execute the sh file_name or ./ file_name command, for example, sh HDM-R2700-G3_1.30.21_Linux.run.
Figure 21 Installation in a Linux OS
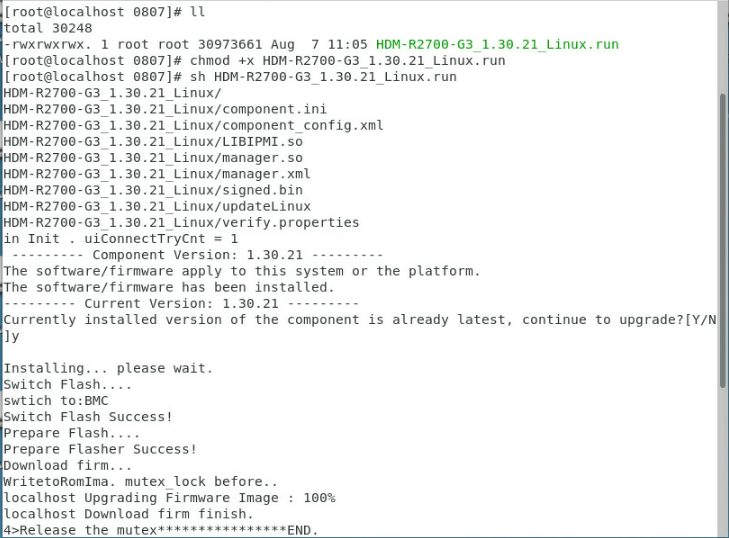
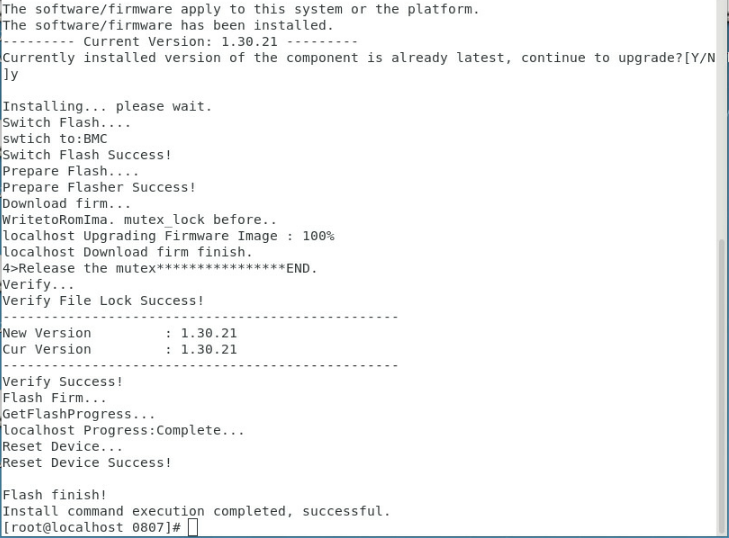
Figure 22 Installation completion
Obtaining logs
The directory for storing log files varies depending on the operating system.
Operating system | Log directory |
Linux | /tmp/componentName/log/baseFilename.log |
VMware | /tmp/componentName/log/baseFilename.log |
Windows | C:\Users\login username\AppData\Local\Temp\number\manager\baseFilename.log. NOTE: The log file is hidden. To access the file, unhide it first. |
Offline firmware update
About offline firmware update
Offline firmware update requires a REPO that comes with a LiveCD system (a small bootable operating system). This feature allows users to update firmware in bulk on servers without any operating systems or servers with operating systems that require permissions.
Restrictions and guidelines
Only FIST 2.00.22 and later versions support offline firmware update of servers in bulk.
Only REPO-1.11.10 and later versions support offline firmware update.
Updating a single server
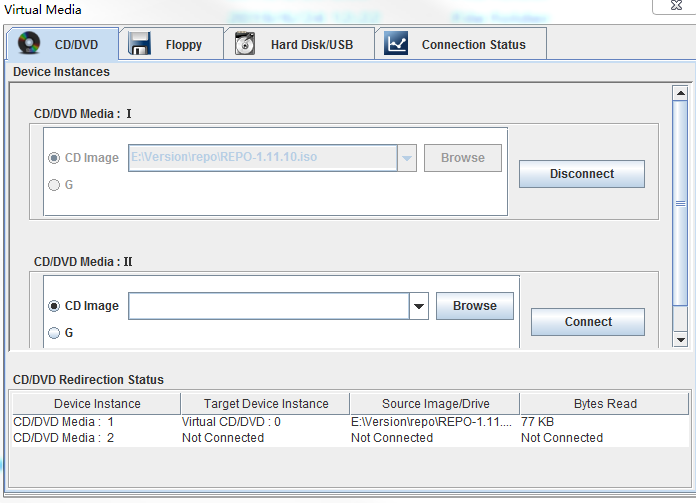
1. Access HDM KVM of the server, and mount the REPO (.iso file) to the server.
Figure 23 File mounting

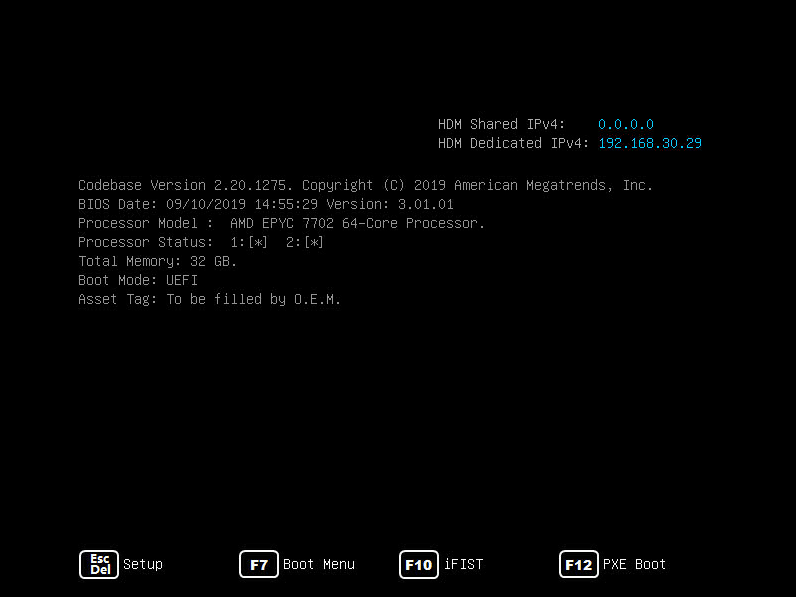
2. Start the server. Press F7 at the prompt to enter the boot menu.
Figure 24 BIOS POST screen
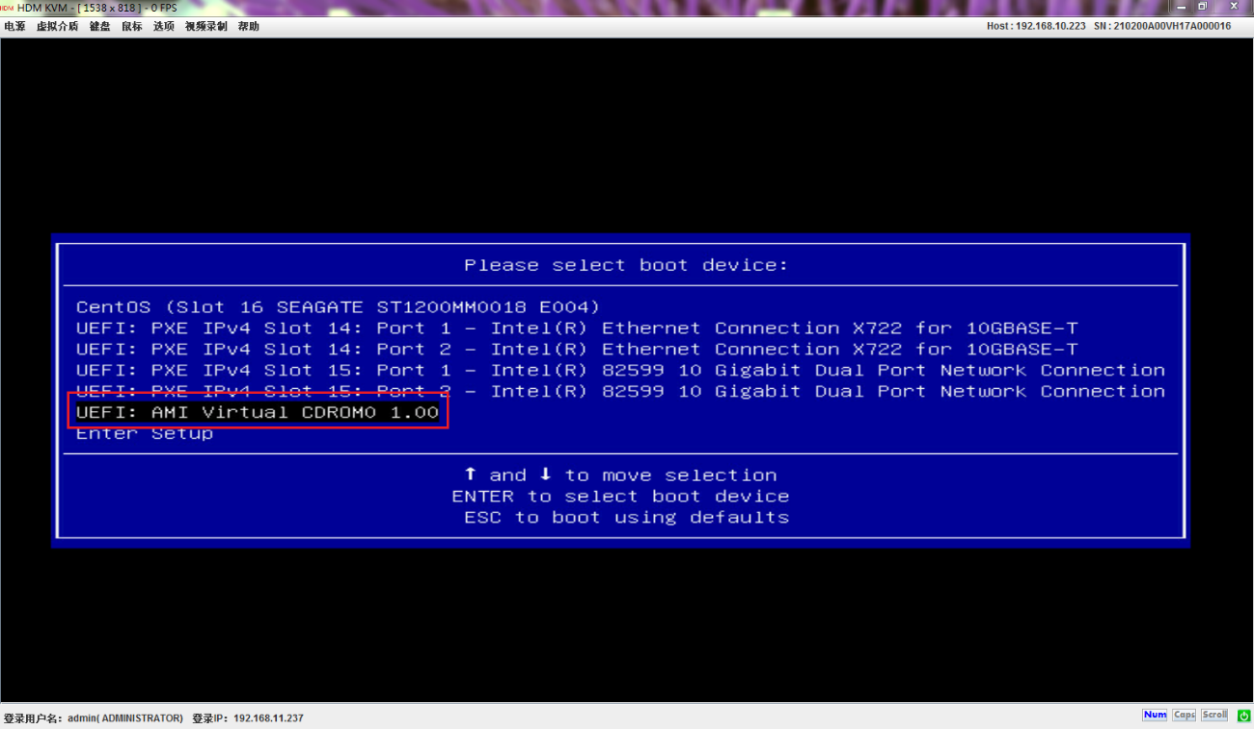
3. Select CDROM as the boot device.
Figure 25 Selecting the boot device
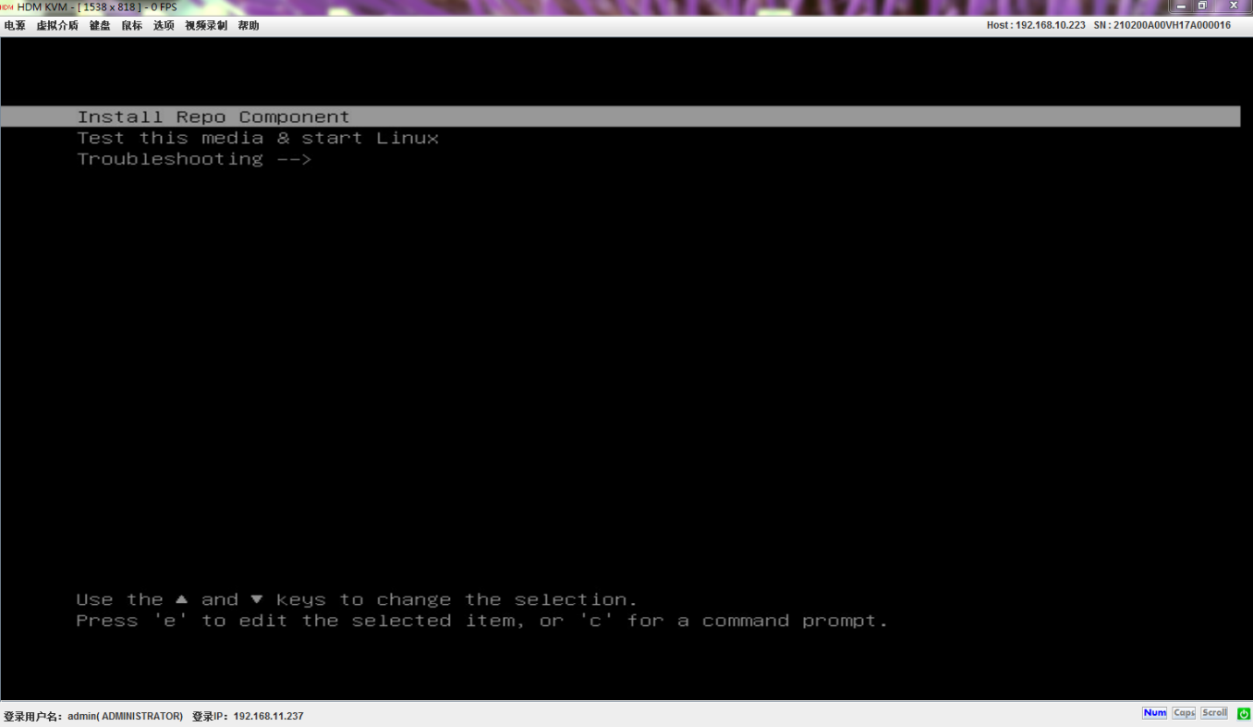
4. Select Install Repo Component.
Figure 26 Selecting Install Repo Component
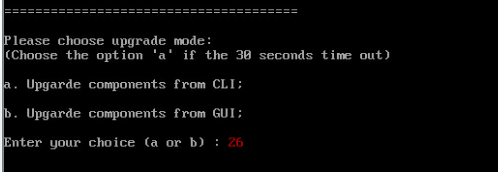
5. Select the upgrade mode. To access the CLI, enter a. To access the GUI, enter b.
If you do not enter your choice within 30 seconds, the system opens the CLI.
Figure 27 Selecting the upgrade mode
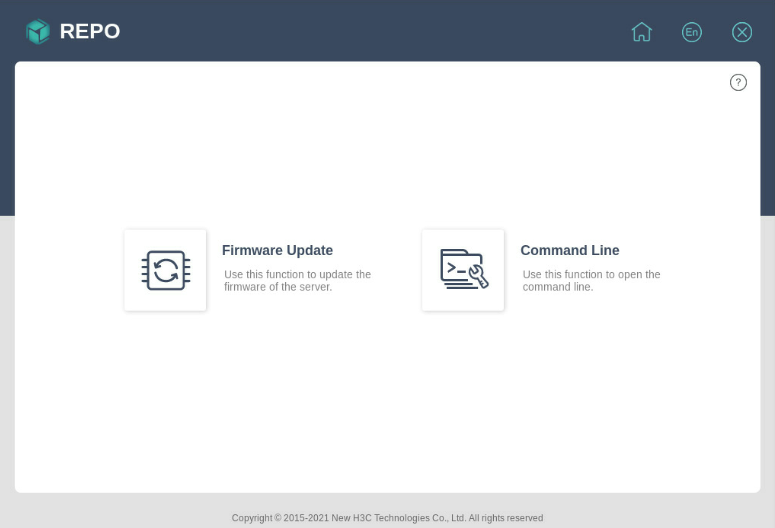
The GUI is as shown in Figure 28. For more information about functions and actions available from the GUI, click the question icon ![]() at the upper right corner and access the REPO online help.
at the upper right corner and access the REPO online help.
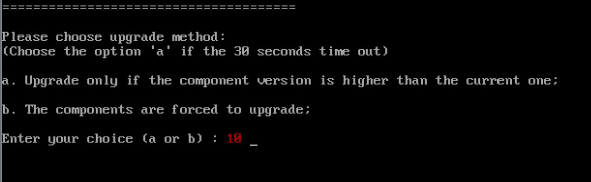
6. If you use the CLI, select the upgrade method. To upgrade all components, enter b.
If you do not enter your choice within 30 seconds, the system upgrades only components whose version is earlier than the firmware version in REPO.
Figure 29 Selecting the upgrade method
The system updates the firmware and displays the update result after the operation finishes.
Figure 30 Update result

Updating servers in bulk
1. Log in to FIST. On the top navigation bar, click Menu, and then select Server List from the Devices menu.
2. Click Add and select the target servers.
3. On the top navigation bar, click Menu, and then select Images from the Templates menu.
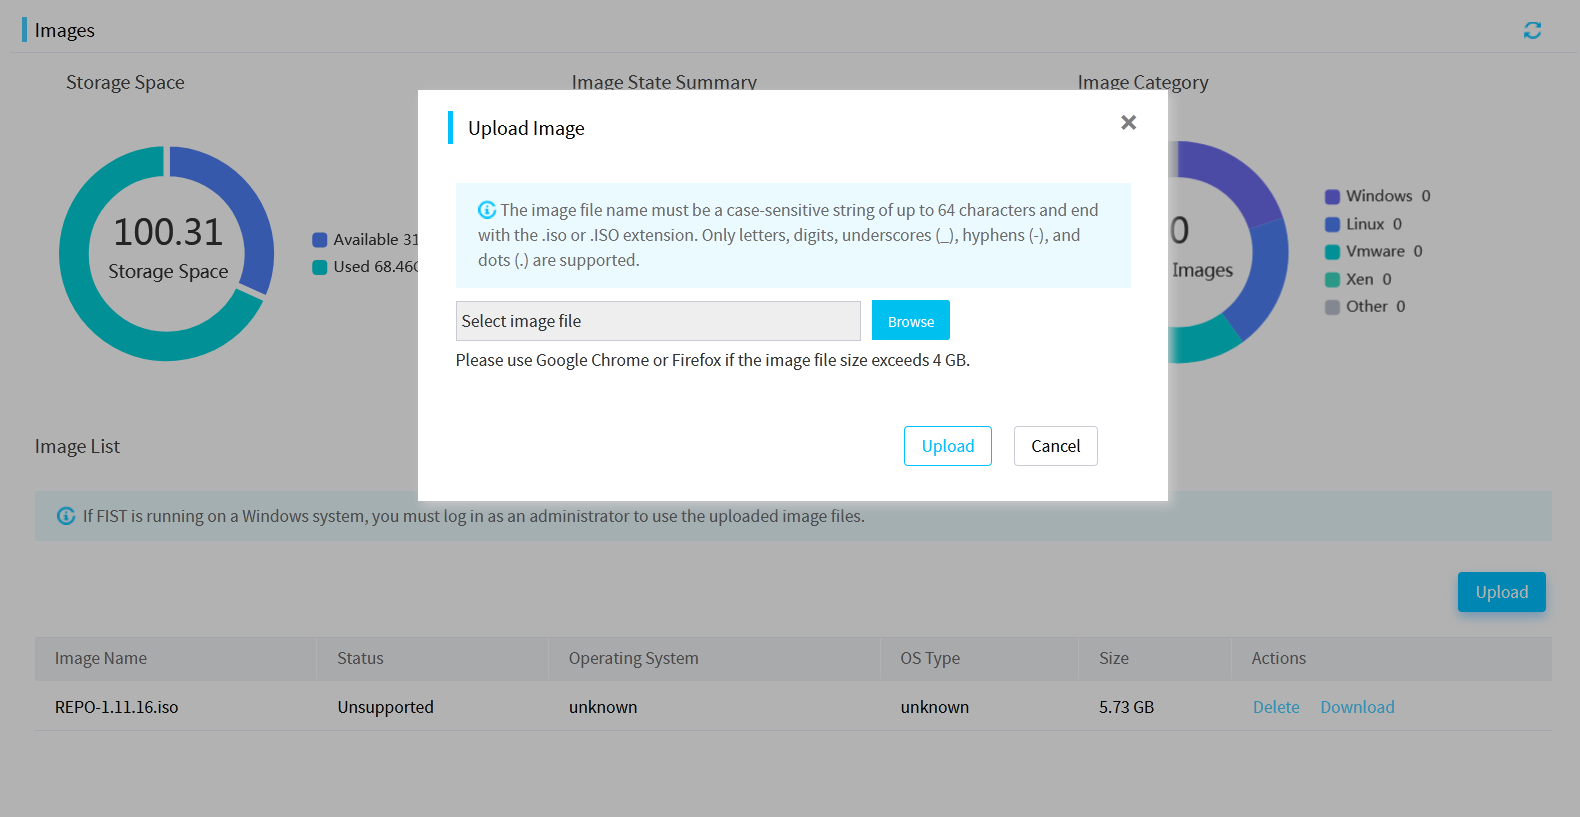
4. Click Upload. In the dialog box that opens, browse to the target image file, and then click Upload.
Figure 31 Uploading the target image file
5. On the top navigation bar, click Menu, and then select Offline Firmware Update from the Server Deployment menu.
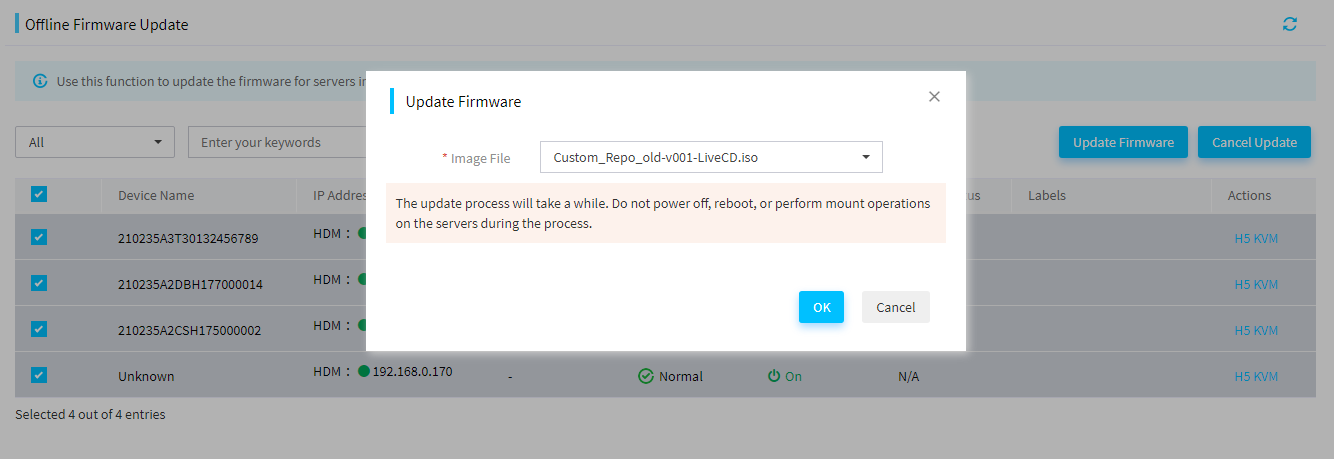
6. Select the target devices and click Update Firmware. In the dialog box that opens, select the uploaded REPO file, and then click OK.
Figure 32 Performing offline update
7. (Optional.) To view the firmware update information of a server, click the H5 KVM link in the Actions column for the sever.
Obtaining logs
The offline firmware update logs are stored in .log files in the /tmp/componentName/log/ directory in the LiveCD system.
Out-of-band firmware update
About out-of-band firmware update
With out-of-band firmware update, you can update the firmware for components in bulk, including:
· Storage controllers.
· Network adapters.
· Drives.
You can do an out-of-band firmware update for one server from HDM or for multiple servers from FIST.
Updating a single server out of band from HDM
Restrictions and guidelines
· To perform a REPO-based out-of-band firmware update from HDM, you must use HDM in conjunction with a compatible version of iFIST.
¡ Make sure the following compatibility matrix is met:
HDM version | iFIST version |
HDM-2.52 or later | iFIST-1.32 or later |
¡ Use the release nodes for HDM or iFIST to verify that the HDM and iFIST versions you are using are compatible.
Without iFIST, you cannot upload REPO images from the HDM Web interface to update firmware.
· The REPO image file size cannot exceed 300 MB.
Procedure
1. Sign in to the HDM Web interface. For more information about the procedure, see the HDM user guide.
2. Open the page for firmware update, as shown in Figure 33.
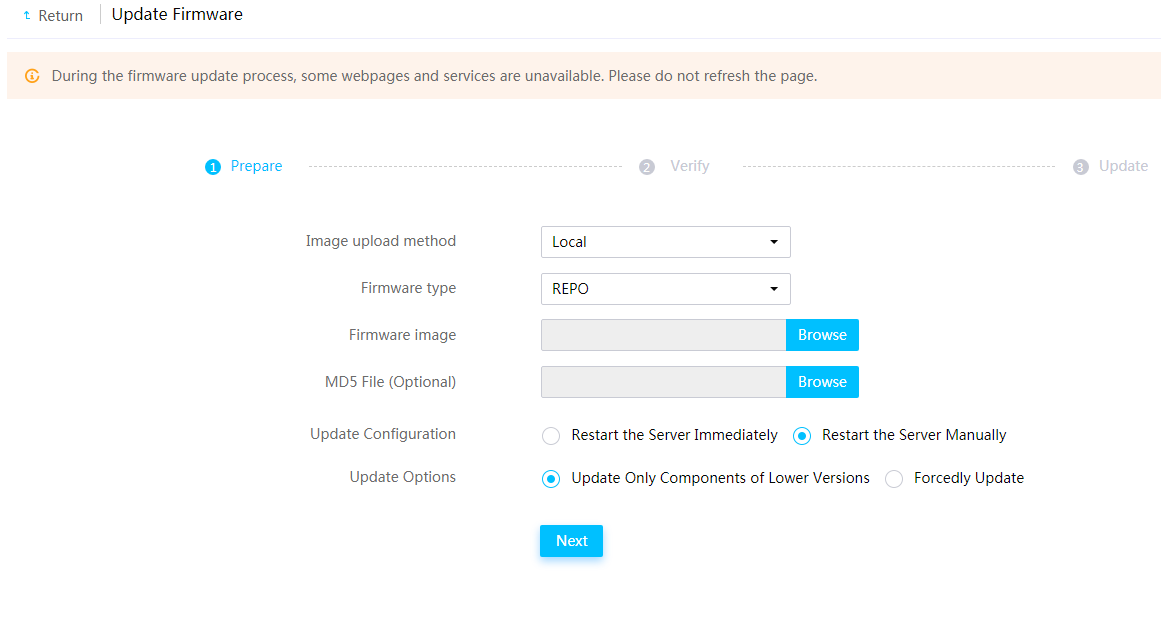
3. Configure settings for uploading the firmware image file.
| NOTE: You can upload firmware image files from the local host or from a TFTP server. As a best practice, upload firmware image files from the local device. |
To upload the image file from the local device:
a. Select Local as the image upload method.
b. Select REPO as the firmware type.
c. Browse to the REPO image, and then select it.
d. (Optional.) Browse to the MD5 checksum file, and then select it.
To upload the image file through TFTP:
a. Select TFTP as the image upload method.
b. Enter the IP address of the TFTP server and the image file name.
c. Select REPO as the firmware type.
d. (Optional.) Browse to the MD5 checksum file, and then select it.
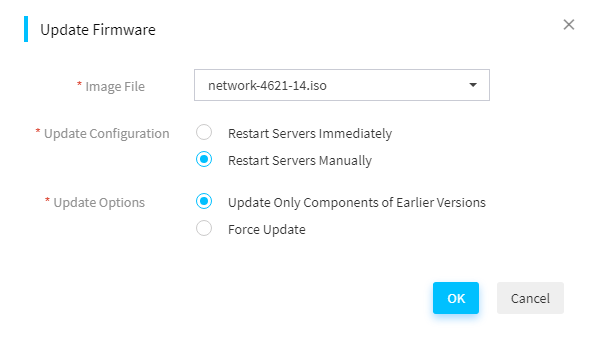
4. Select the method to restart the server and additional update options.
¡ Restart the Server Immediately—To have the server restart automatically to have the updated firmware take effect after the firmware update finishes, select this option.
¡ Restart the Server Manually—To manually restart the server to have the updated firmware take effect after the firmware update finishes, select this option.
5. Click Next to verify the firmware update settings.
Figure 34 Verifying firmware update settings
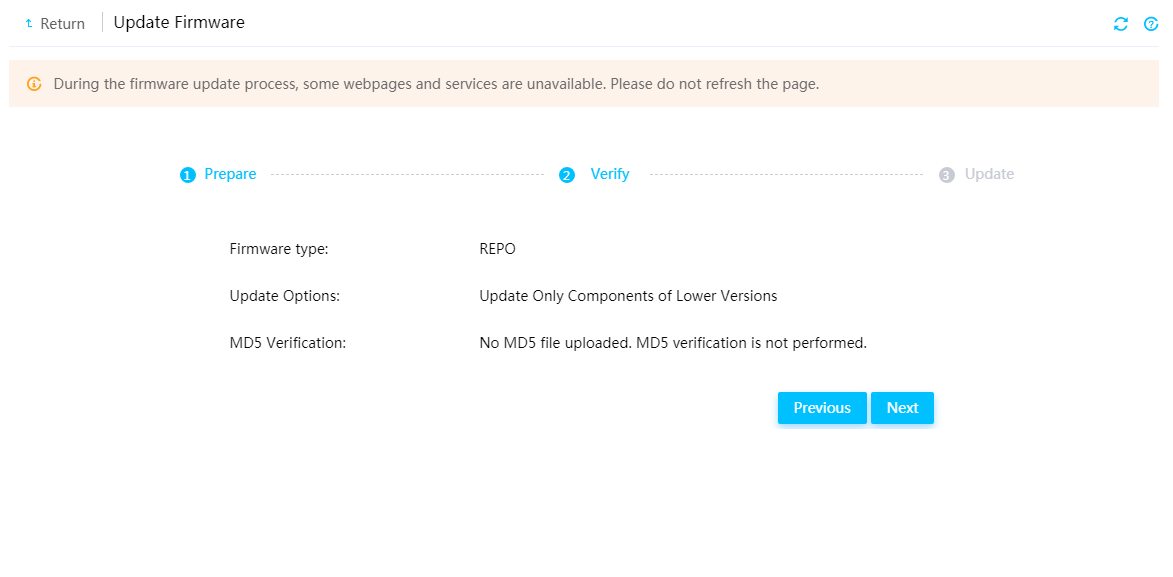
6. If all settings are correct, click Next to update the firmware.
7. If you have selected manual server restart, restart the server manually as needed.
If you have selected automatic server restart, the server restarts automatically and runs iFIST to commit the firmware update.
The system executes the firmware update file at startup to have the update take effect. On completion of this process, the server restarts automatically.
| CAUTION: Do not restart or power cycle the server while it is updating firmware. Doing so might cause the operating system to become inaccessible. |
8. To verify the firmware update status, review the operation log.
Updating servers in bulk out of band from FIST
Restrictions and guidelines
· To perform a REPO-based out-of-band firmware update from FIST, you must use FIST in conjunction with HDM and iFIST and make sure the following compatibility matrix is met:
FIST version | HDM version | iFIST version |
FIST 2.32 or later | HDM-2.52 or later | iFIST-1.32 or later |
· The REPO image file size cannot exceed 300 MB.
Procedure
1. Log in to FIST. For more information about the procedure, see H3C Servers FIST User Guide.
2. Select Menu > Devices > Server List, and then click Add to add servers to the server list.
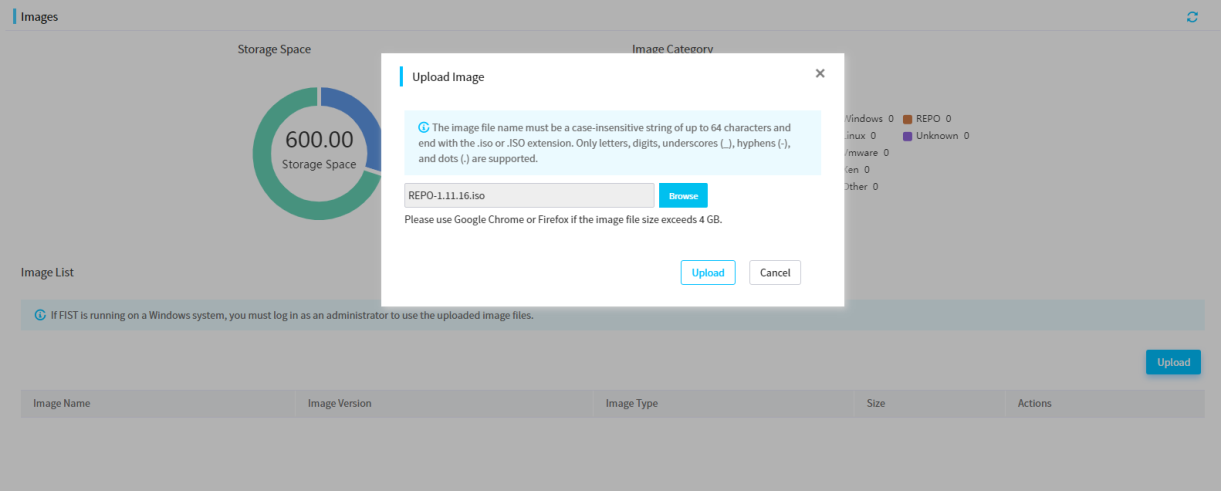
3. Select Menu > Templates > Images, and then click Upload.
In the dialog box that opens, browse to the REPO image, select it, and then click Upload.
Figure 35 Uploading a REPO image
4. Select Menu > Deployment > Firmware Update, and then click the HDM Out-of-Band Firmware Update tab.
Figure 36 HDM out-of-band firmware update
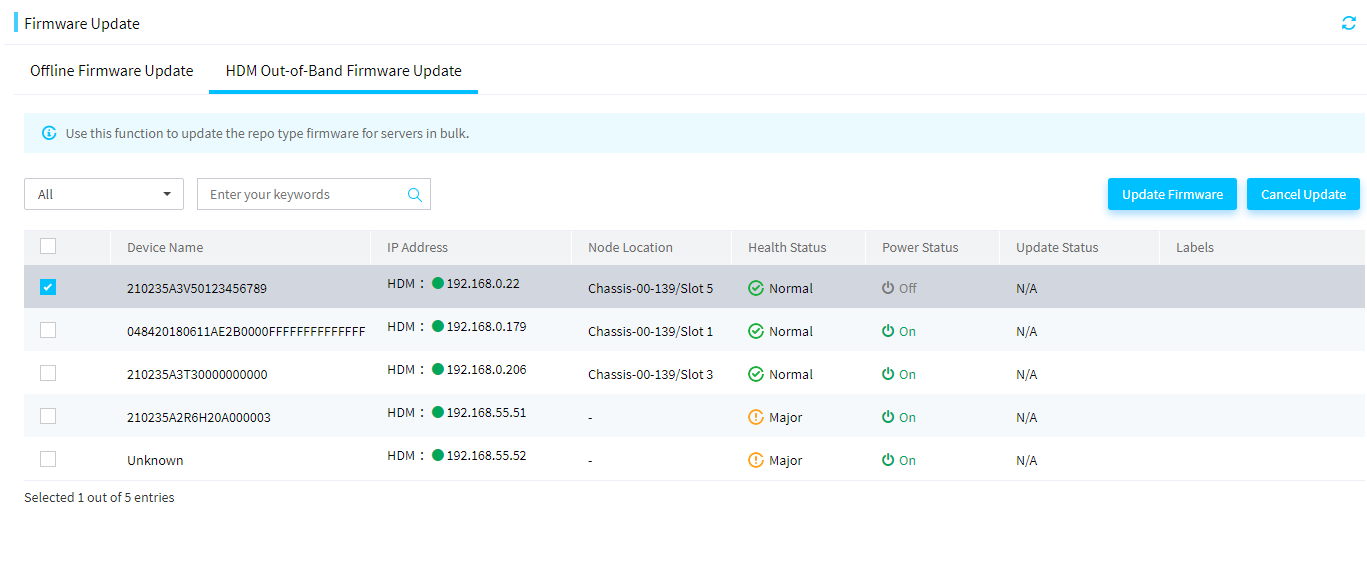
5. Select the target servers, and then click Update Firmware.
To quickly find the target servers, select a filter and enter a keyword in the search box as needed.
6. In the dialog box that opens, select the REPO image file for the update, configure update settings, and then click OK.
Because HDM requires that the REPO image file size should not exceed 300 MB, the image list contains only REPO images that do not exceed 300 MB.
Figure 37 Firmware update settings
7. Click OK to update the firmware.
To cancel the update, click Cancel Update.
You can cancel a firmware update at any time before the system starts verifying the update file. Once file verification starts, you cannot cancel the firmware update.
The servers execute the firmware update file at startup to have the update take effect. On completion of this process, the servers restart automatically.
| CAUTION: Do not restart or power cycle the server while it is updating firmware. Doing so might cause the operating system to become inaccessible. |
8. Verify that the update is completed successfully.
¡ If you selected to restart the server immediately, identify the update result for each selected server in the Update Status column on the HDM Out-of-Band Firmware Update tab.
¡ If you selected to manually restart the server, access the Web interface of HDM and then review the operation log.
Update from FIST
About update through FIST
This feature allows you to upload a REPO to FIST as a repository and then update server components from FIST.
This method uses both the repository and component update features to enable bulk server update.
Restrictions and guidelines
To use this method, make sure FIST SMS has been installed on the servers' OS. For more information about installing FIST SMS, see "Installing FIST SMS."
Preparation
Before the update, obtain one of the following paths:
· UNC path—Path to the shared repository resources in the LAN.
· HTTP path—Path to the HTTP server.
· Local path—Path to the local directory of the FIST host. If you use FIST of a version earlier than 2.00.22, the local path is the path to the local directory of the FIST server.
Procedure
Adding a repository
1. Log in to FIST, and access the Menu > Templates > Repository page.
For more information about logging in to FIST, see the installation guide for FIST.
Figure 38 Repository management

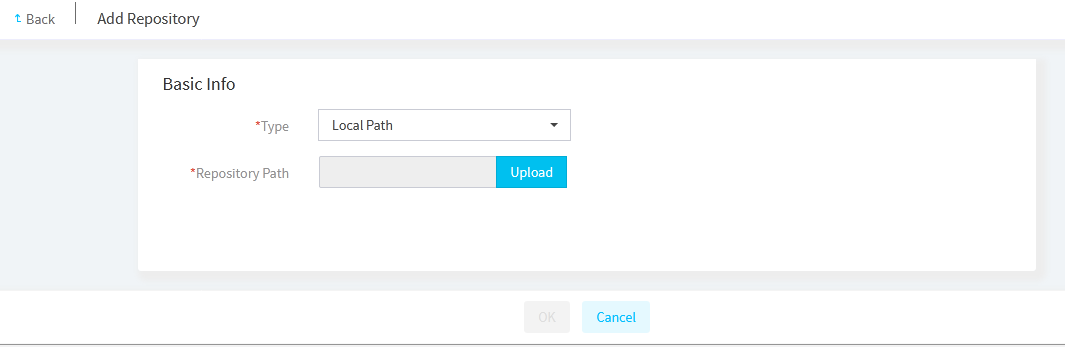
2. Click Add Repository.
3. Select Local Path from the Type field, click Upload, and select the target repository. Then, click OK after the upload process is complete.
Figure 39 Adding a repository
4. Click Inventory for the target repository. The system starts to inventory components.
| NOTE: In FIST 2.00.22 or a later version, the system automatically starts to inventory components after you add a repository. |
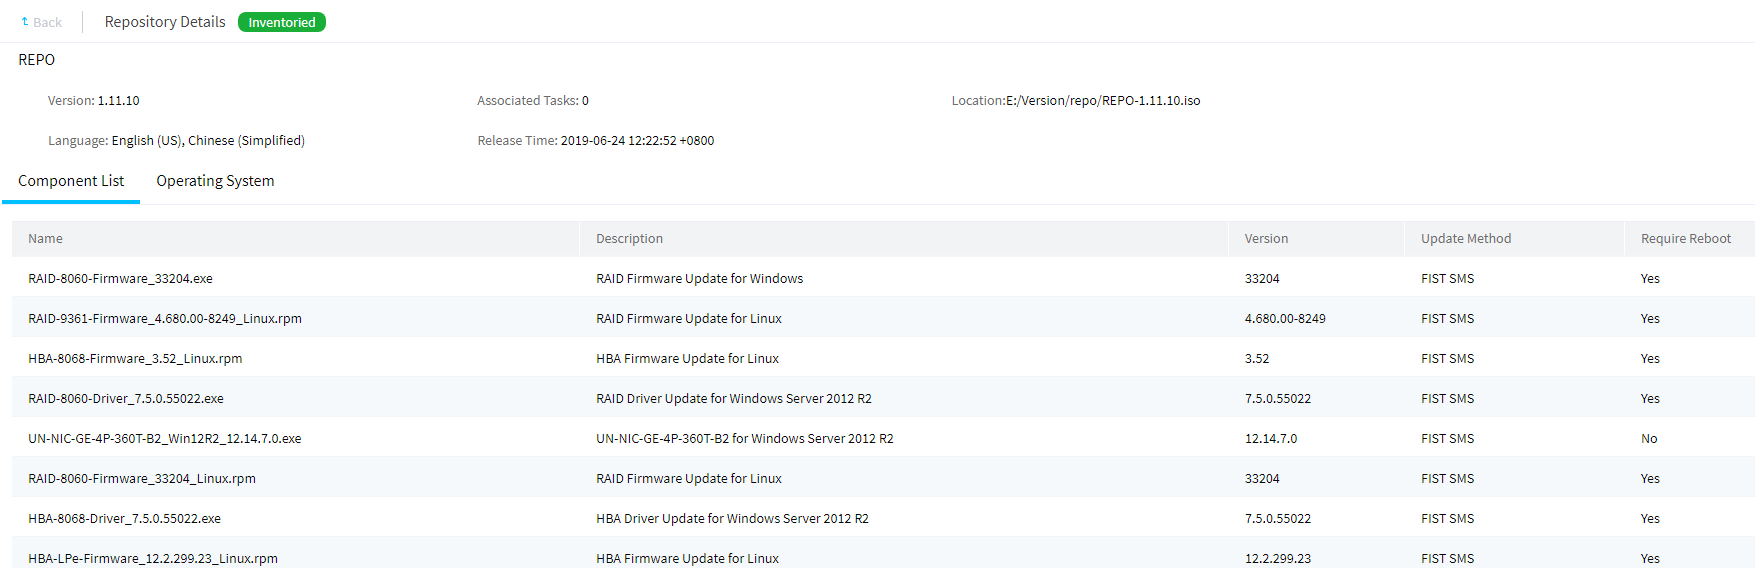
5. To view the check result, click the repository name.
Figure 40 Viewing the inventory result
Updating components
1. Access the Menu > Deployment > Update Component page.
The local host is the host on which FIST runs.
Figure 41 Components update tasks

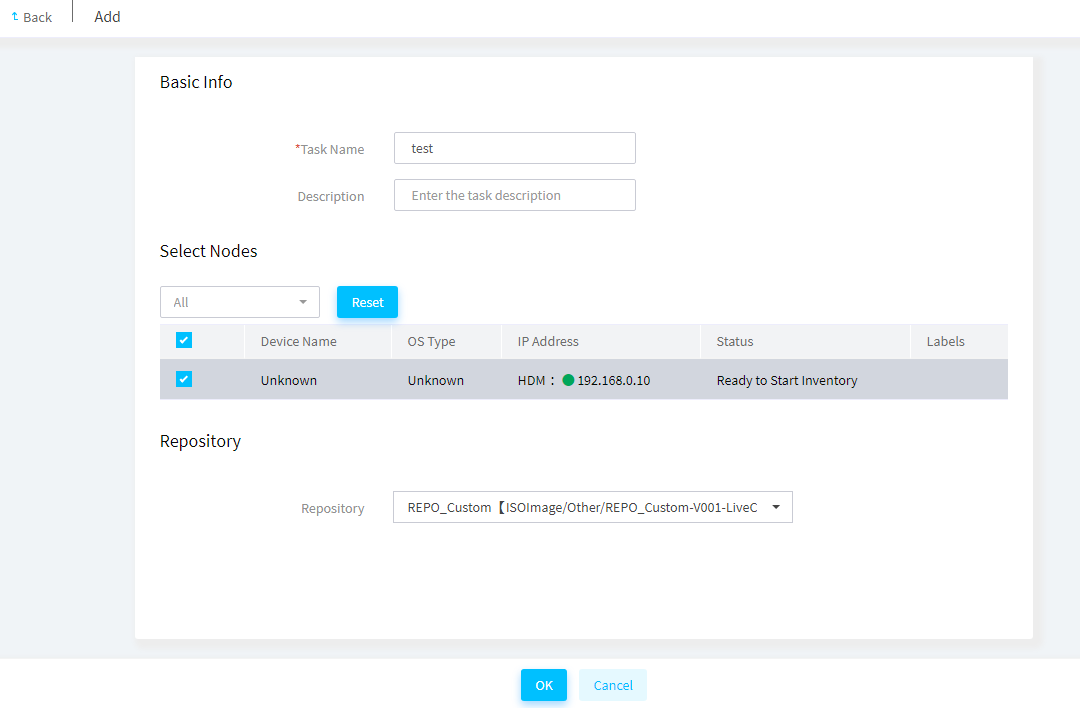
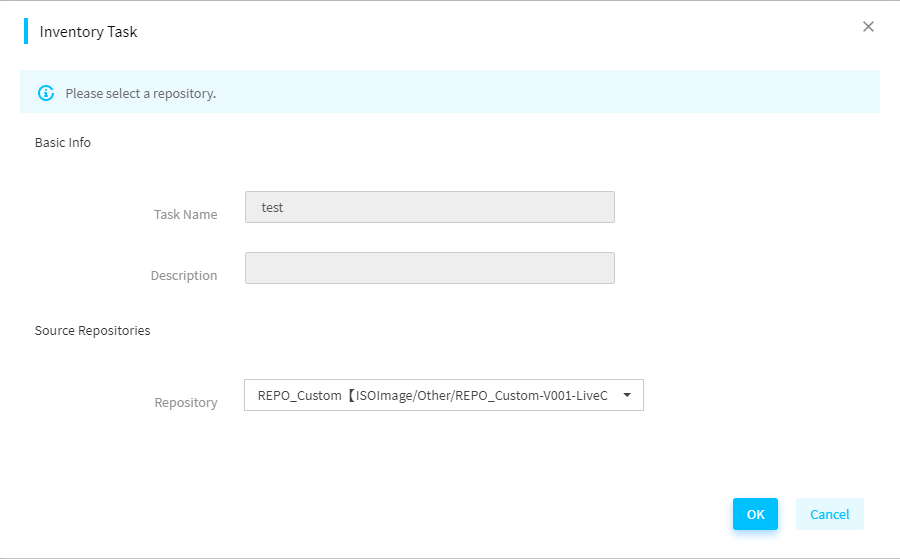
2. Click Add, and configure the task as follows:
¡ Specify the task name.
¡ (Optional.) Specify the task description.
¡ Select the target nodes.
¡ (Optional.) Select the target repository.
¡ Click OK.
Figure 42 Creating a task
The system displays the created task in the component update task list.
Figure 43 Component update tasks

3. Click Inventory for the created task. Then, select the target repository, and click OK.
Figure 44 Inventorying the created task
4. Wait for the inventory to finish and then click Deploy for the task. The localhost task cannot be deployed with any other tasks at the same time.
5. The inventory or deployment operation skips nodes in abnormal state. Failure to inventory or deploy some nodes does not affect the overall inventory or deployment process. If all nodes are in abnormal state, the inventory or deployment operation fails.
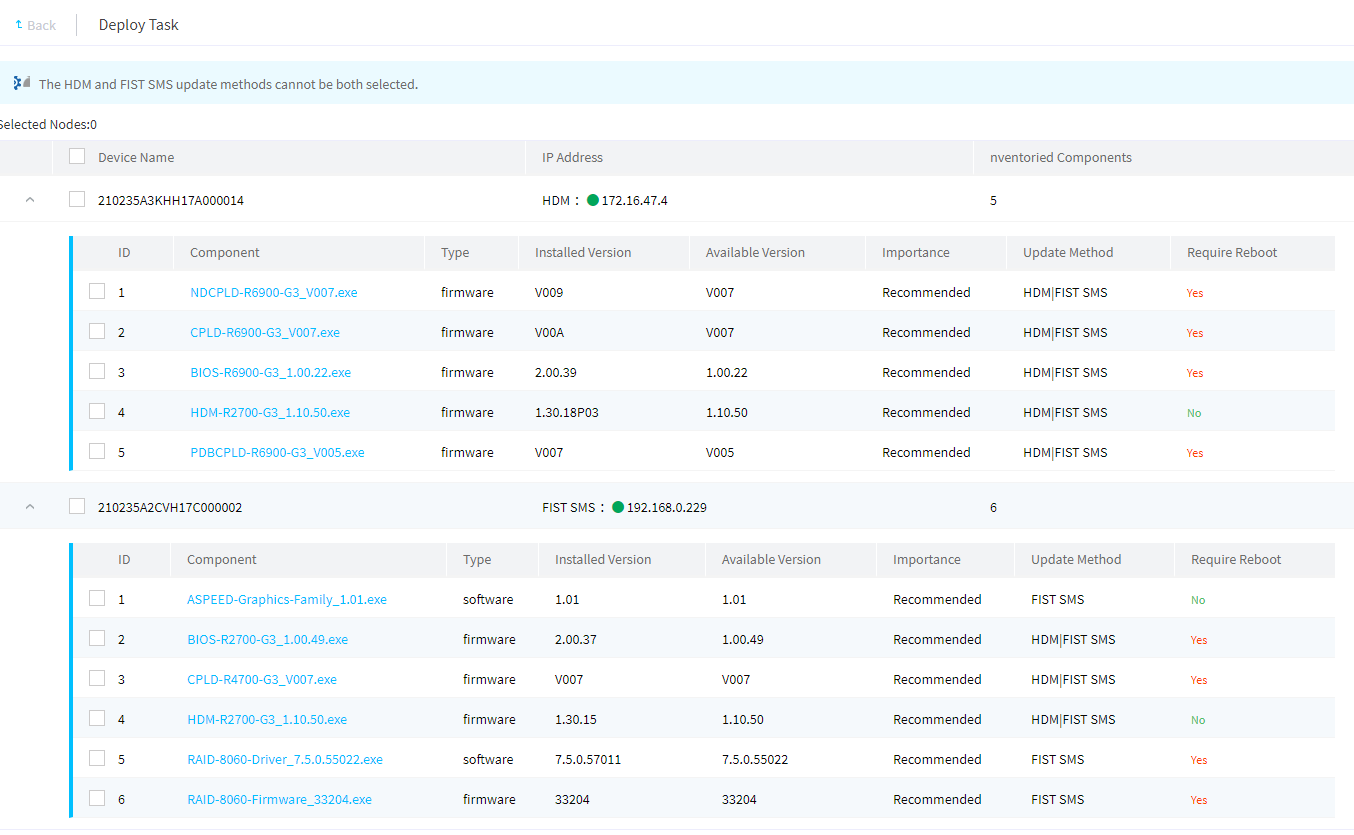
6. Verify that the components to update are as required. Click the name of each component to identify whether the component has any dependent components or requires server restart. Make sure you select the dependent components as well.
Figure 45 Verifying components to update
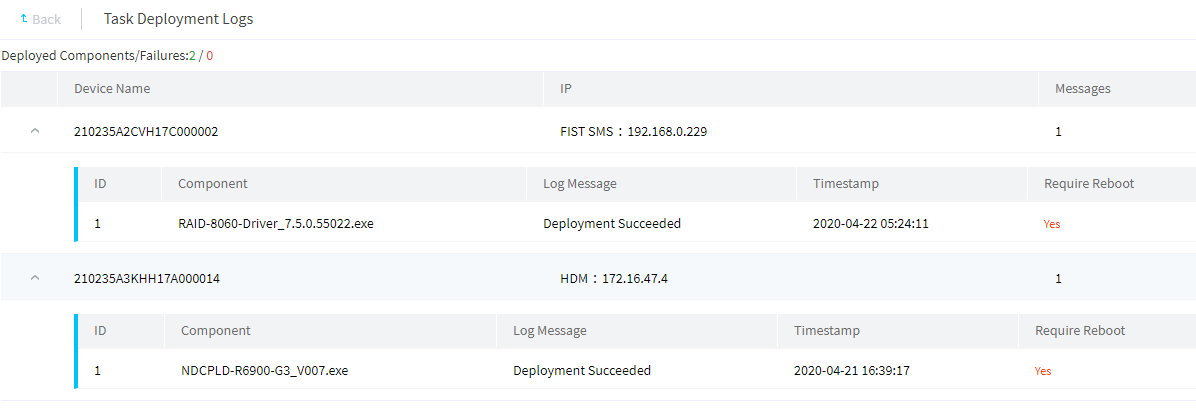
7. After the deployment, click Logs for the task, and view the deployment result.
Figure 46 Deployment completion

Figure 47 Component deployment logs
Obtaining logs
The directory for storing log files varies depending on the operating system.
Operating system | Log directory |
Linux | /log/baseFilename.log in the running directory for FIST SMS. |
Windows | C:\Users\login username\AppData\Local\Temp\number\manager\baseFilename.log. NOTE: The log file is hidden. To access the file, unhide it first. |
Driver update through a FIST server template
About this task
A server template defines a set of server configurations for bulk server deployment, including RAID settings, drivers, and OS. This method allows you to install drivers while installing the OS for servers in bulk.
To perform this task, upload a REPO to FIST as a repository, create a server template using drivers in the repository, and then use the server template to deploy servers. For more information about REPO uploading, see "Adding a repository."
Procedure
1. Log in to FIST, and access the Menu > Templates > Server Templates page.
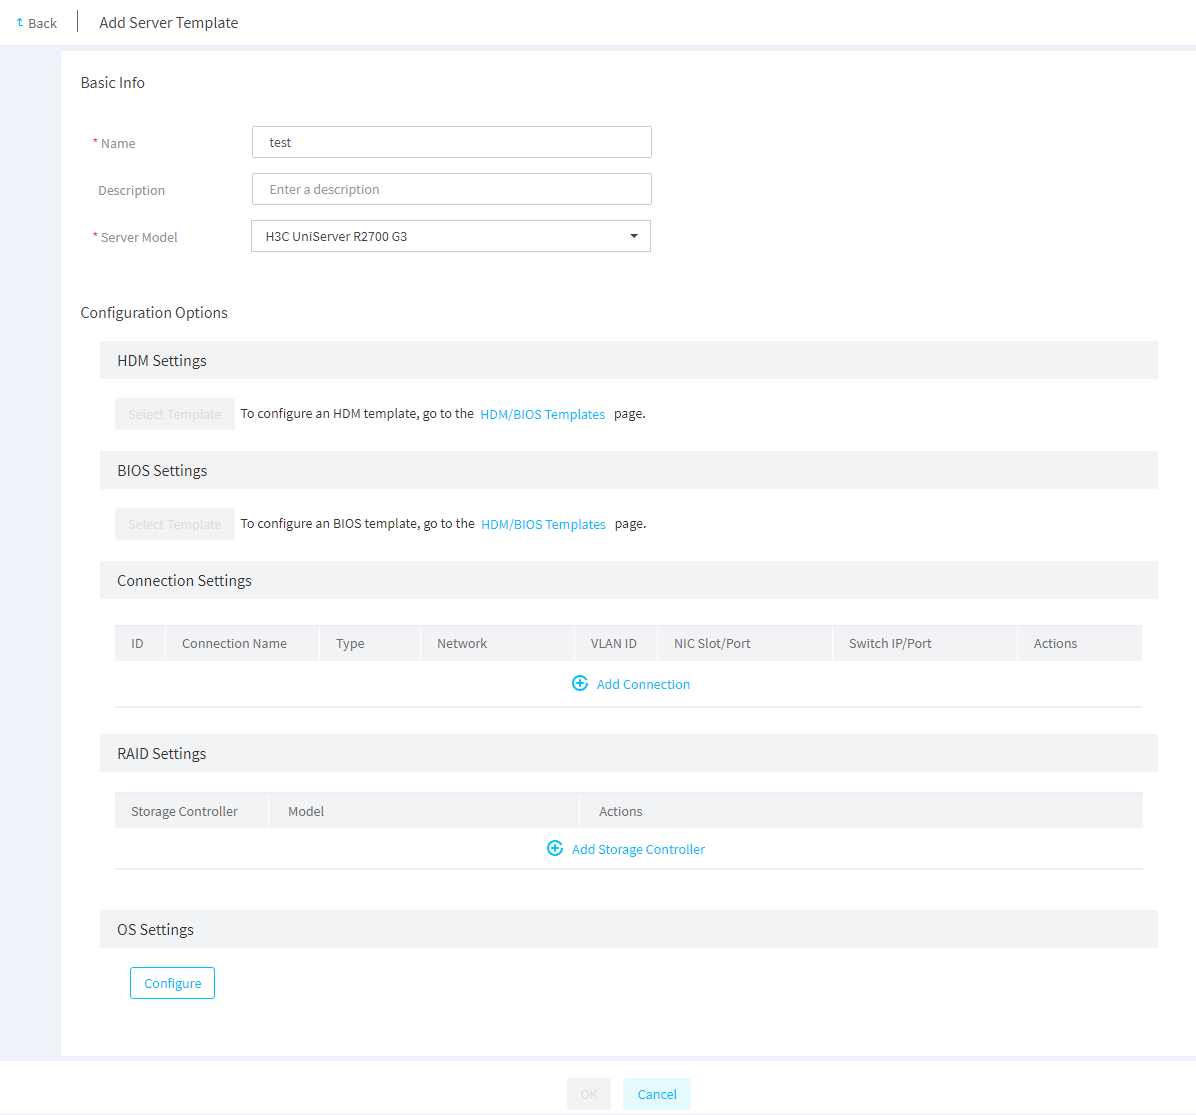
2. Click Add.
3. Specify the server template name and select an applicable server model.
Figure 48 Creating a server template
4. Click Configure in the OS Settings area.
5. Select the OS and image file, configure the other required parameters, and configure system drive settings.
Figure 49 Configuring OS settings

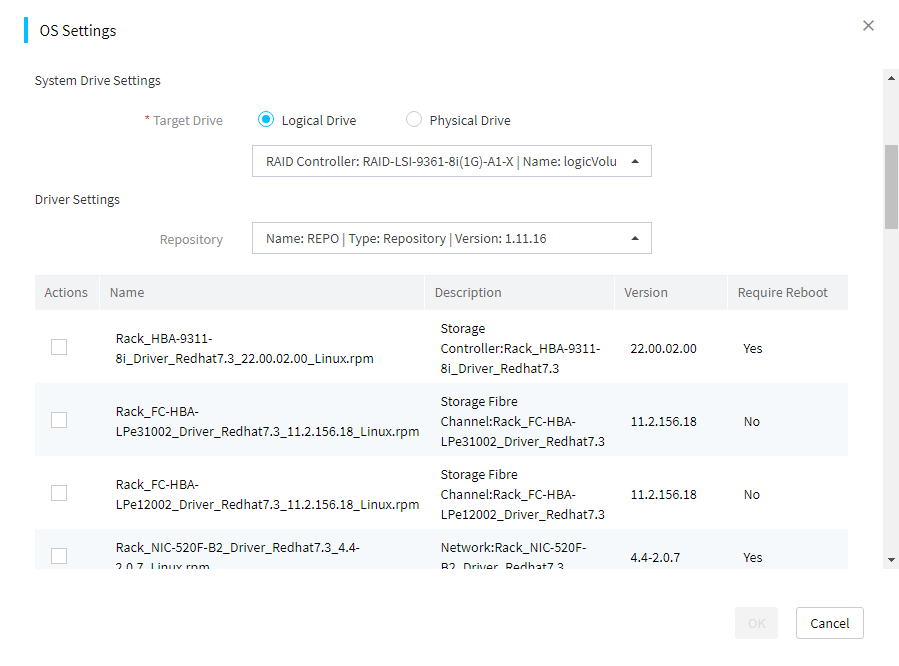
6. Select the repository and the target driver files, and then click OK to submit the system configurations.
Figure 50 Configuring driver settings
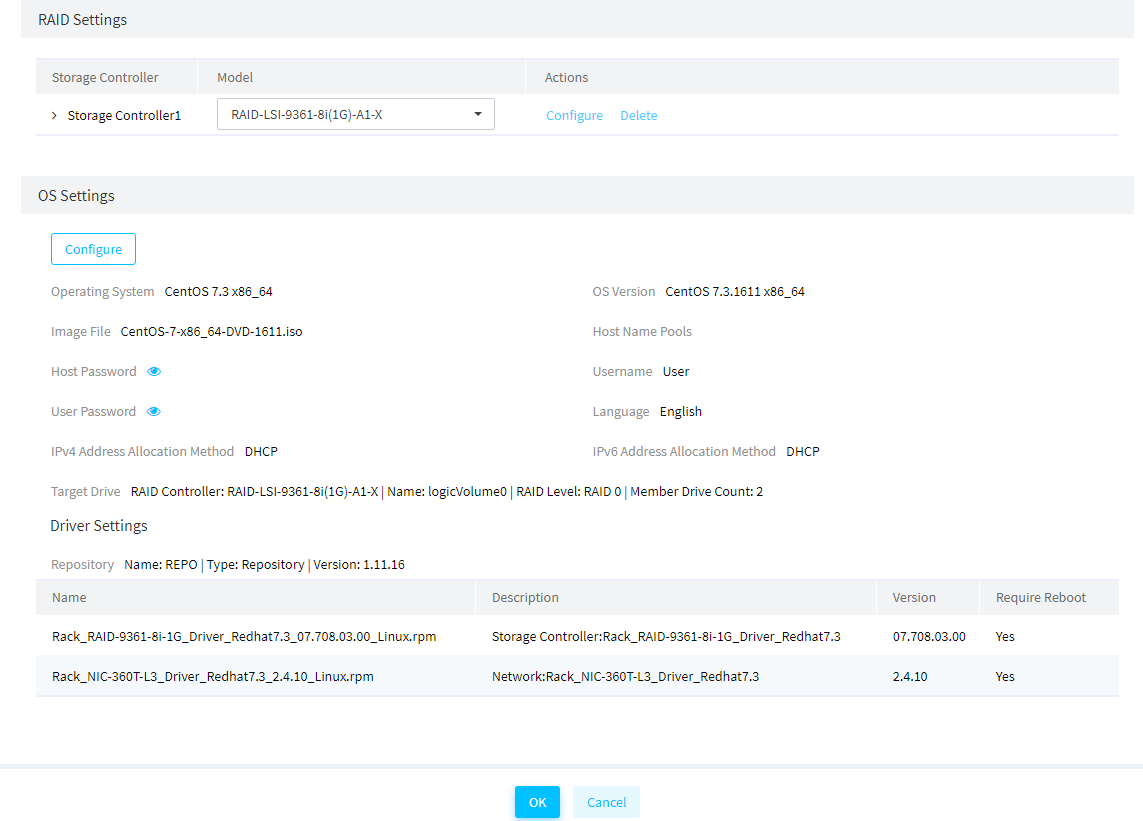
7. Verify the server template settings and then click OK.
Figure 51 Verifying the server template settings
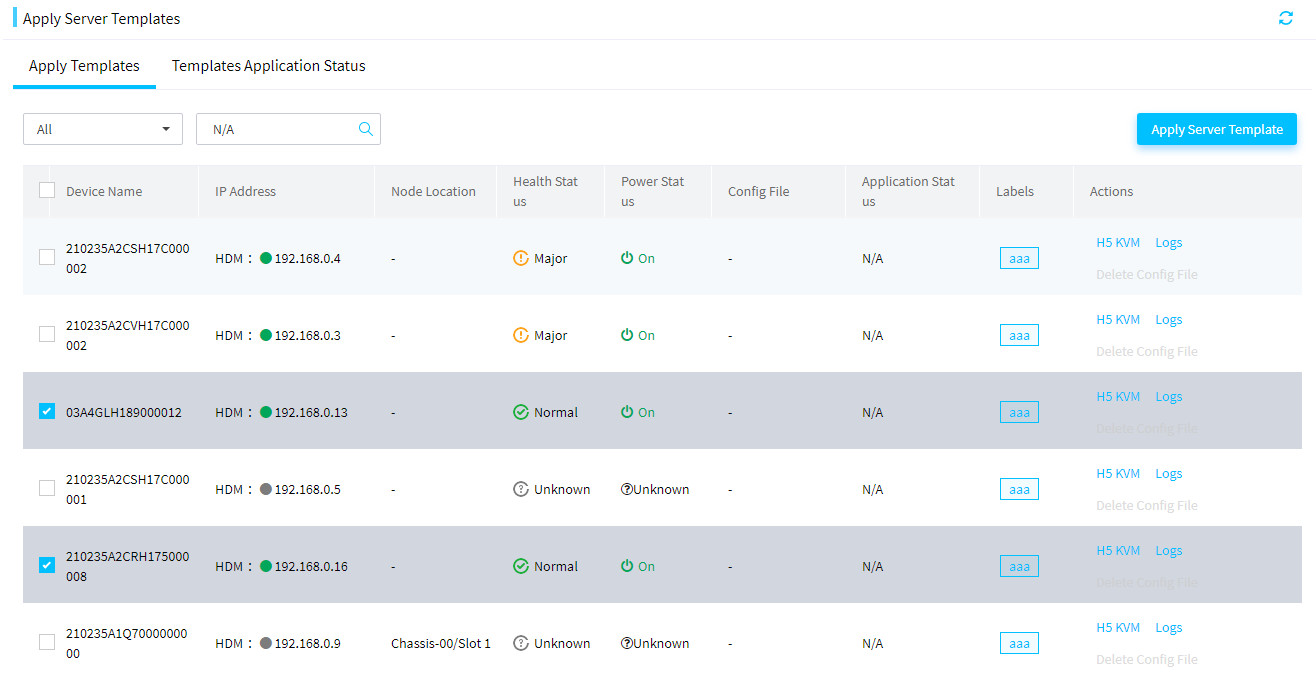
8. Access the Menu > Server Deployment > Apply Server Templates page.
9. Select the target servers, and then click Apply Server Template.
Figure 52 Applying a server template to servers
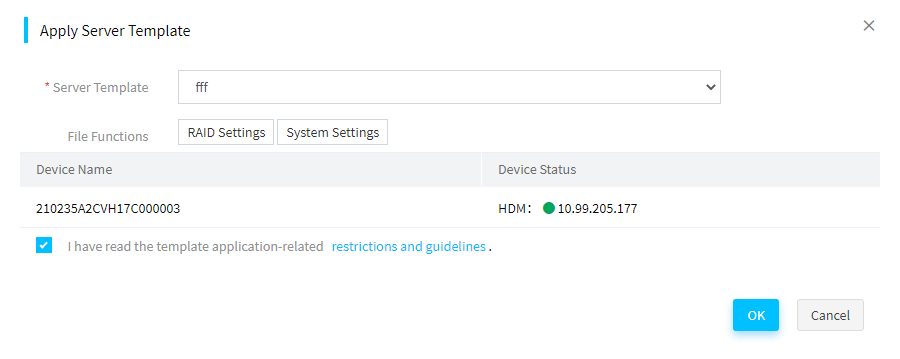
10. Select the created server template, specify the image, and select I have read the template application-related restrictions and guidelines. Then, click OK.
Figure 53 Applying a server template
The application status tab opens. You can view the deployment progress on the page.
Obtaining logs
The directory for storing log files varies depending on the operating system.
Operating system | Log directory |
Linux | /home/log/*/baseFilename.log |
Windows | C:\log\baseFilename.txt. |
Firmware update from iFIST
About this task
This feature allows you to mount a REPO image through a CD/DVD (physical optical drive or HDM virtual media) or USB drive and then update firmware for multiple components on a server from iFIST. Available components include HDM, the BIOS, CPLDs, storage controller, network adapter, and drive.
Restrictions and guidelines
To use a USB drive for image mounting, make sure the image is in a USB drive partion in the FAT32, EXT2/3/4, or NTFS format.
The REPO image name is a string of up to 64 characters (suffix included), and can contain only letters, digits, dots (.), hyphens (-), and underscores (_).
The length of the REPO image storage directory in the USB drive can contain a maximum of 64 characters.
Do not switch to another page during the inventory or deployment process. If you do so, the inventory or deployment task information will be cleared on the firmware update page. To switch to another page, cancel the ongoing task or wait for the task to finish.
If you click Stop inventorying or Stop deployment, the operation stops only after the inventorying or deployment finishes for the firmware that is being operated.
For the system to operate correctly, wait for the new firmware to take effect before performing other operations.
Procedure
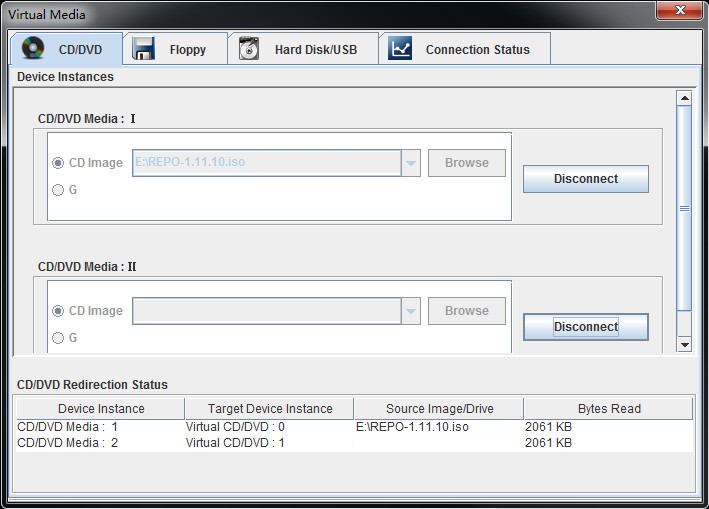
1. Mount a REPO image:
¡ To mount the image by using a CD/DVD, you can log in to iFIST from HDM and use the virtual media provided by HDM KVM.
Figure 54 Using the virtual media
¡ To mount a image by using a USB drive, connect the USB drive that contains the REPO image to the server.
2. Click Firmware update.
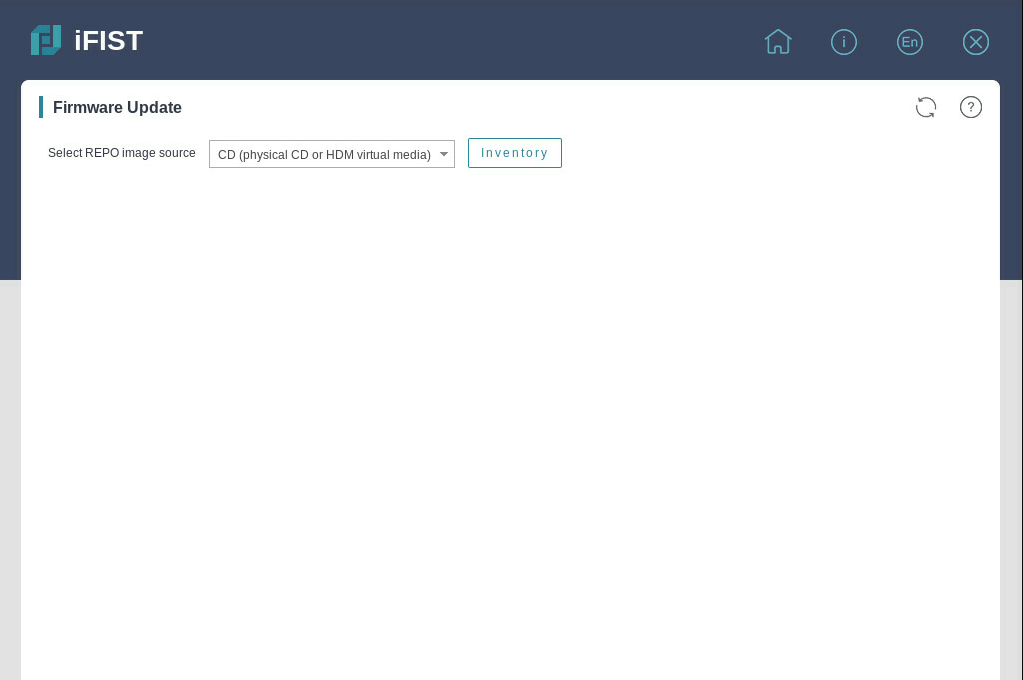
3. Select the image source. If you select USB drive, you must also select the target REPO image.
4. Click Inventory to start inventorying firmware information in the REPO image.
To cancel the ongoing inventory task, click Stop inventorying.
5. (Optional.) Select the target firmware.
After inventorying, the system automatically selects firmware whose available version is higher than the installed version. You can select firmware manually as needed.
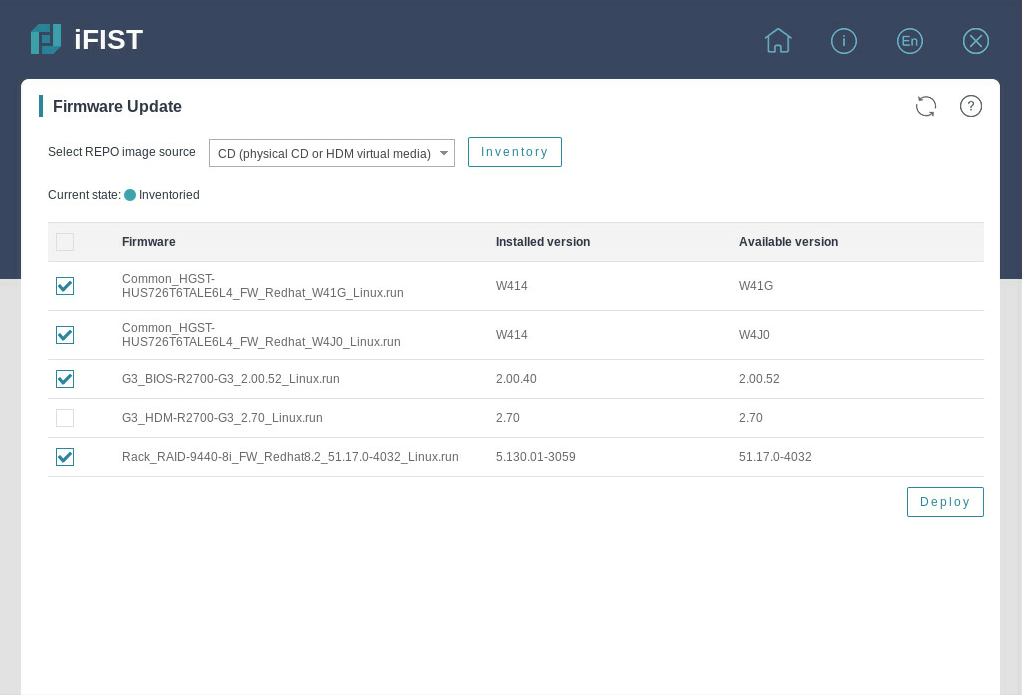
6. Click Deploy.
To cancel the ongoing deployment task, click Stop deploying.
7. Make the new firmware effective. For more information, see Table 2.
Table 2 Actions required for the new firmware to take effect
Firmware | Action for the new firmware to take effect |
HDM | Restart HDM. For more information, see H3C Servers HDM User Guide. |
BIOS | Click the |
CPLD | The method varies by server model. For more information, see H3C Servers Firmware Update Guide. |
· Storage controller · Network adapter · Drive | Click the |
Driver update from iFIST
About this task
Perform this task to configure iFIST to automatically install drivers along with an OS unattended by using an .iso REPO image.
Prerequisites
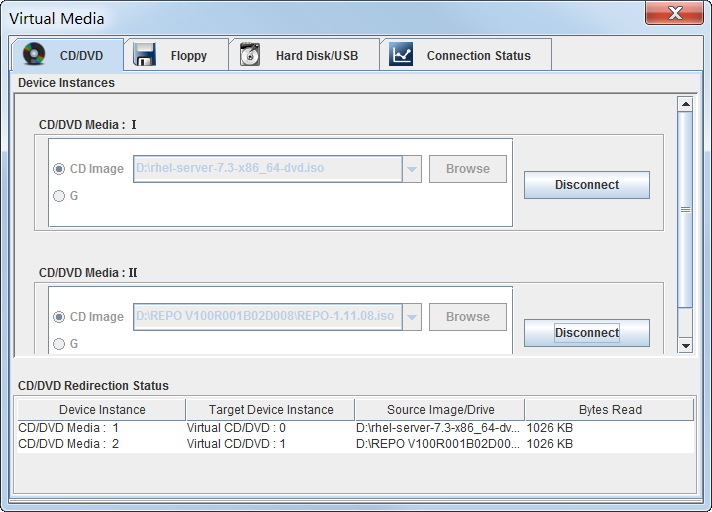
Upload the OS image and REPO to an optical drive (physical optical drive or HDM virtual media) or USB drive, or use an HDM KVM to mount the OS image and REPO to the drive.
Figure 57 Mounting an OS image and REPO to the drive
Procedure
1. Start or restart the server, and press F10 at prompt on the BIOS boot screen to access iFIST.
2. Click OS Installation Wizard.
The OS installation wizard opens.
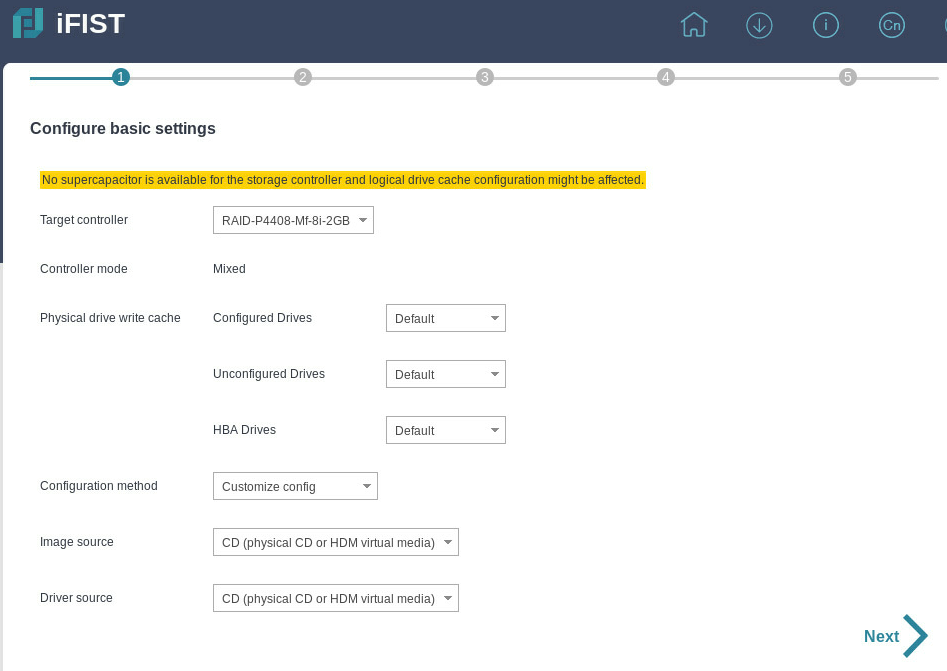
3. Configure basic and RAID settings.
Figure 58 Configuring basic settings
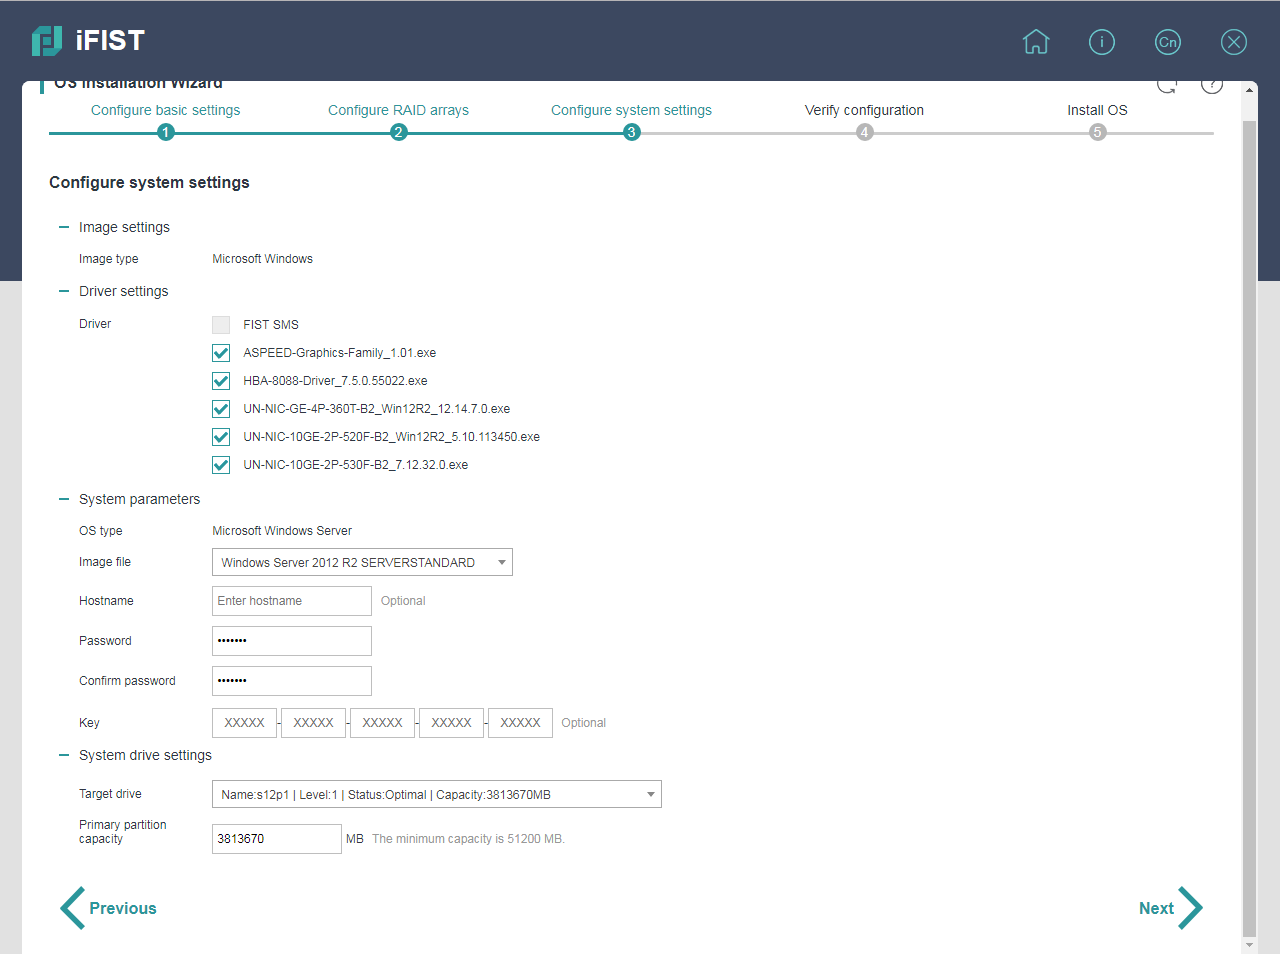
4. Configure system settings.
At this phase, iFIST reads the mounted OS image and REPO, and displays available drivers for selection.
Figure 59 Configuring system settings
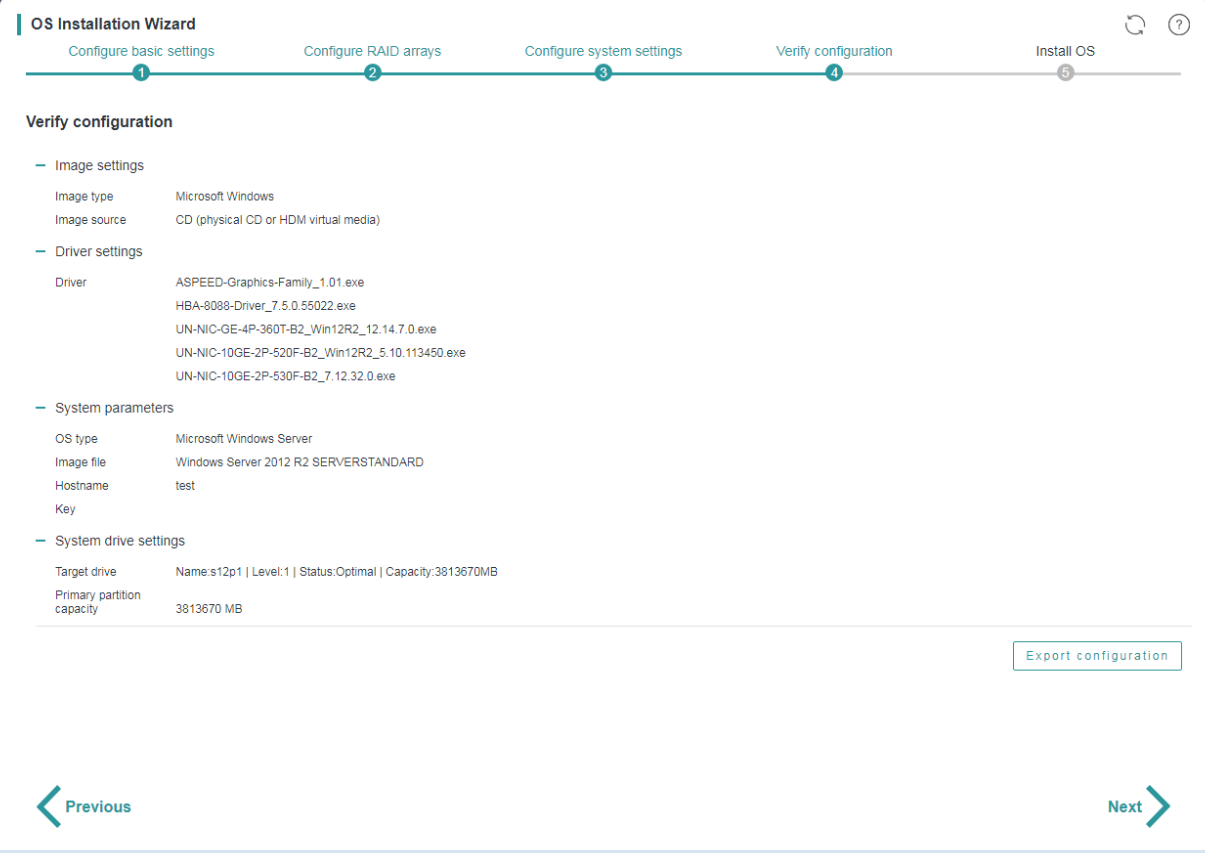
5. Verify the configuration and then click Next.
Figure 60 Verifying the configuration
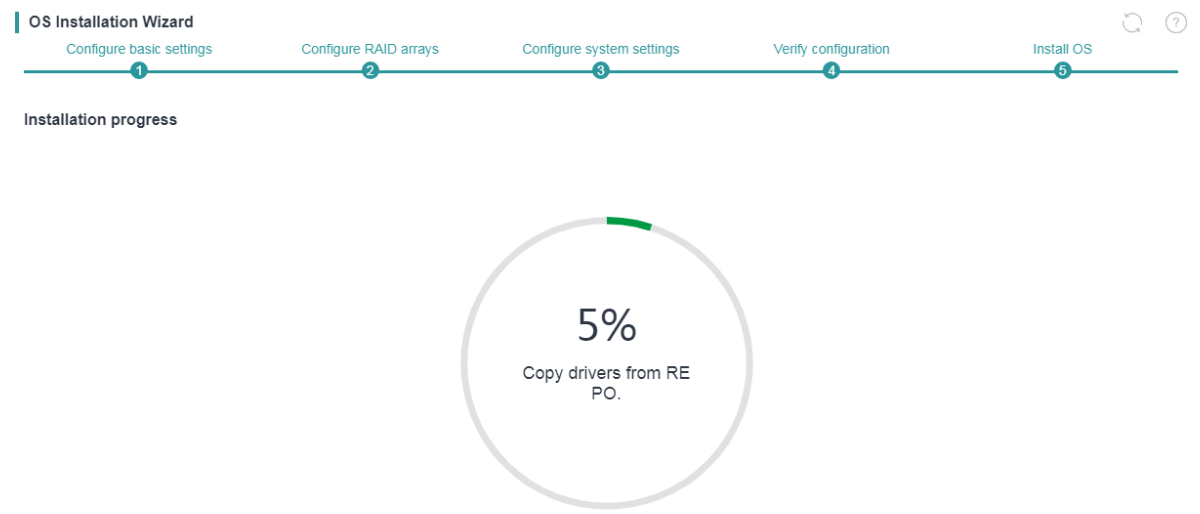
The system starts to copy drivers from the REPO and then restarts the server to initiate the installation process.
Figure 61 Copying drivers from the REPO
Obtaining logs
The directory for storing log files varies depending on the operating system.
Operating system | Log directory |
Linux | home/log/*/baseFilename.log |
Windows | C:\log\baseFilename.txt |
Common operations
Installing FIST SMS
FIST System Management Service (FIST SMS) is the software installed in the OS of the managed servers to enhance HDM and FIST management.
FIST allows you to remotely install FIST SMS to the OSs of servers managed by FIST in bulk. If FIST SMS is successfully installed in the OS of a server, FIST will add this server as a FIST SMS device.
FIST 2.00.16 and later versions automatically push FIST SMS to users. You can install FIST SMS automatically through FIST or manually. This section describes FIST SMS installation through FIST. For more information about manual installation, see the user guide for FIST SMS.
Prerequisites
Install OpenJDK 1.8 (64-bit) on the server.
To install FIST SMS on a server using a Windows OS, perform the following tasks to configure the winrm service:
1. Access the OS and run PowerShell as administrator.
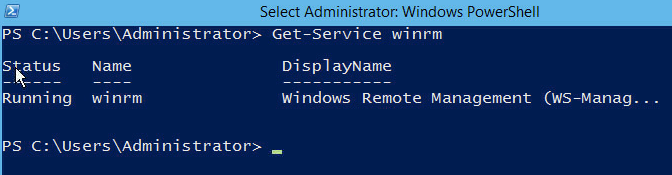
2. Execute the Get-Service winrm command in PowerShell.
¡ If the status of winrm is Running, winrm is enabled. Proceed to step 4.
¡ If the status of winrm is Stopped, winrm is disabled. Proceed to step 3.
Figure 62 Viewing the status of the winrm service
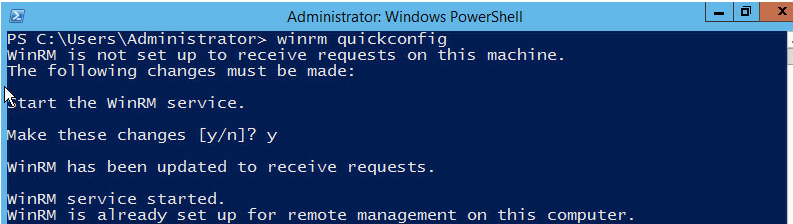
3. Execute the winrm quickconfig command to enable winrm.
Figure 63 Enabling the winrm service
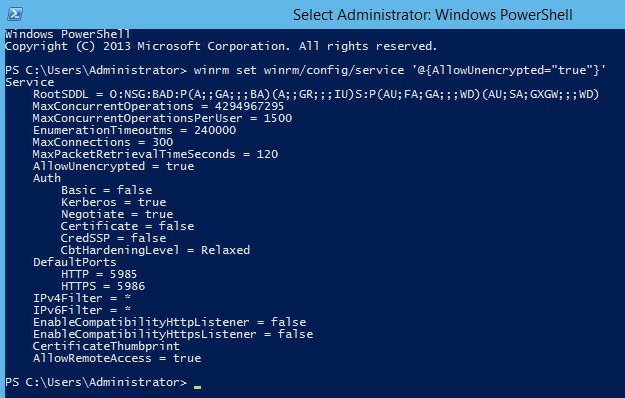
4. Execute the winrm set winrm/config/service '@{AllowUnencrypted="true"}' command to set the value of the AllowUnencrypted parameter to true and enable unencrypted transmission.
Figure 64 Enabling unencrypted transmission
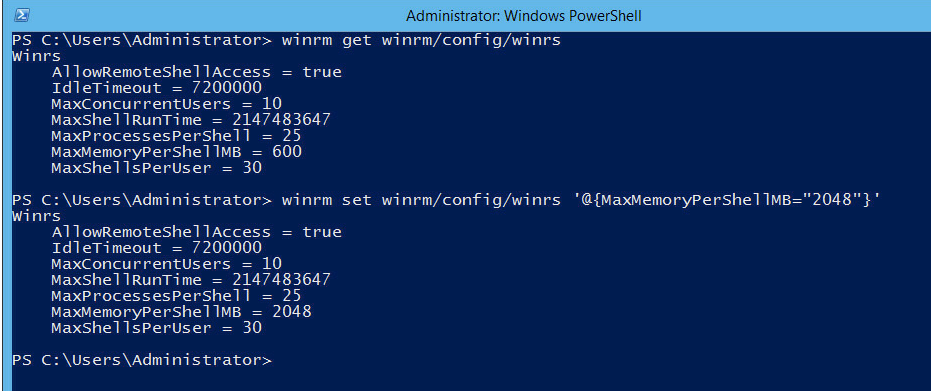
5. Execute the winrm set winrm/config/winrs '@{MaxMemoryPerShellMB="value"}' command to set the value of the MaxMemoryPerShellMB parameter to a number larger than 1/16 of the physical memory size. In this example, the value is 2048.
Figure 65 Setting the value of the MaxMemoryPerShellMB parameter
To install FIST SMS on a server using a Linux OS, perform the following tasks to configure the sshd service:
1. Access the OS as an administrator.
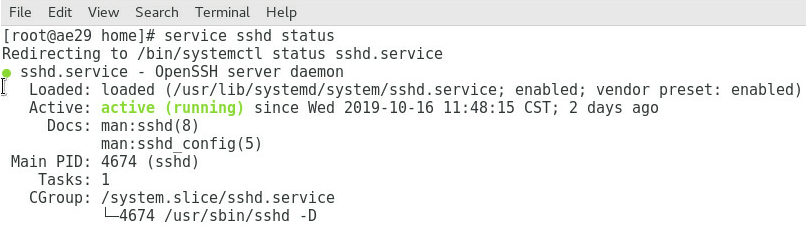
2. Execute the service sshd status command to identify whether the sshd service is enabled.
¡ If the status of the sshd service is active, sshd is enabled. Proceed to the next step.
¡ If the status of the sshd service is inactive, sshd is disabled. Execute the service sshd start command to enable the sshd service and then proceed to the next step.
If the sshd service is not installed, download an sshd tool and enable the sshd service.
Figure 66 Viewing the status of the sshd service
Restrictions and guidelines
Only FIST SMS-1.03.08 and later versions support installation through FIST.
To avoid installation failure, do not edit the content of the FIST SMS installation package.
For FIST SMS to start up successfully, make sure port 12580 is not used by any other program. FIST SMS uses this port to communicate with FIST.
If the firewall feature is enabled on a server, the system will automatically add port 12580 to the whitelist of the firewall after FIST SMS is successfully installed.
If FIST SMS is installed in a Windows server enabled with the firewall feature, FIST will enable the ICMPv4-In rule in the firewall settings so the server can be managed by FIST.
Procedure
1. Log in to FIST, and access the Menu > Tools > Push and Install Software page.
2. Select an installation file type.
3. To upload a device list:
a. (Optional.) Click Download Template under Device List File to download the device list template, and edit the devices in the device list template.
b. Click … in the Device List File field.
c. In the dialog box that opens, click Browse, select a device list file, and then click OK.
d. Click Upload. The Device List area displays the list of devices to which you can install FIST SMS or general software.
Figure 67 Uploading server information
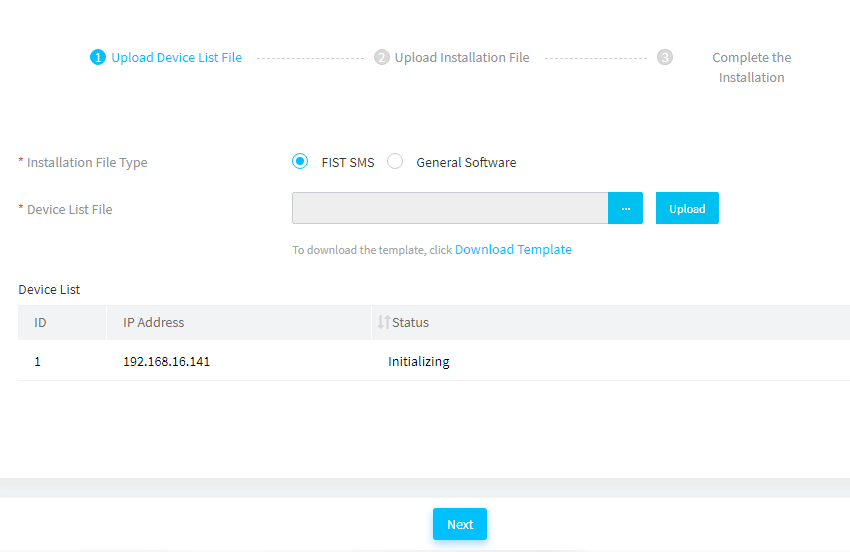
4. Click Next.
5. To upload the FIST SMS or general software installation file:
a. Click … in the FIST SMS Installation File field or General Software Installation File field.
b. In the dialog box that opens, click Browse, select an installation file, and click OK.
c. Click Upload. The system displays the name of the uploaded installation file.
Figure 68 Uploading the FIST SMS installation file
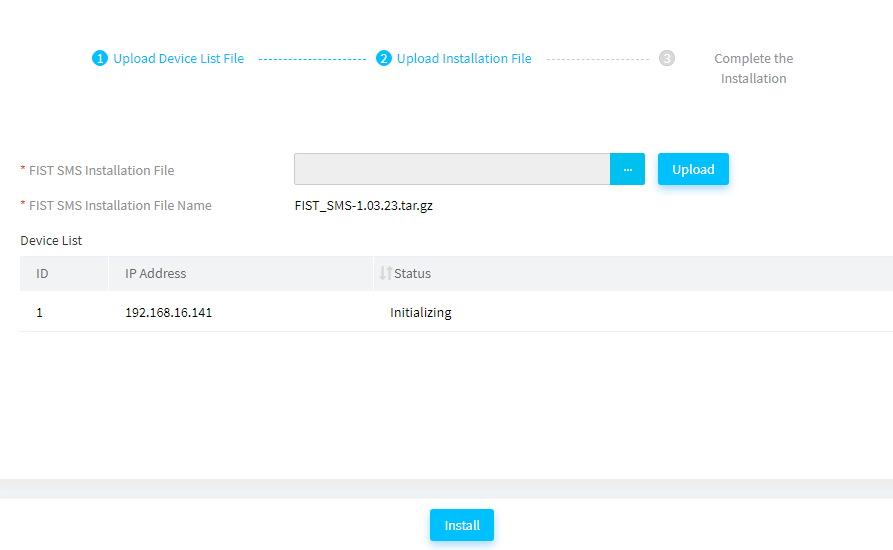
6. Click Install.
The system starts to install FIST SMS or general software on the servers in the device list. It will take a long time, please wait for the process to finish.
After you install general software successfully, you can view the information in the Logs column. To view detailed logs, you can select devices in the device list and then click Download.
7. Click Finish.
Acronyms and abbreviations
Table 3 Acronyms and abbreviations
Term | Definition |
BIOS | Basic Input Output System |
FIST | Fast Intelligent Scalable Toolkit |
FIST SMS | FIST System Management Service |
iFIST | Integrated Fast Intelligent Scalable Toolkit |
OS | Operating system |
RAID | Redundant Arrays of Independent Disks |
REPO | Repository |
