- Table of Contents
- Related Documents
-
| Title | Size | Download |
|---|---|---|
| 01-Bandwidth management configuration | 258.72 KB |
Contents
Configuring bandwidth management
Restrictions: Hardware compatibility with bandwidth management
Restrictions and guidelines: Bandwidth management configuration
Prerequisites for bandwidth management
Bandwidth management tasks at a glance
Configuring bandwidth limits for the traffic profile
Configuring bandwidth detection for the traffic profile
Setting the reference mode for the traffic profile
Configuring match criteria for the traffic rule
Specifying an action for the traffic rule
Specifying a time range for the traffic rule
Managing and maintaining a traffic rule
Activating rule matching acceleration
Enabling after-NAT source or destination matching
Enabling bandwidth management statistics collection
Display and maintenance commands for bandwidth management
Bandwidth management configuration examples
Example: Configuring a single traffic profile
Example: Configuring parent/child traffic profiles
Example: Configuring a user-based traffic profile
Example: Using the packet information after SNAT to match a traffic policy
Example: Using the packet information after DNAT to match a traffic policy
Configuring bandwidth management
About bandwidth management
Bandwidth management provides fine-grained control over traffic that flows through the device by using the following information:
· Source and destination security zones.
· Source and destination IP addresses.
· Services.
· Users/user groups.
· Applications.
· DSCP priorities.
Application scenario
Bandwidth management is used in the following scenarios:
· Enterprise intranet users need far more bandwidth than the amount of bandwidth leased from an ISP. This creates a bandwidth bottleneck at the intranet egress.
· The P2P traffic on the intranet egress consumes a majority of the bandwidth resources. As a result, bandwidth cannot be guaranteed for key services.
Bandwidth management allows you to deploy traffic rules on the network egress for different traffic types. Bandwidth management improves bandwidth efficiency and guarantees bandwidth for key services when congestion occurs.
Bandwidth management process
Bandwidth management is implemented through the traffic policy. You can configure traffic profiles and traffic rules in traffic policy view. A traffic profile specifies the guaranteed bandwidth and maximum bandwidth. A traffic rule specifies match criteria to match packets and the traffic profile to apply to matching packets.
As shown in Figure 1, the bandwidth management process is as follows:
1. The device matches the packet against the match criteria in a traffic rule.
The packet meets a match criterion if it matches any of its match values. A packet does not match a match criterion if it matches none of its match values.
2. If the packet meets all match criteria in the traffic rule (for the user and user group criteria or application and application group criteria, only one criterion needs to be matched), the packet matches the traffic rule. Otherwise, the packet does not match the traffic rule and continues to be matched by the next traffic rule. If the packet does not match any traffic rule, the packet is forwarded without bandwidth management.
3. After the packet matches a traffic rule, the interface processes the packet according to the traffic profile (if any) specified for the traffic rule.
If no traffic profile is specified for the traffic rule, the packet is forwarded without bandwidth management.
4. The traffic profile processes the packet according to its settings.
5. If the interface is configured with a QoS feature in the outbound direction, the interface performs bandwidth management before performing QoS.
6. The packet is controlled by the interface bandwidth of the output interface.
Figure 1 Bandwidth management process

Traffic rule
Multiple traffic rules can be configured in the traffic policy. For a traffic rule, you can define the match criteria to match packets and specify the traffic profile to apply to matching packets.
Traffic rules support rule nesting, which allows a traffic rule to have a parent traffic rule. A maximum of four nesting levels are supported.
Match criteria in a traffic rule
A traffic rule can have multiple match criteria. You can configure the following match criteria in a traffic rule:
· Source and destination security zones.
· Source and destination IP addresses.
· Services.
· Users/user groups.
· Applications.
· DSCP priorities.
One match criterion can contain multiple match values. For example, you can configure multiple applications for an application match criterion.
Action in a traffic rule
You can use a traffic profile for an action in a traffic rule. The device limits the matching traffic according to the settings in the traffic profile.
Match order for parent and child traffic rules
The following rules apply when the device matches a traffic rule with a parent traffic rule:
· The parent traffic rule is first matched. After the parent traffic rule is matched, the child traffic rule is matched. If the parent traffic rule is not matched, the child traffic rule is ignored and the matching process fails.
· If both parent and child traffic rules are matched, the traffic profile for the child traffic rule is executed before the traffic profile for the parent traffic rule is executed. If both parent and child traffic rules are about the same parameter, the smaller value for an upper-limit parameter or the larger value for a lower-limit parameter is applied. If only the parent traffic rule is matched, the traffic profile for the parent traffic rule is applied.
Rule matching acceleration
This feature accelerates traffic rule matching when there is a large number of rules in the traffic policy. Insufficient memory can cause rule matching acceleration failures. Unaccelerated rules do not take effect, and rules that have been accelerated are not affected.
Traffic profile
A traffic profile defines bandwidth resources that can be used by a traffic type. The interface bandwidth can be allocated among multiple traffic profiles. You can configure the following bandwidth limit parameters and priority parameters in a traffic profile:
Rate limit mode for a traffic profile
You can limit the traffic rate in one of the following ways:
· Limit the upstream bandwidth and downstream bandwidth separately.
· Limit the upstream bandwidth and downstream bandwidth as a whole.
Total bandwidth limits
· Total guaranteed bandwidth—Guarantees the total minimum bandwidth for key services when congestion occurs.
· Total maximum bandwidth—Controls the total maximum bandwidth for non-key services to prevent them consuming a large amount of bandwidth.
Per-IP or per-user bandwidth limits
· Per-IP or per-user guaranteed bandwidth—Guarantees the minimum bandwidth per IP address or per user to provide for bandwidth management at finer granularity.
· Per-IP or per-user maximum bandwidth—Controls the maximum bandwidth allowed per IP address or per user to provide for bandwidth management at finer granularity.
Per-rule, per-IP, or per-user connection limits
· Per-rule, per-IP, or per-user connection limits—You can set the connection count limit and connection rate limit to prevent the following situations:
¡ The system resources on the device are exhausted because internal users initiate a large number of connections to external networks in a short time period.
¡ An internal server cannot process normal connection requests because it receives a large number of connection requests in a short time period.
Priority parameters
· Traffic priority—When an interface is congested with packets of multiple traffic profiles, packets with higher priority are sent first. Packets with the same priority have the same chance of being forwarded.
· DSCP marking—Modifies the DSCP value in packets. Network devices can classify traffic by using DSCP values and provide different treatment for packets according to the modified DSCP values.
Restrictions: Hardware compatibility with bandwidth management
|
Hardware platform |
Module type |
Bandwidth management compatibility |
|
M9006 M9010 M9014 |
Blade 4 firewall module |
Yes |
|
Blade 5 firewall module |
No |
|
|
NAT module |
No |
|
|
M9010-GM |
Encryption module |
Yes |
|
M9016-V |
Blade 5 firewall module |
No |
|
M9008-S M9012-S |
Blade 4 firewall module |
Yes |
|
Intrusion prevention service (IPS) module |
Yes |
|
|
Video network gateway module |
Yes |
|
|
M9008-S-6GW |
IPv6 module |
Yes |
|
M9008-S-V |
Blade 4 firewall module |
Yes |
|
M9000-AI-E4 M9000-AI-E8 M9000-AI-E16 |
Blade 5 firewall module |
Yes |
|
M9000-X06 M9000-X10 |
Blade 6 firewall module |
Yes |
vSystem support for features
Non-default vSystems do not support the following features:
· Configuring bandwidth detection for the traffic profile
· Setting the reference mode for the traffic profile
· Specifying a time range for the traffic rule
For information about the support of non-default vSystems for the commands, see bandwidth management command reference. For information about vSystem, see Virtual Technologies Configuration Guide.
Restrictions and guidelines: Bandwidth management configuration
When you configure bandwidth management, follow these restrictions and guidelines:
· As a best practice, observe the depth-first principle when creating policies. Always create a policy with a smaller management scope before a policy with a larger management scope.
· An interface with small default expected bandwidth might experience traffic loss if the following conditions exist:
¡ There is a large amount of traffic on the interface.
¡ The interface uses the default expected bandwidth.
To avoid traffic loss, implicitly set the expected bandwidth to a large value for such an interface. For example, you can set the expected bandwidth of a tunnel interface to a value greater than 64 kbps (the default) if there is a large amount of traffic on the interface.
Prerequisites for bandwidth management
Before configuring bandwidth management, complete the following tasks:
· Configure time ranges (see time range configuration in ACL and QoS Configuration Guide).
· Configure IP address object groups and service object groups (see object group configuration in Security Configuration Guide).
· Configure applications (see APR configuration in Security Configuration Guide).
· Configure users and user groups (see user identification configuration in Security Configuration Guide).
· Configure security zones (see security zone configuration in Security Configuration Guide).
Bandwidth management tasks at a glance
To configure bandwidth management, perform the following tasks:
1. Configuring a traffic profile
¡ Configuring bandwidth limits for the traffic profile
¡ (Optional.) Configuring bandwidth detection for the traffic profile
¡ Setting the reference mode for the traffic profile
¡ (Optional.) Renaming the traffic profile
¡ Configuring match criteria for the traffic rule
¡ Specifying an action for the traffic rule
¡ (Optional.) Specifying a time range for the traffic rule
3. (Optional.) Managing and maintaining a traffic rule
4. (Optional.) Activating rule matching acceleration
5. (Optional.) Enabling after-NAT source or destination matching
6. (Optional.) Enabling bandwidth management statistics collection
Configuring a traffic profile
Creating a traffic profile
1. Enter system view.
system-view
2. Enter traffic policy view.
traffic-policy
3. Create a traffic profile and enter traffic profile view.
profile name profile-name
Configuring bandwidth limits for the traffic profile
About this task
A traffic profile defines the bandwidth resources that can be used and takes effect after it is specified for a traffic rule.
Restrictions and guidelines
· Any two of the following settings are mutually exclusive:
¡ Per-IP maximum bandwidth.
¡ Per-user maximum bandwidth.
¡ Dynamic and even allocation for maximum bandwidth.
The most recent configuration takes effect.
· The per-IP guaranteed bandwidth setting and per-user guaranteed bandwidth setting are mutually exclusive.
Procedure
1. Enter system view.
system-view
2. Enter traffic policy view.
traffic-policy
3. Enter traffic profile view.
profile name profile-name
4. Configure bandwidth settings.
¡ Set the total guaranteed bandwidth or maximum bandwidth for the traffic profile.
bandwidth { downstream | total | upstream } { guaranteed | maximum } bandwidth-value
By default, the total guaranteed bandwidth and maximum bandwidth are not set.
The maximum bandwidth must be greater than or equal to the guaranteed bandwidth.
Before you can enable dynamic and even allocation for maximum bandwidth, you must set the total maximum bandwidth.
¡ Set the per-IP or per-user guaranteed bandwidth or maximum bandwidth for the traffic profile.
bandwidth { downstream | total | upstream } { guaranteed | maximum } { per-ip | per-user } bandwidth-value
By default, the per-IP or per-user guaranteed bandwidth and maximum bandwidth are not set.
¡ Set the TCP MSS for the traffic profile.
tcp mss mss-value
By default, the TCP MSS is not set.
5. Set the per-IP monthly traffic quota.
bandwidth total traffic-quota per-ip monthly quota-value
By default, the amount of traffic used by an IP address per month is not limited.
6. Enable dynamic and even allocation for maximum bandwidth.
bandwidth average enable
By default, dynamic and even allocation for maximum bandwidth is disabled.
7. Configure connection limit settings.
¡ Set the connection count limit for the traffic profile.
connection-limit count { per-rule | per-ip | per-user } connection-number
By default, the connection count limit is not set.
¡ Set the connection rate limit for the traffic profile.
connection-limit rate { per-rule | per-ip | per-user } connection-rate
By default, the connection rate limit is not set.
8. Configure priority settings.
¡ Set the traffic priority for packets of the traffic profile.
traffic-priority priority-value
By default, the traffic priority for packets of a traffic profile is 1.
¡ Mark the DSCP value for packets of the traffic profile.
remark dscp dscp-value
By default, the DSCP value for packets of a traffic profile is not marked.
Configuring bandwidth detection for the traffic profile
About this task
This feature monitors the traffic rates based on source IP addresses in real time to identify the maximum rate and minimum rate of each IP address. If the traffic rate of an IP address exceeds or falls below a user-configured bandwidth threshold, the device sends logs to the log host by using the fast log output feature.
You can configure static bandwidth thresholds or configure the dynamic bandwidth threshold learning feature.
· Static bandwidth threshold—Allows you to configure a minimum threshold and a maximum threshold.
· Dynamic threshold learning—Allows the device to obtain minimum and maximum bandwidth thresholds by dynamically learning traffic rates. This feature is useful if you do not know the traffic patterns in a network and cannot determine appropriate bandwidth thresholds. With this feature enabled, the device measures the traffic rates over a user-configured duration and calculates an average rate. Then, the device obtains the minimum and maximum bandwidth thresholds by using the average rate multiplied by the minimum and maximum tolerance values.
If you configure both static bandwidth thresholds and the dynamic bandwidth threshold learning feature for the traffic profile, the following rules apply:
· Before the device learns the average traffic rate, it uses the static bandwidth thresholds.
· After the device learns the average traffic rate, it uses the dynamic bandwidth thresholds.
Procedure
1. Enter system view.
system-view
2. Enter traffic policy view.
traffic-policy
3. Enter traffic profile view.
profile name profile-name
4. Enable per-IP bandwidth threshold detection.
per-ip bandwidth-threshold-detect enable
By default, per-IP threshold bandwidth detection is disabled.
5. Configure per-IP static bandwidth thresholds.
¡ Set the maximum bandwidth threshold.
per-ip bandwidth-threshold max-value max-value
By default, the maximum bandwidth threshold is not set.
¡ Set the minimum bandwidth threshold.
per-ip bandwidth-threshold min-value min-value
By default, the maximum bandwidth threshold is not set.
6. Configure per-IP dynamic bandwidth threshold learning.
a. Enable per-IP dynamic bandwidth threshold learning.
per-ip bandwidth-threshold-learn enable
By default, per-IP dynamic bandwidth threshold learning is disabled.
b. Set the duration for per-IP dynamic bandwidth threshold learning.
per-ip bandwidth-threshold-learn duration duration-value
By default, the duration for per-IP dynamic bandwidth threshold learning is 1440 minutes (24 hours).
As a best practice, set the learning duration to be longer than 1440 minutes for the device to learn traffic for no less than a whole day.
c. Set the maximum tolerance value.
per-ip bandwidth-threshold-learn tolerance max-value max-value
By default, the maximum tolerance value is not set.
d. Set the minimum tolerance value.
per-ip bandwidth-threshold-learn tolerance m min-value min-value
By default, the minimum tolerance value is not set.
Setting the reference mode for the traffic profile
About this task
A traffic profile can be referenced by multiple traffic rules in one of the following ways:
· per-rule—Each rule that uses the profile can reach the bandwidth limits and connection limits specified in the profile.
· rule-shared—All rules that use the profile share the bandwidth limits and connection limits specified in the profile.
Procedure
1. Enter system view.
system-view
2. Enter traffic policy view.
traffic-policy
3. Enter traffic profile view.
profile name profile-name
4. Set the reference mode for the traffic profile.
profile reference-mode { per-rule | rule-shared }
The default setting is per-rule.
Renaming the traffic profile
1. Enter system view.
system-view
2. Enter traffic policy view.
traffic-policy
3. Rename a traffic profile.
profile rename old-name new-name
Configuring a traffic rule
Creating a traffic rule
About this task
For a new traffic rule to inherit the match criteria of an existing traffic rule, specify the existing traffic rule as the parent of the new traffic rule. You can specify traffic profiles for both parent and child traffic rules.
Restrictions and guidelines
A level-4 rule cannot act as a parent rule.
You can specify a parent traffic rule only when creating a traffic rule. You cannot add or modify a parent traffic rule for an existing traffic rule.
Procedure
1. Enter system view.
system-view
2. Enter traffic policy view.
traffic-policy
3. (Optional.) Enable bandwidth management for traffic flows of the IP layer and upper layers.
all-traffic-control enable
By default, bandwidth management is performed only for traffic flows of Layer 4 and upper layers.
Use this feature when there is a large number of IP traffic flows in the network.
4. Create a traffic rule and enter traffic rule view.
rule [ rule-id ] name rule-name [ parent parent-rule-name ]
You can specify a traffic rule as the parent traffic rule for multiple child traffic rules.
Configuring match criteria for the traffic rule
1. Enter system view.
system-view
2. Enter traffic policy view.
traffic-policy
3. Enter traffic rule view.
Choose one option as needed:
¡ rule rule-id
¡ rule [ rule-id ] name rule-name [ parent parent-rule-name ]
4. Configure a security zone as a match criterion.
¡ Configure a destination security zone as a match criterion.
destination-zone destination-zone-name
¡ Configure a source security zone as a match criterion.
source-zone source-zone-name
By default, no security zone is used as a match criterion.
5. Configure an IP address object group as a match criterion.
¡ Configure a destination IP address object group as a match criterion.
destination-address address-set object-group-name
¡ Configure a source IP address object group as a match criterion.
source-address address-set object-group-name
By default, no IP address object group is used as a match criterion.
6. Configure a service object group as a match criterion.
service object-group-name
By default, no service object group is used as a match criterion.
7. Configure an application or application group as a match criterion.
application { app application-name | app-group application-group-name }
By default, no application or application group is used as a match criterion.
8. Configure a user or user group as a match criterion.
¡ Configure a user as a match criterion.
user user-name [ domain domain-name ]
¡ Configure a user group as a match criterion.
user-group user-group-name [ domain domain-name ]
By default, no user or user group is used as a match criterion.
9. Configure a DSCP priority as a match criterion.
dscp dscp-value
By default, no DSCP priority is used as a match criterion.
10. Configure an IPv6 packet attribute as a match criterion.
¡ Configure the flow label attribute as a match criterion
ipv6 flow-label { nonzero | zero }
By default, the flow label attribute is not used as a match criterion.
¡ Configure the extension header attribute as a match criterion
ipv6 extension-header { authentication | destination | encapsulating | fragment | hop-by-hop | routing }
By default, the extension header attribute is not used as a match criterion.
11. Configure a terminal or terminal group as a match criterion.
¡ Configure a terminal as a match criterion.
terminal terminal-name
By default, no terminal is used as a match criterion.
¡ Configure a terminal group as a match criterion.
terminal-group group-name
By default, no terminal group is used as a match criterion.
12. Configure a VPN instance as a match criterion.
vrf vrf-name
By default, no VPN instance is used as a match criterion.
Specifying an action for the traffic rule
About this task
If a packet matches a traffic rule, the device performs the action specified in the traffic rule on the packet.
Restrictions and guidelines
When you specify traffic profiles for parent and child traffic rules, make sure the following conditions are met:
· The maximum bandwidth for a child traffic rule must be smaller than or equal to that for the parent traffic rule.
· The guaranteed bandwidth for a child traffic rule must be smaller than or equal to that for the parent traffic rule.
· The traffic profiles cannot be the same for the child and parent traffic rules.
Procedure
1. Enter system view.
system-view
2. Enter traffic policy view.
traffic-policy
3. Enter traffic rule view.
Choose one option as needed:
¡ rule rule-id
¡ rule [ rule-id ] name rule-name [ parent parent-rule-name ]
4. Specify an action for the traffic rule.
action { deny | none | qos profile profile-name }
The default action is none, which allows matching packets to pass through without bandwidth management.
Specifying a time range for the traffic rule
1. Enter system view.
system-view
2. Enter traffic policy view.
traffic-policy
3. Enter traffic rule view.
Choose one option as needed:
¡ rule rule-id
¡ rule [ rule-id ] name rule-name [ parent parent-rule-name ]
4. Specify a time range during which the traffic rule is in effect.
time-range time-range-name
By default, a traffic rule is in effect at any time.
Managing and maintaining a traffic rule
Copying a traffic rule
1. Enter system view.
system-view
2. Enter traffic policy view.
traffic-policy
3. Copy a traffic rule.
rule copy rule-name new-rule-name
Renaming a traffic rule
1. Enter system view.
system-view
2. Enter traffic policy view.
traffic-policy
3. Rename a traffic rule.
rule rename old-rule-name new-rule-name
Moving a traffic rule
1. Enter system view.
system-view
2. Enter traffic policy view.
traffic-policy
3. Move a traffic rule to a new position.
rule move rule-name1 { after | before } rule-name2
Disabling a traffic rule
1. Enter system view.
system-view
2. Enter traffic policy view.
traffic-policy
3. Enter traffic rule view.
Choose one option as needed:
¡ rule rule-id
¡ rule [ rule-id ] name rule-name [ parent parent-rule-name ]
4. Disable the traffic rule.
disable
By default, a traffic rule is enabled.
Activating rule matching acceleration
About this task
Rule matching acceleration does not take effect on newly added, modified, and moved rules unless the feature is activated for the rules. By default, the system automatically activates rule matching acceleration for such rules at specific intervals. The interval is 2 seconds if 100 or fewer rules exist and 20 seconds if over 100 rules exist.
To activate rule matching acceleration immediately after a rule change, you can perform this task.
Restrictions and guidelines
If no rule change is detected, the system does not perform an activation operation.
Insufficient memory can cause rule matching acceleration failures. Unaccelerated rules do not take effect, and rules that have been accelerated are not affected.
Procedure
1. Enter system view.
system-view
2. Enter traffic policy view.
traffic-policy
3. Activate rule matching acceleration.
accelerate activate
Enabling after-NAT source or destination matching
About this task
If source or destination NAT will be performed on a flow to be managed, perform this task to match the flow with the IP address, port number, and VPN instance after NAT. For more information about NAT, see Layer 3—IP Services Configuration Guide.
Procedure
1. Enter system view.
system-view
2. Enter traffic policy view.
traffic-policy
3. Enable after-NAT source matching.
source-matching after-nat
By default, the packet information before NAT is used for matching.
4. Enable after-NAT destination matching.
destination-matching after-nat
By default, the packet information before NAT is used for matching.
Enabling bandwidth management statistics collection
About this task
This feature can collect the following statistics:
· Traffic statistics, which can be displayed by using the display traffic-policy statistics bandwidth command.
· Connection limit statistics, which can be displayed by using the display traffic-policy statistics connection-limit command.
· Rule-hit statistics, which can be displayed by using the display traffic-policy statistics rule-hit command.
Restrictions and guidelines
This feature affects device performance. As a best practice, enable this feature only if you need to view statistics.
Procedure
1. Enter system view.
system-view
2. Enter traffic policy view.
traffic-policy
3. Enable bandwidth management statistics collection.
¡ Enable traffic statistics collection.
statistics bandwidth enable
By default, traffic statistics collection is disabled.
¡ Enable connection limit statistics collection.
statistics connection-limit enable
By default, connection limit statistics collection is disabled.
¡ Enable rule-hit statistics collection.
statistics rule-hit enable
By default, rule-hit statistics collection is disabled.
Display and maintenance commands for bandwidth management
|
|
IMPORTANT: Non-default vSystems do not support some of the display and maintenance commands. For information about vSystem support for these commands, see bandwidth management command reference. |
Execute display commands in any view and reset commands in user view.
|
Task |
Command |
|
Display traffic statistics for traffic rules. |
In standalone mode: display traffic-policy statistics bandwidth { downstream | total | upstream } { per-ip { ipv4 [ ipv4-address ] | ipv6 [ ipv6-address ] } rule rule-name | per-rule [ name rule-name ] | per-user [ user user-name ] rule rule-name } [ slot slot-number [ cpu cpu-number ] ] In IRF mode: display traffic-policy statistics bandwidth { downstream | total | upstream } { per-ip { ipv4 [ ipv4-address ] | ipv6 [ ipv6-address ] } rule rule-name | per-rule [ name rule-name ] | per-user [ user user-name ] rule rule-name } [ chassis chassis-number slot slot-number [ cpu cpu-number ] ] |
|
Display connection limit statistics. |
In standalone mode: display traffic-policy statistics connection-limit { per-ip { ipv4 [ ipv4-address ] | ipv6 [ ipv6-address ] } rule rule-name | per-rule [ name rule-name ] | per-user [ user user-name ] rule rule-name } } [ slot slot-number [ cpu cpu-number ] ] In IRF mode: display traffic-policy statistics connection-limit { per-ip { ipv4 [ ipv4-address ] | ipv6 [ ipv6-address ] } rule rule-name | per-rule [ name rule-name ] | per-user [ user user-name ] rule rule-name } } [ chassis chassis-number slot slot-number [ cpu cpu-number ] ] |
|
Display rule-hit statistics. |
In standalone mode: display traffic-policy statistics rule-hit [ [ beyond beyond-number ] | [ rule rule-name ] ] [ slot slot-number [ cpu cpu-number ] ] In IRF mode: display traffic-policy statistics rule-hit [ [ beyond beyond-number ] | [ rule rule-name ] ] [ chassis chassis-number slot slot-number [ cpu cpu-number ] ] |
|
Clear traffic statistics for traffic rules. |
In standalone mode: reset traffic-policy statistics bandwidth { downstream | total | upstream } { per-ip { ipv4 [ ipv4-address ] | ipv6 [ ipv6-address ] } rule rule-name | per-rule [ name rule-name ] | per-user [ user user-name ] rule rule-name } [ slot slot-number [ cpu cpu-number ] ] In IRF mode: reset traffic-policy statistics bandwidth { downstream | total | upstream } { per-ip { ipv4 [ ipv4-address ] | ipv6 [ ipv6-address ] } rule rule-name | per-rule [ name rule-name ] | per-user [ user user-name ] rule rule-name } [ chassis chassis-number slot slot-number [ cpu cpu-number ] ] |
|
Clear connection limit statistics. |
In standalone mode: reset traffic-policy statistics connection-limit { per-ip { ipv4 [ ipv4-address ] | ipv6 [ ipv6-address ] } rule rule-name | per-rule [ name rule-name ] | per-user [ user user-name ] rule rule-name } } [ slot slot-number [ cpu cpu-number ] ] In IRF mode: reset traffic-policy statistics connection-limit { per-ip { ipv4 [ ipv4-address ] | ipv6 [ ipv6-address ] } rule rule-name | per-rule [ name rule-name ] | per-user [ user user-name ] rule rule-name } } [ chassis chassis-number slot slot-number [ cpu cpu-number ] ] |
|
Clear rule-hit statistics. |
In standalone mode: reset traffic-policy statistics rule-hit [ rule rule-name ] [ slot slot-number [ cpu cpu-number ] ] In IRF mode: reset traffic-policy statistics rule-hit [ rule rule-name ] [ chassis chassis-number slot slot-number [ cpu cpu-number ] ] |
Bandwidth management configuration examples
Example: Configuring a single traffic profile
Network configuration
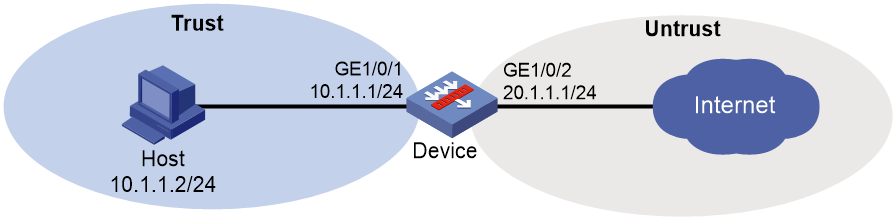
As shown in Figure 2, configure bandwidth management on the device to meet the following requirements:
· The maximum bandwidth is limited to 30720 kbps for both upstream and downstream iQiYiPPS application traffic of the host in the intranet.
· The guaranteed bandwidth is 30720 kbps for both upstream and downstream FTP traffic of the host .
· The bandwidth of the interface to the Internet is limited to 102400 kbps.

Procedure
1. Assign IP addresses to interfaces:
# Assign an IP address to interface GigabitEthernet 1/0/1.
<Device> system-view
[Device] interface gigabitethernet 1/0/1
[Device-GigabitEthernet1/0/1] ip address 10.1.1.1 255.255.255.0
[Device-GigabitEthernet1/0/1] quit
# Assign IP addresses to other interfaces in the same way. (Details not shown.)
2. Configure settings for routing.
This example configures static routes, and the next hop in the routes is 20.1.1.2.
[Device] ip route-static 3.1.1.2 24 20.1.1.2
3. Add interfaces to security zones.
[Device] security-zone name trust
[Device-security-zone-Trust] import interface gigabitethernet 1/0/1
[Device-security-zone-Trust] quit
[Device] security-zone name untrust
[Device-security-zone-Untrust] import interface gigabitethernet 1/0/2
[Device-security-zone-Untrust] quit
4. Configure a security policy:
# Configure a rule named trust-untrust to allow the host to access the Internet.
[Device] security-policy ip
[Device-security-policy-ip] rule name trust-untrust
[Device-security-policy-ip-1-trust-untrust] source-zone trust
[Device-security-policy-ip-1-trust-untrust] destination-zone untrust
[Device-security-policy-ip-1-trust-untrust] source-ip-host 10.1.1.2
[Device-security-policy-ip-1-trust-untrust] action pass
[Device-security-policy-ip-1-trust-untrust] quit
[Device-security-policy-ip] quit
5. Configure traffic profiles:
# Create a traffic profile named aiqiyi, and enter traffic profile view.
[Device] traffic-policy
[Device-traffic-policy] profile name aiqiyi
# Set the maximum bandwidth to 30720 kbps for both upstream and downstream traffic.
[Device-traffic-policy-profile-aiqiyi] bandwidth upstream maximum 30720
[Device-traffic-policy-profile-aiqiyi] bandwidth downstream maximum 30720
[Device-traffic-policy-profile-aiqiyi] quit
# Create a traffic profile named profileftp, and enter traffic profile view.
[Device-traffic-policy] profile name profileftp
# Set the guaranteed bandwidth to 30720 kbps for both upstream and downstream traffic.
[Device-traffic-policy-profile-profileftp] bandwidth upstream guaranteed 30720
[Device-traffic-policy-profile-profileftp] bandwidth downstream guaranteed 30720
[Device-traffic-policy-profile-profileftp] quit
[Device-traffic-policy] quit
6. Set the expected bandwidth to 102400 kbps for interface GigabitEthernet 1/0/2.
[Device] interface gigabitethernet 1/0/2
[Device-GigabitEthernet1/0/2] bandwidth 102400
[Device-GigabitEthernet1/0/2] quit
7. Configure traffic rules:
[Device] traffic-policy
# Create a traffic rule named aiqiyi, and enter traffic rule view.
[Device-traffic-policy] rule name aiqiyi
# Configure the predefined application iQiYiPPS as a match criterion.
[Device-traffic-policy-rule-1-aiqiyi] application app iQiYiPPS
# Specify traffic profile aiqiyi for traffic rule aiqiyi.
[Device-traffic-policy-rule-1-aiqiyi] action qos profile aiqiyi
[Device-traffic-policy-rule-1-aiqiyi] quit
# Create a traffic rule named ruleftp, and enter traffic rule view.
[Device-traffic-policy] rule name ruleftp
# Configure the predefined application FTP as a match criterion.
[Device-traffic-policy-rule-2-ruleftp] application app ftp
# Specify traffic profile profileftp for traffic rule ruleftp.
[Device-traffic-policy-rule-2-ruleftp] action qos profile profileftp
[Device-traffic-policy-rule-2-ruleftp] quit
[Device-traffic-policy] quit
Verifying the configuration
# Verify that the iQiYiPPS application traffic rate cannot exceed 30720 kbps and the FTP traffic rate can reach a minimum of 30720 kbps when the total traffic rate on GigabitEthernet 1/0/2 reaches 102400 kbps. (Details not shown.)
Example: Configuring parent/child traffic profiles
Network configuration
As shown in Figure 3, configure bandwidth management on the device to meet the following requirements:
· The maximum bandwidth is limited to 30720 kbps for both upstream and downstream iQiYiPPS application traffic of the host in the intranet.
· The guaranteed bandwidth is 30720 kbps for both upstream and downstream FTP traffic of the host .
· The total traffic rate of the host is limited to 40960 kbps.
Procedure
1. Assign IP addresses to interfaces:
# Assign an IP address to interface GigabitEthernet 1/0/1.
<Device> system-view
[Device] interface gigabitethernet 1/0/1
[Device-GigabitEthernet1/0/1] ip address 10.1.1.1 255.255.255.0
[Device-GigabitEthernet1/0/1] quit
# Assign IP addresses to other interfaces in the same way. (Details not shown.)
2. Configure settings for routing.
This example configures static routes, and the next hop in the routes is 20.1.1.2.
[Device] ip route-static 3.1.1.2 24 20.1.1.2
3. Add interfaces to security zones.
[Device] security-zone name trust
[Device-security-zone-Trust] import interface gigabitethernet 1/0/1
[Device-security-zone-Trust] quit
[Device] security-zone name untrust
[Device-security-zone-Untrust] import interface gigabitethernet 1/0/2
[Device-security-zone-Untrust] quit
4. Configure a security policy:
# Configure a rule named trust-untrust to allow the host to access the Internet.
[Device] security-policy ip
[Device-security-policy-ip] rule name trust-untrust
[Device-security-policy-ip-1-trust-untrust] source-zone trust
[Device-security-policy-ip-1-trust-untrust] destination-zone untrust
[Device-security-policy-ip-1-trust-untrust] source-ip-host 10.1.1.2
[Device-security-policy-ip-1-trust-untrust] action pass
[Device-security-policy-ip-1-trust-untrust] quit
[Device-security-policy-ip] quit
5. Configure traffic profiles:
# Create a traffic profile named profile, and enter traffic profile view.
[Device] traffic-policy
[Device-traffic-policy] profile name profile
# Set the maximum bandwidth to 40960 kbps for both upstream and downstream traffic.
[Device-traffic-policy-profile-profile] bandwidth upstream maximum 40960
[Device-traffic-policy-profile-profile] bandwidth downstream maximum 40960
[Device-traffic-policy-profile-profile] quit
# Create a traffic profile named aiqiyi, and enter traffic profile view.
[Device-traffic-policy] profile name aiqiyi
# Set the maximum bandwidth to 30720 kbps for both upstream and downstream traffic.
[Device-traffic-policy-profile-aiqiyi] bandwidth upstream maximum 30720
[Device-traffic-policy-profile-aiqiyi] bandwidth downstream maximum 30720
[Device-traffic-policy-profile-aiqiyi] quit
# Create a traffic profile named profileftp, and enter traffic profile view.
[Device-traffic-policy] profile name profileftp
# Set the guaranteed bandwidth to 30720 kbps for both upstream and downstream traffic.
[Device-traffic-policy-profile-profileftp] bandwidth upstream guaranteed 30720
[Device-traffic-policy-profile-profileftp] bandwidth downstream guaranteed 30720
[Device-traffic-policy-profile-profileftp] quit
6. Configure traffic rules:
# Create a traffic rule named rule, and enter traffic rule view.
[Device-traffic-policy] rule name rule
# Specify traffic profile profile for traffic rule rule.
[Device-traffic-policy-rule-1-rule] action qos profile profile
[Device-traffic-policy-rule-1-rule] quit
# Create a traffic rule named aiqiyi, enter traffic rule view, and specify traffic rule rule as its parent rule.
[Device-traffic-policy] rule name aiqiyi parent rule
# Configure the predefined application iQiYiPPS as a match criterion.
[Device-traffic-policy-rule-2-aiqiyi] application app iQiYiPPS
# Specify traffic profile aiqiyi for traffic rule aiqiyi.
[Device-traffic-policy-rule-2-aiqiyi] action qos profile aiqiyi
[Device-traffic-policy-rule-2-aiqiyi] quit
# Create a traffic rule named ruleftp, enter traffic rule view, and specify traffic rule rule as its parent rule.
[Device-traffic-policy] rule name ruleftp parent rule
# Configure the predefined application FTP as a match criterion.
[Device-traffic-policy-rule-3-ruleftp] application app ftp
# Specify traffic profile profileftp for traffic rule ruleftp.
[Device-traffic-policy-rule-3-ruleftp] action qos profile profileftp
[Device-traffic-policy-rule-3-ruleftp] quit
[Device-traffic-policy] quit
Verifying the configuration
# Verify that the total traffic rate of the host is limited to 40960 kbps, and that the iQiYiPPS application traffic rate is limited to 30720 kbps. When congestion occurs, FTP traffic is not affected. (Details not shown.)
Example: Configuring a user-based traffic profile
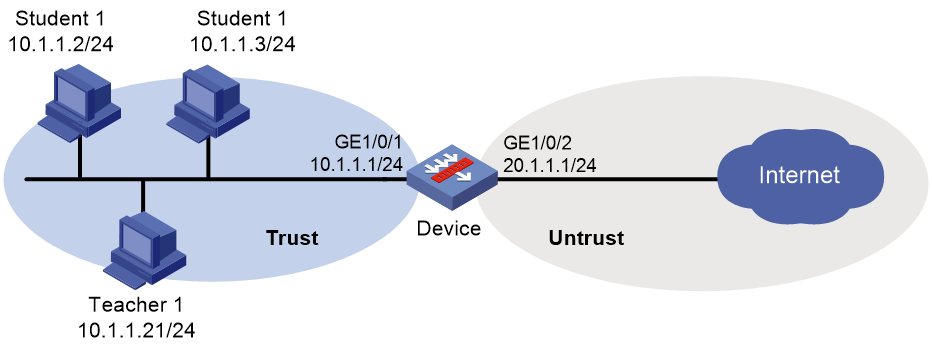
Network configuration
As shown in Figure 4, an intranet has two user groups: a teacher group with two teachers and a student group with five students.
Configure per-user bandwidth management on the device to meet the following requirements:
· The IP addresses of students student1 through student5 are 10.1.1.2/24 through 10.1.1.6/24, respectively. The IP addresses of teachers teacher1 and teacher2 are 10.1.1.21/24 and 10.1.1.22/24, respectively.
· The bandwidth is limited to 10000 kbps for each teacher in both the upstream and downstream directions, and the bandwidth is limited to 2000 kbps for each student in both the upstream and downstream directions.
· The connection count limit is limited to 10000 for each teacher, and the connection count limit is also limited to 10000 for each student.
· Teachers have higher priority over students to access the Internet.
Procedure
1. Assign IP addresses to interfaces:
# Assign an IP address to interface GigabitEthernet 1/0/1.
<Device> system-view
[Device] interface gigabitethernet 1/0/1
[Device-GigabitEthernet1/0/1] ip address 10.1.1.1 255.255.255.0
[Device-GigabitEthernet1/0/1] quit
# Assign IP addresses to other interfaces in the same way. (Details not shown.)
2. Configure settings for routing.
This example configures static routes, and the next hop in the routes is 20.1.1.2.
[Device] ip route-static 3.1.1.2 24 20.1.1.2
3. Add interfaces to security zones.
[Device] security-zone name trust
[Device-security-zone-Trust] import interface gigabitethernet 1/0/1
[Device-security-zone-Trust] quit
[Device] security-zone name untrust
[Device-security-zone-Untrust] import interface gigabitethernet 1/0/2
[Device-security-zone-Untrust] quit
4. Configure a security policy:
# Configure a rule named trust-untrust to allow the host to access the Internet.
[Device] security-policy ip
[Device-security-policy-ip] rule name trust-untrust
[Device-security-policy-ip-1-trust-untrust] source-zone trust
[Device-security-policy-ip-1-trust-untrust] destination-zone untrust
[Device-security-policy-ip-1-trust-untrust] source-ip-host 10.1.1.2
[Device-security-policy-ip-1-trust-untrust] source-ip-host 10.1.1.3
[Device-security-policy-ip-1-trust-untrust] source-ip-host 10.1.1.4
[Device-security-policy-ip-1-trust-untrust] source-ip-host 10.1.1.5
[Device-security-policy-ip-1-trust-untrust] source-ip-host 10.1.1.6
[Device-security-policy-ip-1-trust-untrust] source-ip-host 10.1.1.21
[Device-security-policy-ip-1-trust-untrust] source-ip-host 10.1.1.22
[Device-security-policy-ip-1-trust-untrust] action pass
[Device-security-policy-ip-1-trust-untrust] quit
[Device-security-policy-ip] quit
5. Configure local users:
# Create a network access user named student1.
[Device] local-user student1 class network
# Set the password to student in plaintext form for the user.
[Device-luser-network-student1] password simple student
# Specify the service types as IKE, Portal, and SSL VPN for the user.
[Device-luser-network-student1] service-type ike
[Device-luser-network-student1] service-type portal
[Device-luser-network-student1] service-type sslvpn
[Device-luser-network-student1] quit
# Create four network access users named student2, student3, student4, and student5, and set the password to student in plaintext form for each of these users. (Details not shown.)
# Create two network access users named teacher1 and teacher2, and set the password to teacher in plaintext form for each of these users. (Details not shown.)
# Specify the service types as IKE, Portal, and SSL VPN for each of the six users. (Details not shown.)
# Create a user group named student, and assign users student1 through student5 to the user group as identity users.
[Device] user-group student
[Device-ugroup-student] identity-member user student1
[Device-ugroup-student] identity-member user student2
[Device-ugroup-student] identity-member user student3
[Device-ugroup-student] identity-member user student4
[Device-ugroup-student] identity-member user student5
[Device-ugroup-student] quit
# Create a user group named teacher, and assign users teacher 1 and teacher2 to the user group as identity users.
[Device] user-group teacher
[Device-ugroup-teacher] identity-member user teacher1
[Device-ugroup-teacher] identity-member user teacher2
[Device-ugroup-teacher] quit
# Configure static identity users.
[Device] user-identity static-user student1 bind ipv4 10.1.1.2
[Device] user-identity static-user student2 bind ipv4 10.1.1.3
[Device] user-identity static-user student3 bind ipv4 10.1.1.4
[Device] user-identity static-user student4 bind ipv4 10.1.1.5
[Device] user-identity static-user student5 bind ipv4 10.1.1.6
[Device] user-identity static-user teacher1 bind ipv4 10.1.1.21
[Device] user-identity static-user teacher2 bind ipv4 10.1.1.22
# Enable the user identification feature.
[Device] user-identity enable
6. Configure traffic profiles:
# Create a traffic profile named profile-teacher, and enter traffic profile view.
[Device] traffic-policy
[Device-traffic-policy] profile name profile-teacher
# Set the per-user maximum bandwidth to 10000 kbps for both upstream and downstream traffic.
[Device-traffic-policy-profile-profile-teacher] bandwidth upstream maximum per-user 10000
[Device-traffic-policy-profile-profile-teacher] bandwidth downstream maximum per-user 10000
# Set the per-user connection count limit to 10000.
[Device-traffic-policy-profile-profile-teacher] connection-limit count per-user 10000
# Set the traffic priority to 2.
[Device-traffic-policy-profile-profile-teacher] traffic-priority 2
# Create a traffic profile named profile-student, and enter traffic profile view.
[Device-traffic-policy] profile name profile-student
# Set the per-user maximum bandwidth to 2000 kbps for both upstream and downstream traffic.
[Device-traffic-policy-profile-profile-student] bandwidth upstream maximum per-user 2000
[Device-traffic-policy-profile-profile-student] bandwidth downstream maximum per-user 2000
# Set the per-user connection count limit to 10000.
[Device-traffic-policy-profile-profile-student] connection-limit count per-user 10000
# Set the traffic priority to 1 (lowest).
[Device-traffic-policy-profile-profile-student] traffic-priority 1
7. Configure traffic rules:
# Create a traffic rule named rule-teacher, and enter traffic rule view.
[Device-traffic-policy] rule name rule-teacher
# Configure user group teacher as a match criterion, and specify traffic profile profile-teacher for traffic rule rule-teacher.
[Device-traffic-policy-rule-1-rule-teacher] user-group teacher
[Device-traffic-policy-rule-1-rule-teacher] action qos profile profile-teacher
[Device-traffic-policy-rule-1-rule-teacher] quit
# Create a traffic rule named rule-student, and enter traffic rule view.
[Device-traffic-policy] rule name rule-student
# Configure user group student as a match criterion, and specify traffic profile profile-student for traffic rule rule-student.
[Device-traffic-policy-rule-2-rule-student] user-group student
[Device-traffic-policy-rule-2-rule-student] action qos profile profile-student
[Device-traffic-policy-rule-2-rule-student] quit
[Device-traffic-policy] quit
Verifying the configuration
# Verify that the bandwidth is limited to 10000 kbps for each teacher, and that the bandwidth is limited to 2000 kbps for each student.
# Verify that the per-user connection count is limited to 10000 for both students and teachers.
Example: Using the packet information after SNAT to match a traffic policy
Network configuration
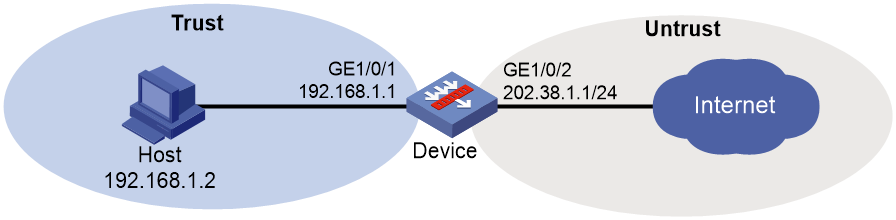
As shown in Figure 4, a company uses the public IP address 202.38.1.2/24 to allows the internal host to access the Internet through NAT.
Configure bandwidth management to use public IP address after SNAT to limit the total bandwidth to 10240 kbps for all internal hosts to access the iQiYiPPS application.
Figure 5 Network diagram
Procedure
1. Assign IP addresses to interfaces:
# Assign an IP address to interface GigabitEthernet 1/0/1.
<Device> system-view
[Device] interface gigabitethernet 1/0/1
[Device-GigabitEthernet1/0/1] ip address 10.1.1.1 255.255.255.0
[Device-GigabitEthernet1/0/1] quit
# Assign IP addresses to other interfaces in the same way. (Details not shown.)
2. Configure settings for routing.
This example configures static routes, and the next hop in the routes is 202.38.1.3.
[Device] ip route-static 3.1.1.2 24 202.38.1.3
3. Add interfaces to security zones.
[Device] security-zone name trust
[Device-security-zone-Trust] import interface gigabitethernet 1/0/1
[Device-security-zone-Trust] quit
[Device] security-zone name untrust
[Device-security-zone-Untrust] import interface gigabitethernet 1/0/2
[Device-security-zone-Untrust] quit
4. Configure a security policy:
# Configure a rule named trust-untrust to allow the host to access the Internet.
[Device] security-policy ip
[Device-security-policy-ip] rule name trust-untrust
[Device-security-policy-ip-1-trust-untrust] source-zone trust
[Device-security-policy-ip-1-trust-untrust] destination-zone untrust
[Device-security-policy-ip-1-trust-untrust] source-ip-subnet 192.168.1.0 24
[Device-security-policy-ip-1-trust-untrust] action pass
[Device-security-policy-ip-1-trust-untrust] quit
[Device-security-policy-ip] quit
5. Configure NAT:
# Configure address group 0, and add address 202.38.1.2 to the group.
[Device] nat address-group 0
[Device-address-group-0] address 202.38.1.2 202.38.1.2
[Router-address-group-0] quit
# Configure ACL 2000 to identify packets from subnet 192.168.1.0/24..
[Device] acl basic 2000
[Device-acl-ipv4-basic-2000] rule permit source 192.168.1.0 0.0.0.255
[Device-acl-ipv4-basic-2000] quit
# Enable outbound dynamic PAT on GigabitEthernet 1/0/2. The source IP addresses of the packets permitted by the ACL rule is translated into the addresses in address group 0.
[Device] interface gigabitethernet 1/0/2
[Device-GigabitEthernet1/0/2] nat outbound 2000 address-group 0
[Device-GigabitEthernet1/0/2] quit
6. Create address object group obj1, and add address 202.38.1.2 to the group.
[Device] object-group ip address obj1
[Device-obj-grp-ip-obj1] network host address 202.38.1.2
[Device-obj-grp-ip-obj1] quit
7. Configure a traffic profile:
# Create a traffic profile named aiqiyi, and enter traffic profile view.
[Device] traffic-policy
[Device-traffic-policy] profile name aiqiyi
# Set the total maximum bandwidth to 10240 kbps.
[Device-traffic-policy-profile-aiqiyi] bandwidth total maximum 10240
[Device-traffic-policy-profile-aiqiyi] quit
8. Configure a traffic rule:
# Create a traffic rule named aiqiyi, and enter traffic rule view.
[Device-traffic-policy] rule name aiqiyi
# Configure address object group obj1 as a match criterion, and specify traffic profile aiqiyi for traffic rule aiqiyi.
[Device-traffic-policy-rule-1-aiqiyi] source-address address-set obj1
[Device-traffic-policy-rule-1-aiqiyi] application app aiqiyi
[Device-traffic-policy-rule-1-aiqiyi] action qos profile aiqiyi
[Device-traffic-policy-rule-1-aiqiyi] quit
# Enabling after-NAT source matching.
[Device-traffic-policy] source-matching after-nat
[Device-traffic-policy] quit
Verifying the configuration
# Verify that the bandwidth is limited to 10240 kbps for all internal users to access iQiYiPPS.
Example: Using the packet information after DNAT to match a traffic policy
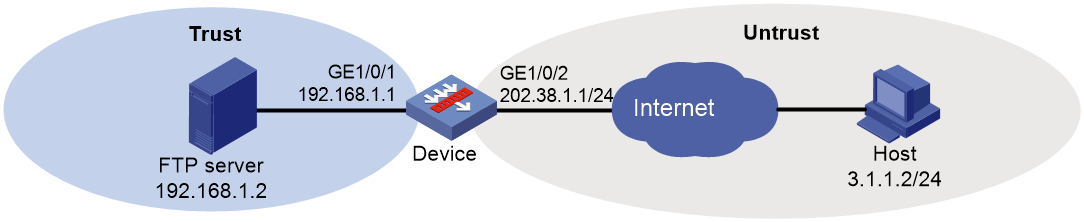
Network configuration
As shown in Figure 4, a company provides FTP services to external users through an FTP server by using the public IP address 202.38.1.1/24. The private IP address of the FTP server is 192.168.1.2/24.
Configure bandwidth management to use the private IP address after DNAT to limit the total bandwidth to 30720 kbps for all external hosts to access the FTP server.
Figure 6 Network diagram
Procedure
1. Assign IP addresses to interfaces:
# Assign an IP address to interface GigabitEthernet 1/0/1.
<Device> system-view
[Device] interface gigabitethernet 1/0/1
[Device-GigabitEthernet1/0/1] ip address 10.1.1.1 255.255.255.0
[Device-GigabitEthernet1/0/1] quit
# Assign IP addresses to other interfaces in the same way. (Details not shown.)
2. Configure settings for routing.
This example configures static routes, and the next hop in the routes is 202.38.1.3.
[Device] ip route-static 3.1.1.2 24 202.38.1.3
3. Add interfaces to security zones.
[Device] security-zone name trust
[Device-security-zone-Trust] import interface gigabitethernet 1/0/1
[Device-security-zone-Trust] quit
[Device] security-zone name untrust
[Device-security-zone-Untrust] import interface gigabitethernet 1/0/2
[Device-security-zone-Untrust] quit
4. Configure a security policy:
# Configure a rule named untrust-trust to allow the hosts in the untrust security zone to access the FTP server in the trust security zone.
[Device] security-policy ip
[Device-security-policy-ip] rule name untrust-trust
[Device-security-policy-ip-1-untrust-trust] source-zone untrust
[Device-security-policy-ip-1-untrust-trust] destination-zone trust
[Device-security-policy-ip-1-untrust-trust] destination-ip-host 192.168.1.2
[Device-security-policy-ip-1-untrust-trust] action pass
[Device-security-policy-ip-1-untrust-trust] quit
[Device-security-policy-ip] quit
5. Configure NAT:
# Configure a NAT server mapping to allow external hosts to access the FTP server by using the address 202.38.1.1 and port 21..
[Device] interface gigabitethernet 1/0/2
[Device-GigabitEthernet1/0/2] nat server protocol tcp global 202.38.1.1 21 inside 192.168.1.2 ftp
6. Create address object group obj1, and add address 192.168.1.2 to the group.
[Device] object-group ip address obj1
[Device-obj-grp-ip-obj1] network host address 192.168.1.2
[Device-obj-grp-ip-obj1] quit
7. Configure a traffic profile:
# Create a traffic profile named ftp, and enter traffic profile view.
[Device] traffic-policy
[Device-traffic-policy] profile name ftp
# Set the total maximum bandwidth to 30720 kbps.
[Device-traffic-policy-profile-ftp] bandwidth downstream guaranteed 30720
[Device-traffic-policy-profile-ftp] quit
8. Configure a traffic rule:
# Create a traffic rule named ftp, and enter traffic rule view.
[Device-traffic-policy] rule name ftp
# Configure address object group obj1 as a match criterion, and specify traffic profile ftp for traffic rule ftp.
[Device-traffic-policy-rule-1-ftp] destination-address address-set obj1
[Device-traffic-policy-rule-1-ftp] application app ftp
[Device-traffic-policy-rule-1-ftp] application app ftp-data
[Device-traffic-policy-rule-1-ftp] action qos profile ftp
[Device-traffic-policy-rule-1-ftp] quit
[Device-traffic-policy] quit
# Enabling after-NAT destination matching.
[Device] traffic-policy
[Device-traffic-policy] destination-matching after-nat
[Device-traffic-policy] quit
Verifying the configuration
# Verify that the bandwidth is limited to 30720 kbps for all external hosts to access the FTP server.
